How I Used Apache Spark and Docker in a Hackathon to Build a Weather App
Hackathons often inspire engineers to create amazing software. By blending various technologies together, really useful and often fun projects can be realized in a short period of time.
In this article, Toptal engineer Radek Ostrowski shares his experience participating in the IBM Sparkathon, and walks us through how he elegantly combined the power of Apache Spark and Docker in IBM Bluemix to build a weather app.

Radek is a blockchain engineer with an interest in Ethereum smart contracts. He also has extensive experience in machine learning.
Expertise
PREVIOUSLY AT

In two of my previous articles, I introduced the audience to Apache Spark and Docker. The time has come that I showed you a fully functional application including both of the aforementioned technologies.
The motivation “rained down from the sky in the shape of data” and it was sparked by a hackathon organised by IBM. Sparkathon’s objective was to use weather data and Analytics for Apache Spark for IBM Bluemix to build weather related mobile applications.
IBM is heavily investing in Spark, and it recently bought digital part of The Weather Channel. As a consequence, this event seems perfect for their publicity.
Inspiration
Have you ever complained about the weather in your location, had some planned time off and money to spend, but did not know where to go? If the answer is yes, then you would really like the My Perfect Weather app.

Just to illustrate how the app could be used, here are some use cases:
- You have a child that you promised to fly a kite with this week, but it’s absolutely windless where you live and you don’t want to break your word.
- You live in a windy and rainy place like I do (Edinburgh, Scotland) and want to feel warmth on your skin and definitely no rain.
- You have an urge to build a snowman and you won’t rest until you fulfill it.
- You want to go fishing, and this time, you really want to catch something.
What It Does
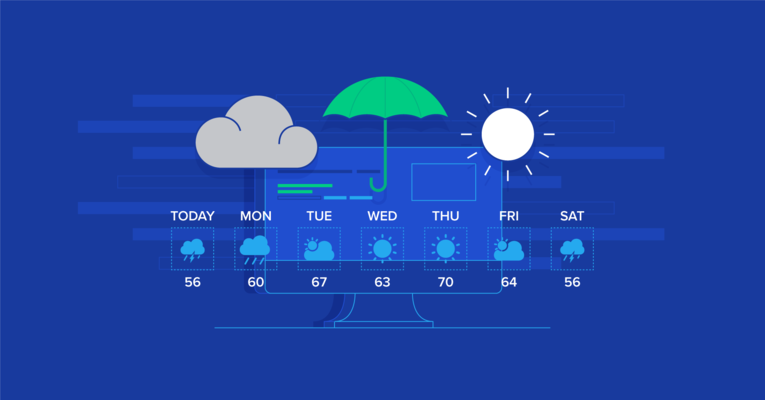
The idea behind the service is very simple. First, you define what perfect weather means for you at a given moment in time. Currently, you can filter by temperature, wind speed, precipitation type and probability of precipitation as shown in the screenshot below. Then the service does the rest and you are presented with the best matching destinations. The results are sorted by the amount of perfect days, those matching the original query, found for each city and limited to the top five. Perfect days are also marked with a different background.
Let’s see how we could use the service for the use cases defined in the previous section.
- Set the wind to be between 16 and 32 km/h, ideal for flying a kite, with a small chance of rain and comfortable temperature.
- Set the min temperature to be warm enough for you, set the chance of rain to 0%.
- Set the temperature to be around and below 0 C, choose snow as a precipitation type and the chance of precipitation to be high.
- Set the wind speed to be less than 16 km/h, little rain and clouds as you want to avoid it being too sunny and have the fish go deeper in the water, comfortable temperature.
If you wish, you can easily check out how to get to your chosen destination, as the application comes integrated with a travel search service Momondo.
How I Built It
Basically, everything except the external travel search service runs inside of IBM Bluemix platform.
IBM offered a free trial to all participants of the hackathon, so I didn’t have to worry about where to run the app.
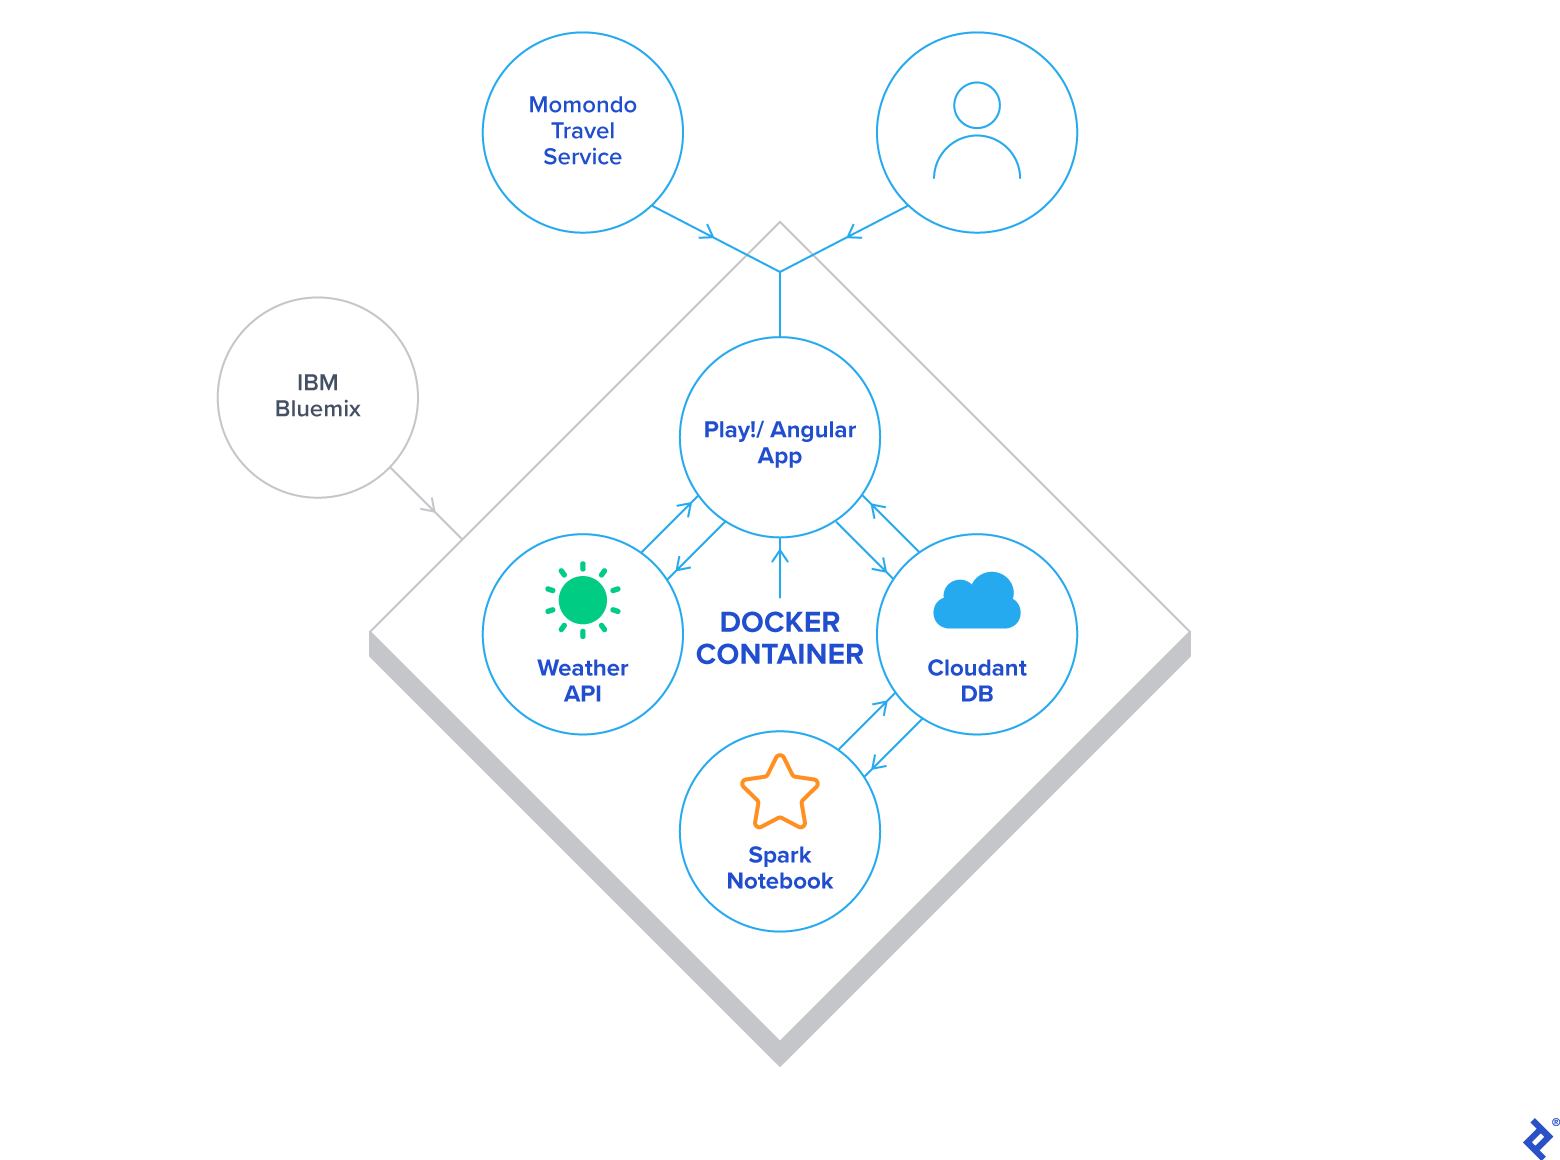
Let’s see how the data flows in the application and how the components presented in the architecture diagram come together.
The Play app is hosted inside of a Docker container. One of its services is capable of contacting the Weather Service and downloading 10-day forecast into Cloudant. In a step following the download, Spark reads the raw weather data from Cloudant, processes it and stores it back to Cloudant for quick and easy access by the Play application.
When users navigate to the main page of the app, they are presented with a form containing various controls to define their perfect weather. Their input is submitted to the backend which queries Cloudant for cities containing the perfect days. Then, another query is made for all the ten days of the forecast for the cities returned in the previous query. Obtained results are presented to the users and cells represent the weather conditions per city per day. The last cell for every city holds a link to a travel service. Clicking on it will take the users to the Momondo website and the flight search form will get pre-populated with the destination and travel dates. If the user has used the service before (and it stored a cookie in their browser), the origin and the amount of travelers might also be pre-filled. Of course, the fields on this form can be changed. For example, one can try different travel dates in search of a better fare.
This is pretty much how the application is built. The following sections go into more details of some of the components.
Spark and Insights for Weather
The first phase of the project was spent on figuring out how the Weather API and the other Bluemix services work, and was followed by the initial weather data exploration using Spark. It let me understand how the data model worked and how it could be employed in the application.
For the purpose of this app, only the first from the following Weather REST API endpoints are used:
GET /v2/forecast/daily/10day - Weather Standard 10-day Daily Forecast
GET /v2/forecast/hourly/24hour - Weather Standard Hourly Forecast
GET /v2/observations/current - Current Weather Observation
GET /v2/observations/timeseries/24hour - Time-Series Observation
The endpoint is queried for the weather forecast for every city of interest by providing a geocode parameter which takes the latitude and longitude of the place in question.
Because of the nature of the service, the number of requests made to the Weather API correlates to the number of cities supported. I considered the Insights for Weather Service free tier limit which was 500 calls per day and decided that for the demo purpose, I would go with a safe number of fifty tourist-type cities in Europe. This let me do several calls per day for each city and handle failed requests without a risk of losing the right to use the API. I would have to start paying in order to have enough requests to cover most of the cities of the world.
The final goal of the project would be to have Spark crunch weather data for all the cities in the world (~50,000) multiplied by ten days of forecast data and perform it several times per day to have the predictions as accurate as possible.
All the Spark code resides in a Jupyter notebook. So far there is no other way to execute Spark jobs. The raw weather data is read from Cloudant DB, processed and written back.
Cloudant NoSQL DB
In short, I found it very pleasant to work with Cloudant NoSQL DB. It’s easy to use and has a good browser based UI. There is no driver as such, but it has a simple REST API and it was straightforward to interact with via HTTP.
However, Bluemix Spark includes a Cloudant Data Sources API, which could be used to read and write to Cloudant without the need of low-level calls. It’s worth noting that it is not possible to create a new database in Cloudant from Spark so it must be created beforehand, for example with the web UI.
Play Framework
The web application is written in Scala. It is very simple. The controller serves a one-page app with AngularJS and Bootstrap, and the service interacts with the Weather API and Cloudant.
One interesting challenge I faced is directly related to the IBM Container Service. My intention was to run the app on port 80 so it’s user-friendly. However, I couldn’t find any way in Bluemix to use Docker port forwarding and map external port 80 to Docker internal port 9000 of the Play app. My workaround was to run as root inside of the container (not a recommended practice) and to edit Play’s application.conf:
# Production port
play.server.http.port = "80"
Docker
Docker came in really handy, especially at the time of deployment to Bluemix. I didn’t need to have any knowledge of Cloud Foundry Apps, worry about Scala buildpacks or anything else. I could just push my Docker image and see it running.
For creating the Docker image, I used a Typesafe Docker Plugin, so I didn’t even need a proper Dockerfile.
It only takes few commands to see the app running in the cloud after a short initial configuration:
# log in to IBM Bluemix
cf login
cf ic login

# create the image locally
sbt docker:publishLocal

# rename it
docker tag -f my-perfect-weather:1.0-SNAPSHOT registry.ng.bluemix.net/radek1st/my-perfect-weather:1.0

# push it
docker push registry.ng.bluemix.net/radek1st/my-perfect-weather:1.0

# and run it
cf ic run --name my-perfect-weather -p 80 -m 2048 registry.ng.bluemix.net/radek1st/my-perfect-weather:1.0
It is worth noting that the Bluemix Container Service performs a Vulnerability Assessment on the images before they can be run. Even though it didn’t really make sense for my app, I still had to patch /etc/login.defs of the parent image, so it can be run. Here’s the Dockerfile if you are interested.
Challenges I Ran Into
As Spark is still quite a fresh addition to IBM Bluemix, it has certain limitations. Currently, the code can only be executed as part of a notebook, thus there is no way of scheduling the runs. This was quite a discovery at the end of the time I had for the hackathon. What it means for My Perfect Weather is that the presented weather days will slowly get out of date if Spark notebook is not re-run manually. I hope that IBM will address this shortcoming promptly.
I also came across a small inaccuracy in the documentation of the Insights for Weather API which surfaced after noticing some issues with the displayed results. For the precipitation type, the only expected values were rain and snow, but I also found a third value precip. From the weather context, it seems to indicate rain with snow, so for the simplicity of the app it is treated as snow.
Accomplishments That I’m Proud Of
I think My Perfect Weather is quite a cool idea, and I’m proud I could implement it very quickly blending all those various technologies together. It is a hack nonetheless, with many loose ends, but what’s most important is that it’s working!
What I Learned
I learned quite a lot during this short project. I was new to the IBM Bluemix, so it was an adventure on its own.
I’ve never heard of Cloudant DB before, but with some experience of MongoDB the transition was rather easy.
I also learned that I shouldn’t be working on a frontend. I’m a backend developer at heart, without the talent to make things look nice, so working with Bootstrap and CSS was a search-copy-paste-modify exercise. Lots of thanks to my wife for helping with the design, visuals, demo and general advice.
What’s next for My Perfect Weather
I’d like to add more weather controls and extend it to cover most of the world, or at least all of Europe in the near future. With more cities/weather-days matching the criteria, it will be more challenging to present the most perfect days, so there is a scope for using Spark MLlib with Spark Streaming for the data coming from users’ sessions.
I hope the IBM will add a capability of scheduling Spark jobs soon, so the service can become fully automated.
Conclusion
You can check out the application for yourself on your computer, smartphone or tablet by navigating to myperfectweather.eu.
If you want to have a peak at the code, it’s hosted on Github.
My Perfect Weather was created as a competing project for IBM Sparkathon with nearly 600 participants. It won the Grand Prize and the Fan Favorite. Check out the project page if you would like to know more.
Radek Ostrowski
Phuket, Thailand
Member since September 24, 2014
About the author
Radek is a blockchain engineer with an interest in Ethereum smart contracts. He also has extensive experience in machine learning.
Expertise
PREVIOUSLY AT