An Informal Introduction to DOCX
With approximately one billion people using Microsoft Office, the DOCX format is the most popular de facto standard for exchanging document files between offices.
While DOCX is a complex format, you may want to parse it manually for simpler tasks such as indexing, converting to TXT and making other small modifications. I’d like to give you enough information on DOCX internals so you don’t have to reference the ECMA specifications, a massive 5,000 page manual.

Stepan is an experienced software developer with extensive experience working in C++, Java, JavaScript, SQL, PHP, and C#.
With approximately one billion people using Microsoft Office, the DOCX format is the most popular de facto standard for exchanging document files between offices. Its closest competitor - the ODT format - is only supported by Open/LibreOffice and some open source products, making it far from standard. The PDF format is not a competitor because PDFs can’t be edited and they don’t contain a full document structure, so they can only take limited local changes like watermarks, signatures, and the like. This is why most business documents are created in the DOCX format; there’s no good alternative to replace it.
While DOCX is a complex format, you may want to parse it manually for simpler tasks such as indexing, converting to TXT and making other small modifications. I’d like to give you enough information on DOCX internals so you don’t have to reference the ECMA specifications, a massive 5,000 page manual.
The best way to understand the format is to create a simple one-word document with MSWord and observe how editing the document changes the underlying XML. You’ll face some cases where the DOCX doesn’t format properly in MS Word and you don’t know why, or come across instances when it’s not evident how to generate the desired formatting. Seeing and understanding exactly what’s going on in the XML will help that.
I worked for about a year on a collaborative DOCX editor, CollabOffice, and I want to share some of that knowledge with the developer community. In this article I will explain the DOCX file structure, summarising information that is scattered over the internet. This article is an intermediary between the huge, complex ECMA specification and the simple internet tutorials currently available. You can find the files that accompany this article in the toptal-docx project on my github account.
A Simple DOCX file
A DOCX file is a ZIP archive of XML files. If you create a new, empty Microsoft Word document, write a single word ‘Test’ inside and unzip it contents, you will see the following file structure:
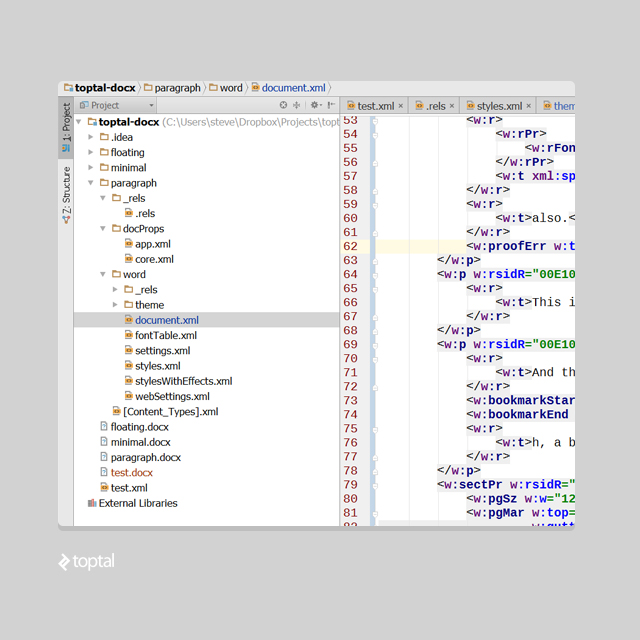
Even though we’ve created a simple document, the save process in Microsoft Word has generated default themes, document properties, font tables, and so on, in XML format.
To start, let us remove the unused stuff and focus on document.xml, which contains the main text elements. When you delete a file, make sure you have deleted all the relationship references to it from other the xml files. Here is a code-diff example on how I’ve cleared dependencies to app.xml and core.xml. If you have any unresolved/missing references, MSWord will consider the file broken.
Here’s the structure of our simplified, minimal DOCX document (and here’s the project on github):

Let’s break it down by file from here, from the top:
_rels/.rels
This defines the reference that tells MS Word where to look for the document contents. In this case, it references word/document.xml:
<?xml version="1.0" encoding="UTF-8" standalone="yes"?>
<Relationships xmlns="http://schemas.openxmlformats.org/package/2006/relationships">
   <Relationship Id="rId1" Type="http://schemas.openxmlformats.org/officeDocument/2006/relationships/officeDocument"
                 Target="word/document.xml"/>
</Relationships>
_rels/document.xml.rels
This file defines references to resources, such as images, embedded in the document content. Our simple document has no embedded resources, so the relationship tag is empty:
<?xml version="1.0" encoding="UTF-8" standalone="yes"?>
<Relationships xmlns="http://schemas.openxmlformats.org/package/2006/relationships">
</Relationships>
[Content_Types].xml
[Content_Types].xml contains information about the types of media inside the document. Since we only have text content, it’s pretty simple:
<?xml version="1.0" encoding="UTF-8" standalone="yes"?>
<Types xmlns="http://schemas.openxmlformats.org/package/2006/content-types">
   <Default Extension="rels" ContentType="application/vnd.openxmlformats-package.relationships+xml"/>
   <Default Extension="xml" ContentType="application/xml"/>
   <Override PartName="/word/document.xml"
             ContentType="application/vnd.openxmlformats-officedocument.wordprocessingml.document.main+xml"/>
</Types>
document.xml
Finally, here is the main XML with the document’s text content. I have removed some of namespace declarations for clarity, but you can find the full version of the file in the github project. In that file you’ll find that some of the namespace references in the document are unused, but you shouldn’t delete them because MS Word needs them.
Here’s our simplified example:
<w:document>
   <w:body>
       <w:p w:rsidR="005F670F" w:rsidRDefault="005F79F5">
           <w:r><w:t>Test</w:t></w:r>
       </w:p>
       <w:sectPr w:rsidR="005F670F">
           <w:pgSz w:w="12240" w:h="15840"/>
           <w:pgMar w:top="1440" w:right="1440" w:bottom="1440" w:left="1440" w:header="720" w:footer="720"
                    w:gutter="0"/>
           <w:cols w:space="720"/>
           <w:docGrid w:linePitch="360"/>
       </w:sectPr>
   </w:body>
</w:document>
The main node <w:document> represents the document itself, <w:body> contains paragraphs, and nested within <w:body> are page dimensions defined by <w:sectPr>.
<w:rsidR> is an attribute that you can ignore; it’s used by MS Word internals.
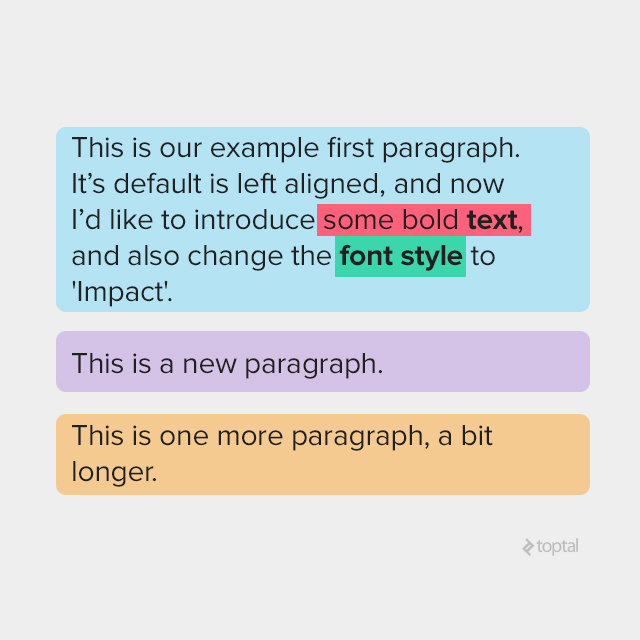
Let’s take a look at a more complex document with three paragraphs. I have highlighted the XML with the same colors on the screenshot from Microsoft Word, so you can see the correlation:
<w:p w:rsidR="0081206C" w:rsidRDefault="00E10CAE">
<w:r> <w:t xml:space="preserve">This is our example first paragraph. It's default is left aligned, and now I'd like to introduce</w:t> </w:r>
    <w:r> <w:rPr>
    <w:rFonts w:ascii="Arial" w:hAnsi="Arial" w:cs="Arial"/>
    <w:color w:val="000000"/>
    </w:rPr> <w:t>some bold</w:t>
    </w:r>
    <w:r> <w:rPr>
    <w:rFonts w:ascii="Arial" w:hAnsi="Arial" w:cs="Arial"/>
    <w:b/> <w:color w:val="000000"/>
    </w:rPr> <w:t xml:space="preserve"> text</w:t>
    </w:r>
    <w:r>  <w:rPr> <w:rFonts w:ascii="Arial"
w:hAnsi="Arial" w:cs="Arial"/> <w:color w:val="000000"/> </w:rPr>
    <w:t xml:space="preserve">, </w:t>
    </w:r>
    <w:proofErr w:type="gramStart"/>
    <w:r> <w:t xml:space="preserve">and also change the</w:t> </w:r>
    <w:r w:rsidRPr="00E10CAE">  <w:rPr><w:rFonts w:ascii="Impact" w:hAnsi="Impact"/>
    </w:rPr>  <w:t>font style</w:t> </w:r>
    <w:r>
    <w:rPr>  <w:rFonts w:ascii="Impact" w:hAnsi="Impact"/>  </w:rPr>  <w:t xml:space="preserve"> </w:t>
    </w:r>
    <w:r> <w:t>to 'Impact'.</w:t></w:r>
    </w:p>
    <w:p w:rsidR="00E10CAE" w:rsidRDefault="00E10CAE"> <w:r> <w:t>This is new paragraph.</w:t> </w:r></w:p>
    <w:p w:rsidR="00E10CAE" w:rsidRPr="00E10CAE" w:rsidRDefault="00E10CAE">
    <w:r> <w:t>This is one more paragraph, a bit longer.</w:t> </w:r>
    </w:p>
Paragraph Structure
A simple document consists of paragraphs, a paragraph consists of runs (a series of text with the same font, color, etc), and runs consist of characters (such as <w:t>).<w:t> tags may have several characters inside, and there might be a few in the same run.
Again, we can ignore <w:rsidR>.
Text properties
Basic text properties are font, size, color, style, and so on. There are about 40 tags that specify text appearance. As you can see in our three paragraph example, each run has its own properties inside <w:rPr>, specifying <w:color>, <w:rFonts> and boldness <w:b>.
An important thing to note is that properties make a distinction between the two groups of characters, normal and complex script (Arabic, for instance), and that the properties have a different tag depending on which type of character it’s affecting.
Most normal script property tags have a matching complex script tag with an added “C” specifying the property is for complex scripts. For example: <w:i> (italic) becomes <w:iCs>, and the bold tag for normal script, <w:b>, becomes <w:bCs> for complex script.
Styles
There’s an entire toolbar in Microsoft Word dedicated to styles: normal, no spacing, heading 1, heading 2, title, and so on. These styles are stored in /word/styles.xml (note: in the first step in our simple example, we removed this XML from DOCX. Make a new DOCX to see this).
Once you have text defined as a style, you will find reference to this style inside the paragraph properties tag, <w:pPr>. Here’s an example where I’ve defined my text with the style Heading 1:
<w:p>
   <w:pPr>
       <w:pStyle w:val="Heading1"/>
   </w:pPr>
   <w:r>
       <w:t>My heading 1</w:t>
   </w:r>
</w:p>
and here is the style itself from styles.xml:
<w:style w:type="paragraph" w:styleId="Heading1">
   <w:name w:val="heading 1"/>
   <w:basedOn w:val="Normal"/>
   <w:next w:val="Normal"/>
   <w:link w:val="Heading1Char"/>
   <w:uiPriority w:val="9"/>
   <w:qFormat/>
   <w:rsid w:val="002F7F18"/>
   <w:pPr>
       <w:keepNext/>
       <w:keepLines/>
       <w:spacing w:before="480" w:after="0"/>
       <w:outlineLvl w:val="0"/>
   </w:pPr>
   <w:rPr>
       <w:rFonts w:asciiTheme="majorHAnsi" w:eastAsiaTheme="majorEastAsia" w:hAnsiTheme="majorHAnsi"
                 w:cstheme="majorBidi"/>
       <w:b/>
       <w:bCs/>
       <w:color w:val="365F91" w:themeColor="accent1" w:themeShade="BF"/>
       <w:sz w:val="28"/>
       <w:szCs w:val="28"/>
   </w:rPr>
</w:style>
The <w:style/w:rPr/w:b> xpath specifies that the font is bold, and <w:style/w:rPr/w:color> indicates the font color. <w:basedOn> instructs MSWord to use “Normal” style for any missing properties.
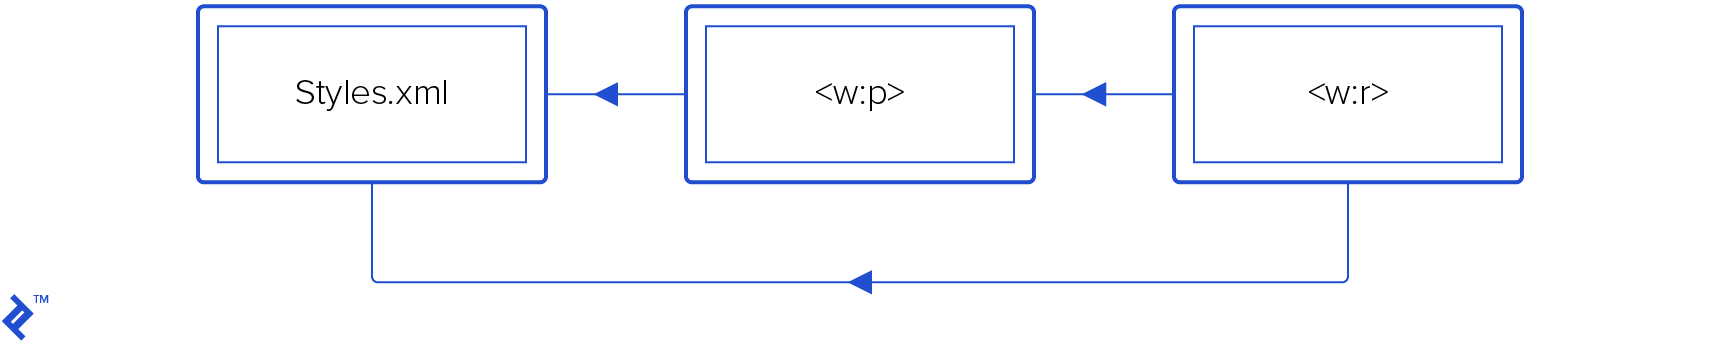
Property Inheritance
Text properties are inherited. A run has its own properties (w:p/w:r/w:rPr/*), but it also inherits properties from paragraph (w:r/w:pPr/*), and both can reference style properties from the /word/styles.xml.
<w:r>
 <w:rPr>
   <w:rStyle w:val="DefaultParagraphFont"/>
   <w:sz w:val="16"/>
 </w:rPr>
 <w:tab/>
</w:r>
Paragraphs and runs start with default properties: w:styles/w:docDefaults/w:rPrDefault/*
and w:styles/w:docDefaults/w:pPrDefault/*. To get the end result of a character’s properties you should:
- Use default run/paragraph properties
- Append run/paragraph style properties
- Append local run/paragraph properties
- Append result run properties over paragraph properties
When I say “append” B to A, I mean to iterate through all B properties and override all A’s properties, leaving all non-intersecting properties as-is.
One more place where default properties may be located is in the <w:style> tag with w:type="paragraph" and w:default="1". Note, that characters themselves inside a run never have a default style, so <w:style w:type="character" w:default="1"> doesn’t actually affect any text.
1554402290400-dbb29eef3ba6035df7ad726dfc99b2af.png)
Toggle properties
Some of the properties are “toggle” properties, such as <w:b> (bold) or <w:i> (italic); these attributes behave like an XOR operator.
This means if the parent style is bold and a child run is bold, the result will be regular, non-bold text.
You have to do lots of testing and reverse-engineering to handle toggle attributes correctly. Take a look at paragraph 17.7.3 of ECMA-376 Open XML specification to get the formal, detailed rules for toggle properties/
Fonts
Fonts follow the same common rules as other text attributes, but font property default values are specified in a separate theme file, referenced under word/_rels/document.xml.rels like this:
<Relationship Id="rId7" Type="http://schemas.openxmlformats.org/officeDocument/2006/relationships/theme" Target="theme/theme1.xml"/>
Based on the above reference, the default font name will be found in word/theme/themes1.xml, inside a <a:theme> tag, a:themeElements/a:fontScheme/a:majorFont or a:minorFont tag.
The default font size is 10 unless the w:docDefaults/w:rPrDefault tag is missing, then it is size 11.
Text alignment
Text alignment is specified by a <w:jc> tag with four w:val modes available: "left", "center", "right" and "both".
"left" is the default mode; text is started at the left of paragraph rectangle (usually the page width). (This paragraph is aligned to the left, which is standard.)
"center" mode, predictably, centers all characters inside the page width. (Again, this paragraph exemplifies centered alignment.)
In "right" mode, paragraph text is aligned to the right margin. (Notice how this text is aligned to the right side.)
"both" mode puts extra spacing between words so that lines get wider and occupy the full paragraph width, with the exception of the last line which is left aligned. (This paragraph is a demonstration of that.)
Images
DOCX supports two sorts of images: inline and floating.
Inline images appear inside a paragraph along with the other characters, <w:drawing> is used instead of using <w:t> (text). You can find image ID with the following xpath syntax:
w:drawing/wp:inline/a:graphic/a:graphicData/pic:pic/pic:blipFill/a:blip/@r:embed
The image ID is used to look up the filename in the word/_rels/document.xml.rels file, and it should point to gif/jpeg file inside word/media subfolder. (See the github project’s word/_rels/document.xml.rels file, where you can see the image ID.)
Floating images are placed relative to paragraphs with text flowing around them. (Here’s th github project sample document with a floating image.)
Floating images use <wp:anchor> instead of <w:drawing>, so if you delete any text inside <w:p>, be careful with the anchors if you don’t want the images removed.

Tables
XML tags for tables are similar to HTML table markup–
<w:tbl>, the table itself, has table properties <w:tblPr>, and each column property is presented by <w:gridCol> inside <w:tblGrid>. Rows follow one by one as <w:tr> tags and each row should have same number of columns as specified in <w:tblGrid>:
<w:tbl>
 <w:tblPr>
   <w:tblW w:w="5000" w:type="pct" />
 </w:tblPr>
 <w:tblGrid><w:gridCol/><w:gridCol/></w:tblGrid>
 <w:tr>
   <w:tc><w:p><w:r><w:t>left</w:t></w:r></w:p></w:tc>
   <w:tc><w:p><w:r><w:t>right</w:t></w:r></w:p></w:tc>
 </w:tr>
</w:tbl>
Width for table columns can be specified in the <w:tblW> tag, but if you don’t define it MS Word will use its internal algorithms to find the optimal width of columns for the smallest effective table size.
Units
Many XML attributes inside DOCX specify sizes or distances. While they’re integers inside the XML, they all have different units so some conversion is necessary. The topic is a complicated one, so I’d recommend this article by Lars Corneliussen on units in DOCX files. The table he presents is useful, though with a small misprint: inches should be pt/72, not pt*72.
Here’s a cheat sheet:
| COMMON DOCX XML UNIT CONVERSIONS | ||||||
| 20th of a point | Points dxa/20 | Inches pt/72 | Centimeters in*2,54 | Font half size pt/144 | EMU in*914400 | |
| Example | 11906 | 595.3 | 8,27… | 21.00086… | 4,135 | 7562088 |
| Tags using this | pgSz/pgMar/w:spacing | w:sz | wp:extent, a:ext | |||
Tips for Implementing a Layouter
If you want to convert a DOCX file (to PDF, for instance), draw it on canvas, or count number of pages, you’ll have to implement a layouter. A layouter is an algorithm for calculating character positions from a DOCX file.
This is a complex task if you need 100 percent fidelity rendering. The amount of time needed to implement a good layouter is measured in man-years, but if you only need a simple, limited one, it can be done relatively quickly.
A layouter fills a parent rectangle, which is usually a rectangle of the page. It add words from a run one by one. When the current line overflows, it starts a new one. If the paragraph is too high for the parent rectangle, it’s wrapped to the next page.
Here are some important things to keep in mind if you decide to implement a layouter:
- The layouter should take care about text alignment and text floating over images
- It should be capable of handling nested objects, such as nested tables
- If you want to provide full support for such images, you’ll have to implement a layouter with at least two passes, the first step collects floating images’ positions and the second fills empty space with text characters.
- Be aware of indentations and spacings. Each paragraph has spacing before and after, and these numbers are specified by the
w:spacingtag. Vertical spacing is specified byw:afterandw:beforetags. Note that line spacing is specified byw:line, but this is not the size of the line as one may expect. To get the size of the line, take the current font height, multiply byw:lineand divide by 12. - DOCX files contain no information about pagination. You won’t find the number of pages in the document unless you calculate how much space you need for each line to ascertain the number of pages. If you need to find exact coordinates of each character on the page, be sure to take into account all spacings, indentations and sizes.
- If you implement a full-featured DOCX layouter that handles tables, note the special cases when tables span multiple pages. A cell which causes a page overflow also affects other cells.
- Creating an optimal algorithm for calculating a table columns’ width is a challenging math problem and word processors and layouters usually use some suboptimal implementations. I propose using the algorithm from W3C HTML table documentation as a first approximation. I haven’t found a description of the algorithm used by MS Word, and Microsoft has fine-tuned the algorithm over time so different versions of Word may lay out tables slightly differently.
If something is unclear: reverse-engineer the XML!
When it’s not obvious how this or that XML tag works inside MS Word, there are two main approaches to figuring it out:
-
Create the desired content step-by-step. Start with a simple docx file. Save each step to its own file, as in
1.docx,2.docx, for example. Unzip each of them and use a visual diff tool for folder comparison to see which tags appear after your changes. (For a commercial option, try Araxis Merge, or for a free option, WinMerge.) -
If you generate a DOCX file that MS Word doesn’t like, work backwards. Simplify your XML step by step. At some point you will learn which change MS Word found incorrect.
DOCX is quite complex, isn’t it?
It is complex, and Microsoft’s license forbids using MS Word on the server side for processing DOCX– this is pretty standard for commercial products. Microsoft has, however, provided the XSLT file to handle most DOCX tags, but it won’t give you 100 percent or even 99 percent fidelity. Processes such as text wrapping over images are not supported, but you will be able to support the majority of documents. (If you don’t need complexity, consider using Markdown as an alternative.)
If you have a sufficient budget (there is no free DOCX rendering engine), you may want to use commercial products such as Aspose or docx4j. The most popular free solution is LibreOffice for converting between DOCX and other formats, including PDF. Unfortunately, LibreOffice contains many small bugs during conversion, and since it’s a sophisticated, open-source C++ product, it’s slow and difficult to fix fidelity issues.
Alternatively, if you find DOCX layouting too complicated to implement yourself, you can also convert it to HTML and use a browser to render it. You can also consider one of Toptal’s freelance XML developers.
DOCX Resources for further reading
- ECMA DOCX specification
- OpenXML library for DOCX manipulation from C#. It doesn’t contain information on layouting or rendering code, but offers a class hierarchy matching each possible XML node in DOCX.
- You can always search or ask on stackoverflow with keywords like docx4j, OpenXML and docx; there are people in the community who are knowledgeable.
Novosibirsk, Novosibirsk Oblast, Russia
Member since January 8, 2016
About the author
Stepan is an experienced software developer with extensive experience working in C++, Java, JavaScript, SQL, PHP, and C#.