Angular Components 101: An Overview
While components have been available in Angular since the beginning, they’re still easy to mess up with common mistakes like people not using them at all, creating components instead of attribute directives, and more.
In this article, Toptal Freelance JavaScript Developer Valters Valdersteins differentiates the correct and incorrect ways to use Angular components and illustrates them with examples.

Valters is a senior programmer with many years of experience working in companies and on projects of varying size and scope.
Expertise
Components have been available in Angular since the beginning; however, many people still find themselves using components incorrectly. In my work, I’ve seen people not using them at all, creating components instead of attribute directives, and more. These are issues that junior and senior Angular developers alike tend to make, myself included. And so, this post is for people like me back when I was learning Angular, since neither the official documentation nor the unofficial documentation about components explain with use cases how and when to use the components.
In this article, I will identify the correct and incorrect ways to use Angular components, with examples. This post should give you a clear idea about:
- The definition of Angular components;
- When you should create separate Angular components; and
- When you should not create separate Angular components.
Before we can jump into the correct usage of Angular components, I want to briefly touch the component topic in general. Generally speaking, each and every Angular application has at least one component by default—the root component. From there, it is up to us, how to design our application. Usually, you would create a component for separate pages, and then each page would hold a list of separate components. As a rule of thumb, a component must fulfill the following criteria:
- Must have a class defined, which holds data and logic; and
- Must be associated with an HTML template that displays information for the end user.
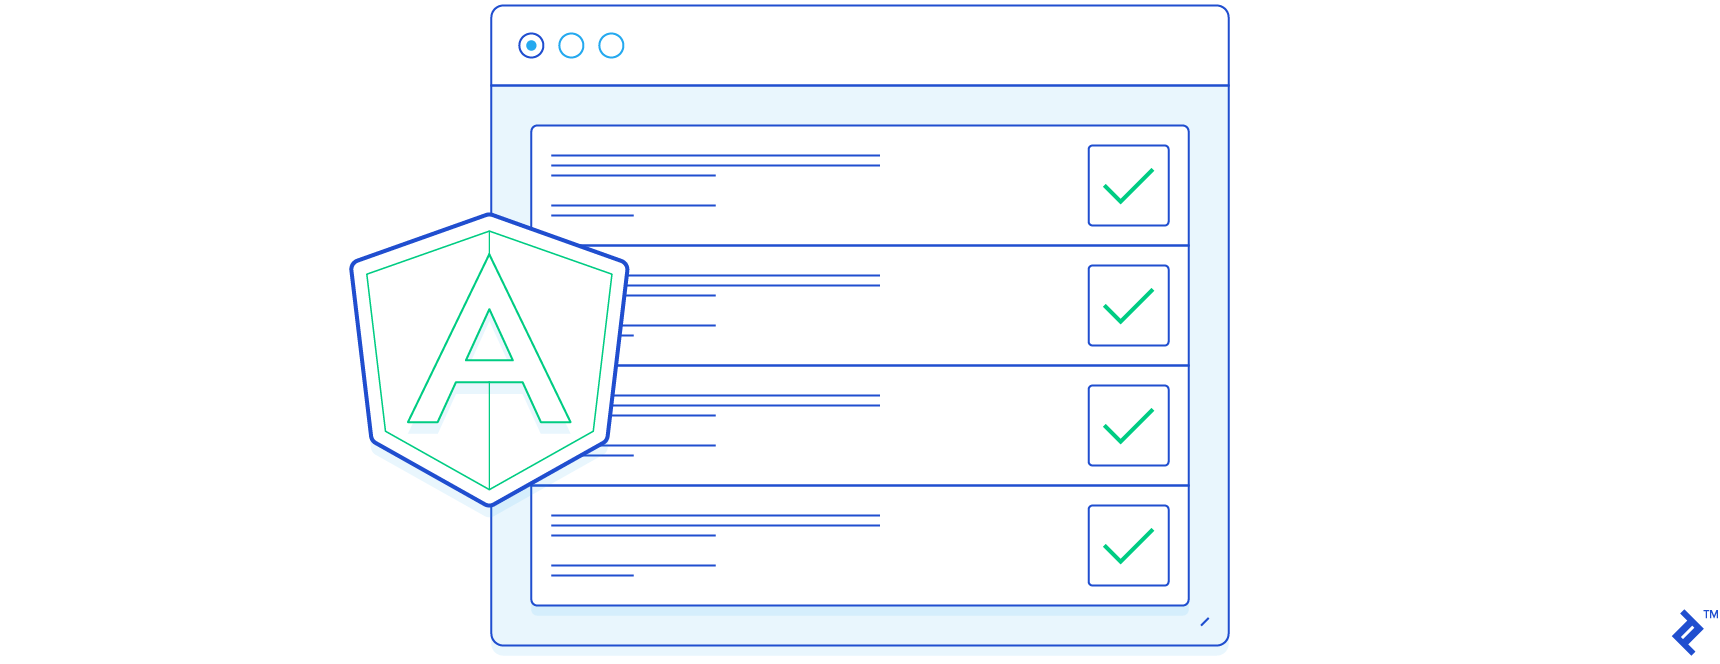
Let’s imagine a scenario where we have an application which has two pages: Upcoming tasks and Completed tasks. In the Upcoming tasks page, we can view upcoming tasks, mark them as “done,” and finally add new tasks. Similarly, in the Completed tasks page, we can view completed tasks and mark them “undone.” Finally, we have navigation links, which allow us to navigate between pages. That being said, we can split the following page into three sections: root component, pages, reusable components.

Based on the screenshot above, we can clearly see that the structure of the application would look something like this:
── myTasksApplication
├── components
│   ├── header-menu.component.ts
│   ├── header-menu.component.html
│   ├── task-list.component.ts
│   └── task-list.component.html
├── pages
│   ├── upcoming-tasks.component.ts
│   ├── upcoming-tasks.component.html
│   ├── completed-tasks.component.ts
│   └── completed-tasks.component.html
├── app.component.ts
└── app.component.html
So let’s link the component files with the actual elements on the wireframe above:
-
header-menu.componentandtask-list.componentare reusable components, which are displayed with a green border in the wireframe screenshot; -
upcoming-tasks.componentandcompleted-tasks.componentare pages, which are displayed with a yellow border in the wireframe screenshot above; and - Finally,
app.componentis the root component, which is displayed with a red border in the wireframe screenshot.
So, that being said, we can specify separate logic and design for each and every component. Based on the wireframes above, we have two pages that reuse one component—task-list.component. The question would arise—how do we specify what type of data we should show on a specific page? Luckily, we don’t have to worry about that, because when you create a component, you can also specify Input and Output variables.
Input Variables
Input variables are used within the components to pass in some data from the parent component. In the above example, we could have two input parameters for the task-list.component—tasks and listType. Accordingly, tasks would be a list of strings which would display each string on a separate row, whereas listType would be either upcoming or completed, which would indicate if the checkbox is checked. Below, you can find a small code snippet of how the actual component could look.
// task-list.component.ts

import { Component, Input } from '@angular/core';

@Component({
  selector: 'app-task-list',
  templateUrl: 'task-list.component.html'
})
export class TaskListComponent  {
  @Input() tasks: string[] = []; // List of tasks which should be displayed.
  @Input() listType: 'upcoming' | 'completed' = 'upcoming'; // Type of the task list.

  constructor() { }
}
Output Variables
Similar to input variables, output variables can be also used to pass some information between the components, but this time to the parent component. For example, for the task-list.component, we could have output variable itemChecked. It would inform the parent component if an item has been checked or unchecked. Output variables must be event emitters. Below, you can find a small code snippet of how the component could look with an output variable.
// task-list.component.ts

import { Component, Input, Output } from '@angular/core';

@Component({
  selector: 'app-task-list',
  templateUrl: 'task-list.component.html'
})
export class TaskListComponent  {
  @Input() tasks: string[] = []; // List of tasks which should be displayed.
  @Input() listType: 'upcoming' | 'completed' = 'upcoming'; // Type of the task list.
  @Output() itemChecked: EventEmitter<boolean> = new EventEmitter();
  @Output() tasksChange: EventEmitter<string[]> = new EventEmitter();

  constructor() { }

  /**
   * Is called when an item from the list is checked.
   * @param selected---Value which indicates if the item is selected or deselected.
   */
  onItemCheck(selected: boolean) {
    this.itemChecked.emit(selected);
  }

  /**
   * Is called when task list is changed.
   * @param changedTasks---Changed task list value, which should be sent to the parent component.
   */
  onTasksChanged(changedTasks: string[]) {
    this.taskChange.emit(changedTasks);
  }
}
task-list.component.ts content after adding output variablesChild Component Usage and Variable Binding
Let’s have a look at how to use this component within the parent component and how to do different types of variable bindings. In Angular, there are two ways to bind the input variables—one-way binding, which means that the property must be wrapped in square brackets [], and two-way binding, which means that property must be wrapped within square and round brackets [()]. Have a look at the example below and see the different ways in which data can be passed between components.
<h1>Upcoming Tasks</h1>
<app-task-list [(tasks)]="upcomingTasks" [listType]="'upcoming'" (itemChecked)="onItemChecked($event)"></app-task-list>
upcoming-tasks.component.html contentLet’s go through each parameter:
- The
tasksparameter is passed using two-way binding. That means that, in case the tasks parameter is changed within the child component, the parent component will reflect those changes on theupcomingTasksvariable. To allow two-way data binding, you have to create an output parameter, which follows the template “[inputParameterName]Change”, in this casetasksChange. - The
listTypeparameter is passed using one-way binding. That means that it can be changed within the child component, but it won’t be reflected in the parent component. Keep in mind that I could have assigned the value'upcoming'to a parameter within the component and passed that instead—it would make no difference. - Finally, the
itemCheckedparameter is a listener function, and it will be called whenever onItemCheck is executed on thetask-list.component. If an item is checked,$eventwould hold the valuetrue, but, if it is unchecked, it would hold the valuefalse.
As you can see, in general, Angular provides a great way to pass and share information between multiple components, so you should not be afraid to use them. Just make sure to use them wisely and not to overuse them.
When to Create a Separate Angular Component
As previously mentioned, you should not be afraid to use Angular components, but you should definitely use them wisely.
So when should you create Angular components?
- You should always create a separate component if the component can be reused in multiple places, like with our
task-list.component. We call them reusable components. - You should consider creation of a separate component if the component will make the parent component more readable and allow them to add additional test coverage. We can call them code organization components.
- You should always create a separate component if you have a part of a page which does not need to be updated often and want to increase performance. This is related to change detection strategy. We can call them optimization components.
These three rules help me identify if I need to create a new component, and they automatically give me a clear vision of the role for the component. Ideally, when you create a component, you should already know what its role will be within the application.
Since we already had a look at usage of reusable components, let’s have a look at usage of code organization components. Let’s imagine that we have a registration form and, in the bottom of the form, we have a box with Terms and Conditions. Usually, the legalese tends to be very large, taking up a lot of space—in this case, in an HTML template. So, let’s look at this example and then see how we could potentially change it.
At the beginning, we have one component—registration.component—which holds everything, including the registration form as well as the terms and conditions themselves.
<h2>Registration</h2>
<label for="username">Username</label><br />
<input type="text" name="username" id="username" [(ngModel)]="username" /><br />
<label for="password">Password</label><br />
<input type="password" name="password" id="password" [(ngModel)]="password" /><br />
<div class="terms-and-conditions-box">
   Text with very long terms and conditions.
</div>
<button (click)="onRegistrate()">Registrate</button>
The template now looks small, but imagine if we would replace “Text with very long terms and conditions” with an actual bit of text that has more than 1000 words—it would make the editing of the file hard and uncomfortable. We have a quick solution for that—we could invent a new component terms-and-conditions.component, which would hold everything related to terms and conditions. So let’s have a look at the HTML file for the terms-and-conditions.component.
<div class="terms-and-conditions-box">
   Text with very long terms and conditions.
</div>
And now we can adjust the registration.component and use the terms-and-conditions.component within it.
<h2>Registration</h2>
<label for="username">Username</label><br />
<input type="text" name="username" id="username" [(ngModel)]="username" /><br />
<label for="password">Password</label><br />
<input type="password" name="password" id="password" [(ngModel)]="password" /><br />
<app-terms-and-conditions></app-terms-and-conditions>
<button (click)="onRegistrate()">Registrate</button>
Congratulations! We have just decreased the size of the registration.component by hundreds of lines and made it more easy to read the code. In the above example, we made changes to the template of the component, but the same principle could be applied to the logic of the component.
Finally, for the optimization components, I would strongly suggest that you go through this post, since it will provide you with all information required to understand the change detection, and to which specific cases you can apply it. You won’t use it often, but there might be some cases, and if you can skip regular checks on multiple components when it’s not necessary, it is a win-win for performance.
That being said, we shouldn’t always create separate components, so let’s have a look when you should avoid creating a separate component.
When to Avoid Creation of a Separate Angular Component
There are three main points based on which I suggest to create a separate Angular component, but there are cases in which I would avoid creating a separate component as well.
Again, let’s have a look at bullet points which will allow you to easily understand when you should not create a separate component.
- You should not create components for DOM manipulations. For those, you should use attribute directives.
- You should not create components if it will make your code more chaotic. This is the opposite of code organization components.
Now, let’s take a closer look and check out both cases in examples. Let’s imagine that we want to have a button that logs the message when it’s clicked. This could be mistaken and a separate component could be created for this specific functionality, which would hold a specific button and actions. Let’s first check the incorrect approach:
// log-button.component.ts

import { Component, Input, Output } from '@angular/core';

@Component({
  selector: 'app-log-button',
  templateUrl: 'log-button.component.html'
})
export class LogButtonComponent  {
  @Input() name: string; // Name of the button.
  @Output() buttonClicked: EventEmitter<boolean> = new EventEmitter();

  constructor() { }

  /**
   * Is called when button is clicked.
   * @param clicked - Value which indicates if the button was clicked.
   */
  onButtonClick(clicked: boolean) {
    console.log('I just clicked a button on this website');
    this.buttonClicked.emit(clicked);
  }
}
log-button.component.ts
And accordingly, this component is accompanied with the following html view.
<button (click)="onButtonClick(true)">{{ name }}</button>
log-button.component.html
As you can see, the above example would work, and you could use the above component throughout your views. It would do what you want, technically. But the correct solution here would be to use directives. That would allow you not only to reduce the amount of code that you have to write but also to add the possibility to apply this functionality to whatever element you want, not just buttons.
import { Directive } from '@angular/core';

@Directive({
    selector: "[logButton]",
    hostListeners: {
        'click': 'onButtonClick()',
    },
})
class LogButton {
    constructor() {}
  /**
   * Fired when element is clicked.
   */
  onButtonClick() {
   console.log('I just clicked a button on this website');
   }
}
logButton directive, which can be assigned to any elementNow when we have created our directive, we can simply use it across our application and assign it to any element we want. For example, let’s reuse our registration.component.
<h2>Registration</h2>
<label for="username">Username</label><br />
<input type="text" name="username" id="username" [(ngModel)]="username" /><br />
<label for="password">Password</label><br />
<input type="password" name="password" id="password" [(ngModel)]="password" /><br />
<app-terms-and-conditions></app-terms-and-conditions>
<button (click)="onRegistrate()" logButton>Registrate</button>
logButton directive used on the registration forms buttonNow, we can take a look at the second case, in which we should not create separate components, and that is the opposite to the code optimisation components. If the newly-created component makes your code more complicated and larger, there is no need to create it. Let’s take as an example our registration.component. One such case would be to create a separate component for label and input field with a ton of input parameters. Let’s have a look at this bad practice.
// form-input-with-label.component.ts

import { Component, Input} from '@angular/core';

@Component({
  selector: 'app-form-input-with-label',
  templateUrl: 'form-input-with-label.component.html'
})
export class FormInputWithLabelComponent  {
  @Input() name: string; // Name of the field
  @Input() id: string; // Id of the field
  @Input() label: string; // Label of the field
  @Input() type: 'text' | 'password'; // Type of the field
  @Input() model: any; // Model of the field

  constructor() { }

}
form-input-with-label.component
And this could be the view for this component.
<label for="{{ id }}">{{ label }}</label><br />
<input type="{{ type }}" name="{{ name }}" id="{{ id }}" [(ngModel)]="model" /><br />
form-input-with-label.component
Sure, the amount of code would be reduced in registration.component, but does it make the overall logic of the code more easier to understand and readable? I think we clearly can see that it makes the code unnecessarily more complex than it was before.
Next Steps: Angular Components 102?
To summarize: Don’t be afraid to use components; just make sure that you have a clear vision about what you want to achieve. The scenarios I’ve listed above are the most common ones, and I consider them to be the most important and common ones; however, your scenario may be unique and it’s up to you to make an informed decision. I hope you’ve learned enough to make a good decision.
If you’d like to learn more about Angular’s change detection strategies and the OnPush strategy, I recommend reading Angular Change Detection and the OnPush Strategy. It’s closely related to components and, as I’ve already mentioned in the post, it can significantly improve the performance of the application.
Since components are only part of the directives that Angular provides, it would be great to also get to know attribute directives and structural directives. Understanding all of the directives will most likely make it easier for the programmer to write better code altogether.
Further Reading on the Toptal Blog:
Understanding the basics
What type of directives there are in Angular?
There are component directives, attribute directives, and structural directives.
What are Angular selectors?
A selector is a way how a component is called in a template. It is a unique identificator for a component.
What are Angular components?
A component is a directive with a template that allows building blocks of a UI in an Angular application. Components will always have a template, a selector, and may or may not have a separate style. Components are declared using @Component.
What are Angular templates?
Angular templates define the UI of a component.
What is an attribute directive in Angular?
Attribute directives change the way how the DOM element appears or behaves. Attributes do not have a template and are declared using @Directive.
What is Angular?
Angular is a platform that allows users to easily build web applications. It is based on TypeScript.
What is TypeScript?
TypeScript is a scripting language, which was originated from, and is a superset of, JavaScript.
Riga, Latvia
Member since February 24, 2017
About the author
Valters is a senior programmer with many years of experience working in companies and on projects of varying size and scope.