How to Make an Android and iOS App in C# on Mac
In the past few years, Microsoft has pulled a few aces from up its sleeve. Yes, they messed up Skype, failed with smartphones, and almost succeeded with tablets. But they did some really amazing things as well.
Relinquishing their closed empire approach, they open-sourced .NET, joined the Linux Foundation, released SQL Server for Linux, and created this great new tool called Visual Studio for Mac.
In this post, Head of Open Source Demir Selmanovic details how to make an Android and iOS app in C# on your Mac.

Demir is a developer and project manager with more than 15 years of professional experience in a wide range of software development roles.
Once upon a time, there was a company that had all the best tools, and writing software for their platform was awesome. But slowly, they became indifferent to their own problems. They did not become alarmed when their systems crashed, but rather accepted this state of the universe as a fact of life. They believed that their programs were perfect within themselves, serene and elegant, their purpose self-evident.
Oh boy, if they only knew how wrong they were…
It was well overdue when they realized their mistakes and their CEO cried to bring back all the developers who left their platform and sailed away. The company was Microsoft and I, for one, was convinced that their fate had been sealed and that they would slowly but surely perish from the forefront of the technology landscape.
I’m so happy that I was wrong!
In the past few years, Microsoft has pulled a few aces from up their sleeves. Yes, they messed up Skype (I still hate them for that), failed with smartphones, and almost succeeded with tablets. But, they did some really amazing things as well. Relinquishing their closed empire approach, they open-sourced .NET, joined the Linux Foundation, released SQL Server for Linux, and created this great new tool called Visual Studio for Mac.
That’s right, a real Microsoft IDE not for Windows, but for Mac. Imagine that!

Writing Your First Cross Platform Android and iOS Application Using C# on Mac
You can use Visual Studio for Mac to create almost any type of the application. This means you can use C# for app development for iOS, tvOS, Android, Mac, .NET Core, or even ASP.NET. As all the cool kids are now writing mobile apps, lets see what it takes in Visual Studio for Mac to create a mobile app using C# that will run on Android and iOS.
The first thing you need to do is pick the application template. Let’s start with a simple “Single View App.”

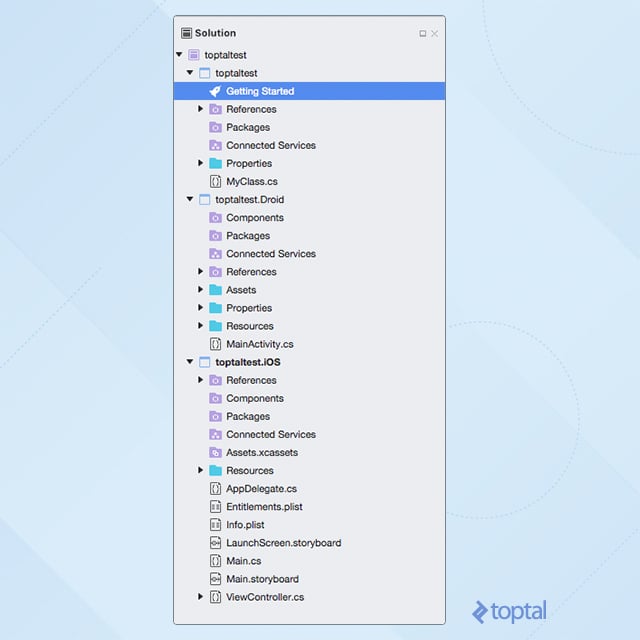
After filling in the package name and bootstrapping your app, Visual Studio will create a solution with three projects. The first project will be a shared library where you should keep the platform-independent code, and the other two will be Android and iOS apps.
You can use the “Run” menu, or commands in the application bar, to start your app.
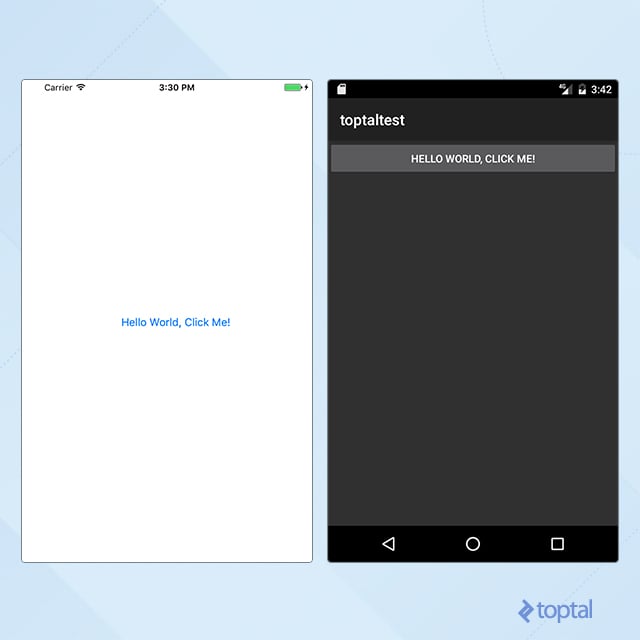
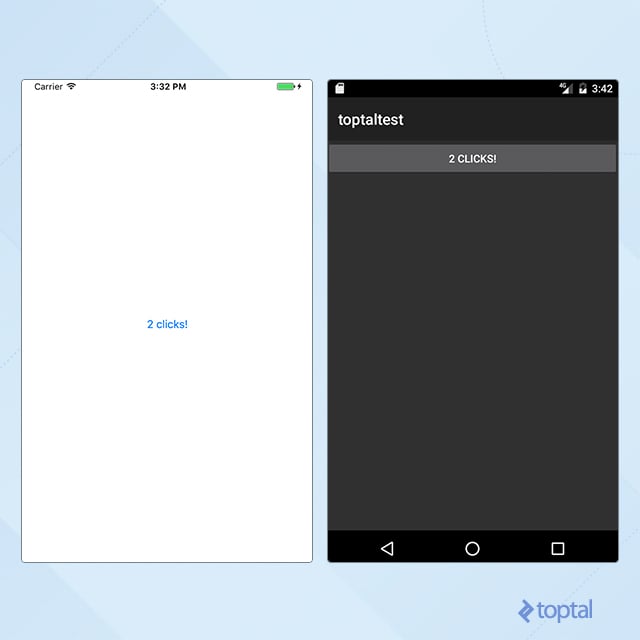
Congratulations! You are now an iOS and Android developer regardless of the fact that you never wrote a line of Objective-C, Swift, or Java code.
We haven’t really accomplished much yet with our C# iPhone app though. Let’s make things more interesting and incorporate maps and location services.
Using Maps and Location Services
Have in mind that VS for Mac is still in “Preview” and there is not much help and documentation you will find on using it. The best place for references on how to do things is still official Xamarin documentation.
Visual Studio For Mac does not use the same solution and application structure as Xamarin tools that you might have seen on the PC. In most cases, you will need to experiment and work around few hurdles to get their examples to work. Let’s hope that Microsoft will stay on top of their game and provide an awesome collection of MSDN resources once the final version of VS for Mac is released.
Showing Current Location on iOS
Accessing mobile device resources, such as current location, requires users to “manually” grant permissions to your app to use those resources. iOS uses the file info.plist to store these settings. VS for Mac provides a visual interface for editing this file. First thing we need to do is add a value for the setting named NSLocationWhenInUseUsageDescription.
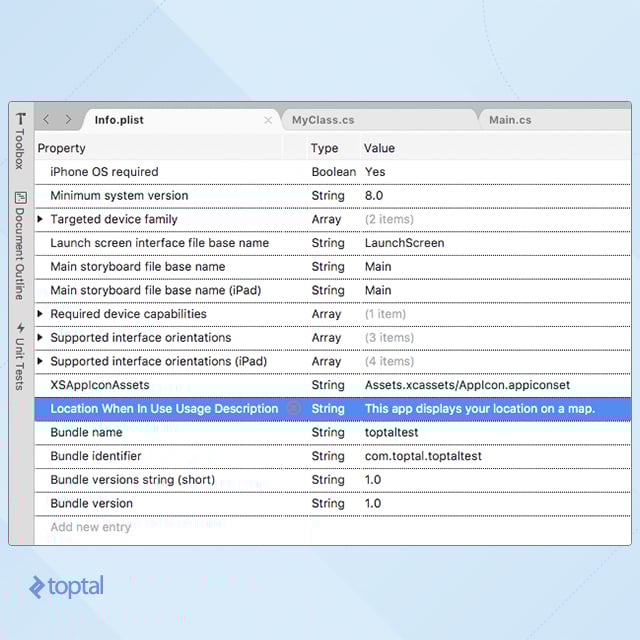
Note: VS will show a long name for “NSLocationWhenInUseUsageDescription” when you set the property name. This is expected and do not worry about it.
Our bootstrapped application was created with a simple button that was counting clicks. The first thing you will want to do is to remove it and replace the screen content with a map. In order to do this, look for the Main.storyboard file in the solution browser and double-click on it to open it in the editor.
Storyboards are introduced by Apple and adopted by Xamarin as well. Refer to Apple Documentation or Xamarin Documentation for more information.
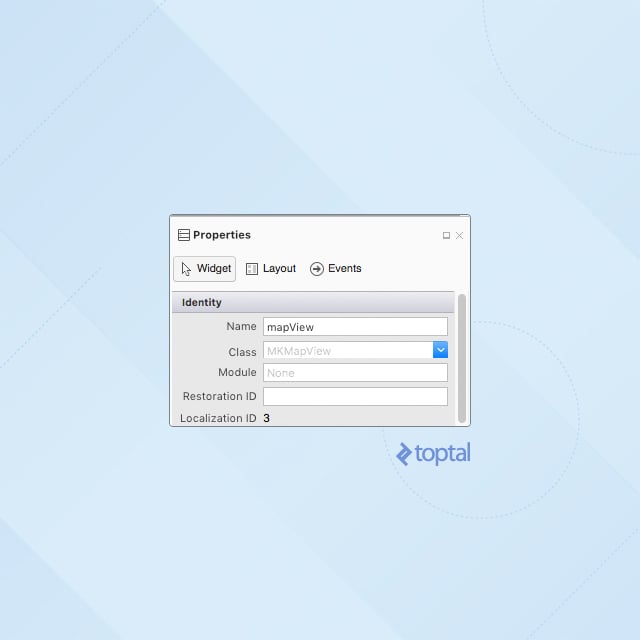
Remove the button and add a Map View component to the page.

Make sure to name your “mapView” component properly.
All that is left now is to clean up your ViewController.cs file, and modify the ViewDidLoad() method to match the following:
        using CoreLocation;

        public override void ViewDidLoad()
        {
            base.ViewDidLoad();
            // Perform any additional setup after loading the view, typically from a nib.

            CLLocationManager locationManager = new CLLocationManager();
            locationManager.RequestWhenInUseAuthorization();
            mapView.ShowsUserLocation = true;
        }
You can use the “Quick fix” feature to have VS automatically add a reference to the CoreLocation library or you can manually add it.
After you run your iOS app you should see the request to access your location. Once the permission is granted your map will load with a standard blue dot showing where you are (or where you are faking to be by using the iOS simulator :) ).

Showing Current Location on Android
Unfortunately, Google and Microsoft decided to make this simple task a bit more complicated than it was with iOS. In order to use maps in the Android application, you will need to create Google Maps API key, and add it to your AndroidManifest.xml file.
Xamarin guys created a pretty straightforward guide for obtaining a Google Maps API key. Please follow the steps in their guide before you proceed. When you’re done, your AndroidManifest.xml should contain a setting like this:
<meta-data android:name="com.google.android.maps.v2.API_KEY" android:value="YOUR KEY" />
You are now ready to add a map to your application.
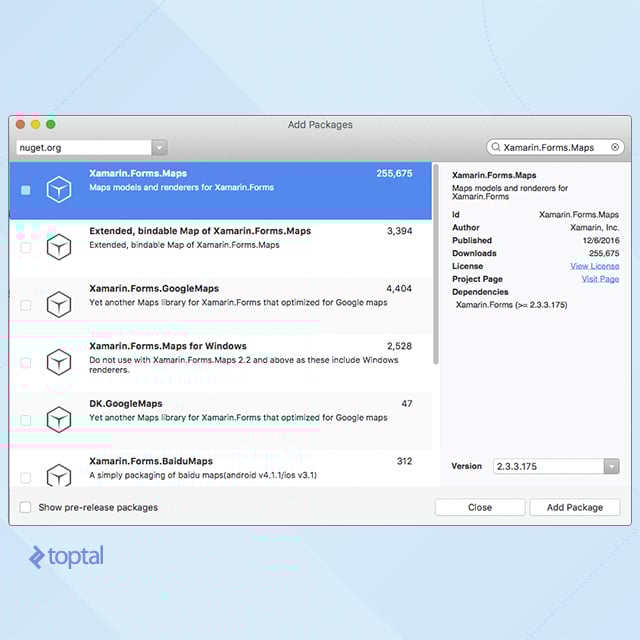
The great thing with VS for Mac is that it is powered by NuGet, just like its big brother. As map handling libraries aren’t included by default, you will need to install the Xamarin.Forms.Maps package.
However, there is no “Map View” component that you can just drag to your “Activity”. Instead, adding a map to the screen requires manually changing your Resources->layout->Main.axml file. You can use the designer view to delete the button created before, but then switch to “Code View” and add the following fragment code in your LinearLayout:
    <fragment xmlns:android="http://schemas.android.com/apk/res/android"
          android:id="@+id/map"
          android:layout_width="match_parent"
          android:layout_height="match_parent"
          class="com.google.android.gms.maps.MapFragment" />
As with C# for iOS, you will need to configure your app to ask for proper permissions. To do so, open AndroidManifest.xml for editing and click the “Application” button on the bottom left side of the editor. VS will show you a visual interface for setting these values. There are a few of them you will need to enable, as shown below.

It is now time to write some real code. Find the MainActivity.cs file, open it for editing, and make the following changes:
Add namespace references:
using Android.Gms.Maps.Model;
using Android.Gms.Maps;
using Android.Locations;

Make your MainActivity also a ILocationListener.

public class MainActivity : Activity, ILocationListener

Implement the ILocationListener methods within your MainActivity:
        public void OnProviderEnabled(string provider) {}

        public void OnProviderDisabled(string provider) {}

        public void OnStatusChanged(string provider, Availability status, Bundle extras) {}

        public void OnLocationChanged(Android.Locations.Location location)
        {
            LatLng latLng = new LatLng(location.Latitude, location.Longitude);
            CameraPosition.Builder builder = CameraPosition.InvokeBuilder();
            builder.Target(latLng);
            builder.Zoom(15);
            builder.Bearing(155);
            builder.Tilt(10);
            CameraPosition cameraPosition = builder.Build();
            CameraUpdate cameraUpdate = CameraUpdateFactory.NewCameraPosition(cameraPosition);

            MapFragment mapFrag = (MapFragment)FragmentManager.FindFragmentById(Resource.Id.map);
            GoogleMap map = mapFrag.Map;
            if (map != null)
            {
                map.MoveCamera(cameraUpdate);
            }
          }
Add the following two variables as class level variables:
        LocationManager locMgr;
        string locationProvider;
And cleanup the OnCreate() method to look like this:
        protected override void OnCreate(Bundle savedInstanceState)
        {
            base.OnCreate(savedInstanceState);


            // Set our view from the "main" layout resource
            SetContentView(Resource.Layout.Main);

            locMgr = GetSystemService(LocationService) as LocationManager;

            Criteria locationCriteria = new Criteria();

            locationCriteria.Accuracy = Accuracy.Coarse;
            locationCriteria.PowerRequirement = Power.Medium;

            locationProvider = locMgr.GetBestProvider(locationCriteria, true);
            locMgr.RequestLocationUpdates(locationProvider, 2000, 1, this);
        }
By calling the GetSystemService from within the OnCreate() method, your MainActivity will be activated as an ILocationListener and will thereby be able to handle all the events listed above.
Run your Android application and you should get the map positioned to your location, similar to the following image.

Using Shared Libraries for iOS and Android
One of the greatest features of VS for Mac is the possibility of having shared code between iOS and Android apps. Ideally, we could have all the business logic of the app in a shared library, limiting any iOS and Android specific code to being part of the UI.
Let’s create a shared Class that will asynchronously perform an HTTP request and show the content in a Debug console.
Create a new class file in your shared library named RestClient.cs with the following code:
(Make sure to use the correct namespace from your project)
using System;
using System.Net;

namespace testshared
{
    public delegate void callback(string responseText);

    class ReqState
    {
        public ReqState(HttpWebRequest req, callback cb)
        {
            request = req;
            callback = cb;
        }
        public HttpWebRequest request { get; set; }
        public callback callback;
    }

    public class RestClient
    {
        public RestClient() {}


        public void FetchPage(string url, callback cb)
        {
            HttpWebRequest request = (HttpWebRequest)WebRequest.Create(url);
            request.BeginGetResponse(new AsyncCallback(FinishWebRequest), new ReqState(request, cb));
        }

        private void FinishWebRequest(IAsyncResult result)
        {
            ReqState reqState = (result.AsyncState as ReqState);
            HttpWebResponse response = reqState.request.EndGetResponse(result) as HttpWebResponse;
            using (var reader = new System.IO.StreamReader(response.GetResponseStream()))
            {
                string responseText = reader.ReadToEnd();
                reqState.callback(responseText);
            }
        }

    }
}
Using the Library on iOS
Modify your ViewController.cs file in the iOS project to match the following code:
(Make sure to use the correct namespace from your project)
using System;
using UIKit;
using System.Diagnostics;

namespace testshared.iOS
{
    public partial class ViewController : UIViewController
    {
        RestClient rest = new RestClient();

        public ViewController(IntPtr handle) : base(handle) {}


        public override void ViewDidLoad()
        {
            base.ViewDidLoad();

            // Perform any additional setup after loading the view, typically from a nib.
            Button.AccessibilityIdentifier = "myButton";
            Button.TouchUpInside += delegate
            {
                Button.SetTitle("Loading...", UIControlState.Normal);
                rest.FetchPage("http://www.google.com", doneCallback);
            };
        }

        public void doneCallback(string content)
        {
            InvokeOnMainThread(() =>
            {
                Debug.Write(content);
                Button.SetTitle("All Done", UIControlState.Normal);
            });
        }

        public override void DidReceiveMemoryWarning()
        {
            base.DidReceiveMemoryWarning();
            // Release any cached data, images, etc that aren't in use.
        }
    }
}
Run your iOS app, click the button and check the “Application Output” tab in Visual Studio. It should display something like this:

Using the Library on Android
Changes needed on an Android app are very similar to those needed on iOS. Modify the MainActivity.cs file to match the following:
(Make sure to use the correct namespace from your project)
using Android.App;
using Android.Widget;
using Android.OS;

namespace testshared.Droid
{
    [Activity(Label = "testshared", MainLauncher = true, Icon = "@mipmap/icon")]
    public class MainActivity : Activity
    {
        RestClient rest = new RestClient();

        protected override void OnCreate(Bundle savedInstanceState)
        {
            base.OnCreate(savedInstanceState);

            // Set our view from the "main" layout resource
            SetContentView(Resource.Layout.Main);

            // Get our button from the layout resource,
            // and attach an event to it
            Button button = FindViewById<Button>(Resource.Id.myButton);

            button.Click += delegate {
                button.Text = $"Loading...";
                rest.FetchPage("http://www.google.com", doneCallback);
            };
        }

        public void doneCallback(string content)
        {
            RunOnUiThread(() =>
            {
                Button button = FindViewById<Button>(Resource.Id.myButton);
                button.Text = "All done";
                System.Diagnostics.Debug.WriteLine(content);
            });
        }
    }
}
Note: The system architecture of both platforms, Android and iOS, requires that all UI interaction happen on the main application thread. This means that any change to UI elements should happen from within the main thread as well. That is where RunOnUiThread and InvokeOnMainThread come in. Since HTTP requests were executed in a separate thread and doneCallback() was called outside the main thread, we had to use these methods to be able to access the buttons and change the label.
C# Developers Are Taking Over Android and iOS
Visual Studio for Mac has still has a few wrinkles to work out, but from the first look at it, I’m very excited about its future. The need for mobile applications grows each day and, with Visual Studio for Mac, Microsoft has further enabled an army of great C# developers to fill in this need. Naturally, this does not mean VS, Xamarin, and C# iOS development will come to dominate mobile development, but seeing more talent, competition, and innovation in any software development niche is never a bad thing.
Sarajevo, Federation of Bosnia and Herzegovina, Bosnia and Herzegovina
Member since July 8, 2014
About the author
Demir is a developer and project manager with more than 15 years of professional experience in a wide range of software development roles.