Who Knew Adobe CC Could Wireframe?
Wireframing is a major step in designing any user interface, whether a website, application, or software product. Apps in the Adobe CC suite can be used to create wireframes for an efficient workflow.
Wireframing is a major step in designing any user interface, whether a website, application, or software product. Apps in the Adobe CC suite can be used to create wireframes for an efficient workflow.

Ivana is a visual designer with over 15 years of experience, an Adobe Certified Instructor, and Algebra University College Asst. Lecturer.
Expertise
Wireframing is a major step in designing any user interface, whether a website, application, or software product. Without distraction in the form of visuals, colors, typography, styles, and effects, you can be more focused on defining content hierarchy and user experience.
Doing low-fidelity wireframes and prototypes will help you test and iterate earlier and more often in the process. Low-fidelity wireframes allow designers to work faster and develop products that users will love.
There are a lot of different wireframing tools to choose from in the wild. Which one you choose will depend on your personal preferences and workflow style.
Just like a lot of designers who have moved to digital design from the print world, I’m an expert in Adobe applications such as Illustrator, InDesign, and Photoshop. I can use them efficiently and intuitively from anywhere and at any time (even if someone wakes me up in the middle of the night and refuses to give me a cup of coffee).
Not surprisingly, these versatile applications have also become the tools I use to do web and application visual design. So, for my workflow to be the most efficient, I use them for wireframing as well.

With each project, I usually start designing by doing very rough sketches on paper, or on my iPad or smartphone screen if I am not near my office desk. These sketches are there to focus my thoughts regarding the chosen concept; the client will probably never see any of them. When I feel confident that my idea works, I move into wireframing. I usually use Adobe Illustrator and InDesign combined: Illustrator for creating most of the UI kit elements and InDesign for the wireframing itself.
I’ll explain a step-by-step process of how to also incorporate those tools into your wireframing workflow later in the article, but before I go into details, let me show you the strengths and weaknesses of using InDesign as a primary wireframing tool.
The Pros and Cons of Using Adobe InDesign as a Wireframe and Prototyping Tool
For some time now, Adobe InDesign has been not only a desktop publishing application but also widely used for digital publishing and EPUB creation. There are also several reasons why it is a suitable tool for wireframing as well:
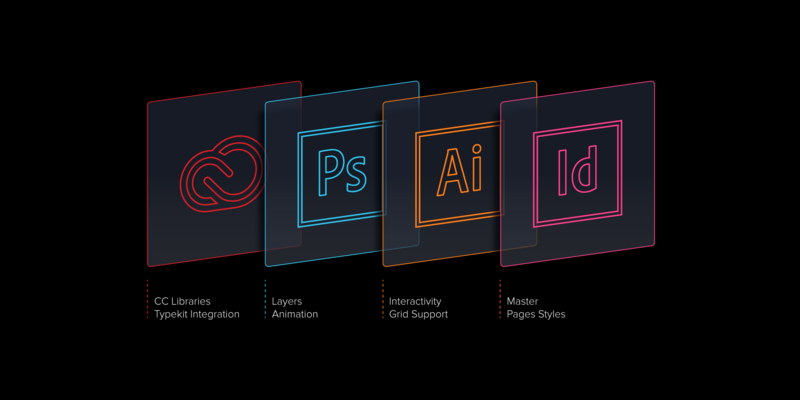
- Master pages – You can quickly and consistently apply global design elements like navigation, headers, footers, and so on using master pages. You can create as many master pages as you need, and on top of that, one master can be based on another.
- Solid grid support – Allows you to easily create and apply different kinds of grids, complementing columns, horizontal and vertical guides to create modules, and subgrids for greater complexity and precision.
- Alternate layouts – Enables wireframes for multiple devices and orientations in the same file.
- CC Libraries – Generates a library of different reusable assets like commonly used objects, colors, characters, and paragraph styles. Create assets in InDesign, Illustrator, or Photoshop, or with the Adobe Capture mobile app—whichever you prefer.
- Layers – Provides the ability to organize, group, show/hide, and lock/unlock objects and content selectively in the wireframe. Every page of a multi-page InDesign document has the same number and order of layers. All of the changes you make to layers are reflected on all pages, like visibility, stacking order, or deletion.
- Styles and tables – Gives complete control over the look of your text, objects, and tables through the use of InDesign styles. Styles can inherit from each other providing the ability to cascade desired formatting easily throughout the document. Creating and formatting tables to be used as wireframe content elements or even helpers for layout purposes is very simple.
- Typekit integration – In high-fidelity mockups, you can use any of the Typekit fonts that sync to the desktop.
- Interactivity and animations – You can use Adobe InDesign’s built-in interactivity and animation features to create different states of web or application design elements for interaction prototyping. Most people use these features while creating magazines for digital publishing solutions and fixed-layout EPUB export, but they are suitable for prototyping as well.
- Export options – InDesign can export the wireframes and prototypes you create in a variety of formats. Interactive PDFs will probably be your format of choice in the majority of cases, but you can also use the Publish Online feature to convert your document to interactive HTML, which can be viewed in modern desktop and mobile browsers. Unfortunately, you don’t have much control over the export using Publish Online, and exported files are hosted on Adobe servers. You can share the prototype URL to your client or embed it into your site. For more control and direct export to HTML5, you can use the in5 extension from Ajar Productions.
Adobe InDesign has many pros to be used as a wireframe and prototyping tool, but it also has some disadvantages:
- Lack of predefined wireframe templates and elements – Since InDesign is not meant to be a wireframing tool, you have to create and prepare templates and object assets by yourself. (I’ll show you how to handle this step later in the article.) The good news is that most of this work will be done only once, and after a few hours of work, you’ll be ready to jump-start your InDesign wireframing. Also, there are a lot of assets and wireframe kits that you can download from the internet, so there is no need to draw everything yourself.
- Interactivity and animation features are limited – Although you can easily connect pages and add some interactivity and animations, the process can sometimes take a long time. Some of the simple interaction tools are not very intuitive. If you haven’t used InDesign interactivity features, you’ll need to overcome a slight learning curve before you’ll be able to apply them efficiently.
- InDesign documents can’t export directly as layered PSD files – If you do your visual design in Adobe Photoshop and want to have separated wireframe elements for building your design, then you will have to export your wireframes to PDF first. Then you will need to open the PDF in Illustrator and export it again as a layered PSD. People working on the Mac can also use a free script written by Rob Day to save InDesign files as a layered PSD.
Good Wireframe Preparation Is Half of the Work
Start by fine-tuning your working environment. If you do not already have a saved workspace in Illustrator and InDesign for this kind of work, create one. In Illustrator, start with the predefined Web workspace and adapt it to your liking: Close panels you don’t often use, be sure to open the ones you will use, and then arrange them to suit your work style.
When done, save the workspace by choosing Window > Workspace > New Workspace… Do the same thing in InDesign using the Digital Publishing workspace as a starter.
Assembling Wireframe/Mockup/Prototype Kits
An efficient wireframing workflow using Illustrator and InDesign requires that you invest some time in making your user interface assets kit first. Since the introduction of Adobe Creative Cloud, CC Libraries are the best way to store all your UI kit components.
You can create one or more libraries for wireframing and prototyping purposes. For example, you can create one library for website wireframing, another for iOS applications, a third for Android applications, and so on.
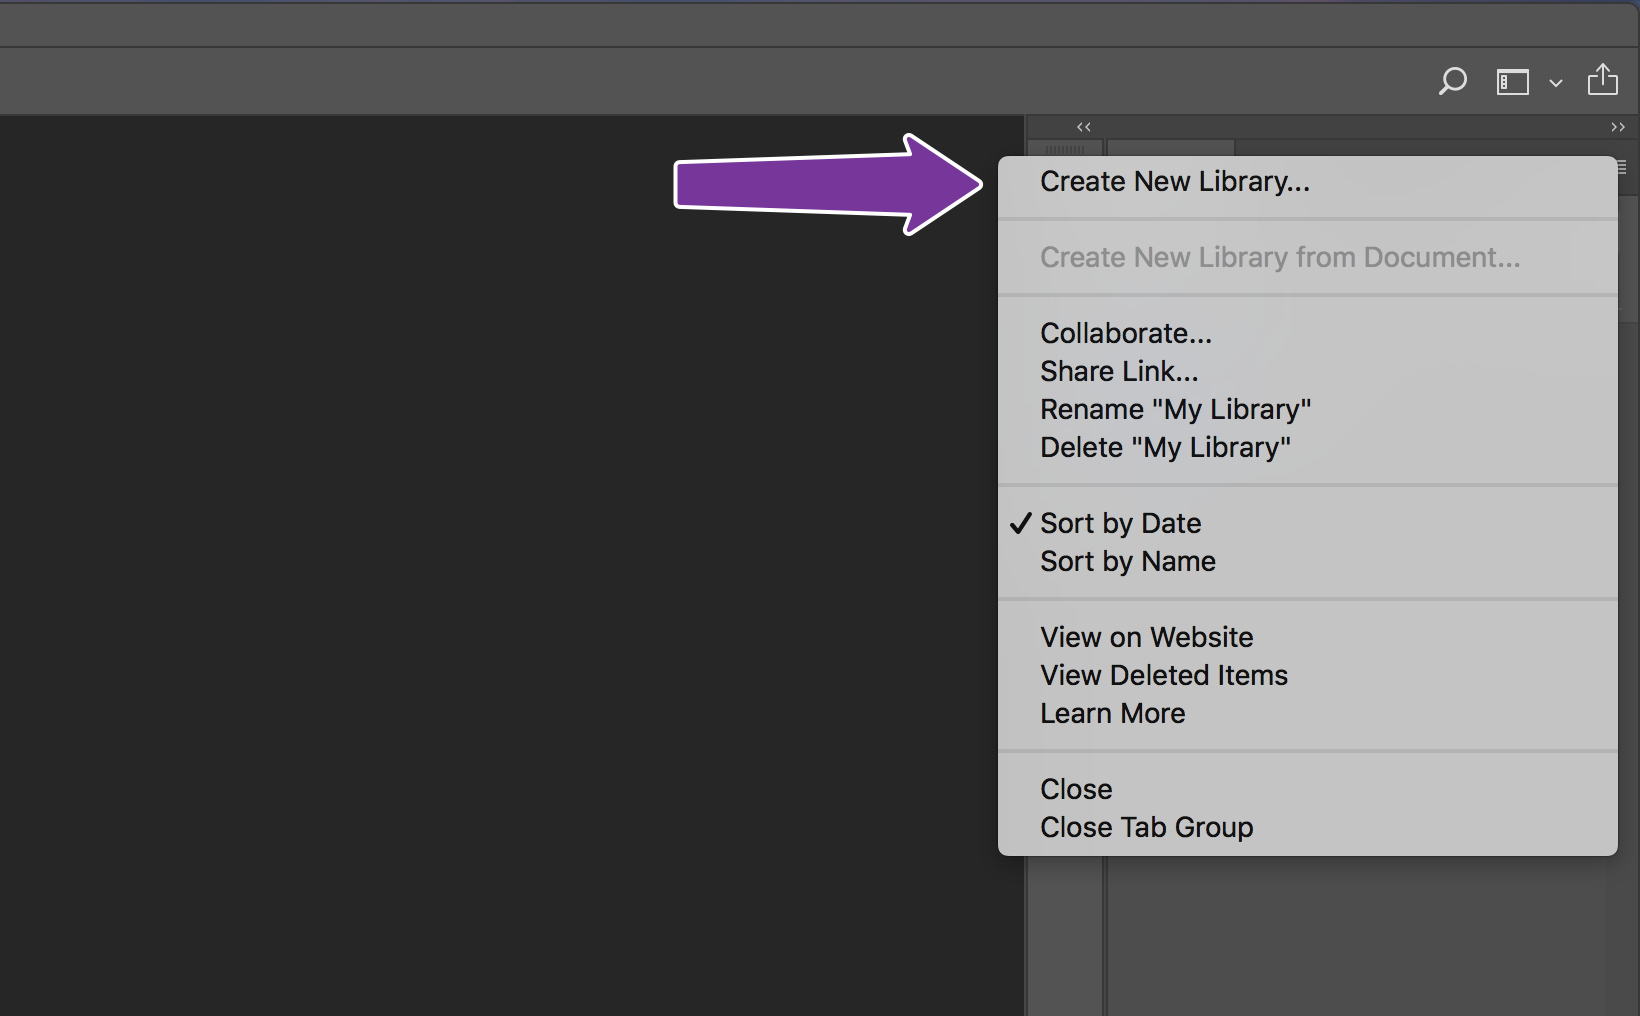
To create an Adobe CC Library, open the Libraries panel and choose Create New Library from the hamburger menu in the panel. Assets you put in libraries can be made and used in different Adobe desktop or mobile apps on all devices you log into with your Adobe ID. That means you can start with the project on your iPad or iPhone, continue on your desktop computer in the office, and make last-minute changes on your home laptop with the same assets available on all devices.
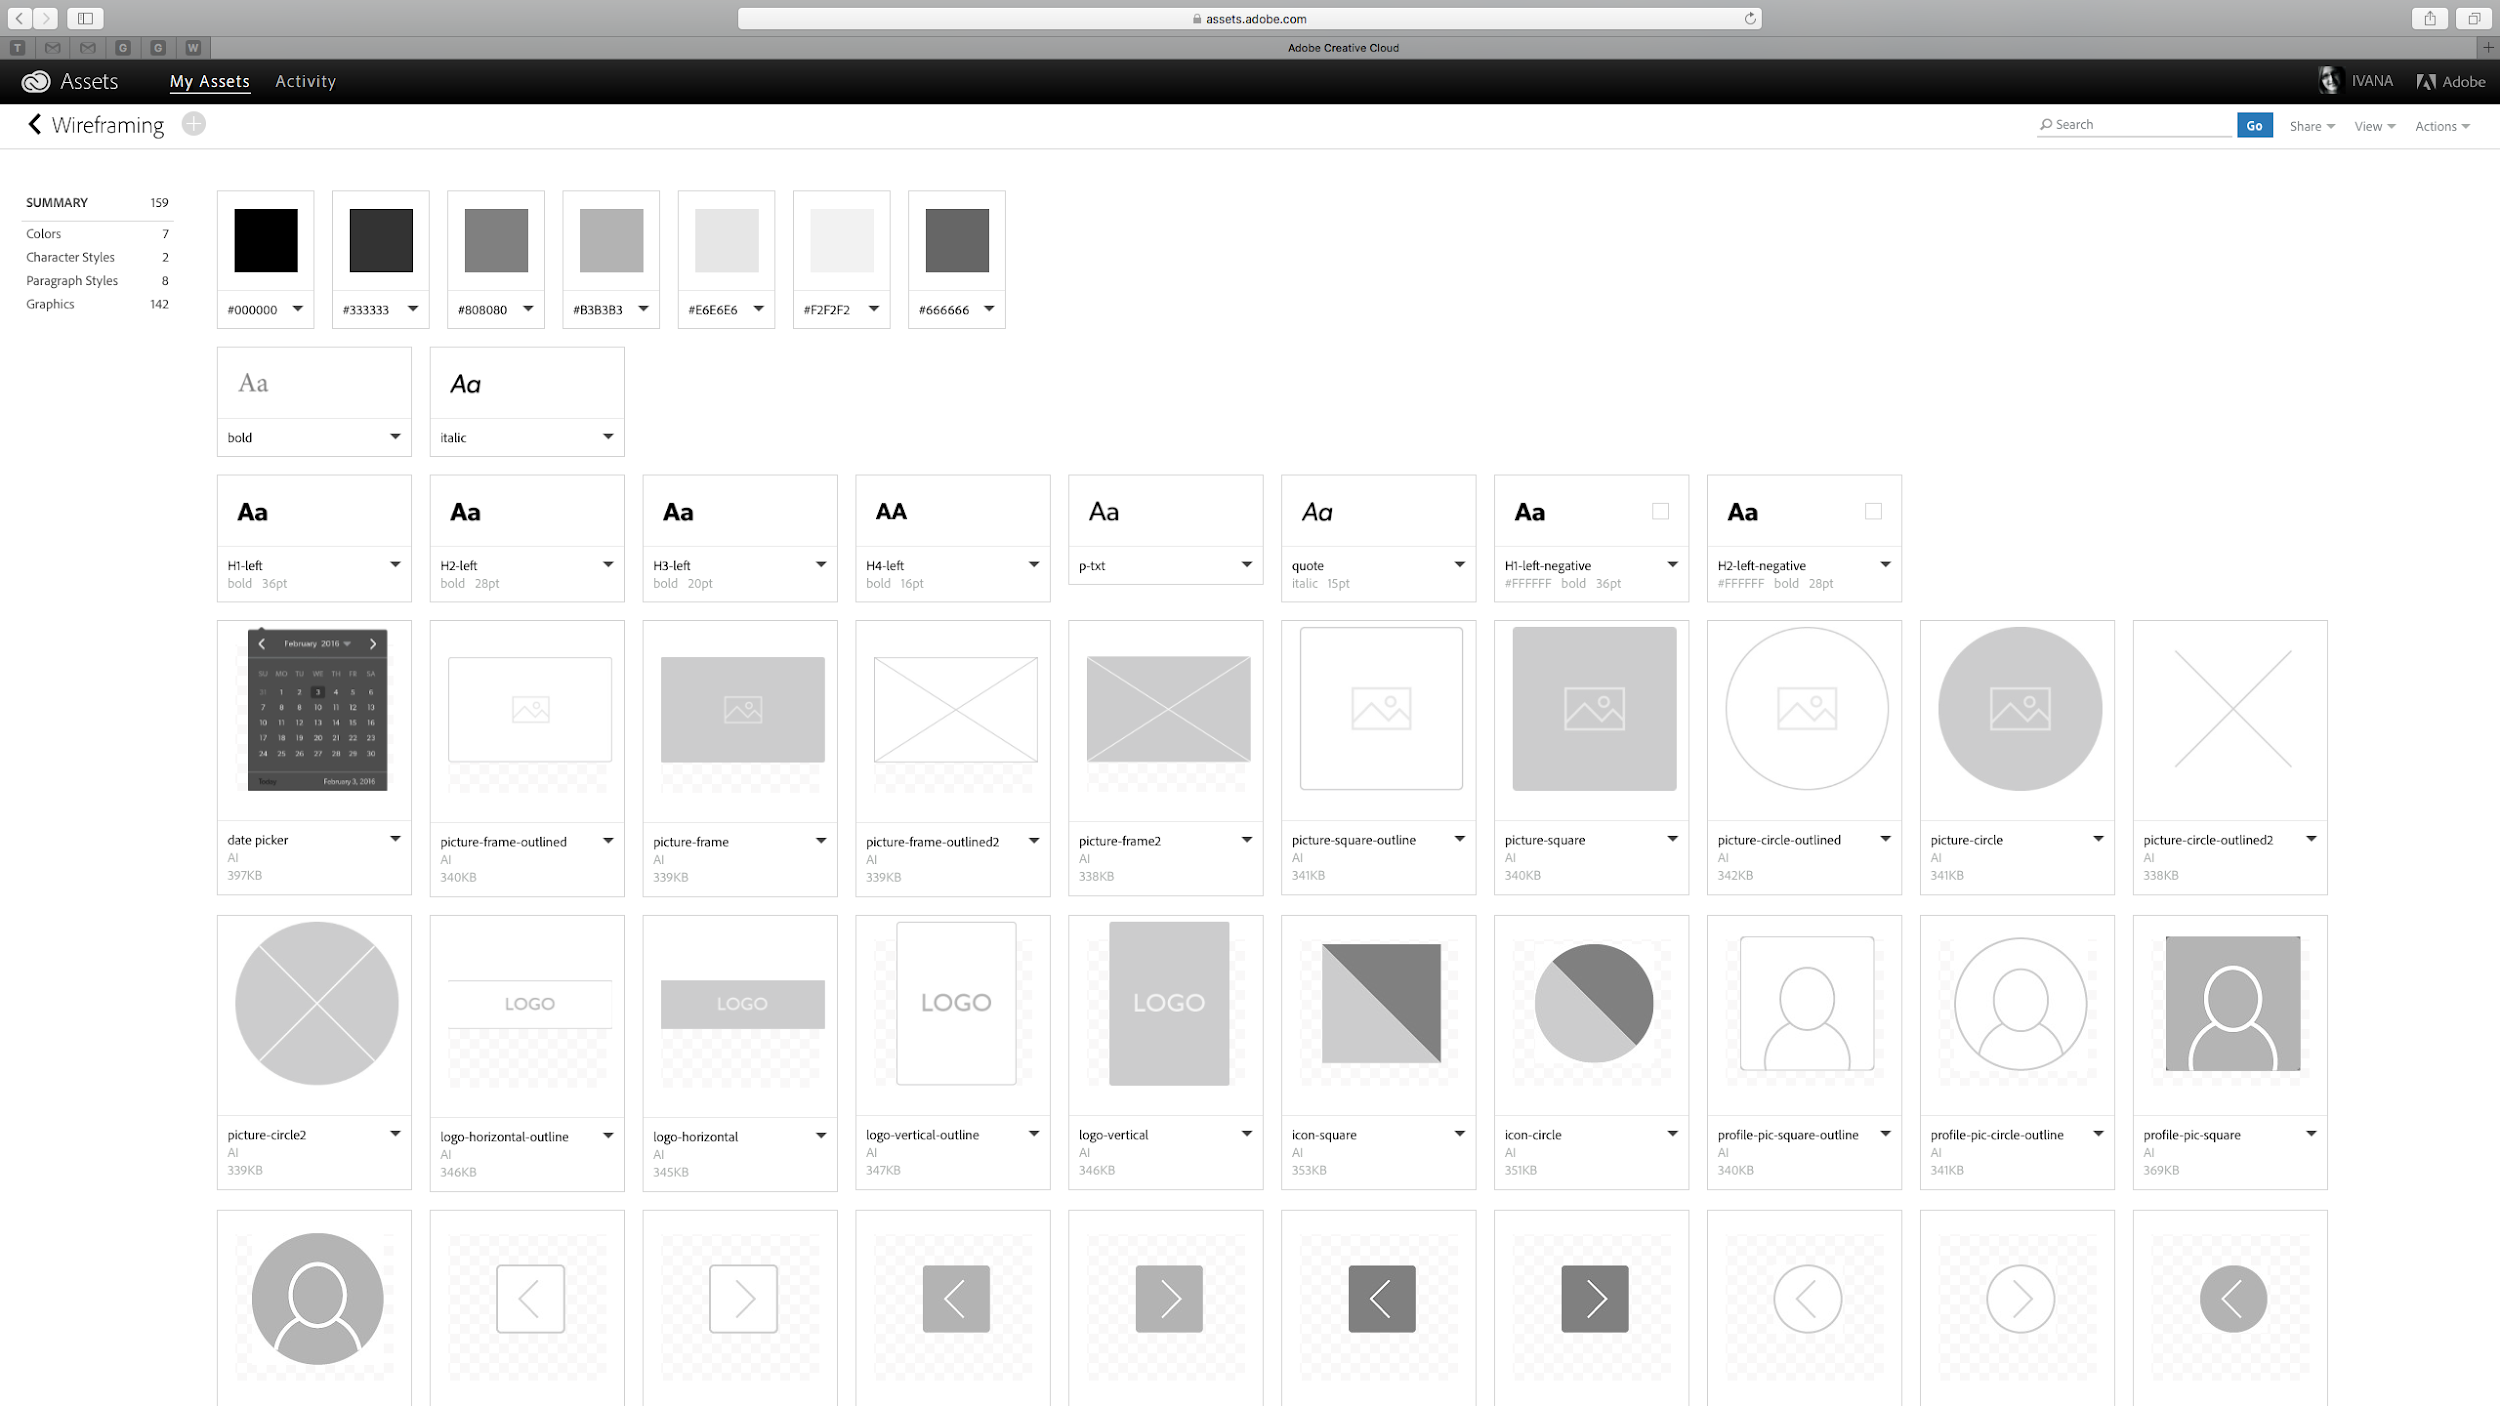
If you work as a part of a larger team, library assets can be shared between team members. Libraries can contain colors, graphics, layer styles (Photoshop only), and paragraph and character styles. You add assets in libraries by clicking on the corresponding button at the bottom of the CC Library panel with the respective element selected. You can also add graphic assets by dragging them directly from your artboard to the Libraries panel.
Assets in libraries are organized by categories. Stick with good practices and rename each asset with a meaningful name. Libraries are searchable, and finding an asset by typing the beginning of its name will save you tons of time later, especially when you have many different items in your libraries. To change an asset’s name, double click on it and type in a new one.
Creating Wireframe Kit Components
Although Adobe InDesign has some basic drawing tools that are pretty similar to Illustrator’s, Illustrator is a much better choice for drawing various elements in your wireframe. As a rule of thumb, create all kit elements that require some drawing more complex than basic geometric shapes in Illustrator. Create simpler elements that contain text that you will need to change in the layout, such as simple buttons, in InDesign.
For starters, make a list of all the elements you’ll need in the wireframe, such as navigation elements, page elements including images, video frames, and text boxes, icons, avatars, form elements, and all other interface elements. After your list is completed, you can head to Illustrator and InDesign to create those elements.
Start by creating a new document for wireframe or mockup kit components. Double-check that you choose either Web/Devices Profile in Illustrator or Web/Digital Publishing Intent from the New Document dialog box. This ensures that pixels are used as units and the color mode is set to RGB.
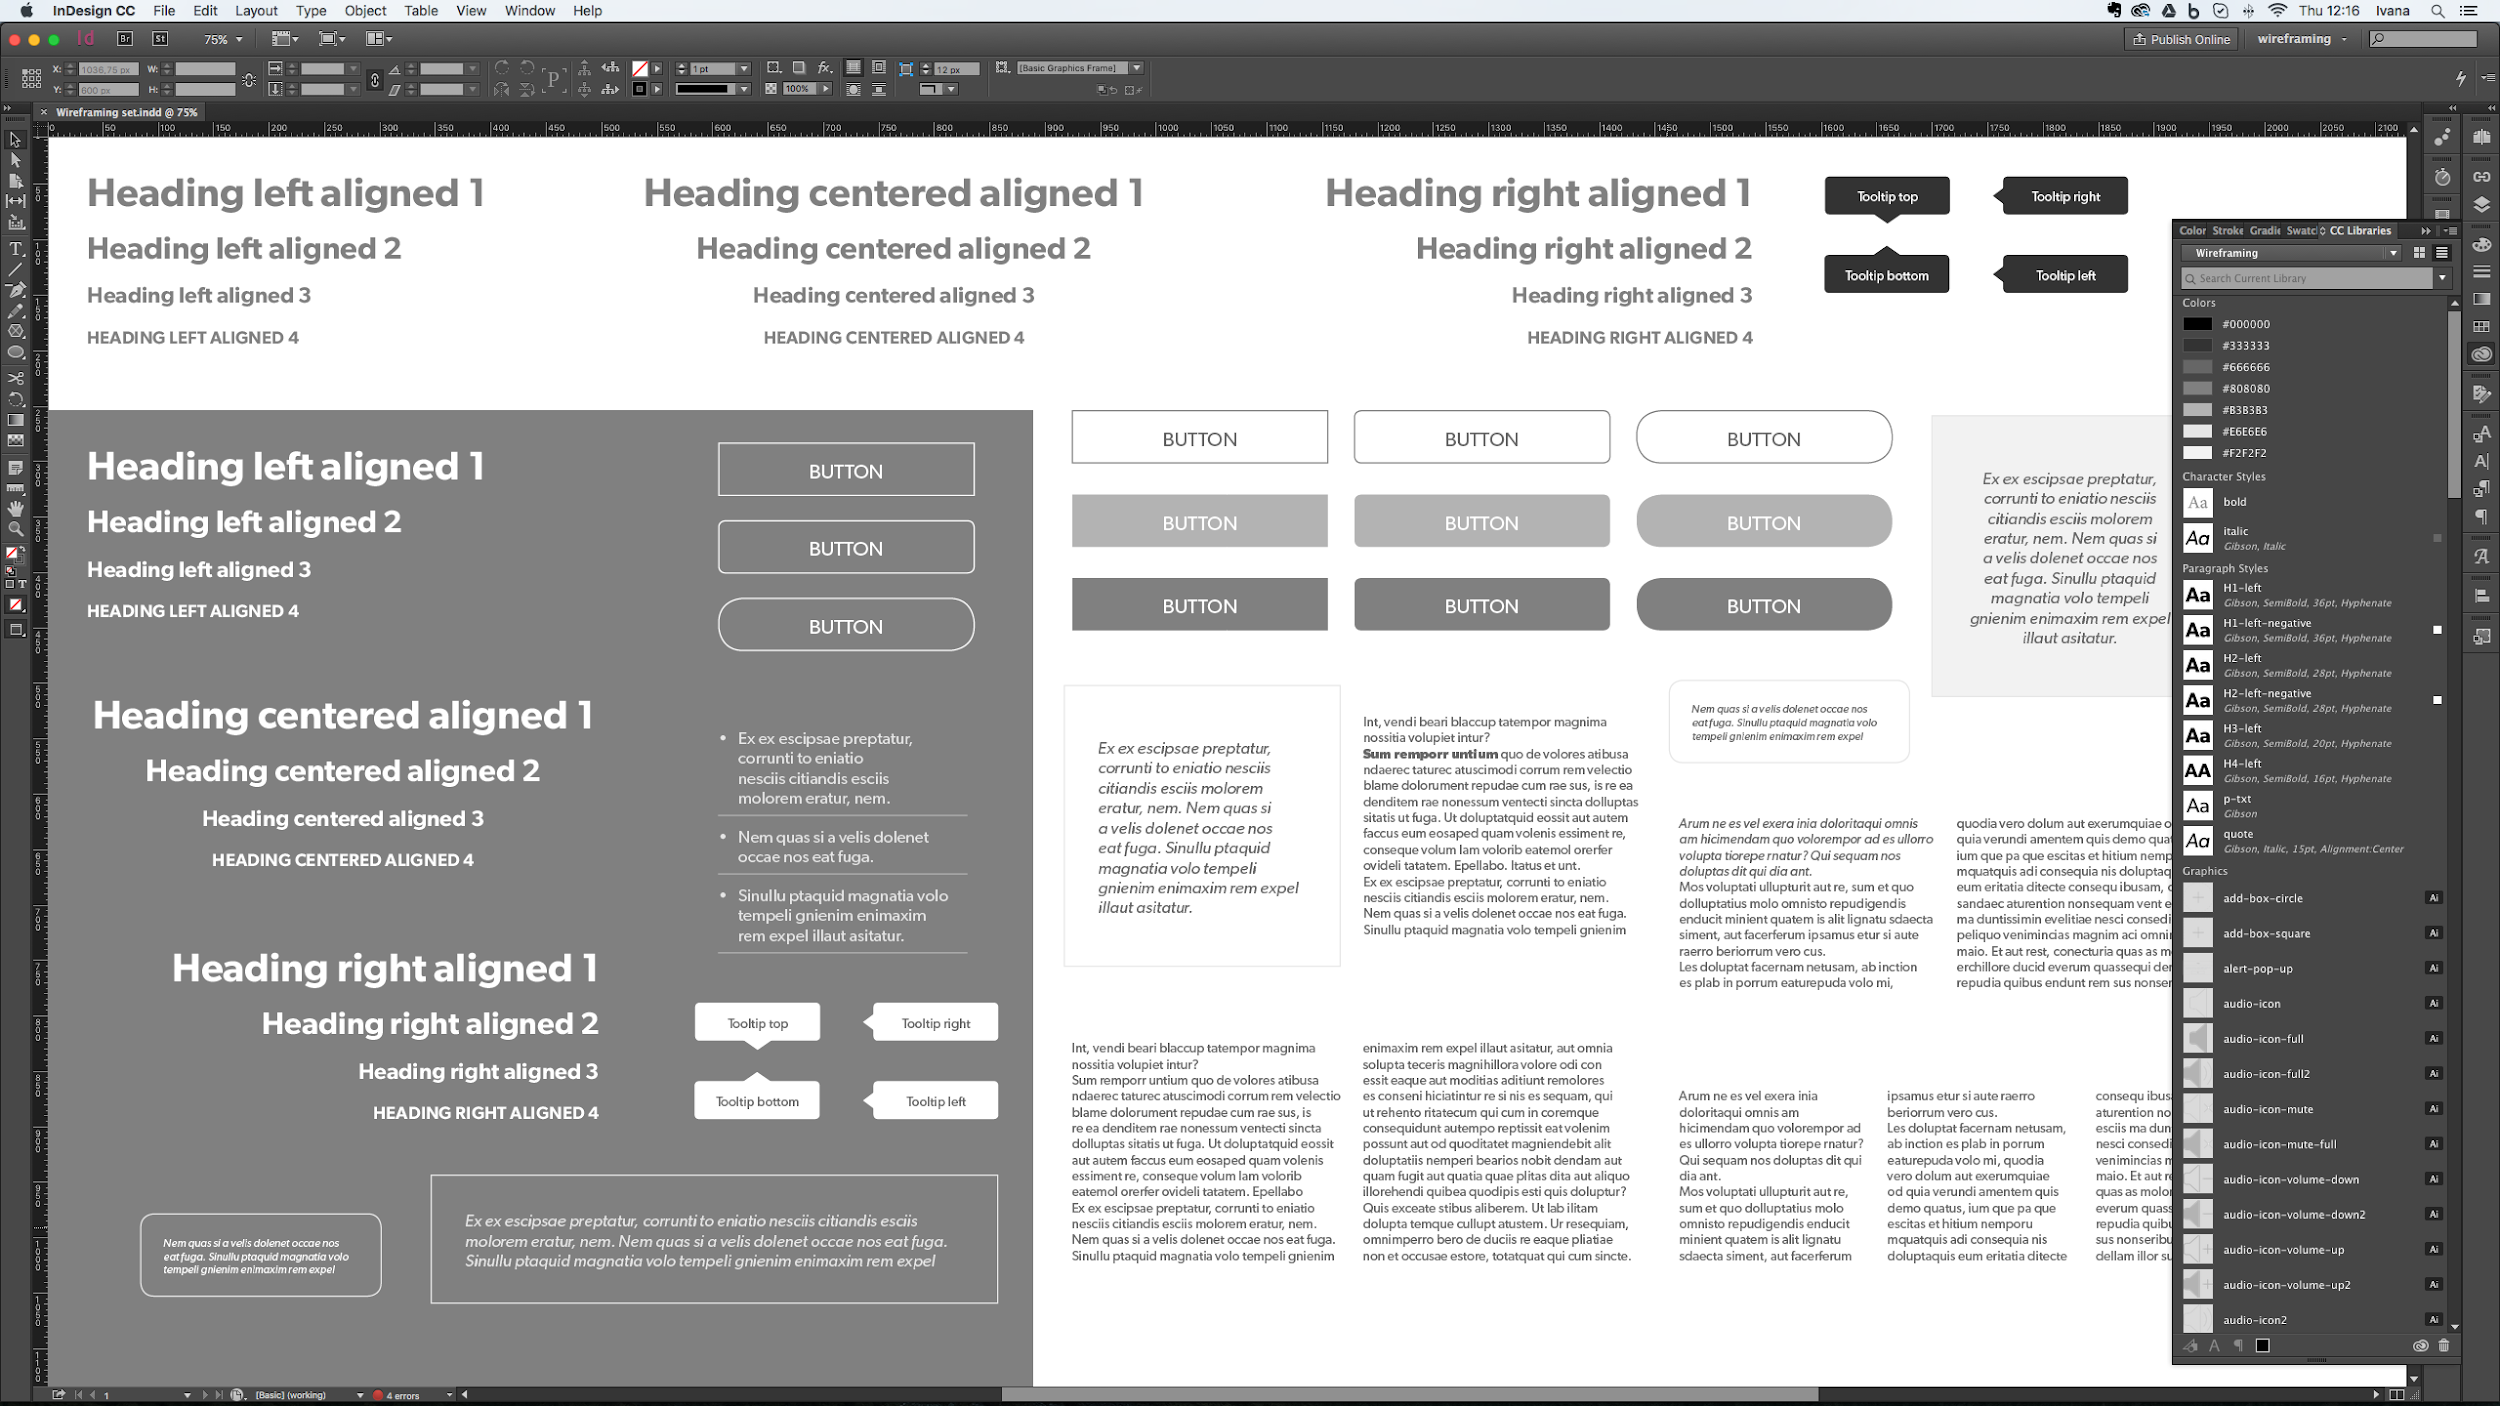
Make wireframe kit assets as simple as possible because they need to give fast visual cues for what they represent without being too detailed. You should use very limited color palettes of preferably a few shades of grey. Visually accentuate elements that are more important by coloring them with darker shades or by giving them higher contrast.
For higher-fidelity mockups or prototypes, create UI kits with more detailed elements that use each project’s respective color palette. For easy access to color palettes, add them to CC libraries.
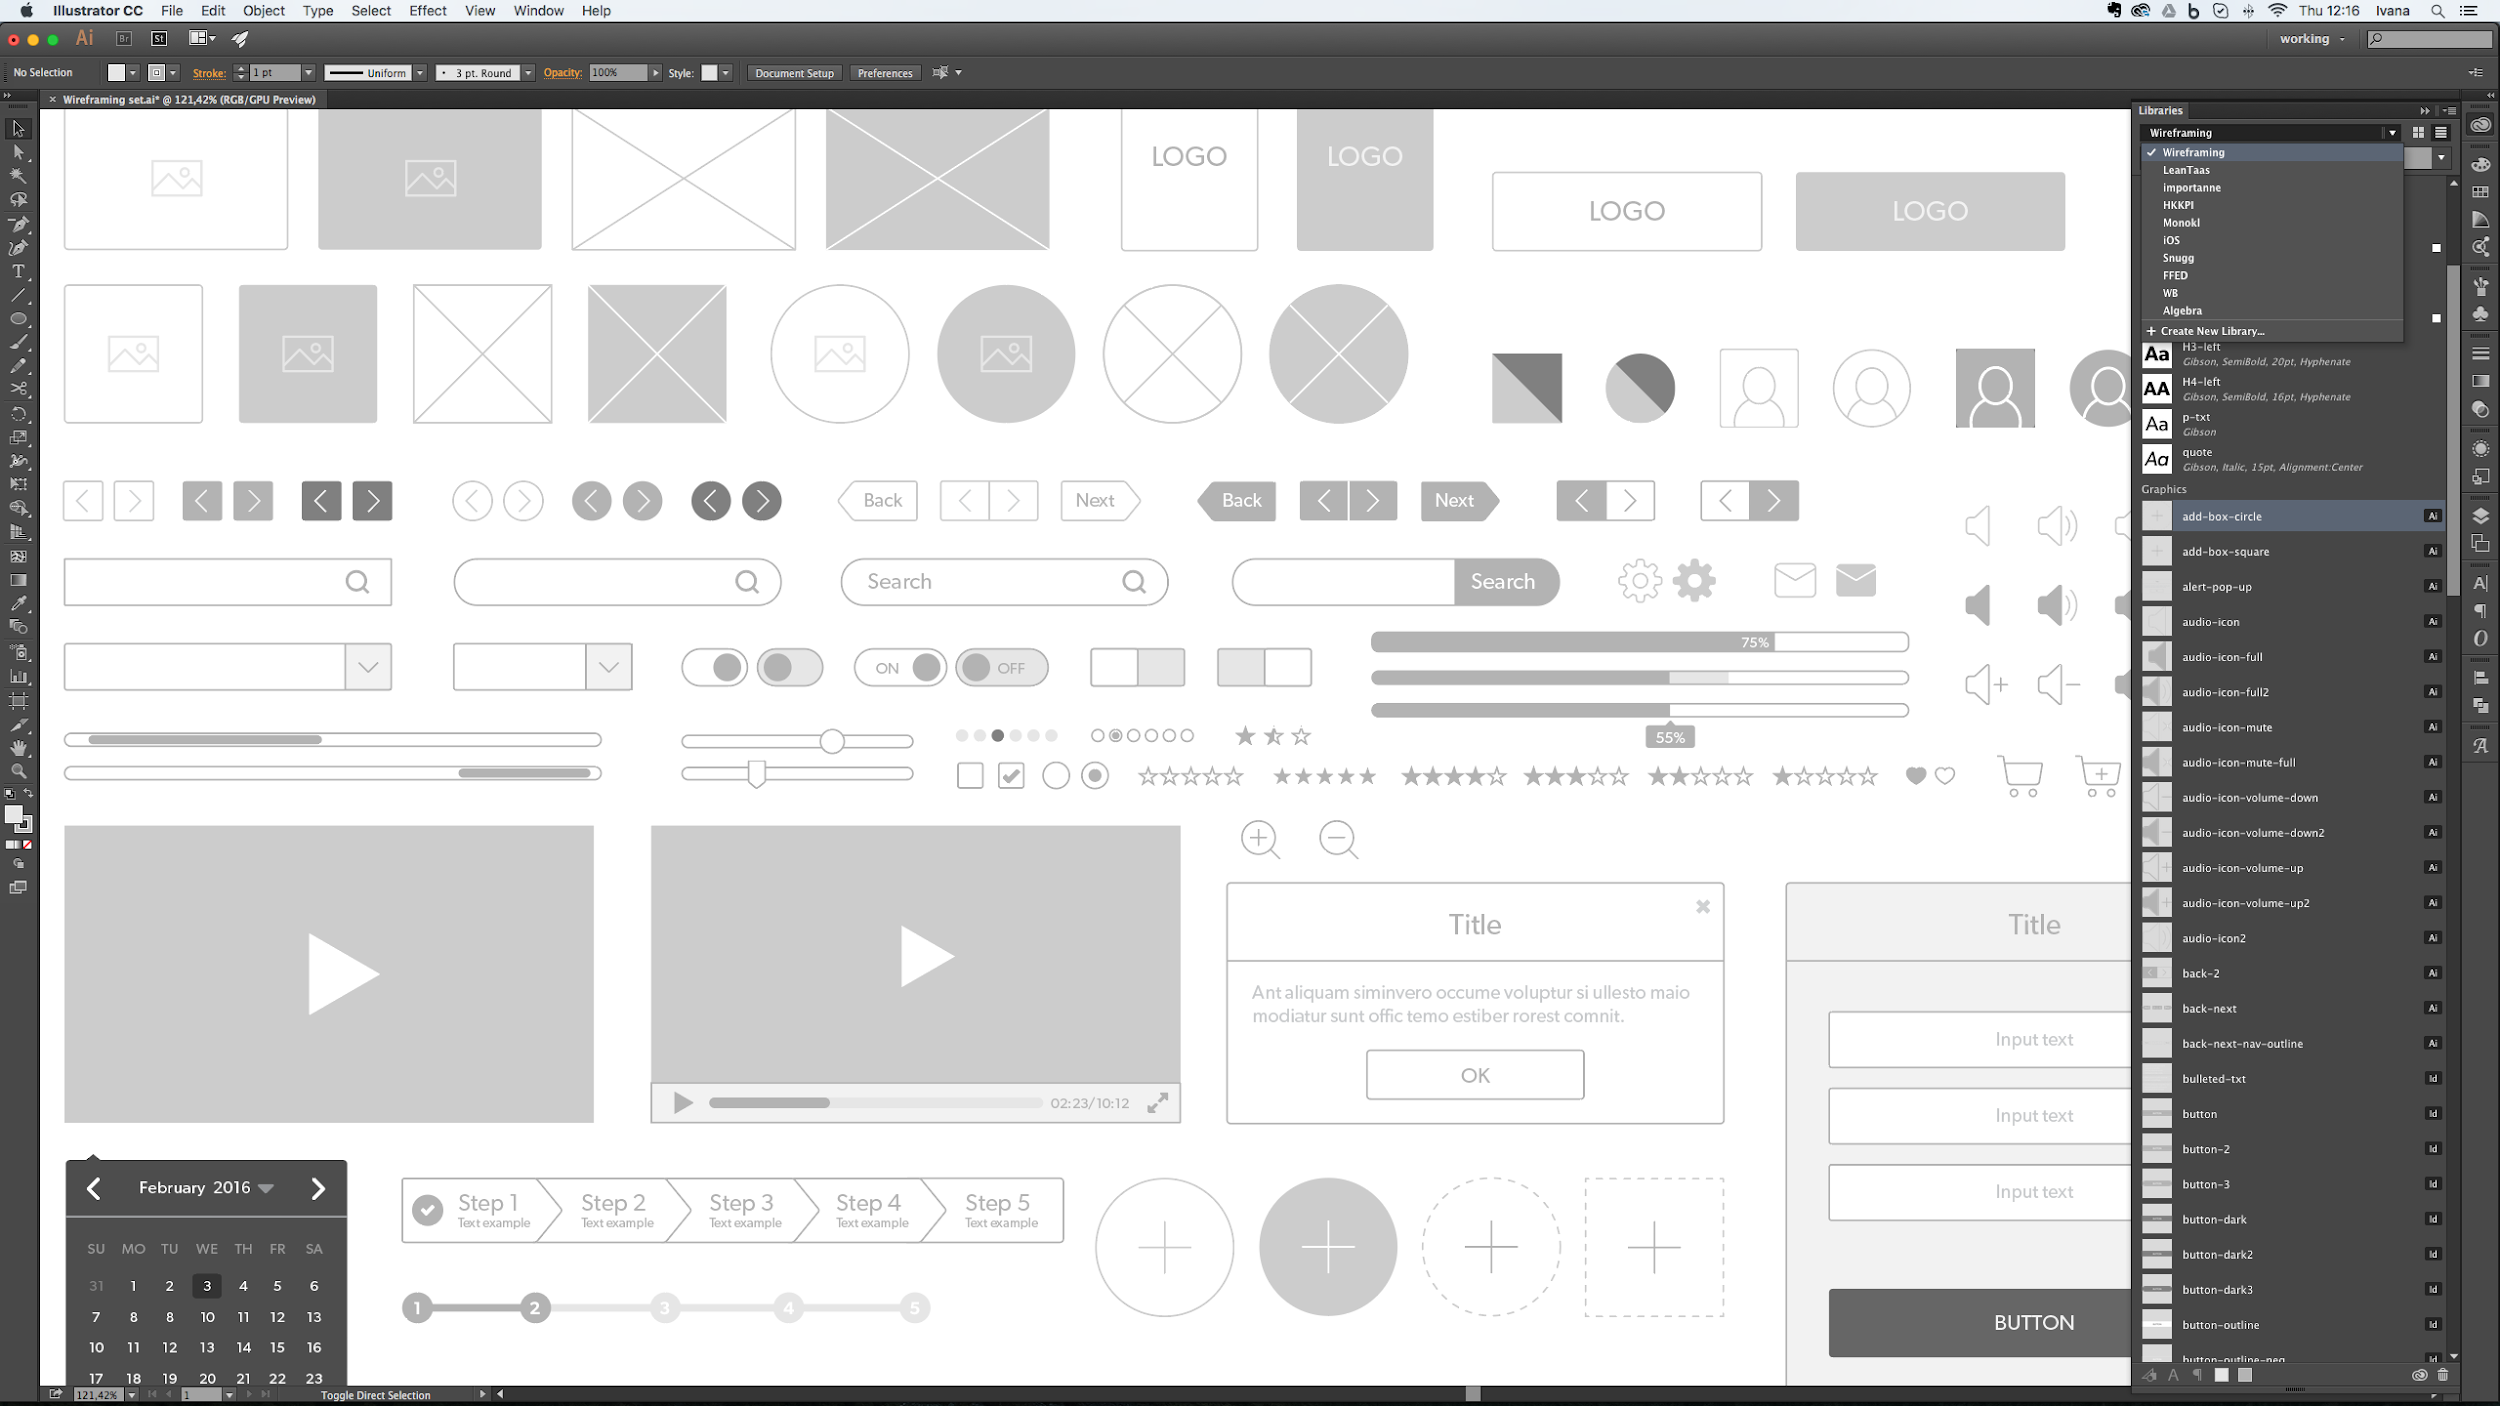
Adobe Illustrator Assets in CC Libraries
Assets you add to libraries from Illustrator are linked by default (since Adobe CC 2015). That means when you modify a library asset in Illustrator, changes are reflected in all instances used. If you want to add an unlinked asset to the document, press the option/alt key while dragging it from the panel.
When you use linked Illustrator assets in InDesign, they will have a little cloud icon in the upper left corner when the document is viewed in Normal mode. They are all also listed in the Links panel. If you modify a library asset in Illustrator, changes in the InDesign document won’t be done automatically. The cloud icon will be replaced with a modified link exclamation mark icon, and you’ll have to update these links.
InDesign assets that you place in an InDesign document are not linked. This means that you can edit instances independently of the original, and when the original asset is modified, those changes are not reflected on assets that have already been placed into the layout.
Consider those properties when creating wireframes: Add assets to the Library from Illustrator when you assume they’ll need to be modified and updated globally, or add them from InDesign when you know you’ll want to modify them individually. Note that you can also create graphics in Illustrator, copy/paste them to InDesign, and then modify if needed before adding it to the library as an InDesign asset.
If you happen to forget which graphic asset is created by which application, look at the right side of each item in the Library panel while using Show Items as a list.
Adobe InDesign Flexibility with Content and Copy
To ensure that you can easily change copy and typography in your wireframes, create text containers in InDesign. InDesign has a nice feature for filling text boxes with placeholder text. When you draw a text box, right-click on it and choose Fill With Placeholder Text.
Add text boxes to the Adobe library like any other graphic element by dragging them. When you use those text assets later as a part of your wireframes layout, you can modify the text box as well as its content in your wireframe.
Consider making button UI elements in InDesign, too. To create a button, make a text frame, type in the text, and then use Object > Text Frame Options to define Inset spacing. Adjust the vertical justification of text inside a box by choosing the desired option from the Align drop-down menu.
Switch to the Auto-Size tab and choose appropriate auto-sizing (that would probably be Width Only) and a convenient reference point. If you do not want to let InDesign break your text into more than one line, check the No Line Breaks option.
Use Existing Resources
There are a lot of Adobe Illustrator wireframing and prototyping UI kits available on the internet that you can buy or even download for free if you want a ready-made solution. Maybe you already have elements that you can dig up from your completed projects. Open those documents, tweak any previously created elements as necessary, and put them into their respective libraries.
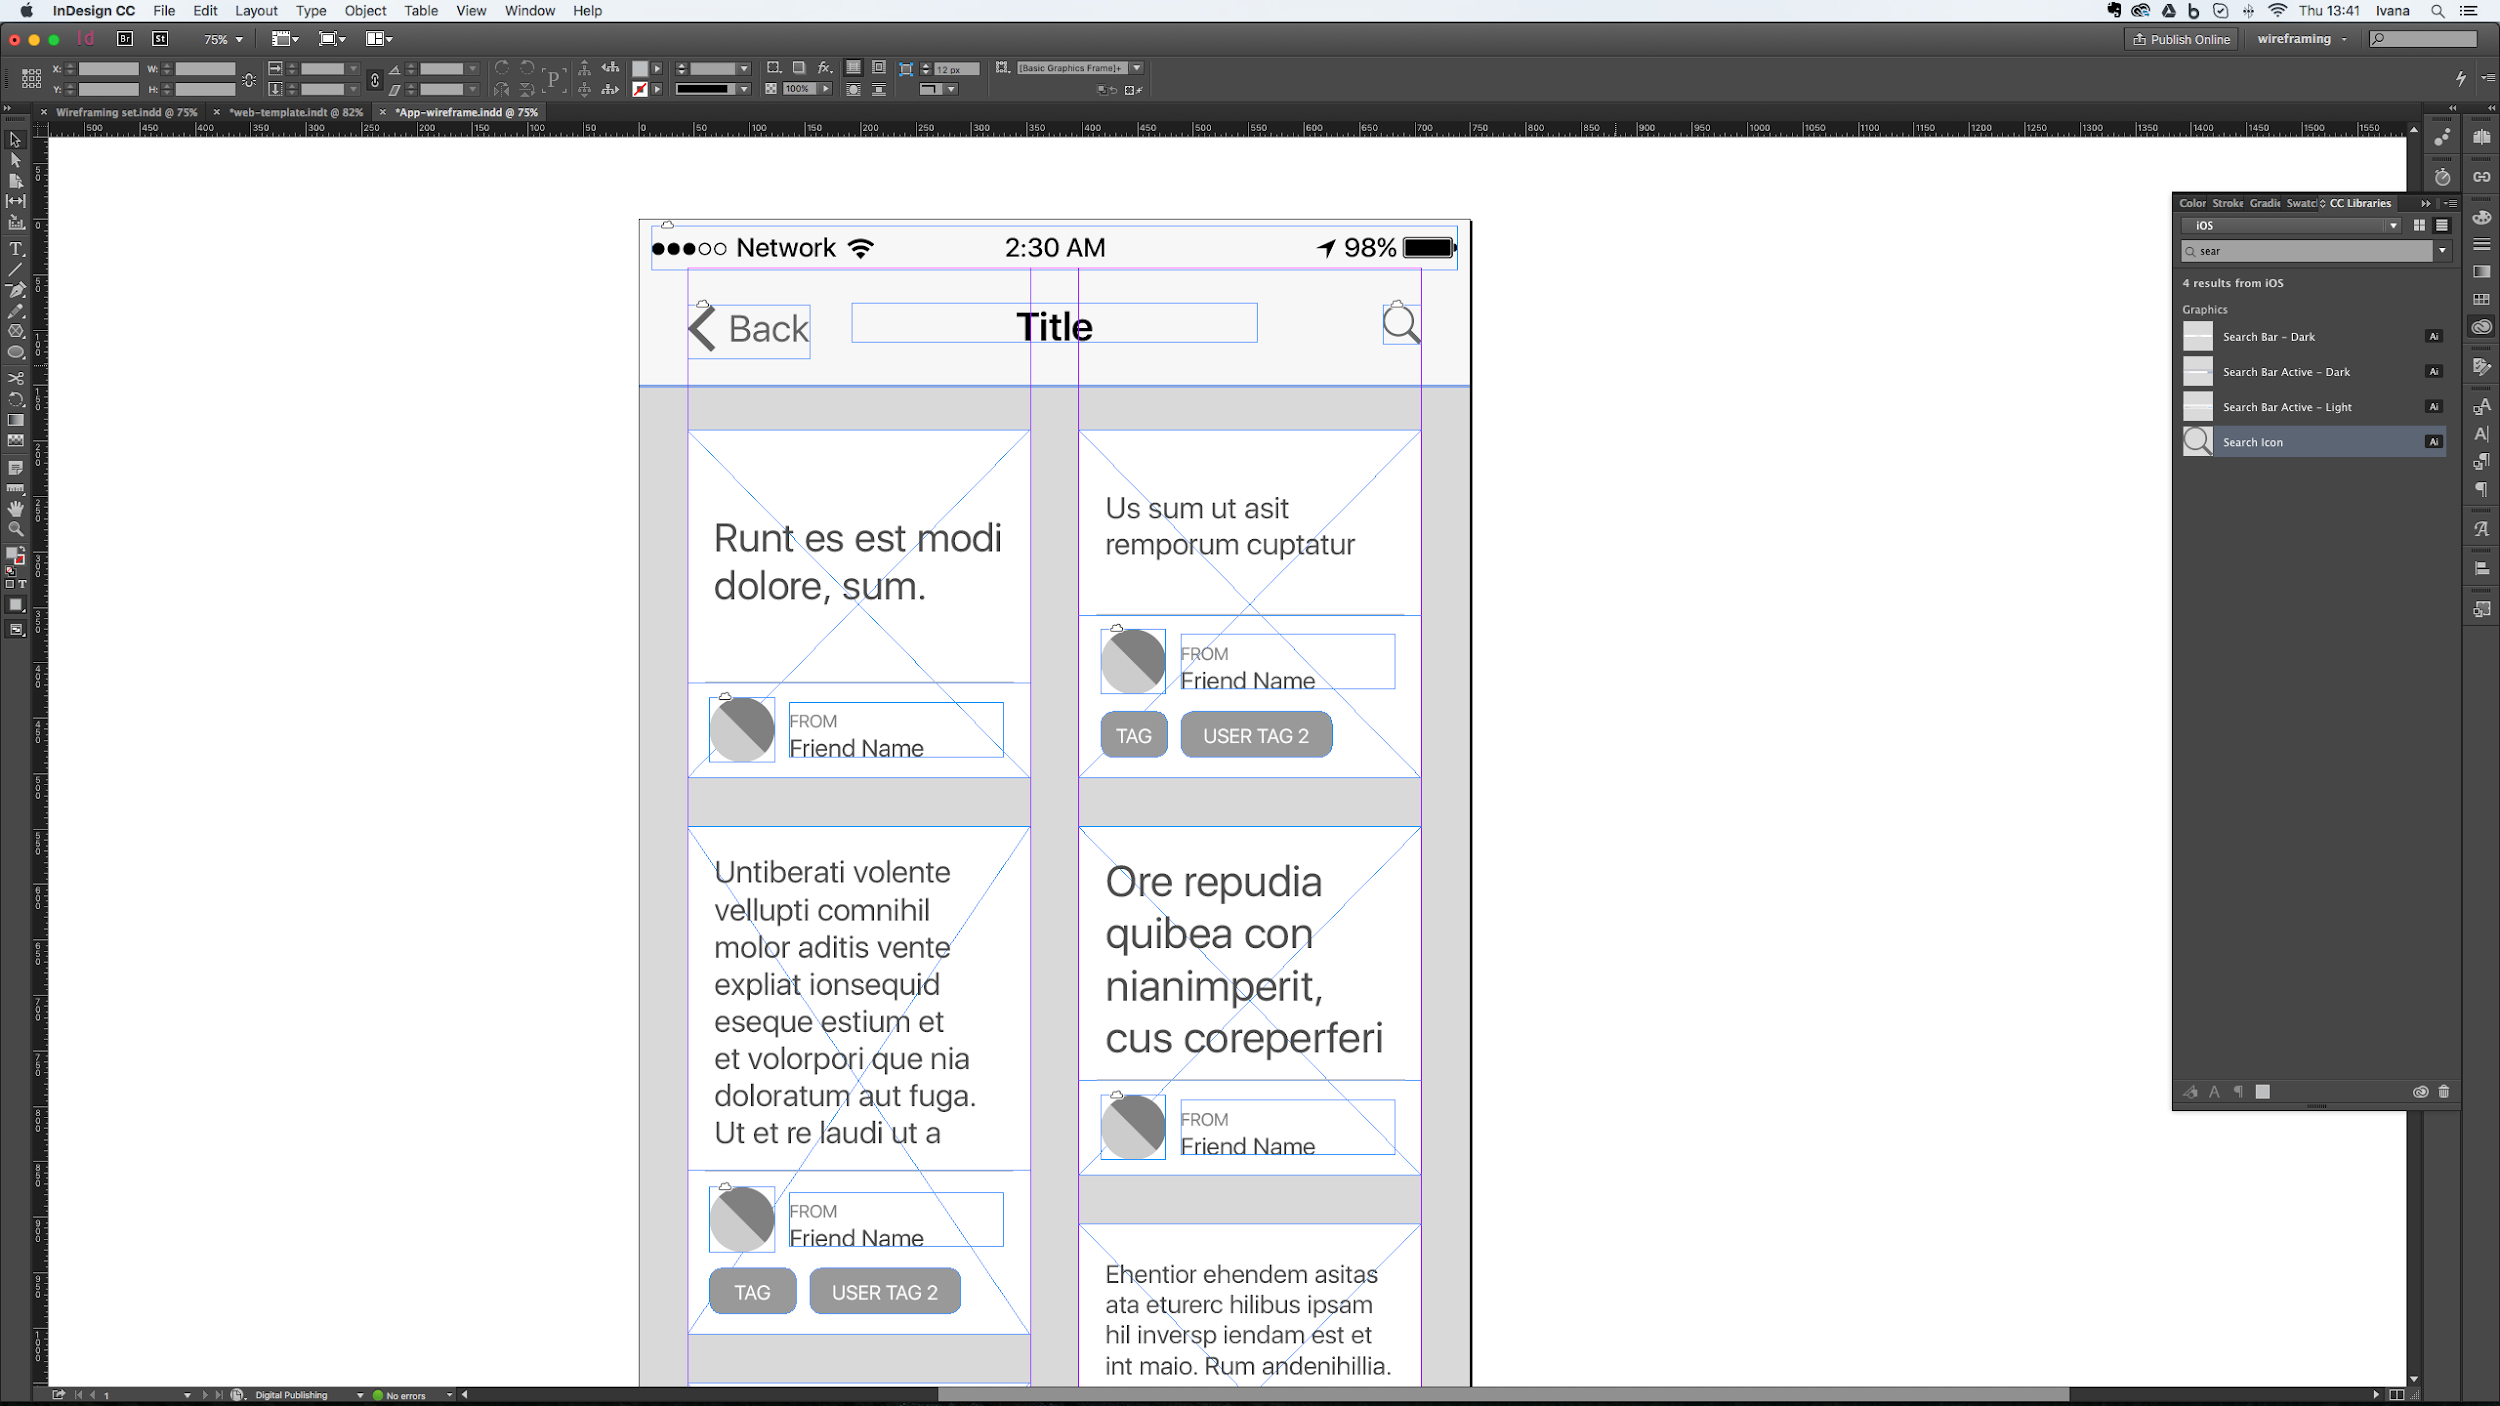
If you are designing for a particular platform—for example, an iOS or Android application—be sure that you carefully read their human interface guidelines and use appropriate assets. It may be convenient to have UI elements that are specific to various platforms in your kit.
Don’t focus too much on trying to account for every future asset or state in your libraries before you start with the actual wireframing process. You can add assets to your libraries later and build on it as you go.
Creating InDesign Wireframe Templates
There is one more important preparation step left: Create InDesign templates that you’ll use for making wireframes. Start by creating a new document with Web or Digital Publishing intent and define appropriate page sizes for the screens you are designing for.
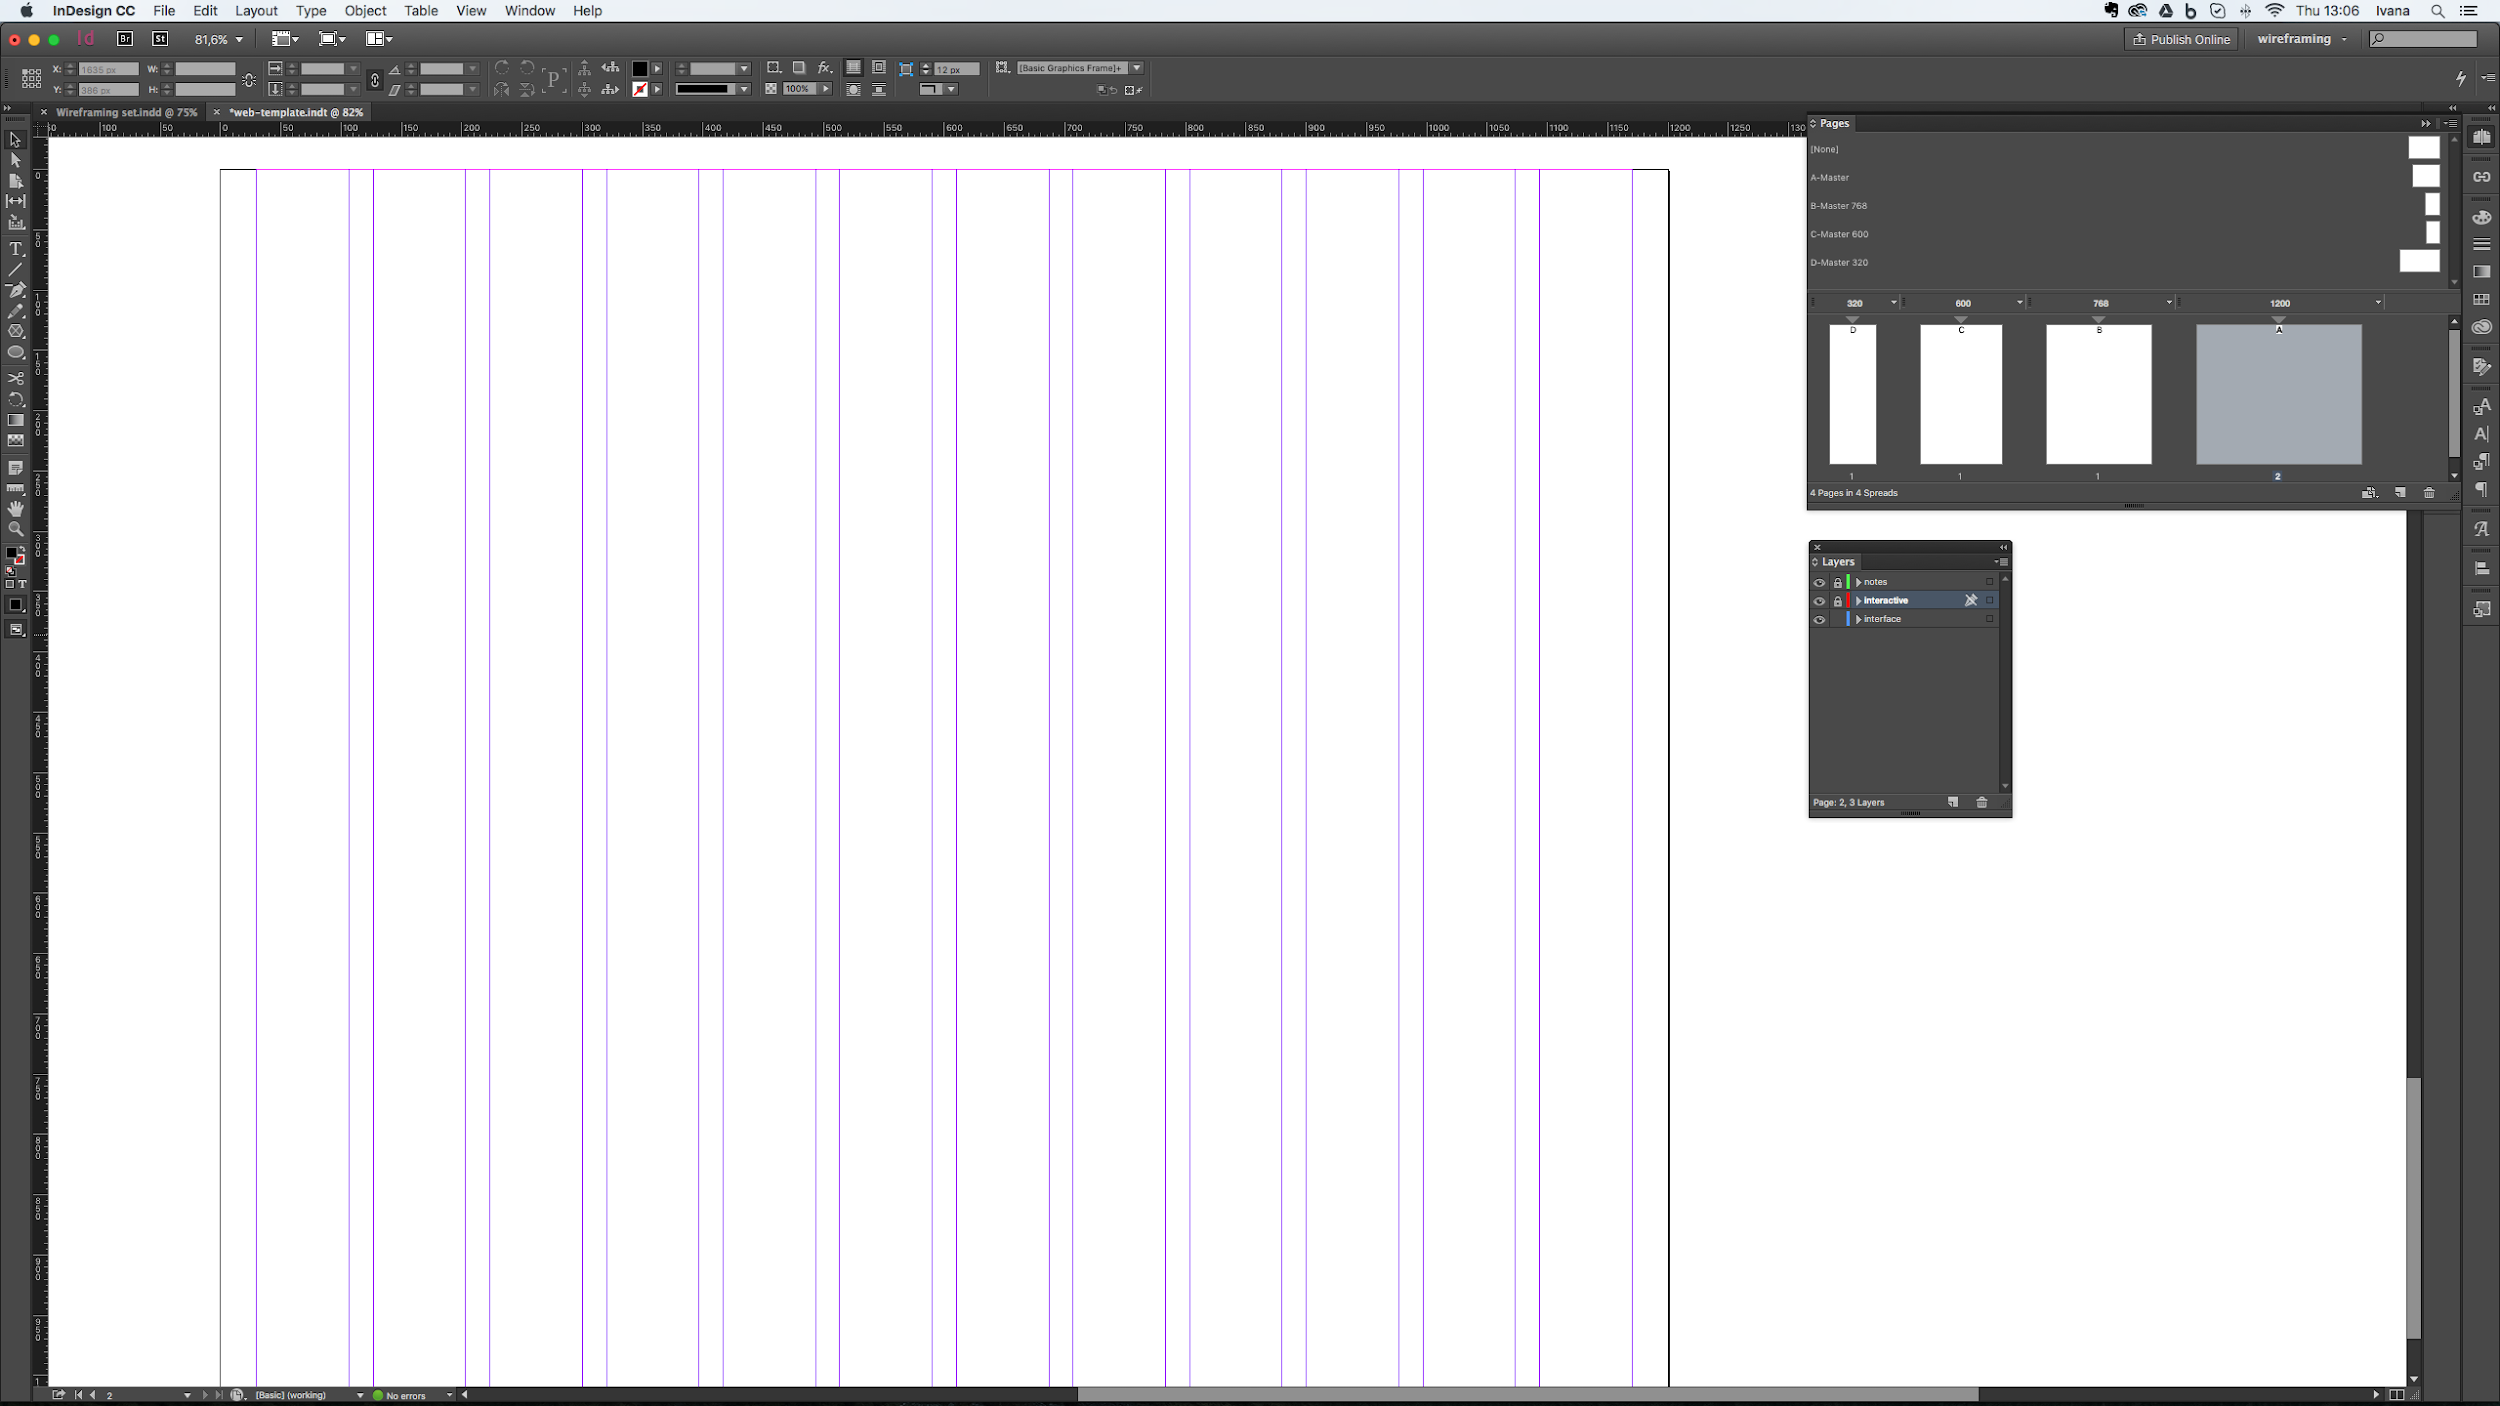
Since it is recommended that you use some kind of a grid for laying out your wireframe elements, set up the margins and create a column grid by setting the desired number of columns and the gutter space. You can change those settings later from Layout > Margins and Columns with its respective master page (or pages) selected in the Pages panel.
If you need horizontal guides and complementary vertical guides, create them manually or make an additional grid by using Layout > Create Guides. When creating a grid, it’s helpful to use one of the online grid calculator tools like the Gridulator.
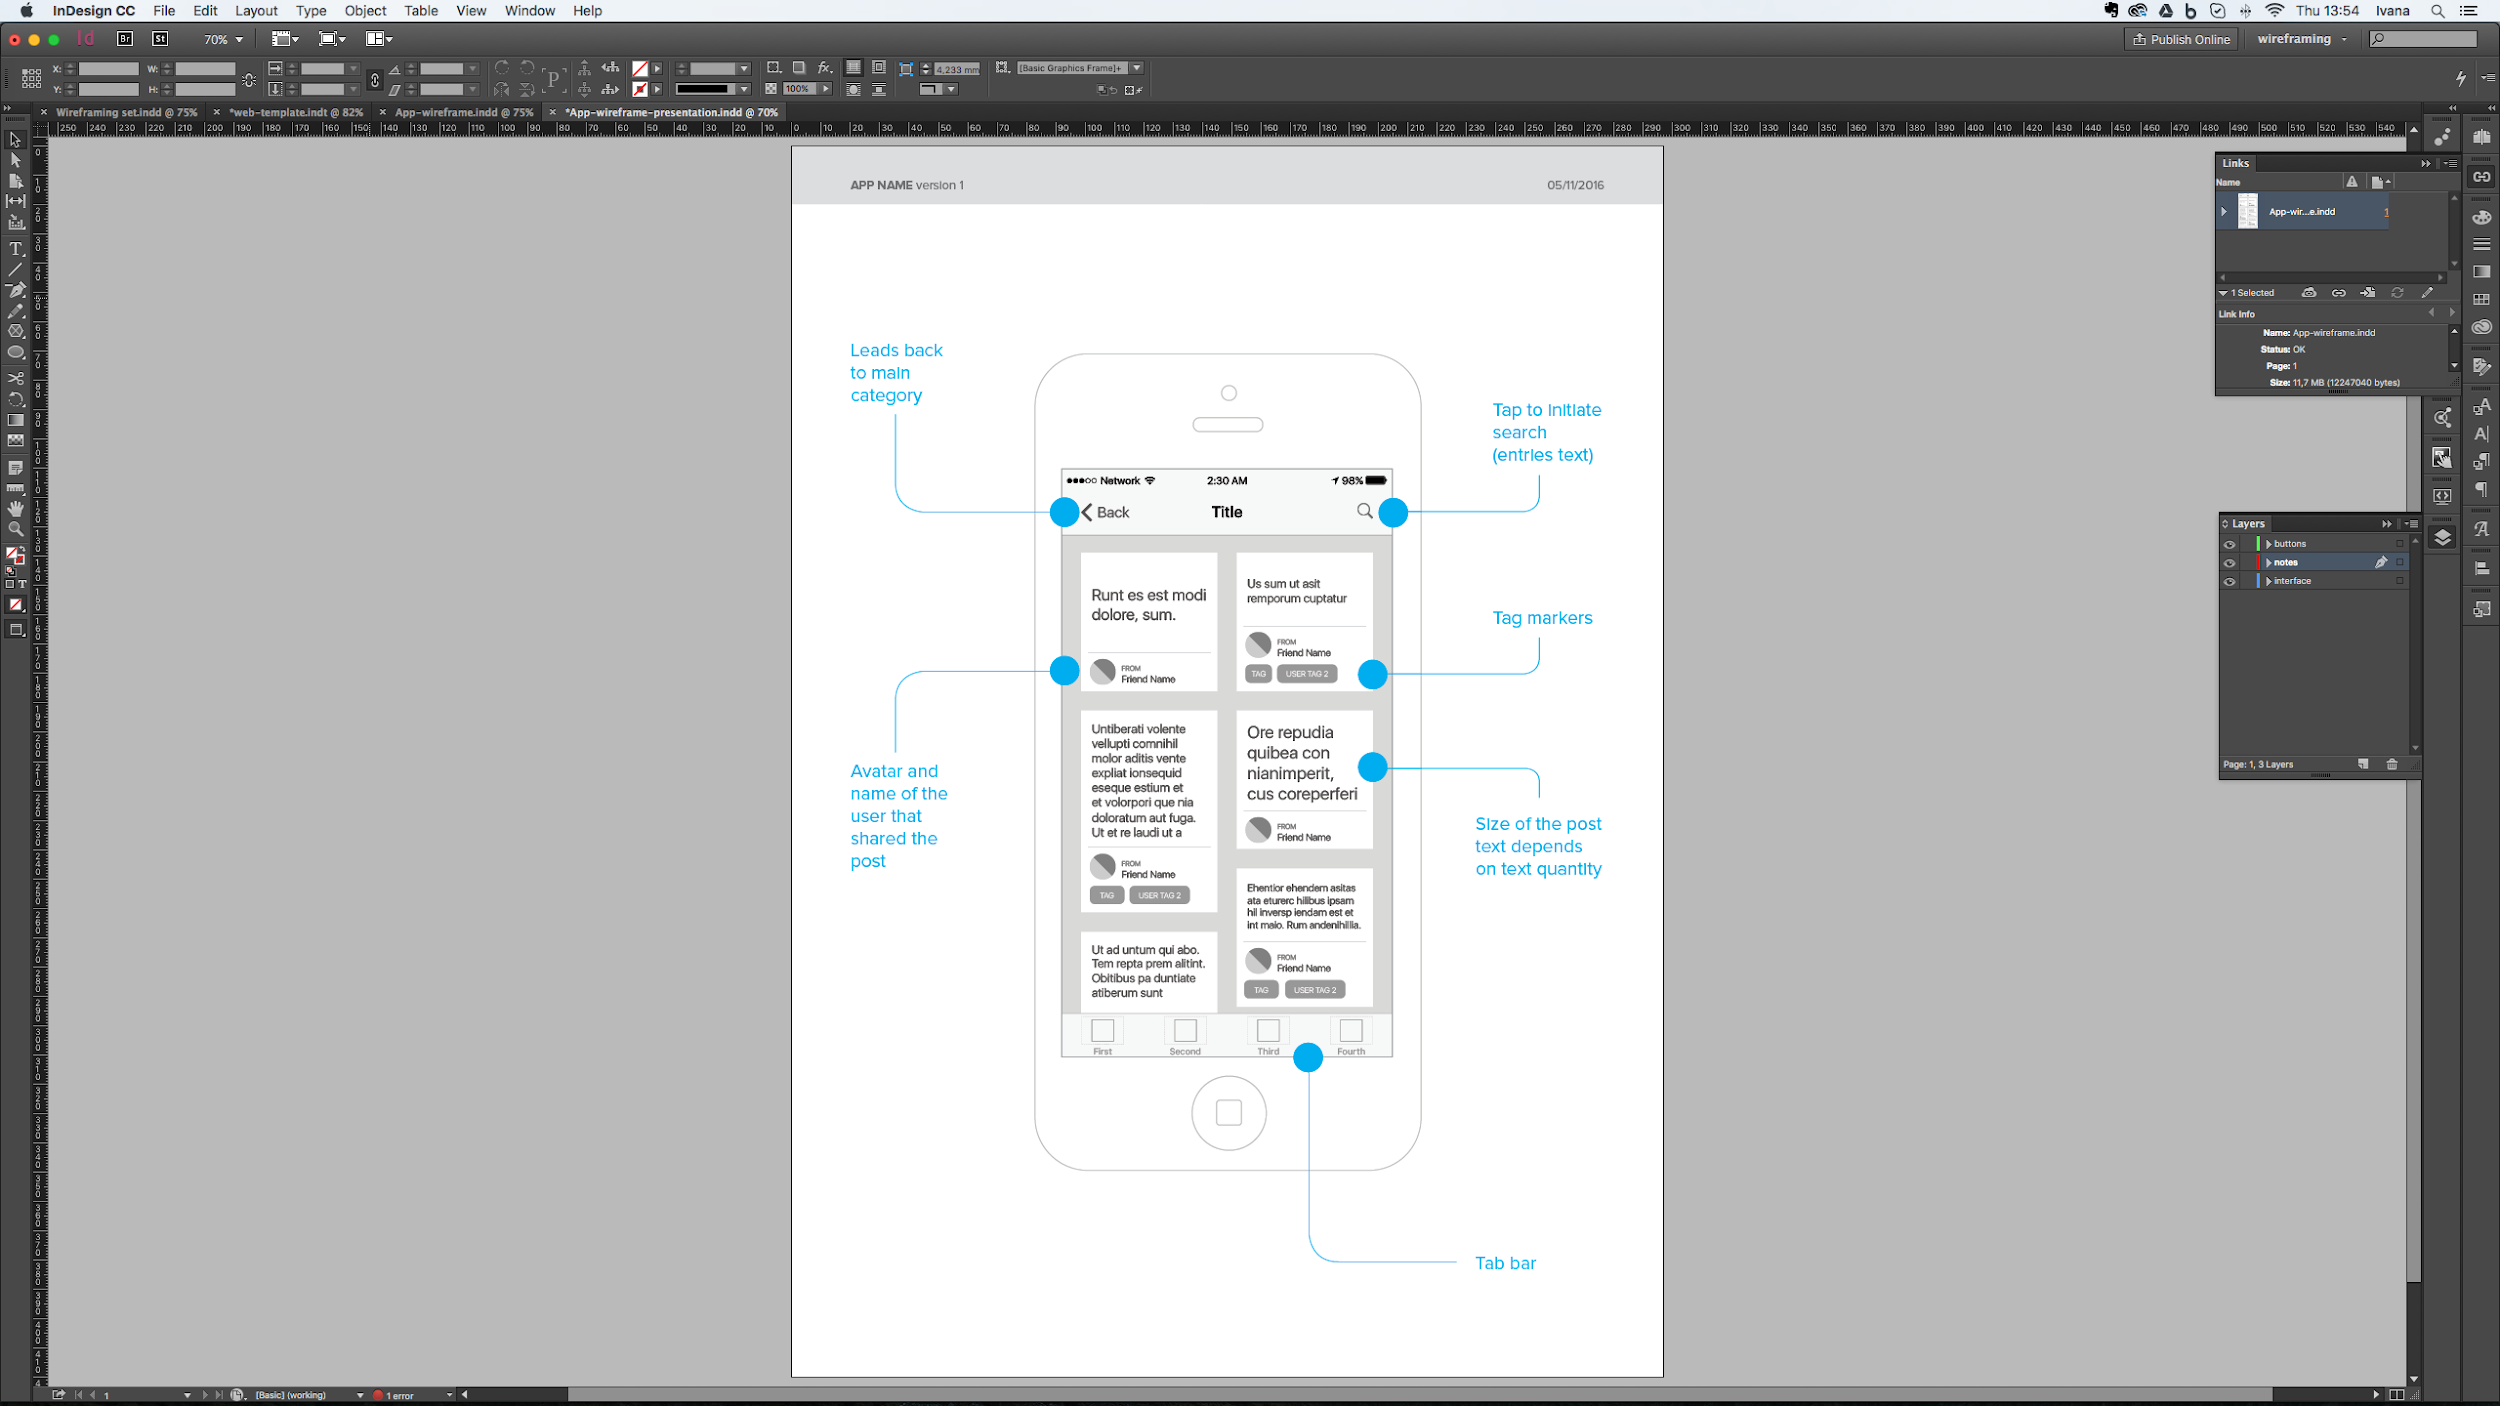
You can also create additional templates for presentation purposes with device mockups as a frame for your wireframes. Since one InDesign document can be linked to another, you can create wireframes in one InDesign document and then place it into another one for presentations.
Although it might seem complicated at first, this is actually a very simple and effective workflow. Keeping actual wireframes in a separate document makes it easier to continue building from approved wireframes to a polished visual design.
It is also simple to create presentation-ready templates in which to place wireframes, add labels and comments, and be able to show your best solution to the client. When you make modifications on a wireframe file, just update it like any other link in a presentation document and ta-daaa! All changes are in your presentation as well.
In the Layers panel, you can prepare separate layers for different kinds of content: user interface elements, interactive features, gestures, labels, and notes. If you need more layers for a specific project, you’ll be able to easily add them anytime during the wireframing process.
When you are done with creating, save your templates as InDesign.indt template files. After all the templates you need are saved, you are finally ready to start wireframing efficiently.
Building Wireframes
First things first—start with the master page. Drag all global elements that will be the same across all screens of your project from the library. If you are designing a website, these are usually headers with a logo, navigation, and footer. Since you can create more than one master page and they can inherit from each other, you can take advantage of nesting master pages.
For example, depending on the project, you can create a master page for one UI element, such as a modal or dialog popup, then make new masters based on the first master, altering only the elements that need to be different.
You can’t select, change, or delete master elements on regular document pages unless you click on them while holding Command/Control + Shift to override the master. Once your element is overridden, you can change any of its parameters or completely delete it from the layout.
Keep in mind that even when you override the element, parameters that you haven’t changed will still be inherited from the master. For example, if you override an element by changing its color, its size will not change as it is still connected to the master. Further, if you change it on the master page, it will also be modified on the element you previously overrode.
When inserting additional pages into your wireframing document, remember to base them on their respective master. If you need to change the master for pages already in the layout, select them in the Pages panel, right-click, and choose Apply Master to Pages. Use the library assets and arrange them using the Smart Guides and Align options to create the final UI wireframe layouts.
If you are creating designs for more than one screen size, make alternate layouts from Layouts > Create Alternate Layout or the Pages panel. You can use liquid layout rules when creating alternate layouts to automatically adopt page elements from one size and orientation to another, or you can manually control them. For applying and testing Liquid Layout Rules, use the Page tool or open the panel Window > Interactive > Liquid Layout.
Adding Interactivity
Adobe InDesign has a bunch of interactivity features that you can take advantage of when creating wireframes or prototypes. Which features you’ll include will depend on the final format you will need for your wireframes, prototypes, or presentations.
If you are exporting as PDF, interactivity will be limited, but you can at least make links between screens work using the hyperlinks panel to create them. Select the element you want to behave as a link and click on the New Hyperlink icon. From the Link To drop-down menu, choose Page and enter the desired page number. Repeat that action on all the items you want to behave as links between the screens.
You can also add hyperlinks to objects residing on the master pages, which can be a real time saver. Create links on the master page once and they will work on all the screens of your document.
You can create buttons from any graphic, text, image, or group of elements. To create a button from a selected object, use the Window > Interactive > Buttons and Forms panel and click on the Convert to Button icon.
Buttons can have different states created for normal, rollover, and click appearances. To add rollover or click states to buttons, click on them in the Buttons panel and edit the button appearance for each state. To add an action to a button, click on a plus sign and choose it from the list. Take into account that actions under SWF/EPUB will not work in interactive PDFs.
To create popup elements, choose Show/Hide Buttons and Forms. To hide buttons until triggered check Hidden Until Triggered option. You can include multi-state objects in an interactive PDF, but only if you export them as an SWF first and then place them back into the InDesign layout for PDF export. This workflow is tedious and the PDFs cannot be seen properly in all PDF readers, so try to avoid doing this unless really necessary.
If you want to convert your document to an HTML prototype using InDesign CC 2015 Publish Online feature, you can use many more interactive options like animations, multi-state objects, and multiple button actions, including all those intended for SWF/EPUB export.
You can add simple animations using the Animation panel and choosing one of the built-in presets from the drop-down menu and setting its properties. One object can have only one animation applied, but if you need to add more of them, group your object with an empty box and use the new animation on that newly created object.
For UI elements that require showing different states, create a multi-state object. Create a separate object for each state. Objects can be a single element (picture, text box, graphic) or a group of different elements. Open the Window > Interactive > Object States panel, select all the objects you created for the multi-state object, and click on the New button at the bottom of the panel.
After your multi-state object is made, you’ll need to create buttons to move from one object state to another. Go To Next State or Go To Previous State actions reveal the specific object state with the Go To State action.
If you want to have a scrollable frame in your wireframe/prototype, the easiest way to create one is by using the Universal Scrolling Frames extension from Ajar Productions. After you download and install the extension, you can use it as an InDesign panel. For a scrollable frame, you’ll need to create content as well as one frame for a container.
The scrollable content can be a text frame, picture, or several elements grouped together. When you are finished with creating the content and container box, select the content and Edit > Cut. Then select the container and paste the content inside by using Edit > Paste Into. Select the container and using Universal Scrolling Frames, adjust the desired scroll direction.
By combining buttons, multi-state objects, animations, and scrollable frames you can achieve a rich interactive experience. To test interactivity in InDesign, use the EPUB Interactivity Preview panel. You can preview a single page or the whole document. Enlarge the preview panel as you need.
If you haven’t used the Adobe InDesign interactive features, be prepared as, at first, there is a bit of a learning curve. But with a little practice and some trial and error, you’ll quickly master them.
Exporting Finished Documents
When you are done creating the wireframes and presentation files, all that is left is to show your great ideas to the client in the best way possible. For that purpose, you’ll need to export your wireframes in a format your client can preview. Although InDesign files can be exported in a variety of formats, you are probably going to use Interactive PDF or the Publish Online feature if testing functional low- or high-fidelity prototypes. To save as an interactive PDF, choose Adobe PDF (Interactive) from the Format drop-down menu in the Export dialog box and adjust the properties as needed. Do not forget to tick Forms and Media if there are interactive elements that you want to include. Clients can view PDF wireframes in the free Adobe Reader and write all their comments in that same file.
You can also use a PDF document exported from InDesign to create an InVision (or some other tool that supports PDFs) prototype. If your standard prototyping tool, perhaps Marvel, can’t import a PDF, export your InDesign wireframe pages as JPEG or PNG images.
To export interactive an HTML prototype that can be seen in modern browsers on different devices, go to File > Publish Online, or click on the Publish Online button from the Application Bar. After the document is prepared for publication online and uploaded, you can copy a document URL to share with stakeholders and start the reviewing process. You can also embed the published prototype on your site.
A downside of the Publish Online feature is that it doesn’t have any additional control over the export, and files are always stored on Adobe’s servers. Also, it’s still a preview feature and you can’t be sure in which direction Adobe is going to develop it, or even if it will be discontinued.
Once your wireframe/prototype is exported, it’s time for the testing, reviewing, and iterating process to start.
Understanding the basics
What is the use of Adobe InDesign?
Adobe InDesign is an application in the Adobe CC suite often used for print and graphic design. InDesign is also a surprisingly effective tool for designers to build wireframes and UI kits for interactive design.
What is the use of Adobe Audition CC?
Adobe Audition CC is one of the pieces of software in the Adobe Creative Cloud suite used primarily for audio recording, editing, and sound mixing.
What is a wireframe prototype?
A wireframe prototype is a lower-fidelity prototype used by UX and UI designers primarily as a tool in testing and validating assumptions in the earlier stages of the design process. Wireframe prototypes represent potential user experience flows without the distraction of visual treatment.
Why is a wireframe important in web design?
Wireframes are important in web design for a variety of reasons. Wireframes are a rough representation of how a visitor will experience content on a website. Wireframes represent various aspects of a website in a range of fidelities and are essential for validating design decisions and user testing.
What are wireframes and mockups?
Wireframes and mockups are generally static visual representations of a dynamic website or product. They are stand-ins for the final product used as tools to design, iterate, and test various aspects of interactive designs.
Zagreb, Croatia
Member since October 7, 2015
About the author
Ivana is a visual designer with over 15 years of experience, an Adobe Certified Instructor, and Algebra University College Asst. Lecturer.