Ramping up Software Deployment - A Docker Swarm Tutorial
Docker itself has been around for years and is composed of many inter-operating pieces. One of them is Docker Swarm, which allows you to declare your applications as stacks of services and let Docker handle the rest.
In this article, Toptal Freelance Software Engineer Leah Sapan explains how to use Docker Swarm to deploy your own self-managing stack, followed by a quick example.

As a full-stack software engineer, Leah has worn many hats. Beyond software, she specializes in secure, scalable AWS deployments.
Expertise
PREVIOUSLY AT

Unless you’ve been living inside a shipping container, you’ve probably heard about containers. The industry has been making a distinct move away from persistent to ephemeral infrastructure, and containers are square in the middle of that move. The reason is quite simple: While containers certainly help dev teams get up and running quickly, they have even more potential to completely change the face of operations.
But what exactly does that look like? What happens when you’re ready to take the leap off of running containers locally, or manually on a few servers? In an ideal world, you want to just throw your application at a cluster of servers and say “run it!”
Well thankfully, that’s where we are today.
In this article, we’ll explore what Docker Swarm is, along with some of the great features it has to offer. Then we’ll take a look at what actually using Swarm mode and deploying to a swarm looks like, and we’ll wrap up with some examples of what daily operations are like with a deployed swarm. A basic knowledge of Docker and containers is definitely recommended, but you can check out this excellent blog post first if you’re new to containers.
What Is Docker Swarm?

Before we dive into creating and deploying to our first swarm, it’s helpful to have an idea of what Docker Swarm is. Docker itself has been around for years, and most people today think of it as a container runtime. In actuality though, Docker is composed of many different pieces, all working together. For example, that container runtime portion is handled by two smaller components, called runC and containerd. As Docker has evolved and given back to the community, they’ve found that creating these smaller components is the best way to grow and rapidly add features. As such, we now have SwarmKit, and Swarm mode, which is built straight into Docker.
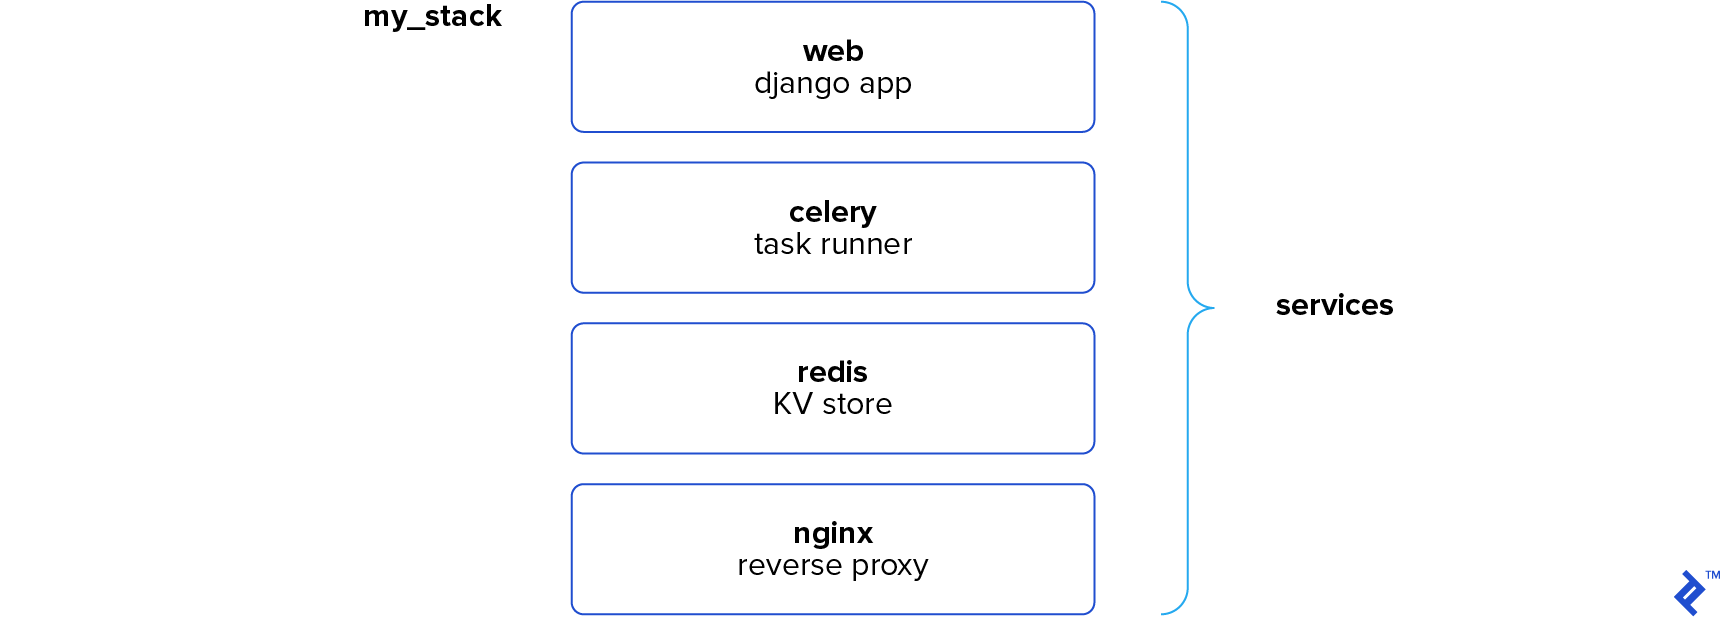
Docker Swarm is a container orchestration engine. At a high level, it takes multiple Docker Engines running on different hosts and lets you use them together. The usage is simple: declare your applications as stacks of services, and let Docker handle the rest. Services can be anything from application instances to databases, or utilities like Redis or RabbitMQ. This should sound familiar if you’ve ever worked with docker-compose in development, as it is exactly the same concept. In fact, a stack declaration is literally just a docker-compose.yml file with the version 3.1 syntax. This means you can use a similar (and in many cases identical) compose configuration for development and swarm deployment, but I’m getting a bit ahead of myself here. What happens when you have instances of Docker in Swarm mode?
Don’t Fall Off the Raft
We have two types of nodes (servers) in the Swarm world: managers and workers. It’s important to keep in mind that managers are also workers, they just have the additional responsibility of keeping things running. Every swarm starts out with one manager node designated as the leader. From there, it’s just a matter of running one command to securely add nodes to the swarm.
Swarm is highly available thanks to its implementation of the Raft algorithm. I won’t go into too much detail on Raft because there’s already a great tutorial on how it works, but here’s the general idea: The leader node is constantly checking in with its fellow manager nodes and syncing their states. In order for a state change to be “accepted,” the manager nodes much reach consensus, which happens when a majority of the nodes acknowledge the state change.
The beauty of this is that manager nodes can sporadically drop off without compromising the consensus of the swarm. If a state change reaches consensus, we know it’s guaranteed to exist on a majority of manager nodes and will persist even if the current leader fails.
Let’s say we have three manager nodes named A, B, and C. Of course, A is our fearless leader. Well, one day a transient networking error knocks A offline, leaving B and C alone. Having not heard from A in a long time (a few hundred milliseconds), B and C wait a randomly generated period of time before putting themselves up for election and notifying the other. Of course, the first one to go up for election, in this case, will be elected. In this example, B becomes the new leader, and a quorum is restored. But then, plot twist: What happens when A comes back online? It’ll think it’s still the leader, right? Each election has a term associated with it, so A was actually elected in term 1. As soon as A comes back online and starts ordering B and C around, they’ll kindly let it know that B is the leader of term 2, and A will step down.
This same process works on a much larger scale, of course. You can have many more than three manager nodes. I will add one other quick note though. Each Swarm can only take a specific number of manager losses. A swarm of n manager nodes can lose (n-1)/2 managers without losing quorum. That means for a three manager swarm you can lose one, for five you can lose two, etc. The underlying reason for this comes back to the idea about majority consensus, and it’s definitely something to keep in mind as you go to production.
Task Scheduling and Reconciliation
So far, we’ve established that our managers are really good at staying in sync. Great! But what are they actually doing? Remember how I said that you deploy a stack of services to Swarm? When you declare your services, you provide Swarm with important information about how you actually want your services to be run. This includes parameters like how many replicas you want of each service, how the replicas should be distributed, whether they should only be run on certain nodes, and more.
Once a service is deployed, it is the job of the managers to ensure that any deployment requirements you set continue to be met. Let’s say you deploy an Nginx service and specify that there should be three replicas. The managers will see that no containers are running and evenly distribute the three containers across the available nodes.
What’s even cooler, though, is that if a container should fail (or an entire node were to go offline), the Swarm will automatically create containers on the remaining nodes to make up for the difference. If you say you want three containers running, you’ll have three containers running, while Swarm handles all the nitty gritty details. Plus—and this is a big plus—scaling up or down is as easy as giving Swarm a new replication setting.
Service Discovery and Load Balancing
I want to point out an important but subtle detail from that last example: If Swarm is intelligently starting containers on nodes of its choice, we don’t necessarily know where those containers are going to be running. That may sound scary at first, but it’s actually one of Swarm’s most powerful features.
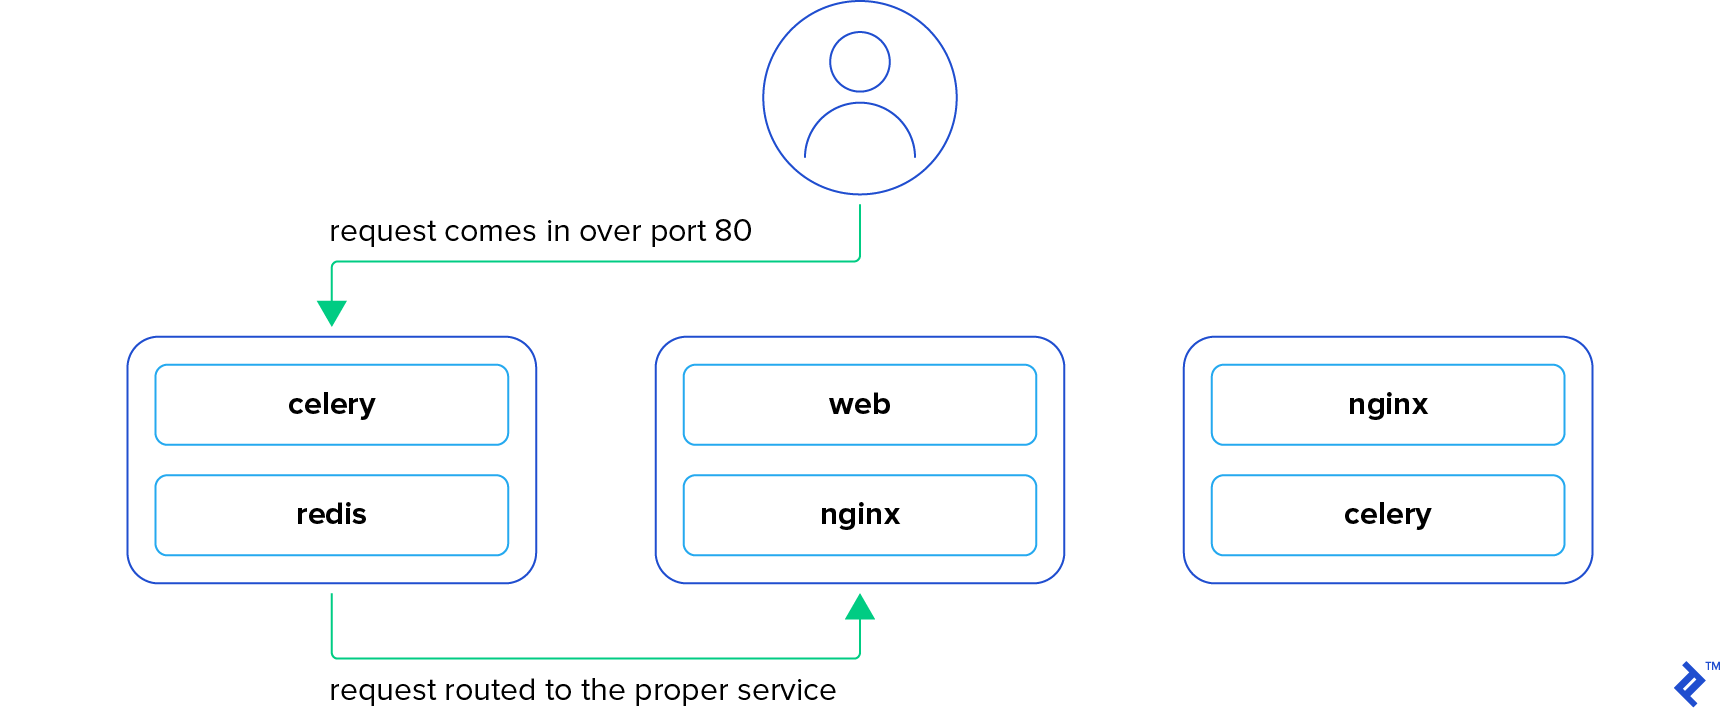
Continuing the same Nginx example, imagine we told Docker that those containers should expose port 80. If you point your browser to a node running that container on port 80, you’ll see that container’s content. There’s no surprise there. What may be surprising though, is that if you send your request to a node that isn’t running that container, you’ll still see the same content! What’s happening here?
Swarm is actually using an ingress network to send your request to an available node running that container, and it’s load balancing it at the same time. So if you make three requests to the same node, you’re likely going to hit the three different containers. As long as you know the IP of a single node in the swarm, you can access anything running in it. Conversely, this lets you point a load balancer (such as an ELB) at all of the nodes in the swarm without needing to worry about what’s running where.
It doesn’t stop at external connections. Services running on the same stack have an overlay network that lets them communicate with each other. Instead of hard coding IP addresses in your code, you can simply use the name of the service as the hostname you want to connect to. For example, if your app needs to communicate with a Redis service named “redis,” it can simply use “redis” as the hostname and Swarm will route its request to the appropriate container. And because this works seamlessly in development with docker-compose and in production with Docker Swarm, it’s one less thing to worry about when deploying your app.
Rolling Updates
If you’re in ops, you’ve probably experienced a panic attack when a production update goes horribly wrong. It could be a bad code update, or even just a configuration error, but suddenly production is down! Odds are the boss isn’t going to care either way. They’re just going to know it’s your fault. Well, don’t worry, Swarm has your back on this one, too.
When updating a service, you can define how many containers should be updated at a time and what should happen if the new containers start failing. After a certain threshold, Swarm can either stop the update or (as of Docker 17.04) roll back the containers to the previous image and settings. Don’t worry about having to bring your boss a coffee tomorrow morning.
Security
Last, but nowhere near least, Docker Swarm comes with great security features out of the box. When a node joins the swarm, it uses a token that not only verifies itself but also verifies it is joining the swarm you think it is. From that moment on, all communication between nodes takes place using mutual TLS encryption. This encryption is all provisioned and managed automatically by the Swarm, so you never need to worry about renewing certificates, and other typical security hassles. And of course, if you want to force a key rotation, there’s a command for that.
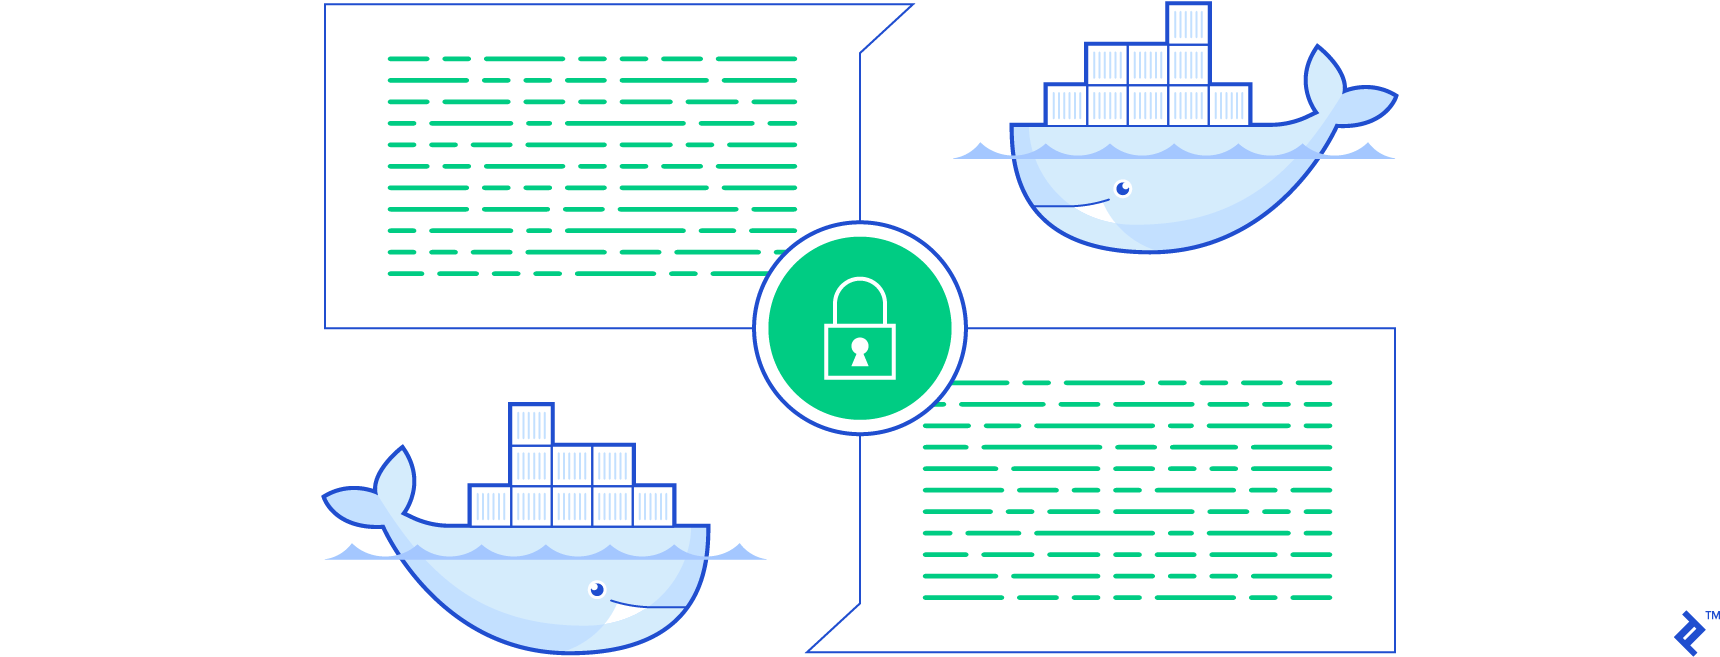
The latest version of Docker Swarm also comes with built-in secrets management. This lets you securely deploy secrets such as keys and passwords to the services that need them, and only the services that need them. When you provide a service with a secret, the containers for that service will have a special file mounted in their file system that includes the value of the secret. It goes without saying, but this is much more secure than using environment variables, which were the traditional approach.
Diving into the Swarm
If you’re anything like me, you’re itching to jump in and take all these features for a spin! So without further ado, let’s dive in!
Docker Swarm Example App
I’ve created a very rudimentary Flask app to demonstrate the power and ease of using Docker Swarm. The web app simply displays a page that tells you which container served your request, how many total requests have been served, and what the “secret” database password is.
It’s broken down into three services: the actual Flask app, an Nginx reverse proxy, and a Redis keystore. On each request, the app increments the num_requests key in Redis, so regardless of which Flask instance you’re hitting, you’ll see the correct number of requests reflected.
All of the source code is available on GitHub if you want to “check out” what is going on.
Play with Docker!
Feel free to use your own servers as you go through this tutorial, but I highly recommend using play-with-docker.com if you want to just jump in. It’s a site run by a few Docker developers that lets you spin up several networked nodes that have Docker pre-installed. They’ll be shut down after four hours, but that’s plenty for this example!
Creating a Swarm
Alright, here we go! Go ahead and create three instances in PWD (play-with-docker) or spin up three servers in your favorite VPS (virtual private server) service and install Docker engine on all of them. Keep in mind, you could always create an image and re-use that when adding nodes in the future. There’s no difference software-wise between a manager node and a worker node, so you don’t need to maintain two different images.
Still spinning up? Don’t worry, I’ll wait. Okay, now we’re going to create our first manager and leader node. On your first instance, initialize a swarm:
docker swarm init --advertise-addr <node ip here>
Replace <node_ip_here> with the IP address of your node. On PWD, the IP address is displayed at the top, and if you’re using your own VPS, feel free to use your server’s private IP address as long as it is accessible from the other nodes in your network.
You now have a swarm! It’s a pretty boring swarm, though, since it only has one node. Let’s go ahead and add the other nodes. You’ll notice that when you ran init, it displayed a long message explaining how to use the join token. We’re not going to use that one because it would make the other nodes workers, and we want them to be managers. Let’s get the join token for a manager by running this on the first node:
docker swarm join-token manager
Copy the resulting command and run it on your second and third nodes. Behold, a three node swarm! Let’s verify that all of our nodes really exist. The docker node ls command will list all of the nodes in our swarm. You should see something like this:
$ docker node ls
ID                            HOSTNAME            STATUS              AVAILABILITY        MANAGER STATUS
su1bgh1uxqsikf1129tjhg5r8 *   node1               Ready               Active              Leader
t1tgnq38wb0cehsry2pdku10h     node3               Ready               Active              Reachable
wxie5wf65akdug7sfr9uuleui     node2               Ready               Active              Reachable
Notice how our first node has an asterisk next to the ID. That’s simply telling us that is the node we are currently connected to. We can also see that this node is currently the Leader, and the other nodes are Reachable if something were to happen to it.
Take a moment to appreciate how easy that was, and let’s deploy our first app!
Ship It!
This just in, the business development team promised a client that their new app would be deployed and ready within the hour! Typical, I know. But fear not, we won’t need nearly that much time, since it was built using Docker! The developers were kind enough to lend us their docker-compose file:
version: '3.1'

services:
    web:
        image: lsapan/docker-swarm-demo-web
        command: gunicorn --bind 0.0.0.0:5000 wsgi:app
        deploy:
            replicas: 2
        secrets:
            - db_password

    nginx:
        image: lsapan/docker-swarm-demo-nginx
        ports:
            - 8000:80
        deploy:
            mode: global

    redis:
        image: redis
        deploy:
            replicas: 1

secrets:
    db_password:
        external: true
We’ll break it down in a moment, but there’s no time for that yet. Let’s get it deployed! Go ahead and create a file on your first node called docker-compose.yml and populate it with the configuration above.You can do that easily with echo "<pasted contents here>" > docker-compose.yml.
Ordinarily, we could just deploy this, but our configuration mentions that we use a secret called db_password, so let’s quickly create that secret:
echo "supersecretpassword" | docker secret create db_password -
Great! Now all we need to do is tell Docker to use our configuration:
docker stack deploy -c docker-compose.yml demo
When you run this command, you’ll see Docker creating the three services we defined: web, nginx, and redis. However, because we named our stack demo, our services are actually named demo_web, demo_nginx, and demo_redis. We can look at our running services by running the docker service ls command, which should show something like this:
$ docker service ls
ID                  NAME                MODE                REPLICAS            IMAGE                                   PORTS
cih6u1t88vx7        demo_web            replicated          2/2                 lsapan/docker-swarm-demo-web:latest
u0p1gd6tykvu        demo_nginx          global              3/3                 lsapan/docker-swarm-demo-nginx:latest   *:8000->80/
tcp
wa1gz80ker2g        demo_redis          replicated          1/1                 redis:latest
Voila! Docker has downloaded our images to the appropriate nodes and created containers for our services. If your replicas are not at full capacity yet, wait a moment and check again. Docker is likely still downloading the images.
Seeing Is Believing
Don’t take my word (or Docker’s word) for it though. Let’s try to connect to our app. Our service configuration tells Docker to expose NGINX on port 8000. If you’re on PWD, there should be a blue link at the top of the page that says “8000”. PWD has actually automatically detected that we have a service running on that port! Click that, and it’ll route you to the selected node on port 8000. If you rolled your own servers, simply navigate to one of your servers’ IPs on port 8000.
You’ll be greeted with a beautifully styled screen giving you some basic information:

Make a note of which container served your request and then refresh the page. Odds are it changed. But why? Well, we told Docker to create two replicas of our Flask app, and it’s distributing requests to both of those instances. You just happened to hit the other container the second time. You’ll also notice that the number of requests went up because both Flask containers are communicating with the single Redis instance we specified.
Feel free to try hitting port 8000 from any node. You’ll still be properly routed to the app.
Demystifying the Magic
At this point, everything works, and hopefully, you found the process to be painless! Let’s take a closer look at that docker-compose.yml file and see what we actually told Docker. At a high level, we see we’ve defined three services: web, nginx, and redis. Just like a normal compose file, we’ve provided Docker with an image to use for each service, as well as a command to run. In the case of nginx, we’ve also specified that port 8000 on the host should map to port 80 in the container. All of this is standard compose syntax so far.
What is new here are the deploy and secrets keys. These keys are ignored by docker-compose, so they won’t affect your development environment, but are used by docker stack. Let’s look at the web service. Simple enough, we’re telling Docker that we’d like to run two replicas our Flask app. We’re also letting Docker know that the web service requires the db_password secret. This is what ensures that the container will have a file named /run/secrets/db_password containing the value of the secret.
Moving down to Nginx, we can see the deploy mode is set to global. The default value (which is implicitly used in web) is replicated, which means we’ll specify how many replicas we want. When we specify global, it tells Docker that every node in the swarm should run exactly one instance of the service. Run docker service ls again, you’ll notice that nginx has three replicas, one for each node in our swarm.
Finally, we’ve instructed Docker to run a single instance of Redis somewhere in the swarm. It doesn’t matter where, as our web containers are routed automatically to it when they request the Redis host.
Using Swarm Day to Day
Congratulations on deploying your first app to a Docker Swarm! Let’s take a moment to review a few common commands you’ll be using.
Inspecting Your Swarm
Need to check on your services? Try docker service ls and docker service ps <service name>. The former shows you a high-level overview of each service, and the latter gives you information on each container running for the specified service. That one is particularly helpful when you want to see which nodes are running a service.
Rolling Updates
What about when you are ready to update an app? Well, the cool thing about docker stack deploy is it will actually apply updates to an existing stack as well. Let’s say you’ve pushed a new Docker image to your repository. You can actually just run the same deploy command you used the first time and your swarm will download and deploy the new image.
Of course, you may not always want to update every service in your stack. We can perform updates at the service level as well. Let’s assume I recently updated the image for my web service. I can issue this command to update all of my web containers:
docker service update \
    --image lsapan/docker-swarm-demo-web:latest \
    demo_web
An added benefit to that command is that it will apply a rolling update if you specified that it should in your original configuration. And even if you didn’t, you can pass flags to update that will instruct it to do a rolling update like so:
docker service update \
    --image lsapan/docker-swarm-demo-web:latest \
    --update-parallelism 1 --update-delay 30s \
    demo_web
That will update one container at a time, waiting 30 seconds in between updates.
Scaling Services Up or Down
Having two web containers is great, but you know what is better? Having ten! Scaling services up and down in a swarm is as easy as:
docker service scale demo_web=10
Run that command and check the output of docker service ps demo_web. You’ll see that we now have ten containers, and eight of them were started just a moment ago. If you’re interested, you can also go back to the web application and refresh the page a few times to see that you now are getting more than the original two container IDs.
Removing Stacks and Services
Your stacks and services are deployed and scaled, awesome! But now you want to take them offline. This can be done with the respective rm command. To remove our demo stack, run the command:
docker stack rm demo
Or, if you’d rather just remove a single service, just use:
docker service rm demo_web
Draining Nodes
Remember when we ran docker node ls earlier to check on the nodes in our swarm? It provided a bunch of information on each node, including its Availability. By default, nodes are Active, which means they’re fair game to run containers. However, there are times when you may need to take a node temporarily offline to perform maintenance. Sure, you could just shut it down and the swarm would recover, but it’s nice to give Moby (the Docker whale) a bit of notice.
This is where draining nodes comes in. When you mark a node as Drain, Docker Swarm will delegate any containers running on it to other nodes, and it won’t start any containers on the node until you change its availability back to Active.
Let’s say we want to drain node1. We can run:
docker node update --availability drain node1
Easy! When you’re ready to get it back to work:
docker node update --availability active node1
Wrapping Up
As we’ve seen, Docker coupled with Swarm mode enables us to deploy applications more efficiently and reliably than ever before. It’s worth mentioning that Docker Swarm is by no means the only container orchestration engine out there. In fact, it’s one of the younger ones. Kubernetes has been around longer and is definitely used in more production applications. That said, Swarm is the one officially developed by Docker, and they are working on adding even more features every day. Regardless of which you choose to use, keep containering!
Understanding the basics
What is Docker Swarm?
Docker Swarm is a container orchestration engine. As such, it handles the scheduling and balancing of containers across nodes in your cluster in a highly-available fashion.
Why would you use Docker Swarm?
Instead of managing your infrastructure manually, Docker Swarm lets you declaratively specify how your apps should be deployed and scaled. Once deployed, it will ensure that your specifications are continually met.
What does it take to get a Docker Swarm running?
Not much! Simply install Docker on your hosts and have one of them initialize a swarm. Once that’s done, the other hosts can quickly join.
How does Docker Swarm bridge the gap between development and operations?
Thanks to Docker stacks using the same syntax as docker-compose, your developers will already have done most of the work of writing your stack configuration! This means fewer surprises when going live, and that’s always a good thing.
Leah Sapan
Scarborough, United States
Member since August 31, 2015
About the author
As a full-stack software engineer, Leah has worn many hats. Beyond software, she specializes in secure, scalable AWS deployments.
Expertise
PREVIOUSLY AT