Installing Django on IIS: A Step-by-Step Tutorial
Although the most wide-spread and supported way of running Django is on a Linux system (e.g., with uwsgi and nginx), it actually doesn’t take much work to get it to run on IIS. In this article, Toptal Engineer Ivan Voras walks you through a step-by-step tutorial, clearly explaining how to install Django on IIS.

Although the most wide-spread and supported way of running Django is on a Linux system (e.g., with uwsgi and nginx), it actually doesn’t take much work to get it to run on IIS. In this article, Toptal Engineer Ivan Voras walks you through a step-by-step tutorial, clearly explaining how to install Django on IIS.

Ivan’s 15+ years of back-end and blockchain architecture has seen everything from DBA ops to development of OS kernel modules (FreeBSD).
Though many Django Developers might consider it blasphemous, sometimes it is actually necessary to deploy Django applications on Windows/IIS, especially when working with a client that has based its infrastructure around the Windows ecosystem. The “blasphemy” part comes from Django having really been targeted at the Unix environment, relying heavily on features like WSGI, FastCGI, and command-line tooling, all of which are foreign to Windows. Fortunately, Django/IIS compatibility is improving, thanks to the addition of features (which would otherwise be a kludge) on both the Windows and the Python+Django sides of the equation, thereby helping to resolve compatibility issues between these two disparate technical worlds.
This short, focused tutorial walks you through the basic setup of a Django project on Windows. It covers the installation of Python, Django, and related tools, including running the Django project both standalone and as a FastCGI server. The latter is increasingly important, incidentally, since IIS now officially supports FastCGI (on IIS 7+, simply install the CGI feature).
Note: This tutorial is intended for those with a working understanding of Windows and who are familiar with the IIS management console. The version of IIS used in this tutorial is 8.5, but the descriptions and techniques are similar on earlier versions. The tutorial is based on Python 2.7 and Django 1.7, since those are the versions I use for my projects. You can find another Django tutorial here.
Pro tip: If you are going to deploy multiple Django (or even plain Python) projects, or if you are a developer, you should look at virtualenv, a tool for creating isolated Python environments.
Installing Python on Windows
First, download Python. Both 32-bit and 64-bit MSI installers are provided, and you should choose the one appropriate for the machine you are installing on.
PIP is the tool which installs and maintains Python libraries (of which Django is only one example). It is invoked by running the pip command at the command prompt. It implements several sub-commands, and two of the most useful ones are install and freeze. PIP will also install project dependencies (additional libraries) are installed, should the project have any.
Running pip install <package_name> will download and install the package and all of its dependencies (which may be nested and fairly complex). Running pip install --upgrade <package_name> will likewise upgrade an existing package to its most recent version. PIP supports a special syntax for installing precise versions of a package instead of just "the most recent one". It is done by appending an operator and a version number to the package name; e.g. "Jinja2==2.7.3" (to install a precise version) or "six>=1.8" (to install any version equal to or greater than the specified version number).
Running pip freeze simply shows the list of currently installed packages in a format which is directly usable by pip install.
Note that some Python / PIP packages come with libraries written in C, which must be compiled for the package to work. Unless you set up your system to have a working C compiler which is also compatible with the Python executables, you will not be able to install such packages. Django is a pure Python library so it does not require a C compiler to install.
It’s important that you install Python 2.7.9 or later, since Python versions beginning with 2.7.9 include PIP, the Python library/package/software manager which is used to install everything else in this tutorial.
The installer process is very straightforward and simple. It will offer to install Python in the C:\Python27 directory, which you should accept as it makes life easier afterwards. Try not to give in to the Windows habit of installing stuff in directories with spaces in their names.
The basic directory after installation will contain around 8 subdirectories, some miscellaneous files and two executables named Python.exe and PythonW.exe. The former is the default command-line interpreter and Python shell, while the latter is only the interpreter, which will not use (or spawn) a console window if invoked, and because of this is suitable for running GUI Python applications.
Next, Python should be added to the system’s PATH environment variable. This is done in Advanced System Settings (or System Properties), in the Advanced tab, by clicking on the Environment Variables button. There are two directories to be added: C:\Python27 and C:\Python27\Scripts. These should be appended to the PATH list, separated by semicolons (;). The ending of your PATH variable should look like ;C:\Python27;C:\Python27\Scripts.
Pro tip: You may also want to install GOW, a light-weight collection of Unix command-line utilities similar to Cygwin. It will provide you with tools such as
ls, but also more interesting ones such asmake,wget,curl,ssh,scp,gzipandtar.
Installing Django on Windows
Django can be installed using PIP with a command such as pip install django. The process may pull in some additional dependencies if they are not already present on your system. Otherwise, it will simply install only Django, with output similar to the following:
Downloading/unpacking django
Installing collected packages: django
Successfully installed django
Cleaning up...
You can check if both Python and Django for Windows are working by starting a new Windows Command Prompt, running the python command, and entering the import django command at the Python prompt. If it works properly, there should be no output or messages after the import django command; i.e.:
Python 2.7.9 (default, Dec 10 2014, 12:24:55) [MSC v.1500 32 bit (Intel)] on win32
Type "help", "copyright", "credits" or "license" for more information.
>>> import django
>>>
Installing a Django project on Windows
A Django “project” consists of one or more “apps”. A project’s top-level directory usually contains one special project subdirectory which contains settings and some general project-level information, one subdirectory per app, and a command-line script called manage.py. For example:
C:\Devel\djangoproject\src>dir
 Volume in drive C is OS
 Volume Serial Number is 6A3D-C1B8

 Directory of C:\Devel\djangoproject\src

22/12/2014  04:25    <DIR>          .
22/12/2014  04:25    <DIR>          ..
22/12/2014  04:19    <DIR>          project
22/12/2014  04:58    <DIR>          djangoapp
16/12/2014  03:30    <DIR>          templates
16/12/2014  00:50               250 manage.py
               1 File(s)            250 bytes
               5 Dir(s)  23,552,929,792 bytes free
Django projects can be simply distributed by archiving the entire project directory and decompressing it on another machine. In the example above, the project contains the project subdirectory, the application directory named djangoapp, and an auxiliary templates subdirectory.
The manage.py script is the “swiss army knife” of Django applications. It does everything from creating new apps, to database migrations, to running a test (embedded) HTTP server or even a FastCGI server.
Running a test HTTP server
If the project and its apps are functional, you should be able to start the default Django development-only HTTP server by running the command manage.py runserver, which should result in output similar to the following:
C:\Devel\djangoproject\src>manage.py runserver
Performing system checks...

System check identified no issues (0 silenced).
December 23, 2014 - 01:19:02
Django version 1.7.1, using settings 'project.settings'
Starting development server at http://127.0.0.1:8000/
Quit the server with CTRL-BREAK.
As you can see from the messages, this starts a server on localhost, port 8000. You can access it immediately with your web browser.
Configuring and running a FastCGI server
A more interesting option is to enable a FastCGI server. With FastCGI, you can use IIS, Apache, or any other web server, to serve the application in a production setting. For this to work, you need to download the fcgi.py (the Django management command to run Django on Windows with IIS through FastCGI) and put it into the management/commands subdirectory of the Django app’s (not the project’s!) subdirectory. Both the management and the commands subdirectories must have an empty file named __init__.py (which turn those directories into Python modules).
fcgi.py is a very simple and minimalistic WSGI to FastCGI adapter that does not support listening on a TCP socket or a pipe, and does all its processing by using stdin and stdout`. As such, it is not usable with modern web servers such as nginx, but will work with IIS.
Configuring IIS to run a FastCGI application
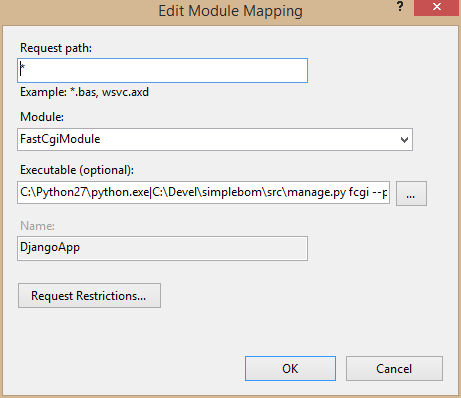
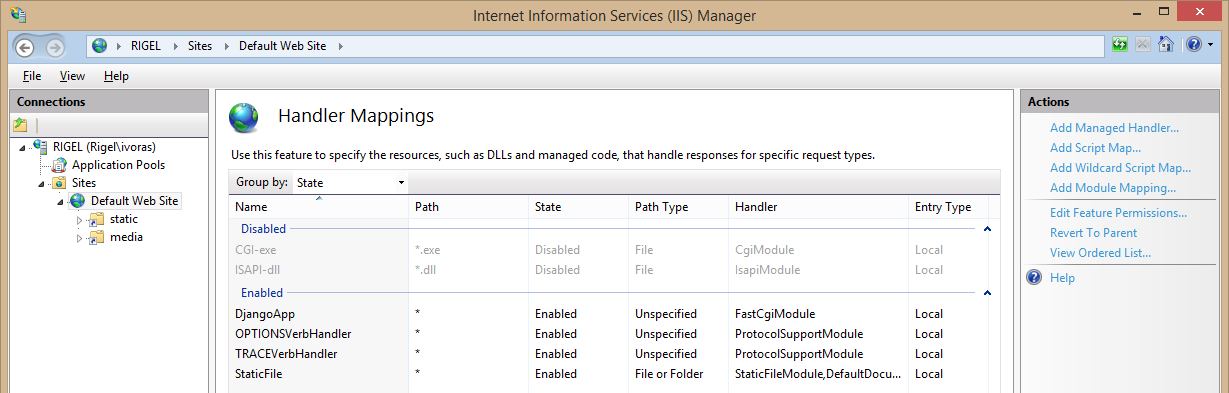
If the FastCGI module is loaded in IIS (or simply the CGI module in IIS 7+), the IIS management console will have the “FastCGI Settings” icon available. Django is a framework which has its own URL routing, so Django apps must be installed as a “handler” in IIS for specific paths. To install a Django app on the IIS’s Default Web Site, select it in the management console, and open the Handler mappings configuration feature. In it, click on the Add Module Mapping… action, and enter the following information:
-
Request path: Set it to
\*to handle all requests with internal Django routing -
Module: Set it to
FastCgiModuleto use the IIS’ FastCGI module -
Executable: Here, both the
python.exepath and its command line arguments need to be set, using the pipe character (|) as a separator. An example value for this setting is:C:\Python27\python.exe|C:\app\src\manage.py fcgi --pythonpath C:\app\src --settings project.settings. Note that you need to specify thefcgicommand for themanage.pyscript, and manually set the Python interpreter’s search path for the project, as well as the Python module name for the project’s setting module. - Name: You can set this to whatever you like.
Your configuration dialog should look something like this:
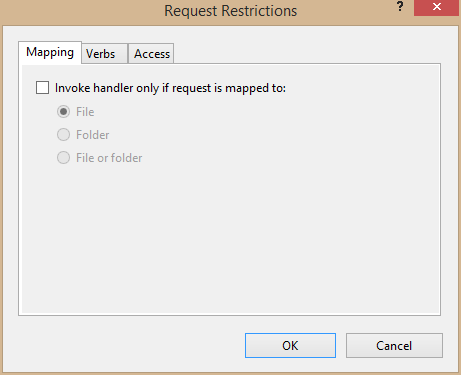
Next, click the Request restrictions button and edit the Mapping tab. Uncheck the “Invoke handler only if the request is mapped to…” checkbox (otherwise, IIS will have problems mapping what it thinks are subdirectories in the URL request):
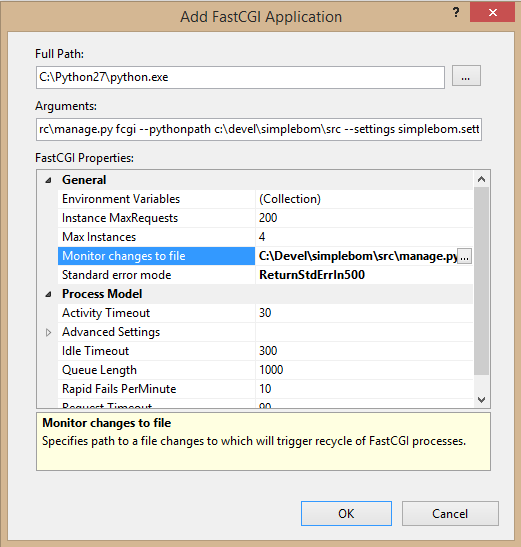
Click OK on the handler information dialog. IIS will then ask you to confirm the creation of a matching FastCGI application entry which you will need to confirm. This entry will be visible in the FastCGI Settings feature, accessible at the root screen of the IIS Management Console. The default entry created by IIS itself is adequate, but there are some optional settings available which you may want to take advantage of:
- Max instances: The approach we’re employing for running FastCGI applications is single-process, single-threaded, meaning that a separate Python interpreter process will be started for each simultaneous request. This setting limits the number of simultaneous Django app instances.
- Monitor changes to file: By default, once started, the app processes will be active either until manually shut down, or until they handle Instance MaxRequest requests. By using this setting, IIS will monitor a timestamp of an arbitrary file, and if it changes, it will stop and reload app instances. This is convenient both for developers and for production environments, as it allows apps to be reloaded when changed. The “monitor a file’s timestamp for a reload indicator” is a fairly strange concept on Windows, but it’s normal in Unix-like environments, and so it was carried over here with FastCGI.
Configuring the static resource and media directories
Modern web applications use multiple resource files, such as CSS, JavaScript and others, and Django apps are no exception. Django provides for a very convenient feature which allows developers to integrate the needed resources into the application directory tree, but which can be extracted and copied by Django into a proper, static directory. This is basically a developer-controlled feature, and the locations where Django will store the static files is controlled in the project’s settings.py. Well-behaved projects will use a reasonably sane path for this, but it is not standardized.
Apps which handle uploaded files store them in a similarly-managed directory which, in Django, is traditionally named media. The static and media directories need to be added to the IIS configuration as virtual directories:
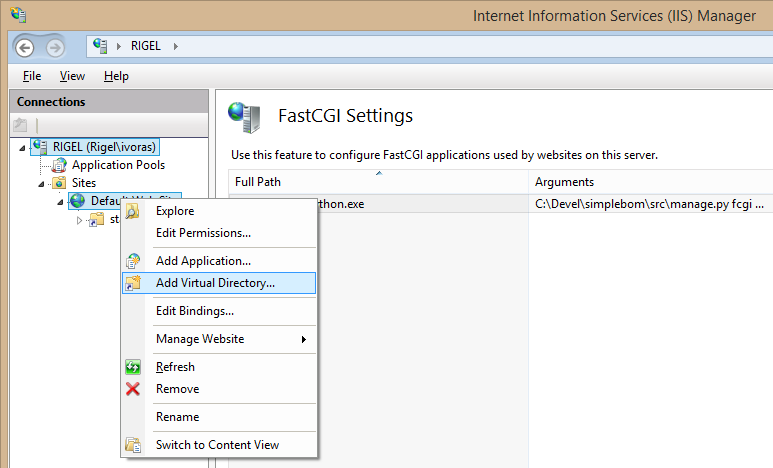
The important step here is to reconfigure the Handler Mappings feature for each of the directories and remove the Django App handler, leaving the StaticFile handler as the most important one.
Note that the static directory must be readable by IIS (as well as all other files and directories in the Django project), but the media directory must also be writable by IIS. The final site configuration should resemble the following:
A note about databases
SQLite works by default on Windows, as it does on Unix-like systems. Most of the other open source databases now work on Windows, even PostgreSQL, which I recommend. On existing Windows installations, though, there could be a requirement to deploy Django with the MS SQL Server. This is possible either by using an ODBC bridge driver or by using a native MS SQL driver. In theory, both work, but I haven’t tested them. At least the database connection parameters (in the project’s settings.py file) need to be changed to switch to a new database. Data migration needs to be done manually.
Note that if using the SQLite database, both the database file and the directory where it is located need to be writable by IIS.
Troubleshooting
The described configuration is tested and proven to work, but if something goes wrong, here are some basic steps for troubleshooting your Django for Windows install:
- Try starting the FastCGI command line yourself. This is the command configured in the FastCGI Settings and which must match the one configured in Handler Mappings for the site.
- Install the Tracing feature for IIS, then configure it for the Django site in Failed Request Tracing Rules to trace all content (), the status code “500” and the event severity “Error”. The traces will be available as XML files (with attached XSLT) in the IIS’s
C:\inetpub\logs\FailedReqLogFilesdirectory (or a similar one, depending on your configuration). You then need to enable tracing for the particular web site (or a virtual directory) in the *Configure->Failed request tracing… action.
Conclusion
To be sure, Django is tailored for a Unix-like environment, and the most wide-spread and supported way of running Django is on a Linux system (e.g., with uwsgi and nginx).
Yet it doesn’t take much work to make Django run on Windows, as shown in this tutorial. Some of the steps described may seem counter-intuitive from a pure Windows perspective, but they are necessary and, fortunately, the effort spent in the configuration is one-time only. Once configured, the Django application should then behave in much the same way that it would on a Linux platform.
Further Reading on the Toptal Blog:
Zagreb, Croatia
Member since August 26, 2014
About the author
Ivan’s 15+ years of back-end and blockchain architecture has seen everything from DBA ops to development of OS kernel modules (FreeBSD).