How to Integrate OAuth 2 Into Your Django/DRF Back-end Without Going Insane
So you’ve implemented user authentication. Now, you want to allow your users to log in with Twitter, Facebook, or Google. No problem. You’re only a few lines of code away from doing so.
But while there are hundreds of OAuth 2 packages that pip knows, only a few actually do what they’re supposed to do.
In this article, Toptal Software Engineer Peter Goodspeed-Niklaus explains how to integrate OAuth 2 into your Django or Django Rest Framework using Python Social Auth.

Peter, BSc (with distinction), is a professional Python/Django developer who has also written an exotic processor emulator in Rust.
We’ve all been there. You’re working on the API back-end, and you’re happy with how it’s going. You’ve recently completed the minimal viable product (MVP), the tests are all passing, and you’re looking forward to implementing some new features.
Then the boss sends you an email: “By the way, we need to let people log in via Facebook and Google; they shouldn’t have to create an account just for a little site like ours.”
Great. Scope creep strikes again.
The good news is that OAuth 2 has emerged as the industry standard for social and third-party authentication (used by services such as Facebook, Google, etc.) so you can focus on understanding and implementing that standard to support a wide range of social authentication providers.
It’s likely you’re not familiar with OAuth 2; I wasn’t, when this happened to me.

As a Python developer, your instinct may lead to you pip, the Python Package Index (PyPA) recommended tool for installing Python packages. The bad news is that pip knows about 278 packages that deal with OAuth – 53 of which specifically mention Django. It’s a week’s worth of work just to research the options, nevermind start writing code.
In this tutorial, you’ll learn how to integrate OAuth 2 into your Django or Django Rest Framework using Python Social Auth. Although this article focuses on the Django REST Framework, you can apply the information provided here to implement the same in a variety of other common back-end frameworks.
A quick overview of the OAuth 2 flow
OAuth 2 was designed from the beginning as a web authentication protocol. This is not quite the same as if it had been designed as a net authentication protocol; it assumes that tools like HTML rendering and browser redirects are available to you.
This is obviously something of a hindrance for a JSON-based API, but you can work around this.
You’ll go through the process as if you were writing a traditional, server-side website.
The Server-side OAuth 2 Flow
The first step happens outside the application flow entirely. The project owner must register your application with each OAuth 2 provider you need logins for.
During this registration, they provide the OAuth 2 provider with a callback URI, at which your application will be available to receive requests. In exchange, they receive a client key and client secret. These tokens are exchanged during the authentication process to validate the login requests.
The tokens refer to your server code as the client. The host is the OAuth 2 provider. They aren’t meant for your API’s clients.
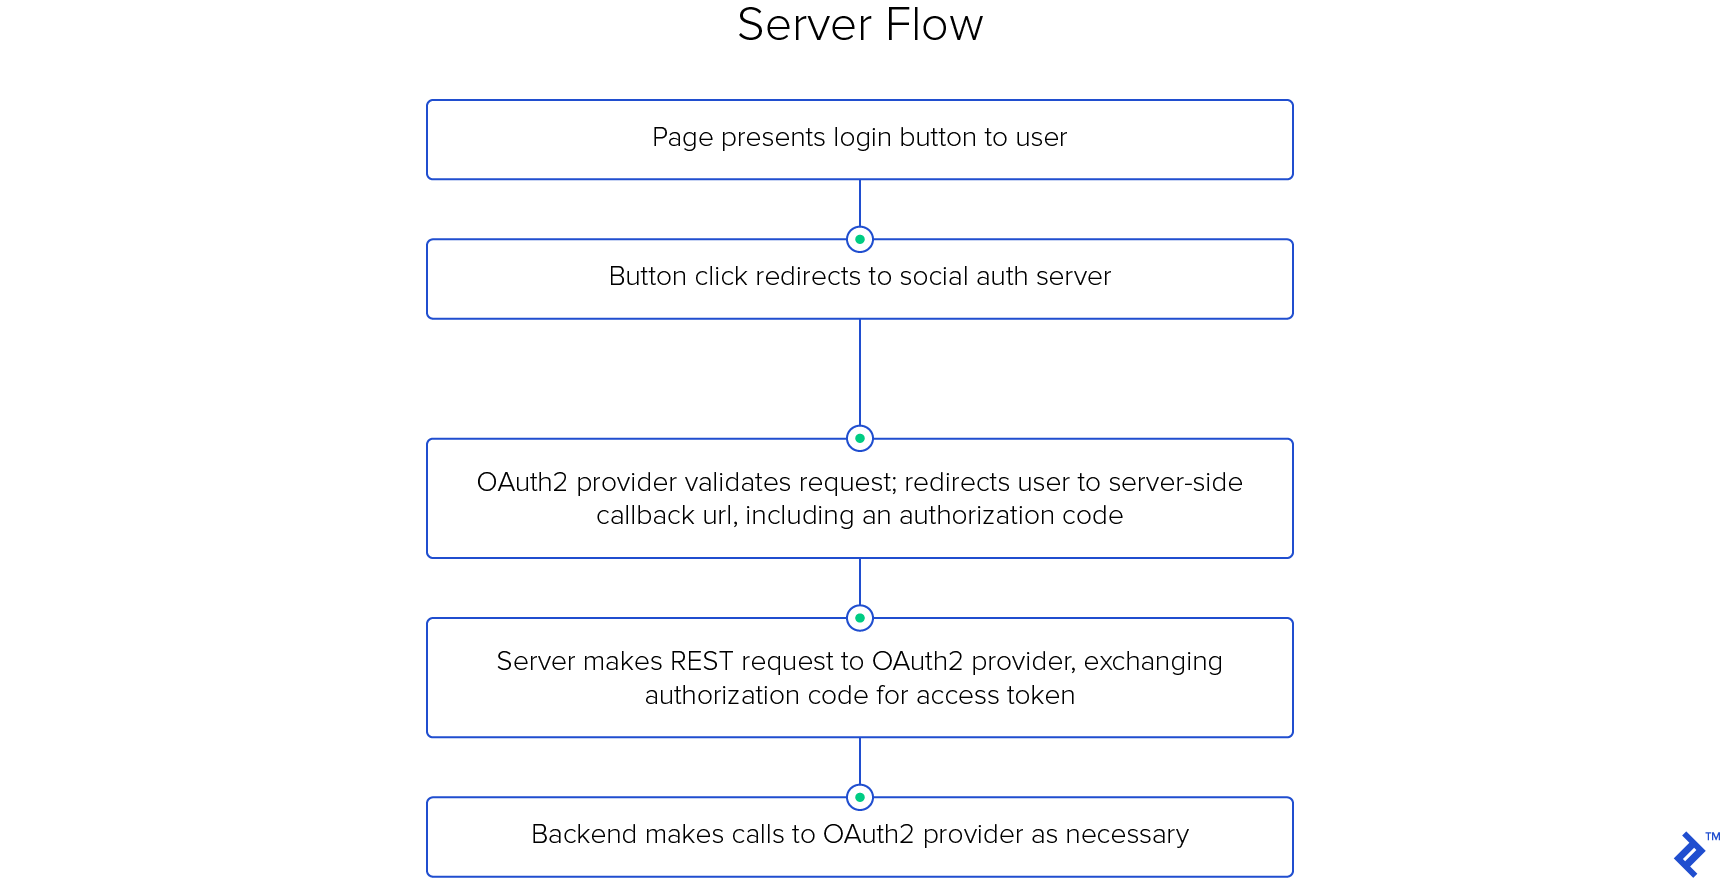
The flow begins when your application generates a page that includes a button, like “Log in with Facebook” or “Sign in with Google+”. Fundamentally, these are nothing other than simple links, each of which points to a URL like the following:
https://oauth2provider.com/auth?
    response_type=code&
    client_id=CLIENT_KEY&
    redirect_uri=CALLBACK_URI&
    scope=profile&
    scope=email
(Note: Line breaks inserted into the URI above for readability.)
You’ve provided your client key and redirect URI, but no secrets. In exchange, you’ve told the server that you’d like an authentication code in response and access to both the ‘profile’ and ‘email’ scopes. These scopes define the permissions you request from the user, and limit the authorization of the access token you receive.
Upon receipt, the user’s browser is directed to a dynamic page the OAuth 2 provider controls. The OAuth 2 provider verifies that the callback URI and client key match each other before proceeding. If they do, the flow briefly diverges depending on the user’s session tokens.
If the user isn’t currently logged in to that service, they’ll be prompted to do so. Once they’ve logged in, the user is presented with a dialog requesting permission to allow your application to log in.

Assuming the user approves, the OAuth 2 server then redirects them back to the callback URI that you provided, including an authorization code in the query parameters: GET https://api.yourapp.com/oauth2/callback/?code=AUTH_CODE.
The authorization code is a fast-expiring, single-use token; immediately upon its receipt, your server should turn around, and make another request to the OAuth 2 provider, including both the authorization code and your client secret:
POST https://oauth2provider.com/token/?
   grant_type=authorization_code&
   code=AUTH_CODE&
   redirect_uri=CALLBACK_URI&
   client_id=CLIENT_KEY&
   client_secret=CLIENT_SECRET
The purpose of this authorization code is to authenticate the POST request above, but due to the nature of the flow, it has to be routed through the user’s system. As such, it is inherently insecure.
The restrictions on the authorization code (i.e., that it expires quickly and can be used only once) are there to mitigate the inherent risk of passing an authentication credential through an untrusted system.
This call, made directly from your server to the OAuth 2 provider’s server, is the key component of the OAuth 2 server-side login process. Controlling the call means you know the call is TLS-secured, thereby helping protect it against wiretapping attacks.
Including the authorization code ensures that the user explicitly granted consent. Including the client secret, which is never visible to your users, ensures that this request doesn’t originate from some virus or malware on the user’s system, which intercepted the authorization code.
If everything matches up, the server returns an access token, with which you can make calls to that provider while authenticated as the user.
Once you’ve received the access token from the server, your server then redirects the user’s browser once more to the landing page for users who have just logged in. It’s common to retain the access token in the user’s server-side session cache, so that the server can make calls to the given social provider whenever necessary.
The access token should never be made available to the user!
There are more details we could dive into.
For example, Google includes a refresh token that extends the life of your access token while Facebook provides an endpoint at which you can exchange short-lived access tokens for something longer-lived. These details don’t matter to us, though, because we’re not going to use this flow.
This flow is cumbersome for a REST API. While you could have the front-end client generate the initial login page and have the back-end provide a callback URL, you’ll eventually run into a problem. You want to redirect the user to the front-end’s landing page once you’ve received the access token, and there’s no clear, RESTful way to do so.
Luckily, there’s another OAuth 2 flow available, which works much better in this case.
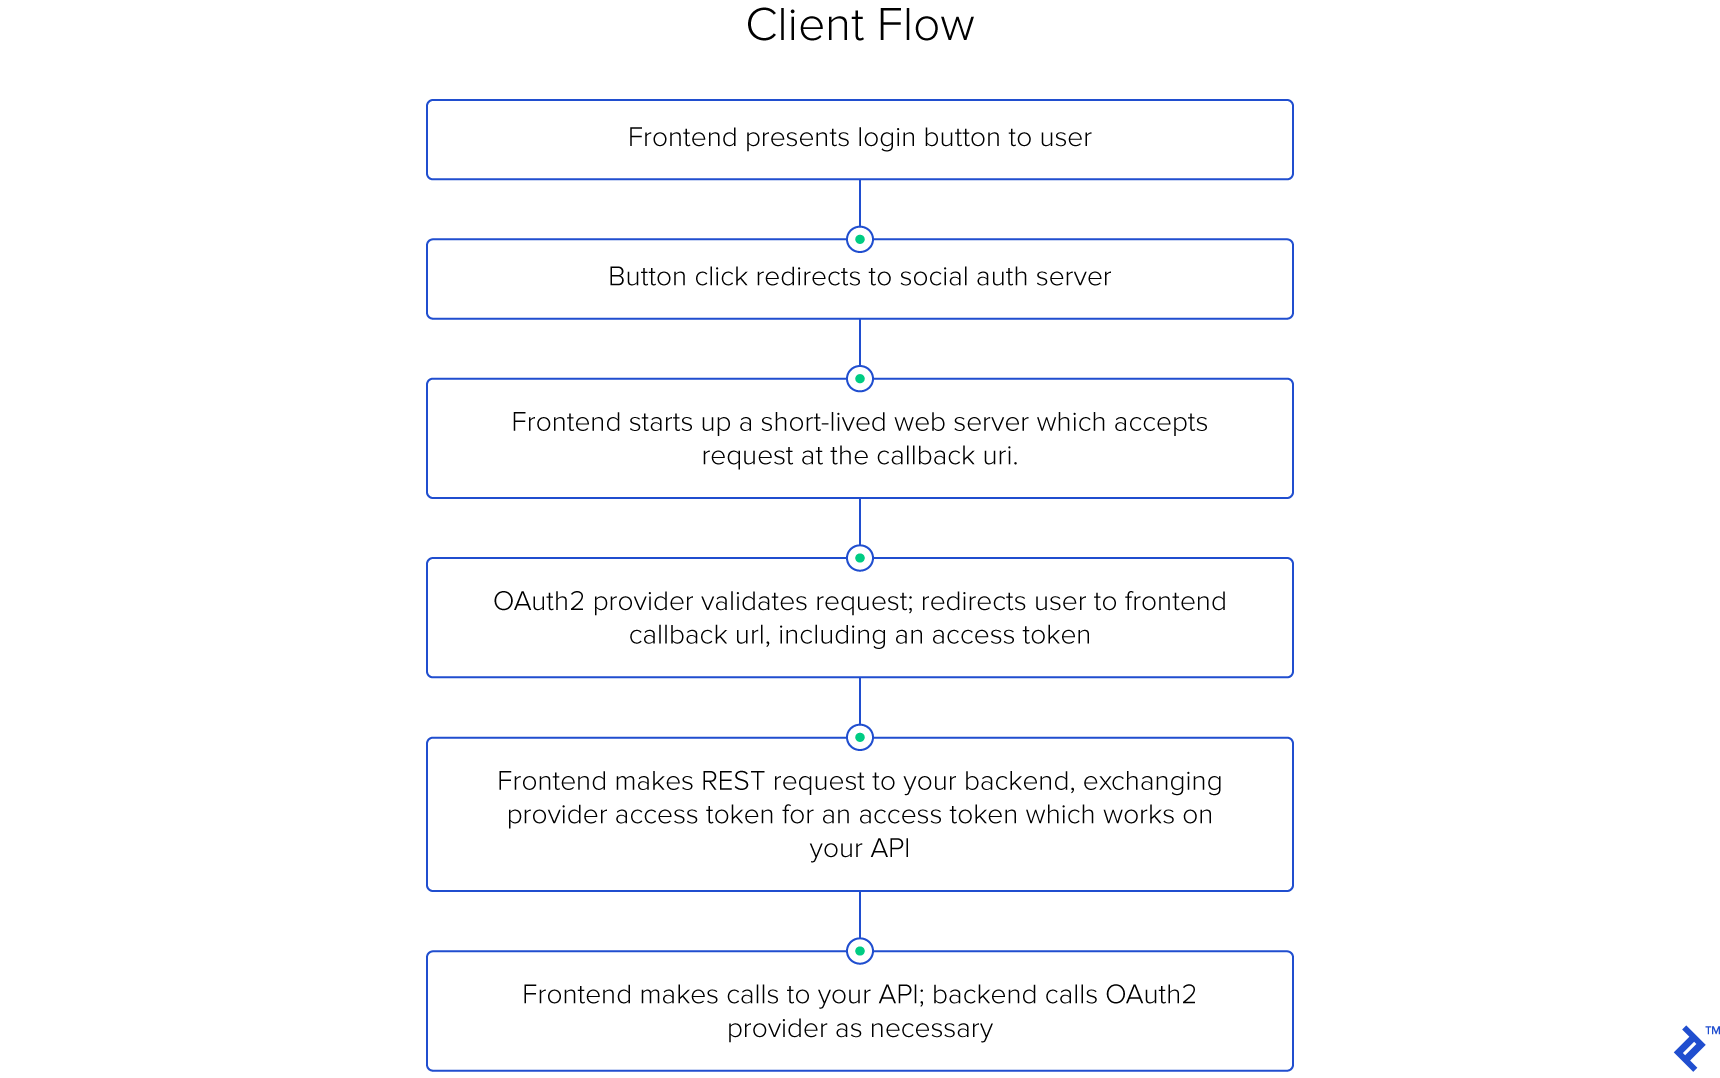
The Client-side OAuth 2 Flow
In this flow, the front-end becomes responsible for handling the entire OAuth 2 process. It generally resembles the server-side flow, with an important exception – front-ends live on machines that users control, so they cannot be entrusted with the client secret. The solution is to simply eliminate that entire step of the process.
The first step, as in the server-side flow, is registering the application.
In this case, the project owner still registers the application, but as a web application. The OAuth 2 provider will still provide a client key, but may not provide any client secret.
The front-end provides the user with a social login button, which directs to a webpage the OAuth 2 provider controls, and requests permission for our application to access certain aspects of the user’s profile.
The URL looks a little different this time though:
https://oauth2provider.com/auth?
   response_type=token&
   client_id=CLIENT_KEY&
   redirect_uri=CALLBACK_URI&
   scope=profile&
   scope=email
Note that the response_type parameter this time in the URL is token.
So what about the redirect URI?
This is simply any address on the front-end that is prepared to handle the access token appropriately.
Depending on the OAuth 2 library in use, the front-end may actually temporarily run a server capable of accepting HTTP requests on the user’s device; in that case, the redirect URL is of the form http://localhost:7862/callback/?token=TOKEN.
Because the OAuth 2 server returns a HTTP redirect after the user has accepted, and this redirect is processed by the browser on the user’s device, this address is interpreted correctly, giving the front-end access to the token.
Alternatively, the front-end may directly implement an appropriate page. Either way, the front-end is responsible, at this point, for parsing the query parameters and processing the access token.
From this point on, the front-end can directly call the OAuth 2 provider’s API using the token. But the users don’t really want that; they want authenticated access to your API. All the back-end needs to provide is an endpoint at which the front-end can exchange a social provider’s access token for a token that grants access to your API.
Why allow this at all, given that supplying the access token to the front-end is inherently less secure than the server-side flow?
The client-side flow allows a stricter separation between a back-end REST API and a user-facing front-end. There’s nothing strictly stopping you from specifying your back-end server as the redirect URI; the end effect would be some kind of hybrid flow.
The issue is that the server must then generate an appropriate user-facing page, and then hand control back to the front-end in some way.
It’s common in modern projects to strictly separate concerns between the front-end UI and the back-end that handles all the business logic. They typically communicate via a well-defined JSON API. The hybrid flow described above muddies that separation of concerns, though, forcing the back-end to both serve a user-facing page, and then design some flow to somehow hand control back to the front-end.
Allowing the front-end to handle the access token is an expedient technique that retains the separation of concerns. It somewhat increases the risk from a compromised client, but it works well, in general.
This flow may seem complicated for the front-end, and it is, if you require the front-end team to develop everything on their own. However, both Facebook and Google provide libraries which enable the front-end to include login buttons that handle the entire process with a minimal configuration.
Here’s a recipe for token exchange on the back-end.
Under the client flow, the back-end is pretty isolated from the OAuth 2 process. Don’t be misled: This is not a simple job. You’ll want it to support at least the following functionalities.
- Send at least one request to the OAuth 2 provider, just to ensure that the token that the front-end provided was valid, not some arbitrary random string.
- When the token is valid, return a valid token for your API. Otherwise, return an informative error.
- If this is a new user, create a
Usermodel for them, and populate it appropriately. - If this is a user for whom a
Usermodel already exists, match them by their email address, so they gain access to the correct existing account instead of creating a new one for the social login. - Update the user’s profile details based on what they’ve provided on social media.
The good news is that implementing all this functionality on the back-end is much simpler than you might expect.
Here’s the magic for how to get all this working on the back-end in just two dozen lines of code. This depends on the Python Social Auth library (“PSA” henceforth), so you’ll need to include both social-auth-core and social-auth-app-django in your requirements.txt.
You’ll also need to configure the library as documented here. Note that this excludes some exception handling for clarity.
Full code for this example can be found here.
@api_view(http_method_names=['POST'])
@permission_classes([AllowAny])
@psa()
def exchange_token(request, backend):
    serializer = SocialSerializer(data=request.data)

    if serializer.is_valid(raise_exception=True):
        # This is the key line of code: with the @psa() decorator above,
        # it engages the PSA machinery to perform whatever social authentication
        # steps are configured in your SOCIAL_AUTH_PIPELINE. At the end, it either
        # hands you a populated User model of whatever type you've configured in
        # your project, or None.
        user = request.backend.do_auth(serializer.validated_data['access_token'])

        if user:
            # if using some other token back-end than DRF's built-in TokenAuthentication,
            # you'll need to customize this to get an appropriate token object
            token, _ = Token.objects.get_or_create(user=user)
            return Response({'token': token.key})

        else:
            return Response(
                {'errors': {'token': 'Invalid token'}},
                status=status.HTTP_400_BAD_REQUEST,
            )
There’s just a little more that needs to go in your settings (full code), and then you’re all set:
AUTHENTICATION_BACKENDS = (
    'social_core.backends.google.GoogleOAuth2',
    'social_core.backends.facebook.FacebookOAuth2',
    'django.contrib.auth.backends.ModelBackend',
)
for key in ['GOOGLE_OAUTH2_KEY',
            'GOOGLE_OAUTH2_SECRET',
            'FACEBOOK_KEY',
            'FACEBOOK_SECRET']:
    # Use exec instead of eval here because we're not just trying to evaluate a dynamic value here;
    # we're setting a module attribute whose name varies.
    exec("SOCIAL_AUTH_{key} = os.environ.get('{key}')".format(key=key))
SOCIAL_AUTH_PIPELINE = (
  'social_core.pipeline.social_auth.social_details',
  'social_core.pipeline.social_auth.social_uid',
  'social_core.pipeline.social_auth.auth_allowed',
  'social_core.pipeline.social_auth.social_user',
  'social_core.pipeline.user.get_username',
  'social_core.pipeline.social_auth.associate_by_email',
  'social_core.pipeline.user.create_user',
  'social_core.pipeline.social_auth.associate_user',
  'social_core.pipeline.social_auth.load_extra_data',
  'social_core.pipeline.user.user_details',
)
Add a mapping to this function in your urls.py, and you’re all set!
How does that magic work?
Python Social Auth is a very cool, very complex piece of machinery. It’s perfectly happy to handle authentication and access to any of several dozen social auth providers, and it works on most popular Python web frameworks, including Django, Flask, Pyramid, CherryPy, and WebPy.
For the most part, the code above is a very standard Django REST framework (DRF) function-based view: It listens for POST requests on whichever path you map it to in your urls.py and, assuming you send it a request in the format it expects, it then gets you a User object, or None.
If you get a User object, it’s of the model type you’ve configured elsewhere in your project, which may or may not have already existed. PSA already took care of validating the token, identifying whether or not a user match existed, creating a user if necessary, and updating user details from the social provider.
The exact details of how a user is mapped from the social provider’s user to yours, and associated with existing users, are specified by the SOCIAL_AUTH_PIPELINE defined above. There’s a lot more to learn about how this all works, but it’s outside the scope of this post. You can read more about it here.
The key bit of magic is the @psa() decorator on the view, which adds some members to the request object that gets passed in to your view. The most interesting one to us is request.backend (to PSA, a backend is any social authentication provider).
The appropriate back-end was chosen for us and appended to the request object based on the backend argument to the view, which gets populated by the URL itself.
Once you have the backend object in hand, it’s perfectly happy to authenticate you against that provider, given your access code; that’s the do_auth method. This, in turn, engages the entirety of the SOCIAL_AUTH_PIPELINE from your config file.
The pipeline can do some pretty powerful things if you extend it, although it already does everything you need it to with nothing but its default, built-in functionality.
After that, it’s just back to normal DRF code: if you got a valid User object, you can very easily return an appropriate API token. If you didn’t get a valid User object back, it’s easy to generate an error.
One drawback of this technique is that while it’s relatively simple to return errors if they occur, it’s difficult to get much insights into what specifically went wrong. PSA swallows any details the server might have returned about what the problem was.
Then again, it is in the nature of well-designed authentication systems to be fairly opaque about error sources. If an application ever tells a user “Invalid Password” after a login attempt, that’s tantamount to saying “Congratulations! You’ve guessed a valid username.”
Why not just roll your own?
In a word: extensibility. Very few social OAuth 2 providers require or return exactly the same information in their API calls in exactly the same way. There are all kinds of special cases and exceptions though.
Adding a new social provider once you’ve already set up a PSA is a matter of a few lines of configuration in your settings files. You don’t have to adjust any code at all. PSA abstracts all of that out, so that you can focus on your own application.
How on Earth do I test this?
Good question! unittest.mock is not well-suited to mocking out API calls buried under an abstraction layer deep inside a library; just discovering the precise path to mock would take substantial effort.
Instead, because PSA is built atop the Requests library, you use the excellent Responses library to mock out the providers at the HTTP level.
A full discussion of testing is beyond the scope of this article, but a sample of our tests are included here. Particular functions to note there are the mocked context manager and the SocialAuthTests class.
Let PSA do the heavy lifting.
The OAuth2 process is detailed and complicated with a lot of inherent complexity. Luckily, it’s possible to bypass much of that complexity by bringing in a library dedicated to handling it in as painless a way as possible.
Python Social Auth does a great job at that. We’ve demonstrated a Django/DRF view that utilizes the client-side, implicit, OAuth2 flow to get seamless user creation and matching in only 25 lines of code. That’s not too shabby.
Further Reading on the Toptal Blog:
Würzburg, Bavaria, Germany
Member since October 19, 2015
About the author
Peter, BSc (with distinction), is a professional Python/Django developer who has also written an exotic processor emulator in Rust.