Mirror API Tutorial: Google Glass for Web Developers
Wouldn’t it be great to develop for Google Glass without learning a new programming language, and even by just using knowledge common to all web developers? Yes, it is possible!
This article will introduce you to web development techniques you can use to build application used on Google Glass.

Wouldn’t it be great to develop for Google Glass without learning a new programming language, and even by just using knowledge common to all web developers? Yes, it is possible!
This article will introduce you to web development techniques you can use to build application used on Google Glass.

Demir is a developer and project manager with over 15 years of professional experience in a wide range of software development roles.
Expertise
Android devices are certainly taking over the world. Thousands of smartphones, tablets, smart-tvs, and a whole bunch of other devices are powered by Google’s open source platform. On top of that, Google’s wearable computing incentive is pushing the world to whole new heights. Google Glass is a device that is very close to changing the way we interact with technology. For a very long time, we’ve been walking with our heads down, staring at our small phone screens. Google Glass is helping us raise our heads and walk proudly while interacting with our wearable technology.
At first, Android development was limited only to developers that had Java knowledge. A large community of developers were building great web applications using other platforms, and had extensive difficulties adopting the Android development. There are a few approaches that evolved later and provided some sort of cross-platform development, empowering savvy web developers to start building apps for Android without Java and Android SDK knowledge. But, wouldn’t it be great to develop for Google Glass without learning a new programming language, and even by just using knowledge common to web developers? Yes, it is possible!
Google provided cloud based RESTful services that enable web developers to build Glassware, just by interacting with web services hosted and managed by Google. These services are named Mirror API, and are independent on development platforms. In order to start using Glass’s Mirror API, you don’t even have to possess a Google Glass device, though some advanced features require that you have one.
There are only two things you need to know:
- Execute OAuth 2.0 request and obtain Authentication Token
- Execute HTTP request to predefined end point
This Google Glass development tutorial will introduce you to techniques you can use to build applications for Glass.
If you still haven’t used Google Glass, take a look at these two videos, as they should give you enough information to understand the basics of the user interface.
There are even more useful videos for setup and navigation here, and many more details about the user interface here.
There are a lot of differences between Mirror API and native Google Glass development. The purpose of this tutorial is not to debate on these differences, but to provide web developers with insight on how Google Glass works, and how they can get on board as soon as possible.
How Does a Mirror API Work?
The first and most important thing is that you are building a standard web application. Your application will run on a web server and it will never interact directly with a Google Glass device. Instead, your application will interact with the Mirror API services. Mirror API based applications do not require any installation on the Glass itself, and all the services are already part of the Glass OS.

The Google Glass device will run its own sync services to push or pull content back to your application through the Mirror API.
You cannot impact the frequency of when Google Glass checks for updates on Mirror API, and having the “middle man” has a cost. The direct consequence of this architecture is that you cannot have a real-time interaction with Glass users. You should always expect a delay between your request for an action, and the actual event being executed on the Glass device.
Setup and Authentication
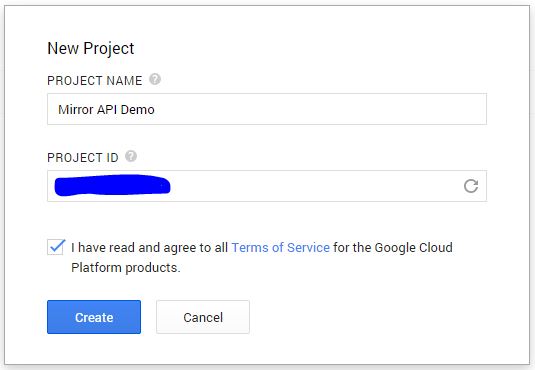
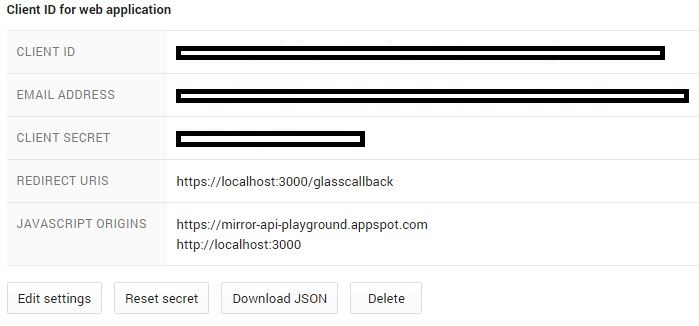
In order to use the Mirror API for web development, you need to define an application identity on the Google Developers Console. Open the Google APIs console and sign in with your Google account.
Create your new project; let’s name it “Mirror API Demo”
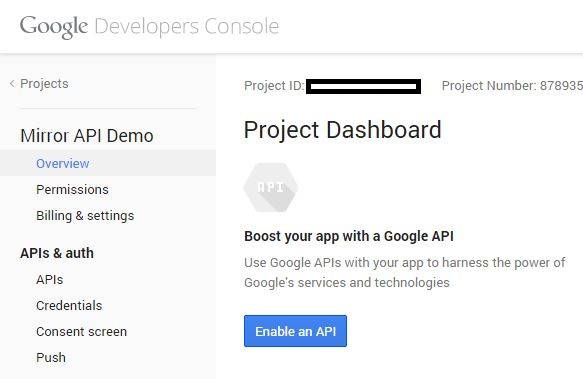
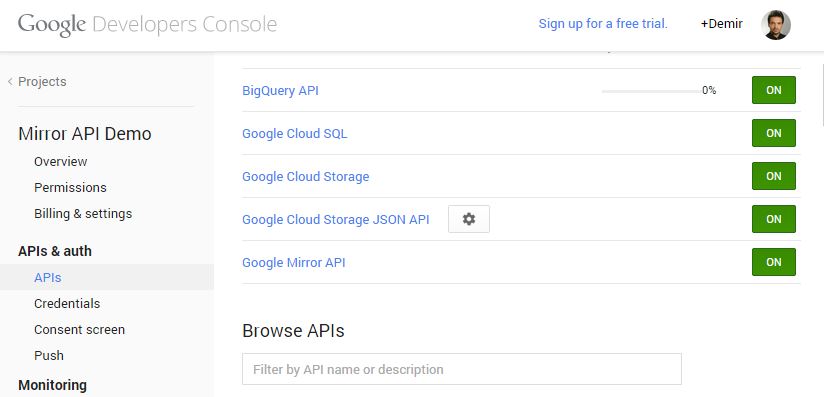
The next thing you need to do is enable Mirror API for your Glass web application. To do that, click the “Enable an API” button in the project overview page, find Mirror API on the list and switch it ON.
Next, create Client ID for Glass web applications. To do this, just click the “Create New Client ID” button in the Credentials screen.
Note: You might be asked to fill in the “Consent screen” details. Data on this form is presented to a user when granting access to your application.
We will test Mirror API using the Google Glass Playground. To enable the Playground you will need to authorize https://mirror-api-playground.appspot.com as a valid origin for HTTP requests. We will not be using OAuth redirection in this demo, so you can leave anything in “Redirect URIs” field.
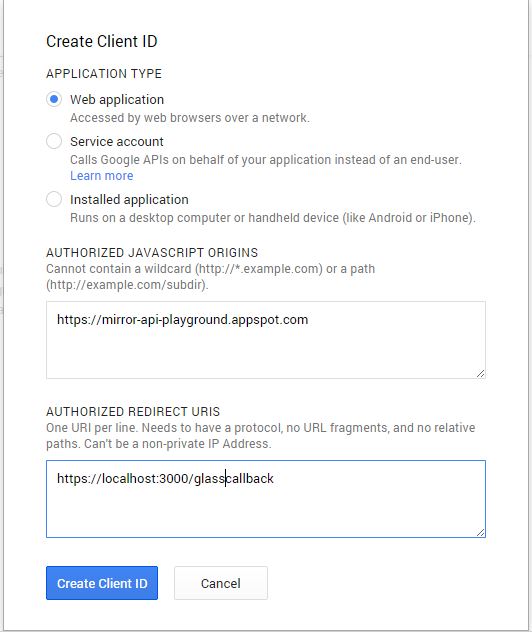
Click “Create Client ID” and you are ready to make your first Mirror API request.
Authenticating Mirror API application
Important: Do not mistake your Mirror API Developer account with your Google Glass owner account. You might do this exercise with just one account that is a developer and a Glass owner, but it is important to be aware of the separation of these two accounts.
Every HTTP request sent from your Glass web application to Mirror API needs to be authorized. Mirror API is using standard “Bearer Authentication”, which means that you need to provide a token with each request. Token is issued by the Google API using standard OAuth 2.0 protocol.
- The user (Glass Owner) will open a page on your web application and click “Login”
- Your application will issue a request to Google API, and the user will be presented with a consent screen generated by the Google API (usually in a new popup screen)
- If access permissions are granted to your application, Google API will issue a token that you will use for calling the Mirror API
Mirror API Playground
The Google Glass Playground lets you experiment with how content is displayed on a Glass. You can use it to push content to your Glass, but even if you do not have a device you can see how it would look on the Glass display.
Mirror API Playground can be found at this URL.
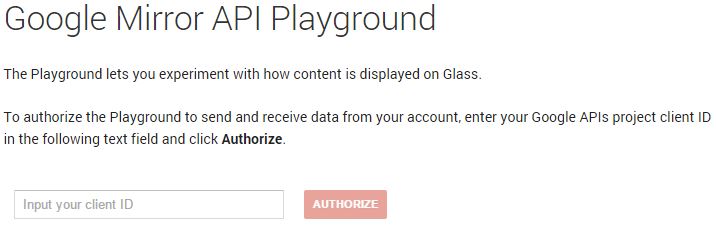
We have already allowed Mirror API Playground endpoint as a valid HTTP request origin. In order to use the Playground you will need to “identify Mirror API Playground as your application” by providing your Client ID. You can find your application’s Client ID at Google Developers Console.

When you click “Authorize,” you will be presented with an OAuth 2.0 consent screen, similar to the picture below. Please note that you should log in using your “Glass Owner” account, as these are the credentials that the application will use to interact with the Glass.
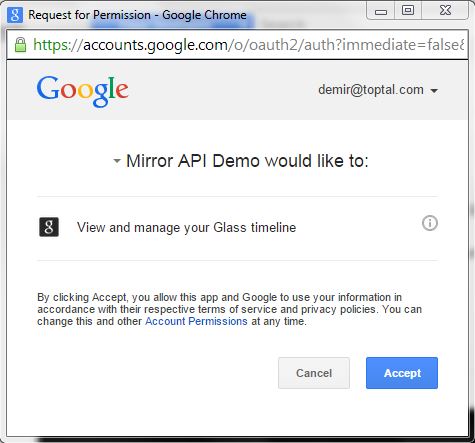
After you click “Accept,” Mirror API Playground will be identified as your own application; it will obtain access to the User’s Glass Timeline and you will be able to interact with the Google Glass device from the Playground.
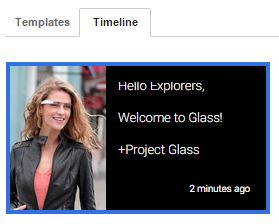
Hello Glass Explorers!
The Mirror API Playground is filled with predefined templates you can use for trying the API. Scroll through the list and find an example that you like the most. For this demo I chose the “Hello Explorers” card.
The selected item will be displayed in the Playground, together with the HTTP Request Body content used to construct its layout.
{
  "text": "Hello Explorers,\n\nWelcome to Glass!\n\n+Project Glass\n",
  "creator": {
    "displayName": "Project Glass",
    "imageUrls": [
      "https://lh3.googleusercontent.com/-quy9Ox8dQJI/T3xUHhub6PI/AAAAAAAAHAQ/YvjqA3Pw1sM/glass_photos.jpg?sz=360"
    ]
  },
  "menuItems": [
    {
      "action": "REPLY"
    }
  ],
  "notification": {
    "level": "DEFAULT"
  }
}
Feel free to modify the request, and when you are happy with the design, click the “Insert Item” button. After the request is processed your “Timeline” will be updated. If you have a Glass device, the item will be inserted in the timeline as well.
Writing Your Own Mirror API Web Application
Congratulations! You executed your first Mirror API request and sent a message to your Google Glass, without even writing any code.
Let’s make things a little more interesting. We want to remove the Mirror API Playground and put our own application in its place.
First, we need to assure that the Google API will accept requests from our application. Go back to Google Developers Console and add your application’s URL to the list of authorized JavaScript Origins. I’ll use http://localhost:3000 but you can modify this to your own setup.
Getting the Authorization Token
To execute OAuth 2.0 request and obtain authorization token from Google API, we will use Google API JavaScript Client Library.
Create a simple HTML page with the following content, make sure to replace CLIENT ID with your application ID:
<!DOCTYPE html>
<html>
  <head>
    <title>{{ title }}</title>
    <link rel='stylesheet' href='/stylesheets/style.css' />
    <script src="https://apis.google.com/js/client.js"></script>
    <script>
        function auth() {
            var config = {
                'client_id': <YOUR APPLICATION CLIENT ID>',
                'scope': [
                    'https://www.googleapis.com/auth/userinfo.profile',
                    'https://www.googleapis.com/auth/glass.timeline',
                    'https://www.googleapis.com/auth/glass.location'
                ]
            };
            gapi.auth.authorize(config, function () {
                console.log('login complete');
                console.log(gapi.auth.getToken());
            });
        }
    </script>
  </head>
  <body>
    <h1>{{ title }}</h1>
    <button onclick="auth();">Authorize</button>
  </body>
</html>
When you start the Google Glass application (make sure it is running on URL you specified as authorized JavaScript origin in Google Developers Console) and click “Authorize,” you will start OAuth 2.0 flow. Log in with your Google account and your token will be displayed in the browser console.
Now, armed with your token, you are ready to start posting to Mirror API! Your token will expire in 60 minutes, but that should be more than enough time to finish the demo. You can always get another token by clicking “Authorize” again.
RESTful services and HTTP requests are common terms among all web developers, no matter what development platform or programming language they use. To try this Demo, you will need to execute standard HTTP requests toward the Mirror API endpoints. I choose to use the Postman for this. Feel free to take the request details and implement the Demo in your favorite programming language. Use the Postman, or any other HTTP client tool.
Getting the Timeline Items
You can always retrieve the list of items you’ve pushed to Glass by executing HTTP GET to https://www.googleapis.com/mirror/v1/timeline.
Every request towards Mirror API needs to be authorized. An authorization token is sent as a value in Authorization HTTP Header, prefixed by “Bearer “ word.
In Postman it would look something like this:

If you execute the request, the response should be similar to this:
{
    "kind": "mirror#timeline",
    "nextPageToken": "CsEBCqQBwnSXw3uyIAD__wAA_wG4k56MjNGKjJqN18bHzszIy8rMz8nIy9bRlouaktedxp2dyJrHmtLInsue0suZzZvSncvOxtLIyJnGnJyex57Px8zW_wD-__730HDTmv_7_v5HbGFzcy51c2VyKDk4MTM3NDUzMDY3NCkuaXRlbShiOWJiN2U4ZS03YTRhLTRmMmQtYjQxOS03N2Y5Y2NhOGEwODMpAAEQASG5sX4SXdVLF1AAWgsJsgPYYufX654QASAA8ISVfAE=",
    "items": [
        {
            "kind": "mirror#timelineItem",
            "id": "b9bb7e8e-7a4a-4f2d-b419-77f9cca8a083",
            "selfLink": "https://www.googleapis.com/mirror/v1/timeline/b9bb7e8e-7a4a-4f2d-b419-77f9cca8a083",
            "created": "2014-11-04T19:11:07.554Z",
            "updated": "2014-11-04T19:11:07.554Z",
            "etag": "1415128267554",
            "creator": {
                "kind": "mirror#contact",
                "source": "api:182413127917",
                "displayName": "Project Glass",
                "imageUrls": [
                    "https://lh3.googleusercontent.com/-quy9Ox8dQJI/T3xUHhub6PI/AAAAAAAAHAQ/YvjqA3Pw1sM/glass_photos.jpg?sz=360"
                ]
            },
            "text": "Hello Explorers,\n\nWelcome to Glass!\n\n+Project Glass\n",
            "menuItems": [
                {
                    "action": "REPLY"
                }
            ],
            "notification": {
                "level": "DEFAULT"
            }
        }
    ]
}
If you take a look at the content of the response, you will notice that it contains the item you posted from the Playground.
Creating a New Item
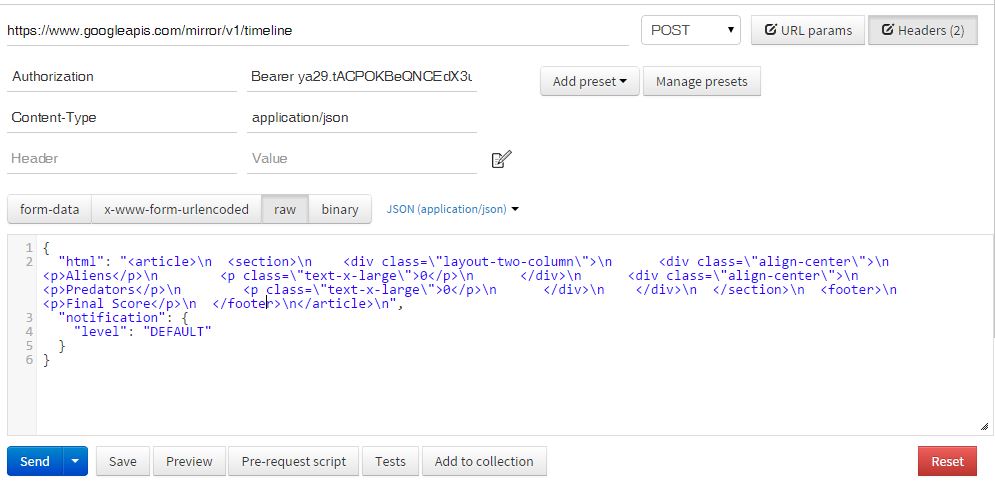
To create a new item, you need to execute POST to https://www.googleapis.com/mirror/v1/timeline. You will also need to specify that Content-Type is application/json, and provide Authorization header, just like in the previous example.
Let’s assume that we are big fans of sports, and our favorite team the Aliens are playing the Predators. We want to use Mirror API to send results to all the fans.
Request body should look like this.
{
  "html": "<article>\n  <section>\n    <div class=\"layout-two-column\">\n      <div class=\"align-center\">\n        <p>Aliens</p>\n        <p class=\"text-x-large\">0</p>\n      </div>\n      <div class=\"align-center\">\n        <p>Predators</p>\n        <p class=\"text-x-large\">0</p>\n      </div>\n    </div>\n  </section>\n  <footer>\n    <p>Final Score</p>\n  </footer>\n</article>\n",
  "notification": {
    "level": "DEFAULT"
  }
}
And Postman screen should be similar to this.
When you execute the request, Mirror API should provide the response similar to this.
{
	kind: "mirror#timelineItem",
	id: "e15883ed-6ca4-4324-83bb-d79958258603",
	selfLink: https://www.googleapis.com/mirror/v1/timeline/e15883ed-6ca4-4324-83bb-d79958258603,
	created: "2014-11-04T19:29:54.152Z",
	updated: "2014-11-04T19:29:54.152Z",
	etag: "1415129394152",
	html: "<article>\ <section>\ <div class=\"layout-two-column\">\ <div class=\"align-center\">\ <p>Aliens</p>\ <p class=\"text-x-large\">0</p>\ </div>\ <div class=\"align-center\">\ <p>Predators</p>\ <p class=\"text-x-large\">0</p>\ </div>\ </div>\ </section>\ <footer>\ <p>Final Score</p>\ </footer>\ </article>\ ",
	notification: {
		level: "DEFAULT"
	}
}
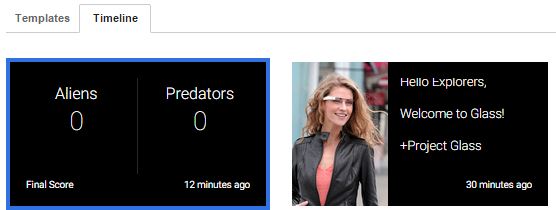
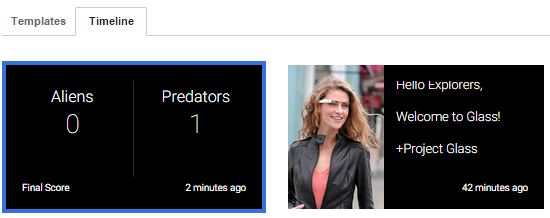
Even If you don’t have a Google Glass, you can go back to the Mirror API Playground and click “Reload Timeline Items” button. You should see two items, exactly as they would be displayed on Glass display. Both items will be listed if you execute the first example and GET the items.
If you take a look at the content of the response from previous example, you can find a line similar to
id: "e15883ed-6ca4-4324-83bb-d79958258603"
Mirror API will assign a globally unique ID to every item when it is inserted. This ID will be included in the response after POST is executed, and it will be included in the item details when you execute GET to list the timeline items.
Let’s say that the Predators took the lead and scored. In order to update the score, you will need to execute PUT to https://www.googleapis.com/mirror/v1/timeline followed by ID. Similar to
https://www.googleapis.com/mirror/v1/timeline/e15883ed-6ca4-4324-83bb-d79958258603
Modify the item content to reflect your change.
{
  "html": "<article>\n  <section>\n    <div class=\"layout-two-column\">\n      <div class=\"align-center\">\n        <p>Aliens</p>\n        <p class=\"text-x-large\">0</p>\n      </div>\n      <div class=\"align-center\">\n        <p>Predators</p>\n        <p class=\"text-x-large\">1</p>\n      </div>\n    </div>\n  </section>\n  <footer>\n    <p>Final Score</p>\n  </footer>\n</article>\n",
  "notification": {
    "level": "DEFAULT"
  }
}
Postman configuration should look similar to this.
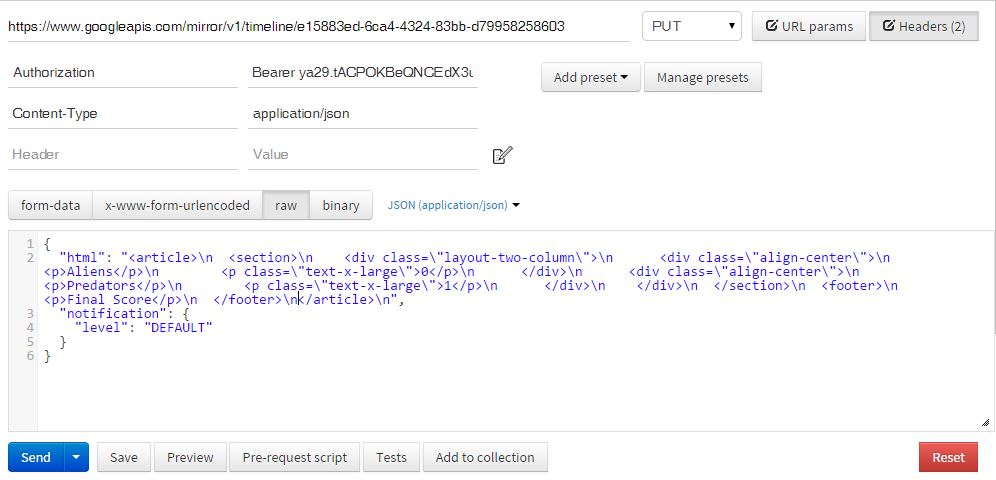
After you execute the request, and check the content of your timeline, you should notice that Predators are leading by 1:0.
Menus and Interaction With the User
So far, we were just pushing content to the Glass, without any interaction or feedback from the user. Unfortunately, you cannot simulate user interaction, and you will need to use a real Glass device to try this example.
So, the game continues and Aliens score for 1:1. We want to enable some kind of “I Like” functionality, where users will be able to execute simple action while looking at a timeline item.
First, we need to add the menu to our card showing the score. Following the steps from the previous example, update the timeline item with the following content:
{
  "html": "<article>\n  <section>\n    <div class=\"layout-two-column\">\n      <div class=\"align-center\">\n        <p>Aliens</p>\n        <p class=\"text-x-large\">1</p>\n      </div>\n      <div class=\"align-center\">\n        <p>Predators</p>\n        <p class=\"text-x-large\">1</p>\n      </div>\n    </div>\n  </section>\n  <footer>\n    <p>Final Score</p>\n  </footer>\n</article>\n",
  "notification": {
    "level": "DEFAULT"
  },
  "menuItems":[
    {
      "action":"CUSTOM",
      "id":"i_like",
      "values":[
        {
          "displayName":"I Like!"
        }
      ]
    }
  ]
}
When you execute this request, your user will see that the score is now updated to 1:1. But when the user taps the Glass, a menu will be presented.
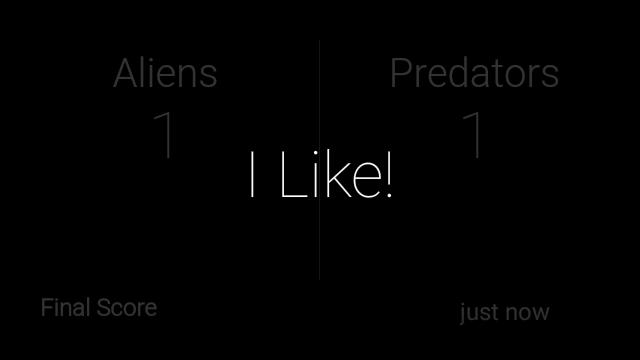
If you now tap “I Like,” nothing will happen!
I’ve already mentioned that there is always a “middle man” between your application and a Glass device. When you select “I Like,” the Glass device will send the information to Mirror API, but you haven’t specified where Mirror API should forward this information.
This is where Subscriptions comes in. You need to subscribe to receive notifications from Mirror API when your user performs an action.
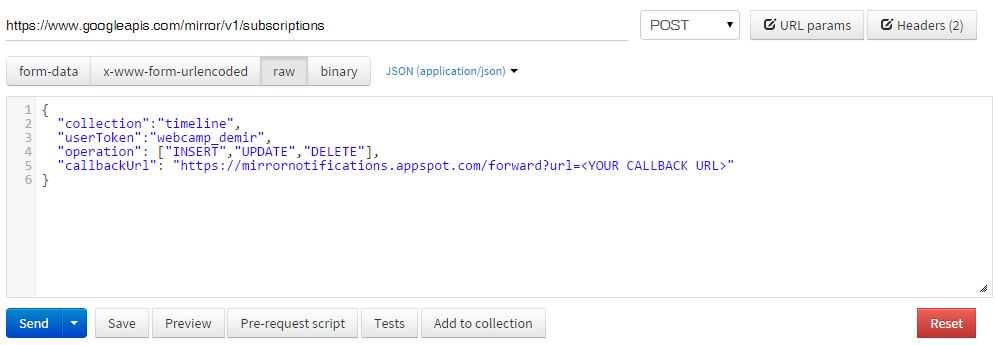
To create a subscription, you need execute a POST to https://www.googleapis.com/mirror/v1/subscriptions.
Request body should be like this:
{
  "collection":"timeline",
  "userToken":"toptal_test",
  "operation": ["INSERT","UPDATE","DELETE"],
  "callbackUrl": "https://mirrornotifications.appspot.com/forward?url=<YOUR URL>"
}
callbackUrl contains your redirect URL.
Note: Mirror API requires SSL encryption for URL where event data is forwarded. However, for testing purpose Google has provided a proxy at
https://mirrornotifications.appspot.com/forward.
Mirror API will execute POST to the URL you specified in a subscription. You will need to use your preferred development environment to create a handler for that URL. I’ve provided the simple JavaScript (NodeJS/ExpressJS) sample that will just output the request content.
router.get('/notify', function(req, res) {
    console.log(req);
    res.send("OK");
});
Closure
Google Glass Mirror API is unique in many ways. Designed to give web developers access to Glass development without any prerequisites, it is included in the core of Glass OS, and it does not rely on third party development tools. Mirror API is fully managed and maintained by Google, and it is part of the Google API platform, which relieves you of any concerns regarding stability and scalability.
If you are a web developer that never used Google Glass, you probably avoided learning about Mirror API because you thought that you needed to have a Glass device, or you thought that you would need to spend a lot of time learning about Google Glass development. I hope that this Mirror API tutorial helped you break that barrier, and gave you a nudge to spend a few minutes looking at this type of development.
Wearable technology is here, Google Glass is on its frontier, and every developer should have a chance to be part of it. Mirror API gives you exactly that.
This article gives you tools and instructions for authenticating your Mirror API application, reading data from Google Glass, sending data to Google Glass, and receiving feedback from a user. To learn more about Mirror API and its features, please visit the Mirror API Guides.
Sarajevo, Federation of Bosnia and Herzegovina, Bosnia and Herzegovina
Member since July 8, 2014
About the author
Demir is a developer and project manager with over 15 years of professional experience in a wide range of software development roles.