How to Build an Infinite Runner on iOS: Cocos2D, Automation, and More
Building games for the iOS platform can be an enriching experience in terms of both financial and personal growth. Recently, I deployed a Cocos2D-based game to the App Store. In this post, I’ll explain the process behind developing games for iOS, from Cocos2D through to publishing.

Building games for the iOS platform can be an enriching experience in terms of both financial and personal growth. Recently, I deployed a Cocos2D-based game to the App Store. In this post, I’ll explain the process behind developing games for iOS, from Cocos2D through to publishing.

Alexey is a full-stack developer and architect. He has expert knowledge of Python and is strong in Java and Objective-C.
Developing iOS games can be an enriching experience in terms of both personal and financial growth. Earlier this year, I deployed a Cocos2D-based game, Bee Race, to the App Store. Its gameplay is simple: an infinite runner in which players (in this case, bees) collect points and avoid obstacles. See here for a demo.
In this tutorial, I’ll explain the process behind developing games for iOS, from Cocos2D through to publishing. For reference, here’s a short table-of-contents:
- Sprites and physical objects
- A brief introduction to Cocos2D
- Using Cocos2D with storyboards
- Gameplay and (brief) project description
- Automate jobs. Use tools. Be cool.
- In-app billing
- Multiplayer gameplay with the Game Center
- Room for improvement
- Conclusion
Sprites and physical objects
Before we get into the gritty details, it’ll be helpful to understand the distinction between sprites and physical objects.
For any given entity that appears on the screen of an endless runner game, the graphical representation of that entity is referred to as a sprite, while the polygonal representation of that entity in the physics engine is referred to as a physical object.
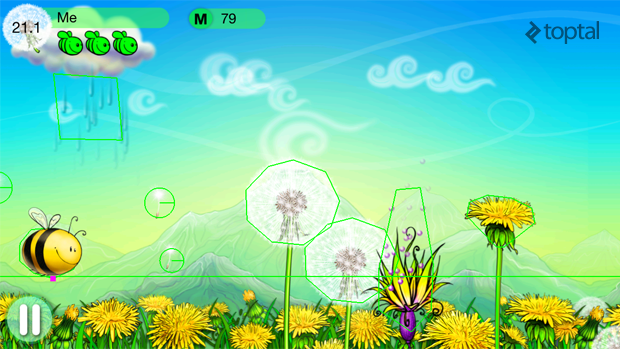
So the sprite is drawn on the screen, backed by its corresponding physical object, which is then handled by your physics engine. That setup can be visualized here, where sprites are displayed on the screen, with their physical polygonal counterparts outlined in green:
Physical objects aren’t connected to their respective sprites by default, which means that you as the iOS developer can choose which physics engine to use and how to connect sprites and bodies. The most common way is to subclass the default sprite and add a concrete physical body to it.
With that in mind…
A brief tutorial on Cocos2D iOS game development
Cocos2D-iphone is an open source framework for iOS that uses OpenGL for hardware graphics acceleration and supports the Chipmunk and Box2D physics engines.
First of all, why do we need such a framework? Well, for starters, frameworks implement the oft-used components of game development. For example, Cocos2D can load sprites (in particular, sprite sheets (why?)), launch or stop a physics engine, and handle timing and animation properly. And it does all this with code that’s been reviewed and tested extensively—why devote your own time to re-writing likely-inferior code?
Perhaps most importantly, however—Cocos2D game development uses graphics hardware acceleration. Without such acceleration, any iOS infinite runner game with even a moderate number of sprites will run with notably poor performance. If we try to make a more complicated application, then we will probably start to see a “bullet-time” effect on the screen, i.e., multiple copies of each sprite as it attempts to animate.
Finally, Cocos2D optimizes memory usage since it caches sprites. Thus, any duplicated sprites require minimal additional memory, which is obviously useful for games.
Using Cocos2D with storyboards
After all of the praise I’ve lapped on Cocos2D, it might seem illogical to suggest using Storyboards. Why not just manipulate your objects with Cocos2D, etc.? Well, to be honest, for static windows it is often more convenient to use Xcode’s Interface Builder and its Storyboard mechanism.
Firstly, it allows me to drag and position all my graphical elements for my endless runner game with my mouse. Secondly, the Storyboard API is very, very useful. (And yes, I know about Cocos Builder).
Here’s a quick glimpse of my Storyboard:
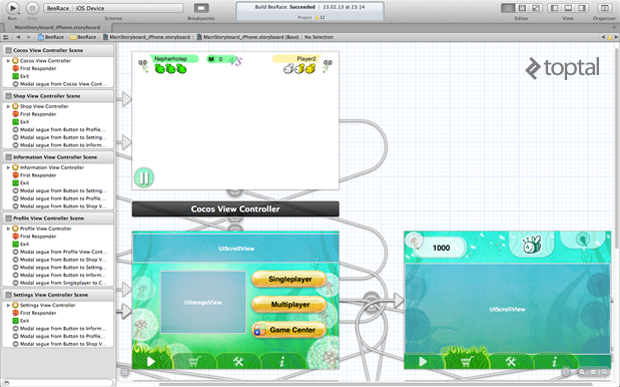
The game’s main view controller just contains a Cocos2D scene with some HUD elements on top:
Pay attention to the white background: it’s a Cocos2D scene, which will load all of the necessary graphic elements at runtime. Other views (live indicators, dandelions, buttons, etc.) are all standard Cocoa views, added to the screen using Interface Builder.
I won’t dwell on the details—if you’re interested, examples can be found on GitHub.
Gameplay and (brief) project description
(To provide some more motivation, I’d like to describe my endless runner game in slightly more detail. Feel free to skip this section if you want to proceed to the technical discussion.)
During live gameplay, the bee is motionless, and the field itself is actually rushing along, bringing with it various dangers (spiders and poisonous flowers) and perks (dandelions and their seeds).
Cocos2D has camera object which was designed to follow the character; in practice, it was less complicated to manipulate the CCLayer containing the game world.
The controls are simple: tapping the screen moves the bee up, and another tap moves it down.
The world layer itself actually has two sublayers. When the game starts, the first sublayer is populated from 0 to BUF_LEN and displayed initially. The second sublayer is populated in advance from BUF_LEN to 2*BUF_LEN. When the bee reaches BUF_LEN, the first sublayer is cleaned and instantly repopulated from 2*BUF_LEN to 3*BUF_LEN, and the second sublayer is presented. In this way, we alternate between layers, never retaining obsolete objects, an important part of avoiding memory leaks.

In terms of physics engines, I used Chipmunk for two reasons:
- It’s written in pure Objective-C.
- I’ve worked with Box2D before, so I wanted to compare the two.
The physics engine was really only used for collision detection. Sometimes, I’m asked, “Why didn’t you write your own collision detection?”. In reality, there’s not much sense to that. Physics engines were designed for that very purposes: they can detect collisions between bodies of complicated shapes and optimize that process. For example, physics engines often split the world into cells and perform collision checks only for bodies in the same or adjacent cells.
Automate jobs. Use tools. Be cool.
A key component of indie infinite runner game development is to avoid stumbling over small issues. Time is a crucial resource when developing an app, and automation can be incredibly time-saving.
But sometimes, automation can also be a compromise between perfectionism and meeting your deadline. In this sense, perfectionism can be an Angry Birds killer.
For example, in another iOS game I am currently developing, I built a framework to create layouts using a special tool (available on GitHub). This framework has its limitations (for example, it doesn’t have nice transitions between scenes), but using it allows me to make my scenes in a tenth of the time.
So while you can’t build your own superframework with special supertools, you still can and should automate as many of these small tasks as possible.
In building this infinite runner, automation was key once again. For example, my artist would send me high resolution graphics through a special Dropbox folder. To save time, I wrote some scripts to automatically build file sets for the various target resolutions required by the App Store, adding -hd or @2x as well (said scripts are based on ImageMagick).
In terms of additional tools, I found TexturePacker to be very useful—it can pack sprites into sprite sheets so that your app will consume less memory and load faster, as all of your sprites will be read from a single file. It can also export textures in almost all possible frameworks formats. (Note that TexturePacker is not a free tool, but I think it’s worth the price. You can also check out free alternatives like ShoeBox.)
The main difficulty associated with game physics is to create suitable polygons for each sprite. In other words, creating a polygonal representation of some obscurely-shaped bee or flower. Don’t even try to do this by hand—always use special applications, of which there are many. Some are even quite… exotic—like creating vector masks with Inkspace and then importing them into to game.
For my own endless runner game development, I created a tool to automate this process, which I call Andengine Vertex Helper. As the name suggests, it was initially designed for the Andengine framework, although it will work appropriately with a number of formats these days.
In our case, we need to use the plist pattern:
<real>%.5f</real><real>%.5f</real>
Next, we create a plist file with object descriptions:
<?xml version="1.0" encoding="UTF-8"?> <!DOCTYPE plist PUBLIC "-//Apple//DTD PLIST 1.0//EN" "http://www.apple.com/DTDs/PropertyList-1.0.dtd">
<plist version="1.0">
<dict>
    <key>jet_ant</key>
    <dict>
        <key>vertices</key>
        <array>
<real>-0.18262</real><real>0.08277</real>
<real>-0.14786</real><real>-0.22326</real>
<real>0.20242</real><real>-0.55282</real>
<real>0.47047</real><real>0.41234</real>
<real>0.03823</real><real>0.41234</real>
        </array>
    </dict>
</dict>
</plist>
And an object loader:
- (void)createBodyAtLocation:(CGPoint)location{
    float mass = 1.0;
    body = cpBodyNew(mass, cpMomentForBox(mass, self.sprite.contentSize.width*self.sprite.scale,        self.sprite.contentSize.height*self.sprite.scale));
    body->p = location;
    cpSpaceAddBody(space, body);
    NSString *path =[[NSBundle mainBundle] pathForResource:@"obj _descriptions" ofType:@"plist"];

    // <- load plist
    NSDictionary *objConfigs = [[[NSDictionary alloc] initWithContentsOfFile:path] autorelease];   NSArray *vertices = [[objConfigs objectForKey:namePrefix] objectForKey:@"vertices"];
    shape = [ChipmunkUtil polyShapeWithVertArray:vertices
        withBody:body
        width:self.sprite.contentSize.width
        height:self.sprite.contentSize.height];
    shape->e = 0.7;
    shape->u = 1.0;
    shape->collision_type = OBJ_COLLISION_TYPE;
    cpSpaceAddShape(space, shape);
}
To test out how sprites correspond to their physical bodies, see here.
Much better, right?
In summary, always automate when possible. Even simple scripts can save you tons of time. And importantly, that time can be used for programming instead of mouse clicking. (For additional motivation, here’s a token XKCD.)
In-app billing
Collected blowballs in the game act as an in-app currency, allowing users to purchase new skins for their bee. However, this currency can also be purchased with real money. An important point to note with respect to in-app billing is whether or not you need to perform server-side checks for purchase validity. Since all of the purchasable goods are essentially equal in terms of gameplay (just altering the bee’s appearance), there is no need to perform a server check for purchase validity. However, in many cases, you’ll definitely need to do so.
For more, Ray Wenderlich has the perfect in-app billing tutorial.
Multiplayer gameplay with the Game Center
In mobile gaming, socializing is more than just adding a Facebook ‘Like’ button or setting up leaderboards. To make the game more exciting, I implemented a multiplayer version.
How does it work? First, two players are connected using the iOS Game Center’s real-time match-making. As the players are really playing the same infinite runner game, there needs to be just a single set of game objects. That means that one player’s instance needs to be generating the objects, and the other play’s will read them off. In other words, if both players’ devices were generating game objects, it’d be tough to synchronize the experience.
With that in mind, after the connection is established, both players send each other a random number. The player with the higher number acts as the “server”, creating game objects.
Do you remember the discussion of portioned world generation? Where we had two sublayers, one from 0 to BUF_LEN and the other from BUF_LEN to 2*BUF_LEN? This architecture wasn’t used by accident—it was necessary to provide smooth graphics over delayed networks. When a portion of objects is generated, it gets packed into a plist and sent to the other player. The buffer is big enough to let the second player play even with a network delay. Both players send each other their current position with a period of half a second, also sending their up-down movements immediately. To smooth out the experience, position and velocity are corrected every 0.5 second with a smooth animation, so in practice it looks like the other player is moving or accelerating gradually.
There are certainly more considerations to be made with regards to multiplayer endless running gameplay, but hopefully this gives you a sense for the types of challenges involved.
Room for improvement
Games are never finished. Admittedly, there are several areas where I’d like to improve my own, namely:
- Control issues: tapping is often an unintuitive gesture for players who prefer to slide.
-
The world layer is moved using the CCMoveBy action. This was fine when the world layer’s velocity was constant, since CCMoveBy action was cycled with CCRepeatForever:
-(void) infiniteMove{
    id actionBy = [CCMoveBy actionWithDuration: BUFFER_DURATION position: ccp(-BUFFER_LENGTH, 0)];  id actionCallFunc = [CCCallFunc actionWithTarget:self               selector:@selector(requestFillingNextBuffer)];
    id actionSequence = [CCSequence actions: actionBy, actionCallFunc, nil];
    id repeateForever = [CCRepeatForever actionWithAction:actionSequence];
    [self.bufferContainer runAction:repeateForever];
}
But later, I added a world velocity increase to make the game harder as it goes on:
-(void) infiniteMoveWithAccel {
    float duration = BUFFER_DURATION-BUFFER_ACCEL*self.lastBufferNumber;
    duration = max(duration, MIN_BUFFER_DURATION);
    id actionBy = [CCMoveBy actionWithDuration: duration position: ccp(-BUFFER_LENGTH, 0)];
    id restartMove = [CCCallFunc actionWithTarget:self selector:@selector(infiniteMoveWithAccel)];  id fillBuffer = [CCCallFunc actionWithTarget:self           selector:@selector(requestFillingNextBuffer)];
    id actionSequence = [CCSequence actions: actionBy, restartMove, fillBuffer, nil];   [self.bufferContainer runAction:actionSequence];
}
This change caused the animation to tatter on each action restart. I tried to fix the issue, to no avail. However, my beta testers didn’t notice the behavior, so I postponed the fix.
- On the one hand, there’s been no need to write my own authorization for multiplayer when using Game Center or running my own game server. On the other hand, it’s made it impossible to create bots, which is something I might like to change.
Conclusion
Creating your own indie infinite runner game can be a great experience. And once you get to the publishing step of the process, it can be a wonderful feeling as you release your own creation out into the wild.
The review process can range from several days to several weeks. For more, there’s a helpful site here that uses crowd-sourced data to estimate current review times.
Additionally, I recommend using AppAnnie to examine various information about all the applications in the App Store, and registering with some analytics services like Flurry Analytics can be helpful too.
And if this game has intrigued you, be sure to check out Bee Race in the store.
Harrington Park, NJ, United States
Member since July 11, 2012
About the author
Alexey is a full-stack developer and architect. He has expert knowledge of Python and is strong in Java and Objective-C.