Implementing a Remote Framebuffer Server in Java
Connecting to remote computers and working on them through terminals over a network is something we often take for granted. Technologies that enable us to do this have changed the way we work and have opened doors to amazing possibilities. Although the inner workings of these technologies may seem like obscure knowledge, implementations of many of these technologies are surprisingly straightforward. In this article, Toptal engineer Igor Delac gives us a step-by-step tutorial on how to implement the Remote Framebuffer server-side protocol in Java, allowing Swing-based applications to run and be interacted with remotely using standard VNC clients.

Connecting to remote computers and working on them through terminals over a network is something we often take for granted. Technologies that enable us to do this have changed the way we work and have opened doors to amazing possibilities. Although the inner workings of these technologies may seem like obscure knowledge, implementations of many of these technologies are surprisingly straightforward. In this article, Toptal engineer Igor Delac gives us a step-by-step tutorial on how to implement the Remote Framebuffer server-side protocol in Java, allowing Swing-based applications to run and be interacted with remotely using standard VNC clients.

Igor is an enthusiastic and skilled professional with experience in Java development, system administration, and he loves to experiment.
PREVIOUSLY AT

In computing, Virtual Network Computing (VNC) is a graphical desktop sharing system that uses the Remote Framebuffer (RFB) protocol to remotely control another computer. It transmits keyboard and mouse events from one computer to another, and relays graphical screen updates back in the other direction over a network.
RFB is a simple protocol for remote access to graphical user interfaces. Because it works at the frame buffer level, it is applicable to all windowing systems and applications including Microsoft Windows, Mac OS X, and X Window System.
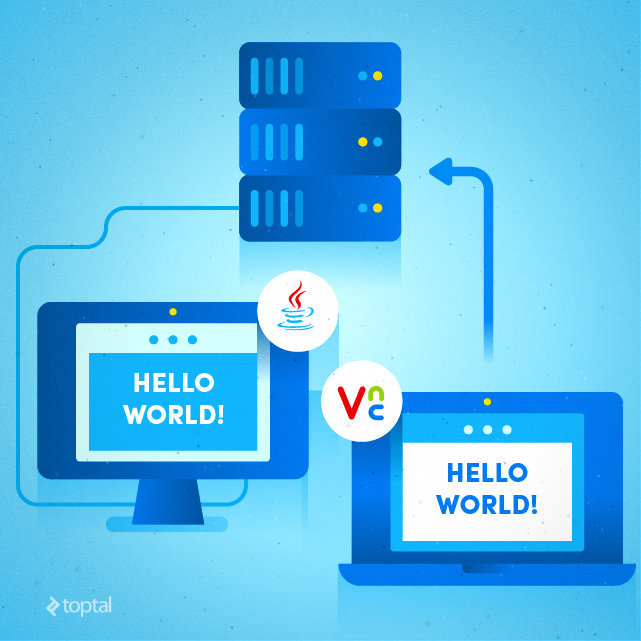
In this article I will show how to implement RFB server-side protocol and demonstrate with a small Java Swing application how to transmit the main window over TCP connection to VNC viewers. The idea is to demonstrate basic features of the protocol and possible implementation in Java.
Reader should have basic knowledge of Java programming language and should be familiar with basic concepts of TCP/IP networking, client-server model, etc. Ideally, the reader is a Java developer and has some experience with well-known VNC implementations such as RealVNC, UltraVNC, TightVNC, etc.
Remote Framebuffer Protocol Specification
RFB protocol specification is pretty well defined. According to Wikipedia, RFB protocol has several versions. For this article, our focus will be on common messages that should be understood properly by most VNC implementations regardless of protocol version.
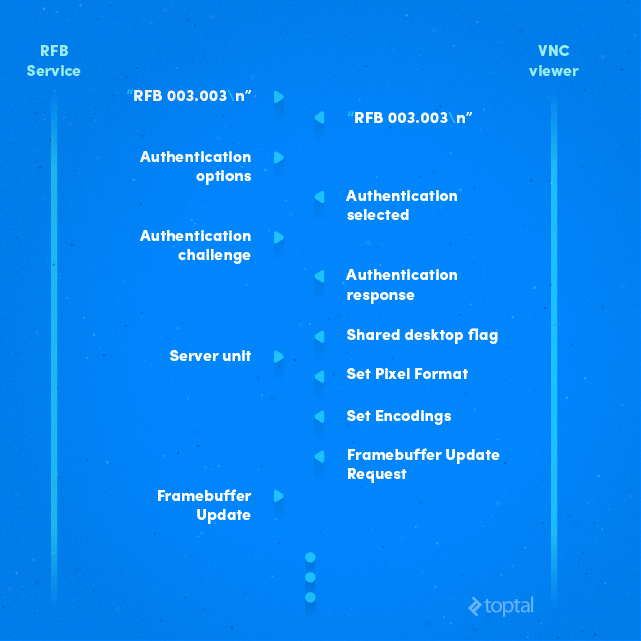
After a VNC viewer (client) establishes a TCP connection to a VNC server (RFB service), the first phase involves the exchange of protocol version:
RFB Service    -----------  "RFB 003.003\n"  -------> VNC viewer
RFB Service    <----------  "RFB 003.008\n"  -------- VNC viewer
It’s a simple stream of bytes which can be decoded into ASCII characters, such as “RFB 003.008\n”.
Once that is done, the next step is authentication. VNC server sends an array of bytes to indicate what type of authentications it supports. For example:
RFB Service    -----------  0x01 0x02 -----------> VNC viewer
RFB Service    <-----------  0x02  -----------     VNC viewer
Here the VNC server sent only 1 possible authentication type (0x02). The first byte 0x01 denotes the number of authentication types available. VNC viewer has to reply with value 0x02, since that’s the only possible type supported by the server in this example.
Next, server will send authentication challenge (depending on which algorithm, there are several), and the client has to respond with proper challenge response message and wait for the server to confirm the response. Once the client is authenticated, they can continue with the process of session establishment.
The simplest way here is to choose no authentication at all. RFB protocol is insecure anyway, regardless of authentication mechanism. If security is important, the proper way would be to tunnel RFB sessions via VPN or SSH connections.
At this point, VNC viewer sends a shared desktop message which tells if the client will share and allow other VNC viewers to connect to the same desktop. It’s up to RFB service implementation to consider that message and possibly prevent multiple VNC viewers from sharing the same screen. This message is only 1 byte in length, and a valid value is either 0x00 or 0x01.
Finally the RFB server sends a server init message, which contains screen dimension, bits per pixel, depth, big endian flag and true color flags, maximum values for red, green and blue colors, bit positions in pixel for red, green and blue colors, and desktop string/title. First two bytes represent screen width in pixels, next two bytes are screen height. After screen height bytes, bits per pixel byte should be present in message. The value is usually 8, 16, or 32. On most modern systems with full color range, bits per pixel byte has value 32 (0x20). It tells client that it can request full color for each pixel from server. Big endian byte is non-zero only if pixels are in big endian order. If true color byte is non-zero (true) then the next six bytes specify how to extract red, green and blue color intensities from the pixel value. Next six bytes are maximum allowed values for red, green and blue component of pixel. This is important in 8-bit color mode, where only few bits are available for each color component. Red, green, and blue shifts determine bit positions for each color. Last three bytes are padding and should be ignored by the client. After pixel format, there is a byte that defines length of a string for desktop title. Desktop title is an ASCII encoded string in byte array of arbitrary length.
After server init message, RFB service should read client messages from socket and decode them. There are 6 types of messages:
- SetPixelFormat
- SetEncodings
- FramebufferUpdateRequest
- KeyEvent
- PointerEvent
- ClientCutText
Protocol documentation is pretty exact and explains each message. For each message, every byte is explained. For example, server init message:
| No of bytes | Type | Description |
|---|---|---|
| 2 | U16 | framebuffer-width |
| 2 | U16 | framebuffer-height |
| 16 | PIXEL_FORMAT | server-pixel-format |
| 4 | U32 | name-length |
| name-length | U8 array | name-string |
Here, PIXEL_FORMAT is:
| No of bytes | Type | Description |
|---|---|---|
| 1 | U8 | bits-per-pixel |
| 1 | U8 | depth |
| 1 | U8 | big-endian-flag |
| 1 | U8 | true-colour-flag |
| 2 | U16 | red-max |
| 2 | U16 | green-max |
| 2 | U16 | blue-max |
| 1 | U8 | red-shift |
| 1 | U8 | green-shift |
| 1 | U8 | blue-shift |
| 3 | padding |
U16 means unsigned 16-bit integer (two bytes), U32 is unsigned 32-bit integer, U8 array is array of bytes, etc.
Protocol Implementation in Java
A typical Java server application consists of one thread listening for client connections, and several threads handling client connections.
/*
 * Use TCP port 5902 (display :2) as an example to listen.
 */
int port = 5902;
ServerSocket serverSocket;
serverSocket = new ServerSocket(port);

/*
 * Limit sessions to 100. This is lazy way, if
 * somebody really open 100 sessions, server socket
 * will stop listening and no new VNC viewers will be
 * able to connect.
 */
while (rfbClientList.size() < 100) {

	/*
	 * Wait and accept new client.
	 */
	Socket client = serverSocket.accept();

	/*
	 * Create new object for each client.
	 */
	RFBService rfbService = new RFBService(client);

	/*
	 * Add it to list.
	 */
	rfbClientList.add(rfbService);

	/*
	 * Handle new client session in separate thread.
	 */
	(new Thread(rfbService, "RFBService" + rfbClientList.size())).start();

}
Here TCP port 5902 was chosen (display :2), and the while loop waits for a client to connect. Method ServerSocket.accept() is blocking and it makes the thread wait for a new client connection. Once the client connects, a new thread RFBService is created which handles RFB protocol messages received from the client.
Class RFBService implements Runnable interface. It’s full of methods to read bytes from socket. Method run() is important, which is executed immediately when the thread is started at end of loop:
@Override
public void run() {

	try {

		/*
		 * RFB server has to send protocol version string first.
		 * And wait for VNC viewer to replay with
* protocol version string.
		 */
		sendProtocolVersion();
		String protocolVer = readProtocolVersion();
		if (!protocolVer.startsWith("RFB")) {
			throw new IOException();
		}
Here method sendProtocolVersion() sends RFB string to client (VNC viewer) and then reads protocol version string from client. Client should reply with something like “RFB 003.008\n”. Method readProtocolVersion() is of course blocking, like any method whose name starts with the word read.
private String readProtocolVersion() throws IOException {
	byte[] buffer = readU8Array(12);
	return new String(buffer);
}
Method readProtocolVersion() is simple: it reads 12 bytes from socket, and returns a string value. Function readU8Array(int) reads specified number of bytes, in this case 12 bytes. If there are not enough bytes to read on socket, it waits:
private byte[] readU8Array(int len) throws IOException {
	byte[] buffer = new byte[len];
	int offset = 0, left = buffer.length;
	while (offset < buffer.length) {
		int numOfBytesRead = 0;
		numOfBytesRead = in.read(buffer, offset, left);
		offset = offset + numOfBytesRead;
		left = left - numOfBytesRead;
	}
	return buffer;
}
Similar to readU8Array(int), methods readU16int() and readU32int() exist which read bytes from socket and return integer value.
After sending the protocol version and reading the response, RFB service should send security message:
/*
 * RFB server sends security type bytes that may request
 * a user to type password.
 * In this implementation, this is set to simples
 * possible option: no authentication at all.
 */
sendSecurityType();
In this implementation, the simplest way is chosen: do not require any password from VNC client-side.
private void sendSecurityType() throws IOException {
	out.write(SECURITY_TYPE);
	out.flush();
}
where SECURITY_TYPE is byte array:
private final byte[] SECURITY_TYPE = {0x00, 0x00, 0x00, 0x01};
This array of bytes by RFB protocol version 3.3 mean that VNC viewer does not need to send any password.
Next what RFB service should get from client is shared desktop flag. It’s one byte on socket.
/*
 * RFB server reads shared desktop flag. It's a single
 * byte that tells RFB server
 * should it support multiple VNC viewers connected at
 * same time or not.
 */
byte sharedDesktop = readSharedDesktop();
Once shared desktop flag is read from the socket, we ignore it in our implementation.
RFB service has to send server init message:
/*
 * RFB server sends ServerInit message that includes
 * screen resolution,
 * number of colors, depth, screen title, etc.
 */
screenWidth = JFrameMainWindow.jFrameMainWindow.getWidth();
screenHeight = JFrameMainWindow.jFrameMainWindow.getHeight();
String windowTitle = JFrameMainWindow.jFrameMainWindow.getTitle();
sendServerInit(screenWidth, screenHeight, windowTitle);
Class JFrameMainWindow is JFrame, which is here for demo purpose as source of graphics. Server init message has mandatory screen width and height in pixel, and desktop title. In this example it’s JFrame’s title obtained by getTitle() method.
After server init message, RFB service thread loops by reading from socket six types of messages:
/*
 * Main loop where clients messages are read from socket.
 */
while (true) {

	/*
	 * Mark first byte and read it.
	 */
	in.mark(1);
	int messageType = in.read();
	if (messageType == -1) {
		break;
	}
	/*
	 * Go one byte back.
	 */
	in.reset();

	/*
	 * Depending on message type, read complete message on socket.
	 */
	if (messageType == 0) {
		/*
		 * Set Pixel Format
		 */
		readSetPixelFormat();
	}
	else if (messageType == 2) {
		/*
		 * Set Encodings
		 */
		readSetEncoding();
	}
	else if (messageType == 3) {
		/*
		 * Frame Buffer Update Request
		 */
		readFrameBufferUpdateRequest();
	}
	else if (messageType == 4) {
		/*
		 * Key Event
		 */
		readKeyEvent();
	}
	else if (messageType == 5) {
		/*
		 * Pointer Event
		 */
		readPointerEvent();
	}
	else if (messageType == 6) {
		/*
		 * Client Cut Text
		 */
		readClientCutText();
	}
	else {
		err("Unknown message type. Received message type = " + messageType);
	}
}
Each method readSetPixelFormat(), readSetEncoding(), readFrameBufferUpdateRequest(), … readClientCutText() is blocking and triggers some action.
For example, readClientCutText() method reads text which is encoded in message when user cuts text on client-side and then VNC viewer sends text via RFB protocol to server. Text is then placed on server-side in Clipboard.
Client Messages
All six messages have to be supported by RFB service, at least on byte level: when client sends message, a full byte length has to be read. This is because RFB protocol is byte oriented and there is no boundary between two messages.
The most import message is frame buffer update request. Client may request full update or incremental update of screen.
private void readFrameBufferUpdateRequest() throws IOException {

	int messageType = in.read();
	int incremental = in.read();

	if (messageType == 0x03) {

		int x_pos = readU16int();
		int y_pos = readU16int();
		int width = readU16int();
		int height = readU16int();

		screenWidth  = width;
		screenHeight = height;

		if (incremental == 0x00) {

			incrementalFrameBufferUpdate = false;

			int x = JFrameMainWindow.jFrameMainWindow.getX();
			int y = JFrameMainWindow.jFrameMainWindow.getY();

			RobotScreen.robo.getScreenshot(x, y, width, height);

			sendFrameBufferUpdate(x_pos, y_pos, width, height, 0, RobotScreen.robo.getColorImageBuffer());


		}
		else if (incremental == 0x01) {

			incrementalFrameBufferUpdate = true;

		}
		else {
			throw new IOException();
		}
	}
	else {
		throw new IOException();
	}

}
First byte of frame buffer request message is message type. Value is always 0x03. Next byte is incremental flag, which tells server to send full frame or just a difference. In case of full update request, RFB service will take screenshot of main window using RobotScreen class and send it to client.
If it is incremental request, a flag incrementalFrameBufferUpdate will be set to true. This flag will be used by Swing components to check if they need to send parts of screen that have changed. Usually JMenu, JMenuItem, JTextArea, etc. need to do incremental update of screen when user moves mouse pointer, clicks, sends keystroke, etc.
Method sendFrameBufferUpdate(int, int, int, int, int[]) flushes image buffer to socket.
public void sendFrameBufferUpdate(int x, int y, int width, int height, int encodingType, int[] screen) throws IOException {

	if (x + width > screenWidth || y + height > screenHeight) {
		err ("Invalid frame update size:");
		err (" x = " + x + ", y = " + y);
		err (" width = " + width + ", height = " + height);
		return;
	}

	byte messageType = 0x00;
	byte padding     = 0x00;

	out.write(messageType);
	out.write(padding);

	int numberOfRectangles = 1;

	writeU16int(numberOfRectangles);

	writeU16int(x);
	writeU16int(y);
	writeU16int(width);
	writeU16int(height);
	writeS32int(encodingType);

	for (int rgbValue : screen) {

		int red   = (rgbValue & 0x000000FF);
		int green = (rgbValue & 0x0000FF00) >> 8;
		int blue  = (rgbValue & 0x00FF0000) >> 16;

		if (bits_per_pixel == 8) {
			out.write((byte) colorMap.get8bitPixelValue(red, green, blue));
		}
		else {
			out.write(red);
			out.write(green);
			out.write(blue);
			out.write(0);
		}
	}
	out.flush();
}
Method checks that (x, y) coordinate do not go off the screen together with width x height of image buffer. Message type value for frame buffer update is 0x00. Padding value is usually 0x00 and should be ignored by VNC viewer. Number of rectangles is two byte value and defines how many rectangles are following in message.
Each rectangle has upper left coordinate, width, and height, encoding type and pixel data. There are some efficient encoding formats that can be used, such as zrle, hextile, and tight. However, to keep things simple and easy to understand, we will use raw encoding in our implementation.
Raw encoding means that pixel color is transmitted as RGB component. If client has set pixel encoding as 32-bit, then 4 bytes are transmitted for each pixel. If client uses 8-bit color mode, then each pixel is transmitted as 1 byte. Code is shown in for-loop. Note that for 8-bit mode color map is used to find best match for each pixel from screenshot / image buffer. For 32-bit pixel mode, image buffer contains array of integers, each value has RGB components multiplexed.
Swing Demo Application
Swing demo application contains action listener that triggers sendFrameBufferUpdate(int, int, int, int, int[]) method. Usually application elements, like Swing components, should have listeners and send screen change to client. Such as when user types something in JTextArea, it should be transmitted to VNC viewer.
public void actionPerformed(ActionEvent arg0) {

	/*
	 * Get dimensions and location of main JFrame window.
	 */
	int offsetX = JFrameMainWindow.jFrameMainWindow.getX();
	int offsetY = JFrameMainWindow.jFrameMainWindow.getY();

	int width  = JFrameMainWindow.jFrameMainWindow.getWidth();
	int height = JFrameMainWindow.jFrameMainWindow.getHeight();

	/*
	 * Do not update screen if main window dimension has changed.
	 * Upon main window resize, another action listener will
	 * take action.
	 */
	int screenWidth = RFBDemo.rfbClientList.get(0).screenWidth;
	int screenHeight = RFBDemo.rfbClientList.get(0).screenHeight;
	if (width != screenWidth || height != screenHeight) {
			return;
	}

	/*
	 * Capture new screenshot into image buffer.
	 */
	RobotScreen.robo.getScreenshot(offsetX, offsetY, width, height);

	int[] delta = RobotScreen.robo.getDeltaImageBuffer();

	if (delta == null) {

			offsetX = 0;
			offsetY = 0;

			Iterator<RFBService> it = RFBDemo.rfbClientList.iterator();
			while (it.hasNext()) {

					RFBService rfbClient = it.next();

					if (rfbClient.incrementalFrameBufferUpdate) {

						try {

							/*
							 * Send complete window.
							 */
							rfbClient.sendFrameBufferUpdate(
											offsetX, offsetY,
											width, height,
											0,
										RobotScreen.robo.getColorImageBuffer());
						}
						catch (SocketException ex) {
							it.remove();
						}
						catch (IOException ex) {
							ex.printStackTrace();

							it.remove();
						}

						rfbClient.incrementalFrameBufferUpdate = false;

					}
			}
	}
	else {

			offsetX = RobotScreen.robo.getDeltaX();
			offsetY = RobotScreen.robo.getDeltaY();

			width =  RobotScreen.robo.getDeltaWidth();
			height =  RobotScreen.robo.getDeltaHeight();

			Iterator<RFBService> it = RFBDemo.rfbClientList.iterator();
			while (it.hasNext()) {

					RFBService rfbClient = it.next();

					if (rfbClient.incrementalFrameBufferUpdate) {

						try {

							/*
							 * Send only delta rectangle.
							 */
							rfbClient.sendFrameBufferUpdate(
											offsetX, offsetY,
											width, height,
											0,
											delta);

						}
						catch (SocketException ex) {
							it.remove();
						}
						catch (IOException ex) {
							ex.printStackTrace();

							it.remove();
						}

						rfbClient.incrementalFrameBufferUpdate = false;

					}
			}
	}
}
The code of this action listener is pretty simple: it takes a screenshot of the main window JFrameMain using RobotScreen class, then it is determined if partial update of screen is needed. Variable diffUpdateOfScreen is used as flag for partial update. And finally complete image buffer or only different rows are transmitted to client. This code also considers more clients connected, that is why iterator is used and client list is maintained in RFBDemo.rfbClientList<RFBService> member.
Framebuffer update action listener could be used in Timer which can be started by any JComponent change:
/*
 * Define timer for frame buffer update with 400 ms delay and
* no repeat.
 */
timerUpdateFrameBuffer = new Timer(400, new ActionListenerFrameBufferUpdate());
timerUpdateFrameBuffer.setRepeats(false);
This code is in constructor of JFrameMainWindow class. Timer is started in doIncrementalFrameBufferUpdate() method:
public void doIncrementalFrameBufferUpdate() {

	if (RFBDemo.rfbClientList.size() == 0) {
		return;
	}

	if (!timerUpdateFrameBuffer.isRunning()) {
		timerUpdateFrameBuffer.start();
	}

}
Other action listeners usually call doIncrementalFrameBufferUpdate() method:
public class DocumentListenerChange implements DocumentListener {

	@Override
	public void changedUpdate(DocumentEvent e) {
		JFrameMainWindow jFrameMainWindow = JFrameMainWindow.jFrameMainWindow;
		jFrameMainWindow.doIncrementalFrameBufferUpdate();
	}

	// ...

}
This way should be simple and easy to follow. Only a reference to JFrameMainWindow instance is needed and a single call of doIncrementalFrameBufferUpdate() method. Method will check if there are clients connected, and if there are, timer timerUpdateFrameBuffer will be started. Once the timer is started, action listener will actually take screenshot and sendFrameBufferUpdate() is executed.
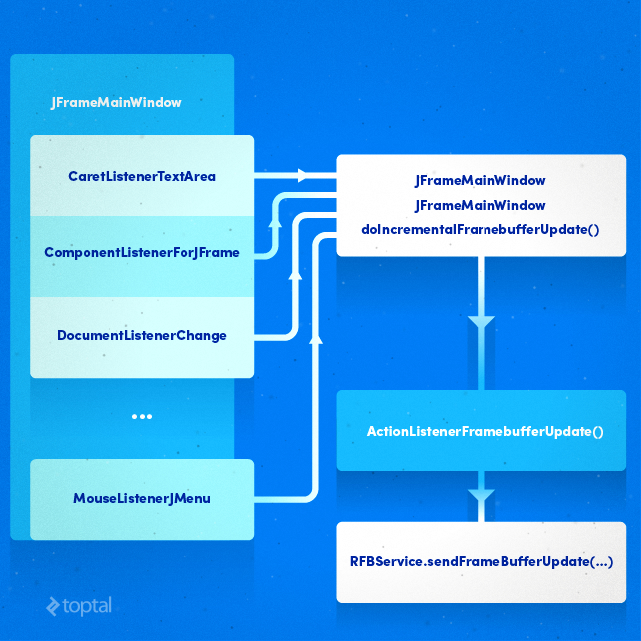
The figure above shows listener relationship to frame buffer update procedure. Most listeners are triggered when the user does action: clicks, selects text, types something in text area, etc. Then member function doIncrementalFramebufferUpdate() is executed which starts the timer timerUpdateFrameBuffer. The timer will eventually call sendFrameBufferUpdate() method in RFBService class and it will cause screen update on client-side (VNC viewer).
Capture Screen, Play Keystrokes and Move Mouse Pointer on Screen
Java has a built-in Robot class that enables developer to write an application that will grab screenshots, send keys, manipulate mouse pointer, produce clicks, etc.
To grab area of screen where JFrame window is displayed, RobotScreen is used. Main method is getScreenshot(int, int, int, int) which captures a region of screen. RGB values for each pixel are stored in an int[] array:
   	public void getScreenshot(int x, int y, int width, int height) {

         	Rectangle screenRect = new Rectangle(x, y, width, height);
         	BufferedImage colorImage = robot.createScreenCapture(screenRect);

         	previousImageBuffer = colorImageBuffer;

   		colorImageBuffer = ((DataBufferInt) colorImage.getRaster().getDataBuffer()).getData();

   		if (previousImageBuffer == null ||
   		     	previousImageBuffer.length != colorImageBuffer.length) {
   		   previousImageBuffer = colorImageBuffer;
   		}

   		this.width = width;
   		this.height = height;

   	}
Method stores pixels in colorImageBuffer array. To get pixel data, getColorImageBuffer() method can be used.
Method also saves previous image buffer. It is possible to get only pixels that have been changed. To get only difference of image area, use method getDeltaImageBuffer().
Sending keystrokes to system is easy with Robot class. However, some special key codes received from VNC viewers have to be translated correctly first. Class RobotKeyboard has method sendKey(int, int) that handles special keys and alphanumeric keys:
public void sendKey(int keyCode, int state) {
	switch (keyCode) {
	case 0xff08:
		doType(VK_BACK_SPACE, state);
		break;
	case 0xff09:
		doType(VK_TAB, state);
		break;
	case 0xff0d: case 0xff8d:
		doType(VK_ENTER, state);
		break;
	case 0xff1b:
		doType(VK_ESCAPE, state);
		break;
…
	case 0xffe1: case 0xffe2:
		doType(VK_SHIFT, state);
		break;
	case 0xffe3: case 0xffe4:
		doType(VK_CONTROL, state);
		break;
	case 0xffe9: case 0xffea:
		doType(VK_ALT, state);
		break;
	default:

		/*
		 * Translation of a..z keys.
		 */
		if (keyCode >= 97 && keyCode <= 122) {
			/*
			 * Turn lower-case a..z key codes into upper-case A..Z key codes.
			 */
			keyCode = keyCode - 32;
		}

		doType(keyCode, state);

	}
}
Argument state determine if key is pressed or released. After correct translation of key code into VT constant, method doType(int, int) pass key value to Robot and effect is same as local user has hit the key on keyboard:
private void doType(int keyCode, int state) {
   	if (state == 0) {
	  	robot.keyRelease(keyCode);
	}
	else {
		robot.keyPress(keyCode);
	}
}
Similar to RobotKeyboard is RobotMouse class which handles pointer events, and causes mouse pointer to move and click.
public void mouseMove(int x, int y) {
	robot.mouseMove(x, y);
}
All three classes RobotScreen, RobotMouse, and RobotKeyboard allocate new Robot instance in constructor:
this.robot = new Robot();
We have only one instance of each, since there is no need on the application level to have more than one instance of RobotScreen, RobotMouse, or RobotKeyboard class.
public static void main(String[] args) {
	...
	/*
	* Initialize static Robot objects for screen, keyboard and mouse.
	*/
	 RobotScreen.robo = new RobotScreen();
	 RobotKeyboard.robo = new RobotKeyboard();
	 RobotMouse.robo = new RobotMouse();
	 ...
}
In this demo application these instances are created in main() function.
The result, is a Swing based application in Java which acts as an RFB service provider and allows standard VNC viewers to connect to it:

Conclusion
RFB protocol is widely used and accepted. Client implementations in form of VNC viewers exist for almost all platforms and devices. The main purpose is to remotely display desktops, but there can be other applications as well. For example, you could create nifty graphical tools and access them remotely to enhance your existing remote workflows.
This article covers the basics of RFB protocol, message format, how to send part of screen, and how to deal with keyboard and mouse. Full source code with Swing demo application is available on GitHub.
Igor Delac
Split, Croatia
Member since November 3, 2014
About the author
Igor is an enthusiastic and skilled professional with experience in Java development, system administration, and he loves to experiment.
PREVIOUSLY AT