Magento Performance Optimization Explained
Magento is an extremely popular eCommerce platform used by businesses of all sizes, so what can we do to make it faster and more efficient? In this article, Toptal Freelance Magento Developer Paul Mestereaga explains what you can do to improve the performance of your Magento site.
Magento is an extremely popular eCommerce platform used by businesses of all sizes, so what can we do to make it faster and more efficient? In this article, Toptal Freelance Magento Developer Paul Mestereaga explains what you can do to improve the performance of your Magento site.
Paul is a devoted Magento developer, a real go-getter, and a person who is truly passionate about the web.
Expertise
Magento performance is of paramount importance. Loading speed has a direct and measurable impact on the conversion rate of your website, hence having an optimized Magento installation is crucial to the success of your Magento shop and possibly even your business in general.
In this article I will present some ways in which Magento developers can optimize their Magento 2 installation, and explain how to do the following:
- Check third-party modules and find bottlenecks
- Enable full-page cache
- Varnish, not files for full-page cache
- Make sure full-page cache works, it can be broken so easily
- Enable Production mode
- CSS/JS minification
- Enable Flat tables
- Get the fastest hosting you can afford
- Optimize images
- Indexers to “Update on Schedule”
- GZIP compression
- Use Elasticsearch on catalog pages and search.
- Check for unnecessary Ajax calls back to the server after page load (can cause session locks)
- Redis for page cache and session storage
Check Third-party Modules and Find Bottlenecks
There are many third-party Magento modules out there with bad code, using deprecated methods, or having compatibility issues with the latest stable version of Magento. The best way to identify heavy requests is to use a profiler. That helps you identify how many MySQL queries you have on a page and how many are identical. Knowing that, you can compact those queries into one, and thus speed up Magento.
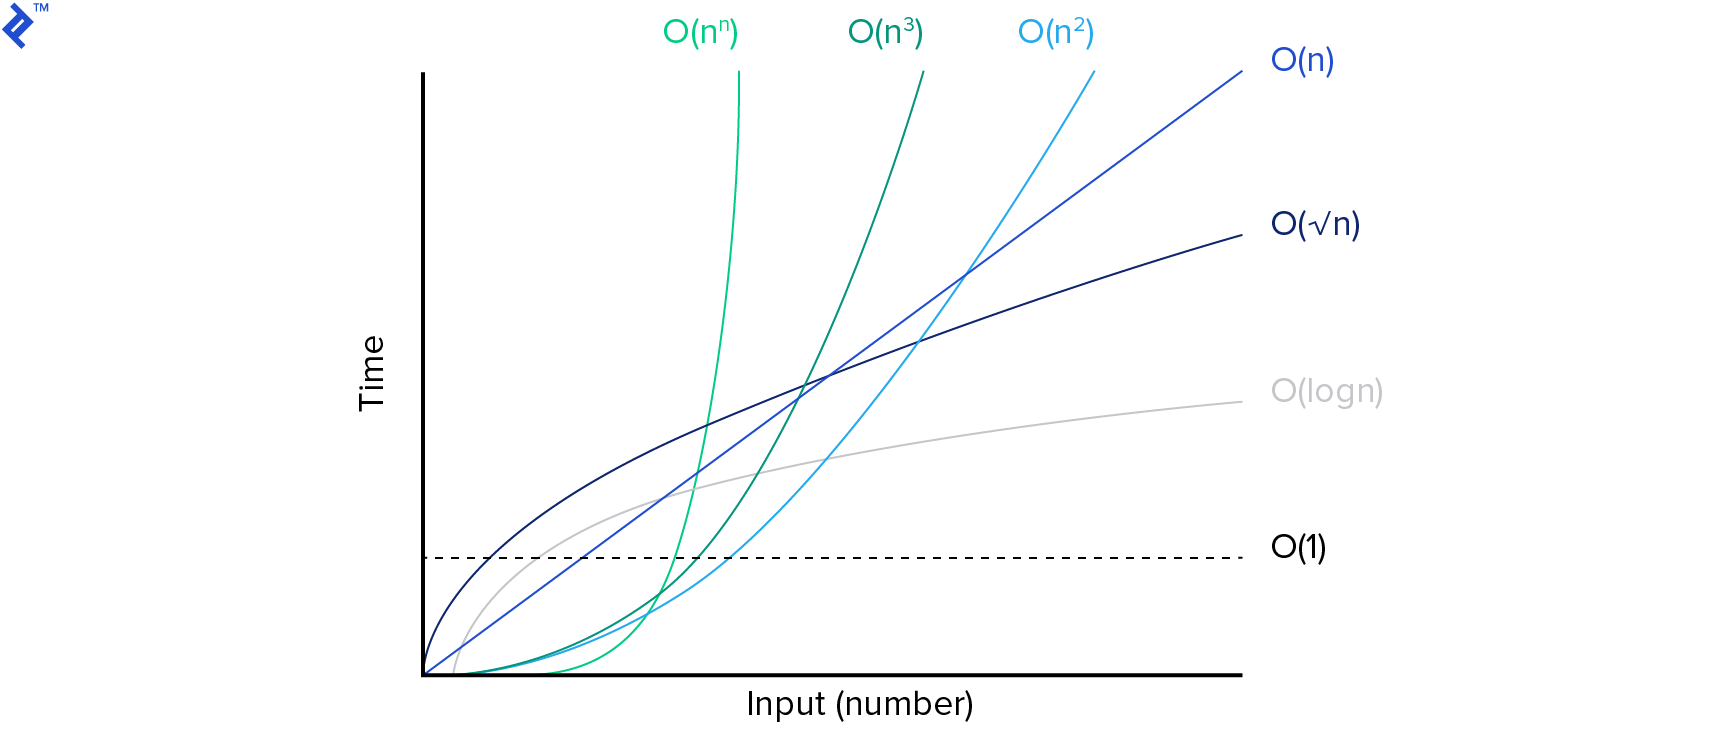
One of the main things junior developers are doing wrong in Magento is to load models inside loops. Try to avoid that as much as you can. Load the whole collection with everything you need and then loop through it. Always keep in mind the time and space complexity and build your algorithm in an optimized way.
Look how your layout is loaded and which are the template blocks that perform the slowest, then look into that code. Look into the Model CRUD metrics where you can find insightful data such as load calls into loops.
Magento Full-page Cache
When a user is accessing your store, a request is made to the server. This request is processed by PHP doing specific operations and database queries then returning the corresponding HTML to be displayed to the user. Full-page cache stores that HTML response, so that the next identical request will directly return it skipping all the back-end processing and database queries. This makes the website response much faster.
Using full-page cache as part of your Magento optimization efforts can tremendously increase your website speed. This will create cached versions of your pages and will deliver them to the user instead of running all the queries for each request. Of course, not all pages are cached. For example, the cart page will not be cached, otherwise, all users will see the first cached version of the page. These are dynamic pages or sections of pages that are user- and session-specific.
To enable Magento full-page cache you can run the following CLI command:
php bin/magento cache:enable full_page
To enable cache types you can run the CLI command:
php bin/magento cache:enable
You can also do it from Magento Admin by logging in as an administrator:
- Go To System > Tools > Cache Management
- Select the Cache Type you want to activate
- In the Actions dropdown select Enable and click Submit

Use Varnish for Full-page Cache
When enabling full-page cache, use Varnish to handle it, not files. Magento strongly recommends using Varnish (or Redis) in production. The integrated full-page caching (to either the file system or database) is much slower than Varnish, and Varnish is designed to accelerate HTTP traffic.
You can find a full guide on how to install and configure Varnish in the official Magento 2 documentation.
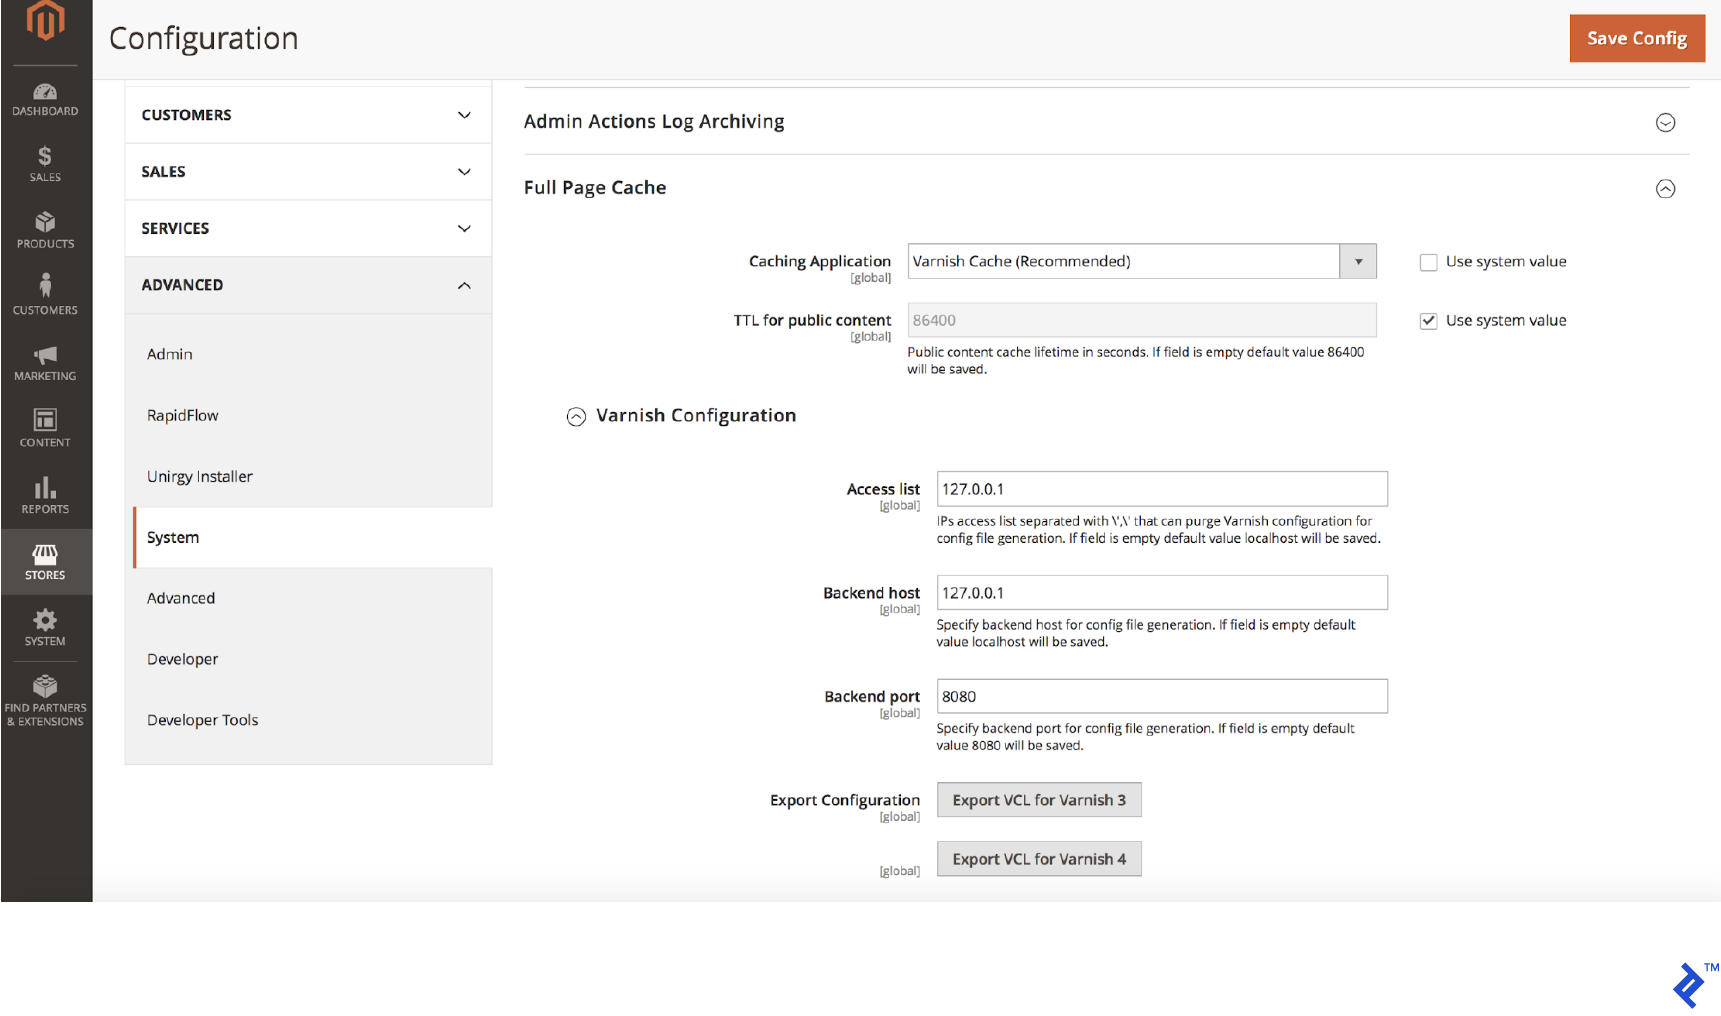
To configure Magento to use Varnish log in to the Magento Admin as an administrator:
- Go to Stores > Configuration > Advanced > System > Full Page Cache
- From the Caching Application list, click Varnish Caching
- Enter a value in the TTL for public content field
- Expand Varnish Configuration and enter the specific information about your Varnish configuration
Make Sure Full-page Cache Works: It’s Easily Broken
Full-page cache can be easily broken in Magento 2. For example, If you want to exclude a block from the cache don’t use the attribute cacheable="false" in the XML layout when declaring your block. This will disable the cache for the whole page that contains that block, not only for that block. That is a mistake I’ve seen people make.
Look for the cacheable="false" attribute in your layouts and see on which blocks they are set and on which pages those blocks are called. Thus, you can identify if trivial pages have problems with cache.
You can also test whether or not your page is cached manually. Put the store in Developer Mode on your local or stage environment:
- Clear Magento cache
- Load the page in the browser
- Inspect the page headers in your browsers debug network tab.
- Look for X-Magento-Cache-Debug: MISS
- Refresh the page, it should change to HIT
If it does not change to HIT it means the page is not cached and the cache is not working.
Don’t Forget to Enable Production Mode
Magento has three running modes, default, developer, and production mode.
The production mode is intended for deployment on a production system. This mode hides exceptions, serves the static files from cache only and does not allow you to enable or disable cache types in Magento Admin. It also prevents automatic code file compilation.
While working and developing the store, the developer mode is active. Don’t forget to switch to production mode when you deploy your site to the live server!
The CLI command to see the current mode is:
php bin/magento deploy:mode:show
The CLI command to switch to production mode is:
php bin/magento deploy:mode:set production
The CLI command to switch to developer mode is:
php bin/magento deploy:mode:set developer
You can find more detailed information about different Magento modes here.
CSS/JS Minification
Minifying the CSS and JS files is an important element of Magento 2 speed optimization. By minifying them we remove all the spaces, tabs, and newlines in the files. The resulting files will have fewer characters and thus a smaller size, so they will download faster.
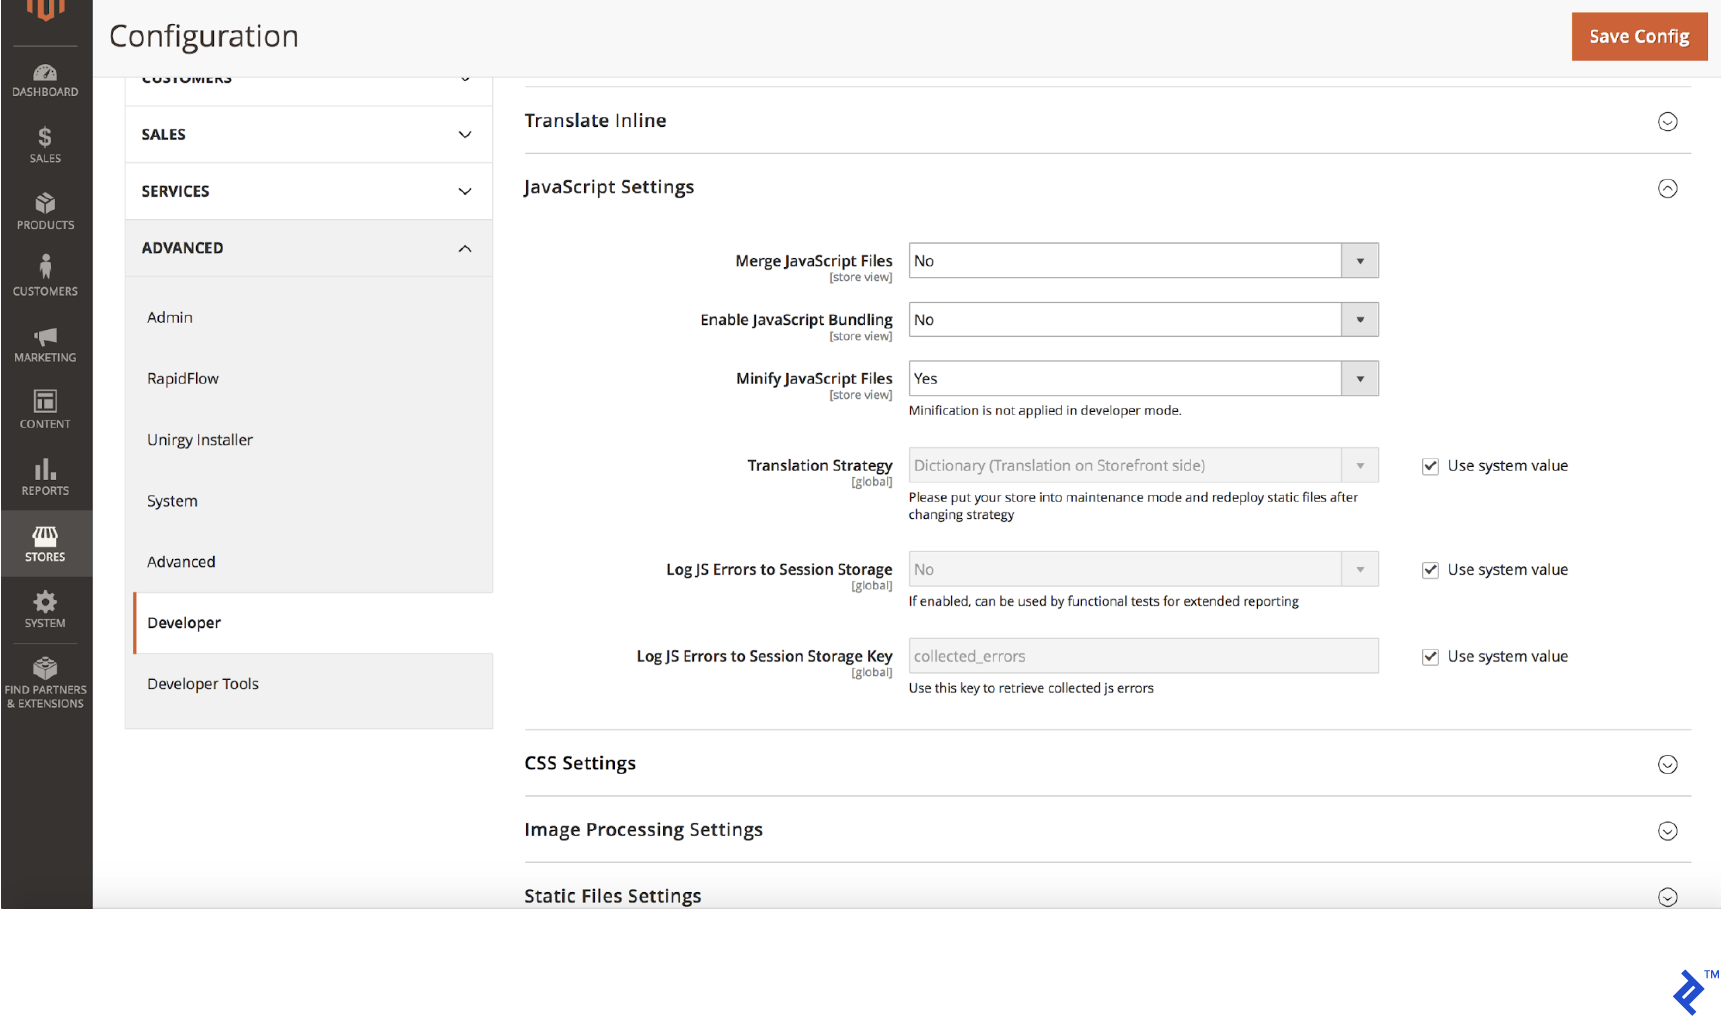
Magento has this feature built-in and you can enable CSS/JS minification in Admin. To enable JavaScript minification, follow these steps:
- put Magento on production mode
- Go to Stores > Configuration > Advanced > Developer
- Set Minify Javascript Files option to Yes
- Save Config
- Flush Cache at System > Cache Management page
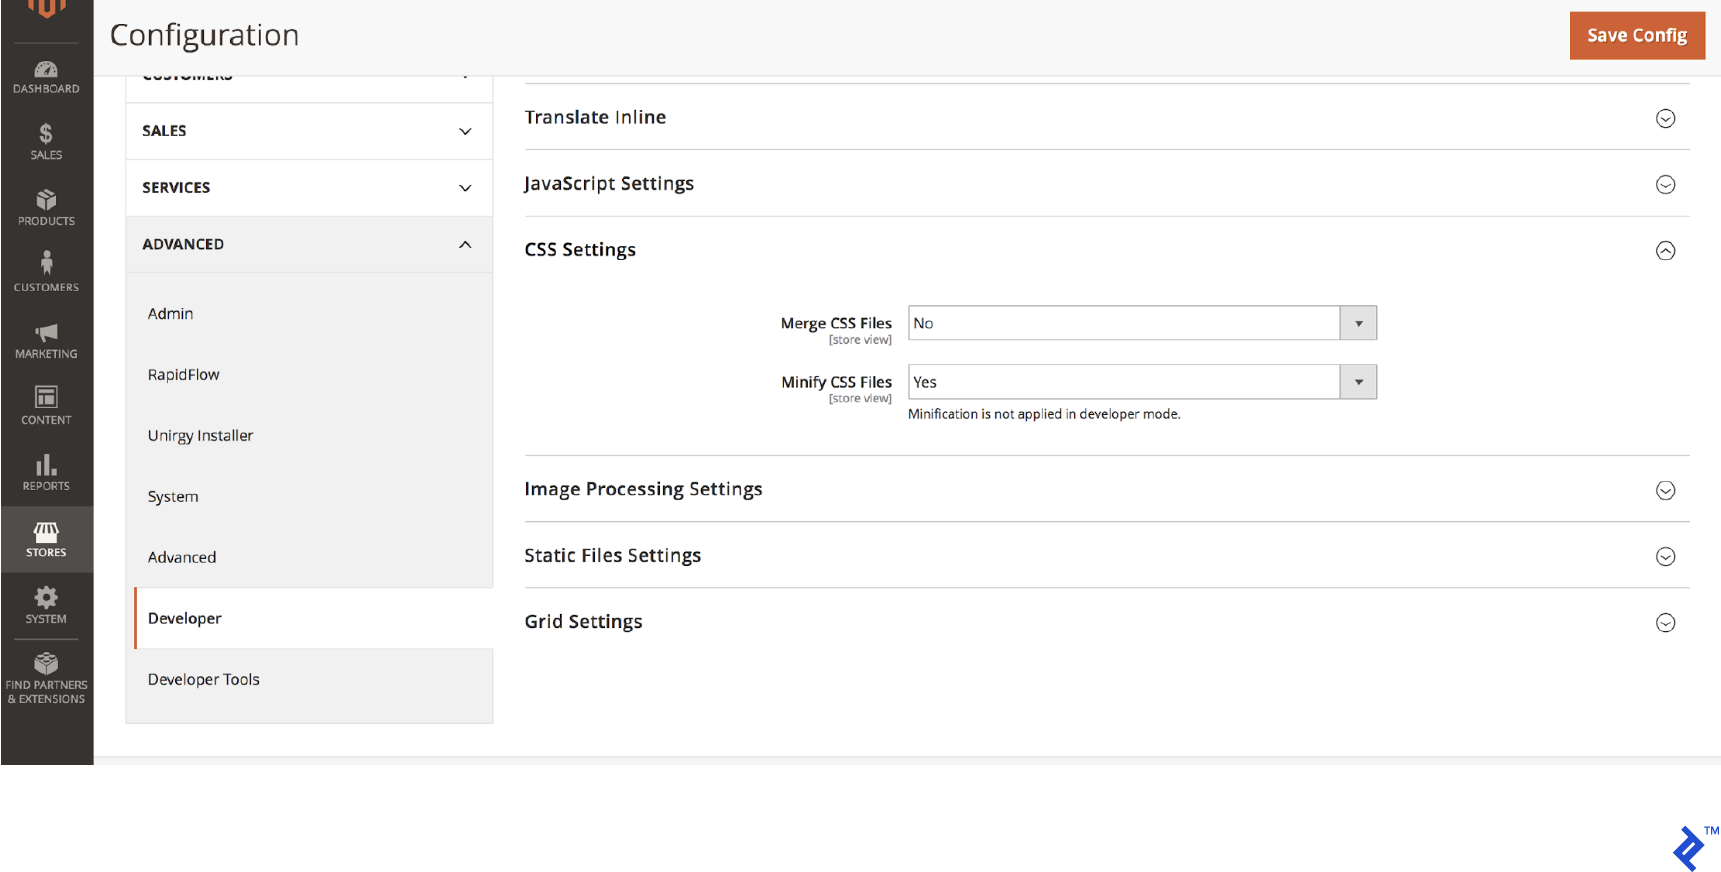
To enable CSS minification, the following steps are required:
- put Magento on production mode
- Go to Stores > Configuration > Advanced > Developer > CSS Settings
- Set Minify CSS Files option to Yes
- Save Config
- Flush Cache at System > Cache Management page
Note: Do not merge JS files – just minify them.
Enable Flat Tables
Magento uses the EAV (entity attribute value) Model which stores the attributes of its entities in multiple tables depending on their value type. Using multiple tables, joins and requests on multiple tables are necessary to retrieve the data, which can slow down the queries.
Magento has the option to use flat tables for the catalog and products. Flat tables are created by merging all the attributes of an entity into one table. When requesting the data we need to query one table, making it much faster.
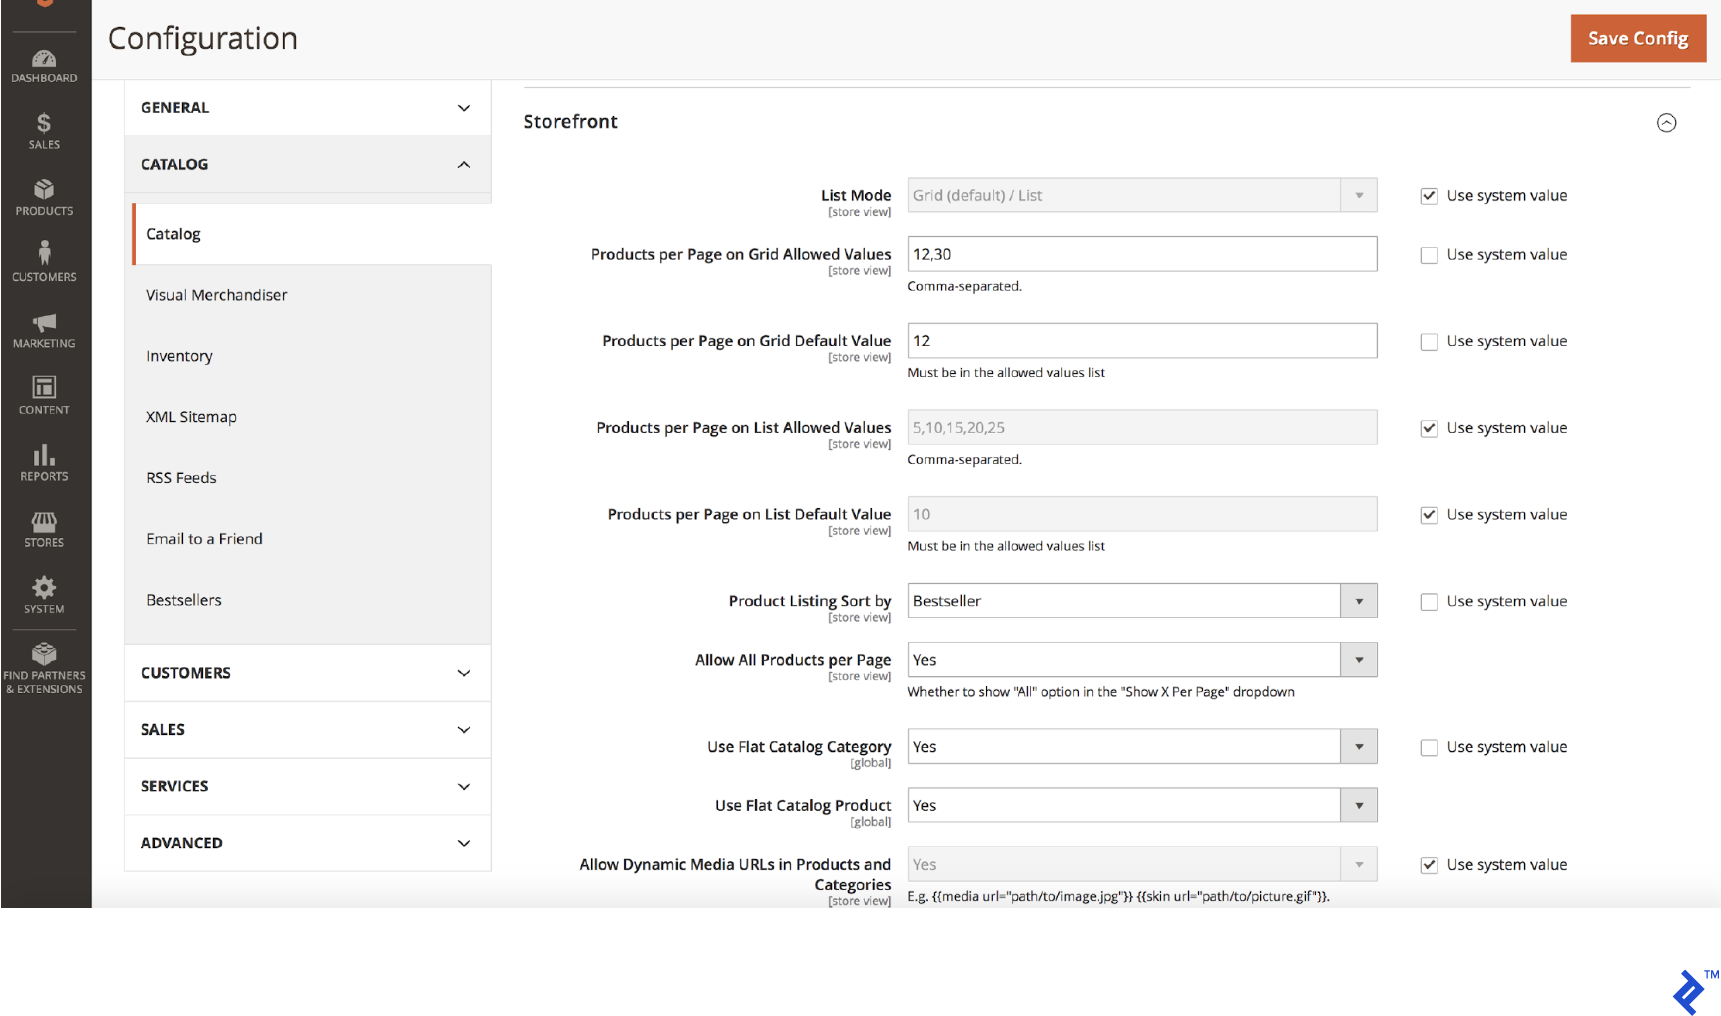
Magento generates and updates flat tables on every indexation. You can enable flat tables by logging into Magento Admin as an administrator:
- Go to Stores > Configuration > Catalog > Catalog > Storefront
- Select Yes for Use Flat Catalog Category
- Select Yes for Use Flat Catalog Product
- Save Config
Choose Fast Magento Hosting
Check out the Magento minimum requirements and see if your server meets them. You can see the official Magento 2.2.x technology stack requirements here.
The hosting configuration is very important for Magento 2 performance. There are also dedicated hosting services for Magento, though these can be more about marketing than anything else.
Bottom line: Get the fastest hosting solution you can afford unless it’s overkill for your project.
Magento Image Optimization
The size of your images obviously impacts the speed of your website. For example, if you have a catalog page with 20 products and each product image is 1Mb in size, that makes for a total of 20Mb to be downloaded when the page loads, and this could obviously be an issue in some scenarios (mobile devices, limited bandwidth in certain regions etc.).
Check if your images are properly optimized and if they have a good ratio between quality and size. Also, make sure your images are not resized by CSS but have the source file resized to the specific size you need.
Another technique is to use lazy loading, which means loading your images after the page was fully loaded, or while the user scrolls through the catalog.
You can also use AWS or a CDN to deliver your content much faster. Let’s take a quick look at the differences between AWS, CDN and traditional hosting from a bitmap optimization perspective.
Traditional hosting
The traditional way is to store your content such as images on the same server as your website. This can take up disk space and a good chunk of your bandwidth, creating substantial server load. Obviously, scaling with traditional hosting can be an issue.
CDN (Content Delivery Network)
A content delivery network is usually used to reduce the load of a server by serving some of the website’s content. Besides that, it brings high performance by delivering your content quickly and high availability by using multiple networks to call upon.
AWS (Amazon CloudFront)
Amazon CloudFront is a highly-secure Content Delivery Network (CDN) that provides both network and application level protection. Check this tutorial on how to get started with AWS and deliver content faster.
In addition, you can use AWS to resize images on the fly based on dimensions passed via a query parameter. For additional information, consult this tutorial on Resizing Images with Amazon CloudFront and Lambda@Edge.
Set Indexers to “Update on Schedule”
Magento indexers can be set to two modes: “Update on Save” or “Update on Schedule.”
When they are set to “Update on Save” every time you save a product, attribute or a category, the specific index starts running. Indexers can become resource consuming and that might slow down your server.
The best mode to set the indexers is to “Update on Schedule”. In this way, you are sure that they are executed by the cron job at a specific time that you set. Choose a time when the traffic on your website is low.
You can view the current indexers mode by running the command:
php bin/magento indexer:show-mode
Or in Magento Admin by going to:
System > Index Management
You can change the indexers mode to “Update on Schedule” by running the command:
php bin/magento indexer:set-mode schedule
You can change the indexers mode to “Update on Save” by running the command:
php bin/magento indexer:set-mode realtime
And here it is in Magento Admin:
System > Index Management: Select all indexers and from Actions dropdown select “Update on Schedule”
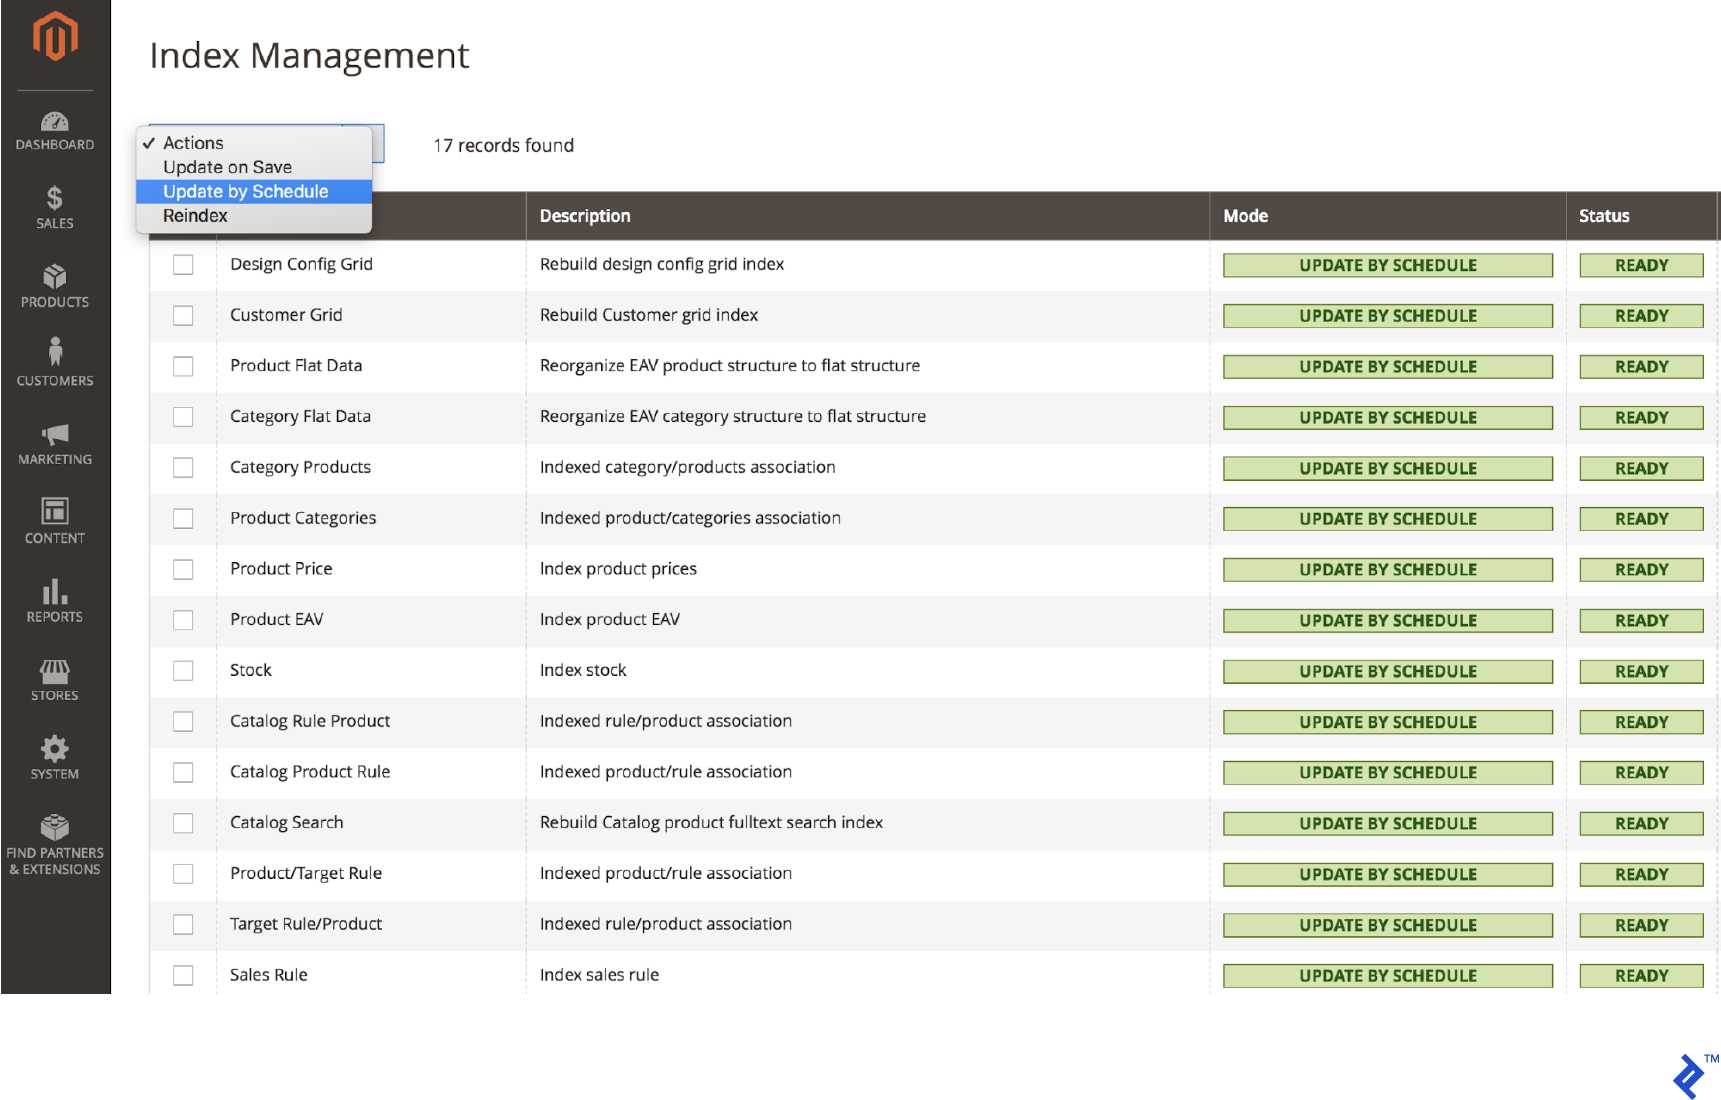
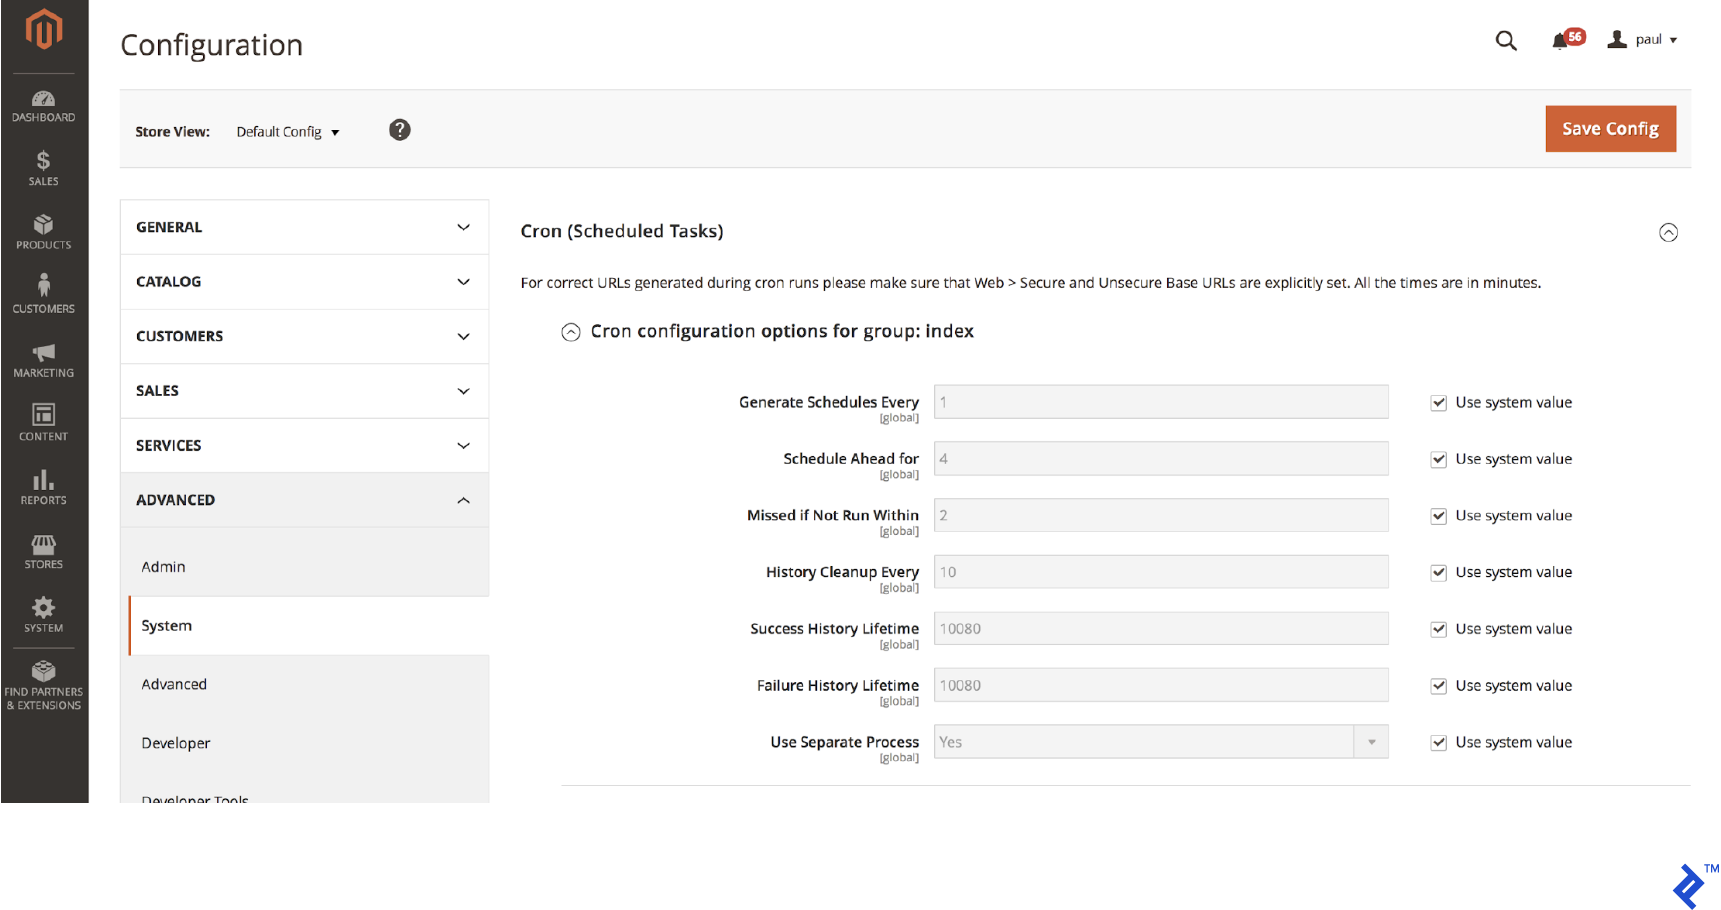
You also configure the Scheduled Tasks by going into Admin to:
Store > Settings > Configuration > Advanced > System > Cron (Scheduled Tasks)
Expand “Cron configuration options for group: index”
GZIP Compression
Gzip is a method of compressing files for faster network transfers. Compression allows your web server to provide smaller file sizes which load faster for your website users. However, this comes at a cost.
While compressing a file you load the CPU, and the more you compress a file the longer the process it takes. Even though this can increase the server CPU load, it could also substantially decrease bandwidth usage. With gzip, you can choose between different levels of compression, ranging from 1 to 9.
On level 1 you have the fastest compression time, but a lower compression ratio. On the opposite side, on level 9 you have the highest compression rate but a lower speed. The default configuration of gzip uses level 6, favoring compression over speed. Nginx though uses level 1, favoring speed over file size.
To turn on gzip compression and activate the mod_deflate module of Apache, you can add this by updating your .htaccess file and uncomment the appropriate lines as shown below. The mod_deflate module compresses static resources into smaller files before transferring them to the browser.
<IfModule mod_deflate.c>

############################################

## enable apache served files compression
## http://developer.yahoo.com/performance/rules.html#gzip

    # Insert filter on all content
    SetOutputFilter DEFLATE
    # Insert filter on selected content types only
    AddOutputFilterByType DEFLATE text/html text/plain text/xml text/css text/javascript application/javascript application/x-javascript application/json image/svg+xml

    # Netscape 4.x has some problems...
    BrowserMatch ^Mozilla/4 gzip-only-text/html

    # Netscape 4.06-4.08 have some more problems
    BrowserMatch ^Mozilla/4\.0[678] no-gzip

    # MSIE masquerades as Netscape, but it is fine
    BrowserMatch \bMSIE !no-gzip !gzip-only-text/html

    # Don't compress images
    SetEnvIfNoCase Request_URI \.(?:gif|jpe?g|png)$ no-gzip dont-vary

    # Make sure proxies don't deliver the wrong content
    Header append Vary User-Agent env=!dont-vary

</IfModule>
Use Elasticsearch on Catalog Pages and Search
Another way that you can increase your website speed is by using Elasticsearch for catalog pages and search results. Setup your Elasticsearch server and connect your Magento store to it. Searching becomes much faster by using Elasticsearch.
This official guide explains how you can configure Magento with Elasticsearch.
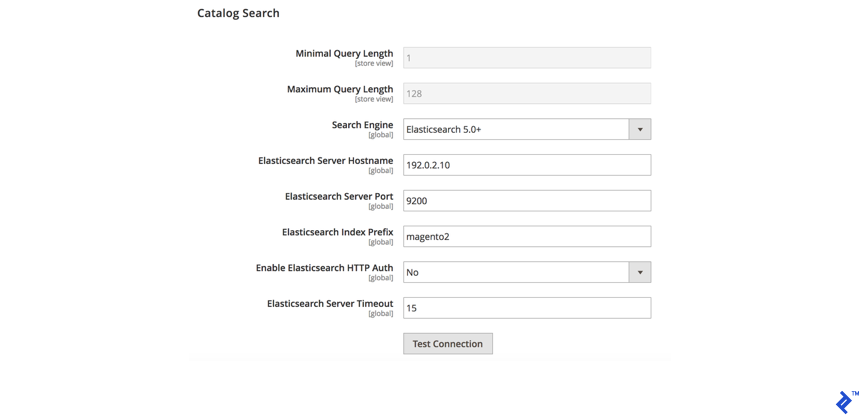
To configure Magento to use Elasticsearch log in to the Magento Admin as an administrator:
- Click Stores > Settings > Configuration > Catalog > Catalog > Catalog Search.
- From the Search Engine list, click Elasticsearch or Elasticsearch 5.0+ as the following figure shows. (The Elasticsearch 5.0+ option is not available for Magento 2.1.)
Check for Unnecessary Ajax Calls
Calls back to the server after page load can cause session locks. A way to check for all the Ajax calls that your page is doing is by using the DevTools in Chrome. You can open it by right click on the page and selecting Inspect.
Go to the network tab and there you can filter the request by XHR. Now you can see all the Ajax requests of the page and check them to see which of them are necessary on that particular page.

Redis for page cache and session storage
Redis is an optional back-end cache solution to replace Zend_Cache_Backend_File, which is used in Magento 2 by default.
Why Use Redis?
Using Redis can have multiple advantages:
- You can replace memcached with Redis because it can be used also for PHP session storage.
- Redis supports on-disk save and master/slave replication, which is a highly requested feature that is not supported by memcached. Replication avoids a single point of failure and provides high availability.
- Tag operations do not require a full scan of every cache file because Redis works by indexing tags in files.
- The back-end supports tag-based cache cleanup without foreach loops.
There is also a main downside:
- Because Redis is an in-memory store, all your data must fit in memory, meaning it’s only limited by RAM speed and capacity.
Configure Magento to use Redis for session storage
Following is a sample configuration to add to <your Magento install dir>app/etc/env.php:
'session' =>
array (
  'save' => 'redis',
  'redis' =>
  array (
    'host' => '127.0.0.1',
    'port' => '6379',
    'password' => '',
    'timeout' => '2.5',
    'persistent_identifier' => '',
    'database' => '2',
    'compression_threshold' => '2048',
    'compression_library' => 'gzip',
    'log_level' => '1',
    'max_concurrency' => '6',
    'break_after_frontend' => '5',
    'break_after_adminhtml' => '30',
    'first_lifetime' => '600',
    'bot_first_lifetime' => '60',
    'bot_lifetime' => '7200',
    'disable_locking' => '0',
    'min_lifetime' => '60',
    'max_lifetime' => '2592000'
  )
),
You can check here all the details about the parameters, and how to do a basic verification that your Redis installation works fine together with your Magento.
Configure Magento to Use Redis for Page and Default Cache
There are two ways to configure Redis for page and default cache. You can manually edit <Magento install dir>app/etc/env.php file or you can use the command line, which is the recommended method because also provides validation.
For the default cache run the command:
php bin/magento setup:config:set --cache-backend=redis --cache-backend-redis-<parameter_name>=<parameter_value>...
Specify parameters that are specific to Redis default caching.
For the page cache run the command:
Php bin/magento setup:config:set --page-cache=redis --page-cache-redis-server=redis.example.com --page-cache-redis-db=1
This command enables Redis page caching, sets the host to redis.example.com and assigns the database number to 1. You can check all the details on the Magento DevDocs.
Magento Performance Optimization Summarized
We’ve covered quite a few approaches to Magento 2 performance optimization, so let’s do a quick recap.
Identifying and solving bottlenecks will make a huge difference in processing your data. Using full-page cache and Varnish will also improve your website speed and accelerate HTTP traffic. You should always use Magento on production mode on your live server, no excuses. Use minification to decrease the size of CSS and JS files, a smaller file will both download faster and use up less bandwidth.
Enable flat tables to decrease the database requests and improve database response time. Optimize your images and use a CDN if possible. Set indexers to update on schedule and enable the Magento cron. Enabling gzip compression will also decrease the size of the files to be downloaded. Using Elasticsearch will increase the speed of your catalog pages and the search results page will load much faster. Use Redis for page cache and session storage which is significantly faster than the default memcache.
You can implement all of these recommendations or just a few that you have not used so far. Even a couple should be enough to improve Magento performance, which should hopefully transform into more conversions.
Understanding the basics
What is Magento?
Magento is a modern eCommerce platform built on open-source technology that extends beyond the shopping cart system, offering powerful tools for B2C, B2B, and B2B2C.
What language is Magento written in?
Magento is written in PHP.
What is Magento Cloud?
Magento Commerce Cloud is a managed and automated hosting platform for Magento specifically created for Cloud infrastructures. This version combines Magento Commerce and cloud infrastructure hosting, with a few differences and added features.
Why use Magento 2?
Magento 2 is designed for growth and built for flexibility. It can deliver a seamless shopping experience, reduce business costs, automate repetitive tasks and save hours of manual effort. Also by being agile and user-friendly, with Magento you can go to market quickly.
How to speed up Magento 2?
Use full-page cache, Varnish, and enable flat tables. Use minification for CSS and JS files. Optimize images and use a CDN if possible. Set indexers to update on schedule. Enable Magento cron and gzip compression. Use Elasticsearch for catalog and search. Use Redis for page cache and session storage.
Is Magento 2 free?
Magento 2 is offered in both free or paid versions. The offered solutions are Magento Open Source and Magento Commerce. Magento Open Source is free for everyone. Magento Commerce it is a paid solution that can be also hosted in Magento’s own cloud, Magento Commerce Cloud.
Timișoara, Timiș County, Romania
Member since March 29, 2017
About the author
Paul is a devoted Magento developer, a real go-getter, and a person who is truly passionate about the web.

