Context Aware Applications and Complex Event Processing Architecture
Since almost all smartphones today are equipped with location sensors, motion sensors, bluetooth, and wifi, today’s mobile apps can use context awareness to dramatically increase their capabilities and value. This article walks you through building a context aware app that employs complex event processing.

Since almost all smartphones today are equipped with location sensors, motion sensors, bluetooth, and wifi, today’s mobile apps can use context awareness to dramatically increase their capabilities and value. This article walks you through building a context aware app that employs complex event processing.

Rahul is a professional software engineer with leadership experience and expertise building full-stack React.js/Node.js applications.
Expertise
Mobile phone usage across the globe is constantly increasing. As of 2013, around 73% of Internet users consumed content via a mobile device and this percentage is expected to reach close to 90% by 2017.
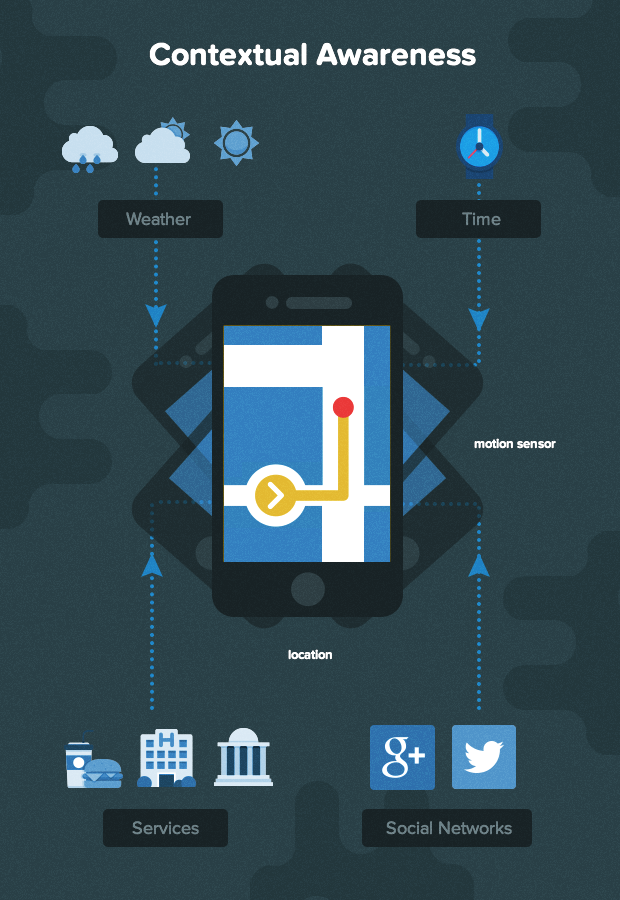
There are, of course, many reasons for the mobile revolution. But one of the most significant is that mobile apps generally get access to richer context as almost all smartphones today are equipped with location sensors, motion sensors, bluetooth, and wifi. By making use of their data, apps can achieve “context awareness” that can dramatically increase their capabilities and value, and can really make them stand out in app stores.
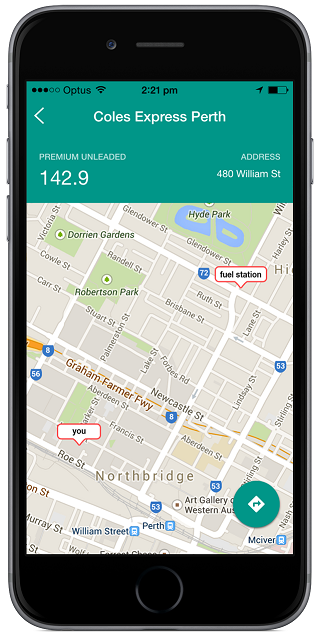
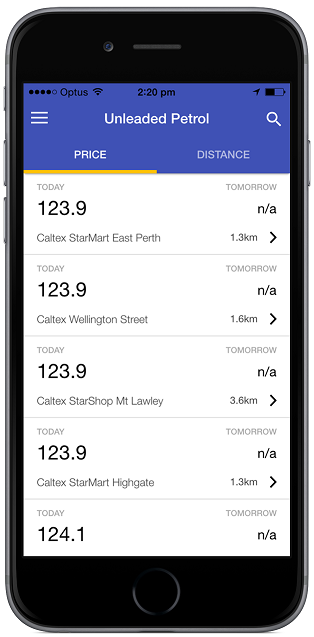
In this tutorial, we’ll explore creating context aware apps through a complex events processing example. We’ll use a fairly simple example: a fuel price app that finds the best fuel prices in your area.
Context aware apps
In Designing Calm Technology, Mark Weiser and John Seely Brown describe calm technology as “that which informs but doesn’t demand our focus or attention.”
Context-aware mobile apps are highly consistent with this notion and are an important and valuable step down this path. They employ contextual information gleaned from their sensors to proactively provide the user with valuable information and they do so with minimal effort on the part of the user. Mark Weiser and John Seely Brown would undoubtedly applaud this technological advancement.
Context-awareness is the idea that an app can sense and react based on the contextual data it has access to. Such an app makes use of rich sensor data that is available on a mobile device to provide accurate and relevant information to the user in the appropriate context. Through trends it observes over the course of usage of the device, and/or through feedback provided by the user, such an app can actually “learn” over time, thereby becoming “smarter” and more useful.
Complex event processing
Complex event processing (CEP) is a form of event processing that employs more sophisticated analyses of multiple events (i.e., over time, from different sources, and so on), integrating and analyzing their content to deduce more meaningful information and patterns.
In a mobile app, CEP can be applied to events generated from the mobile device’s sensors as well as external data sources to which the app has access.
Key features of our fuel price app
For purposes of our complex event processing tutorial, let’s assume that the features of our fuel price app are limited to the following:
- automatically detecting locations that are geographically-relevant to the user (e.g., user’s home location and user’s work location)
- automatically identifying fuel stations within a reasonable distance of the user’s home and work locations
- automatically notifying the user of best fuel prices near home and work
OK, let’s get started.
Detecting user’s home and work locations
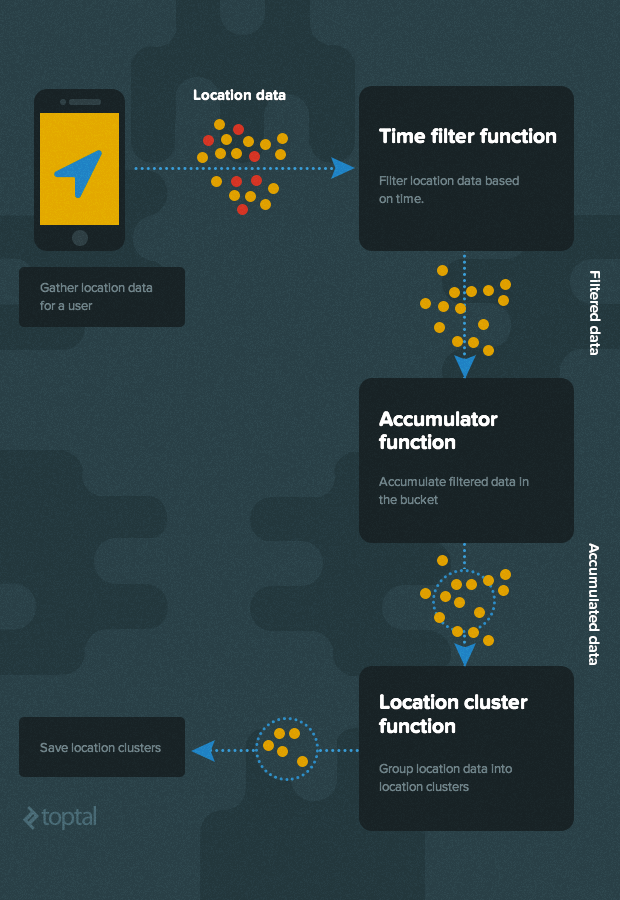
Let’s begin with the logic for automatically detecting the home and work locations of the user. In order to keep things simple for our complex event processing example, we’re going to assume that the user has a fairly normal work schedule. We can therefore assume that the user will typically be home between 2 and 3 AM, and will typically be at their office between 2 and 3 PM.
Based on those assumptions, we define two CEP rules and collect location and time data from user’s smartphone:
-
Home Location rule
- gather location data between 2 and 3 AM for a week
- clusterize location data to get approximate home address
-
Work Location rule
- gather location data between 2 and 3 PM for weekdays
- clusterize location data to get approximate work location
The high level algorithm to detect locations is depicted below.
Lets assume the following simple JSON data structure for location data:
{
  "uid": "some unique identifier for device/user",
  "location": [longitude, latitude]
  "time": "time in user's timezone"
}
Note: It is always a good practice to make sensor data immutable (or value type), so that it can be safely used by different modules in the CEP workflow.
Implementation
We will implement our algorithm using a composable module pattern, whereby each module performs only one task and calls next when the task is complete. This conforms to the Unix Rule of Modularity philosophy.
Specifically, each module is a function that accepts a config object and a next function which is called to pass the data to the next module. Accordingly, each module returns a function that can accept sensor data. Here is the basic signature of a module:
// nominal structure of each composable module
function someModule(config, next) {
  // do initialization if required
  return function(data) {
    // do runtime processing, handle errors, etc.
    var nextData = SomeFunction(data);

    // optionally call next with nextData
    next(nextData);
  }
}
To implement our algorithm for deducing the user’s home and work locations, we’ll need the following modules:
- Time filter module
- Accumulator module
- Clustering module
Each of these modules is described in more detail in the subsections that follow.
Time filter module
Our time filter is a simple function that takes location data events as input and only passes data to the next module if the event occurred within the time slice of interest. The config data for this module therefore consists of the start and end times of the time slice of interest. (A more sophisticated version of the module could filter based on multiple time slices.)
Here is a pseudocode implementation of the time filter module:
function timeFilter(config, next) {
  function isWithin(timeval) {
    // implementation to compare config.start <= timeval <= config.end
    // return true if within time slice, false otherwise
  }

  return function (data) {
    if(isWithin(data.time)) {
      next(data);
    }
  };
}
Accumulator module
The responsibility of accumulator is simply to gather location data to then be passed to the next module. This function maintains an internal fixed-size bucket to store data. Each new location encountered is added to the bucket until the bucket is full. The accumulated location data in the bucket is then sent to the next module as an array.
Two types of accumulator buckets are supported. The bucket type affects what is done to the contents of the bucket after the data is forwarded to the next phase, as follows:
-
Tumbling window bucket (
type = 'tumbling'): after forwarding data, empties the entire bucket and starts fresh (reduced bucket size back to 0) -
Running window type (
type = 'running'): after forwarding data, only discards the oldest data element in the bucket (reduces bucket size by 1)
Here is a basic implementation of the accumulator module:
function accumulate(config, next) {
  var bucket = [];
  return function (data) {
    bucket.unshift(data);
    if(bucket.length >= config.size) {
      var newSize = (config.type === 'tumbling' ? 0 : bucket.length - 1);
      next(bucket.slice(0));
      bucket.length = newSize;
    }
  };
}
Clustering module
There are of course many sophisticated techniques in coordinate geometry to clusterize 2D data. Here is one simple way of clustering location data:
- find neighbors for each location in a set of locations
- if some of the neighbors belong to an existing cluster, then expand neighbors with cluster
- if locations in neighbor set are more than threshold, add neighbors as a new cluster
Here’s an implementation of this clustering algorithm (using Lo-Dash):
var _ = require('lodash');

function createClusters(location_data, radius) {
  var clusters = [];
  var min_points = 5; // Minimum cluster size
  function neighborOf(this_location, all_locations) {
    return _.filter(all_locations, function(neighbor) {
      var distance = distance(this_point.location, neighbor.location);
      // maximum allowed distance between neighbors is 500 meters.
      return distance && (500 > distance);
    }
  }
  _.each(location_data, function (loc_point) {
    // Find neighbors of loc_point
    var neighbors = neighborOf(loc_point, location_data, radius);
    _.each(clusters, function (cluster, index) {
      // Check whether some of the neighbors belong to cluster.
      if(_.intersection(cluster, neighbors).length){
        // Expand neighbors
        neighbors = _.union(cluster, neighbors);
        // Remove existing cluster. We will add updated cluster later.
        clusters[index] = void 0;
      }
    });
    if(neighbors.length >= min_points){
      // Add new cluster.
      clusters.unshift(neighbors);
    }
  });
  return _.filter(clusters, function(cluster){ return cluster !== void 0; });
}
The above code assumes the existence of a distance() function that calculates the distance (in meters) between two geographic locations. It accepts two location points in the form of [longitude, latitude] and returns the distance between them. Here is a sample implementation of such a function:
function distance(point1, point2) {
  var EARTH_RADIUS = 6371000;
  var lng1 = point1[0] * Math.PI / 180;
  var lat1 = point1[1] * Math.PI / 180;

  var lng2 = point2[0] * Math.PI / 180;
  var lat2 = point2[1] * Math.PI / 180;

  var dLat = lat2 - lat1;
  var dLon = lng2 - lng1;

  var a = Math.sin(dLat/2) * Math.sin(dLat/2) +
          Math.sin(dLon/2) * Math.sin(dLon/2) * Math.cos(lat1) * Math.cos(lat2);
  var arc = 2 * Math.atan2(Math.sqrt(a), Math.sqrt(1 - a));
  var distance = EARTH_RADIUS * arc;
  return distance;
}
With our clustering algorithm defined and implemented (in our createClusters() function shown earlier), we can use it as the basis for our clustering module:
function clusterize(config, next) {
  return function(data) {
    var clusters = createClusters(data, config.radius);
    next(clusters);
  };
}
Pulling it all together
All the required component functions are now defined, so we are ready to code our home/work location rules.
Here, for example, is a possible implementation of the home location rule:
var CLUSTER_RADIUS = 150;      // use cluster radius of 150 meters
var BUCKET_SIZE = 500;         // collect 500 location points
var BUCKET_TYPE = 'tumbling';  // use a tumbling bucket in our accumulator

var home_cluster = clusterize({radius: CLUSTER_RADIUS}, function(clusters) {
    // Save clusters in db
  });

var home_accumulator = accumulate({size: BUCKET_SIZE, type: BUCKET_TYPE}, home_cluster);
var home_rule = timeFilter({start: "2AM", end: "3AM"}, home_accumulator);
Now whenever location data is received from smart phone (via websocket, TCP, HTTP) we forward this data to home_rule function which in turn detects clusters for user’s home.
The user’s “home location” is then assumed to be the center of the home location cluster.
Note: While this may not be entirely precise, it is adequate for our simple example, especially since the goal of this app in any case is simply to know the area surrounding the user’s home, rather than knowing the user’s precise home location.
Here’s a simple example function that calculates the “center” of a set of points in a cluster by average the latitudes and longitudes of all points in the cluster set:
function getCentre(cluster_data) {
  var len = cluster_data.length;
  var sum = _.reduce(cluster_data, function(memo, cluster_point){
    memo[0] += cluster_point[0];
    memo[1] += cluster_point[1];
    return memo;
  }, [0, 0]);
  return [sum[0] / len, sum[1] / len];
}
A similar approach could be employed for deducing the work location, with the only difference being that it would use a time filter between 2 and 3 PM (as opposed to 2 and 3 AM).
Our fuel app is thus able to automatically detect the user’s work and home locations without requiring any user intervention. This is context-aware computing at it’s finest!
Finding nearby fuel stations
The hard work to establish context awareness has now been done, but we still need one more rule to identify which fuel station prices to monitor (i.e., which fuel stations are close enough to the user’s home or work location to be relevant). This rule needs access to all the fuel station locations for all the regions supported by fuel app. The rule is as follows:
- Fuel station rule
- find nearest fuel stations for each home & work location
This can easily be implemented using the distance function shown earlier as a location filter to apply to all fuel stations known to the app.
Monitoring fuel prices
Once the fuel app obtains the list of preferred (i.e., nearby) fuel stations for the user, it can easily watch for the best fuel prices at these stations. It can also notify user when one of these fuel stations has special prices or offers, especially when the user is detected to be near these fuel stations.
Conclusion
In this complex event processing tutorial, we have really barely scratched the surface of context-aware computing.
In our simple example, we added location context to an otherwise simple fuel price reporting app and made it smarter. The app now behaves differently on each device and over time detects the location patterns to automatically improve the value of the information it provides to its users.
Surely much more logic and sensor data can be added to increase the accuracy and utility of our context aware app. A clever mobile developer could, for example, make use of social network data, weather data, POS terminal transaction data, and so on to add even more context-awareness to our app and make it more viable and marketable.
With context-aware computing, the possibilities are endless. More and more smart apps will continue to appear in app stores that employ this powerful technology to make our lives simpler.
Perth, Western Australia, Australia
Member since October 3, 2014
About the author
Rahul is a professional software engineer with leadership experience and expertise building full-stack React.js/Node.js applications.