How to Set Up a Microservices Architecture in Ruby: A Step-by-Step Guide
Microservices are one of the latest trends in software design. In a microservices architecture, the classic monolithic back-end is substituted by a suite of distributed services. This design allows better separation of responsibilities, easier maintenance, greater flexibility in the choice of technologies for each service, and easier scalability and fault tolerance.
In this article, Toptal Freelance Software Engineer Francisco Temudo guides us in a step-by-step tutorial on how to build a microservices suite using Ruby.

Francisco’s 15+ years in software development (including PHP & Java) have lately been focused on full-stack web development (Ruby & JS.)
Expertise
PREVIOUSLY AT

What Are Microservices?
Microservices are one of the latest trends in software design where multiple independent services communicate among themselves and have their own processes and resources. This approach differs from a typical client-server application design. The usual client-server application consists of one or more clients, a monolithic back-end which includes all domain data and logic, and an API which allows clients to access the back-end and its functionality.
In a microservices architecture, the described monolithic backend is instead substituted by a suite of distributed services. This design allows better separation of responsibilities, easier maintenance, greater flexibility in the choice of technologies for each service, and easier scalability and fault tolerance. At the same time, complex distributed systems have their set of challenges. They have a greater chance of having to deal with race conditions, and they are harder to debug as problems are not easily pinpointed to one single service, but are instead distributed through many. If an effort is not made to follow the best practices while building such a system, you may find yourself surrounded by fires that you do not know how to put out. Special care must be taken with the services’ payload contracts, as changes in one service may affect all its clients, and consequently all the back-end’s service suite.
All these considerations are important, but let’s assume you have already thought them over. Now what you want is to find a way to build a microservices back-end on your own. So let’s dive right into that.
How to Set up a Microservices Architecture
There are currently many ways you can set up your microservices, and in this guide we will focus on a broker architecture.
A Broker Architecture
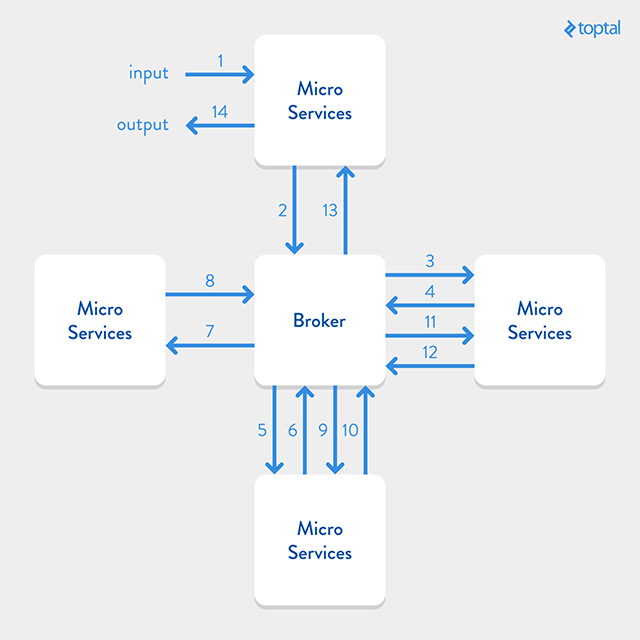
A broker architecture is one of the ways you can get your services to communicate amongst themselves. In it, all services surround a messaging server, the broker, and all are connected to it. Services send messages to the broker, who then knows which other service or services he needs to forward these messages. This way, services do not need to keep information about other services. Instead, they rely on the broker to take care of all the messaging, and it allows them to be isolated and focused only on their particular domain. A broker may also store messages when their receivers are down, allowing senders and receivers to not be forced to be up simultaneously, thus allowing for even greater isolation. Of course, there are drawbacks to this solution as the broker can quickly become a bottleneck since all the communication must go through them, and it can also become a single point of failure for your backend. However, there are a few ways to mitigate these problems. One way is to have multiple instances of the broker running in parallel, which would allow better system fault tolerance. Another way would be using other architectures. Alternative architectures differ from the architecture we will implement in this guide by not using a broker, or by using a different broker architecture, or by using a different messaging protocol such as HTTP.
Communication Between Services
In this guide, we will be using ZeroMQ to handle the communication between the services and the broker.

ZeroMQ provides a protocol abstraction layer which handles multipart asynchronous messages over random transports. The advantages of using ZeroMQ for messaging between services and broker are outside the scope of this guide, so we won’t go over them right here, but if you want to know more about them, check out following Quora article. If you are interested in finding out other ways to get your services talking to each other, I suggest you take a look at Broker vs. Brokerless article to see what else can be achieved.
Building the Microservices Suite
This article will guide you through all the steps needed to create your microservices suite. Our system will consist of a broker and a service. We will also be using a small client script to test calls to the service suite, but keep in mind that the client code can easily be used anywhere.
So, let’s start building.
Getting Started
First, let’s make sure you have everything you need to run the broker and the service. First, begin by downloading and installing Node.js, ZeroMQ and Git on your machine. If you are using OSX, there are homebrew packages for each of them, and most Linux distributions have a package for each of them too, so you should have no problem with this. Windows users can simply use the download links provided above.
Running the Broker
After installing all the required dependencies, let’s get our broker running. In this guide, we are using a Node.js implementation of the broker which is a part of the ZMQ Service Oriented Suite. You can find its code and documentation on GitHub. To run the broker, first clone a Broker bootstrap to your machine. This repository is a bootstrap for using the broker library above. Note, this step is not required as the original library is itself runnable, but the difference between the two is that in the bootstrap repository you can change the default configurations.
So, first, use the following Git command to download the project to your machine:
$ git clone git@github.com:dadah/zmq-broker-bootstrap.git
After you have done that, move to the created directory:
$ cd zmq-broker-bootstrap
Now install the package dependencies:
$ npm install
The broker is now ready. To run your broker, run the following command:
$ bin/zss-broker run
You can find configuration files for each environment in the config/ directory. This is the default development configuration:
{
 "broker": {
   "backend": "tcp://127.0.0.1:7776",
   "frontend": "tcp://127.0.0.1:7777"
 },
 "log": {
   "consolePlugin": {
     "level": "debug"
   }
 }
}
The backend parameter defines the ip:port address of the broker’s back-end and front-end. The back-end address is where the broker receives requests from and replies to the services, and the front-end address is where it receives and sends to the service clients. You can also set the logging level by changing the log.consolePlugin.level. Possible values are trace, debug, info, warn and error, and they determine the amount of logging information broker process will output.
Running the Service
After you have your broker up, it is time to develop your first Ruby microservice. Start by opening a new console window. Then, create a directory where your services will be stored and then go to that directory. In this guide, we are using the Ruby client and service of ZMQ SOA Suite. There is a bootstrap “Hello world” service available, so let’s use it to get our first microservice running.
Go to your services directory and clone the bootstrap repository:
$ git clone git@github.com:dadah/zmq-service-suite-ruby-bootstrap.git
Go to the newly created directory:
$ cd zmq-service-suite-ruby-bootstrap
Now install all dependencies:
$ bundle install
To start the service, run the following command:
$ bin/zss-service run
Great. You have your first service up and running.
If you go to the console window where you left your broker running, you can see the following output:
2015-12-15 16:45:05 | INFO | BROKER - Async Broker is waiting for messages...

2015-12-15 16:45:14 | DEBUG | BACKEND - received from: hello-word#aaa65374-8585-410a-a41d-c8a5b024553b rid: 76f50741-913a-43b9-94b0-36d8f7bd75b1
2015-12-15 16:45:14 | DEBUG | BACKEND - routing from: hello-word#aaa65374-8585-410a-a41d-c8a5b024553b rid: 76f50741-913a-43b9-94b0-36d8f7bd75b1 to SMI.UP request...
2015-12-15 16:45:14 | INFO | SMI - SMI register for sid: HELLO-WORD instance: hello-word#aaa65374-8585-410a-a41d-c8a5b024553b!
2015-12-15 16:45:14 | DEBUG | BACKEND - reply to: hello-word#aaa65374-8585-410a-a41d-c8a5b024553b rid: 76f50741-913a-43b9-94b0-36d8f7bd75b1 with status: 200
2015-12-15 16:45:15 | DEBUG | BACKEND - received from: hello-word#aaa65374-8585-410a-a41d-c8a5b024553b rid: 3b3a0416-73fa-4fd2-9306-dad18bc0502a
2015-12-15 16:45:15 | DEBUG | BACKEND - routing from: hello-word#aaa65374-8585-410a-a41d-c8a5b024553b rid: 3b3a0416-73fa-4fd2-9306-dad18bc0502a to SMI.HEARTBEAT request...
2015-12-15 16:45:15 | DEBUG | BACKEND - reply to: hello-word#aaa65374-8585-410a-a41d-c8a5b024553b rid: 3b3a0416-73fa-4fd2-9306-dad18bc0502a with status: 200
2015-12-15 16:45:16 | DEBUG | BACKEND - received from: hello-word#aaa65374-8585-410a-a41d-c8a5b024553b rid: b3044c24-c823-4394-8204-1e872f30e909
2015-12-15 16:45:16 | DEBUG | BACKEND - routing from: hello-word#aaa65374-8585-410a-a41d-c8a5b024553b rid: b3044c24-c823-4394-8204-1e872f30e909 to SMI.HEARTBEAT request...
2015-12-15 16:45:16 | DEBUG | BACKEND - reply to: hello-word#aaa65374-8585-410a-a41d-c8a5b024553b rid: b3044c24-c823-4394-8204-1e872f30e909 with status: 200
This log means the broker has acknowledged the existence of a new service and is receiving heartbeat messages from it. Every second, the service sends a heartbeat message to the broker, so it knows the instance of the service is up.
Consuming from the Service
So now we have a service running, how do we use it?
In the bootstrap repository, there is a dummy client you can use to test your “Hello World” service. Simply open a new console window or tab, and go to your service directory. Once you are there, run the following command:
$ bin/zss-client
You should see something like this:
15-49-15 16:49:54 | INFO | ZSS::CLIENT - Request 90a88081-3485-45b6-91b3-b0609d64592a sent to HELLO-WORD:*#HELLO/WORLD with 1.0s timeout
15-49-15 16:49:54 | INFO | ZSS::CLIENT - Received response to 90a88081-3485-45b6-91b3-b0609d64592a with status 200
"Hello World"
If you go to the console window where your service is running, you should see this:
Started hello-word daemon...
15-45-15 16:45:14 | INFO | ZSS::SERVICE - Starting SID: 'HELLO-WORD' ID: 'hello-word#aaa65374-8585-410a-a41d-c8a5b024553b' Env: 'development' Broker: 'tcp://127.0.0.1:7776'
15-49-15 16:49:54 | INFO | ZSS::SERVICE - Handle request for HELLO-WORD:*#HELLO/WORLD
15-49-15 16:49:54 | INFO | ZSS::SERVICE - Reply with status: 200
Good. You have just launched and consumed your “Hello World” microservice. This is not, however, what we set out to do. We want to build our service(s). Let’s get to it, then.
Building Your Service
First, let’s stop our “Hello World” service. Go to the service’s console window and press Ctrl+C to stop the service. Next we need to turn our “Hello World” service into the “Person” service.
Code Structure
Let’s start by taking a look at the code tree of the project. It looks like this:
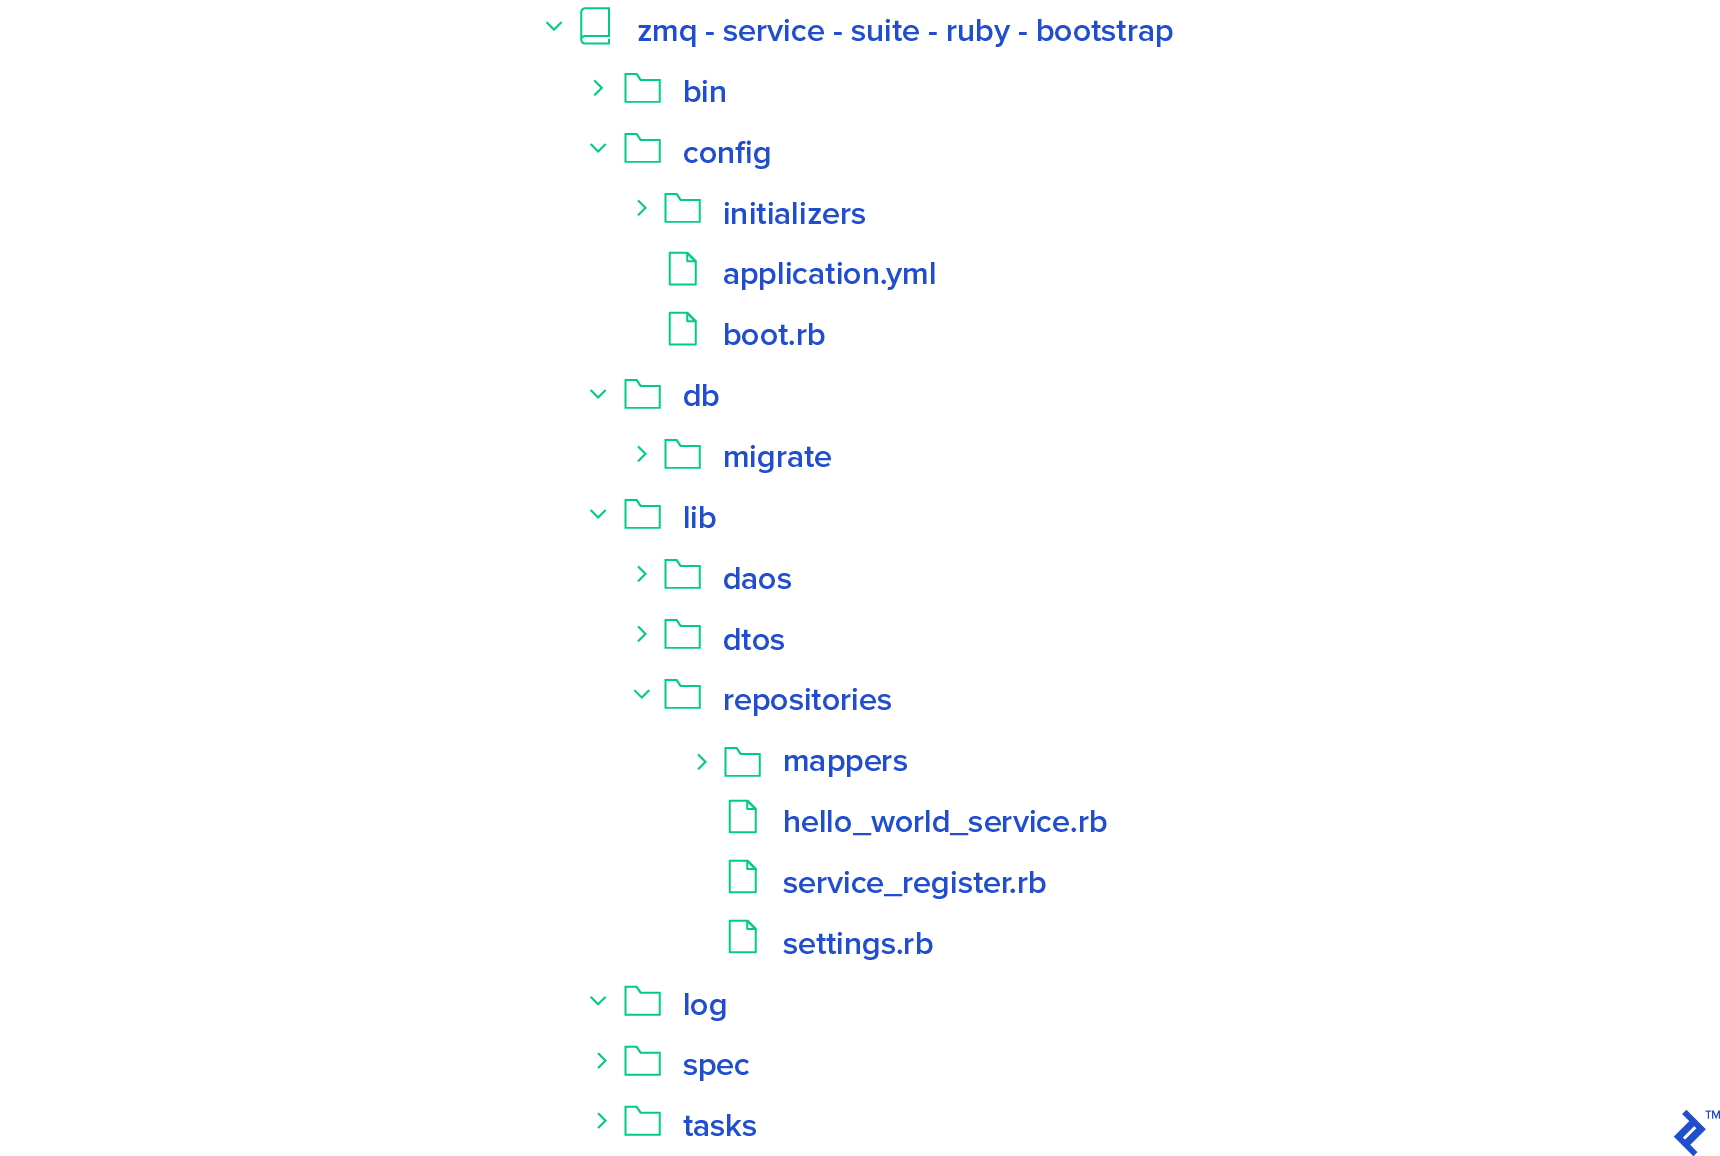
- The
bindirectory is where you store the scripts that launch your service. - The
configdirectory stores all the configuration files.- The
boot.rbfile is where you can add all your service dependencies. If you open it, you can notice there are many dependencies already listed there. If you need to add any more, this is where you should do it. - The
application.ymlfile stores all your application settings. We will take a look at this file later. - In
config/initializersdirectory you can add your initializer scripts. You can, for example, add settings for ActiveRecord or Redis connections here. The scripts you add to this directory will run on the service startup.
- The
- In the
db/migratedirectory you can store your ActiveRecord or Sequel migrations if you have any. In case you do not, you can delete this directory altogether. - The
libdirectory is where your main application code resides.- The
settings.rbfile simply loads theapplication.ymlfile and makes it available throughout the scope of the service, so that you can access your configurations anywhere. For instance,Settings.broker.backendreturns the broker backend address you defined in the YML file above. - File
service_register.rbis where you register your services and service routes. We will explain it later. - The
hello_world_service.rbfile defines the “Hello World” service’s endpoints. - The
lib/daosdirectory is where you store your ActiveModel objects if you are using ActiveRecord, or any other data access objects you might eventually create, such as your Sequel models. - The
lib/dtosdirectory stores your data transfer objects. These objects are the ones that are eventually sent back to the service’s clients. - The
lib/repositoriesdirectory stores your repositories. Repositories are objects that allow services to access data and are the only objects allowed to handle DAOs. So if a service wants a group of “Hello World” instances, it will ask the repository for them. The repository, in turn, uses the appropriate DAOs to fetch the relevant data from the database. The data is then mapped into a suitable “HelloWorld” DTO or “HelloWorld” DTO collection which is returned to the service. - The
lib/repositories/mappersdirectory is where you store your mappers. Mappers are objects that convert DAOs into DTOs, and vice-versa.
- The
The application.yml file from the config directory looks like this:
defaults: &defaults
  broker:
    backend: tcp://127.0.0.1:7776
    frontend: tcp://127.0.0.1:7777
  logging:
    console:
      level: info

development:
  <<: *defaults

test:
  <<: *defaults

production:
  <<: *defaults
This setting simply sets the broker’s back-end and front-end address, and logging level.
If all this sounds confusing so far, do not worry as it will become clearer as we move on.
“Person” Service
So, let’s go on with our “Person” service. Let’s start by configuring the database connection. Open the file config/initializers/active_record.rb and uncomment the only line there. Then, add the following entry to your development configuration in the application.yml so that it looks like this:
defaults: &defaults
  broker:
    backend: tcp://127.0.0.1:7776
    frontend: tcp://127.0.0.1:7777
  logging:
    console:
      level: info
  database:
    adapter: postgresql
    database: zss-tutorial-development
Now that you added your database configuration, you must create the database. At this time, there is no way of doing this automatically unless you are using a default PostgreSQL database, in which case you can simply run:
$ rake db:create
If you prefer another database, you have to add the appropriate gem to the gemfile and then bundle install the project.
Next is the migration. For that, simply create the file db/migrate called 000_creates_persons.rb:
$ touch db/migrate/000_creates_persons_table.rb
Open the file and create the migration as you would with a regular Rails migration:
class CreatesPersons < ActiveRecord::Migration

  def change
    create_table :persons do |t|
      t.name
      t.timestamps
    end
  end

end
Next, run it:
$ rake db:migrate
== 0 CreatesPersons: migrating ================================================
-- create_table(:persons)
DEPRECATION WARNING: `#timestamp` was called without specifying an option for `null`. In Rails 5, this behavior will change to `null: false`. You should manually specify `null: true` to prevent the behavior of your existing migrations from changing. (called from block in change at /Users/francisco/Code/microservices-tutorial/db/migrate/000_creates_persons.rb:6)
   -> 0.0012s
== 0 CreatesPersons: migrated (0.0013s) =======================================
Now that we have our table created, let’s create a model for it. Create the file lib/daos/person.rb:
$ touch lib/daos/person.rb
Edit it like this:
module DAO
  class Person < ActiveRecord::Base
  end
end
There is your model. Now you need to create a DTO model for a “Person” so that you can return it to the client. Create the file lib/dtos/person.rb:
$ touch lib/dtos/person.rb
Edit it like this:
module DTO
  class Person < Base
    attr_reader :id, :name
  end
end
Next you have to create a Mapper to convert the “Person” DAO into a “Person” DTO. Create the file lib/repositories/mappers/person.rb, and edit it like this:
module Mapper
  class Person < Mapper::Base

    def self.to_dao dto_instance
      DAO::Person.new id: dto_instance.id, name: dto_instance.name
    end

    def self.to_dto dao_instance
      DTO::Person.new id: dao_instance.id, name: dao_instance.name
    end

  end
end
Here, Mapper::Base requires you to implement self.to_dao and self.to_dto. If you do not wish to do so, you can implement self.map instead and override the Mapper::Base.map which calls to_dao or to_dto, depending on whether the attribute it receives is a DAO or a DTO.
Now you have a DAO to access your database, a DTO to send it to the client, and a Mapper to convert one into the other. You can now use these three classes within a repository to create the logic that enables you to get persons from the database and return a corresponding collection of DTOs.
Let’s create the repository then. Create the file lib/repositories/person.rb:
$ touch lib/dtos/person.rb
Edit it like this:
module Repository
  class Person < Repository::Base

    def get
      DAO::Person.all.map do |person|
        Mapper::Person.map(person)
      end
    end

  end
end
This repository only has the instance method get which simply gets all persons from the database and maps them into a collection of person DTOs - pretty simple. Let’s bring this all together now. All that is left now is to create the service and the endpoint which calls this repository. To do that, let’s create the file lib/person_service.rb:
$ touch lib/person_service.rb
Edit it like this:
class PersonService < BaseService

  attr_reader :person_repo

  def initialize
    @person_repo = Repository::Person.new
  end

  def get payload, headers
    persons = person_repo.get()
    if persons.empty?
      raise ZSS::Error.new(404, "No people here")
    else
      persons.map &:serialize
    end
  end

end
The “Person” service initializes the repository in its initializer. All public instance methods of the “Person” service have payload and headers which you can omit if you do not need them. Both are Hashie::Mash instances and they store the variables sent to the endpoint, either as attributes or headers, and their replies mimic HTTP responses as each response has a status code which clients can use to find out the result of requests sent to the service, along with the service’s response payload. Response codes are the same as you’d expect from an HTTP server. For example, a successful request will return a 200 status code, along with the response payload. If some service error occurs, then the status code will be 500, and if there is something wrong with the parameters sent to the server, the status code will be 400. The service can reply with most HTTP status codes along with its payload. So, if for example you want your service to tell its clients when they are not allowed to access a certain endpoint, you can do so by responding with a 403 code. You can see another example of response codes if you look back at our service code above. In the get endpoint, we are returning status code 404 along with the optional “No people here” message when no people are found, just like an HTTP server would return a 404 if there are no resources available. If the repository does indeed return people, then the service serializes the DTOs and returns them to the client. Each DTO has a default serializer that returns a JSON object with the keys and corresponding values defined as either attr_reader or attr_accessible in the DTO definition. You can, of course, override the serializer by defining your serialize method in your DTO classes.
Now that we have a service defined, we need to register it. This is the final step. Open the file lib/service_register.rb and substitute all occurrences of “HelloWorld” with “Person”, so that the file finally looks somewhat like this:
module ZSS
  class ServiceRegister

    def self.get_service
      config = Hashie::Mash.new(
        backend: Settings.broker.backend
      )

      service = ZSS::Service.new(:person, config)

      personInstance = PersonService.new

      service.add_route(personInstance, :get)

      return service
    end

  end
end
As you probably noticed, there is a small change in the add_route call. We removed the string “HELLO/WORLD”. That is because the string is only needed if the service verb does not match the method that implements it. In our case, when calling the person service with the GET verb, the method to be called is get, so we can omit the string.
The ServiceRegister class is where you have to define the method self.get_service. This method initializes the service and connects it to the broker’s backend. It then matches routes on that service to methods in one or more service definitions. For instance, in the following case, it creates the service and binds it to the broker:
config = Hashie::Mash.new(
  backend: Settings.broker.backend
)

service = ZSS::Service.new(:person, config)
Then it instantiates a service handler:
personInstance = PersonService.new
Next, the service handler is bound to the service:
service.add_route(personInstance, :get)
Finally, it must return the service instance.
return service
Now, there is only one last step before we can launch our “Person” service; we need to create an executable script for it. We have already got one for the “HelloService”. So, open the file bin/zss-service, substitute “hello-word” with “person”, and save the file. Go back to the console and run:
$ bin/zss-service run
Starting person:
	PID: ./log
	LOGS: ./log
Started person daemon...
15-29-15 19:29:54 | INFO | ZSS::SERVICE - Starting SID: 'PERSON' ID: 'person#d3ca7e1f-e229-4502-ac2d-0c01d8c285f8' Env: 'development' Broker: 'tcp://127.0.0.1:7776'
That’s it. You have just started your “Person” service for the first time. Now let’s test it. Open the bin/zss-client file, change the sid variable to “person” and change the client call from hello_world() to get(). Once that’s done, run the client in a new window:
$ bin/zss-client
/Users/francisco/.rvm/gems/ruby-2.1.2/gems/zss-0.3.4/lib/zss/client.rb:41:in `new': No people here (ZSS::Error)
	from /Users/francisco/.rvm/gems/ruby-2.1.2/gems/zss-0.3.4/lib/zss/client.rb:41:in `call'
	from /Users/francisco/.rvm/gems/ruby-2.1.2/gems/zss-0.3.4/lib/zss/client.rb:55:in `method_missing'
	from bin/zss-client:12:in `<main>'
As you can see, you have caught a ZSS::Error. This is because we raise an error when no people are found by the service and we have no people yet in our service’s database.
Let us handle this error then. Open zss-client and edit it like this:
begin
  client = ZSS::Client.new(sid, config)
  p client.get()
rescue ZSS::Client => e
  if e.code == 404
    p e.message
  else
    raise e
  end
end
Now we are printing the error message when the error code is 404, while raising the error if it is a different one. Let’s see it in action by running our client again:
$ bin/zss-client
"No people here"
Excellent. Let’s now add some people to our table and see if they are returned by the service to our client. To do this, simply open a service console:
$ rake service:console
Add some people:
$ rake service:console
[1] pry(main)> DAO::Person.create name: 'John'
=> #<DAO::Person:0x007fe51bbe9d00 id: 1, name: "John", created_at: 2015-12-16 13:22:37 UTC, updated_at: 2015-12-16 13:22:37 UTC>
[2] pry(main)> DAO::Person.create name: 'Mary'
=> #<DAO::Person:0x007fe51c1dafe8 id: 2, name: "Mary", created_at: 2015-12-16 13:22:42 UTC, updated_at: 2015-12-16 13:22:42 UTC>
[3] pry(main)> DAO::Person.create name: 'Francis'
=> #<DAO::Person:0x007fe51bc11698 id: 3, name: "Francis", created_at: 2015-12-16 13:22:53 UTC, updated_at: 2015-12-16 13:22:53 UTC>
[4] pry(main)> exit
Now, run your client again.
$ bin/zss-client
[{"id"=>1, "name"=>"John"}, {"id"=>2, "name"=>"Mary"}, {"id"=>3, "name"=>"Francis"}]
There you have it.
Final Considerations
Going through the code provided in this guide, you might think there are lots of steps that were unnecessary, such as creating repositories or DTOs, and you’d be right. All you would need to have a functioning “Person” service would be your service class and your DAO, which you could call directly from the service class. Nevertheless, it is good practice to follow the pattern described in this article, as it allows you to keep service logic separated from your data storage manipulation. Services should only be focused on their logic, and repositories should handle all interactions with your data storage. DTOs determine your services’ payloads and serialization, and DAOs are only concerned with getting data from storage. The conventions and techniques described in this guide are known as the repository pattern, which you can check out in the image below.

I’d like to finish by asking anyone who found this useful to contribute to the SOA service suite, by expanding and enhancing it in any way. All your forks and pull requests are welcome.
I hope this will help you get started in microservices. If you want to check out the service code, a complete version is available on GitHub.
Further Reading on the Toptal Blog:
Francisco Temudo
Lisbon, Portugal
Member since December 7, 2015
About the author
Francisco’s 15+ years in software development (including PHP & Java) have lately been focused on full-stack web development (Ruby & JS.)
Expertise
PREVIOUSLY AT