WebVR Part 5: Design and Implementation
With all building blocks in place, it is time to wrap up our WebVR journey and demonstrate how everything is implemented.
In the last part of our WebVR series, Toptal Full-stack Developer Michael Cole goes over design and implementation in detail, explaining how the experience comes together.
With all building blocks in place, it is time to wrap up our WebVR journey and demonstrate how everything is implemented.
In the last part of our WebVR series, Toptal Full-stack Developer Michael Cole goes over design and implementation in detail, explaining how the experience comes together.

Michael is an expert full-stack web engineer, speaker, and consultant with over two decades of experience and a degree in computer science.
Expertise
PREVIOUSLY AT

I love getting projects to “done.” We have arrived at the end of our journey - and the birth of our celestial gravity simulation in WebVR.
In this final post, we will plug our high-performance simulation code (Articles 1,2,3) into a WebVR visualizer based on the canvas visualizer (Article 4).
- “n-body problem” Intro and Architecture
- Web Workers get us additional browser threads
- WebAssembly and AssemblyScript for our O(n²) performance bottleneck code
- Canvas Data Visualization
- WebVR Data Visualization
This is a longer article, so we’ll skip some technical details covered previously. Check out the previous posts if you’d like an orientation, or read on dangerously.
We have been exploring the browser’s paradigm shift from a single-threaded JavaScript runtime to a multi-threaded (web workers) high-performance run-time (WebAssembly). These performance desktop computing features are available in Progressive Web Apps and the SaaS distribution model.

VR will create compelling distraction-free sales and marketing environments to communicate, persuade, and measure engagement (eye tracking and interaction). Data will still be zeros and ones, but the expected executive summary and consumer experience will be WebVR - just like we build mobile dashboard experiences for the flat web today.
These technologies also enable distributed browser edge computing. For example, we could create a web-based application to run our WebAssembly computations for millions of stars in a simulation. Another example is an animation application that renders other users’ creations while you’re editing your own.
Entertainment content is leading the uptake of Virtual Reality, just like entertainment led on mobile. However, once VR is normal (like mobile-first design is today), it will be the expected experience (VR-first design). This is a very exciting time to be a designer and developer - and VR is a completely different design paradigm.
You are not a VR designer if you can’t grip. That is a bold statement, and today is the deep dive into VR design. This field is being invented as you read this. My purpose is to share my experiences in software and film to prime the “VR-first design” conversation. We all learn from each other.
With those grandiose predictions in mind, I wanted to complete this project as a professional tech demo - WebVR is a great choice for that!
WebVR and Google A-Frame
The WebVR git repo is a fork of the canvas version for a couple of reasons. It makes hosting the project on Github pages easier, and WebVR required a couple of changes that would have cluttered the canvas version and these articles.
If you remember our first post on the architecture, we delegated the entire simulation to nBodySimulator.
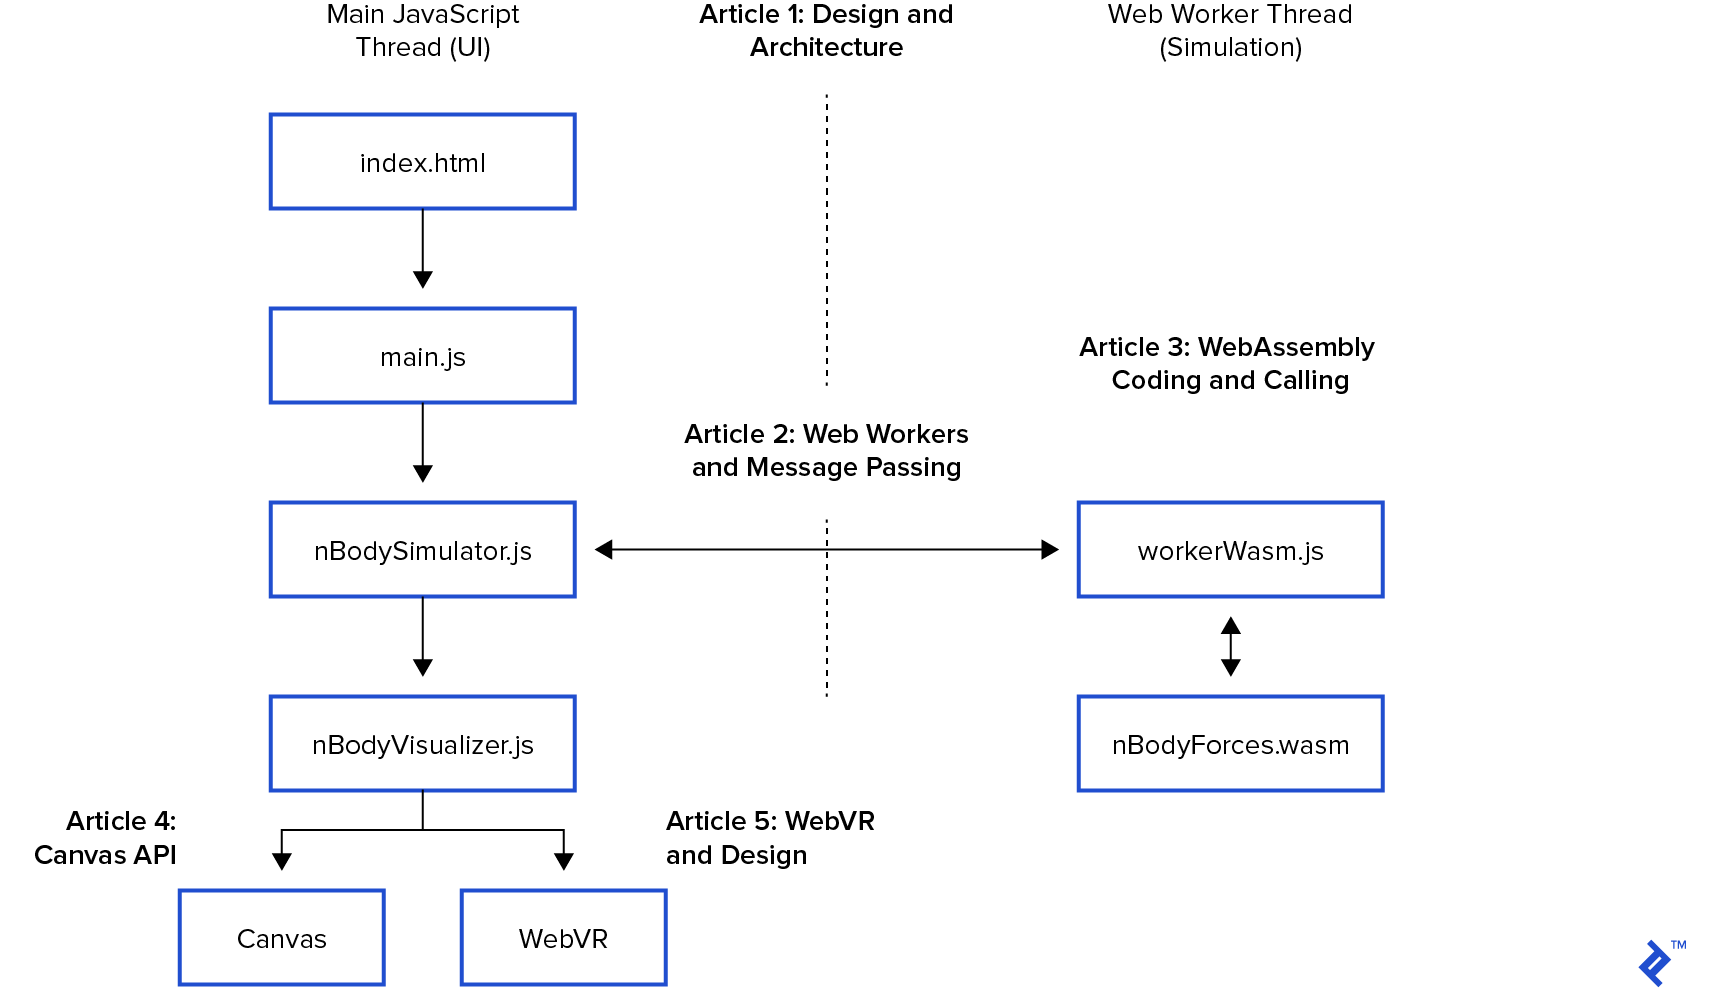
The web worker post showed nBodySimulator has a step() function called every 33ms of the simulation. step() calls calculateForces() to run our O(n²) WebAssembly simulation code (article 3), then updates the positions and repaints. In our previous post creating a canvas visualization, we implemented this with a canvas element, starting from this base class:
/**

 * Base class that console.log()s the simulation state.

 */

export class nBodyVisualizer {

  constructor(htmlElement) {

    this.htmlElement = htmlElement

    this.resize()

    this.scaleSize = 25 // divided into bodies drawSize. drawSize is log10(mass)

    // This could be refactored to the child class.

    // Art is never finished. It must be abandoned.

  }

  resize() {}

  paint(bodies) {

    console.log(JSON.stringify(bodies, null, 2))

  }

}
Define the Integration Challenge
We have the simulation. Now, we want to integrate with WebVR - without re-architecting our project. Whatever adjustments we make to the simulation happen every 33ms in the main UI thread in the function paint(bodies).
This is how we will measure “done.” I’m excited - let’s get to work!
How to Make a Virtual Reality
First, we need a design:
- What is VR made of?
- How is WebVR design expressed?
- How can we interact with it?
Virtual Reality goes back to the dawn of time. Every campfire story is a tiny virtual world of outlandish exaggerations papered over by trivial details.
We can 10x our campfire story by adding 3D stereoscopic visuals and audio. My film production budgeting instructor used to say, “We are only paying for the poster. We’re not building reality.”
If you’re familiar with the browser DOM, you’ll know it creates a tree-like hierarchical structure.
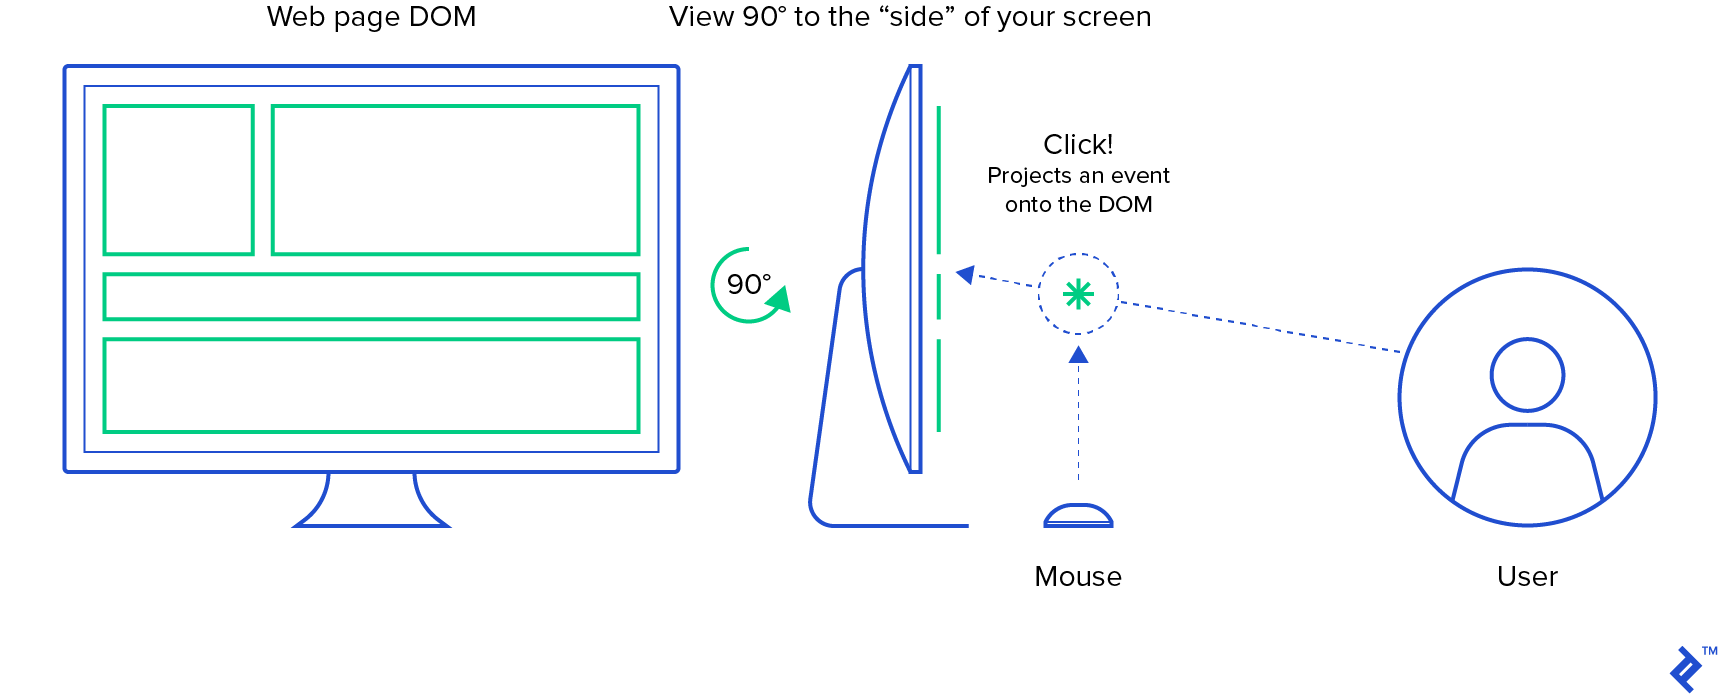
Implicit in the design of the web is the viewer viewing from the “front.” Looking from the side would reveal the DOM elements as lines, and from the back, we’d just see the <body> tag because it obscures its children.
Part of the immersive experience of VR is letting the user control their viewpoint, style, pace, and order of interactions. They don’t have to pay attention to anything in particular. If you programmatically move or rotate the camera, they will literally puke from VR sickness.
Please note that VR sickness is no joke. Both our eyes and inner ears detect motion. It’s very important for an animal that walks upright. When those motion sensors disagree, our brain naturally assumes our mouth has been eating nonsense again and vomits. We were all children once. Much has been written about this survival instinct in VR already. The “Epic Fun” title is free on Steam, and the rollercoaster is the best VR sickness demo I’ve found.
Virtual Reality is expressed as a “scene graph.” A scene graph has the same tree-like pattern as the DOM to hide the detail and complexity of a convincing 3D environment. However, instead of scrolling and routing, we position the viewer where they want to pull the experience toward them.
Here is the Hello World scene graph from Google’s A-Frame WebVR Framework:
<!DOCTYPE html>

<html>

  <head>

    <meta charset="utf-8">

    <title>Hello, WebVR! • A-Frame</title>

    <meta name="description" content="Hello, WebVR! • A-Frame">

    <script src="https://aframe.io/releases/0.9.2/aframe.min.js"></script>

  </head>

  <body>

    <a-scene background="color: #FAFAFA">

      <a-box position="-1 0.5 -3" rotation="0 45 0" color="#4CC3D9" shadow></a-box>

      <a-sphere position="0 1.25 -5" radius="1.25" color="#EF2D5E" shadow></a-sphere>

      <a-cylinder position="1 0.75 -3" radius="0.5" height="1.5" color="#FFC65D" shadow></a-cylinder>

      <a-plane position="0 0 -4" rotation="-90 0 0" width="4" height="4" color="#7BC8A4" shadow></a-plane>

    </a-scene>

  </body>

</html>
This HTML document creates a DOM in the browser. The <a-*> tags are part of the A-Frame framework, and <a-scene> is the root of the scene graph. Here, we see four 3D primitives displayed in the scene.
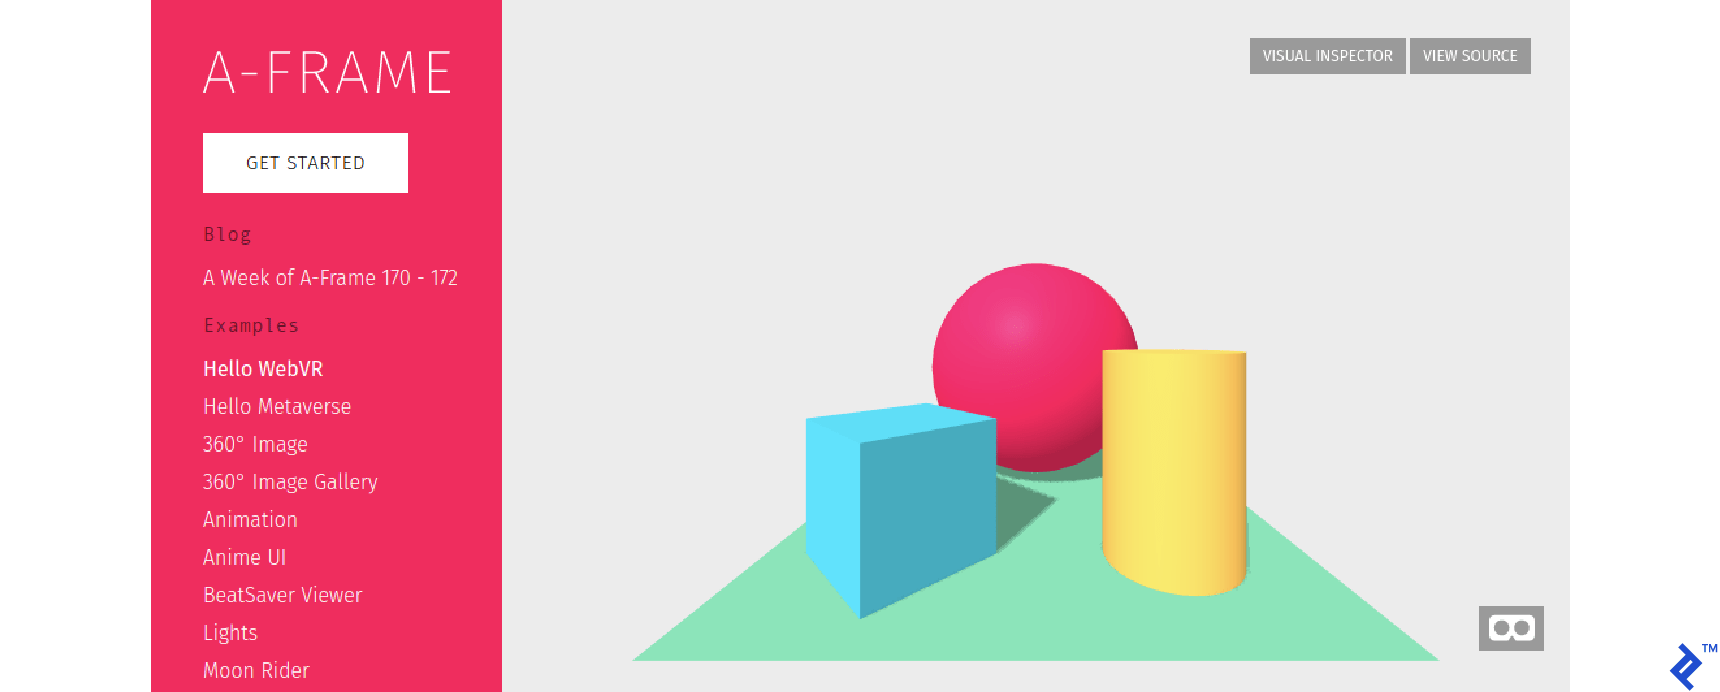
First, notice we’re viewing the scene from a flat-web browser. The little mask in the lower right invites the user to switch to a 3D stereoscopic mode.

In theory, you should be able to:
- Open this on your phone
- Hold your phone up to your face
- Delight in the splendor of a new reality!
I’ve never gotten that to work without the fancy lenses of a VR headset. You can get a VR headset for an Android phone on the cheap (a basic device based on Google Cardboard), however, for developing content, I suggest a standalone HMD (Head Mounted Display) such as Oculus Quest.
Much like Scuba diving or skydiving, Virtual Reality is a gear sport.
VR Designers’ Learning “Cliff”
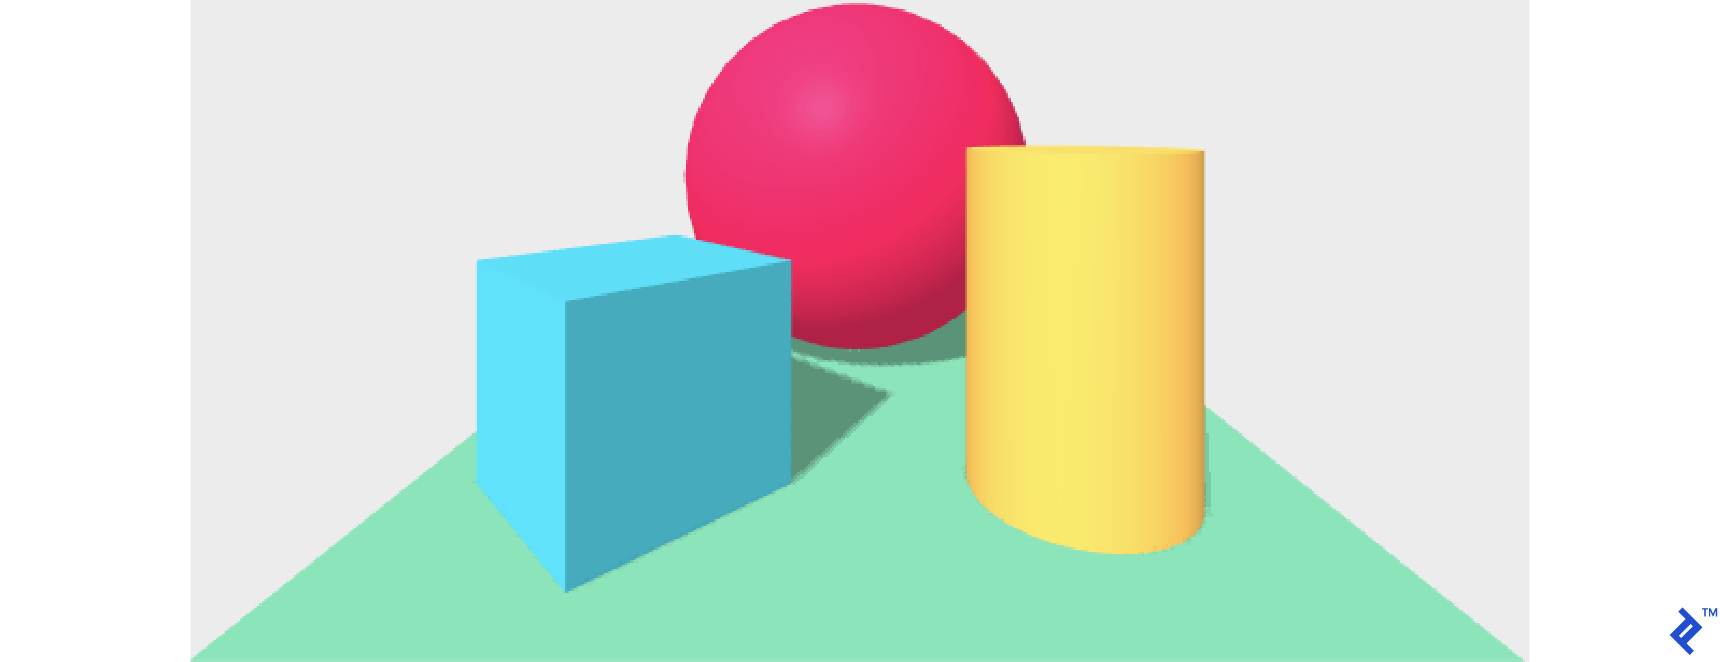
Notice the A-Frame Hello World scene has a default lighting and camera:
- The faces of the cube are different colors - the cube is self-shadowing.
- The cube is throwing a shadow on the plane - there is a directional light.
- There is no gap between the cube and the plane - this is a world with gravity.
These are critical cues that say to the viewer, “Relax, this thing on your face is totally normal.”
Also notice this default setup is implicit in the Hello World scene’s code above. A-Frame wisely provides a sensible default, but take note - camera and lighting is the chasm flat-web designers must cross to create VR.
We take the default lighting setup for granted. For example, buttons:

Notice how pervasive this implicit lighting is in design and photography. Even the “flat design” button couldn’t escape the web’s default lighting - it’s throwing a shadow down and to the right.
Designing, communicating, and implementing lighting and camera setups are the WebVR designer’s learning cliff. The “Language of Film” is a collection of cultural norms - expressed as different camera and lighting setups - that emotionally communicate the story to the audience. The professionals in film who design/move lights and camera around a scene are the grip department.
Back to Our Virtual Reality
Now then, let’s get back to work. Our celestial WebVR scene has a similar pattern:
<!DOCTYPE>

<html>

<head>

  <script src="https://aframe.io/releases/0.9.2/aframe.min.js"></script>

  <script src="https://unpkg.com/aframe-event-set-component@3.0.3/dist/aframe-event-set-component.min.js"></script>

  <script src="main.js"></script>

</head>

<body>

  <a-scene id="a-pocket-universe">

    <a-sky color="#222"></a-sky>

    <a-entity geometry="primitive: circle; radius: 12" position="0 0 -.5"

      material="color: #333; transparent: true; opacity: 0.5">

      <a-sphere color="black" radius=."02"></a-sphere>

    </a-entity>

    <a-entity id="a-bodies"></a-entity>

    <a-entity geometry="primitive: plane; width: 2; height: auto" position="0 -10 .3" rotation="55 0 0"

      material="color: blue"

      text="value: Welcome Astronaut!...">

    </a-entity>

    <a-entity id="rig" position="0 -12 .7" rotation="55 0 0">

      <a-camera>

        <a-cursor color="#4CC3D9" fuse="true" timeout="1"></a-cursor>

      </a-camera>

    </a-entity>

  </a-scene>

</body>

</html>
This HTML document loads the A-Frame framework and an interaction plugin. Our scene starts at <a-scene id="a-pocket-universe">.
Inside, we start with an <a-sky color="#222"></a-sky> element to background color everything we don’t define in the scene.
Next, we create an “orbital plane” for the viewer to “hold onto” as they fly through our strange and unknown world. We create this as a disc and a small black sphere at (0,0,0). Without this, turning felt “ungrounded” to me:
    <a-entity geometry="primitive: circle; radius: 12" position="0 0 -.5"

      material="color: #333; transparent: true; opacity: 0.5">

      <a-sphere color="black" radius=."02"></a-sphere>

    </a-entity>
Next, we define a collection where we can add/remove/reposition A-Frame entities.
<a-entity id="a-bodies"></a-entity>
This is the clearing for nBodyVisualizers paint(bodies) to do its work.
Then, we create the relationship between the viewer and this world. As a tech demo, this world’s purpose is to let the viewer explore WebVR and the browser tech that enables it. A simple “astronaut” narrative creates a sense of play, and this stellar signpost is another reference point for navigation.
   <a-entity geometry="primitive: plane; width: 2; height: auto" position="0 -10 .3" rotation="55 0 0"

      material="color: blue"

      text="value: Welcome Astronaut!\n  ...">

    </a-entity>
That completes our scene graph. Finally, I wanted some kind of interaction on a phone demo between the user and this spinny world. How can we recreate the “Throw Debris” button in VR?
The button is a primal element of all modern design - where are the VR buttons?
Interactions in WebVR
Virtual Reality has its own “above” and “below the fold.” A viewer’s first interaction is through their avatar or camera. This is all the controls to zoom around.
If you’re reading this on a desktop, you can WASD to move and mouse to rotate the camera. This exploration reveals information but doesn’t express your will.
Real Reality has a couple of very important features not often found on the web:
- Perspective - objects get visibly smaller as they move away from us.
- Occlusion - objects are hidden and revealed based on position.
VR simulates these features to create the 3D effect. They can also be used in VR to reveal information and interface - and to set the mood before presenting the interactions. I’ve found most people just need a minute to enjoy the experience before moving forward.
In WebVR, we interact in 3D space. We have two basic tools for this:
- Collision - a passive 3D event fired when two objects share the same space.
- Projection - an active 2D function call listing all objects intersecting a line.
Collision Is the Most “VR-like” Interaction
In VR, a “collision” is exactly what it sounds like: When two objects share the same space, A-Frame creates an event.
For the user to “press” a button, we must give them a pawn and something to press the button with.
Unfortunately, WebVR can’t assume controllers yet - many people will look at a flat-web version on their desktop or phone, and many will use a headset like Google Cardboard or Samsung’s Gear VR to show a stereoscopic version.
If the user doesn’t have controllers, they can’t reach out and “touch” things, so any collision will have to be with their “personal space.”
We could give the player an astronaut-shaped pawn to move around, but forcing the user into a whirling miasma of planets seems a bit off-putting and contrary to the spaciousness of our design.
Projection Is a 2D “Web-like” Click in a 3D Space
Besides “collision,” we can also use “projection.” We can project a line through our scene and see what it touches. The most common example is the “teleport ray.”
A teleport ray traces a line in the world to show where a player can move. This “projection” looks for places to land. It returns one or more objects in the path of the projection. Here is a teleport ray example:
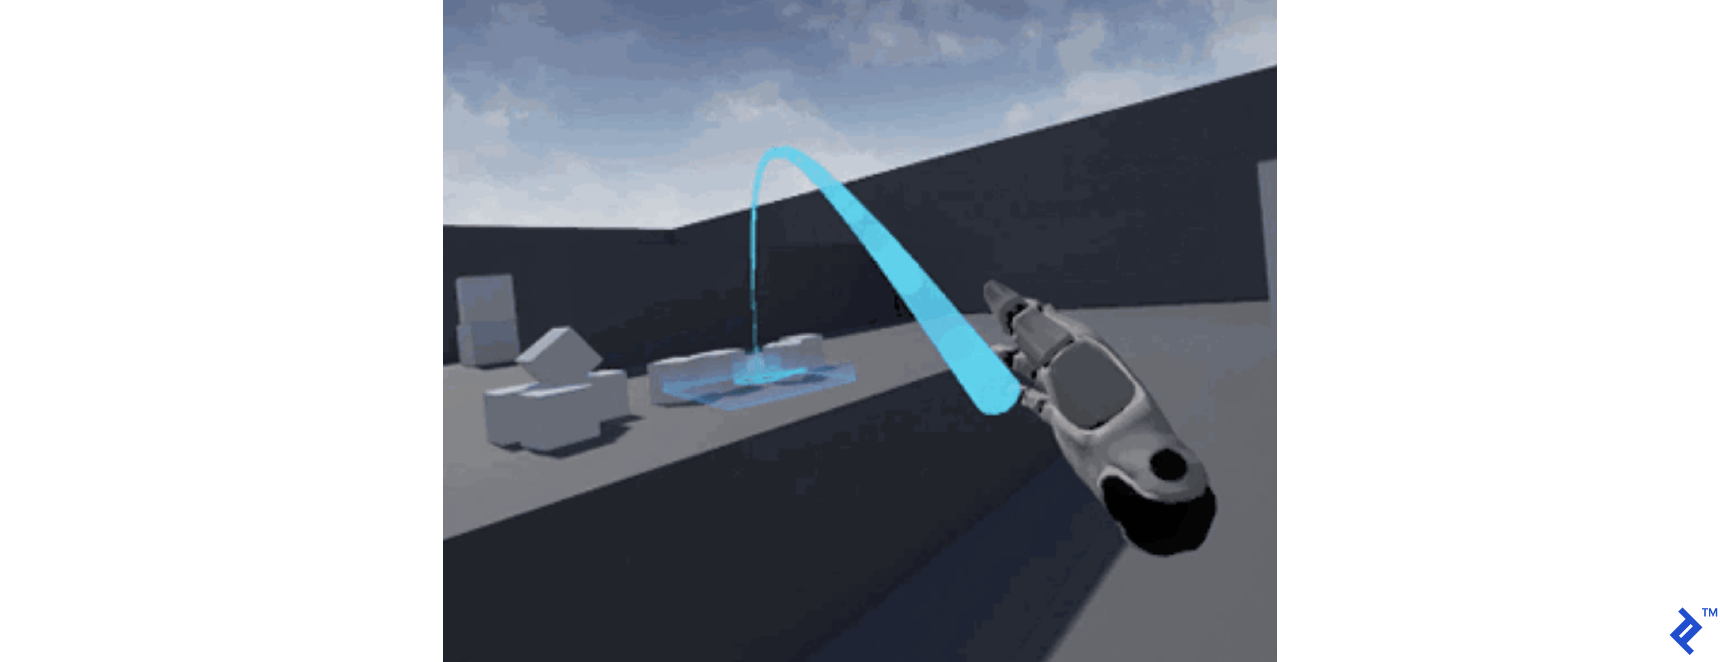
Notice the ray is actually implemented as a parabola pointing down. This means it naturally intersects with the “ground” like a thrown object. This also naturally sets a maximum teleportation distance. Limits are the most important design choices in VR. Luckily, reality has many natural limitations.
Projection “flattens” the 3D world into 2D so you can point at stuff to click it like a mouse. First-person shooters are elaborate games of “2D click” on exquisitely frustrating buttons - often with an elaborate story to explain why it’s not ok those darn buttons are “clicking” you back.
There are so many guns in VR because guns have been perfected as accurate and reliable 3D mice - and clicking is what consumers know how to do without learning.
Projection also offers the safety of distance in the relationship with the scene. Remember, getting closer to something in VR will naturally occlude all the other things whose importance may not yet have been revealed.
Projection Without Controllers Using the “Gaze”
To create this interaction primitive in WebVR without controllers, we can project the viewers’ “gaze” as a line of sight “cursor.” This cursor can be used programmatically to interact with objects with a “fuse.” This is communicated to the viewer as a small blue circle. Now we’re clicking!
If you remember campfire stories, the bigger the lie, the less detail is needed to sell it. An obvious and absurd “gaze” interaction is to stare at the sun. We use this “stare” to trigger adding new “debris” planets to our simulation. No viewer has ever questioned this choice - VR is quite charming when absurd.
In A-Frame, we express the camera (players’ invisible pawn) and this line of sight “cursor” as our camera rigging. Placing the <a-cursor> inside the <a-camera> causes the camera’s transformations to also be applied to the cursor. When the player moves/rotates their pawn (a-camera), it also moves/rotates their gaze (a-cursor).
// src/index.html

    <a-entity id="rig" position="0 -12 .7" rotation="55 0 0">

      <a-camera>

        <a-cursor color="#4CC3D9" fuse="true" timeout="1"></a-cursor>

      </a-camera>

    </a-entity>
The cursor’s “fuse” waits until a full second of “stare” has passed before emitting an event.
I used the default lighting so you may notice there is an unlit “back” of the sun. While I haven’t been outside the orbital plane, I don’t think that’s how the sun works. However, it works for our tech demo poster of reality.
An alternative option would be to put the lighting inside the camera element, so it moves with the user. This would create a more intimate - and possibly spooky - asteroid miner experience. These are fun design choices.
We Have an Integration Plan
With that, we now have our integration points between the A-Frame <a-scene> and our JavaScript simulation:
A-Frame <a-scene>:
-
A named collection for the bodies:
<a-entity id="a-bodies"></a-entity> -
A cursor that will emit projection events:
<a-cursor color="#4CC3D9" fuse="true" timeout="1"></a-cursor>
Our JavaScript simulation:
-
nBodyVisWebVR.paint(bodies)- add/remove/reposition the VR entities from the simulation bodies -
addBodyArgs(name, color, x, y, z, mass, vX, vY, vZ)to add new debris bodies to the simulation
index.html loads main.js, which initializes our simulation much like the canvas version:
// src/main.js

import { nBodyVisualizer, nBodyVisWebVR } from ."/nBodyVisualizer"

import { Body, nBodySimulator } from ."/nBodySimulator"

window.onload = function() {

  // Create a Simulation

  const sim = new nBodySimulator()


  // this Visualizer manages the UI

  sim.addVisualization(new nBodyVisWebVR(document.getElementById("a-bodies"), sim))


  // making up stable universes is hard

  //                   name            color     x    y    z    m      vz    vy   vz

  sim.addBody(new Body("star",         "yellow", 0,   0,   1,   1e9))

  sim.addBody(new Body("hot-jupiter",  "red",   -1,  -1,   1,   1e4,  .24,  -0.05,  0))

  sim.addBody(new Body("cold-jupiter", "purple", 4,   4,  .5,   1e4, -.07,   0.04,  0))

  // Start simulation

  sim.start()


  // Add another

  sim.addBody(new Body("saturn",       "blue",  -8,  -8,  .1,   1e3,   .07,   -.035,  0))

}
You’ll notice here we set the htmlElement of the visualizer to the a-bodies collection to hold the bodies.
Programmatically Managing A-Frame Objects from JavaScript
Having declared our scene in index.html, we’re now ready to code up the visualizer.
First, we set up nBodyVisualizer to read from the nBodySimulation bodies list and create/update/delete A-Frame objects in the <a-entity id="a-bodies"></a-entity> collection.
// src/nBodyVisualizer.js

/**

 * This is the WebVR visualizer.

 * It's responsible for painting and setting up the entire scene.

 */

export class nBodyVisWebVR extends nBodyVisualizer {

  constructor(htmlElement, sim) {

    // HTML Element is a-collection#a-bodies.

    super(htmlElement)

    // We add these to the global namespace because

    // this isn't the core problem we are trying to solve.

    window.sim = sim

    this.nextId = 0

  }

  resize() {}
In the constructor, we save our A-Frame collection, set a global variable for our gaze event to find the simulation, and initialize an id counter we’ll use to match bodies between our simulation and A-Frame’s scene.
  paint(bodies) {

    let i

    // Create lookup table: lookup[body.aframeId] = body

    const lookup = bodies.reduce( (total, body) => {

      // If new body, give it an aframeId

      if (!body.aframeId) body.aframeId = `a-sim-body-${body.name}-${this.nextId++}`

      total[body.aframeId] = body

      return total

    }, {})

    // Loop through existing a-sim-bodies and remove any that are not in

    // the lookup - this is our dropped debris

    const aSimBodies = document.querySelectorAll(."a-sim-body")

    for (i = 0; i < aSimBodies.length; i++) {

      if (!lookup[aSimBodies[i].id]) {

        // if we don't find the scene's a-body in the lookup table of Body()s,

        // remove the a-body from the scene

        aSimBodies[i].parentNode.removeChild(aSimBodies[i]);

      }

    }

    // loop through sim bodies and upsert

    let aBody

    bodies.forEach( body => {

      // Find the html element for this aframeId

      aBody = document.getElementById(body.aframeId)

      // If html element not found, make one.

      if (!aBody) {

        this.htmlElement.innerHTML += `

<a-sphere

  id="${body.aframeId}"

  class="a-sim-body"

  dynamic-body

  ${ (body.name === "star") ? "debris-listener event-set__enter='_event: mouseenter; color: green' event-set__leave='_event: mouseleave; color: yellow'" : ""}

  position="0 0 0"

  radius="${body.drawSize/this.scaleSize}"

  color="${body.color}">

</a-sphere>`

        aBody = document.getElementById(body.aframeId)

      }

      // reposition

      aBody.object3D.position.set(body.x, body.y, body.z)

    })

}
First, we loop through the sim bodies to label and/or create a lookup table for matching A-Frame entities to simulation bodies.
Next, we loop through the existing A-Frame bodies and remove any that were trimmed by the simulation for traveling out of bounds. This increases the perceived performance of the experience.
Finally, we loop through the sim bodies to create a new <a-sphere> for missing bodies and to reposition the others with aBody.object3D.position.set(body.x, body.y, body.z)
We can programmatically alter elements in the A-Frame scene using standard DOM functions. To add an element to the scene, we append a string to the container’s innerHTML. This code tastes weird to me but it works, and I didn’t find anything better.
You’ll notice when we create the string to append, we have a ternary operator near “star” to set an attribute.
<a-sphere

  id="${body.aframeId}"

  class="a-sim-body"

  dynamic-body

  ${ (body.name === "star") ? "debris-listener event-set__enter='_event: mouseenter; color: green' event-set__leave='_event: mouseleave; color: yellow'" : ""}

  position="0 0 0"

  radius="${body.drawSize/this.scaleSize}"

  color="${body.color}">

</a-sphere>`
If the body is a “star,” we add some extra attributes describing its events. Here’s how our star looks when mounted in the DOM:
<a-sphere id="a-sim-body-star-0"

class="a-sim-body"

dynamic-body=""

debris-listener=""

event-set__enter="_event: mouseenter; color: green"

event-set__leave="_event: mouseleave; color: yellow"

position="0 0 0"

radius="0.36"

color="yellow"

material=""

geometry=""></a-sphere>
Three attributes, debris-listener, event-set__enter and event-set__leave, set up our interactions and are the last lap of our integration.
Defining A-Frame Events and Interactions
We use the NPM package “aframe-event-set-component” in the entity’s attributes to change the color of the sun when the viewer “looks” at it.
This “gaze” is a projection from the viewer’s position and rotation, and the interaction provides necessary feedback that their gaze is doing something.
Our star sphere now has two shorthand events enabled by the plugin, event-set__enter and event-set__leave:
<a-sphere id="a-sim-body-star-0"

...

event-set__enter="_event: mouseenter; color: green"

event-set__leave="_event: mouseleave; color: yellow"

…
></a-sphere>
Next, we decorate our star sphere with a debris-listener we’ll implement as a custom A-Frame component.
<a-sphere id="a-sim-body-star-0"

...

debris-listener=""

…
></a-sphere>
A-Frame components are defined at the global level:
// src/nBodyVisualizer.js

// Component to add new bodies when the user stares at the sun. See HTML

AFRAME.registerComponent('debris-listener', {

  init: function () {

    // Helper function

    function rando(scale) { return (Math.random()-.5) * scale }

    // Add 10 new bodies

    this.el.addEventListener('click', function (evt) {

      for (let x=0; x<10; x++) {

        // name, color, x, y, z, mass, vx, vy, vz

        window.sim.addBodyArgs("debris", "white", rando(10), rando(10), rando(10), 1, rando(.1), rando(.1), rando(.1))

      }

    })

  }

})
This A-Frame component acts like a ‘click’ listener that can be triggered by the gaze cursor to add 10 new random bodies to our scene.
To summarize:
- We declare the WebVR scene with A-Frame in standard HTML.
- We can programmatically add/remove/update A-Frame entities in the scene from JavaScript.
- We can create interactions in JavaScript with event handlers through A-Frame plugins and components.
WebVR: Veni, Vidi, Vici
I hope you got as much out of this tech demo as I did. Where we’ve applied these features (web workers and WebAssembly) to WebVR, they can also be applied to browser edge computing.
A huge technology wave has arrived - Virtual Reality (VR). Whatever you felt the first time you held a smartphone, experiencing VR for the first time delivers a 10x emotional experience in every aspect of computing. It’s only been 12 years since the first iPhone.
VR has been around much longer, but the technology needed to bring VR to average users has arrived via the mobile revolution and Facebook’s Oculus Quest - not the PC revolution.
The internet and open-source are among humanity’s greatest wonders of the world. To all the people who created the flat internet - I raise a toast to your courage and sense of adventure.
Manifesto! We will build worlds, for we have the power to create.
Further Reading on the Toptal Blog:
Understanding the basics
What is Web based VR?
VR happens when a person straps a screen to their face, creating an immersive experience that gives their “make-believe” permission to pretend they are really there.
How does VR work?
Web-based VR uses the bizarre reality the web to deliver virtual realities more engaging to the human psyche, but outside the rigid “information is a page in book” paradigm. WebVR is the VR commons.
What is edge computing?
Edge computing is the concept of using the computing power of all edge devices running your app before renting new ones.
Michael Cole
Dallas, United States
Member since September 10, 2014
About the author
Michael is an expert full-stack web engineer, speaker, and consultant with over two decades of experience and a degree in computer science.
Expertise
PREVIOUSLY AT