
The Complete Tutorial to Building a CRUD App With React.js and Supabase
Serverless databases are becoming increasingly popular because they allow developers to build fully functional applications without setting up a traditional server or writing server-side code. A serverless database is a cloud-based system where resources are dynamically allocated and managed by the provider.

Serverless databases are becoming increasingly popular because they allow developers to build fully functional applications without setting up a traditional server or writing server-side code. A serverless database is a cloud-based system where resources are dynamically allocated and managed by the provider.

Melvin Kosisochukwu
Melvin is a JavaScript Engineer, technical writer, blockchain enthusiast, and gamer. A JavaScript lover and an individual who wants to spread knowledge.
Introduction
Serverless databases are becoming increasingly popular because they allow developers to build fully functional applications without setting up a traditional server or writing server-side code. A serverless database is a cloud-based system where resources are dynamically allocated and managed by the provider.
Examples of serverless databases and backend platforms include Firebase, DynamoDB, and Supabase.
In this tutorial, we’ll look at Supabase and integrate it into a React CRUD app.
Prerequisites for this tutorial:
- A GitHub account
- Experience with React.js
- Familiarity with Context API
- Basic understanding of async functions
What Is Supabase?
React.js developers may already be familiar with CRUD apps, but if the concept of Supabase feels a bit vague, here is a quick explanation.
Supabase is an open-source backend platform built on PostgreSQL. PostgreSQL is an object-relational database system with more than 30 years of active development and a strong reputation for reliability and performance. Supabase is often positioned as an alternative to Google’s Firebase and can be used to build CRUD applications with React.
Supabase comes with many out-of-the-box services and functionalities designed to make development easier, including:
- Authentication: When a user signs up, Supabase creates a new user in the auth.users table. A JWT, or JSON Web Token, is returned with the user’s UID, or unique identifier. Subsequent requests to the database also send the JWT, which PostgreSQL can inspect to determine which user is making the request.
- Policies: Policies are PostgreSQL rules used to set restrictions on a table or row. They allow you to write SQL rules that fit your application’s needs and can be matched with a user’s UID to enforce read and write access to specific data.
- RLS (Row Level Security): Row Level Security, or RLS, allows you to restrict access to rows in your tables. Supabase makes it easy to turn on PostgreSQL’s RLS for better access control.
- Realtime Database: Supabase extends PostgreSQL with real-time functionality, allowing you to listen for changes in the database.
You get these features out of the box when you create a project in Supabase.
Setting Up a Project
Create an Account With Supabase
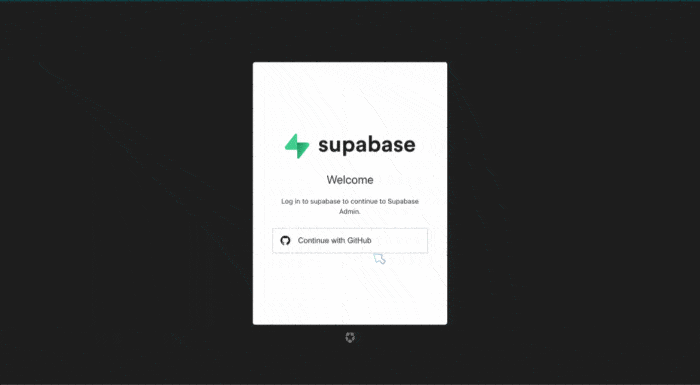
The first thing we need to do is create a Supabase account. You’ll need a GitHub account to continue from this point. If you don’t have one, you can create an account using the link in the prerequisites section.
Once you log in, you should see a New Project button. Click it to continue, then select an existing organization or create a new one. After that, you should see a form where you can enter the database name and password.
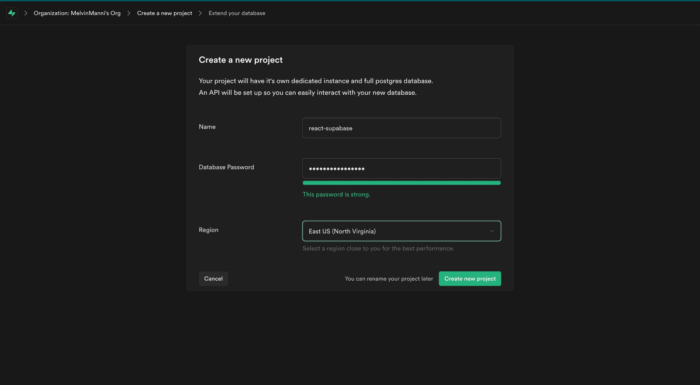
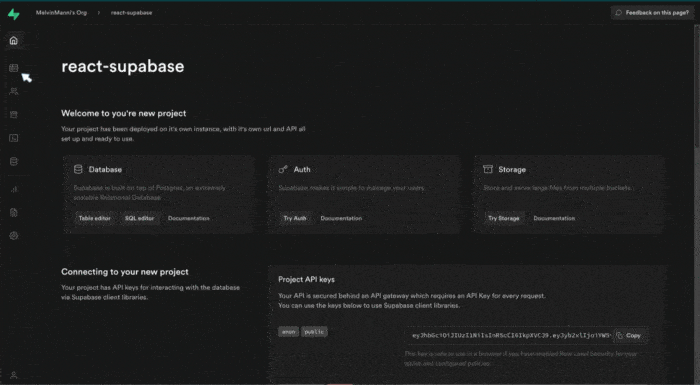
Fill out the form and enter a strong password. Click Create New Project, then wait for the database creation process to complete. This may take a few minutes. Once the operation is complete, click Table Editor in the left panel to create a new table.
Then click Create New Table, fill in the table details, and click Save to create your table. Once the table has been saved, you can preview it from the table editor page.
Now you’re ready to add columns to your table. By default, each new table includes an ID column.
To create an additional column for your table, click the + button.

On the next step, you will see a form with fields for the column name, description, data type, and default value. Once you’ve filled in the form fields, click Save to continue.

For the project, we will create three additional columns:
-
item, with the variable typevarcharand nullable disabled. -
done, with the variable typebooleanand the default value set tofalse. -
userId, with the variable typeUUID.
Once you create the columns, the next step is setting up our React app with Supabase.
Create the React App
We can use create-react-app to initialize an app called react_supabase. In your terminal, run the following command to create the React app and install the required dependency:
npx create-react-app react_supabase --use-yarn
cd react_supabase
yarn add @supabase/supabase-js bootstrap react-router-dom
Following the installation of all dependencies, we’ll clean up the file structure and create the files required for the project. The file structure for the React app should now look similar to the sample below:
📦react_supabase
┣ 📂node_modules
┣ 📂public
┣ 📂src
┃ ┣ 📂components
┃ ┃ ┣ 📜ActiveList.js
┃ ┃ ┣ 📜DoneList.js
┃ ┃ ┣ 📜Navbar.js
┃ ┃ ┣ 📜TodoItem.js
┃ ┃ ┗ 📜UpdateItem.js
┃ ┣ 📂pages
┃ ┃ ┣ 📜Home.js
┃ ┃ ┗ 📜Login.js
┃ ┣ 📜App.js
┃ ┣ 📜App.test.js
┃ ┣ 📜ItemsContext.js
┃ ┣ 📜index.css
┃ ┣ 📜index.js
┃ ┣ 📜reportWebVitals.js
┃ ┣ 📜setupTests.js
┃ ┗ 📜supabaseClient.js
┣ 📜.env.local
┣ 📜.gitignore
┣ 📜README.md
┣ 📜package.json
┗ 📜yarn.lock
Now we’re ready to start writing some code.
In the App.js file, we’ll set up routing for the login page and home page like this:
import "bootstrap/dist/css/bootstrap.css";
import { useEffect } from "react";
import { Route, Switch, useHistory, withRouter } from "react-router-dom";
import Navbar from "./components/Navbar";
import Home from "./pages/Home";
import Login from "./pages/Login";
import { supabase } from "./supabaseClient";

function App() {
  const history = useHistory();

  useEffect(() => {
    supabase.auth.onAuthStateChange((_event, session) => {
      if (session === null) {
        history.replace("/users/login");
      } else {
        history.replace("/");
      }
    });
    // eslint-disable-next-line react-hooks/exhaustive-deps
  }, []);

  const NavbarWithRouter = withRouter((props) => <Navbar {...props} />);
  return (
    <>
      <NavbarWithRouter exact />
      <Switch>
        <Route exact path="/" component={Home} />
        <Route exact path="/users/login" component={Login} />
      </Switch>
    </>
  );
}

export default App;
If you look at the useEffect hook, you’ll notice supabase.auth.onAuthStateChange. This listens for changes in the auth or session state. The code block inside useEffect checks whether there is an active session. If there is no active session, the app redirects the user to the login route; otherwise, it redirects to the home route. This ensures that only authenticated users can access the home route.
Another thing worth mentioning is withRouter, a higher-order function that allows you to pass router props to a standalone component, in this case, the Navbar component.
After this, we need to wrap the App component imported in the index.js file with BrowserRouter.
...   <React.StrictMode>
      <BrowserRouter>
        <App />
      </BrowserRouter>
  </React.StrictMode>...
Set Up Supabase
To set up Supabase, we need the API URL and the Supabase anon key. You can find both in your Supabase dashboard. In the dashboard’s left pane, click API, then navigate to authentication settings. There, you’ll find your database URL and anon key.

Copy the database URL and anon key into the .env.local file.
REACT_APP_SUPABASE_URL='your supabase url'
REACT_APP_SUPABASE_ANON_KEY='your anon key'
Inside the supabaseClient file, import createClient from @supabase/supabase-js. Then, initialize a supabase variable by calling the createClient function with the Supabase URL and anon key as parameters.
import { createClient } from "@supabase/supabase-js";

export const supabase = createClient(process.env.REACT_APP_SUPABASE_URL, process.env.REACT_APP_SUPABASE_ANON_KEY)
Set Up Context State
Now that we have the Supabase client set up, the next step is to set up state management inside the ItemsContext file.
import React, { createContext, useState } from "react";
import { supabase } from "./supabaseClient";

// Initializing context
export const ItemsContext = createContext();

export function ItemsContextProvider({ children }) {
  const [activeItems, setActiveItems] = useState([]);
  const [inactiveItems, setInactiveItems] = useState([]);
  const [loading, setLoading] = useState(false);
  const [adding, setAdding] = useState(false);

  ...

  return (
    <ItemsContext.Provider
      value={{
        activeItems,
        inactiveItems,
        loading,
        adding,
        ...
      }}
    >
      {children}
    </ItemsContext.Provider>
  );
}
Now wrap the entire app with ItemsContextProvider to complete the setup.
...
  <React.StrictMode>
    <ItemsContextProvider>
      <BrowserRouter>
        <App />
      </BrowserRouter>
    </ItemsContextProvider>
  </React.StrictMode>
...
Handling Authentication
It is time to start working on the core functionality of our app.
We’ll start with authentication and the login page. For authentication, we’ll use Supabase’s magic link method.
Supabase also supports a range of external authentication providers, including:
- Apple
- Azure
- Bitbucket
- Discord
- GitHub
- GitLab
- Twitch
To get started with authentication, copy and paste the code block below inside your context component:
// Authentication function for logging in new/old user with supabase magic link
  const logInAccount = async (email) => {
    setLoading(true);
    try {
      // supabase method to send the magic link to the email provided
      const { error } = await supabase.auth.signIn({ email });

      if (error) throw error; //check if there was an error fetching the data and move the execution to the catch block

      alert("Check your email for your magic login link!");

    } catch (error) {
      alert(error.error_description || error.message);
    } finally {
      setLoading(false);
    }
  };
If you review the code block above, you’ll see that the function accepts one parameter: the user’s email address. Supabase signIn receives this email address as a parameter. Once the request is successful, an email is sent to that address with an authentication link. When the user clicks the link, they are logged in.
It’s worth noting that you can change the authentication redirect URL in your Supabase dashboard. The default URL is http://localhost:3000.
Next, let’s create the login page and consume the authentication function. Copy and paste the code block below into your Login.js file.
import React, { useContext, useEffect, useState } from "react";
import { useHistory } from "react-router-dom";
import { ItemsContext } from "../ItemsContext";
import { supabase } from "../supabaseClient";

export default function Login() {
  const history = useHistory();
  const [email, setEmail] = useState("");
  const { loading, logInAccount } = useContext(ItemsContext);

  const handleSubmit = (e) => {
    e.preventDefault();
    logInAccount(email);
  };

  useEffect(() => {
    if (supabase.auth.user() !== null) {
      history.replace("/");
    }
    // eslint-disable-next-line react-hooks/exhaustive-deps
  }, []);

  return (
    <div className="container">
      <div className="row justify-content-center mt-5">
        <div className=" col-12 col-lg-6">
          <div className="card">
            <div className="card-header">
              <h5 className="text-center text-uppercase">Log In</h5>
            </div>
            <div className="card-body">
              <form onSubmit={handleSubmit}>
                <div className="mb-4">
                  <label htmlFor="exampleInputEmail1" className="form-label">
                    Email address
                  </label>
                  <input
                    type="email"
                    value={email}
                    onChange={(e) => setEmail(e.target.value)}
                    name="email"
                    required
                    className="form-control form-control-lg w-100 mt-1"
                  />
                  <div className="form-text">
                    Enter your email to get your magic link
                  </div>
                </div>
                <button disabled={loading} type="submit" className="btn btn-primary btn-lg w-100 ">
                  {loading ? "Loading..." : "Submit"}
                </button>
              </form>
            </div>
          </div>
        </div>
      </div>
    </div>
  );
}
Adding an Item
To add an item, we’ll use another function with the Supabase insert method. You will pass in an object with keys that match the column names created in your table.
...
const user = supabase.auth.user();

await supabase.from("todo").insert({ item, userId: user?.id }); //insert an object with the key value pair, the key being the column on the table
...
First, you call the from method and pass in the table name where the data should be inserted. The supabase.auth.user() method allows you to get the authenticated user’s details. The code above inserts a new row into the to-do table with the item value and the authenticated user’s UUID as the userId.
Reading To-do Items From the Database
Once we have created a row in the table, we can read data from it. To do this, we’ll use another Supabase method, select, along with additional query parameters to filter the data.
...
      // get the user currently logged in
      const user = supabase.auth.user();
      const { error, data } = await supabase
        .from("todo") //the table you want to work with
        .select("item, done, id") //columns to select from the database
        .eq("userId", user?.id) //comparison function to return only data with the user id matching the current logged in user
        .eq("done", false) //check if the done column is equal to false
        .order("id", { ascending: false }); // sort the data so the last item comes on top;

      if (error) throw error; //check if there was an error fetching the data and move the execution to the catch block
      if (data) setActiveItems(data);
...
The select() method accepts a string parameter with the columns to return. After that, we use the eq() method, which takes two parameters: the first is the column name to compare, and the second is the value to match. The code block above will return the item, done, and id columns from rows where the userId column matches the authenticated user’s UUID.
Updating a To-do Item
We’ll use the function below to update a row. First, we create an async function that receives two parameters: the new value to update and the row ID. Then, we use the Supabase update method, which accepts an object with the column name as the key and the new value as the value.
// update column(s) on the database
  const updateItem = async ({ item, id }) => {
    setLoading(true);
    try {
      const user = supabase.auth.user();

      const { error } = await supabase
        .from("todo")
        .update({ item })
        .eq("userId", user?.id)
        .eq("id", id); //matching id of row to update

      if (error) throw error;

      await getActiveItems();
    } catch (error) {
      alert(error.error_description || error.message);
    } finally {
      setLoading(false);
    }
  };
Toggling an Item as Done
Toggling an item as done is very similar to the update function, except we already know the new value and the field to update. All we need to pass in is the row ID. We’ll use a function similar to the update function to toggle the done column in the table between true and false.
    // change value of done to true
....
      const { error } = await supabase.from("todo")
        .update({ done: true })
        .eq("userId", user?.id)
        .eq("id", id); //match id to toggle

...
Deleting an Item
To delete an item from the database, copy and paste the code block below:
 // delete row from the database
  const deleteItem = async (id) => {
    try {
      const user = supabase.auth.user();

      const { error } = await supabase
        .from("todo")
        .delete() //delete the row
        .eq("id", id) //the id of row to delete
        .eq("userId", user?.id) //check if the item being deleted belongs to the user

      if (error) throw error;

      await getInactiveItems(); //get the new completed items list
      await getActiveItems(); //get the new active items list
    } catch (error) {
      alert(error.error_description || error.message);
    }
  };
The deleteItem function receives one parameter: the row ID to delete. The eq query compares that ID against the table’s id column to find the matching row. Once the request completes successfully, Supabase deletes the matching row from the table.
Conclusion
You now have all the functions needed to complete CRUD operations in your React app. You can find the complete project code in the GitHub repository. For more information about Supabase, review the official documentation.
FAQs
Q: For what purpose is a CRUD used?
CRUD stands for create, read, update, and delete. It is an abbreviation for the four basic functions of a database.
Q: What is Supabase?
Supabase is an open-source backend platform built on PostgreSQL. It provides features such as authentication, real-time database functionality, storage, and row-level security, making it a popular alternative to Firebase for building CRUD applications with React and other frameworks.