
In-app Notifications Within Model-driven Apps
The target audience for this article is Power Platform Developers and Solution Architects with some familiarity with JavaScript or coding.

The target audience for this article is Power Platform Developers and Solution Architects with some familiarity with JavaScript or coding.

Larry Saytee
Larry is a Power Platform & M365 Solutions Architect, Developer, and Author. He specializes in Power Platform and SharePoint (cloud and on-premises). He writes articles that make complex topics easy to understand with clear steps and visuals. Knowing how hard it can be to learn new technology, he supports better tools to make it simpler.
The target audience for this article is Power Platform Developers and Solution Architects with some familiarity with JavaScript or coding.
In this article, you will learn about:
- Model-driven in-app notifications
- JavaScript - Reusable function definition
- JavaScript - Usage notification instance
- In-app notifications implementation steps
- Managing security for notifications
- In-app notifications vs. push notifications
Model-driven In-app Notifications
Model-driven apps allow developers to configure in-app notifications as toast messages within the notification centre. The system automatically checks for new notifications and displays them accordingly. The sender or an administrator can control how notifications appear and when they expire. (The default is 14 days, but this can be overridden)
Notifications are user-specific, meaning each is sent to an individual user rather than to a team. To notify multiple users, separate notifications must be created for each. This article provides steps for sending in-app notifications to a specific user.
JavaScript - Reusable Function Definition
The function, InAppNotificationWrapper.SendAppNotificationRequest, streamlines the process of generating and dispatching notifications by encapsulating the necessary parameters and metadata. You should define the InAppNotificationWrapper.SendAppNotificationRequest reusable function in a standalone JavaScript file. The function is defined as follows:
// define SendAppNotificationRequest function

var InAppNotificationWrapper = window.InAppNotificationWrapper || {};
InAppNotificationWrapper.SendAppNotificationRequest = function (
   title,
   recipient,
   body,
   priority,
   iconType,
   toastType,
   expiry,
   overrideContent,
   actions)
{
    this.Title = title;
    this.Recipient = recipient;
    this.Body = body;
    this.Priority = priority;
    this.IconType = iconType;
    this.ToastType = toastType;
    this.Expiry = expiry;
    this.OverrideContent = overrideContent;
    this.Actions = actions;
};

InAppNotificationWrapper.SendAppNotificationRequest.prototype.getMetadata = function () {
    return {
        boundParameter: null,
        parameterTypes: {
            "Title": {
                "typeName": "Edm.String",
                "structuralProperty": 1
            },
            "Recipient": {
                "typeName": "mscrm.systemuser",
                "structuralProperty": 5
            },
            "Body": {
                "typeName": "Edm.String",
                "structuralProperty": 1
            },
            "Priority": {
                "typeName": "Edm.Int",
                "structuralProperty": 1
            },
            "IconType": {
                "typeName": "Edm.Int",
                "structuralProperty": 1
            },
            "ToastType": {
                "typeName": "Edm.Int",
                "structuralProperty": 1
            },
            "Expiry": {
                "typeName": "Edm.Int",
                "structuralProperty": 1
            },
            "OverrideContent": {
                "typeName": "mscrm.expando",
                "structuralProperty": 5
            },
            "Actions": {
                "typeName": "mscrm.expando",
                "structuralProperty": 5
            },
        },
        operationType: 0,
        operationName: "SendAppNotification",
    };
};
Notifications sent using the “SendAppNotification” message are stored in the notification (appnotification) table (Web API appnotification). The full table can be found @appnotification EntityType (Microsoft.Dynamics.CRM) | Microsoft Learn.
Also read: 5 Dataverse Security Roles for Power Platform and Dynamics 365 Users
Script Parameters
- “title”: The notification’s title.
- “recipient”: The logical name and GUID of the user receiving the notification (e.g., /systemusers(<GUID>)).
- “body”: The main content or message of the notification.
- “priority”: Determines the notification’s importance, affecting its display order in the notification center.
- “iconType”: Specifies the icon displayed alongside the notification.
- “toastType”: Defines the notification’s behavior, such as whether it appears briefly or remains until dismissed.
- “expiry”: The duration (in seconds) before the notification expires if not dismissed.
- “overrideContent”: Allows customization of the notification’s title and body using a limited subset of markdown for styling.
- “actions”: Defines interactive elements within the notification, such as buttons that trigger specific functions or navigation.
Notification Behavior
You can change in-app notification behaviour by setting “toastType” to one of the following values shown in Table 1 below: ToastType behaviour.
Toast Type | Behaviour | Value |
Timed | The notification appears for a brief duration (the default is four seconds) and then disappears. | 200000000 |
Hidden | The notification appears only in the notification center and not as a toast notification. | 200000001 |
Table 1 - ToastType behavior
Notification Icons
You can change the default in-app notification icon by setting “iconType” to one of the following values in Table 2. When using a custom icon, specify the “iconUrl” parameter within the OverrideContent parameter.
Icon Type | Value | Image |
Info | 100000000 |  |
Success | 100000001 |  |
Failure | 100000002 |  |
Warning | 100000003 |  |
Mention | 100000004 |  |
Custom | 100000005 |
Table 2 - Default in-app notification IconTypes
JavaScript - Usage Notification Instance
Once the reusable function is defined, it can be utilized to send a notification together with a second JavaScript file to send the notification as follows:
// send a notification function

function SendVersionNotification()
{
 // pass current login user guid
  var currentRecordId = Xrm.Utility.getGlobalContext().userSettings.userId;
  currentRecordId = currentRecordId.replace("{","").replace("}","");
  // replace GUID of USER with your desired user id
  var SendAppNotificationRequest = new InAppNotificationWrapper.SendAppNotificationRequest(
      title = "New Project Form",
      recipient = "/systemusers("+currentRecordId+")",
      body = "You have opened a New Project Form",
      priority = 200000000,
      iconType = 100000001,
      toastType = 200000000,
  );

  Xrm.WebApi.online.execute(SendAppNotificationRequest).then(function (response) {
      if (response.ok) {
          console.log("Status: %s %s", response.status, response.statusText);

          return response.json();
      }
  })
  .then(function (responseBody) {
      console.log("Response Body: %s", responseBody.NotificationId);
  })
  .catch(function (error) {
      console.log(error.message);
  });
}
The above example sends a notification informing the user that they have opened a new project form, with a styled message and a link to the task record. By integrating this function into your client scripts, you can efficiently manage and dispatch in-app notifications tailored to your application’s requirements.
In-app Notifications Implementation Steps
For this part, the reader must know their way around Power Platform Model-driven apps. That includes how to create a Model-driven app, how to create a solution, and add a publisher. Follow the steps below to set up or implement your in-app notification.
Step 1 – Log in to https://make.powerapps.com
Step 2 – Navigate to the Environment of interest.
Step 3 – Create a Solution (including adding a Publisher).
Step 4 – Create a new ‘Web resource’.
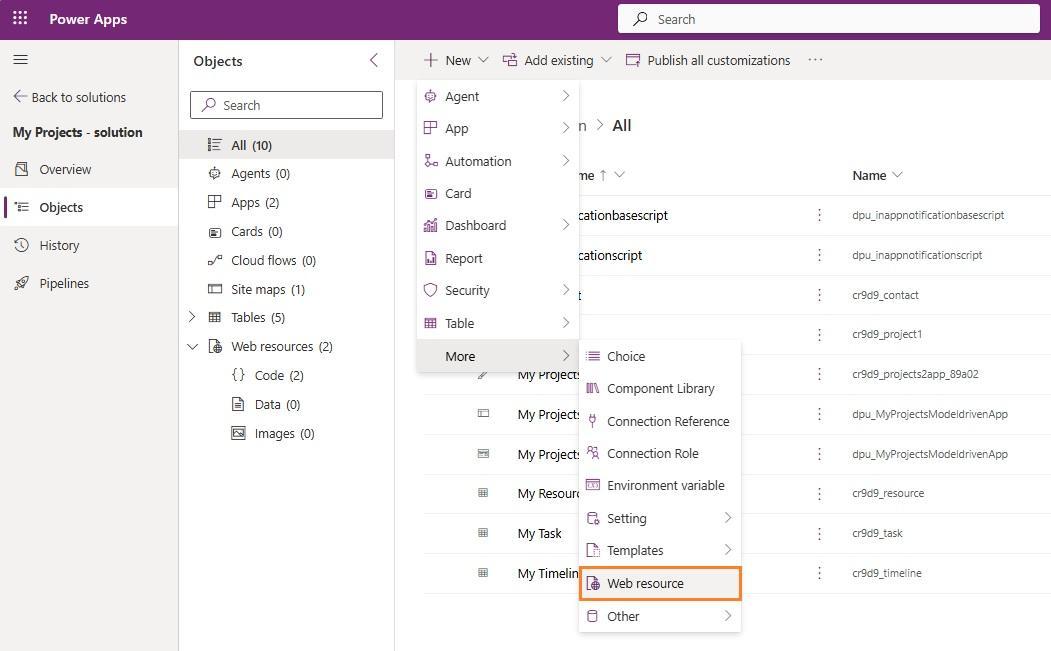
Figure 1 - Create a New > “Web resource”
Step 5 – Add/upload your JavaScript files.
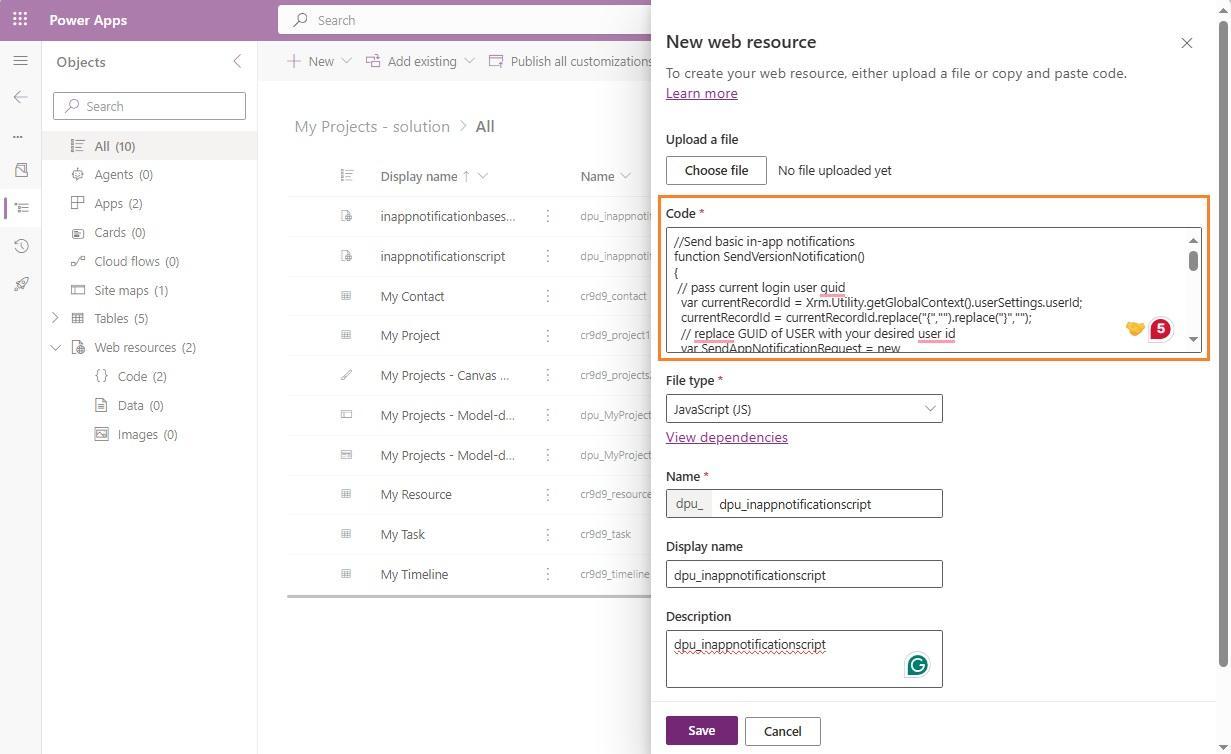
Figure 2 - Add/Upload your JavaScript files
As outlined above, you will require two JavaScript files in your solution to implement or send in-app notifications. That means you will create two “Web resource” files. You can use whatever naming convention you prefer. In this example, the files are named as follows:
- Display name: “inappnotificationbasescript” for reusable function definition
- Display name: “inappnotificationscript” for function notification instance
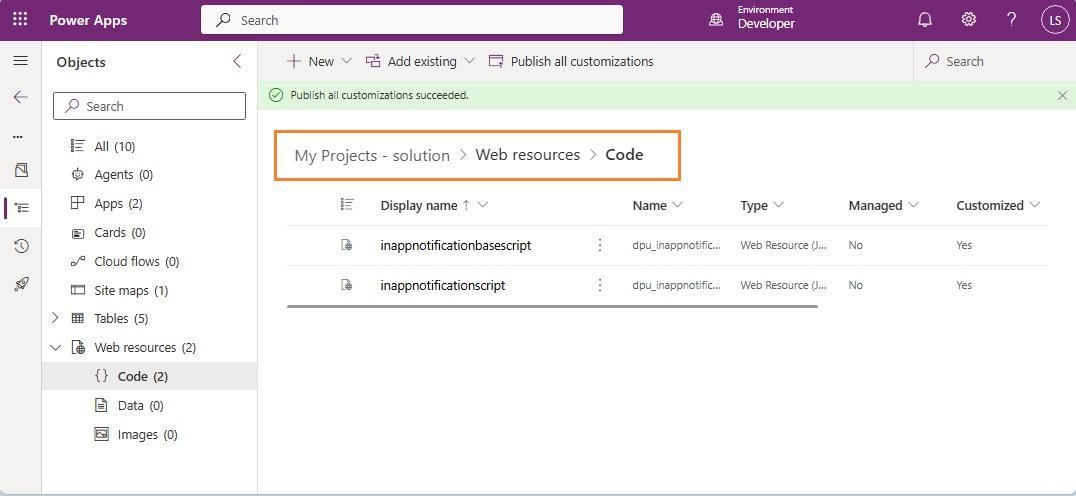
Figure 3 - JavaScript files stored in the solution web resource
Once your files have been added, they should look like the “Figure 3 - JavaScript files stored in the solution web resource” above. Make sure to click the “Publish all customizations” button in the command bar, then wait for the “Publish all customizations succeeded” system notification.
Step 6 – Select a Form for the table of interest.
Select a Form for the table where you’re adding the toast notification. The “Main” system form has been selected for this example.
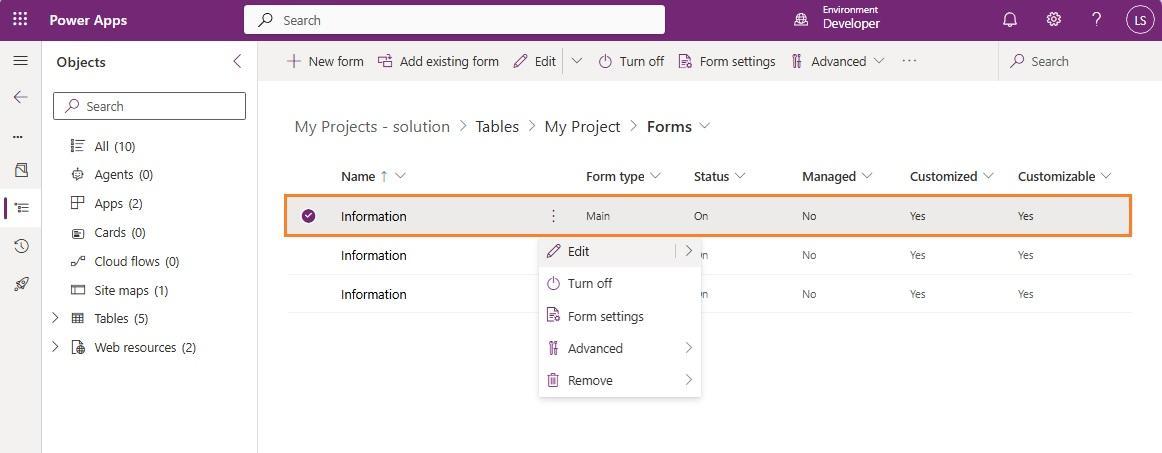
Figure 4 - Select a Form from the table of interest
Select the “Main” form and edit it. The “On Load” event of the form was selected, as illustrated in Figure 5. You can use an “On Save” event for when the notification appears when the user saves or submits the form.
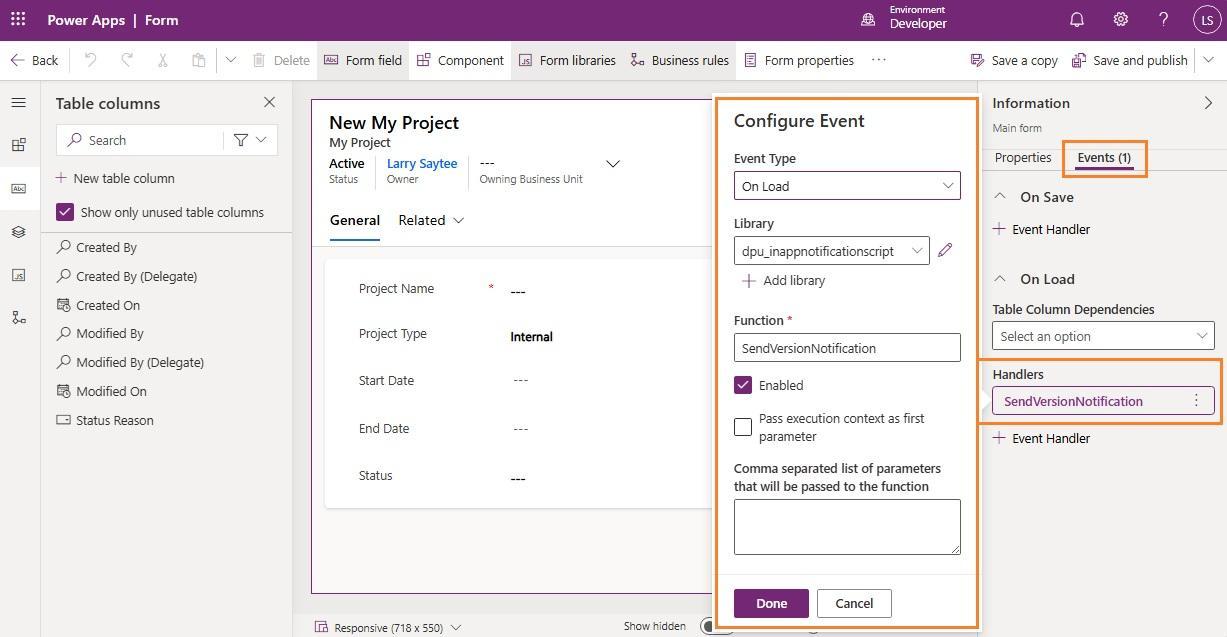
Figure 5 - Configure Event - Handler
Step 7 – Create your Model-driven app.
Click the “Create an app” button in the command bar of the starting table you’re creating the Model-driven app for. In this example the “My Project” table is chosen. You can always add more components, views, charts, dashboards, etc. to your app as illustrated in Figure 6.
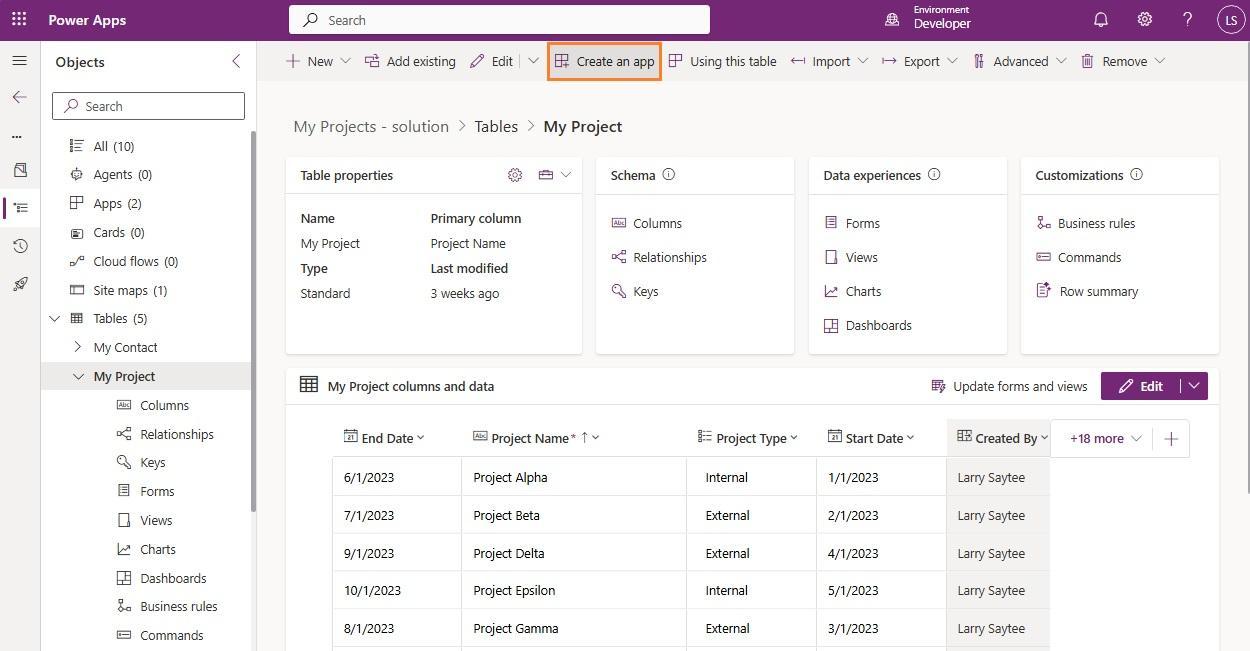
Figure 6 - Create your Model-driven app
Step 8 – Enable in-app notifications from the app Settings and Features.
In the app designer, click the settings icon to access the app settings. From there, click the “Features” tab. Scroll down the list of features for “In-app notifications” or search for it. Once you’ve found it, click to toggle from “no” to “yes”.
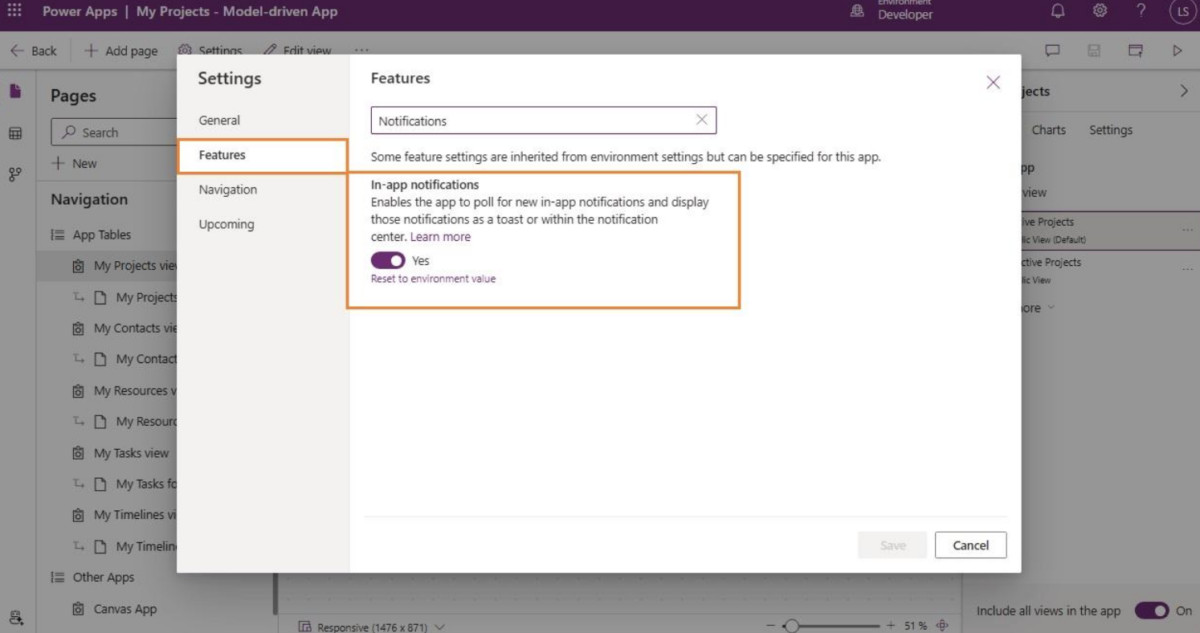
Figure 7 - Enable in-app notifications
Tip:
Be sure to share the app in your solution. Select the app then click the “Share” button in the Command bar. In the left panel titled “Share name of app”, use “People” to enter a name, email address, or group. Select the new person or group, “Assign a security role”, then click the “Share’’ button at the bottom.
Step 9 – Play the app from the app designer.
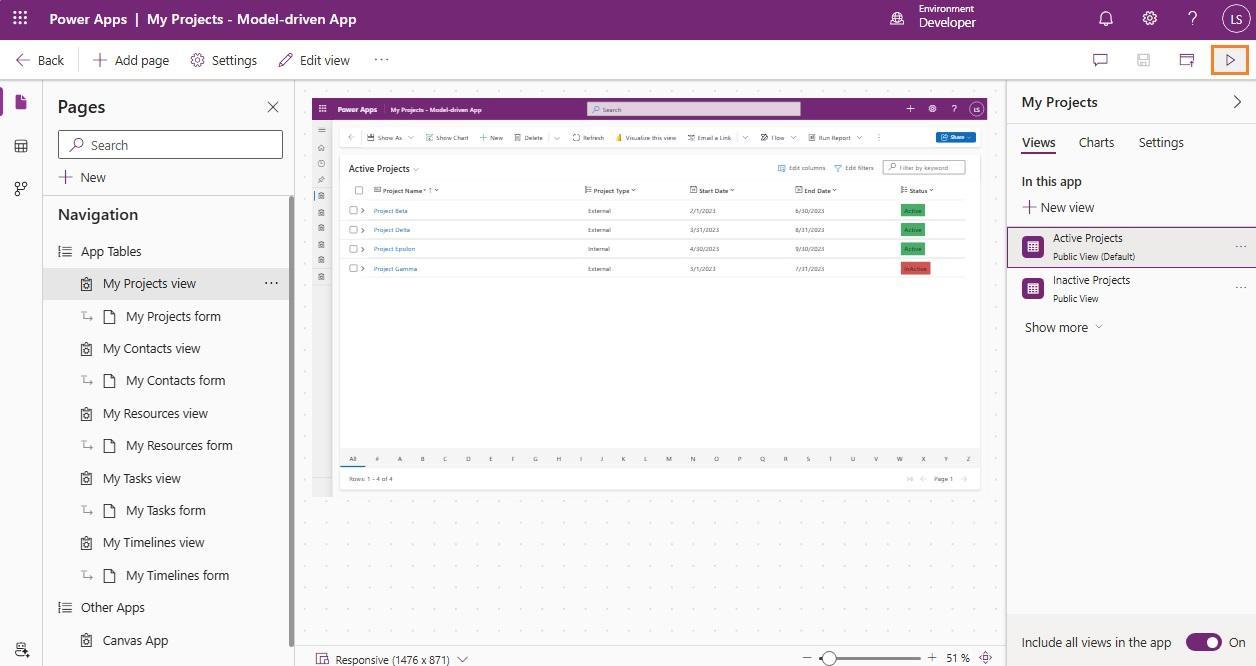
Figure 8 - The app designer
Step 10 – Add an item using the Main form.
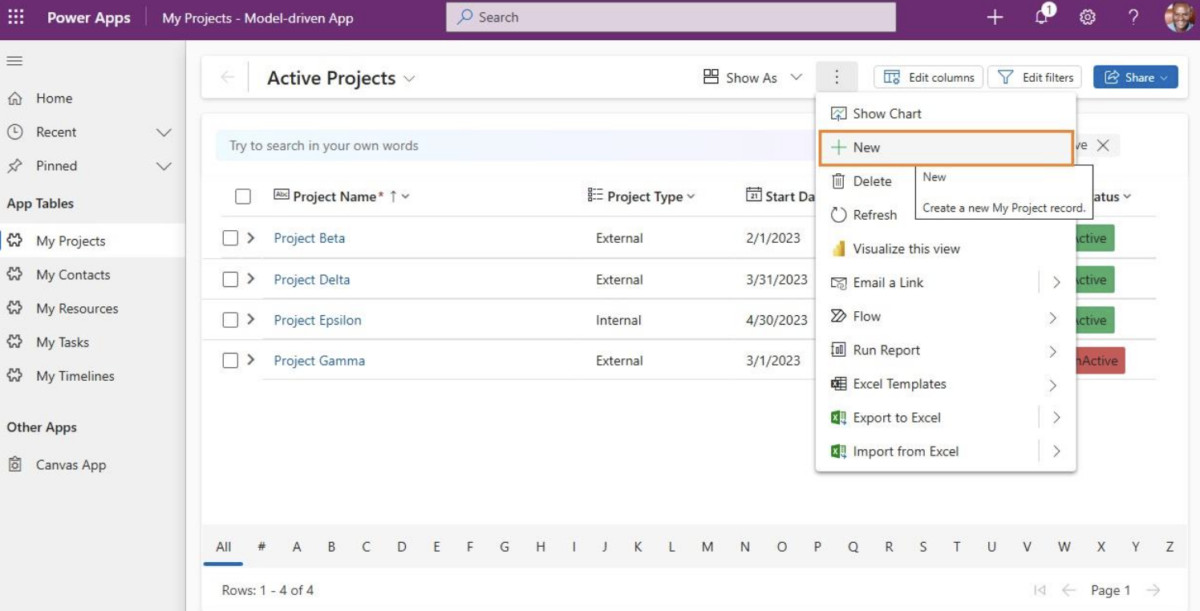
Figure 9 - Add an item using the Main form
Step 11 – Notice the in-app (Toast) notification in the right corner of the screen.
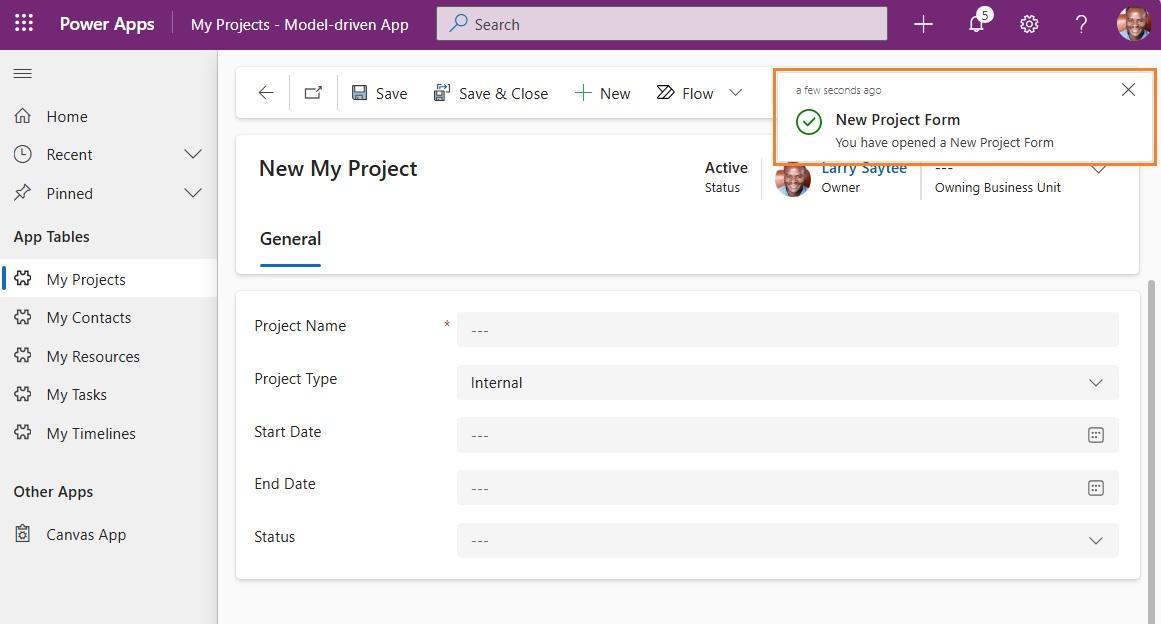
Figure 10 - Notice the Toast notification in the right corner of the screen
When you turn on “In-app notifications” in your Model-driven app and play your app, you should notice the notifications icon (with a number) at the top right of the screen. You can dismiss all of the notifications at once or “x” them individually, as illustrated in Figure 8.
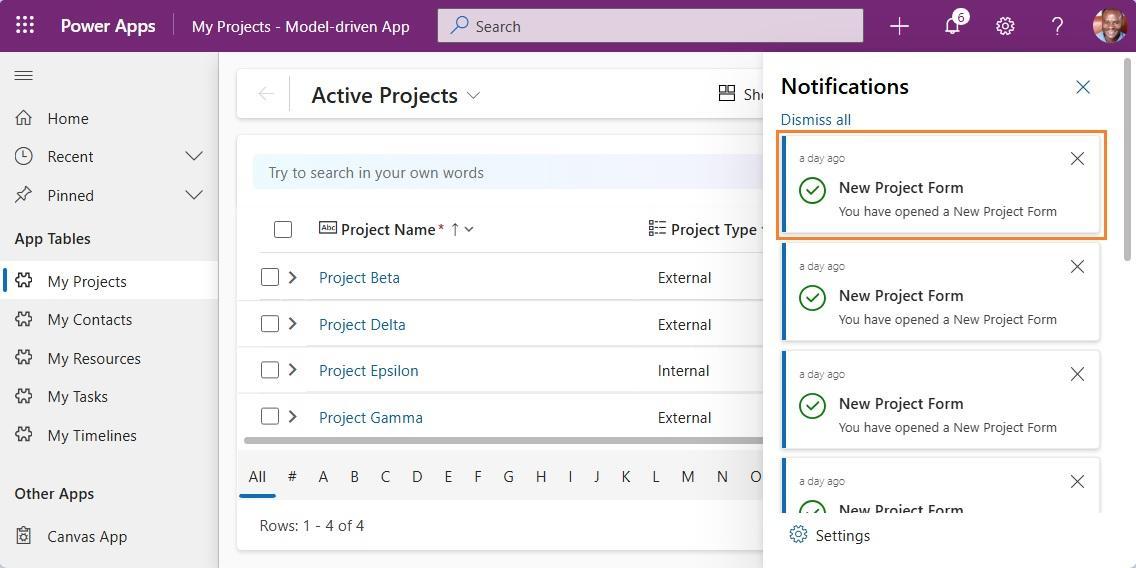
Figure 11 - Notifications icon
Managing Security for Notifications
The in-app notification feature uses three tables. A user needs to have the correct security roles to receive notifications and send to themselves or other users.
In addition to the appropriate table permissions, a user must be assigned the Send In-app Notification “prvSendAppNotification” privilege to execute the “SendAppNotification” message. The privilege is granted to the Environment Maker role by default. In-app notifications may be created directly through “appnotification” entity records, without executing the “SendAppNotification” message, which isn’t required to receive notifications.
Usage | Required table privileges |
User has no in-app notification bell and receives no in-app notification | None |
User can receive in-app notifications | Basic: Read privilege on the app notification table. Create, Read, Write, and Append privileges app. Read and AppendTo privileges on setting definition. |
User can send in-app notifications to self | Basic: Create privilege on the app notification table. Additionally, Send In-app notification using SendAppNotification. |
User can send in-app notifications to others | Create privilege with Local, Deep, or Global access level on the app notification table based on the receiving user's business unit. Send In-app notification using SendAppNotification. |
User can delete in-app notifications | Global: Delete privileges on the app notification table. |
Table 3 - Required table privileges
Note:
In-app notifications are different from push notifications. The Power Apps notification connector is for push notifications, which are separate from in-app notifications. Push notifications only appear on the mobile device notifications list to open the app. In-app notifications appear when the app is open.
Also read: 6 Model-Driven App Controls and When to Use Them
In-App Notifications vs. Push Notifications
Power Apps push notifications are alerts that appear on a user’s mobile device, even when the Power Apps application is not actively open. They notify users of important updates, new information, or required actions within their Power App. These notifications function much like typical mobile phone push notifications for other apps. They can be triggered by specific events within the app and are sent using the Power Apps Notification connector.
Push Notifications - Delivery Method
They appear on the user’s phone notification panel, prompting them to open the Power Apps application to view the details.
Push Notifications - Use Case
Ideal for high-priority alerts that require immediate user attention, such as new task assignments, urgent updates, or reminders.
Push Notifications - Configuration
You can set up push notifications within Power Apps using Power Automate flows to define the trigger conditions and the content of the notification.
It is recommended that you limit the use of push notifications to high-priority items to avoid overwhelming the user. You can read more about the notification connector on the following web pages:
- Power Apps Notification connector
- Power Apps Notification V2 connector
- Create push notifications for Power Apps Mobile
Additional:
You can also create in-app notifications for model-driven apps through a low-code approach using Power Automate: https://www.youtube.com/watch?v=maFgzxUo1Us.
FAQs
Q: What are Model-driven in-app Notifications?
Model-driven in-app notifications are toast messages that appear inside Power Apps model-driven apps to alert users of specific events or actions. These notifications are user-specific and show up in the app’s notification center to help users stay informed without needing to leave the app.
Q: Do I need code to use in-app notifications?
Not necessarily. While JavaScript offers a powerful way to create and customize in-app notifications, you can also use Power Automate for a low-code approach. This makes it easier for non-developers to set up basic notification workflows without writing custom scripts.
Q: Can I send notifications to multiple users?
Yes, but you’ll need to create a separate notification for each user. In-app notifications are user-specific by design, so there’s no built-in bulk-send feature. However, you can automate this process using loops in Power Automate or custom scripts for efficiency.