Android Developer’s Guide to the Google Location Services API
Location-based applications on our mobile devices have changed the way we interact with mobile technology. The list of these applications is extensive and has had a major impact on our lives.
This article walks us through a step-by-step tutorial of how to determine the location of an Android device using Google Location Services API.

Danny is a full-stack software engineer with 7+ years of experience doing project management and building web and mobile applications.
PREVIOUSLY AT

Knowing your user’s location is useful information in many applications we develop and use today. There are a lot of popular location-based applications out there that are making our lives easier, as well as changing the way that we use these services. An example is the wildly popular application Foursquare, where users who frequent to an establishment and “check in” often win discounts. Uber, which helps you get a ride from your mobile phone at a lower rate than a normal taxi. The list is large and still growing.
In this article, we are going to build a simple Android application to determine the user’s latitude and longitude using Android’s Google Location Services API. When developing Android applications, there are a couple of ways to get the user’s location.
Package “android.location”
The package “android.location” has been available since Android was first introduced, and it gives us access to location services. These services allow applications to obtain periodic updates of the device’s geographical location.
The package provides two means of acquiring location data:
-
LocationManager.GPS_PROVIDER: Determines location using satellites. Depending on the conditions, this provider may take a while to return a location fix.
-
LocationManager.NETWORK_PROVIDER: Determines location based on availability of nearby cell towers and WiFi access points. This is faster than GPS_PROVIDER.
When you are looking for user location you have to play with these providers and their availability. Ideally you obtain the first location using NETWORK_PROVIDER, which might not be as accurate, but is much faster. You might then make an attempt to increase accuracy by listening for a better location fix using the GPS_PROVIDER.
The APIs provided by this package are fairly low-level, and require the developer of the application to handle the finer details of determining when to request location data and schedule calls to the API in an optimized way. To improve developer experience with location based system services and ease the process of developing location-aware applications, Google introduced a new way of requesting a user’s location using Google Play Services. It offers a simpler API with higher accuracy, low-power geofencing, and much more.
Google Location Services API
Google Location Services API, also known as FusedLocationProviderApi, is Google’s recommended way of getting a user’s location. It provides the best accuracy based on our needs. Some of the advantages of using this API over the previous one are:
-
Simplicity: Unlike the previous API, you no longer have to deal with multiple providers. Instead, you specify high-level needs, such as “high accuracy” or “low power”, and it will take a suitable approach.
-
Availability: Gives your app immediate access to the best, most recent known location. Usually this information is readily available, you just have to ask for it.
-
Power-efficiency: Minimizes your application’s usage of power.
-
Versatility: Meets a wide range of needs, from foreground uses - needing highly accurate location data, to background uses - requiring only periodic location updates with negligible power impact.
Let us build a location-based Android application using this API. For this, we will use Google’s suggested IDE for Android application development - Android Studio. Getting started with Android Studio is pretty straight forward. Their website describes the procedure involving the installation and configuration of Android Studio in great detail, including how to bootstrap your first Android application for development.
Android Studio should make things super-easy for us. However, we will need to begin by configuring the build script and adding Google Play Services as a dependency for this application. This can be done by modifying the “build.gradle” file as follows:
dependencies {
    compile 'com.android.support:appcompat-v7:21.0.3'
    compile 'com.google.android.gms:play-services:6.5.87' // Add this line
}
At the time I am writing this article, the latest version of Google Play Services available is 6.5.87. Make sure you always check for the latest version available before you start. In case newer versions comes out later down the road and you decide to update it for your own projects, test all location related features against all versions of Android you are supporting.
At this point, we should be able to start doing the actual work for our application.
Requesting Permission, Configuring AndroidManifest.xml
Androids have specific security features that would prevent any arbitrary application from requesting a precise user location. To solve this, we need to edit “AndroidManifest.xml” and add the permission we require for this application:
<uses-permission android:name="android.permission.ACCESS_FINE_LOCATION" />
While we are at it, we should also define the version of Google Play Services we are using for this application:
<meta-data android:name="com.google.android.gms.version"
           android:value="@integer/google_play_services_version" />
Checking for Google Play Services Availability
Before accessing features provided by Google Play Services, we must check if the device has Google Play Services installed, and that the version is the one we intend to use (6.5.87).
private boolean checkGooglePlayServices(){
	int checkGooglePlayServices = GooglePlayServicesUtil
		.isGooglePlayServicesAvailable(mContext);
	if (checkGooglePlayServices != ConnectionResult.SUCCESS) {
		/*
		* Google Play Services is missing or update is required
		*  return code could be
		* SUCCESS,
		* SERVICE_MISSING, SERVICE_VERSION_UPDATE_REQUIRED,
		* SERVICE_DISABLED, SERVICE_INVALID.
		*/
		GooglePlayServicesUtil.getErrorDialog(checkGooglePlayServices,
		mContext, REQUEST_CODE_RECOVER_PLAY_SERVICES).show();

		return false;
	}

	return true;
}
This method will check for Google Play Services, and in case the device doesn’t have it installed (it’s rare, but I’ve seen such cases), it will open a dialog with the corresponding error and invite the user to install/update Google Play Services from the Google Play Store.

After the user completes the resolution provided by “GooglePlayServicesUtil.getErrorDialog()”, a callback method “onActivityResult()” is fired, so we have to implement some logic to handle that call:
@Override
protected void onActivityResult(int requestCode, int resultCode, Intent data) {
	if (requestCode == REQUEST_CODE_RECOVER_PLAY_SERVICES) {
		if (resultCode == RESULT_OK) {
			// Make sure the app is not already connected or attempting to connect
			if (!mGoogleApiClient.isConnecting() &&
					!mGoogleApiClient.isConnected()) {
				mGoogleApiClient.connect();
			}
		} else if (resultCode == RESULT_CANCELED) {
			Toast.makeText(mContext, "Google Play Services must be installed.",
			Toast.LENGTH_SHORT).show();
			finish();
		}
	}
}
Accessing Google APIs
To access Google APIs, we just need to perform one more step: create an instance of GoogleApiClient. The Google API Client provides a common entry point to all the Google Play services, and manages the network connection between the user’s device and each Google service. Our first step here is to initiate the connection. I usually call this code from “onCreate” method of the activity:
protected synchronized void buildGoogleApiClient() {
	mGoogleApiClient = new GoogleApiClient.Builder(this)
		.addConnectionCallbacks(this)
		.addOnConnectionFailedListener(this)
		.addApi(LocationServices.API)
		.build();
}
By chaining a series of method calls, we are specifying the callback interface implementation and the Location Service API that we want to use. The interface implementation, in this case “this”, will receive response to the asynchronous “connect()” method when the connection to Google Play Services succeed, fail, or become suspended. After adding this code, our “MainActivity” should look like this:
package com.bitwoo.userlocation;

import android.content.Intent;
import android.location.Location;
import android.os.Bundle;
import android.support.v7.app.ActionBarActivity;
import android.view.Menu;
import android.view.MenuItem;
import android.widget.Toast;

import com.google.android.gms.common.ConnectionResult;
import com.google.android.gms.common.GooglePlayServicesUtil;
import com.google.android.gms.common.api.GoogleApiClient;
import com.google.android.gms.location.LocationServices;


public class MainActivity extends ActionBarActivity  implements GoogleApiClient.ConnectionCallbacks, GoogleApiClient.OnConnectionFailedListener {

	private static int REQUEST_CODE_RECOVER_PLAY_SERVICES = 200;

	private GoogleApiClient mGoogleApiClient;
	private Location mLastLocation;

	@Override
	protected void onCreate(Bundle savedInstanceState) {
		super.onCreate(savedInstanceState);
		setContentView(R.layout.activity_main);

		if (checkGooglePlayServices()) {
		buildGoogleApiClient();
		}
	}


	@Override
	public boolean onCreateOptionsMenu(Menu menu) {
		// Inflate the menu; this adds items to the action bar if it is present.
		getMenuInflater().inflate(R.menu.menu_main, menu);
		return true;
	}

	@Override
	public boolean onOptionsItemSelected(MenuItem item) {
		// Handle action bar item clicks here. The action bar will
		// automatically handle clicks on the Home/Up button, so long
		// as you specify a parent activity in AndroidManifest.xml.
		int id = item.getItemId();

		//noinspection SimplifiableIfStatement
		if (id == R.id.action_settings) {
		return true;
		}

		return super.onOptionsItemSelected(item);
	}

	private boolean checkGooglePlayServices() {

		int checkGooglePlayServices = GooglePlayServicesUtil
			.isGooglePlayServicesAvailable(this);
		if (checkGooglePlayServices != ConnectionResult.SUCCESS) {
			/*
			* google play services is missing or update is required
			*  return code could be
			* SUCCESS,
			* SERVICE_MISSING, SERVICE_VERSION_UPDATE_REQUIRED,
			* SERVICE_DISABLED, SERVICE_INVALID.
			*/
			GooglePlayServicesUtil.getErrorDialog(checkGooglePlayServices,
			this, REQUEST_CODE_RECOVER_PLAY_SERVICES).show();

			return false;
		}

		return true;

	}

	@Override
	protected void onActivityResult(int requestCode, int resultCode, Intent data) {
		if (requestCode == REQUEST_CODE_RECOVER_PLAY_SERVICES) {

			if (resultCode == RESULT_OK) {
				// Make sure the app is not already connected or attempting to connect
				if (!mGoogleApiClient.isConnecting() &&
					!mGoogleApiClient.isConnected()) {
					mGoogleApiClient.connect();
				}
			} else if (resultCode == RESULT_CANCELED) {
				Toast.makeText(this, "Google Play Services must be installed.",
				Toast.LENGTH_SHORT).show();
				finish();
			}
		}
	}

	protected synchronized void buildGoogleApiClient() {
		mGoogleApiClient = new GoogleApiClient.Builder(this)
			.addConnectionCallbacks(this)
			.addOnConnectionFailedListener(this)
			.addApi(LocationServices.API)
			.build();

	}


	@Override
	public void onConnected(Bundle bundle) {

	}

	@Override
	public void onConnectionSuspended(int i) {

	}

	@Override
	public void onConnectionFailed(ConnectionResult connectionResult) {

	}
}
Then in our “onStart” method we call the “connect” method and wait for “onConnected” callback method be invoked:
@Override
protected void onStart() {
	super.onStart();
	if (mGoogleApiClient != null) {
		mGoogleApiClient.connect();
	}

}
The “onConnected” method will look like this:
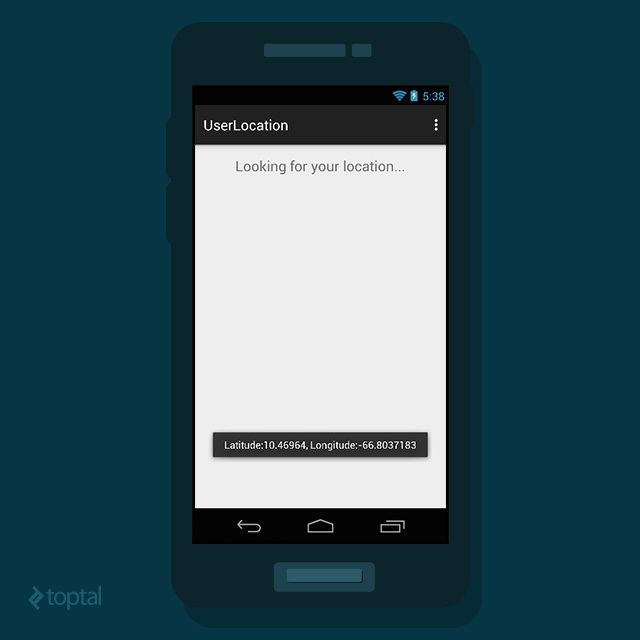
@Override
public void onConnected(Bundle bundle) {

	mLastLocation = LocationServices.FusedLocationApi.getLastLocation(
		mGoogleApiClient);
	if (mLastLocation != null) {

		Toast.makeText(this, "Latitude:" + mLastLocation.getLatitude()+", Longitude:"+mLastLocation.getLongitude(),Toast.LENGTH_LONG).show();

	}

}
This callback is fired when Google Play Services is connected, which means by then we should have the last known location. However, this location can be null (it’s rare but not impossible). In that case, what I recommend is to listen for location updates which will be covered next.
Listening for Location Updates
After you invoke “getLastLocation”, you might want to request periodic updates from the Fused Location Provider. Depending on your application, this period could be short or long. For instance, if you are building an application that tracks a user’s location while he drives, you will need to listen for updates on short intervals. On the other hand, if your application is about sharing user location with his friend, you maybe just need to request the location once in a while.
Creating a request is pretty easy - you can call this method inside the “onCreate” method:
protected void createLocationRequest() {
	mLocationRequest = new LocationRequest();
	mLocationRequest.setInterval(20000);
	mLocationRequest.setFastestInterval(5000);
	mLocationRequest.setPriority(LocationRequest.PRIORITY_HIGH_ACCURACY);
}
We instantiate a new LocationRequest object. Set the interval to 20 seconds (20000 milliseconds). Furthermore, we set a throttled update rate to 5 seconds. This tells the API to provide updates every 20 seconds (preferably), but if there is a change available within a 5 second period, it should provide that too. Finally, we set the priority to “PRIORITY_HIGH_ACCURACY”, among the other available priority options: PRIORITY_BALANCED_POWER_ACCURACY, PRIORITY_LOW_POWER, PRIORITY_NO_POWER.
Once you have built the request, you are ready to start listening on location updates after “onConnected()” method has been fired:
protected void startLocationUpdates() {
	LocationServices.FusedLocationApi.requestLocationUpdates(
		mGoogleApiClient, mLocationRequest, this);
}
All that remains now is to implement the callback method to satisfy the LocationListener interface:
public class MainActivity extends ActionBarActivity implements
		ConnectionCallbacks, OnConnectionFailedListener, LocationListener {

	// ...

	@Override
	public void onLocationChanged(Location location) {
		mLastLocation = location;
Toast.makeText(this, "Latitude:" + mLastLocation.getLatitude()+", Longitude:"+mLastLocation.getLongitude(),Toast.LENGTH_LONG).show();

	}

}
Stop Listening for Updates
It is important to explicitly stop listening for updates when you don’t need them anymore, or if the user leaves your application. The following method should be invoked from within “onPause” callback:
protected void stopLocationUpdates() {
	if (mGoogleApiClient != null) {
		LocationServices.FusedLocationApi.removeLocationUpdates(
		mGoogleApiClient, this);
	}
}
… and disconnecting Google API:
@Override
protected void onStop() {
	super.onStop();
	if (mGoogleApiClient != null) {
		mGoogleApiClient.disconnect();
	}
}
Wrapping Up
As you can see, the fundamental ideas behind implementing location aware applications in Android is very simple. Moreover, with the available APIs that are both simple to use and easy to understand, it should be a no-brainer to build basic location-based applications for Android. The small sample application we have built here is meant to demonstrate exactly that. You can find the complete source code for this on GitHub. Please note that to keep things simple, the application is not handling the “onConnectionFailed” callback method.
Hopefully this tutorial will help you get started with using the Google Location Services API.
Further Reading on the Toptal Blog:
Danny Gonzalez
Panama, NY, United States
Member since August 22, 2012
About the author
Danny is a full-stack software engineer with 7+ years of experience doing project management and building web and mobile applications.
PREVIOUSLY AT