Navigating the React.js Ecosystem
In this article, I’ll go through some of the interesting features and libraries that are available to use with React. Even if you don’t plan on using React, taking a look at its ecosystem is inspiring. You may want to simplify your build system using the powerful, yet comparatively easy to configure, module bundler Webpack, or start writing ECMAScript 6 and even ECMAScript 7 today with the Babel compiler. So, let’s explore the React ecosystem!

In this article, I’ll go through some of the interesting features and libraries that are available to use with React. Even if you don’t plan on using React, taking a look at its ecosystem is inspiring. You may want to simplify your build system using the powerful, yet comparatively easy to configure, module bundler Webpack, or start writing ECMAScript 6 and even ECMAScript 7 today with the Babel compiler. So, let’s explore the React ecosystem!

Tomas started as a Ruby on Rails enthusiast, but in 2010 he turned to JavaScript and since prefers to work with Angular, React, and NodeJS.
Expertise
PREVIOUSLY AT


The speed of innovation in JavaScript Land is so high, that some people even think it is counter-productive. A library can go from early-adopter toy, to state-of-art, to obsolescence in the course of a few months. Being able to identify a tool that is going to stay relevant for at least another year is becoming an art itself.
When React.js was released two years ago, I was just learning Angular, and I quickly dismissed React as some obscure yet-another-templating-library. During those two years, Angular really gained a foothold among JavaScript developers, and almost became synonymous with modern JS development. I even started seeing Angular in very conservative corporate environments, and I took it’s bright future for granted.
But suddenly, a strange thing happened. It seems Angular became a victim of the Osborne effect, or “death by pre-announcement”. The team announced that, first, Angular 2 will be completely different, without a clear migration path from Angular 1, and, second, that Angular 2 won’t be available for another year or so. What does that tell someone who want’s to start a new web project? Do you want to write your new project in a framework that is going to be made obsolete by a new version release?
This anxiety among developers played into the hands of React, which was seeking to establish itself in the community. But React always marketed itself as the “V” in “MVC.” This caused some amount of frustration among web developers, who are used to working with complete frameworks. How do I fill in the missing pieces? Should I write my own? Should I just use an existing library? If so, which one?
Sure enough, Facebook (creators of React.js) had one more ace in the hole: The Flux workflow, which promised to fill in the missing “M” and “C” functions. To make things even more interesting, Facebook stated that Flux is a “pattern,” not a framework, and their implementation of Flux is just one example of the pattern. True to their word, their implementation was really simplistic, and involved writing a lot of verbose, repetitive boilerplate to get things going.
The open source community came to the rescue, and a year later, we have dozens of Flux libraries, and even some meta-projects aimed at comparing them. This is a good thing; instead of releasing some ready-made corporate framework, Facebook has managed to stir interest in the community, and encouraged people to come up with their own solutions.
There’s one interesting side-effect to this approach: when you have to combine a lot of different libraries to get your complete framework, you are effectively escaping the vendor lock-in, and the innovations that emerge during your own framework construction can be readily reused elsewhere.
That’s why the new stuff around React is so interesting; most of it can be readily reused in other JavaScript environments. Even if you don’t plan on using React, taking a look at its ecosystem is inspiring. You may want to simplify your build system using the powerful, yet comparatively easy to configure, module bundler Webpack, or start writing ECMAScript 6 and even ECMAScript 7 today with the Babel compiler.
In this article, I’ll go through some of the interesting features and libraries that are available. So, let’s explore the React ecosystem!

Build System
The build system is arguably the first thing you should care about when creating a new web application. The build system is not only a tool for running scripts, but in the JavaScript world, it usually shapes the general structure of your application. The most important tasks a build system must cover are as follows:
- Managing external and internal dependencies
- Running compilers and preprocessors
- Optimizing assets for production
- Running the development web server, file watcher, and browser reloader
In recent years, the Yeoman workflow with Bower and Grunt were presented as the holy trinity of modern frontend development, solving the problems of boilerplate generation, package management, and common task running respectively, with the more progressive folk switching from Grunt to Gulp recently.
In the React environment, you can safely forget about these. Not that you couldn’t use them, but chances are you can just get away with using Webpack and good old NPM. How is that possible? Webpack is a module bundler, which implements CommonJS module syntax, common in the Node.js world, in the browser as well. It actually makes things simpler since you don’t need to learn yet another package manager for front end; you just use NPM and share dependencies between server and front end. You also don’t need to deal with the problem of loading the JS files in the correct order because it’s inferred from dependency imports specified in each file, and the whole swarm is correctly concatenated to one loadable script.

To make thing even more appealing, Webpack, unlike its older cousin Browserify, can handle other asset types as well. For example, with loaders, you can transform any asset file into a JavaScript function that either inlines, or loads, the referenced file. So, forget about manually preprocessing and referencing assets from HTML. Just require your CSS/SASS/LESS files from JavaScript, and Webpack takes care of the rest with a simple config file. Webpack also includes a development web server, and a file watcher. Plus, you can use the "scripts" key in package.json to define shell one-liners:
{
  "name": "react-example-filmdb",
  "version": "0.0.1",
  "description": "Isomorphic React + Flux film database example",
  "main": "server/index.js",
  "scripts": {
    "build": "./node_modules/.bin/webpack --progress --stats --config ./webpack/prod.config.js",
    "dev": "node --harmony ./webpack/dev-server.js",
    "prod": "NODE_ENV=production node server/index.js",
    "test": "./node_modules/.bin/karma start --single-run",
    "postinstall": "npm run build"
  }
  ...
}
And that’s about all you need to replace Gulp and Bower. Of course, you can still use Yeoman for generating application boilerplate. Don’t get discouraged when there’s no Yeoman generator for the stuff you want (the most cutting edge libraries often don’t have one). You can still just clone some boilerplate from GitHub, and hack away.
ECMAScript of Tomorrow, Today
The pace of JavaScript language development has substantially increased in recent years, and after a period of removing quirks and stabilizing the language, we now see powerful new features coming in. The ECMAScript 6 (ES6) specification draft has been finalized, and even though it has not been made official yet, it is already finding widespread adoption. Work on ECMAScript 7 (ES7) is in progress, but many of its features are already being adopted by the more cutting-edge libraries.

How is this possible? Maybe you think you can’t take advantage of these shiny new JavaScript features until they are supported in Internet Explorer, but think again. ES transpilers have already become so ubiquitous that we can even do without proper browser support. The best ES transpiler available right now is Babel: it will take your newest ES6+ code, and transform it to vanilla ES5, so, you can use any new ES feature as soon as it is invented (and implemented in Babel, which usually happens quite quickly).

The newest JavaScript features are useful across all front end frameworks, and React has recently been updated to work nicely with the ES6 and ES7 specifications. These new features should eliminate a lot of headaches when developing with React. Let’s take a look at some of the most useful additions, and how they can benefit a React project. Later, we’ll see how to use some useful tools and libraries with React while harnessing this improved syntax.
ES6 classes
Object-oriented programming is a powerful and widely-adopted paradigm, but JavaScript’s take on it is a bit exotic. Most of the front end frameworks, be it Backbone, Ember, Angular, or React, have thus adopted their own proprietary ways of defining classes and creating objects. But with ES6, we now have traditional classes in JavaScript, and it simply makes sense to use them instead of writing our own implementation. So, instead of:
React.createClass({
  displayName: 'HelloMessage',
  render() {
    return <div>Hello {this.props.name}</div>;
  }
})
we can write:
class HelloMessage extends React.Component {
  render() {
    return <div>Hello {this.props.name}</div>;
  }
}
For a more elaborate example, consider this code, using the old syntax:
React.createClass({
  displayName: 'Counter',
  getDefaultProps: function(){
    return {initialCount: 0};
  },
  getInitialState: function() {
    return {count: this.props.initialCount}
  },
  propTypes: {initialCount: React.PropTypes.number},
  tick() {
    this.setState({count: this.state.count + 1});
  },
  render() {
    return (
      <div onClick={this.tick}>
        Clicks: {this.state.count}
      </div>
    );
  }
});
And compare to the ES6 version:
class Counter extends React.Component {
  static propTypes = {initialCount: React.PropTypes.number};
  static defaultProps = {initialCount: 0};

  constructor(props) {
    super(props);
    this.state = {count: props.initialCount};
  }

  state = {count: this.props.initialCount};
  tick() {
    this.setState({count: this.state.count + 1});
  }

  render() {
    return (
      <div onClick={this.tick.bind(this)}>
        Clicks: {this.state.count}
      </div>
    );
  }
}
Here, the React lifecycle methods getDefaultProps and getInitialState are no longer necessary. getDefaultProps becomes the static class variable defaultProps, and initial state is just defined in the constructor. The only drawback is, methods are no longer autobound, so you have to use bind when calling handlers from JSX.
Decorators
Decorators are a useful feature from ES7. They allow you to augment the behavior of a function or class by wrapping it inside another function. For example, let’s assume that you want to have the same change handler on some of your components, but you don’t want to commit to the inheritance antipattern. You can use a class decorator instead. Let’s define the decorator as follows:
addChangeHandler: function(target) {
  target.prototype.changeHandler = function(key, attr, event) {
    var state = {};
    state[key] = this.state[key] || {};
    state[key][attr] = event.currentTarget.value;
    this.setState(state);
  };
  return target;
}
The important thing here is that the function addChangeHandler adds the changeHandler function to the prototype of the target class.
To apply the decorator, we could write:
MyClass = changeHandler(MyClass)
or more elegantly, with ES7 syntax:
@addChangeHandler
class MyClass {
  ...
}
As for content of the changeHandler function itself, with React’s absence of two-way data binding, working with inputs in React can be tedious. The changeHandler function tries to make it easier. The first parameter specifies a key on the state object, which will serve as a data object for the input. The second parameter is the attribute, to which the value from the input field will be saved. Those two parameters are set from JSX using the bind keyword.
@addChangeHandler
class LoginInput extends React.Component {
  constructor(props) {
    super(props);
    this.state = {
      login: {}
    };
  }
  render() {
    return (
      <input
        type='text'
        value={this.state.login.username}
        onChange={this.changeHandler.bind(this, 'login', 'username')} />
      <input
        type='password'
        value={this.state.login.password}
        onChange={this.changeHandler.bind(this, 'login', 'password')} />
    )
  }
}
When the user changes the username field, its value is saved to this.state.login.username, without the need of defining more custom handlers.
Arrow Functions
JavaScript’s dynamic this context has been a constant pain to developers because, somewhat unintuitively, the this context of a nested function is reset to global, even inside a class. To fix this, it’s usually necessary to save this to some outer scope variable (usually _this) and use it in inner functions:
class DirectorsStore {
  onFetch(directors) {
    var _this = this;
    this.directorsHash = {};
    directors.forEach(function(x){
      _this.directorsHash[x._id] = x;
    })
  }
}
With the new ES6 syntax, the function(x){ can be rewritten as (x) => {. This “arrow” method definition not only correctly binds this to the outer scope, but is also considerably shorter, which definitely counts when writing a lot of asynchronous code.
onFetch(directors) {
  this.directorsHash = {};
  directors.forEach((x) => {
    this.directorsHash[x._id] = x;
  })
}
Destructuring Assignments
Destructuring assignments, introduced in ES6, allow you to have a compound object on the left side of an assignment:
var o = {p: 42, q: true};
var {p, q} = o;

console.log(p); // 42
console.log(q); // true
This is nice, but how does it actually help us in React? Consider the following example:
function makeRequest(url, method, params) {
  var config = {
    url: url,
    method: method,
    params: params
  };
  ...
}
With destructuring, you can save a few keystrokes. The keys literal {url, method, params} is automatically assigned values from scope with same names as the keys. This idiom is used quite often, and eliminating repetition makes the code less error-prone.
function makeRequest(url, method, params) {
  var config = {url, method, params};
  ...
}
Destructuring can also help you load just a subset of a module:
const {clone, assign} = require('lodash');
function output(data, optional) {
  var payload = clone(data);
  assign(payload, optional);
}
Arguments: Default, Rest, and Spread
Function arguments are more powerful in ES6. Finally, you can set the default argument:
function http(endpoint, method='GET') {
  console.log(method)
  ...
}

http('/api') // GET
Tired of messing with the unwieldy arguments object? With the new specification, you can get the rest of the arguments as an array:
function networkAction(context, method, ...rest) {
  // rest is an array
  return method.apply(context, rest);
}
And if you don’t like calling apply(), you can just spread an array into function arguments:
myArguments = ['foo', 'bar', 123];
myFunction(...myArguments);
Generators and Async Functions
ES6 introduced JavaScript generators. A generator is basically a JavaScript function whose execution can be paused and then resumed later, remembering its state. Each time the yield keyword is encountered, execution is paused, and the yield argument is passed back to the calling object:
function* sequence(from, to) {
  console.log('Ready!');
  while(from <= to) {
    yield from++;
  }
}
Here’s an example of this generator in action:
> var cursor = sequence(1,3)
Ready!
> cursor.next()
{ value: 1, done: false }
> cursor.next()
{ value: 2, done: false }
> cursor.next()
{ value: 3, done: false }
> cursor.next()
{ value: undefined, done: true }
When we call the generator function, it executes until the first yield, and then stops. After we call next(), it returns the first value, and resumes execution. Each yield returns another value, but after the third call, the generator function terminates, and each subsequent call to next() will return { value: undefined, done: true }.
Of course, the point of generators is not to create elaborate numerical sequences. The exciting part is their ability to stop and resume function execution, which can be used to control asynchronous program flow and finally get rid of those pesky callback functions.
To demonstrate this idea, we first need an asynchronous function. Usually, we’d have some I/O operation, but for simplicity, let’s just use setTimeout and return a promise. (Note that ES6 also introduced native promises to JavaScript.)
function asyncDouble(x) {
  var deferred = Promise.defer();
  setTimeout(function(){
    deferred.resolve(x*2);
  }, 1000);
  return deferred.promise;
}
Next, we need a consumer function:
function consumer(generator){
  var cursor = generator();
  var value;
  function loop() {
    var data = cursor.next(value);
    if (data.done) {
      return;
    } else {
      data.value.then(x => {
        value = x;
        loop();
      })
    }
  }
  loop();
}
This function takes any generator as an argument, and keeps calling next() on it as long as there are values to yield. In this case, the yielded values are promises, and so it is necessary to wait for the promises to resolve, and use recursion with loop() to achieve looping across nested functions.
The return value is resolved in the then() handler, and passed to value, which is defined in the outer scope, and which will get passed into the next(value) call. This call makes the value a result of the corresponding yield expression. This means that we are now able to write asynchronously without any callbacks at all:
function* myGenerator(){
  const data1 = yield asyncDouble(1);
  console.log(`Double 1 = ${data1}`);
  const data2 = yield asyncDouble(2);
  console.log(`Double 2 = ${data2}`);
  const data3 = yield asyncDouble(3);
  console.log(`Double 3 = ${data3}`);
}

consumer(myGenerator);
The generator myGenerator will be paused on each yield, waiting for consumer to deliver the resolved promise. And indeed, we’ll see the computed numbers appear in the console in one-second intervals.
Double 1 = 2
Double 2 = 4
Double 3 = 6
This demonstrates the basic concept, however, I don’t recommend that you use this code in production. Instead, choose a well-tested library such as co. This will allow you to easily write async code with yields, including error handling:
co(function *(){
  var a = yield Promise.resolve(1);
  console.log(a);
  var b = yield Promise.resolve(2);
  console.log(b);
  var c = yield Promise.resolve(3);
  console.log(c);
}).catch(function(err){
  console.error(err.stack);
});
So, this example shows how to write asynchronous code without callbacks using ES6 generators. ES7 takes this approach one step further by introducing the async and await keywords, and removing the need for a generator library altogether. With this capability, the previous example would look like this:
async function (){
  try {
    var a = await Promise.resolve(1);
    console.log(a);
    var b = await Promise.resolve(2);
    console.log(b);
    var c = await Promise.resolve(3);
    console.log(c);
  } catch (err) {
    console.error(err.stack);
  }
};
In my opinion, this takes the pain out of working with asynchronous code in JavaScript. Not only in React, but everywhere else, as well.
Generators are not only more concise and straightforward, but also allow us to use techniques that would be very hard to implement with callbacks. A prominent example of generator goodness is the koa middleware library for Node.js. It aims to replace Express, and, towards that goal, it comes with one killer feature: The middleware chain flows not only downstream (with client request), but also upstream, allowing further modification to the server’s response. Consider the following koa server example:
// Response time logger middleware
app.use(function *(next){
  // Downstream
  var start = new Date;
  yield next;
  // Upstream
  this.body += ' World';
  var ms = new Date - start;
  console.log('%s %s - %s', this.method, this.url, ms);
});

// Response handler
app.use(function *(){
  this.body = 'Hello';
});

app.listen(3000);

The response middleware yields downstream into the response handler, which sets the response body, and in the upstream flow (after the yield expression), further modification of this.body is allowed, as well as other functions like time logging, which is possible because the upstream and downstream shares the same function context. This is much more powerful than Express, in which an attempt to accomplish the same thing would end like this:
var start;
// Downstream middleware
app.use(function(req, res, next) {
  start = new Date;
  next();
  // Already returned, cannot continue here
});

// Response
app.use(function (req, res, next){
  res.send('Hello World')
  next();
});

// Upstream middleware
app.use(function(req, res, next) {
  // res already sent, cannot modify
  var ms = new Date - start;
  console.log('%s %s - %s', this.method, this.url, ms);
  next();
});

app.listen(3000);
You can probably already spot what’s wrong here; using a “global” start variable will result in a race condition, returning nonsense with concurrent requests. The solution is some non-obvious workaround, and you can forget about modifying the response in the upstream flow.
Also, when using koa, you’ll get the generator asynchronous workflow for free:
app.use(function *(){
  try {
    const part1 = yield fs.readFile(this.request.query.file1, 'utf8');
    const part2 = yield fs.readFile(this.request.query.file2, 'utf8');
    this.body = part1 + part2;
  } catch (err) {
    this.status = 404
    this.body = err;
  }
});

app.listen(3000);
You can imagine the promises and callbacks involved in re-creating this small example in Express.

How does all of this Node.js talk relate to React? Well, Node is the first choice when considering a suitable back end for React. Since Node is written in JavaScript as well, it supports code sharing between back end and front end, allowing us to build isomorphic React web applications. But, more about this later.
Flux Library
React is great at creating composable view components, but we need some way to manage data and state across the whole application. It has been almost universally agreed that React is best complemented by the Flux application architecture. If you are completely new to Flux, I recommend a quick refresh.

What has not been so universally agreed is which of the many Flux implementations to choose. Facebook Flux would be the obvious choice, but for most people it’s too verbose. Alternative implementations focus mostly on reducing the amount of required boilerplate with a convention-over-configuration approach, and also with some convenience functions for higher-order components, server-side rendering, and so on. Some of the top contenders, with various popularity metrics, can be seen here. I’ve looked into Alt, Reflux, Flummox, Fluxxor, and Marty.js.
My way of choosing the right library is in no way objective, but it might help anyway. Fluxxor was one of this first libraries I checked out, but now it looks a bit stale. Marty.js is interesting, and has a lot of features, but still involves a lot of boilerplate, and some of the functions seem superfluous. Reflux looks great and has some traction, but feels a bit hard for beginners, and also lacks proper documentation. Flummox and Alt are very similar, but Alt seems to have even less boilerplate, very active development, up-to-date documentation and a helpful Slack community.Therefore, I chose Alt.
Alt Flux

With Alt, the Flux workflow becomes much simpler without losing any of it’s power. Facebook’s Flux documentation says a lot about the dispatcher, but we are free to ignore that because, in Alt, the dispatcher is implicitly wired to actions by convention, and usually doesn’t require any custom code. This leaves us with just stores, actions, and components. These three layers may be used in such a way that they map nicely into the MVC thought model: Stores are Models, actions are Controllers, and components are Views. The main difference is the unidirectional data flow central to the Flux pattern, which means, that controllers (actions) cannot directly modify views (components), but, instead, can only trigger model (store) modifications, to which views are passively bound. This was already a best practice for some enlightened Angular developers.
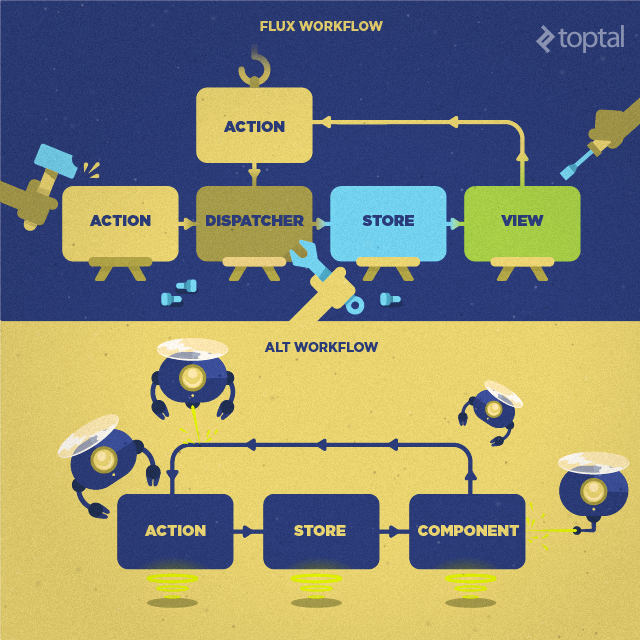
The workflow is as follows:
- Components initiate actions.
- Stores listen to actions and update data.
- Components are bound to stores, and rerender when data are updated.
Actions
When using the Alt Flux library, actions generally come in two flavors: automatic and manual. Automatic actions are created using the generateActions function, and they go directly to the dispatcher. Manual methods are defined as methods of your action classes, and they can go to the dispatcher with an additional payload. The most common use case of automatic actions is to notify stores about some event in the application. Manual actions are, among other things, the preffered way of dealing with server interactions.
So the REST API calls belong to actions. The complete workflow is as follows:
- Component triggers an action.
- The action creator runs an asynchronous server request, and the result goes to the dispatcher as a payload.
- The store listens to the action, the corresponding action handler receives the result as an argument, and the store updates its state accordingly.
For AJAX requests, we can use the axios library, which, among other things, deals with JSON data and headers seamlessly. Instead of promises or callbacks, we can use the ES7 async/await pattern. If the POST response status is not 2XX, an error is thrown, and we dispatch either returned data, or received error.
Let’s look at a login page for a simple example of the Alt workflow. The logout action does not need to do anything special, only notify the store, so we can generate it automatically. The login action is manual, and expects login data as a parameter to the action creator. After we get a response from server, we either dispatch success data, or, if an error is thrown, we dispatch the error received.
class LoginActions {
  constructor() {
    // Automatic action
    this.generateActions('logout');
  }

  // Manual action
  async login(data) {
    try {
      const response = await axios.post('/auth/login', data);
      this.dispatch({ok: true, user: response.data});
    } catch (err) {
      console.error(err);
      this.dispatch({ok: false, error: err.data});
    }
  }
}

module.exports = (alt.createActions(LoginActions));
Stores
The Flux store serves two purposes: It has action handlers, and carries state. Let’s continue our login page example to see how this works.
Let’s create LoginStore, with two state attributes: user, for the current logged-in user, and error, for the current login-related error. In the spirit of reducing boilerplate, Alt allows us to bind to all actions from one class with a single function bindActions.
class LoginStore {
  constructor() {
    this.bindActions(LoginActions);
    this.user = null;
    this.error = null;
  }
  ...
Handler names are defined by convention, prepending on to the corresponding action name. So the login action is handled by onLogin, and so forth. Note that the first letter of the action name will be capitalized in camelCase style. In our LoginStore, we have the following handlers, called by the corresponding actions:
  ...
  onLogin(data) {
    if (data.ok) {
      this.user = data.user;
      this.error = null;
      router.transitionTo('home');
    } else {
      this.user = null;
      this.error = data.error
    }
  }

  onLogout() {
    this.user = null;
    this.error = null;
  }
}
Components
The usual way of binding stores to components is to use some kind of React mixin. But since mixins are going out of fashion, there needs to be some other way. One of the new approaches is to use higher-order components. We take our component and put it inside a wrapper component, which will take care of listening to stores and calling re-render. Our component will receive the store’s state in props. This approach is also helpful to organize our code into smart and dumb components, which have become trendy lately. For Alt, the component wrapper is implemented by AltContainer:
export default class Login extends React.Component {
  render() {
    return (
      <AltContainer stores={{LoginStore: LoginStore}}>
        <LoginPage/>
      </AltContainer>
  )}
}
Our LoginPage component also uses the changeHandler decorator introduced earlier. Data from LoginStore is used to display errors in case of an unsuccessful login, and re-rendering is taken care of by AltContainer. Clicking on the login button executes the login action, completing the Alt flux workflow:
@changeHandler
export default class LoginPage extends React.Component {
  constructor(props) {
    super(props);
    this.state = {
      loginForm: {}
    };
  }
  login() {
    LoginActions.login(this.state.loginForm)
  }
  render() {
    return (
      <Alert>{{this.props.LoginStore.error}}</Alert>
      <Input
        label='Username'
        type='text'
        value={this.state.login.username}
        onChange={this.changeHandler.bind(this, 'loginForm', 'username')} />
      <Input
        label='Password'
        type='password'
        value={this.state.login.password}
        onChange={this.changeHandler.bind(this, 'loginForm', 'password')} />
      <Button onClick={this.login.bind(this)}>Login</Button>
  )}
}
Isomorphic Rendering
Isomorphic web applications are a hot topic these days because they solve some of the biggest chores of traditional single page applications. In those applications, markup is created dynamically by JavaScript in the browser. The result is that the content is not available to clients with JavaScript turned off, most notably, search engine web crawlers. This means your web page is not indexed and does not appear in search results. There are ways to work around this, but they are far from optimal. The isomorphic approach attempts to fix this problem by pre-rendering the requested URL of a single page application on the server. With Node.js, you have JavaScript on the server, meaning React can also run server-side. This shouldn’t be too hard, right?
One obstacle is that some Flux libraries, especially those that use singletons, have difficulties with server-side rendering. When you have singleton Flux stores and multiple concurrent requests to your server, the data will get mixed up. Some libraries solve this by using Flux instances, but this comes with other drawbacks, particularly the need to pass those instances around in your code. Alt offers Flux instances too, but it has also solved the problem of server-side rendering with singletons; it flushes stores after each request, so that each concurrent request starts with a clean slate.
The core of the server-side rendering functionality is provided by React.renderToString. The whole React front end application is run on the server, as well. This way, we don’t need to wait for the client-side JavaScript to create the markup; it’s pre-built on the server for the accessed URL, and sent to the browser as HTML. When the client JavaScript runs, it picks up where the server has left off. To support this, we can use the Iso library, which is meant to be used with Alt.
First, we initialize Flux on the server using alt.bootstrap. It is possible to prefill the Flux stores with data for rendering. It is also necessary to decide which component to render for which URL, which is the functionality of the client side Router. We are using the singleton version of alt, so after each render, we need to alt.flush() the stores to have them clean for another request. Using the iso add-on, the state of Flux is serialized to the HTML markup, so that the client knows where to pick up:
// We use react-router to run the URL that is provided in routes.jsx
var getHandler = function(routes, url) {
  var deferred = Promise.defer();
  Router.run(routes, url, function (Handler) {
    deferred.resolve(Handler);
  });
  return deferred.promise;
};

app.use(function *(next) {
  yield next;
  // We seed our stores with data
  alt.bootstrap(JSON.stringify(this.locals.data || {}));
  var iso = new Iso();
  const handler = yield getHandler(reactRoutes, this.request.url);
  const node = React.renderToString(React.createElement(handler));
  iso.add(node, alt.flush());
  this.render('layout', {html: iso.render()});
});
On the client side, we pick up the server state, and bootstrap alt with the data. Then we run Router and React.render on the target container, which will update the server-generated markup as necessary.
Iso.bootstrap(function (state, _, container) {
  // Bootstrap the state from the server
  alt.bootstrap(state)
  Router.run(routes, Router.HistoryLocation, function (Handler, req) {
    let node = React.createElement(Handler)
    React.render(node, container)
  })
})
Lovely!
Useful Front-End Libraries
A guide to the React ecosystem wouldn’t be complete without mentioning a few front-end libraries that play especially well with React. These libraries tackle the most common tasks found in almost every web application: CSS layouts and containers, styled forms and buttons, validations, date picking, and so on. There’s no point in reinventing the wheel when those problems have been solved already.
React-Bootstrap

Twitter’s Bootstrap framework has become commonplace since it is of immense help to every web developer who does not want to spend a ton of time working in CSS. In the prototyping phase especially, Bootstrap is indispensable. To leverage the power of bootstrap in a React application, it’s good to use it with React-Bootstrap, which comes with nice React syntax and re-implements Bootstrap’s jQuery plugins using native React components. The resulting code is terse and easy to understand:
<Navbar brand='React-Bootstrap'>
  <Nav>
    <NavItem eventKey={1} href='#'>Link</NavItem>
    <NavItem eventKey={2} href='#'>Link</NavItem>
    <DropdownButton eventKey={3} title='Dropdown'>
      <MenuItem eventKey='1'>Action</MenuItem>
      <MenuItem eventKey='2'>Another action</MenuItem>
      <MenuItem eventKey='3'>Something else here</MenuItem>
      <MenuItem divider />
      <MenuItem eventKey='4'>Separated link</MenuItem>
    </DropdownButton>
  </Nav>
</Navbar>
Personally, I cannot escape the feeling that this is what HTML should always have been like.
If you want to use Bootstrap source with Webpack, consider using less-loader or bootstrap-sass-loader, depending on the preprocessor you prefer. It will allow you to easily customize which Bootstrap components to include, and also allow the usage of LESS or SASS global variables in your CSS code.
React Router

React Router has become the de-facto standard for routing in React. It allows nested routing, support for redirections, plays nicely with isomorphic rendering, and has a simple JSX-based syntax:
<Router history={new BrowserHistory}>
  <Route path="/" component={App}>
    <Route path="about" name="about" component={About}/>
    <Route path="users" name="users"  component={Users} indexComponent={RecentUsers}>
      <Route path="/user/:userId" name="user" component={User}/>
    </Route>
    <Route path="*" component={NoMatch}/>
  </Route>
</Router>
React Router also provides a Link component that you can use for navigation in your application, specifying only the route name:
<nav>
  <Link to="about">About</Link>
  <Link to="users">Users</Link>
</nav>
There is even a library for integration with React-Bootstrap, so if you are using Bootstrap’s components and don’t feel like setting the active class on them manually all the time, you can use react-router-bootstrap and write code like this:
<Nav>
  <NavItemLink to="about">About</NavItemLink>
  <NavItemLink to="users">Users</NavItemLink>
</Nav>
No additional setup is necessary. Active links will take care of themselves.
Formsy-React
Working with forms can be tedious, so let’s get some help from the formsy-react library, which will help us manage validations and data models. The Formsy-React library, strangely enough, does not include the actual form inputs because users are encouraged to write their own (which is great). But if you are content with the common ones, just use formsy-react-components. Bootstrap classes are included:
import Formsy from 'formsy-react';
import {Input} from 'formsy-react-components';
export default class FormsyForm extends React.Component {
  enableButton() {
    this.setState({canSubmit: true});
  }
  disableButton() {
    this.setState({canSubmit: true});
  }
  submit(model) {
    FormActions.saveEmail(model.email);
  }
  render() {
    return (
      <Formsy.Form onValidSubmit={this.submit} onValid={this.enableButton} onInvalid={this.disableButton}>
        <Input
          name="email"
          validations="isEmail"
          validationError="This is not a valid email"
          required/>
        <button type="submit" disabled={!this.state.canSubmit}>Submit</button>
      </Formsy.Form>
  )}
}
Calendar and Typeahead
Calendar and typeahead are icing on the cake of every UI toolkit. Sadly, these two components were removed from Bootstrap 3, probably because they are too specialized for a general purpose CSS framework. Luckily, I’ve been able to find worthy replacements in react-pikaday and react-select. I’ve tested more than 10 libraries, and these two came out as the best. They are dead easy to use, as well:
import Pikaday from 'react-pikaday';
import Select from 'react-select';

export default class CalendarAndTypeahead extends React.Component {
  constructor(props){
    super(props);
    this.options = [
      { value: 'one', label: 'One' },
      { value: 'two', label: 'Two' }
    ];
  }
  dateChange(date) {
    this.setState({date: date});
  },
  selectChange(selected) {
    this.setState({selected: selected});
  },
  render() {
    return (
      <Pikaday
        value={this.state.date}
        onChange={this.dateChange} />
      <Select
        name="form-field-name"
        value={this.state.selected}
        options={this.options}
        onChange={selectChange} />
  )}
}
Conclusion - React.JS
In this article I’ve presented libraries and techniques that I consider some of the most productive in current web development. Some of them are React-specific, but due to React’s open nature, many of them are usable in other environments as well. Technological progress is sometimes hindered by fear of the newest stuff, so I hope this article will help to dissipate doubts concerning React, Flux and the newest features in ECMAScript.

If you are interested, you can take a look at my example application* built with these technologies. The source code is available on GitHub.
* Note: After publication, Heroku stopped offering free hosting, and the demo is no longer available.
Further Reading on the Toptal Blog:
Tomas Holas
Prague, Czech Republic
Member since February 10, 2015
About the author
Tomas started as a Ruby on Rails enthusiast, but in 2010 he turned to JavaScript and since prefers to work with Angular, React, and NodeJS.
Expertise
PREVIOUSLY AT