Introduction to OpenGL: A 3D Text Rendering Tutorial
Over time, the race between DirectX and OpenGL has caused these technologies to become more accessible to developers, along with better documentation and an easier process of getting started with them. This tutorial article shows you how to build a 3D modeling application that generates and renders 3D texts from user inputs.

Over time, the race between DirectX and OpenGL has caused these technologies to become more accessible to developers, along with better documentation and an easier process of getting started with them. This tutorial article shows you how to build a 3D modeling application that generates and renders 3D texts from user inputs.

Timofey has 14 years of experience in programming on C++/Windows platforms, over 4 years working with QT, and experience with SQL.
With the availability of tools like DirectX and OpenGL, writing a desktop application that renders 3D elements is not very difficult nowadays. However, like many technologies, there are sometimes obstacles making it difficult for developers trying to enter into this niche. Over time, the race between DirectX and OpenGL has caused these technologies to become more accessible to developers, along with better documentation and an easier process of becoming a skilled DirectX or OpenGL developer.
DirectX, introduced and maintained by Microsoft, is a technology specific to the Windows platform. On the other hand, OpenGL is a cross-platform API for the 3D graphics arena whose specification is maintained by the Khronos Group.
In this introduction to OpenGL, I will explain how to write a very simple application to render 3D text models. We will be using Qt/Qt Creator to implement the UI, making it easy to compile and run this application on multiple platforms. The source code of the prototype built for this article is available on GitHub.
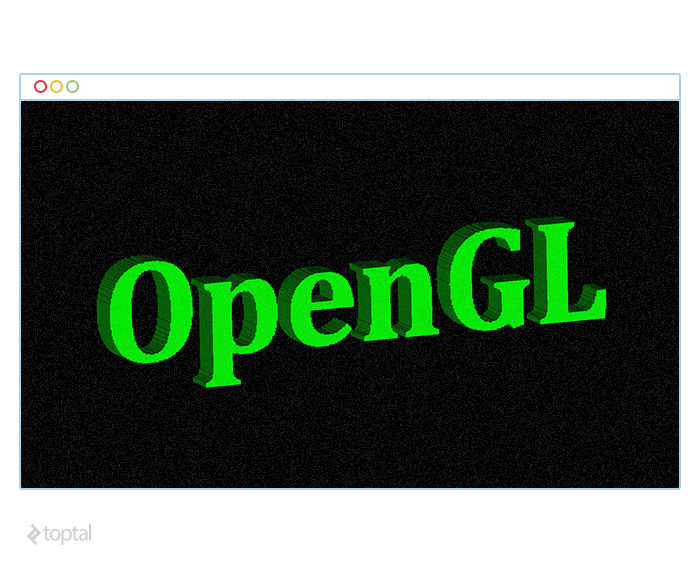
The goal of this simple application is to generate 3D models, save them to a file with a simple format, and to open and render them on screen. The 3D model in the rendered scene will be rotatable and zoomable, to give a better sense of depth and dimension.
Prerequisites
Before getting started, we will need to prepare our development environment with some useful tools for this project. The very first thing we need is the Qt framework and relevant utilities, which can be downloaded from www.qt.io. It may also be available through your operating system’s standard package manager; if that is the case, you might want to try with it first. This article requires some familiarity with the Qt framework. However, if you are not familiar with the framework, please do not feel discouraged to follow along, as the prototype relies on some fairly trivial features of the framework.
You can also use Microsoft Visual Studio 2013 on Windows. In that case, please make sure you are using the appropriate Qt Addin for Visual Studio.
At this point, you might want to clone the repository from GitHub and follow it as you read through this article.
OpenGL Overview
We will begin by creating a simple Qt application project with a single document widget. Since it is a bare-bones widget, compiling and running it will not produce anything useful. With Qt designer, we will add a “File” menu with four items: “New…”, “Open…”, “Close”, and “Exit”. You can find the code that binds these menu items to their corresponding actions in the repository.
Clicking on “New…” should popup a dialog that will look something like this:
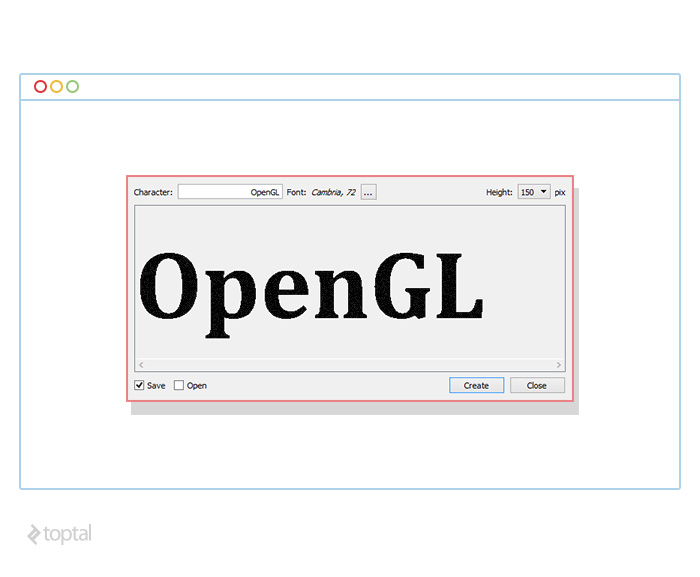
Here, the user may enter some text, choose a font, tweak the resulting model height, and generate a 3D model. Clicking on “Create” should save the model, and should also open it if the user chooses the appropriate option from the lower-left corner. As you can tell, the goal here is to convert some user inputted text into a 3D model and render it on the display.
The project will have a simple structure, and the components will be broken down into a handful of C++ and header files:
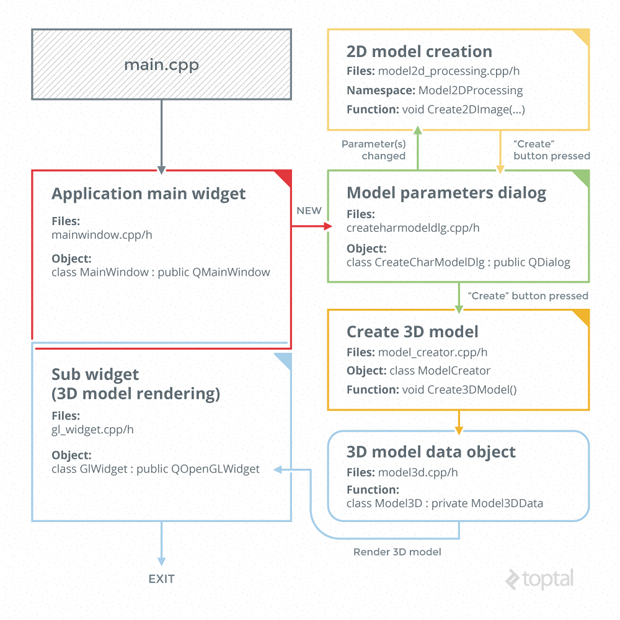
createcharmodeldlg.h/cpp
Files contain QDialog derived object. This implements the dialog widget which allows the user to type text, select font, and choose whether to save the result into a file and/or display it in 3D.
gl_widget.h/cpp
Contains implementation of QOpenGLWidget derived object. This widget is used to render the 3D scene.
mainwindow.h/cpp
Contains implementation of the main application widget. These files were left unchanged since they were created by Qt Creator wizard.
main.cpp
Contains the main(…) function, which creates the main application widget and shows it on screen.
model2d_processing.h/cpp
Contains functionality of creation of 2D scene.
model3d.h/cpp
Contains structures which store 3D model objects and allow operations to work on them (save, load etc.).
model_creator.h/cpp
Contains implementation of class which allows creation of 3D scene model object.
OpenGL Implementation
For brevity, we will skip the obvious details of implementing the user interface with Qt Designer, and the code defining the behaviors of the interactive elements. There are certainly some more interesting aspects of this prototype application, ones that are not only important but also relevant to 3D model encoding and rendering that we want to cover. For example, the first step of converting text to a 3D model in this prototype involves converting the text to a 2D monochrome image. Once this image is generated, it is possible to know which pixel of the image forms the text, and which ones are just “empty” space. There are some simpler ways of rendering basic text using OpenGL, but we are taking this approach in order to cover some nitty-gritty details of 3D rendering with OpenGL.
To generate this image, we instantiate a QImage object with the QImage::Format_Mono flag. Since all we need to know is which pixels are part of the text and which ones are not, a monochrome image should work just fine. When the user enters some text, we synchronously update this QImage object. Based on the font size and image width, we try our best to fit the text within the user defined height.
Next, we enumerate all the pixels which are part of the text - in this case, the black pixels. Each pixel here is treated as separate square-ish units. Based on this, we can generate a list of triangles, computing the coordinates of their vertices, and store them in our 3D model file.
Now that we have our own simple 3D model file format, we can start focusing on rendering it. For OpenGL based 3D rendering, Qt provides a widget called QOpenGLWidget. To use this widget, three functions may be overridden:
- initializeGl() - this is where the initialization code goes
- paintGl() - this method is called everytime the widget is redrawn
- resizeGl(int w, int h) - this method is called with the widget’s width and height every time it is resized
We will initialize the widget by setting the appropriate shader configuration in the initializeGl method.
glEnable(GL_DEPTH_TEST);
glShadeModel(GL_FLAT);
glDisable(GL_CULL_FACE);
The first line makes the program show only those rendered pixels that are closer to us, rather than the ones that are behind other pixels and out of sight. The second line specifies the flat shading technique. The third line makes the program render triangles regardless of which direction their normals point to.
Once initialized, we render the model on the display every time paintGl is called. Before we override the paintGl method, we must prepare the buffer. To do that, we first create a buffer handle. We then bind the handle to one of the binding points, copy the source data into the buffer, and finally we tell the program to unbind the buffer:
// Get the Qt object which allows to operate with buffers
QOpenGLFunctions funcs(QOpenGLContext::currentContext());
// Create the buffer handle
funcs.glGenBuffers(1, &handle);
// Select buffer by its handle (so we’ll use this buffer
// further)
funcs.glBindBuffer(GL_ARRAY_BUFFER, handle);
// Copy data into the buffer. Being copied,
// source data is not used any more and can be released
funcs.glBufferData(GL_ARRAY_BUFFER,
	size_in_bytes,
	src_data,
	GL_STATIC_DRAW);
// Tell the program we’ve finished with the handle
funcs.glBindBuffer(GL_ARRAY_BUFFER, 0);
Inside the overriding paintGl method, we use an array of vertices and an array of normal data to draw the triangles for each frame:
QOpenGLFunctions funcs(QOpenGLContext::currentContext());
// Vertex data
glEnableClientState(GL_VERTEX_ARRAY);// Work with VERTEX buffer
funcs.glBindBuffer(GL_ARRAY_BUFFER, m_hVertexes);	// Use this one
glVertexPointer(3, GL_FLOAT, 0, 0);		// Data format
funcs.glVertexAttribPointer(m_coordVertex, 3, GL_FLOAT,
	GL_FALSE, 0, 0);	// Provide into shader program

// Normal data
glEnableClientState(GL_NORMAL_ARRAY);// Work with NORMAL buffer
funcs.glBindBuffer(GL_ARRAY_BUFFER, m_hNormals);// Use this one
glNormalPointer(GL_FLOAT, 0, 0);	// Data format
funcs.glEnableVertexAttribArray(m_coordNormal);	// Shader attribute
funcs.glVertexAttribPointer(m_coordNormal, 3, GL_FLOAT,
	GL_FALSE, 0, 0);	// Provide into shader program

// Draw frame
glDrawArrays(GL_TRIANGLES, 0, (3 * m_model.GetTriangleCount()));

// Rendering finished, buffers are not in use now
funcs.glDisableVertexAttribArray(m_coordNormal);
funcs.glBindBuffer(GL_ARRAY_BUFFER, 0);
glDisableClientState(GL_VERTEX_ARRAY);
glDisableClientState(GL_NORMAL_ARRAY);
For improved performance, we used Vertex Buffer Object (VBO) in our prototype application. This lets us store data in video memory and use it directly for rendering. An alternate method to this involves providing the data (vertex coordinates, normals and colors) from the rendering code:
glBegin(GL_TRIANGLES);
	// Provide coordinates of triangle #1
	glVertex3f( x[0], y[0], z[0]);
	glVertex3f( x[1], y[1], z[1]);
	glVertex3f( x[2], y[2], z[2]);
	// Provide coordinates of other triangles
	...
glEnd();
This may seem like a simpler solution; however, it has serious performance implications, as this requires the data to travel through the video memory bus - a relatively slower process. After implementing the paintGl method, we must pay attention to shaders:
m_shaderProgram.addShaderFromSourceCode(QOpenGLShader::Vertex,
    	QString::fromUtf8(
        	"#version 400\r\n"
        	"\r\n"
        	"layout (location = 0) in vec3 coordVertexes;\r\n"
        	"layout (location = 1) in vec3 coordNormals;\r\n"
        	"flat out float lightIntensity;\r\n"
        	"\r\n"
        	"uniform mat4 matrixVertex;\r\n"
        	"uniform mat4 matrixNormal;\r\n"
        	"\r\n"
        	"void main()\r\n"
 	       	"{\r\n"
        	"   gl_Position = matrixVertex * vec4(coordVertexes, 1.0);\r\n"
        	"   lightIntensity = abs((matrixNormal * vec4(coordNormals, 1.0)).z);\r\n"
        	"}"));
m_shaderProgram.addShaderFromSourceCode(QOpenGLShader::Fragment,
    	QString::fromUtf8(
        	"#version 400\r\n"
        	"\r\n"
        	"flat in float lightIntensity;\r\n"
        	"\r\n"
        	"layout (location = 0) out vec4 FragColor;\r\n"
        	"uniform vec3 fragmentColor;\r\n"
        	"\r\n"
        	"void main()\r\n"
        	"{\r\n"
        	"	FragColor = vec4(fragmentColor * lightIntensity, 1.0);\r\n"
        	"}"));
	m_shaderProgram.link();
	m_shaderProgram.bind();

	m_coordVertex =
		m_shaderProgram.attributeLocation(QString::fromUtf8("coordVertexes"));
	m_coordNormal =
		m_shaderProgram.attributeLocation(QString::fromUtf8("coordNormals"));
	m_matrixVertex =
		m_shaderProgram.uniformLocation(QString::fromUtf8("matrixVertex"));
	m_matrixNormal =
		m_shaderProgram.uniformLocation(QString::fromUtf8("matrixNormal"));
	m_colorFragment =
		m_shaderProgram.uniformLocation(QString::fromUtf8("fragmentColor"));
With OpenGL, shaders are implemented using a language known as GLSL. The language is designed to make it easy to manipulate 3D data before it is rendered. Here, we will need two shaders: vertex shader and fragment shader. In vertex shader, we will transform the coordinates with the transformation matrix to apply rotation and zoom, and to calculate color. In fragment shader, we will assign color to the fragment. These shader programs must then be compiled and linked with the context. OpenGL provides simple ways of bridging the two environments so that parameters inside the program may be accessed or assigned from outside:
// Get model transformation matrix
QMatrix4x4 matrixVertex;
... // Calculate the matrix here
// Set Shader Program object' parameters
m_shaderProgram.setUniformValue(m_matrixVertex, matrixVertex);
In the vertex shader code, we calculate the new vertex position by applying the transformation matrix on the original vertices:
gl_Position = matrixVertex * vec4(coordVertexes, 1.0);
To compute this transformation matrix, we compute a few separate matrices: screen scale, translate scene, scale, rotate, and center. We then find the product of these matrices in order to compute the final transformation matrix. Start by translating the model center to the origin (0, 0, 0), which is the center of the screen as well. Rotation is determined by the user’s interaction with the scene using some pointing device. The user can click on the scene and drag around to rotate. When the user clicks, we store the cursor position, and after a movement we have the second cursor position. Using these two coordinates, along with the scene center, we form a triangle. Following some simple calculations we can determine the rotation angle, and we can update our rotation matrix to reflect this change. For scaling, we simply rely on the mouse wheel to modify the scaling factor of the X and Y axes of the OpenGL widget. The model is translated back by 0.5 to keep it behind the plane from which the scene is rendered. Finally, to maintain the natural aspect ratio we need to adjust the decrease of the model expansion along the longer side (unlike the OpenGL scene, the widget where it is rendered may have different physical dimensions along either axes). Combining all these, we calculate the final transformation matrix as follows:
void GlWidget::GetMatrixTransform(QMatrix4x4& matrixVertex,
                                 const Model3DEx& model)
{
   matrixVertex.setToIdentity();

   QMatrix4x4 matrixScaleScreen;
   double dimMin = static_cast<double>(qMin(width(), height()));
   float scaleScreenVert = static_cast<float>(dimMin /
       static_cast<double>(height()));
   float scaleScreenHorz = static_cast<float>(dimMin /
       static_cast<double>(width()));
   matrixScaleScreen.scale(scaleScreenHorz, scaleScreenVert, 1.0f);

   QMatrix4x4 matrixCenter;
   float centerX, centerY, centerZ;
   model.GetCenter(centerX, centerY, centerZ);
   matrixCenter.translate(-centerX, -centerY, -centerZ);

   QMatrix4x4 matrixScale;
   float radius = 1.0;
   model.GetRadius(radius);
   float scale = static_cast<float>(m_scaleCoeff / radius);
   matrixScale.scale(scale, scale, 0.5f / radius);

   QMatrix4x4 matrixTranslateScene;
   matrixTranslateScene.translate(0.0f, 0.0f, -0.5f);

   matrixVertex = matrixScaleScreen * matrixTranslateScene * matrixScale * m_matrixRotate * matrixCenter;
}
Conclusion
In this introduction to OpenGL 3D rendering, we explored one of the technologies that allow ud to utilize our video card to render a 3D model. This is much more efficient than using CPU cycles for the same purpose. We used a very simple shading technique, and made the scene interactive through the handling of user inputs from the mouse. We avoided using the video memory bus to pass data back-and-forth between the video memory and the program. Even though we just rendered a single line of text in 3D, more complicated scenes can be rendered in very similar ways.
To be fair, this tutorial has barely scratched the surface of 3D modeling and rendering. This is a vast topic, and this OpenGL tutorial can’t claim this is all you need to know to be able to build 3D games or modeling softwares. However, the purpose of this article is to give you a peek into this realm, and show how easily you can get started with OpenGL to build 3D applications.
Moscow, Russia
Member since September 20, 2014
About the author
Timofey has 14 years of experience in programming on C++/Windows platforms, over 4 years working with QT, and experience with SQL.