Going Real-Time with Redis Pub/Sub
Real-time applications have already started to dominate the landscape of the Internet. With modern frameworks and standardization of the necessary client-side features, building a real-time web application has become a breeze. However, such web applications still pose unique scalability challenges.
In this article, Toptal engineer Mahmud Ridwan explores the architecture of a simple real-time web application that works using Redis Pub/Sub and doesn’t compromise its horizontal scalability.

Mahmud is a software developer with many years of experience and a knack for efficiency, scalability, and stable solutions.
Scaling a web app is almost always an interesting challenge, regardless of the complexity involved. However, real-time web apps pose unique scalability issues. For example, to be able to horizontally scale a messaging web app that uses WebSockets to communicate with its clients, it will need to somehow synchronize all its server nodes. If the app wasn’t built ground up with this in mind, then scaling it horizontally may not be an easy option.
In this article, we will walk through the architecture of a simple real-time image sharing and messaging web app. Here, we will focus on the various components, such as Redis Pub/Sub, involved in building a real-time app and see how they all play their role in the overall architecture.
Functionality wise, the application is very light. It allows for the uploading of images and real time comments on those images. Furthermore, any user can tap on the image and other users will be able to see a rippling effect on their screen.
The entire source code of this app is available on GitHub.
Things We Need
Go
We will use the programming language Go. There is no special reason why we are choosing Go for this article, besides that Go’s syntax is clean and its semantics are easier to follow. And then there is of course author’s bias. However, all the concepts discussed in this article can easily be translated to the language of your choice.
Getting started with Go is easy. Its binary distribution can be downloaded from the offical site. In case you are on Windows, there is an MSI installer for Go on their download page. Or, in case your operating system (fortunately) offers a package manager:
Arch Linux:
pacman -S go
Ubuntu:
apt-get install golang
Mac OS X:
brew install go
This one will work only if we have Homebrew installed.
MongoDB
Why use MongoDB if we have Redis, you ask? As mentioned earlier, Redis is an in-memory data store. Although it can persist data to disk, using Redis for that purpose probably is not the best way to go. We will use MongoDB to store uploaded image metadata and messages.
We can download MongoDB from their official website. In some Linux distributions, this is the preferred way of installing MongoDB. It should still be installable using most distribution’s package manager nonetheless.
Arch Linux:
pacman -S mongodb
Ubuntu:
apt-get install mongodb
Mac OS X:
brew install mongodb
Within our Go code, we will use the package mgo (pronounced mango). Not only is it battle tested, the driver package offers a really clean and simple API.
If you are not a MongoDB expert, do not worry at all. The use of this database sevice is minimal in our sample app, and is almost irrelevant to the focus of this article: Pub/Sub architecture.
Amazon S3
We will be using Amazon S3 to store the user uploaded images. There is not much to do here, except make sure that we have an Amazon Web Services ready account and a temporary bucket created.
Storing the uploaded files to local disk is not an option because we do not want to rely on the identity of our web nodes in any way. We want the users to be able to connect to any of the available web nodes an still be able to see the same content.
To interact with the Amazon S3 bucket from our Go code, we will use AdRoll/goamz, a fork of Canonical’s goamz package with some differences.
Redis
Last, but not the least: Redis. We can install it using our distribution’s package manager:
Arch Linux:
pacman -S redis
Ubuntu:
apt-get install redis-server
Mac OS X:
brew install redis
Or, fetch its source code and compile it yourself. Redis has no dependencies other than GCC and libc for building it:
wget http://download.redis.io/redis-stable.tar.gz
tar xvzf redis-stable.tar.gz
cd redis-stable
make
Once Redis is installed and running, start a terminal and enter Redis’ CLI:
redis-cli
Try entering the following commands and see if you get the expected output:
SET answer 41
INCR answer
GET answer
The first command stores “41” against the key “answer”, the second command increments the value, the third command prints the value stored against the given key. It result should read “42”.
You can learn more about all the commands that Redis supports on their official website.
We will use the Go package redigo to connect to Redis from within our app code.
Peek at Redis Pub/Sub
The publish-subscribe pattern is a way of passing messages to an arbitrary number of senders. The senders of these messages (publishers) do not explicitly identify the targeted recipients. Instead, the messages are sent out on a channel on which any number of recipients (subscribers) can be waiting for them.
In our case, we can have any number of web nodes running behind a load balancer. At any given moment, two users looking at the same image may not be connected to the same node. This is where Redis Pub/Sub comes into play. Whenever a web node needs observes a change (for example a new message is created by the user), it will use Redis Pub/Sub to broadcast that information to all relevant web nodes. Which, in turn, will propagate the information to the relevant clients so that they may fetch the updated list of messagesredis.
Since the publish-subscribe pattern allows us to dispatch messages on named channels, we can have each web node connected to Redis, and subscribed to only those channels that their connected users are interested in. For example, if two users are both looking at the same image but are connected to two different web nodes out of many web nodes, then only those two web nodes need to subscribe to the corresponding channel. Any message published on that channel will be delivered to those two web nodes only.
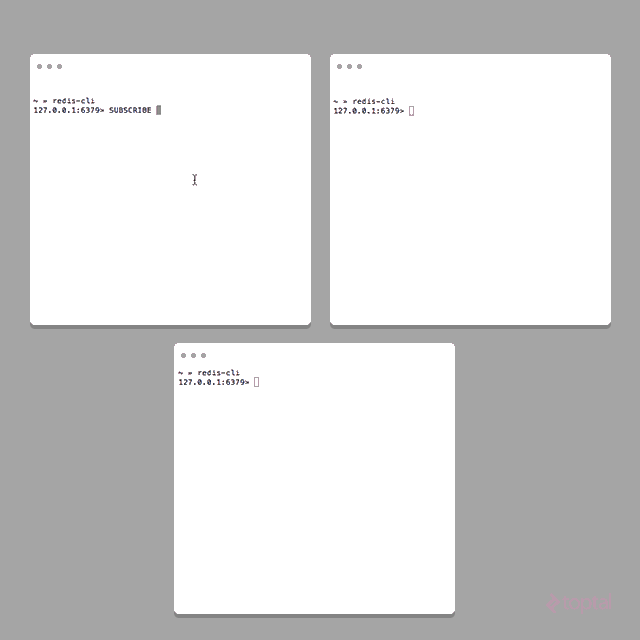
Sounds too good to be true? We can try it out using Redis’ CLI. Start three instances of redis-cli. Execute the following command in the first instance:
SUBSCRIBE somechannel
Execute the following command in the second Redis CLI instance:
SUBSCRIBE someotherchannel
Execute the following commands in the third instance of Redis CLI:
PUBLISH somechannel lorem
PUBLISH someotherchannel ipsum
Notice how the first instance received “lorem” but not “ipsum”, and how the second instance received “ipsum” but not “lorem”.
It is worth mentioning that once a Redis client enters the subscriber mode, it can no longer perform any operation other than subscribe to more channels or unsubscribe from the subscribed ones. This means that each web node will need to maintain two connections to Redis, one to connect to Redis as a subscriber and the other to publish messages on channels so that any web node subscribed to those channels can receive them.
Real-Time and Scalable
Before we start exploring what’s going on behind the scene, let us clone the repository:
mkdir tonesa
cd tonesa
export GOPATH=`pwd`
mkdir -p src/github.com/hjr265/tonesa
cd src/github.com/hjr265/tonesa
git clone https://github.com/hjr265/tonesa.git .
go get ./...
… and compile it:
go build ./cmd/tonesad
To run the app, first of all create a file named .env (preferably by copying the file env-sample.txt):
cp env-sample.txt .env
Fill out the .env file with all necessary environment variables:
MONGO_URL=mongodb://127.0.0.1/tonesa
REDIS_URL=redis://127.0.0.1
AWS_ACCESS_KEY_ID={Your-AWS-Access-Key-ID-Goes-Here}
AWS_SECRET_ACCESS_KEY={And-Your-AWS-Secret-Access-Key}
S3_BUCKET_NAME={And-S3-Bucket-Name}
Finally run the built binary:
PORT=9091 ./tonesad -env-file=.env
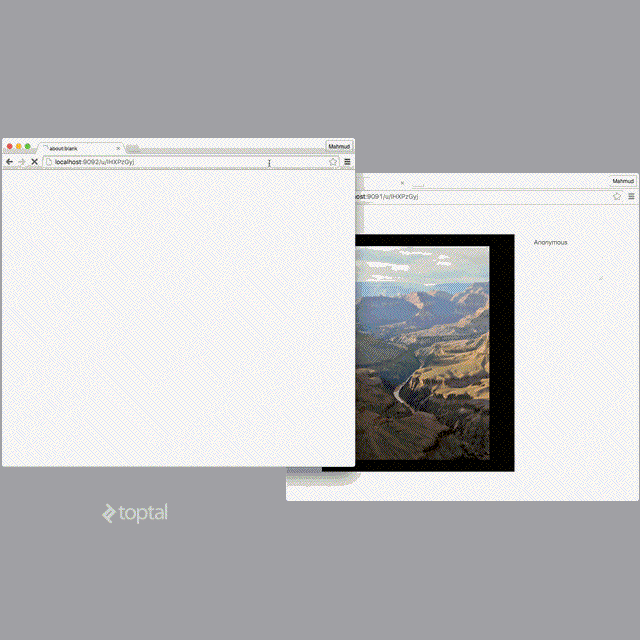
The web node should now be running and be accessible via http://localhost:9091.
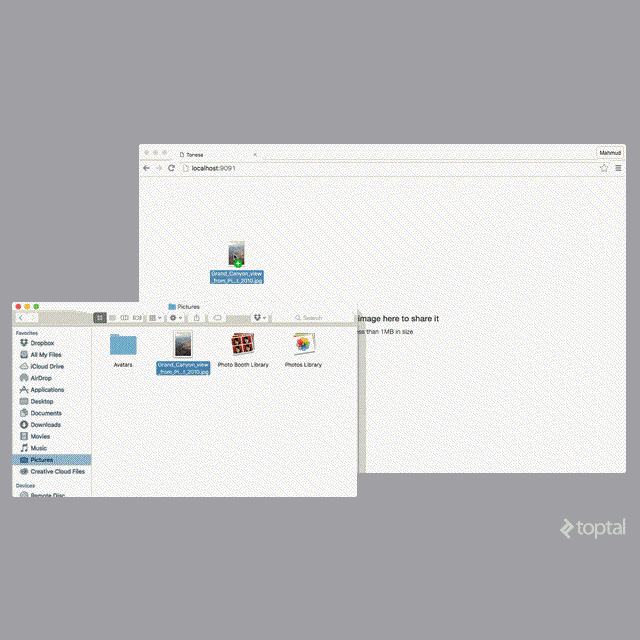
To test if it still works when scaled horizontally, you can spin up multiple web nodes by starting it with different port numbers:
PORT=9092 ./tonesad -env-file=.env
PORT=9093 ./tonesad -env-file=.env
… and accessing them via their corresponding URLs: http://localhost:9092 and http://localhost:9093.
Behind the Scenes
Instead of going through every step in the app’s development, we will focus on some of the most important parts. Although not all of these are 100% relevant to Redis Pub/Sub and its real-time implications, they are still relevant to the overall structure of the app and will make it easier to follow along once we dive deeper.
To keep things simple, we are not going to bother about user authentication. Uploads will be anonymous and available to everyone who knows the URL. All viewers can send messages, and will have the ability to pick their own alias. Adapting proper authentication mechanism and privacy capabilities should be trivial, and is beyond the scope of this article.
Persisting Data
This one is easy.
Whenever a user uploads an image, we store it in Amazon S3 and then store the path to it in MongoDB against two IDs: one BSON Object ID (MongoDB’s favorite), and another short 8 character long ID (somewhat pleasing to the eyes). This goes into our database’s “uploads” collection and has a structure like this:
type Upload struct {
	ID      bson.ObjectId `bson:"_id"`
	ShortID string        `bson:"shortID"`

	Kind Kind `bson:"kind"`

	Content Blob `bson:"content"`

	CreatedAt  time.Time `bson:"createdAt"`
	ModifiedAt time.Time `bson:"modifiedAt"`
}
type Blob struct {
	Path string `bson:"path"`
	Size int64  `bson:"size"`
}
The field Kind is used to indicate the kind of media this “upload” contains. Does this mean we support media other than images? Unfortunately no. But the field has been left there to act as a reminder that we are not necessarily limited to images here.
As users send messages to each other, they are stored in a different collection. Yes, you have guessed it: “messages”.
type Message struct {
	ID bson.ObjectId `bson:"_id"`

	UploadID bson.ObjectId `bson:"uploadID"`

	AuthorName string `bson:"anonName"`
	Content    string `bson:"content"`

	CreatedAt  time.Time `bson:"createdAt"`
	ModifiedAt time.Time `bson:"modifiedAt"`
}
The only interesting bit here is the UploadID field, which is used to associate messages to a particular upload.
API Endpoints
This application essentially has three endpoints.
POST /api/uploads
The handler for this endpoint expects a “multipart/form-data” submission with the image in the “file” field. The behavior of the handler is roughly as follows:
func HandleUploadCreate(w http.ResponseWriter, r *http.Request) {
	f, h, _ := r.FormFile("file")

	b := bytes.Buffer{}
	n, _ := io.Copy(&b, io.LimitReader(f, data.MaxUploadContentSize+10))
	if n > data.MaxUploadContentSize {
		ServeBadRequest(w, r)
		return
	}

	id := bson.NewObjectId()
	upl := data.Upload{
		ID:   id,
		Kind: data.Image,
		Content: data.Blob{
			Path: "/uploads/" + id.Hex(),
			Size: n,
		},
	}

	data.Bucket.Put(upl.Content.Path, b.Bytes(), h.Header.Get("Content-Type"), s3.Private, s3.Options{})

	upl.Put()

	// Respond with newly created upload entity (JSON encoded)
}
Go requires all errors to be handled explicitly. This has been done in the prototype, but is omitted from the snippets in this article to keep the focus on the critical parts.
In the handler of this API endpoint, we are essentially reading the file but limiting its size to a specific value. If the upload exceeds this value, the request is rejected. Otherwise, a BSON ID is generated and used to upload the image to Amazon S3 before persisting the upload entity to MongoDB.
There is a pro and a con to the way BSON Object IDs are generated. They are generated on the client end. However the strategy used to generated Object ID makes the probability of collision so miniscule that it is safe to generate them on client side. On the other hand, values of generated Object IDs are usually sequential and that is something Amazon S3 is not quite fond of. An easy workaround to this is to prefix the filename with a random string.
GET /api/uploads/{id}/messages
This API is used to fetch recent messages, and messages that have been posted after a particular time.
func ServeMessageList(w http.ResponseWriter, r *http.Request) {
	vars := mux.Vars(r)
	idStr := vars["id"]
	if !bson.IsObjectIdHex(idStr) {
		ServeNotFound(w, r)
		return
	}
	upl, _ := data.GetUpload(bson.ObjectIdHex(idStr))
	if upl == nil {
		ServeNotFound(w, r)
		return
	}

	sinceStr := r.URL.Query().Get("since")

	var msgs []data.Message
	if sinceStr != "" {
		since, _ := time.Parse(time.RFC3339, sinceStr)

		msgs, _ = data.ListMessagesByUploadID(upl.ID, since, 16)

	} else {
		msgs, _ = data.ListRecentMessagesByUploadID(upl.ID, 16)
	}

	// Respond with message entities (JSON encoded)
}
When a user’s browser is notified about a new message on an upload that the user is currently looking at, it fetches the new messages using this endpoint.
POST /api/uploads/{id}/messages
And finally the handler that creates messages and notifies everyone:
func HandleMessageCreate(w http.ResponseWriter, r *http.Request) {
	vars := mux.Vars(r)
	idStr := vars["id"]
	if !bson.IsObjectIdHex(idStr) {
		ServeNotFound(w, r)
		return
	}
	upl, _ := data.GetUpload(bson.ObjectIdHex(idStr))
	if upl == nil {
		ServeNotFound(w, r)
		return
	}

	body := Message{}
	json.NewDecoder(r.Body).Decode(&body)

	msg := data.Message{}
	msg.UploadID = upl.ID
	msg.AuthorName = body.AuthorName
	msg.Content = body.Content
	msg.Put()

	// Respond with newly created message entity (JSON encoded)

	hub.Emit("upload:"+upl.ID.Hex(), "message:"+msg.ID.Hex())
}
This handler is so similar to the other ones that it is almost boring to even include it here. Or is it? Notice how there is a function call hub.Emit() at the very end of the function. What is hub you say? That is where all the Pub/Sub magic happens.
Hub: Where WebSockets Meet Redis
Hub is where we glue WebSockets with Redis’ Pub/Sub channels. And, coincidentally the package that we are using to handle WebSockets within our web servers is called glue.
Hub essentially maintains a few data structures that create a mapping between all connected WebSockets to all the channels that they are interested in. For example, a WebSocket on the user’s browser tab pointed to a particular uploaded image should naturally be interested in all the notifications relevant to it.
The hub package implements six functions:
- Subscribe
- UnsubscribeAll
- Emit
- EmitLocal
- InitHub
- HandleSocket
Subscribe and UnsubscribeAll
func Subscribe(s *glue.Socket, t string) error {
	l.Lock()
	defer l.Unlock()

	_, ok := sockets[s]
	if !ok {
		sockets[s] = map[string]bool{}
	}
	sockets[s][t] = true

	_, ok = topics[t]
	if !ok {
		topics[t] = map[*glue.Socket]bool{}
		err := subconn.Subscribe(t)
		if err != nil {
			return err
		}
	}
	topics[t][s] = true

	return nil
}
This function, just like most of the other ones in this package, holds a lock on a read/write mutex while it is executing. This is so that we can safely modify the primitive data structures variables sockets and topics. The first variable, sockets, maps sockets to channel names, while the second one, topics, maps channel names to sockets. In this function we build these mapping. Whenever we see socket subscribe to a new channel name, we make our Redis connection, subconn, subscribe to that channel on Redis using subconn.Subscribe. This makes Redis forward all notifications on that channel to this web node.
And, likewise, in the UnsubscribeAll function, we tear the mapping down:
func UnsubscribeAll(s *glue.Socket) error {
	l.Lock()
	defer l.Unlock()

	for t := range sockets[s] {
		delete(topics[t], s)
		if len(topics[t]) == 0 {
			delete(topics, t)
			err := subconn.Unsubscribe(t)
			if err != nil {
				return err
			}
		}
	}
	delete(sockets, s)

	return nil
}
When we remove the last socket from the data structure interested in a particular channel, we unsubscribe from the channel in Redis using subconn.Unsubscribe.
Emit
func Emit(t string, m string) error {
	_, err := pubconn.Do("PUBLISH", t, m)
	return err
}
This function publishes a message m on channel t using the publish connection to Redis.
EmitLocal
func EmitLocal(t string, m string) {
	l.RLock()
	defer l.RUnlock()

	for s := range topics[t] {
		s.Write(m)
	}
}
InitHub
func InitHub(url string) error {
	c, _ := redis.DialURL(url)
	pubconn = c

	c, _ = redis.DialURL(url)
	subconn = redis.PubSubConn{c}

	go func() {
		for {
			switch v := subconn.Receive().(type) {
			case redis.Message:
				EmitLocal(v.Channel, string(v.Data))

			case error:
				panic(v)
			}
		}
	}()

	return nil
}
In InitHub function, we are creating two connections to Redis: one for subscribing to the channels that this web node is interested in, and the other to publish messages. Once the connections are established, we start a new Go routine with a loop running forever waiting to receive messages through the subscriber connection to Redis. Every time it receives a message, it emits it locally (i.e. to all WebSockets connected to this web node).
HandleSocket
And finally, HandleSocket is where we wait for messages to come through WebSockets or clean up after the connection closes:
func HandleSocket(s *glue.Socket) {
	s.OnClose(func() {
		UnsubscribeAll(s)
	})

	s.OnRead(func(data string) {
		fields := strings.Fields(data)
		if len(fields) == 0 {
			return
		}
		switch fields[0] {
		case "watch":
			if len(fields) != 2 {
				return
			}
			Subscribe(s, fields[1])

		case "touch":
			if len(fields) != 4 {
				return
			}
			Emit(fields[1], "touch:"+fields[2]+","+fields[3])
		}
	})
}
Front-End JavaScript
Since glue comes with its own front-end JavaScript library, it is much easier to handle WebSockets (or fallback to XHR polling when WebSockets are unavailable):
var socket = glue()
socket.onMessage(function(data) {
	data = data.split(':')
	switch(data[0]) {
		case 'message':
			messages.fetch({
				data: {
					since: _.first(messages.pluck('createdAt')) || ''
				},
				add: true,
				remove: false
			})
			break

		case 'touch':
			var coords = data[1].split(',')
			showTouchBubble(coords)
			break
	}
})
socket.send('watch upload:'+upload.id)
On the client side, we are listening for any message coming in through WebSocket. Since glue transmits all messages as strings, we encode all information in it using specfic patterns:
- New message: “message:{messageID}”
- Click on image: “touch:{coordX},{coordY}”, where coordX and coordY are the percentage based coordinate of the user’s click location on the image
When the user creates a new message, we use the “POST /api/uploads/{uploadID}/messages” API to create a new message. This is done using the create method on the backbone collection for messages:
messages.create({
	authorName: $messageAuthorNameEl.val(),
	content: $messageContentEl.val(),
	createdAt: ''
}, {
	at: 0
})
When the user clicks on the image, we compute the position of the click in percentage of the image’s width and height and send the information through the WebSocket directly.
socket.send('touch upload:'+upload.id+' '+(event.pageX - offset.left) / $contentImgEl.width()+' '+(event.pageY - offset.top) / $contentImgEl.height())
The Overview

When the user types in a message and hits the enter key, the client invokes the “POST /api/uploads/{id}/messages” API endpoint. This in turn creates a message entity in the database and publishes a string “message:{messageID}” via Redis Pub/Sub on channel “upload:{uploadID}” through the hub package.
Redis forwards this string to every web node (subscriber) interested on channel “upload:{uploadID}”. Web nodes receiving this string iterate over all the WebSockets relevant to the channel and sends the string to the client via their WebSocket connections. Clients receiving this string begin to fetch new messages from the server using the “GET /api/uploads/{id}/messages”.
Similarly, for propagating click events on the image, the client directly sends a message through the WebSocket that looks something like “touch upload:{uploadID} {coordX} {coordY}”. This message ends up in the hub package where it is published on the channel same channel “upload:{uploadID}”. As a result, the string gets distributed to all the users looking at the uploaded image. The client, upon receiving this string parses it to extract the coordinates and renders a growing-fading circle to highlight the click location momentarily.
Wrap Up
In this article we have seen a glimpse of how the publish-subscribe pattern can help solve the problem of scaling real-time web apps to a great extent and with relative ease.
The sample app exists to serve as a playground for experimenting with Redis Pub/Sub. But, as mentioned earlier, the ideas can be implemented in almost any other popular programming language.
Dhaka, Dhaka Division, Bangladesh
Member since January 16, 2014
About the author
Mahmud is a software developer with many years of experience and a knack for efficiency, scalability, and stable solutions.