
How to Build a Role-based API with Firebase Authentication
Nearly every app requires an authorization system on top of an authentication system. We often need a fine-grained permissions model to allow only specific users to access certain resources while simultaneously restricting access for everyone else.
In this tutorial, Toptal Freelance Firebase Developer Joaquin Cid teaches how to build just such a system. Called role-based authentication, we’ll learn how to implement this system in an API using Node.js and Firebase.

Joaquin is a full-stack developer with over 12 years of experience working for companies like WebMD and Getty Images.
Previously At

In this tutorial, we’ll build a Node.js app that leverages the Firebase Auth REST API to manage users and roles. In addition, we’ll see how to use the API to authorize (or not) which users can access specific resources.
Introduction
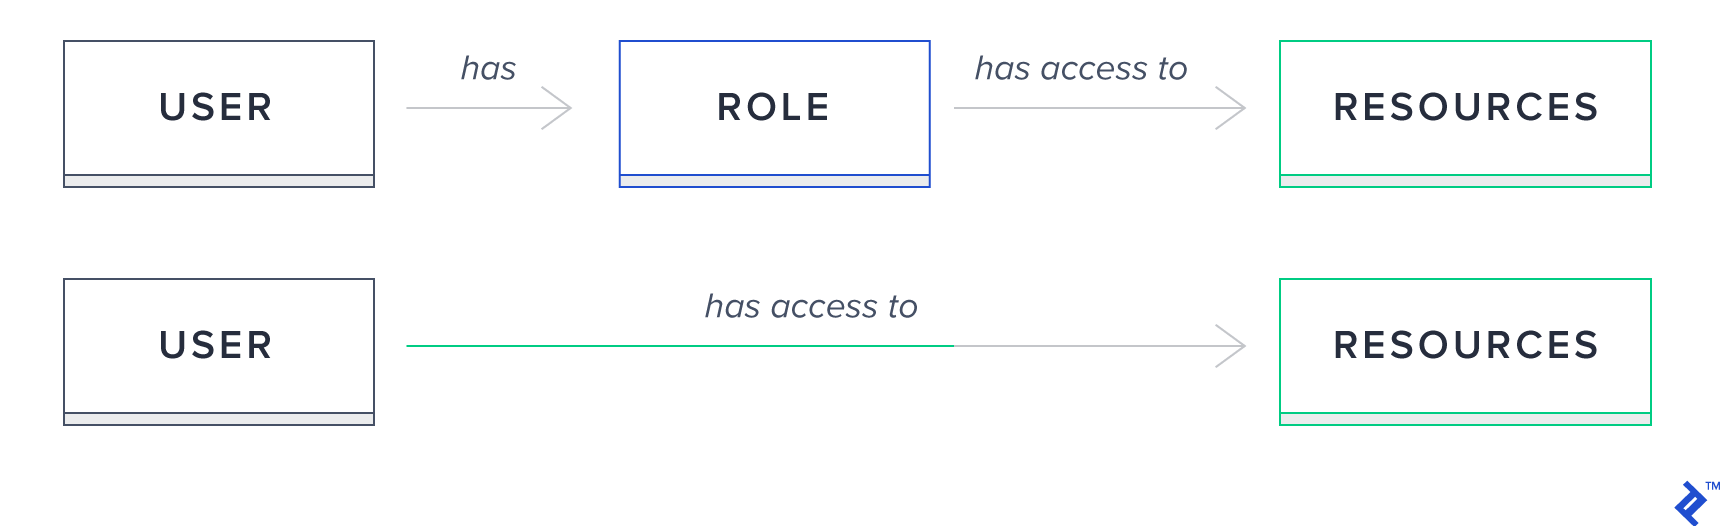
Almost every app requires some level of authorization system. In some cases, validating a username/password set with our Users table is enough, but often, we need a more fine-grained permissions model to allow certain users to access certain resources and restrict them from others. Building a system to support the latter is not trivial and can be very time-consuming. In this tutorial, we’ll learn how to build a role-based auth API using Firebase, which will help us get quickly up and running.
Role-based Auth
In this authorization model, access is granted to roles, instead of specific users, and a user can have one or more depending on how you design your permission model. Resources, on the other hand, require certain roles to allow a user to execute it.
Firebase Authentication
In a nutshell, Firebase Authentication is an extensible token-based auth system and provides out-of-the-box integrations with the most common providers such as Google, Facebook, and Twitter, among others.
It enables us to use custom claims which we’ll leverage to build a flexible role-based API. These claims can be thought of as Firebase user roles that will map directly to the role supported by our app.
We can set any JSON value into the claims (e.g., { role: 'admin' } or { role: 'manager' }).
Once set, custom claims will be included in the generated Firebase token, and we can read the value to control access.
It also comes with a very generous free quota, which in most cases will be more than enough.
Cloud Functions for Firebase
Functions are a fully-managed serverless platform service. We just need to write our code in Node.js and deploy it. Firebase takes care of scaling the infrastructure on demand, server configuration, and more. In our case, we’ll use it to build our API and expose it via HTTP to the web. Cloud Functions v2 also improves concurrency and scaling behavior compared to the original API, allowing applications to handle more requests efficiently with lower cold-start overhead.
Firebase allows us to set express.js apps as HTTP handlers for different paths—for example, you can create an Express app and hook it to /mypath, and all requests coming to this route will be handled by the app configured.
From within the context of a function, you have access to the whole Firebase Authentication API, using the Admin SDK.
This is how we’ll create the user API.
What We’ll Build
So before we get started, let’s take a look at what we’ll build. We are going to create a REST API with the following endpoints:
HTTP Verb | Path | Description | Authorization |
GET | /users | Lists all users | Only admins and managers have access |
POST | /users | Creates new user | Only admins and managers have access |
GET | /users/:id | Gets the :id user | Admins, managers, and the same user as :id have access |
PATCH | /users/:id | Updates the :id user | Admins, managers, and the same user as :id have access |
DELETE | /users/:id | Deletes the :id user | Admins, managers, and the same user as :id have access |
Each of these endpoints will handle authentication, validate authorization, perform the corresponding operation, and finally return a meaningful HTTP code.
We’ll create the authentication and authorization functions required to validate the token and check if the claims contain the required role to execute the operation.
Building the API
In order to build the API, we’ll need:
- A Firebase project
-
firebase-toolsinstalled
First, log in to Firebase:
firebase login
Next, initialize a Functions project:
firebase init

? Which Firebase CLI features do you want to set up for this folder? ...
(O) Functions: Configure and deploy Cloud Functions

? Select a default Firebase project for this directory: {your-project}

? What language would you like to use to write Cloud Functions? TypeScript

? Do you want to use ESLint to catch probable bugs and enforce style? Yes

? Do you want to install dependencies with npm now? Yes
At this point, you will have a Functions folder with the minimum setup required to create Cloud Functions.
At src/index.ts there’s a helloWorld example, which you can uncomment to validate that your function works. Then you can cd functions and run npm run serve. This command will transpile the code and start the local server.
You can check the results at http://127.0.0.1:5001/{your-project}/us-central1/helloWorld
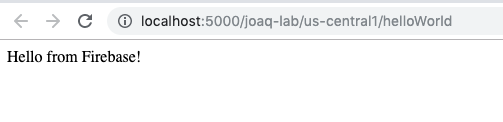
Notice the function is exposed on the path defined as the name of it at 'index.ts: 'helloWorld'.
Creating a Firebase HTTP Function
Now let’s code our API. We are going to create an HTTP Firebase function and hook it on /api path.
First, install npm install express.
On the src/index.ts we will:
- Initialize the firebase-admin SDK module with
admin.initializeApp(); - Set an Express app as the handler of our
apihttps endpoint
import * as admin from 'firebase-admin';
import * as express from 'express';
import { onRequest } from 'firebase-functions/v2/https';

admin.initializeApp();

const app = express();

export const api = onRequest(app);
Now, all requests going to /api will be handled by the app instance.
The next thing we’ll do is configure the app instance to support CORS and parse JSON-formatted requests. This way we can make requests from any URL and handle JSON request bodies without adding a separate body parser dependency.
We’ll first install the required dependency.
npm install --save cors


npm install --save-dev @types/cors
And then:
//...
import * as cors from 'cors';
import * as admin from 'firebase-admin';
import * as express from 'express';
import { onRequest } from 'firebase-functions/v2/https';

import { routesConfig } from './users/routes-config';

admin.initializeApp();

const app = express();

app.use(express.json());
app.use(cors({ origin: true }));

routesConfig(app);

export const api = onRequest(app);
Cloud Functions for Firebase allows us to set an Express app as the handler, and any path after the one you set up at onRequest(app);—in this case, api—will also be handled by the app. This allows us to write specific endpoints such as api/users and set a handler for each HTTP verb, which we’ll do next.
Let’s create the file src/users/routes-config.ts
Here, we’ll set a create handler at POST '/users'
import { Application } from "express";
import { create} from "./controller";

export function routesConfig(app: Application) {
   app.post('/users',
       create
   );
}
Now, we’ll create the src/users/controller.ts file.
In this function, we first validate that all fields are in the body request, and next, we create the user and set the custom claims.
We are just passing { role } in the setCustomUserClaims—the other fields are already set by Firebase.
If no errors occur, we return a 201 code with the uid of the user created.
import { Request, Response } from "express";
import * as admin from 'firebase-admin'

export async function create(req: Request, res: Response) {
   try {
       const { displayName, password, email, role } = req.body

       if (!displayName || !password || !email || !role) {
           return res.status(400).send({ message: 'Missing fields' })
       }

       const { uid } = await admin.auth().createUser({
           displayName,
           password,
           email
       })
       await admin.auth().setCustomUserClaims(uid, { role })

       return res.status(201).send({ uid })
   } catch (err) {
       return handleError(res, err)
   }
}

function handleError(res: Response, err: any) {
   return res.status(500).send({ message: `${err.code} - ${err.message}` });
}
Now, let’s secure the handler by adding authorization. To do that, we’ll add a couple of handlers to our create endpoint. With express.js, you can set a chain of handlers that will be executed in order. Within a handler, you can execute code and pass it to the next() handler or return a response. What we’ll do is first authenticate the user and then validate if it is authorized to execute.
On file src/users/routes-config.ts:
//...
import { isAuthenticated } from "../auth/authenticated";
import { isAuthorized } from "../auth/authorized";

export function routesConfig(app: Application) {
   app.post('/users',
       isAuthenticated,
       isAuthorized({ hasRole: ['admin', 'manager'] }),
       create
   );
}
Let’s create the file src/auth/authenticated.ts.
On this function, we’ll validate the presence of the authorization bearer token in the request header. Then we’ll decode it with admin.auth().verifyIdToken() and persist the user’s uid, role, and email in the res.locals variable, which we’ll later use to validate authorization.
In the case the token is invalid, we return a 401 response to the client:
import { Request, Response } from "express";
import * as admin from 'firebase-admin'

export async function isAuthenticated(req: Request, res: Response, next: Function) {
   const { authorization } = req.headers

   if (!authorization)
       return res.status(401).send({ message: 'Unauthorized' });

   if (!authorization.startsWith('Bearer'))
       return res.status(401).send({ message: 'Unauthorized' });

   const split = authorization.split('Bearer ')
   if (split.length !== 2)
       return res.status(401).send({ message: 'Unauthorized' });

   const token = split[1]

   try {
       const decodedToken: admin.auth.DecodedIdToken = await admin.auth().verifyIdToken(token);
       console.log("decodedToken", JSON.stringify(decodedToken))
       res.locals = { ...res.locals, uid: decodedToken.uid, role: decodedToken.role, email: decodedToken.email }
       return next();
   }
   catch (err) {
       console.error(`${err.code} -  ${err.message}`)
       return res.status(401).send({ message: 'Unauthorized' });
   }
}
Now, let’s create a src/auth/authorized.ts file.
In this handler, we extract the user’s info from res.locals we set previously and validate if it has the role required to execute the operation or in the case the operation allows the same user to execute, we validate that the ID on the request params is the same as the one in the auth token. If the user doesn’t have the required role, we’ll return a 403.
import { Request, Response } from "express";

export function isAuthorized(opts: { hasRole: Array<'admin' | 'manager' | 'user'>, allowSameUser?: boolean }) {
   return (req: Request, res: Response, next: Function) => {
       const { role, uid } = res.locals
       const { id } = req.params

       if (opts.allowSameUser && id && uid === id)
           return next();

       if (!role)
           return res.status(403).send();

       if (opts.hasRole.includes(role))
           return next();

       return res.status(403).send();
   }
}
With these two methods, we’ll be able to authenticate requests and authorize them given the role in the incoming token. That’s great, but since Firebase doesn’t provide a point-and-click interface in the project console for setting custom claims, we won’t be able to execute any of these endpoints until at least one privileged user exists.
For local development or an initial bootstrap step, you can create a privileged user in the Firebase Authentication Console.
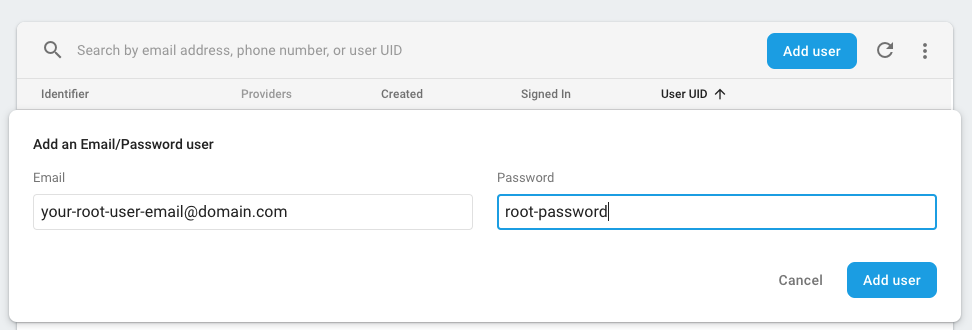
In production applications, avoid hardcoding privileged identifiers directly in source code. A more robust approach is to use environment configuration or dedicated admin custom claims. This type of bootstrap access should only be used temporarily during setup. Once the initial admin user has been provisioned, remove the check or unset the environment variable.
We can then check the configured root user ID in the authorization middleware to allow privileged operations.
//...
  const { role, uid } = res.locals;
  const { id } = req.params;

  if (process.env.ROOT_UID === uid)
    return next();
//...
Now, let’s add the rest of the CRUD operations to src/users/routes-config.ts.
For operations to get or update a single user where :id param is sent, we also allow the same user to execute the operation.
export function routesConfig(app: Application) {
   //..
   // lists all users
   app.get('/users', [
       isAuthenticated,
       isAuthorized({ hasRole: ['admin', 'manager'] }),
       all
   ]);
   // get :id user
   app.get('/users/:id', [
       isAuthenticated,
       isAuthorized({ hasRole: ['admin', 'manager'], allowSameUser: true }),
       get
   ]);
   // updates :id user
   app.patch('/users/:id', [
       isAuthenticated,
       isAuthorized({ hasRole: ['admin', 'manager'], allowSameUser: true }),
       patch
   ]);
   // deletes :id user
   app.delete('/users/:id', [
       isAuthenticated,
       isAuthorized({ hasRole: ['admin', 'manager'] }),
       remove
   ]);
}
And on src/users/controller.ts. In these operations, we leverage the admin SDK to interact with Firebase Authentication and perform the respective operations. As we did previously on create operation, we return a meaningful HTTP code on each operation.
For the update operation, we validate all fields present and override customClaims with those sent in the request:
//..

export async function all(req: Request, res: Response) {
    try {
        const listUsers = await admin.auth().listUsers()
        const users = listUsers.users.map(mapUser)
        return res.status(200).send({ users })
    } catch (err) {
        return handleError(res, err)
    }
}

function mapUser(user: admin.auth.UserRecord) {
    const customClaims = (user.customClaims || { role: '' }) as { role?: string }
    const role = customClaims.role ? customClaims.role : ''
    return {
        uid: user.uid,
        email: user.email || '',
        displayName: user.displayName || '',
        role,
        lastSignInTime: user.metadata.lastSignInTime,
        creationTime: user.metadata.creationTime
    }
}

export async function get(req: Request, res: Response) {
   try {
       const { id } = req.params
       const user = await admin.auth().getUser(id)
       return res.status(200).send({ user: mapUser(user) })
   } catch (err) {
       return handleError(res, err)
   }
}

export async function patch(req: Request, res: Response) {
   try {
       const { id } = req.params
       const { displayName, password, email, role } = req.body

       if (!id || !displayName || !password || !email || !role) {
           return res.status(400).send({ message: 'Missing fields' })
       }

       await admin.auth().updateUser(id, { displayName, password, email })
       await admin.auth().setCustomUserClaims(id, { role })
       const user = await admin.auth().getUser(id)

       return res.status(200).send({ user: mapUser(user) })
   } catch (err) {
       return handleError(res, err)
   }
}

export async function remove(req: Request, res: Response) {
   try {
       const { id } = req.params
       await admin.auth().deleteUser(id)
       return res.status(204).send()
   } catch (err) {
       return handleError(res, err)
   }
}

//...
For simplicity, this example retrieves a single page of users (a maximum of 1,000 users per call). In production applications with large user bases, you’ll likely want to paginate results using Firebase Auth page tokens.
Now we can run the function locally. To do that, first you need to set up the account key to be able to connect with the auth API locally. Then run:
npm run serve
Deploy the API
Great! Now that we have written the application using Firebase’s role-based authentication API, we can deploy it to the web and start using it. Deploying with Firebase is super easy, we just need to run firebase deploy. Once the deploy is completed, we can access our API at the published URL.
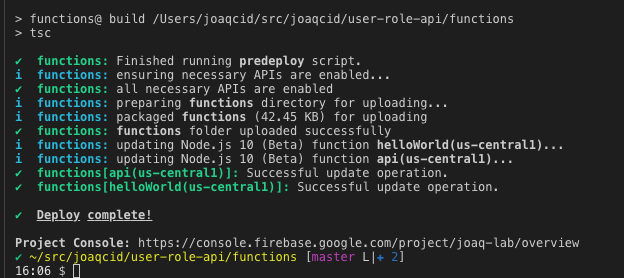
You can check the API URL at https://console.firebase.google.com/u/0/project/{your-project}/functions/list.

In my case, it is [https://us-central1-joaq-lab.cloudfunctions.net/api].
Consuming the API
Once our API is deployed, we have several ways to use it—in this tutorial, I’ll cover how to use it via Postman or from an Angular app.
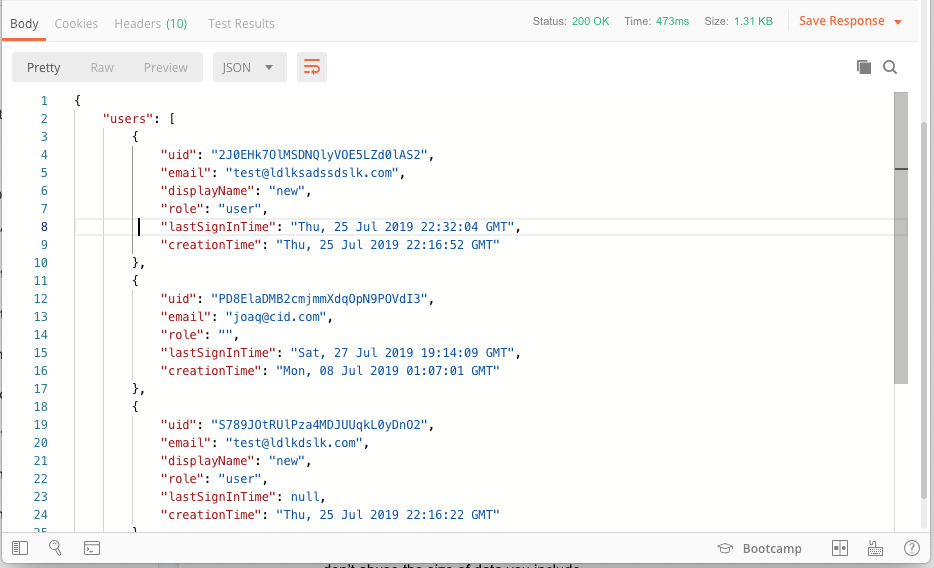
If we enter the List All Users URL (/api/users) on any browser, we’ll get the following:
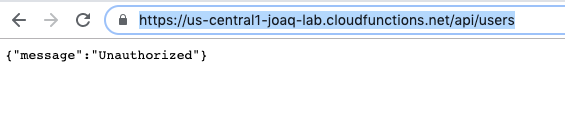
The reason for this is when sending the request from a browser, we are performing a GET request without auth headers. This means our API is actually working as expected!
Our API is secured via tokens—in order to generate such a token, we need to call Firebase’s Client SDK and log in with a valid user/password credential. When successful, Firebase will send a token back in the response which we can then add to the header of any following request we want to perform.
From an Angular App
This example uses a traditional NgModule-based Angular structure, but the same AngularFire Auth calls can also be used in standalone Angular applications. In this tutorial, I’ll just go over the important pieces to consume the API from an Angular app. The full repository can be accessed here.
So, back to signing in, we’ll have a SignInComponent with a <form> to let the user enter a username and password.
//...

<form [formGroup]="form">
   <div class="form-group">
     <label>Email address</label>
     <input type="email"
            formControlName="email"
            class="form-control"
            placeholder="Enter email">
   </div>
   <div class="form-group">
     <label>Password</label>
     <input type="password"
            formControlName="password"
            class="form-control"
            placeholder="Password">
   </div>
 </form>
And on the class, we call signInWithEmailAndPassword using the AngularFire Auth integration with the modular Firebase SDK.
//...

import { Auth, signInWithEmailAndPassword } from '@angular/fire/auth';

//...

form: FormGroup = new FormGroup({
  email: new FormControl(''),
  password: new FormControl('')
});

constructor(
  private auth: Auth
) { }

async signIn() {
  try {
    const { email, password } = this.form.value;
    await signInWithEmailAndPassword(this.auth, email, password);
  } catch (err) {
    console.error(err);
  }
}

//...
At this point, we can sign in to our Firebase project.
![Signing in through the Angular app]](https://bs-uploads.toptal.io/blackfish-uploads/public_files/unnamed-597689b2467db96ec035309334296b78.gif)

And when we inspect the network requests in the DevTools, we can see that Firebase returns a token after verifying our user and password.
This token is the one we will use to send on our header’s request to the API we’ve built. One way to add the token to all requests is using an HttpInterceptor.
This file shows how to retrieve the Firebase auth token using the modular AngularFire SDK and add it to the request headers. We then provide the interceptor file in the AppModule.
http-interceptors/auth-token.interceptor.ts
import { Auth, idToken } from '@angular/fire/auth';

@Injectable({ providedIn: 'root' })
export class AuthTokenHttpInterceptor implements HttpInterceptor {

   constructor(
       private auth: Auth
   ) {

   }

   intercept(req: HttpRequest<any>, next: HttpHandler): Observable<HttpEvent<any>> {
       return idToken(this.auth).pipe(
           take(1),
           switchMap(token => {
               let clone = req.clone();

               if (token) {
                   clone = clone.clone({
                       headers: req.headers.set('Authorization', 'Bearer ' + token)
                   });
               }

               return next.handle(clone);
           })
       );

   }
}

export const AuthTokenHttpInterceptorProvider = {
   provide: HTTP_INTERCEPTORS,
   useClass: AuthTokenHttpInterceptor,
   multi: true
};
app.module.ts
@NgModule({
 //..
 providers: [
   AuthTokenHttpInterceptorProvider
 ]
 //...
})
export class AppModule { }
Once the interceptor is set, we can make requests to our API from HttpClient. For example, here’s a UsersService where we call the list all users, get the user by its ID, create a user, and update a user.
//…

export type CreateUserRequest = { displayName: string, password: string, email: string, role: string }
export type UpdateUserRequest = { uid: string } & CreateUserRequest

@Injectable({
 providedIn: 'root'
})
export class UserService {

 private baseUrl = '{your-functions-url}/api/users'

 constructor(
   private http: HttpClient
 ) { }
  get users$(): Observable<User[]> {
   return this.http.get<{ users: User[] }>(`${this.baseUrl}`).pipe(
     map(result => {
       return result.users
     })
   )
 }

 user$(id: string): Observable<User> {
   return this.http.get<{ user: User }>(`${this.baseUrl}/${id}`).pipe(
     map(result => {
       return result.user
     })
   )
 }

 create(user: CreateUserRequest) {
   return this.http.post(`${this.baseUrl}`, user)
 }

 edit(user: UpdateUserRequest) {
   return this.http.patch(`${this.baseUrl}/${user.uid}`, user)
 }

}
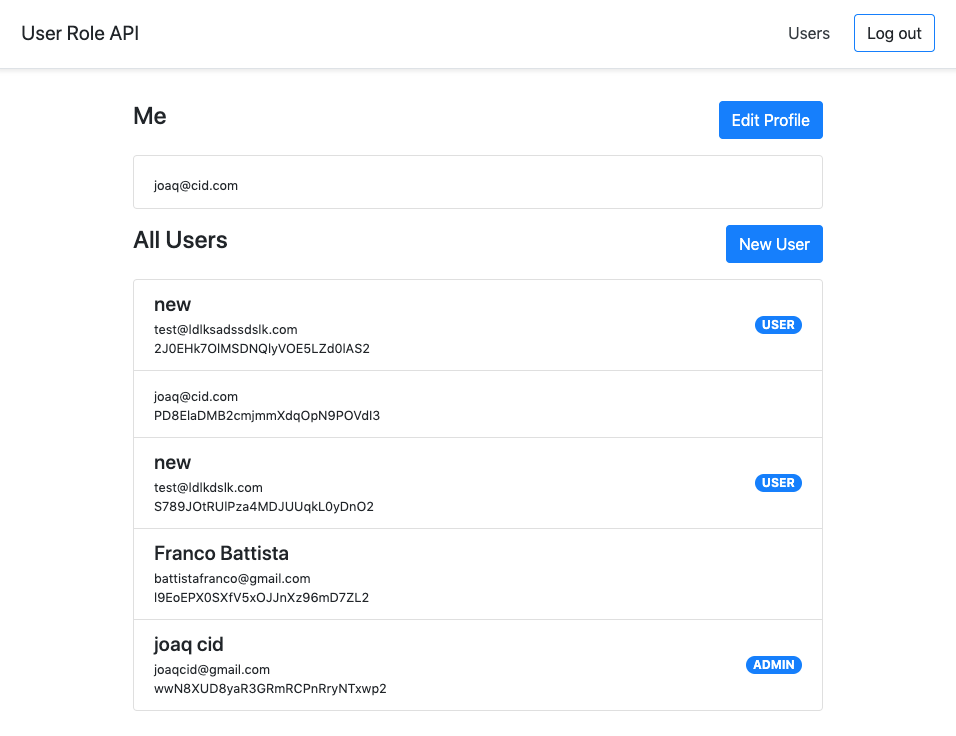
Now, we can call the API to get the logged-in user by its ID and list all users from a component like this:
//...

  <div *ngIf="user$ | async; let user"
       class="col-12">
    <div class="d-flex justify-content-between my-3">
      <h4> Me </h4>
    </div>

    <ul class="list-group">
      <li class="list-group-item d-flex justify-content-between align-items-center">
        <div>
          <h5 class="mb-1">{{user.displayName}}</h5>
          <small>{{user.email}}</small>
        </div>
        <span class="badge badge-primary badge-pill">{{user.role?.toUpperCase()}}</span>
      </li>
    </ul>
  </div>

  <div class="col-12">
    <div class="d-flex justify-content-between my-3">
      <h4> All Users </h4>
    </div>

    <ul *ngIf="users$ | async; let users"
        class="list-group">
      <li *ngFor="let user of users"
          class="list-group-item d-flex justify-content-between align-items-center">
        <div>
          <h5 class="mb-1">{{user.displayName}}</h5>
          <small class="d-block">{{user.email}}</small>
          <small class="d-block">{{user.uid}}</small>
        </div>
        <span class="badge badge-primary badge-pill">{{user.role?.toUpperCase()}}</span>
      </li>
    </ul>

//...
//...

import { Auth, user } from '@angular/fire/auth';

//...

users$: Observable<User[]>;
user$: Observable<User>;

constructor(
  private userService: UserService,
  private userForm: UserFormService,
  private modal: NgbModal,
  private auth: Auth
) { }

ngOnInit() {
  this.users$ = this.userService.users$;

  this.user$ = user(this.auth).pipe(
    filter(currentUser => !!currentUser),
    switchMap(currentUser => this.userService.user$(currentUser.uid))
  );
}

//...
And here’s the result.
Notice that if we sign in with a user with role=user, only the Me section will be rendered.
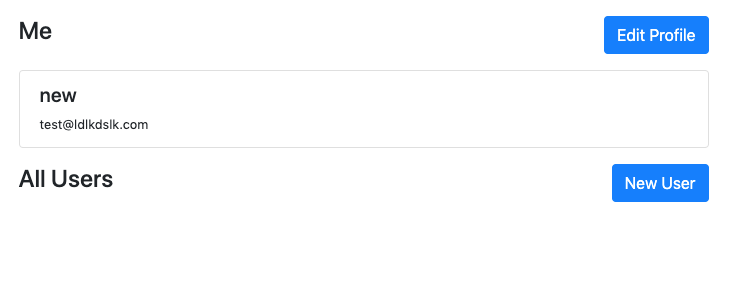
And we’ll get a 403 on the network inspector. This is due to the restriction we set before on the API to only allow “Admins” to list all users.

Now, let’s add the “create user” and “edit user” functionality. In order to do that, let’s create first a UserFormComponent and a UserFormService.
<ng-container *ngIf="user$ | async"></ng-container>
<div class="modal-header">
<h4 class="modal-title"
id="modal-title">{{ title$ | async}}</h4>
<button type="button"
class="close"
aria-describedby="modal-title"
(click)="dismiss()">
<span aria-hidden="true">×</span>
</button>
</div>
<div class="modal-body">
<form [formGroup]="form"
(ngSubmit)="save()">
<div class="form-group">
<label>Email address</label>
<input type="email"
formControlName="email"
class="form-control"
placeholder="Enter email">
</div>
<div class="form-group">
<label>Password</label>
<input type="password"
formControlName="password"
class="form-control"
placeholder="Password">
</div>
<div class="form-group">
<label>Display Name</label>
<input type="string"
formControlName="displayName"
class="form-control"
placeholder="Enter display name">
</div>
<div class="form-group">
<label>Role</label>
<select class="custom-select"
formControlName="role">
<option value="admin">Admin</option>
<option value="manager">Manager</option>
<option value="user">User</option>
</select>
</div>
</form>
</div>
<div class="modal-footer">
<button type="button"
class="btn btn-outline-danger"
(click)="dismiss()">Cancel</button>
<button type="button"
class="btn btn-primary"
(click)="save()">Save</button>
</div>
@Component({
  selector: 'app-user-form',
  templateUrl: './user-form.component.html',
  styleUrls: ['./user-form.component.scss']
})
export class UserFormComponent implements OnInit {

  form = new FormGroup({
    uid: new FormControl(''),
    email: new FormControl(''),
    displayName: new FormControl(''),
    password: new FormControl(''),
    role: new FormControl(''),
  });
  title$: Observable<string>;
  user$: Observable<{}>;

  constructor(
    public modal: NgbActiveModal,
    private userService: UserService,
    private userForm: UserFormService
  ) { }

   ngOnInit() {
    this.title$ = this.userForm.title$;
    this.user$ = this.userForm.user$.pipe(
      tap(user => {
        if (user) {
          this.form.patchValue(user);
        } else {
          this.form.reset({});
        }
      })
    );
  }

  dismiss() {
    this.modal.dismiss('modal dismissed');
  }

  save() {
    const { displayName, email, role, password, uid } = this.form.value;
    this.modal.close({ displayName, email, role, password, uid });
  }

}
import { Injectable } from '@angular/core';
import { BehaviorSubject } from 'rxjs';
import { map } from 'rxjs/operators';

@Injectable({
  providedIn: 'root'
})
export class UserFormService {

  _BS = new BehaviorSubject({ title: '', user: {} });

  constructor() { }

  edit(user) {
    this._BS.next({ title: 'Edit User', user });
  }

  create() {
    this._BS.next({ title: 'Create User', user: null });
  }

  get title$() {
    return this._BS.asObservable().pipe(
      map(uf => uf.title)
    );
  }

  get user$() {
    return this._BS.asObservable().pipe(
      map(uf => uf.user)
    );
  }
}
Back in the main component, let’s add the buttons to call those actions. In this case, “Edit User” will only be available for the logged-in user. You can go ahead and add the functionality to edit other users if you need to!
//...

    <div class="d-flex justify-content-between my-3">
      <h4> Me </h4>
      <button class="btn btn-primary"
              (click)="edit(user)">
        Edit Profile
      </button>
    </div>

//...
    <div class="d-flex justify-content-between my-3">
      <h4> All Users </h4>

      <button class="btn btn-primary"
              (click)="create()">
        New User
      </button>
    </div>
//...
//...
  create() {
    this.userForm.create();
    const modalRef = this.modal.open(UserFormComponent);
    modalRef.result.then(user => {
      this.userService.create(user).subscribe(_ => {
        console.log('user created');
      });
    }).catch(err => {

    });
  }

  edit(userToEdit) {
    this.userForm.edit(userToEdit);
    const modalRef = this.modal.open(UserFormComponent);

    modalRef.result.then(user => {
      this.userService.edit(user).subscribe(_ => {
        console.log('user edited');
      });
    }).catch(err => {

    });

  }
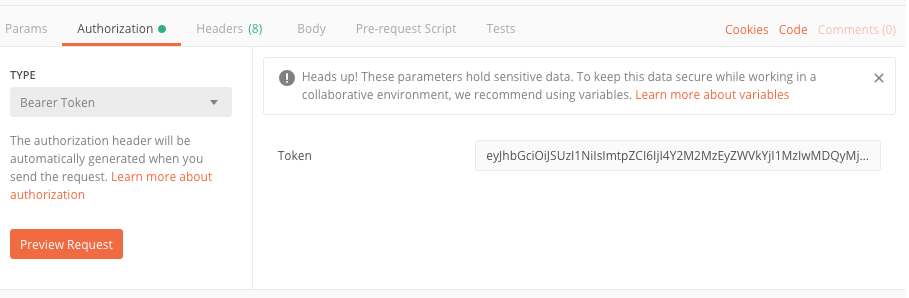
From Postman
Postman is a tool to build and make requests to APIs. This way, we can simulate that we are calling our API from any client app or a different service.
What we’ll demo is how to send a request to list all users.
Once we open the tool, we set the URL https://us-central1-{your-project}.cloudfunctions.net/api/users:

Next, on the tab authorization, we choose Bearer Token and we set the value we extracted from Dev Tools previously.
Conclusion
Congratulations! You’ve made it through the whole tutorial and now you’ve learned to create a user role-based API on Firebase.
We’ve also covered how to consume it from an Angular app and Postman.
Let’s recap the most important things:
- Firebase allows you to get quickly up and running with an enterprise-level auth API, which you can extend later on.
- Almost every project requires authorization—if you need to control access using a role-based model, Firebase Authentication lets you get started very quickly.
- The role-based model relies on validating resources that are requested from users with specific roles vs. specific users.
- Using an Express.js app on Cloud Functions for Firebase, we can create a REST API and set handlers to authenticate and authorize requests.
- Leveraging built-in custom claims, you can create a role-based auth API and secure your app.
You can read further about Firebase auth here.
Understanding the basics
Firebase Auth is a service that allows your app to sign up and authenticate a user against multiple providers such as (Google, Facebook, Twitter, GitHub and more). Firebase Auth provides SDKs with which you can easily integrate with web, Android, and iOS. Firebase Auth can also be consumed as a REST API
Firebase is a suite of cloud products that helps you build a serverless mobile or web app very quickly. It provides most of the common services involved on every app (database, authorization, storage, hosting).
You can create a project with your Google account at firebase.google.com. Once the project is created, you can turn on Firebase Auth and start using it in your app.
Firebase is Google-backed product, and one of which Google is trying to grow and add more and more features. AWS Amplify is a similar product, mostly targeted to mobile apps. Both are great products, with Firebase being an older product with more features.
Firebase is a fully managed service with which you can get started very easily and not worry about infrastructure when you need to scale up. There’s a lot of great documentation and blog posts with examples to quickly learn how it works.
Firebase has two databases: Realtime Database and Firestore. Both are NoSQL databases with similar features and different pricing models. Firestore supports better querying features and both databases are designed so that querying latency is not affected by the database size.
Joaquin Cid
Rosario, Santa Fe Province, Argentina
Member since May 2, 2018
About the author
Joaquin is a full-stack developer with over 12 years of experience working for companies like WebMD and Getty Images.
PREVIOUSLY AT