iOS Continuous Integration with Xcode Server Explained
Continuous integration using nothing but Apple tools used to be tedious and time-consuming. This changed with the launch of Xcode 9.0 last September.
In this article, Toptal iOS Developer Nemanja Stosic explains how you can harness the potential of new Xcode features to streamline iOS development.
Continuous integration using nothing but Apple tools used to be tedious and time-consuming. This changed with the launch of Xcode 9.0 last September.
In this article, Toptal iOS Developer Nemanja Stosic explains how you can harness the potential of new Xcode features to streamline iOS development.
Having worked for Novomatic and Microsoft, Nemanja is no stranger to Agile/Scrum. His main expertise includes Java, Swift, C#, and C++.
PREVIOUSLY AT

Introduction
Prior to Xcode 9, using Apple continuous integration tools was a tedious and complex process that required the purchase and installation of an additional macOS Server app. This led many developers to abandon the idea of continuous integration for their iOS projects or resort to third-party solutions, with greatly varying levels of success.
However, after Xcode 9.0 was released in September 2017, the process was greatly simplified, including the option of automated code signing, and is now completely integrated into Xcode. Therefore, it does not require any additional apps or tools.
While third-party solutions like Fastlane, Bluepill, etc. are of great help and can do a lot of grunt work for you, this article will explore the capabilities of using Xcode and Apple tools alone for your continuous integration needs. We will also be using manual code signing since that often seems to be a problem for a lot of people, and automatic signing also tends not to be the optimal solution when it comes to multiple build configurations.
Note: This article is based on Xcode 9.4.1 and focuses on iOS app development, but a lot of it is applicable to Xcode 10 (currently available as a beta 5 build) and macOS app development.
Setting up Xcode Server
Along with simplifying the actual integration process, Xcode 9 also simplified the Xcode Server setup process.
Launch the Xcode app on your macOS machine that has been designated as your CI server and open Preferences.
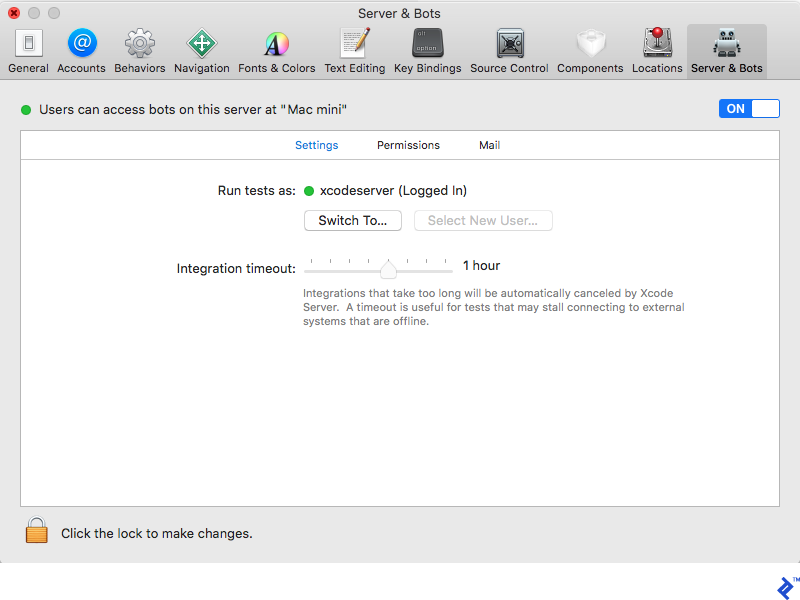
Navigate to the last tab, called Server & Bots.

Turn on Xcode Server capabilities by clicking the switch in the upper-right corner. Then, you’ll be asked to select a user to run and execute build scripts on this machine. It’s probably a good idea to have a dedicated user just for this purpose, instead of using a pre-existing one.
Note that this user has to be logged in to the system in order for any Xcode bot to run. After logging in, you should see a green circle next to the username.

That’s it! Let’s take a closer look at Xcode bots.
How to Configure Xcode Bots
Now you’re ready to start configuring Xcode bots to run on this server. This can be done on any development machine connected to the same network as the server.
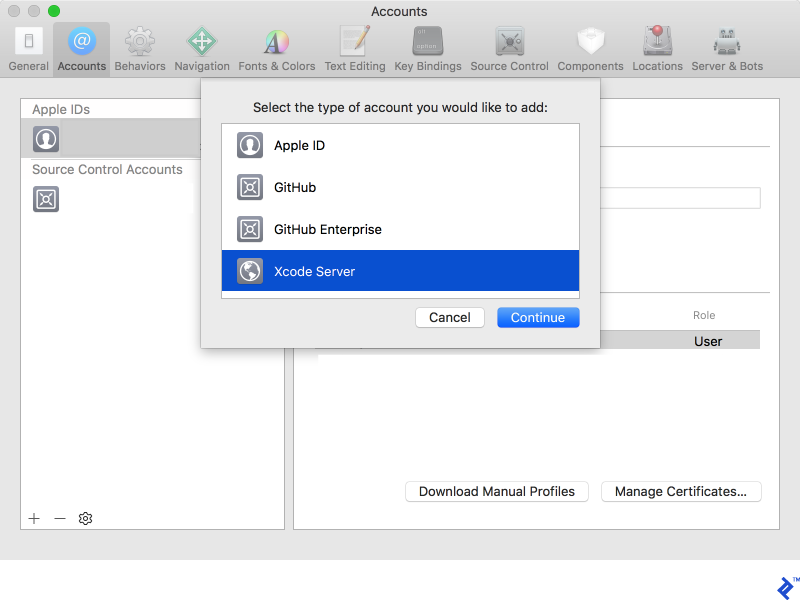
Open Xcode on your development machine and click on Xcode > Preferences from the top menu. Then, go to the Accounts tab and click on the + icon in the bottom left corner. Select Xcode Server from the dialog that appears.

To create a bot, simply open your project in Xcode and choose the Product > Create Bot… option from the top menu. The bot setup has a number of steps and we’ll explore them in the upcoming sections.
Automating App Distribution
One of the most frequent applications of iOS app build automation is configuring a bot to upload an app to an iOS distribution platform such as TestFlight, Fabric etc.
As I explained earlier, this article will only explore uploading to App Store Connect and downloading directly from your Xcode Server, as those are Apple’s native tools for iOS app distribution.
App Store Connect Distribution Using Xcode
Before configuring a bot, make sure you have an App Store Connect app record that matches the bundle ID of your app development project. It is also worth noting that each build needs to have a unique identifier consisting of the build version and build number. We’ll explore how to ensure these conditions are met when we discuss Xcode bot settings later.
Step 1: Setting up the correct build configuration is the crucial step in order to get what you want. Make sure you select the scheme and configuration which produce the app you want to upload to App Store Connect. This includes making sure that the build configuration uses the appropriate bundle id that is registered in your team’s Apple Developer portal (this is used for code-signing) as well as in your App Store Connect portal (this is used for automatically uploading the app).
Step 2: While still on the “Configuration” tab, we need to specify export options. We’re going to explore the export options property list, so make sure “Use Custom Export Options Plist” is selected.
Step 3: Now is the time we make our export options property list. A full list of keys to be used in this file is available if you enter xcodebuild --help, but we’ll explore the ones used in this bot configuration here:
-
compileBitcode– Bitcode is Apple’s interim output format for the app source code. In other words, it is the format in which your source code is converted before being compiled into machine code for a specific architecture. It aims to have a single code container that can be further optimized if an optimization is made in the instruction set, and also to be able to compile it to future architectures from this same format. However, this does not have any effect on your application. It’s up to you to decide whether you want to enable it or not. -
method– This argument specifies what kind of product you’re exporting. Apple distinguishes products by their designated audience—development only allows you to install it on devices specified in the provisioning profile, enterprise allows everyone to install it, but they need to explicitly trust this development profile before running the app, and app-store is for distributing it to the App Store or App Store Connect, so we’re going to use this value. -
provisioningProfiles– This is self-explanatory. But there are a couple of things to note here: The provisioning profiles in export options property list are a dictionary where a key corresponds to the bundle id of a product and value corresponds to the name of the provisioning profile used to code-sign it. -
signingCertificate– Another self-explanatory argument. The value of this field can be a full certificate name or an SHA-1 hash. -
teamID– Another self-explanatory argument. This is the 10-character long identifier that Apple issued to your organization when you signed up for the Apple Developer program. -
uploadBitcode– Whether or not to upload bitcode (if you’ve opted to compile into it) so that it can be used in AppStore Connect to generate new optimized builds or builds for future architectures. -
uploadSymbols– Uploads your debug symbols so that you can get a meaningful crash report rather than just a memory dump and assembly stack.
So now, your export options property list might look something like this:
<?xml version="1.0" encoding="UTF-8"?>
<!DOCTYPE plist PUBLIC "-//Apple//DTD PLIST 1.0//EN" "http://www.apple.com/DTDs/PropertyList-1.0.dtd">
<plist version="1.0">
    <dict>
        <key>compileBitcode</key>
        <false/>
        <key>method</key>
        <string>app-store</string>
        <key>provisioningProfiles</key>
        <dict>
            <key>com.bundle.id</key>
            <string>ProvisioningProfileName</string>
        </dict>
        <key>signingCertificate</key>
        <string>Signing Certificate Exact Name or SHA-1 hash value</string>
        <key>teamID</key>
        <string>??????????</string>
        <key>uploadBitcode</key>
        <false/>
        <key>uploadSymbols</key>
        <true/>
    </dict>
</plist>
Step 4: Choose the .plist you created as the export options property list.
Step 5: Next up is the “Schedule” tab—set it up according to your preferences.
Step 6: On the Signing tab, make sure you uncheck the “Allow Xcode Server to manage my certificates and profiles” option and upload a matching signing certificate and provisioning profile by yourself, on the Certificates & Profiles page.
Step 7: The Devices tab should be left as it is since we’re uploading the app rather than testing it.
Step 8: The Arguments tab allows you to explicitly set xcodebuild arguments or environment variables that can be used in your build or pre-integration and post-integration scripts.
Step 9: Finally, we reach the Triggers tab, which is also the last tab in configuring the Xcode continuous integration bot. This is the most powerful tool in the Xcode Server arsenal. For starters, I like to add the following two commands as a pre-integration script:
#!/bin/sh
set
printenv
The first one prints all the variables that Xcode Server uses and their values in the current integration run. The second one prints all the environment variables and their values. As expected, this can be helpful in debugging your scripts, so I aptly name it “debug info.”
Remember that we mentioned that we need to ensure that each build uploaded to App Store Connect needs to have a unique build version and build number pair. We can use the built-in PlistBuddy tool, but we also need a way to have a unique build number. One thing that is always present during Xcode Server integration—and is also conveniently unique—is the integration number, since it’s auto incremented. We’ll create another pre-integration script, named “set build number” with the following contents to ensure that we have a unique build number each time:
#!/bin/sh
buildNumber=$(/usr/libexec/PlistBuddy -c "Print CFBundleVersion" "${PROJECT_DIR}/${INFOPLIST_FILE}")
buildNumber=$XCS_INTEGRATION_NUMBER
/usr/libexec/PlistBuddy -c "Set :CFBundleVersion $buildNumber" "${PROJECT_DIR}/${INFOPLIST_FILE}"
If you are using CocoaPods and opted not to commit the Pods directory to your DVCS, you should also include a pre-integration script with the following contents:
#!/bin/sh
cd $XCS_PRIMARY_REPO_DIR
pod install
Step 10: We’re almost finished, but we haven’t specified anywhere that we want to upload the build to AppStore Connect or to which account. To this end, we’ll add post-integration script and another build-in tool, called Application Loader. Put the following in the script:
#!/bin/sh
/Applications/Xcode.app/Contents/Applications/Application\ Loader.app/Contents/Frameworks/ITunesSoftwareService.framework/Support/altool --upload-app -f $XCS_PRODUCT -u $TESTFLIGHT_USERNAME -p $TESTFLIGHT_PASSWORD
The $XCS_PRODUCT is an Xcode Server variable and it contains the path to the app that was created in the current integration run. However, the $TESTFLIGHT_USERNAME and $TESTFLIGHT_PASSWORD are neither system nor Xcode Server variables. These must be set up by you and have the value of your Apple ID and password. Unfortunately, Apple has discontinued support for generating an API key for AppStore Connect build uploading. Since this is confidential information, it is the best practice to set it up directly on the Mac server (assuming that it’s your own) as an environment variable rather than in the Xcode Server bot configuration.
Xcode Server Distribution
The Xcode Server distribution bot actually uses the same configuration as the one for the App Store Connect distribution, with the exception of Post-integration scripts. However, downloading the application and installing it can still be tricky. You still have to ensure that the provisioning profile that you’ve signed your app with allows the app to be installed on the device you’re using.
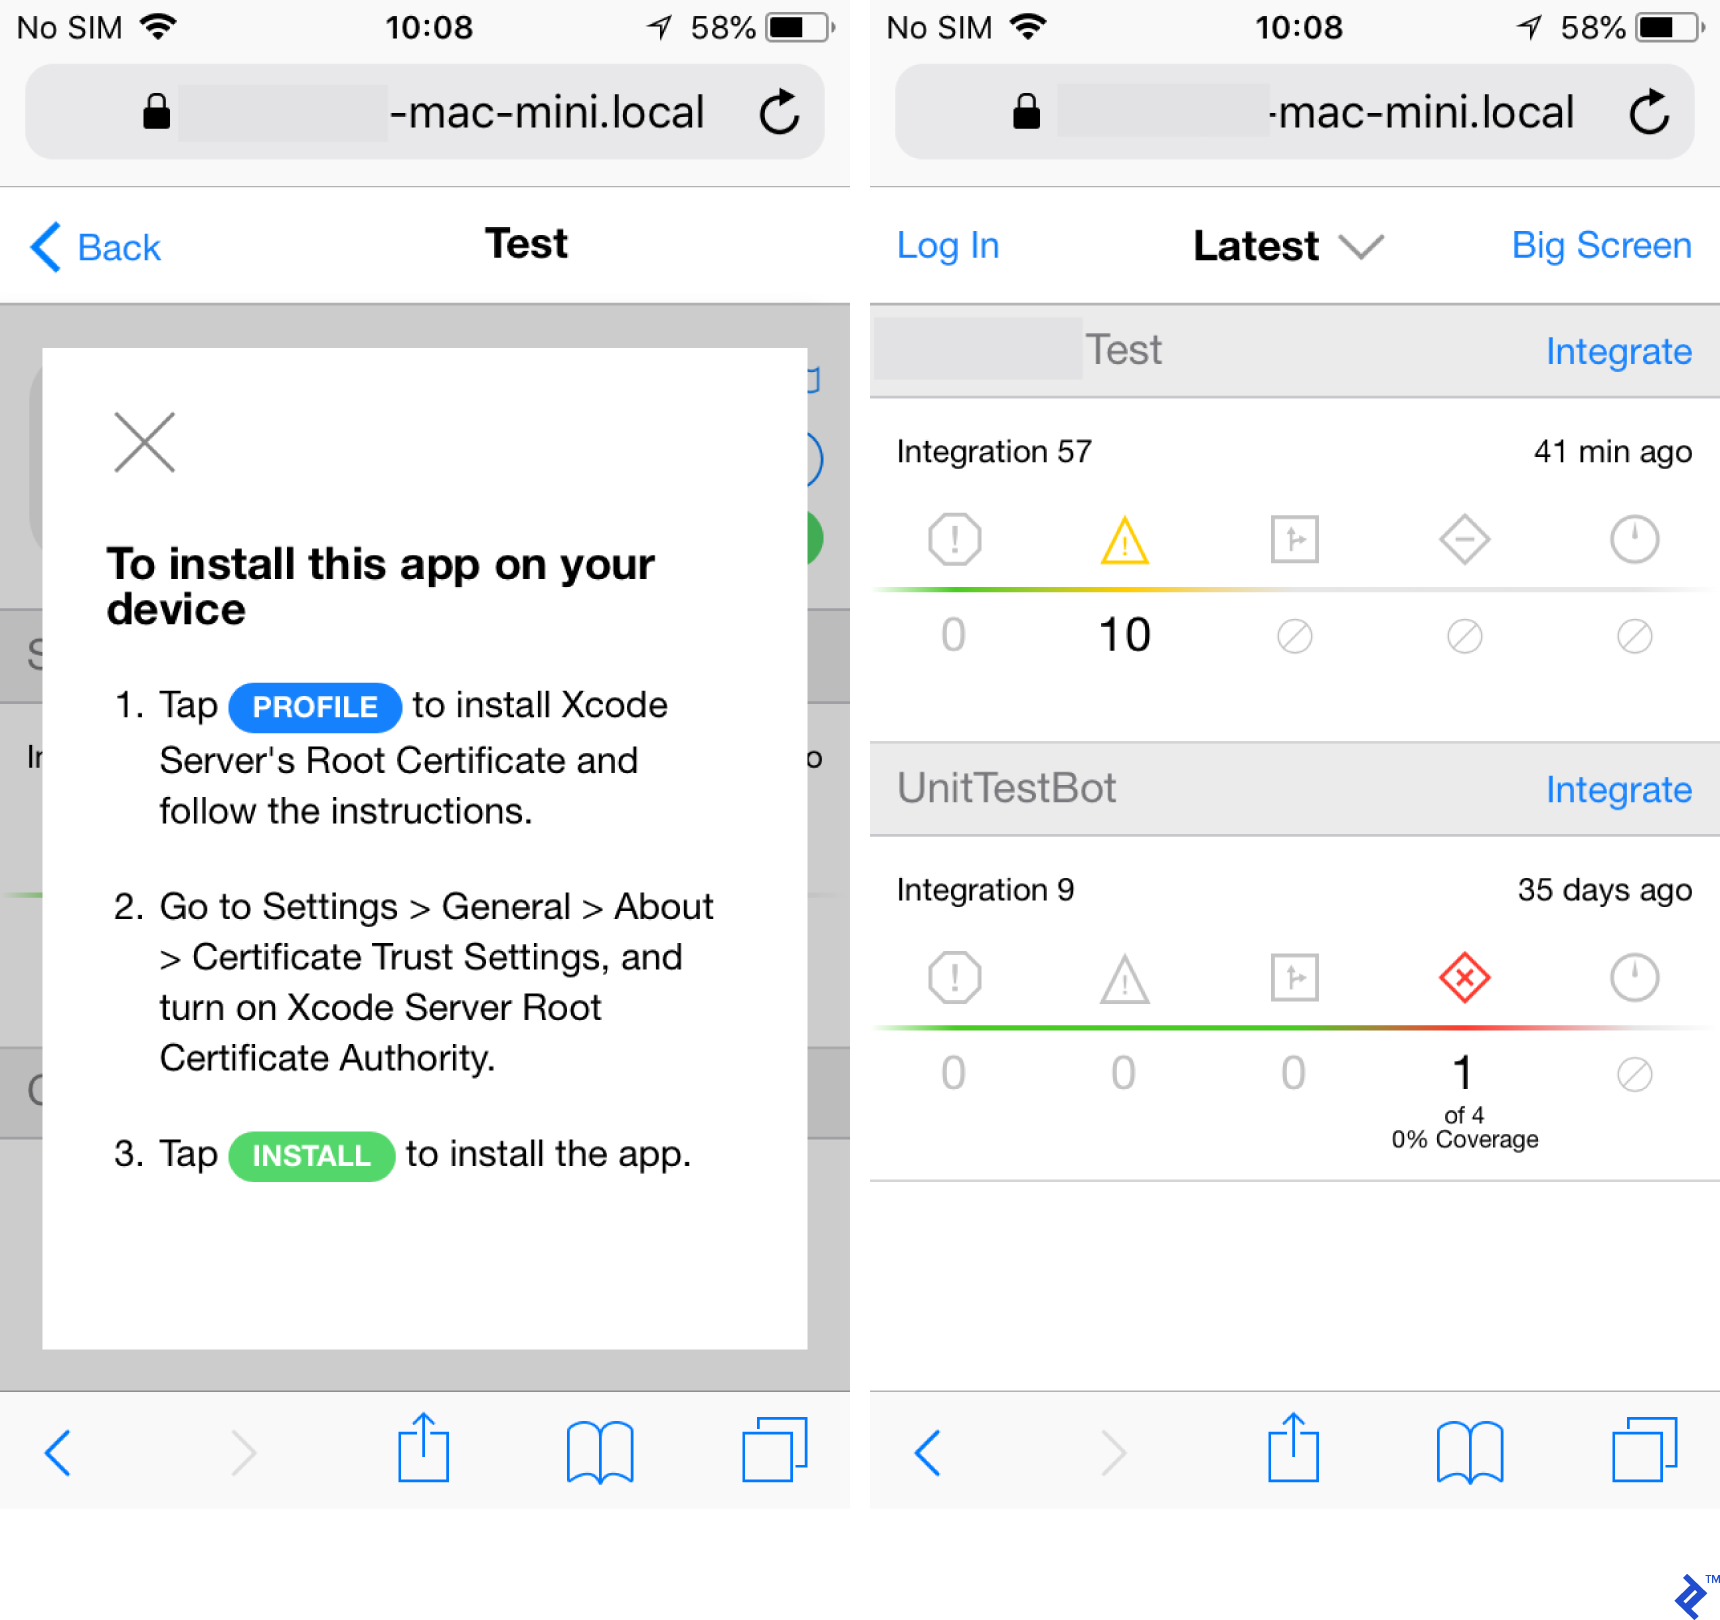
With that in place, you will need to open Safari on your iOS device and navigate to your server’s Xcode Server web dashboard. For example, if your server’s name is “Mac server” you can find it at “mac-server-name.local/xcode” if you’re on the same network as the server. There, you’ll find a list of all your Xcode bots and the statistics of their most recent integrations.
Select the one that has built the app you want to download. On the following screen, you’ll have two buttons—Install and Profile. If this is your first time downloading from this server you have to click on Profile to add its certificate to the list of trusted sources. Afterward, click on the Install button on the same page and you’ll be greeted with iOS confirmation dialog “Are you sure you want to install * on your device?” Confirm it by clicking Yes, and your app would be installed and runnable from the home screen.

For iOS 10.3 and later, a reason why it may fail with “Cannot connect to *.local” is that the self-signed certificate must be trusted manually in Settings on the test device.
Follow these steps:
Step 1: Install self-signed certificate(s) from Xcode server’s bots page on your iPhone.
Step 2: Go to iPhone’s Settings > General > About > Certificate Trust Settings.
Step 3: Find your server’s self-signed certificate(s) under the section ENABLE FULL TRUST FOR ROOT CERTIFICATES, and turn the switch ON.
Step 4: Return to the bot integration page on Xcode Server, click Install.
Xcode Server Automatic App Testing
Another great use of Xcode Server is automatic app testing, whether it be unit or UI testing. In order to do this, you need to have the appropriate target set up for your project. That is, you need to have a target that runs unit or UI tests, depending on your goal.
The setup process is the same as the previous one, but we will select different options. The first major difference is in the Configuration tab. Obviously, we’re going to check the “Analyze” and “Testing” boxes since that’s our primary goal. I’d also advise neither archiving nor exporting the product with this bot. It is possible to achieve both testing and distribution with the same bot configuration. However, these two scenarios differ in their output as well as their schedule. Distribution is often run at the end of the cycle.
Whether you’re working in Scrum or Kanban or some other framework, there should be a predefined time-driven or event-driven cycle at the end of which you should have exported and usable product. On the other hand, you should run your testing bot on each commit, since it’s your first line of defense against regressions. Since the testing bot is obviously run more often, merging those two bots into a single one could quickly use up the disk space on your server. And it would also take each integration more time to complete.
With that out of the way, we’re moving to the “Schedule” tab, and we’ve already addressed this in the previous paragraph. So, the next topic of interest is the code-signing. Notice that, even though your testing target might state that it needs no provisioning profile in your project settings page, you should set it up to use the same team and signing certificate as the host application. This is required if you want to test your app on an iOS device rather than just on a simulator. If this is your case, you also need to make sure that the iOS device used for testing won’t get locked due to inactivity as this could cause your integration run to hang indefinitely without notifying you.
Now we’re on the “Devices” tab which needs no specific explanation. Simply select one, multiple, or all devices (iOS and simulator) that you want to test your code against. You can also check whether to run tests on multiple devices in parallel or sequentially. To set this up you should consider your project needs (whether you’re targeting a specific set of devices or all supported iOS devices) and also server’s hardware resources.
On the Arguments tab. there’s no need to specify anything explicitly, as we’ll only be using built-in environment variables.
Finally, on the Triggers tab, we’ll introduce one pre-integration and one post-integration script. The first one is just there to help us debug in case we run into some issues. It is actually the one we’ve already used:
#!/bin/sh
set
printenv
The second one is the one that will notify us in case one or more of our tests fail in the current integration. Make sure it is set to run only on test failures. And enter the following:
#!/bin/sh
echo "$XCS_TEST_FAILURE_COUNT test(s) failed for $XCS_BOT_NAME bot on build $XCS_INTEGRATION_NUMBER"
echo "You can see bot integration at:"
echo "https://$HOSTNAME/xcode/bots/$XCS_BOT_TINY_ID/integrations/$XCS_INTEGRATION_TINY_ID"
There’s a couple of things that should be explained here. First of all, $HOSTNAME variables store the value of the following format: computer-name.local. Obviously, the link would only be working if you can reach that server via the local network. Also, you’ll most likely get a security warning from your browser when visiting this link, as it’s an https connection to a destination that cannot be trusted. Finally, this is just a starting point for your “Test failure” script. You could send an email to the entire development team, or open JIRA issue via an API request or anything else that you feel is the most appropriate and productive.
Wrapping Up
Hopefully, this article encouraged you to take your time to explore Xcode Server capabilities outside of simply building an app. While this post may not have helped you in exactly the way you wanted or expected, the goal was to introduce you to an open-minded way of using built-in environments and Xcode Server variables to achieve a higher level of automation.
There are plenty of third-party services out there enable more functionality and can do a lot more work for you, including Fabric, Bluepill, and Fastlane. But, inevitably, relying on a third party introduces a new dependency to your project and require sometimes simple, sometimes complex setup and configuration. The techniques described here require only tools already installed on every Mac, so it requires no setup time besides configuring the very bots that will run your automated builds!
Understanding the basics
What is Xcode?
Xcode is an integrated development environment (IDE) developed by Apple that offers code editing and build tools for projects targeting Apple devices—iOS, tvOS, watchOS, and macOS products.
What is Xcode Server?
Xcode Server is one of the tools bundled into Xcode. It allows users to set up continuous integration for one or more of their Xcode projects. The integrations can be run in either the local or remote environment, as long as the chosen computer has the version of Xcode necessary to build the project.
What is continuous integration?
Continuous integration is the practice of running automated pre-determined tasks in the identical environment for a project under development. All the changes introduced by any developer are evaluated inside the same environment and under the same circumstances, which allows for continuous validation.
What built-in tools for continuous integration does Apple provide?
Tools shipped with every Xcode include Application Loader, agvtool, PlistBuddy, xcodebuild, codesign, and more. These tools weren’t made specifically for continuous integration and are useful as standalone tools. However, they do offer additional functionality and versatility for your continuous integration setup.
What other tools can I use to help me set up continuous integration for my projects?
Fastlane is probably the most robust CI tool available at the moment. Bluepill is a tool to run iOS tests in parallel using multiple simulators. BuddyBuild is an online (cloud) continuous integration service that offers all the functionalities discussed here and a lot more.
Nemanja Stošić
Vancouver, BC, Canada
Member since May 25, 2018
About the author
Having worked for Novomatic and Microsoft, Nemanja is no stranger to Agile/Scrum. His main expertise includes Java, Swift, C#, and C++.
PREVIOUSLY AT


