How GWT Unlocks Augmented Reality in Your Browser
In our previous post on the GWT Web Toolkit, we discussed the strengths and characteristics of GWT to mix Java and JavaScript libraries seamlessly in the browser. In today’s post, we would like to go a little deeper and see the GWT Toolkit in action. We’ll demonstrate how we can take advantage of GWT to build a peculiar application: an augmented reality web application that runs in real time, fully in JavaScript, in the browser. We’ll focus on how GWT gives us the ability to interact easily with many JavaScript APIs, such as WebRTC and WebGL, and allows us to harness a large Java library, NyARToolkit, never intended to be used in the browser.
In our previous post on the GWT Web Toolkit, we discussed the strengths and characteristics of GWT to mix Java and JavaScript libraries seamlessly in the browser. In today’s post, we would like to go a little deeper and see the GWT Toolkit in action. We’ll demonstrate how we can take advantage of GWT to build a peculiar application: an augmented reality web application that runs in real time, fully in JavaScript, in the browser. We’ll focus on how GWT gives us the ability to interact easily with many JavaScript APIs, such as WebRTC and WebGL, and allows us to harness a large Java library, NyARToolkit, never intended to be used in the browser.
Dr Alberto spent 20 years working as a researcher in Applied Math & is experienced in managing large computational infrastructures.
Expertise
PREVIOUSLY AT

In our previous post on the GWT Web Toolkit, we discussed the strengths and characteristics of GWT, which, to recall the general idea, lets us transpile Java source code into JavaScript and mix Java and JavaScript libraries seamlessly. We noted that the JavaScript generated by GWT is dramatically optimized.
In today’s post, we would like to go a little deeper and see the GWT Toolkit in action. We’ll demonstrate how we can take advantage of GWT to build a peculiar application: an augmented reality (AR) web application that runs in real time, fully in JavaScript, in the browser.
In this article, we will focus on how GWT gives us the ability to interact easily with many JavaScript APIs, such as WebRTC and WebGL, and allows us to harness a large Java library, NyARToolkit, never intended to be used in the browser. We will show how GWT allowed my team and I at Jooink to put all these pieces together to create our pet project, Picshare, a marker-based AR application that you can try in your browser right now.
This post won’t be a comprehensive walkthrough of how to build the application, but rather will showcase the use of GWT to overcome seemingly overwhelming challenges with ease.
Project Overview: From Reality to Augmented Reality

Picshare uses marker-based augmented reality. This type of AR application searches the scene for a marker: a specific, easily recognized geometric pattern, like this. The marker provides information about the marked object’s position and orientation, allowing the software to project additional 3D scenery into the image in a realistic way. The basic steps in this process are:
- Access the Camera: When dealing with native desktop applications, the operating system provides I/O access to much of the device’s hardware. It’s not the same when we deal with web applications. Browsers were built to be something of a “sandbox” for JavaScript code downloaded from the net, and originally were not intended to allow websites to interact with most device hardware. WebRTC breaks through this barrier using HTML5s media capture features, enabling the browser to access, among other things, the device camera and its stream.
- Analyze the Video Stream: We have the video stream…now what? We have to analyze each frame to detect markers, and compute the marker’s position in the reconstructed 3D world. This complex task is the business of NyARToolkit.
- Augment the Video: Finally, we want to display the original video with added synthetic 3D objects. We use WebGL to draw the final, augmeted scene onto the webpage.
Taking Advantage of HTML5’s APIs with GWT
The use of JavaScript APIs like WebGL and WebRTC enables unexpected and unusual interactions between the browser and the user.
For example, WebGL allows for hardware accelerated graphics and, with the help of the typed array specification, enables the JavaScript engine to execute number crunching with almost native performance. Similarly, with WebRTC, the browser is able to access video (and other data) streams directly from the computer hardware.
WebGL and WebRTC are both JavaScript libraries that must be built into the web browser. Most modern HTML5 browsers come with at least partial support for both APIs (as you can see here and here). But how can we harness these tools in GWT, which is written in Java? As discussed in the previous post, GWT’s interoperability layer, JsInterop (released officially in GWT 2.8) makes this a piece of cake.
Using JsInterop with GWT 2.8 is as easy as adding -generateJsInteropExports as an argument to the compiler. The available annotations are defined in the package jsinterop.annotations, bundled in gwt-user.jar.
WebRTC
As an example, with minimal coding work, using WebRTC’s getUserMedia on Chrome with GWT becomes as simple as writing:
Navigator.webkitGetUserMedia( configs,
               stream -> video.setSrc( URL.createObjectURL(stream) ),
               e -> Window.alert("Error: " + e) );
Where the class Navigator can be defined as follows:
@JsType(namespace = JsPackage.GLOBAL, isNative = true, name="navigator")
final static class Navigator {
               public static native void webkitGetUserMedia(
                             Configs configs, SuccessCallback success, ErrorCallback error);
}
Of interest is the definition of the interfaces SuccessCallback and ErrorCallback, both implemented by lambda expression above and defined in Java by means of the @JsFunction annotation:
@JsFunction
public interface SuccessCallback {
  public void onMediaSuccess(MediaStream stream);
}

@JsFunction
public interface ErrorCallback {
  public void onError(DomException error);
}
Finally, the definition of the class URL is almost identical to that of Navigator, and similarly, the Configs class can be defined by:
@JsType(namespace = JsPackage.GLOBAL, isNative = true, name="Object")
public static class Configs {
  @JsProperty
  public native void setVideo(boolean getVideo);
}
The actual implementation of all of these functionalities takes place in the browser’s JavaScript engine.
You can find the above code on GitHub here.
In this example, for the sake of simplicity, the deprecated navigator.getUserMedia() API is used because it is the only one that works without polyfilling on the current stable release of Chrome. In a production app, we can use adapter.js to access the stream through the newer navigator.mediaDevices.getUserMedia() API, uniformly in all the browsers, but this is beyond the scope of the present discussion.
WebGL
Using WebGL from GWT is not much different compared to using WebRTC, but it’s a bit more tedious due to the OpenGL standard’s intrinsic complexity.
Our approach here mirrors the one followed in the previous section. The result of the wrapping can be seen in the GWT WebGL implemention used in Picshare, which can be found here, and an example of the results produced by GWT can be found here.
Enabling WebGL by itself doesn’t actually give us 3D graphics capability. As Gregg Tavares writes:
What many people don’t know is that WebGL is actually a 2D API, not a 3D API.
3D arithmetic must be performed by some other code, and transformed to the 2D image for WebGL. There are some good GWT libraries for 3D WebGL graphics. My favorite is Parallax, but for the first version of Picshare we followed a more “do-it-yourself” path, writing a small library for rendering simple 3D meshes. The library lets us define a perspective camera and manage a scene of objects. Feel free to check it out, here.
Compiling Third-Party Java Libraries with GWT
NyARToolkit is a pure-Java port of ARToolKit, a software library for building augmented reality applications. The port was written by the Japanese developers at Nyatla. Although the original ARToolKit and the Nyatla version have diverged somewhat since the original port, the NyARToolkit is still actively maintained and improved.
Marker-based AR is a specialized field and requires competency in computer vision, digital image processing, and math, as is apparent here:
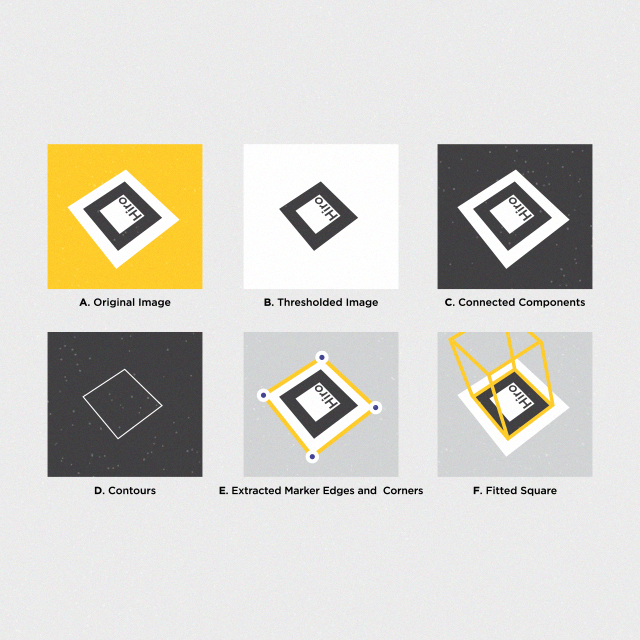
Reproduced from ARToolKit documentation.

Reproduced from ARToolKit documentation.
All of the algorithms used by the toolkit are documented and well understood, but rewriting them from scratch is a long and error prone process, so it is preferable to use an existing, proven toolkit, like ARToolKit. Unfortunately, when targeting the web, there is no such thing available. Most powerful, advanced toolkits have no implementation in JavaScript, a language that is primarily used for manipulating HTML documents and data. This is where GWT proves its invaluable strength, enabling us to simply transpile NyARToolkit into JavaScript, and use it in a web application with very little hassle.
Compiling with GWT
Since a GWT project is essentially a Java project, using NyARToolkit is just a matter of importing the source files in your source path. However, note that since the transpilation of GWT code to JavaScript is done at the source code level, you need the sources of NyARToolkit, and not just a JAR with the compiled classes.
The library used by Picshare can be found here. It is dependent only on the packages found inside lib/src and lib/src.markersystem from the NyARToolkit build archived here. We must copy and import these packages into our GWT project.
We should keep these third-party packages separate from our own implementation, but to proceed with the “GWT-ization” of NyARToolkit we must provide an XML configuration file that informs the GWT compiler where to look for sources. In the package jp.nyatla.nyartoolkit, we add the file NyARToolkit.gwt.xml
<module>
    <source path="core" />
    <source path="detector" />
    <source path="nyidmarker" />
    <source path="processor" />
    <source path="psarplaycard" />
    <source path="markersystem" />
</module>
Now, in our main package, com.jooink.gwt.nyartoolkit, we create the main configuration file, GWT_NyARToolKit.gwt.xml, and instruct the the compiler to include Nyatla’s source in the classpath by inheriting from its XML file:
<inherits name='jp.nyatla.nyartoolkit.NyARToolkit'/>
Pretty easy, actually. In most cases, this would be all it takes, but unfortunately we haven’t finished yet. If we try to compile or execute through Super Dev Mode at this stage, we encounter an error stating, quite surprisingly:
No source code is available for type java.io.InputStream; did you forget to inherit a required module?
The reason for this is that NyARToolkit (that is, a Java library intended for Java projects) uses classes of the JRE that are not supported by the GWT’s Emulated JRE. We discussed this briefly in the previous post.
In this case, the problem is with InputStream and related IO classes. As it happens, we do not even need to use most of these classes, but we need to provide some implementation to the compiler. Well, we could invest a ton of time in manually removing these references from the NyARToolkit source, but that would be crazy. GWT gives us a better solution: Provide our own implementations of the unsupported classes through the <super-source> XML tag.
<super-source>
As described in the the official documentation:
The
<super-source>tag instructs the compiler to re-root a source path. This is useful for cases where you want to re-use an existing Java API for a GWT project, but the original source is not available or not translatable. A common reason for this is to emulate part of the JRE not implemented by GWT.
So <super-source> is exactly what we need.
We can create a jre directory in the GWT project, where we can put our implementations for the classes that are causing us problems:
java.io.FileInputStream
java.io.InputStream
java.io.InputStreamReader
java.io.StreamTokenizer
java.lang.reflect.Array
java.nio.ByteBuffer
java.nio.ByteOrder
All of these, except java.lang.reflect.Array, are really unused, so we only need dumb implementations. For instance, our FileInputStream reads as follows:
package java.io;
import java.io.InputStream;
import com.google.gwt.user.client.Window;

public  class FileInputStream  extends InputStream {
  public FileInputStream(String filename) {
    Window.alert("WARNING, FileInputStream created with filename: " + filename );
  }

  @Override
  public int read() {
    return 0;
  }
}
The Window.alert statement in the constructor is useful during development. Although we must be able to compile the class, we want to ensure we never actually use it, so this will alert us in case the class is used inadvertently.
java.lang.reflect.Array is actually used by the code we need, so a not-completely-dumb implementation is required. This is our code:
package java.lang.reflect;
import jp.nyatla.nyartoolkit.core.labeling.rlelabeling.NyARRleLabelFragmentInfo;
import jp.nyatla.nyartoolkit.markersystem.utils.SquareStack;
import com.google.gwt.user.client.Window;

public class Array {
  public static <T> Object newInstance(Class<T> c, int n) {

    if( NyARRleLabelFragmentInfo.class.equals(c))
      return new NyARRleLabelFragmentInfo[n];
    else if(SquareStack.Item.class.equals(c))
      return new SquareStack.Item[n];
    else
      Window.alert("Creating array of size " + n  + " of " + c.toString());
    return null;

  }
}
Now if we place <super-source path="jre"/> in the GWT_NyARToolkit.gwt.xml module file, we can safely compile and use NyARToolkit in our project!
Gluing it all Together with GWT
Now we are in the position of having:
- WebRTC, a technology able to take a stream from the webcam and display it in a
<video>tag. - WebGL, a technology able to manipulate hardware-accelerated graphics in an HTML
<canvas>. - NyARToolkit, a Java library capable of taking an image (as an an array of pixels), searching for a marker and, if found, giving us a transformation matrix that fully defines the marker’s position in the 3D space.
The challenge now is to integrate all these technologies together.
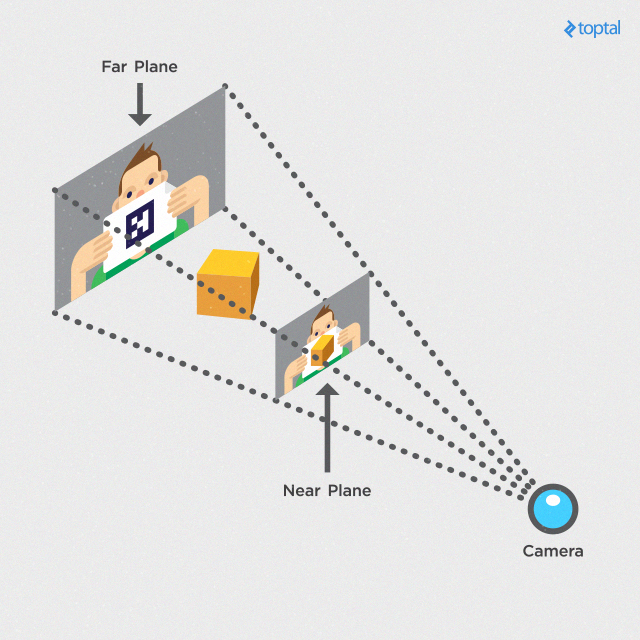
We won’t go into depth on how to accomplish this, but the basic idea is to use the video imagery as the background of our scene (a texture applied to the “far” plane in the image above) and build a 3D data structure allowing us to project this image into space using the results from NyARToolkit.
This construction gives us the right structure to interact with NyARToolkit’s library for marker recognition, and draw the 3D model on top of the camera’s scene.
Making the camera stream usable is a bit tricky. Video data can only be drawn to a <video> element. The HTML5 <video> element is opaque, and does not let us extract the image data directly, so we are forced to copy the video to an intermediate <canvas>, extract the image data, transform it to an array of pixels, and finally push it to NyARToolkit’s Sensor.update() method. Then NyARToolkit can do the work of identifying the marker in the image, and returning a transformation matrix corresponding to its position in our 3D space.
With these elements, we can collocate a synthetic object exactly over the marker, in 3D, in the live video stream! Thanks to GWT’s high performance, we have plenty of computational resources, so we can even apply some video effects on the canvas, such as sepia or blur, before using it as background for the WebGL scene.
The following abridged code describes the core of the process:
// given a <canvas> drawing context with appropriate width and height
// and a <video> where the mediastream is drawn

...

// for each video frame
  // draw the video frame on the canvas
  ctx.drawImage(video, 0, 0, w, h);

  // extract image data from the canvas
  ImageData capt = ctx.getImageData(0, 0, w, h);

  // convert the image data in a format acceptable by NyARToolkit
  ImageDataRaster input = new ImageDataRaster(capt);

  // push the image in to a NyARSensor
  sensor.update(input);

  // update the NyARMarkerSystem with the sensor
  nyar.update(sensor);

  // the NyARMarkerSystem contains information about the marker patterns and is able to detect them.
  // After the call to update, all the markers are detected and we can get information for each
  // marker that was found.

  if( nyar.isExistMarker( marker_id ) ) {
    NyARDoubleMatrix44 m = nyar.getMarkerMatrix(marker_id);
    // m is now the matrix representing the pose (position and orientation) of
    // the marker in the scene, so we can use it to superimpose an object of
    // our choice
    ...
  }

  ...
With this technique, we can generate results such as this:
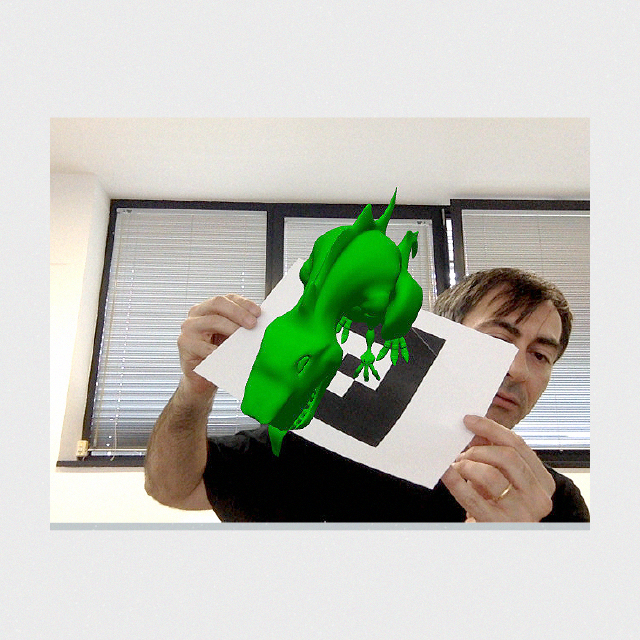
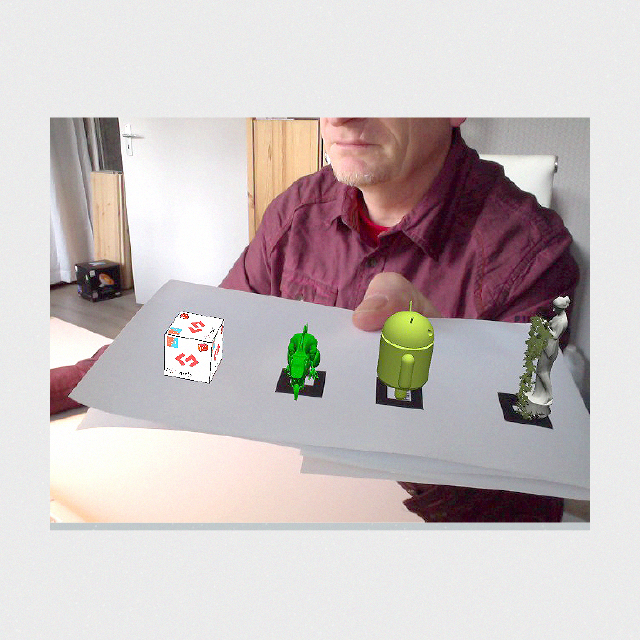
This is the process we used to create Picshare, where you are invited to print out a marker or display it on your mobile, and play with marker-based AR in your browser. Enjoy!
Final Remarks
Picshare is a long-term pet project for us at Jooink. The first implementation dates back a few years, and even then it was fast enough to be impressive. At this link you can see one of our earlier experiments, compiled in 2012 and never touched. Note that in the sample there is just one <video>. The other two windows are <canvas> elements displaying the results of processing.
GWT was powerful enough even in 2012. With the release of GWT 2.8 we have gained a much-improved interoperability layer with JsInterop, further boosting performance. Also, to the celebration of many, we also gained a much better development and debugging environment, Super Dev Mode. Oh yeah, and Java 8 support.
We are looking forward to GWT 3.0!
Alberto Mancini
Florence, Metropolitan City of Florence, Italy
Member since September 29, 2014
About the author
Dr Alberto spent 20 years working as a researcher in Applied Math & is experienced in managing large computational infrastructures.
Expertise
PREVIOUSLY AT

