How to Isolate Client-Server Interaction Logic in iOS Applications
Client-server interactions play a vital role in most modern mobile applications. By leveraging available back-end services, these mobile applications can provide some really amazing functionalities. However, as mobile applications grow complex, it becomes essential to keep the networking module as clean and maintainable as possible - separated from the rest of the application logic.
In this article, Toptal freelance software engineer Alexander Gaidukov walks us through the design of a simple networking module that allows your iOS application to interact with RESTful APIs.

Alexander has 9+ years of experience in developing applications and more than five years with the iOS platform (iPhone and iPad).
PREVIOUSLY AT

Nowadays, most mobile applications rely heavily on client-server interactions. Not only does this mean that they can offload most of their heavy tasks to back-end servers, but it also allows these mobile applications to offer all sorts of features and functionality that can only be made available through the internet.
Back-end servers are usually designed to offer their services through RESTful APIs. For simpler applications, we often feel tempted to get by creating spaghetti code; mixing code that invokes the API with rest of the application logic. However as applications grow complex and deal with more and more APIs, it can become a nuisance to interact with these APIs in an unstructured, unplanned manner.

This article discusses an architectural approach for building a clean REST client networking module for iOS applications that allows you to keep all of your client-server interaction logic isolated from rest of your application code.
Client-Server Applications
A typical client-server interaction looks something like this:
- A user performs some action (e.g., tapping on some button or performing some other gesture on the screen).
- The application prepares and sends an HTTP/REST request in response to the user action.
- The server processes the request and responds accordingly to the application.
- The application receives the response and updates the user interface based on it.
At quick glance, the overall process may look simple, but we do have to think about the details.
Even assuming that a backend server API works as advertised (which is not always the case!), it can often be poorly designed making it inefficient, or even difficult, to use. One common annoyance is that all calls to the API require the caller to redundantly provide the same information (e.g., how request data is formatted, an access token that the server can use to identify the currently signed in user, and so on).
Mobile applications may also need to utilize multiple back-end servers concurrently for different purposes. One server may, for example, be dedicated to user authentication while another deals with collecting analytics only.
Furthermore, a typical REST client will need to do way more than just invoke remote APIs. The ability to cancel pending requests, or a clean and manageable approach to handling errors, are examples of functionality that needs to be built into any robust mobile application.
An Overview of the Architecture
The core of our REST client will be built on these following components:
- Models: Classes that describe the data models of our application, reflecting the structure of data received from, or sent to, the backend servers.
- Parsers: Responsible for decoding server responses and producing model objects.
- Errors: Objects to represent erroneous server responses.
- Client: Sends requests to backend servers and receives responses.
- Services: Manage logically linked operations (e.g. authentication, managing user related data, analytics, etc).
This is how each of these components will interact with each other:
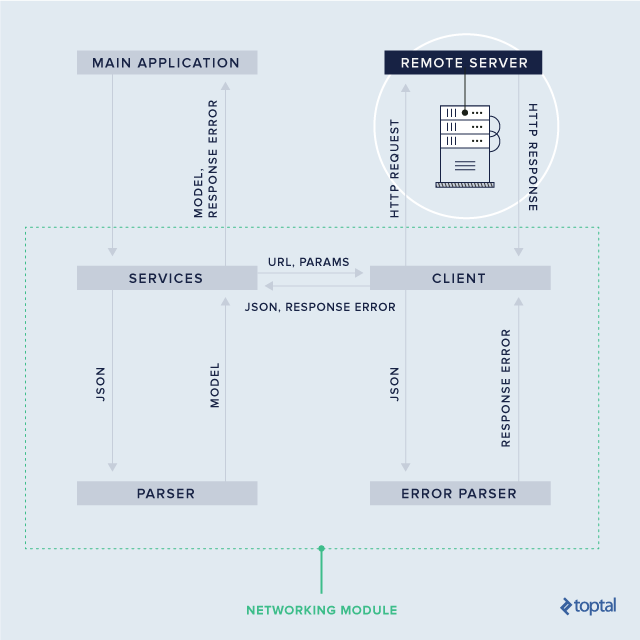
The arrows 1 through 10 in the image above show an ideal sequence of operations between the application invoking a service and the service eventually returning the requested data as a model object. Each component in that flow has a specific role ensuring separation of concerns within the module.
Implementation
We will implement our REST client as part of our imaginary social network application into which we will load a list of the currently logged in user’s friends. We will assume our remote server uses JSON for responses.
Let us begin by implementing our models and parsers.
From Raw JSON to Model Objects
Our first model, User, defines the structure of information for any user of the social network. To keep things simple, we will only include fields that are absolutely necessary for this tutorial (in a real application, the structure would typically have a lot more properties).
struct User {
    var id: String
    var email: String?
    var name: String?
}
Since we will receive all user data from the backend server via its API, we need a way to parse the API response into a valid User object. To do this, we will add a constructor to User that accepts a parsed JSON object (Dictionary) as a parameter. We will define our JSON object as an aliased type:
typealias JSON = [String: Any]
We will then add the constructor function to our User struct as follows:
extension User {
    init?(json: JSON) {
        guard let id = json["id"] as? String else {
            return nil
        }

        self.id = id
        self.email = json["email"] as? String
        self.name = json["name"] as? String
    }
}
To preserve the original default constructor of User, we add the constructor through an extension on the User type.
Next, to create a User object from a raw API response, we need to perform the following two steps:
// Transform raw JSON data to parsed JSON object using JSONSerializer (part of standard library)
let userObject = (try? JSONSerialization.jsonObject(with: data, options: [])) as? JSON
// Create an instance of `User` structure from parsed JSON object
let user = userObject.flatMap(User.init)
Streamlined Error Handling
We will define a type to represent different errors that may occur when attempting to interact with the backend servers. We can divide all such errors into three basic categories:
- No Internet connectivity
- Errors that reported as a part of the response (e.g. validation errors, insufficient access rights, etc.)
- Errors that the server fails to report as a part of the response (e.g. server crash, responses timing out, etc.)
We can define our error objects as an enumeration type. And while we are at it, it is a good idea to make our ServiceError type conform to the Error protocol. This will allow us to use and handle these error values using standard mechanisms provided by Swift (such as using throw to throw an error).
enum ServiceError: Error {
    case noInternetConnection
    case custom(String)
    case other
}
Unlike noInternetConnection and other errors, the custom error has a value associated with it. This will allow us to use the error response from the server as an associated value for the error itself, thereby giving the error more context.
Now, let’s add a errorDescription property to the ServiceError enumartion to make the errors more descriptive. We will add hardcoded messages for the noInternetConnection and other errors and use the associated value as the message for custom errors.
extension ServiceError: LocalizedError {
    var errorDescription: String? {
        switch self {
        case .noInternetConnection:
            return "No Internet connection"
        case .other:
            return "Something went wrong"
        case .custom(let message):
            return message
        }
    }
}
There is just one more thing we need to implement in our ServiceError enumeration. In the case of a custom error, we need to transform the server JSON data into an error object. To do this, we use the same approach we used in the case of models:
extension ServiceError {
    init(json: JSON) {
        if let message =  json["message"] as? String {
            self = .custom(message)
        } else {
            self = .other
        }
    }
}
Bridging the Gap Between the Application and Backend Server
The client component will be an intermediary between the application and the backend server. It’s a critical component that will define how the application and the server will communicate, yet it will know nothing about the data models and their structures. The client will be responsible for invoking specific URLs with provided parameters and returning incoming JSON data parsed as JSON objects.
enum RequestMethod: String {
    case get = "GET"
    case post = "POST"
    case put = "PUT"
    case delete = "DELETE"
}


final class WebClient {
    private var baseUrl: String

    init(baseUrl: String) {
        self.baseUrl = baseUrl
    }

    func load(path: String, method: RequestMethod, params: JSON, completion: @escaping (Any?, ServiceError?) -> ()) -> URLSessionDataTask? {
        // TODO: Add implementation
    }
}
Let’s examine what’s happening in the above code…
First, we declared an enumeration type, RequestMethod, that describes four common HTTP methods. These are among the methods used in REST APIs.
The WebClient class contains the baseURL property which will be used to resolve all relative URLs that it receives. In case our application needs to interact with multiple servers, we can create multiple instances of WebClient each with a different value for baseURL.
The Client has a single method load, which takes a path relative to baseURL as a parameter, request method, request parameters, and completion closure. The completion closure is invoked with the parsed JSON and ServiceError as parameters. For now, the method above lacks an implementation, which we will get to shortly.
Before implementing the load method, we need a way to create a URL from all the information available to the method. We will extend the URL class for this purpose:
extension URL {
    init(baseUrl: String, path: String, params: JSON, method: RequestMethod) {
        var components = URLComponents(string: baseUrl)!
        components.path += path

        switch method {
        case .get, .delete:
            components.queryItems = params.map {
                URLQueryItem(name: $0.key, value: String(describing: $0.value))
            }
        default:
            break
        }

        self = components.url!
    }
}
Here we simply add the path to the base URL. For GET and DELETE HTTP methods, we also add the query parameters to the URL string.
Next, we need to be able to create instances of URLRequest from given parameters. To do this we will do something similar to what we did for URL:
extension URLRequest {
    init(baseUrl: String, path: String, method: RequestMethod, params: JSON) {
        let url = URL(baseUrl: baseUrl, path: path, params: params, method: method)
        self.init(url: url)
        httpMethod = method.rawValue
        setValue("application/json", forHTTPHeaderField: "Accept")
        setValue("application/json", forHTTPHeaderField: "Content-Type")
        switch method {
        case .post, .put:
            httpBody = try! JSONSerialization.data(withJSONObject: params, options: [])
        default:
            break
        }
    }
}
Here, we first create a URL using the constructor from the extension. Then we initialize an instance of URLRequest with this URL, set a few HTTP headers as necessary, and then in case of POST or PUT HTTP methods, add parameters to the request body.
Now that we have covered all the prerequisites, we can implement the load method:
final class WebClient {
    private var baseUrl: String

    init(baseUrl: String) {
        self.baseUrl = baseUrl
    }

    func load(path: String, method: RequestMethod, params: JSON, completion: @escaping (Any?, ServiceError?) -> ()) -> URLSessionDataTask? {
        // Checking internet connection availability
        if !Reachability.isConnectedToNetwork() {
            completion(nil, ServiceError.noInternetConnection)
            return nil
        }


        // Adding common parameters
        var parameters = params

        if let token = KeychainWrapper.itemForKey("application_token") {
            parameters["token"] = token
        }


        // Creating the URLRequest object
        let request = URLRequest(baseUrl: baseUrl, path: path, method: method, params: params)


        // Sending request to the server.
        let task = URLSession.shared.dataTask(with: request) { data, response, error in
            // Parsing incoming data
            var object: Any? = nil
            if let data = data {
                object = try? JSONSerialization.jsonObject(with: data, options: [])
            }

            if let httpResponse = response as? HTTPURLResponse, (200..<300) ~= httpResponse.statusCode {
                completion(object, nil)
            } else {
                let error = (object as? JSON).flatMap(ServiceError.init) ?? ServiceError.other
                completion(nil, error)
            }
        }

        task.resume()

        return task
    }
}
The load method above performs the following steps:
-
Check availability of the Internet connection. If Internet connectivity is not available, we call the completion closure immediately with
noInternetConnectionerror as a parameter. (Note:Reachabilityin the code is a custom class, which uses one of the common approaches to check the Internet connection.) - Add common parameters.. This can include common parameters such as an application token or user id.
-
Create the
URLRequestobject, using the constructor from the extension. -
Send the request to the server. We use the
URLSessionobject to send data to the server. -
Parse incoming data. When the server responds, we first parse the response payload into a JSON object using
JSONSerialization. Then we check the status code of the response. If it is a success code (i.e., in the range between 200 and 299), we call the completion closure with the JSON object. Otherwise, we transform the JSON object into aServiceErrorobject and call the completion closure with that error object.
Defining Services for Logically Linked Operations
In the case of our application, we need a service that will deal with tasks related to friends of a user. For this, we create a FriendsService class. Ideally, a class like this will be in charge of operations such as getting a list of friends, adding a new friend, removing a friend, grouping some friends into a category, etc. For simplicity in this tutorial, we will implement just one method:
final class FriendsService {
    private let client = WebClient(baseUrl: "https://your_server_host/api/v1")

    @discardableResult
    func loadFriends(forUser user: User, completion: @escaping ([User]?, ServiceError?) -> ()) -> URLSessionDataTask? {


        let params: JSON = ["user_id": user.id]

        return client.load(path: "/friends", method: .get, params: params) { result, error in
            let dictionaries = result as? [JSON]
            completion(dictionaries?.flatMap(User.init), error)
        }
    }
}
The FriendsService class contains a client property of type WebClient. It is initialized with the base URL of the remote server which is in charge of managing friends. As previously mentioned, in other service classes, we can have a different instance of WebClient initialized with a different URL if necessary.
In the case of an application that works with only one server, the WebClient class can be given a constructor that initializes with that server’s URL:
final class WebClient {
    // ...
    init() {
        self.baseUrl = "https://your_server_base_url"
    }
    // ...
}
The loadFriends method, when invoked, prepares all the necessary parameters and uses FriendService’s instance of WebClient to make an API request. After it receives the response from the server through the WebClient, it transforms the JSON object into User models and calls the completion closure with them as a parameter.
A typical usage of the FriendService may look something like the following:
let friendsTask: URLSessionDataTask!
let activityIndicator: UIActivityIndicatorView!
var friends: [User] = []


func friendsButtonTapped() {

       friendsTask?.cancel() //Cancel previous loading task.


       activityIndicator.startAnimating() //Show loading indicator


	friendsTask = FriendsService().loadFriends(forUser: currentUser) {[weak self] friends, error in
DispatchQueue.main.async {
	     self?.activityIndicator.stopAnimating() //Stop loading indicators
            if let error = error {
                print(error.localizedDescription) //Handle service error
            } else if let friends = friends {
                 self?.friends = friends //Update friends property
                 self?.updateUI() //Update user interface
            }
}
      }
}
In the above example, we are assuming that the function friendsButtonTapped is invoked whenever the user taps on a button intended to show them a list of their friends in the network. We also keep a reference to the task in the friendsTask property so that we can cancel the request at any time by calling friendsTask?.cancel().
This allows us to have a greater control of the lifecycle of pending requests, enabling us to terminate them when we determine that they have become irrelevant.
Conclusion
In this article, I have shared a simple architecture of a networking module for your iOS application that is both trivial to implement and can be adapted to the intricate networking needs of most iOS applications. However, the key takeaway from this is that a properly designed REST client and components accompanying it – that are isolated from the rest of your application logic – can help keep your application’s client-server interaction code simple, even as the application itself becomes increasingly complex.
I hope you find this article helpful in building your next iOS application. You can find the source code of this networking module on GitHub. Check out the code, fork it, change it, play with it.
If you find some other architecture more preferable for you and your project, please do share the details in the comments section below.
Aleksandr Gaidukov
Phuket, Thailand
Member since August 31, 2016
About the author
Alexander has 9+ years of experience in developing applications and more than five years with the iOS platform (iPhone and iPad).
PREVIOUSLY AT