Swift Tutorial: An Introduction to the MVVM Design Pattern
On every new project, you have the privilege of deciding how you’ll architect the app and organize the code. But if you don’t pay attention, or you rush through coding, you risk ending up with spaghetti code. The solution? Use a proper design pattern.
In this tutorial, Toptal Software Engineer Dino Bartošak explains how to implement an MVVM design pattern on a demo Swift application.
Dino is a software engineer specializing in iOS programming clean code and clean architecture, building iOS apps from scratch and custom UI.
PREVIOUSLY AT

So you’re starting a new iOS project, you received from the designer all the needed .pdf and .sketch documents, and you already have a vision about how you’ll build this new app.
You start transferring UI screens from the designer’s sketches into your ViewController .swift, .xib and .storyboard files.
UITextField here, UITableView there, a few more UILabels and a pinch of UIButtons. IBOutlets and IBActions are also included. All good, we are still in the UI zone.
However, it’s time to do something with all these UI elements; UIButtons will receive finger touches, UILabels and UITableViews will need someone to tell them what to display and in what format.
Suddenly, you have more than 3,000 lines of code.

You ended up with a lot of spaghetti code.
The first step to resolve this is to apply the Model-View-Controller (MVC) design pattern. However, this pattern has its own issues. There comes the Model-View-ViewModel (MVVM) design pattern that saves the day.
Dealing With Spaghetti Code
In no time, your starting ViewController has become too smart and too massive.
Networking code, data parsing code, data adjustments code for the UI presentation, app state notifications, UI state changes. All that code imprisoned inside if-ology of a single file that cannot be reused and would only fit in this project.
Your ViewController code has become the infamous spaghetti code.
How did that happen?
The likely reason is something like this:
You were in a rush to see how the back-end data was behaving inside the UITableView , so you put a few lines of networking code inside a temp method of the ViewController just to fetch that .json from the network. Next, you needed to process the data inside that .json, so you wrote yet another temp method to accomplish that. Or, even worse, you did that inside the same method.
The ViewController kept growing when the user authorization code came along. Then data formats started to change, UI evolved and needed some radical changes, and you just kept adding more ifs into an already massive if-ology.
But, how come the UIViewController is what got out of hand?
The UIViewController is the logical place to start working on your UI code. It represents the physical screen you’re seeing while using any app with your iOS device. Even Apple uses UIViewControllers in its main system app when it switches between different apps and its animated UIs.
Apple bases its UI abstraction inside the UIViewController, since it is at the core of the iOS UI code and part of the MVC design pattern.
Upgrading to the MVC Design Pattern
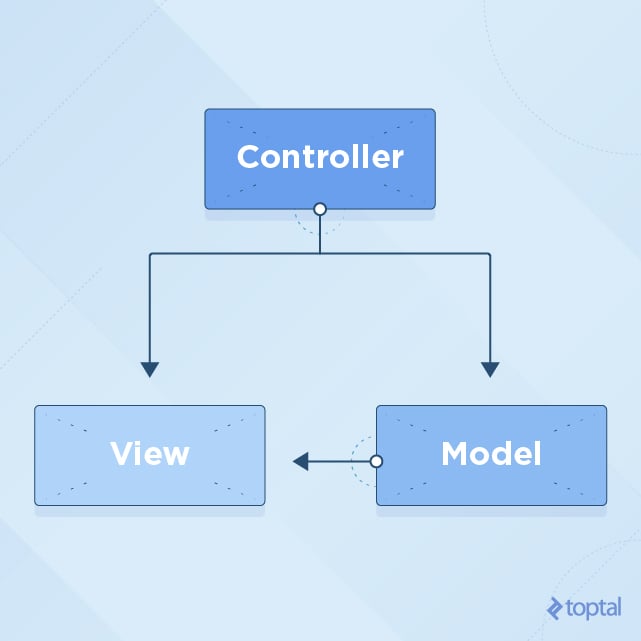
In the MVC design pattern, View is supposed to be inactive and only displays prepared data on demand.
Controller should work on the Model data to prepare it for the Views, which then display that data.
View is also responsible for notifying the Controller about any actions, such as user touches.
As mentioned, UIViewController is usually the starting point in building a UI screen. Notice that in its name, it contains both the “view” and the “controller.” This means that it “controls the view.” It doesn’t mean that both “controller” and “view” code should go inside.
This mixture of view and controller code often happens when you move IBOutlets of little subviews inside the UIViewController, and manipulate on those subviews directly from the UIViewController. Instead you should’ve wrapped that code inside of a custom UIView subclass.
Easy to see that this could lead to View and Controller code paths getting crossed.
MVVM To the Rescue
This is where the MVVM pattern comes in handy.
Since UIViewController is supposed to be a Controller in the MVC pattern, and it’s already doing a lot with the Views, we can merge them into the View of our new pattern - MVVM.
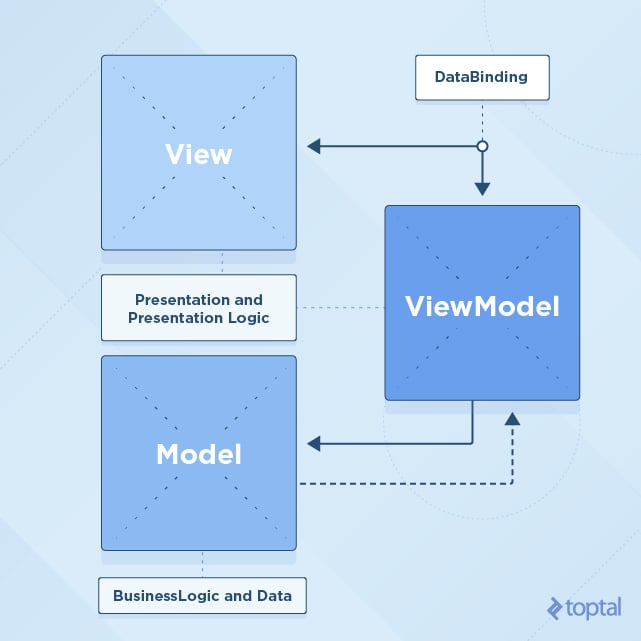
In the MVVM design pattern, Model is the same as in MVC pattern. It represents simple data.
View is represented by the UIView or UIViewController objects, accompanied with their .xib and .storyboard files, which should only display prepared data. (We don’t want to have NSDateFormatter code, for example, inside the View.)
Only a simple, formatted string that comes from the ViewModel.
ViewModel hides all asynchronous networking code, data preparation code for visual presentation, and code listening for Model changes. All of these are hidden behind a well-defined API modeled to fit this particular View.
One of the benefits of using MVVM architecture is testing. Since ViewModel is pure NSObject (or struct for example), and it’s not coupled with the UIKit code, you can test it more easily in your unit tests without it affecting the UI code.
Now, the View (UIViewController/UIView) has become much simpler while ViewModel acts as the glue between the Model and View.
Applying MVVM In Swift
To show you an iOS MVVM project in action, you can download and examine the example Xcode project created for this Swift MVVM tutorial here. This project uses Swift 3 and Xcode 8.1.
There are two versions of the project: Starter and Finished.
The Finished version is a completed mini application featuring Swift MVVM architecture , where Starter is the same project but without the methods and objects implemented.
First, I suggest you download the Starter project, and follow this tutorial. If you need a quick reference of the project for later, download the Finished project.
Tutorial Project Introduction
The tutorial project is a basketball application for the tracking of player actions during the game.
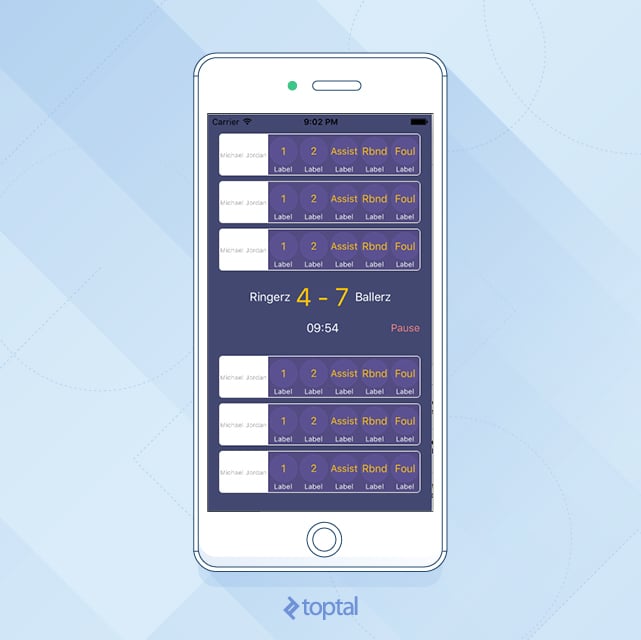
It’s used for the quick tracking of user moves and of the overall score in a pickup game.
Two teams play until the score of 15 (with at least a two-point difference) is reached. Each player can score one point to two points, and each player can assist, rebound, and foul.
Project hierarchy looks like this:
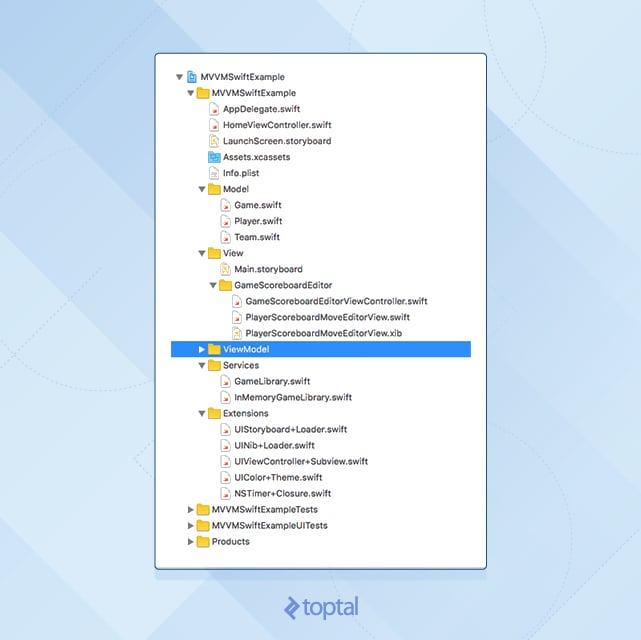
Model
-
Game.swift- Contains game logic, tracks overall score, tracks each player’s moves.
-
Team.swift- Contains team name and players list (three players in each team).
-
Player.swift- A single player with a name.
View
-
HomeViewController.swift- Root view controller, which presents the
GameScoreboardEditorViewController
- Root view controller, which presents the
-
GameScoreboardEditorViewController.swift- Supplemented with Interface Builder view in
Main.storyboard. - Screen of interest for this tutorial.
- Supplemented with Interface Builder view in
-
PlayerScoreboardMoveEditorView.swift- Supplemented with Interface Builder view in
PlayerScoreboardMoveEditorView.xib - Subview of the above view, also uses MVVM design pattern.
- Supplemented with Interface Builder view in
ViewModel
-
ViewModelgroup is empty, this is what you will be building in this tutorial.
The downloaded Xcode project already contains placeholders for the View objects (UIView and UIViewController). The project also contains some custom-made objects made to demo one of the ways on how to provide data to the ViewModel objects (Services group).
The Extensions group contains useful extensions for the UI code that are not in the scope of this tutorial and are self-explanatory.
If you run the app at this point, it will show the finished UI, but nothing happens, when a user presses the buttons.
This is because you’ve only created views and IBActions without connecting them to the app logic and without filling UI elements with the data from the model (from the Game object, as we will learn later).
Connecting View and Model with ViewModel
In the MVVM design pattern, View should not know anything about the Model. The only thing that View knows is how to work with a ViewModel.
Start by examining your View.
In the GameScoreboardEditorViewController.swift file, the fillUI method is empty at this point. This is the place you want to populate the UI with data. To achieve this, you need to provide data for the ViewController. You do this with a ViewModel object.
First, create a ViewModel object that contains all the necessary data for this ViewController.
Go to the ViewModel Xcode project group, which will be empty, create a GameScoreboardEditorViewModel.swift file, and make it a protocol.
import Foundation

protocol GameScoreboardEditorViewModel {
    var homeTeam: String { get }
    var awayTeam: String { get }
    var time: String { get }
    var score: String { get }
    var isFinished: Bool { get }

    var isPaused: Bool { get }
    func togglePause();
}
Using protocols like this keeps thing nice and clean; you only must define data you will be using.
Next, create an implementation for this protocol.
Create a new file, called GameScoreboardEditorViewModelFromGame.swift, and make this object a subclass of NSObject.
Also, make it conform to the GameScoreboardEditorViewModel protocol:
import Foundation

class GameScoreboardEditorViewModelFromGame: NSObject, GameScoreboardEditorViewModel {

    let game: Game

    struct Formatter {
        static let durationFormatter: DateComponentsFormatter = {
            let dateFormatter = DateComponentsFormatter()
            dateFormatter.unitsStyle = .positional
            return dateFormatter
        }()
    }

    // MARK: GameScoreboardEditorViewModel protocol

    var homeTeam: String
    var awayTeam: String

    var time: String
    var score: String
    var isFinished: Bool

    var isPaused: Bool
    func togglePause() {
        if isPaused {
            startTimer()
        } else {
            pauseTimer()
        }

        self.isPaused = !isPaused
    }

    // MARK: Init

    init(withGame game: Game) {
        self.game = game

        self.homeTeam = game.homeTeam.name
        self.awayTeam = game.awayTeam.name

        self.time = GameScoreboardEditorViewModelFromGame.timeRemainingPretty(for: game)
        self.score = GameScoreboardEditorViewModelFromGame.scorePretty(for: game)
        self.isFinished = game.isFinished
        self.isPaused = true
    }

    // MARK: Private

    fileprivate var gameTimer: Timer?
    fileprivate func startTimer() {
        let interval: TimeInterval = 0.001
        gameTimer = Timer.schedule(repeatInterval: interval) { timer in
            self.game.time += interval
            self.time = GameScoreboardEditorViewModelFromGame.timeRemainingPretty(for: self.game)
        }
    }

    fileprivate func pauseTimer() {
        gameTimer?.invalidate()
        gameTimer = nil
    }

    // MARK: String Utils

    fileprivate static func timeFormatted(totalMillis: Int) -> String {
        let millis: Int = totalMillis % 1000 / 100 // "/ 100" <- because we want only 1 digit
        let totalSeconds: Int = totalMillis / 1000

        let seconds: Int = totalSeconds % 60
        let minutes: Int = (totalSeconds / 60)

        return String(format: "%02d:%02d.%d", minutes, seconds, millis)
    }

    fileprivate static func timeRemainingPretty(for game: Game) -> String {
        return timeFormatted(totalMillis: Int(game.time * 1000))
    }

    fileprivate static func scorePretty(for game: Game) -> String {
        return String(format: "\(game.homeTeamScore) - \(game.awayTeamScore)")
    }

}
Notice that you’ve provided everything needed for the ViewModel to work through the initializer.
You provided it the Game object, which is the Model underneath this ViewModel.
If you run the app now, it still won’t work because you haven’t connected this ViewModel data to the View, itself.
So, go back to the GameScoreboardEditorViewController.swift file, and create a public property named viewModel.
Make it of the type GameScoreboardEditorViewModel.
Place it right before the viewDidLoad method inside the GameScoreboardEditorViewController.swift.
var viewModel: GameScoreboardEditorViewModel? {
    didSet {
        fillUI()
    }
}
Next, you need to implement the fillUI method.
Notice how this method is called from two places, the viewModel property observer (didSet) and the viewDidLoad method.
This is because we can create a ViewController and assign a ViewModel to it before attaching it to a view (before viewDidLoad method is called).
On the other hand, you could attach ViewController’s view to another view and call viewDidLoad, but if viewModel is not set at that time, nothing will happen.
That’s why first, you need to check if everything is set for your data to fill the UI. It’s important to guard your code against unexpected usage.
So, go to fillUI method, and replace it with the following code:
fileprivate func fillUI() {
    if !isViewLoaded {
        return
    }

    guard let viewModel = viewModel else {
        return
    }

    // we are sure here that we have all the setup done

    self.homeTeamNameLabel.text = viewModel.homeTeam
    self.awayTeamNameLabel.text = viewModel.awayTeam

    self.scoreLabel.text = viewModel.score
    self.timeLabel.text = viewModel.time

    let title: String = viewModel.isPaused ? "Start" : "Pause"
    self.pauseButton.setTitle(title, for: .normal)
}
Now, implement the pauseButtonPress method:
@IBAction func pauseButtonPress(_ sender: AnyObject) {
    viewModel?.togglePause()
}
All you need do now, is set the actual viewModel property on this ViewController. You do this “from the outside.”
Open HomeViewController.swift file and uncomment the ViewModel; create and setup lines in the showGameScoreboardEditorViewController method:
// uncomment this when view model is implemented
let viewModel = GameScoreboardEditorViewModelFromGame(withGame: game)
controller.viewModel = viewModel
Now, run the app. It should look something like this:
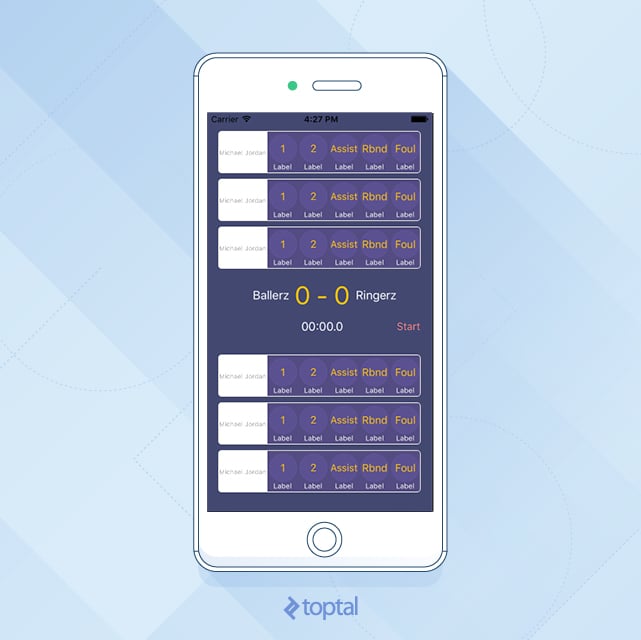
The middle view, which is responsible for the score, time, and team names, no longer shows values set in the Interface Builder.
Now, it’s showing the values from the ViewModel object itself, which gets its data from the actual Model object (Game object).
Excellent! But what about the player views? Those buttons still don’t do anything.
You know that you have six views for player-moves tracking.
You created a separate subview, named PlayerScoreboardMoveEditorView for that, which does nothing with the real data for now and displays static values that were set through the Interface Builder inside the PlayerScoreboardMoveEditorView.xib file.
You need to give it some data.
You’ll do it the same way you did with GameScoreboardEditorViewController and GameScoreboardEditorViewModel.
Open the ViewModel group in the Xcode project, and define the new protocol here.
Create a new file named PlayerScoreboardMoveEditorViewModel.swift, and put the following code inside:
import Foundation

protocol PlayerScoreboardMoveEditorViewModel {
    var playerName: String { get }

    var onePointMoveCount: String { get }
    var twoPointMoveCount: String { get }
    var assistMoveCount: String { get }
    var reboundMoveCount: String { get }
    var foulMoveCount: String { get }

    func onePointMove()
    func twoPointsMove()
    func assistMove()
    func reboundMove()
    func foulMove()
}
This ViewModel protocol was designed to fit your PlayerScoreboardMoveEditorView, just as you did in the parent view, GameScoreboardEditorViewController.
You need to have values for the five different moves that a user can make, and you need to react, when the user touches one of the action buttons. You also need a String for the player name.
After you’ve done this, create a concrete class that implements this protocol, just as you did with the parent view (GameScoreboardEditorViewController).
Next, create an implementation of this protocol: Create a new file, name it PlayerScoreboardMoveEditorViewModelFromPlayer.swift, and make this object a subclass of NSObject. Also, make it conform to the PlayerScoreboardMoveEditorViewModel protocol:
import Foundation

class PlayerScoreboardMoveEditorViewModelFromPlayer: NSObject, PlayerScoreboardMoveEditorViewModel {

    fileprivate let player: Player
    fileprivate let game: Game

    // MARK: PlayerScoreboardMoveEditorViewModel protocol

    let playerName: String

    var onePointMoveCount: String
    var twoPointMoveCount: String
    var assistMoveCount: String
    var reboundMoveCount: String
    var foulMoveCount: String

    func onePointMove() {
        makeMove(.onePoint)
    }

    func twoPointsMove() {
        makeMove(.twoPoints)
    }

    func assistMove() {
        makeMove(.assist)
    }

    func reboundMove() {
        makeMove(.rebound)
    }

    func foulMove() {
        makeMove(.foul)
    }

    // MARK: Init

    init(withGame game: Game, player: Player) {
        self.game = game
        self.player = player

        self.playerName = player.name
        self.onePointMoveCount = "\(game.playerMoveCount(for: player, move: .onePoint))"
        self.twoPointMoveCount = "\(game.playerMoveCount(for: player, move: .twoPoints))"
        self.assistMoveCount = "\(game.playerMoveCount(for: player, move: .assist))"
        self.reboundMoveCount = "\(game.playerMoveCount(for: player, move: .rebound))"
        self.foulMoveCount = "\(game.playerMoveCount(for: player, move: .foul))"
    }

    // MARK: Private

    fileprivate func makeMove(_ move: PlayerInGameMove) {
        game.addPlayerMove(move, for: player)

        onePointMoveCount = "\(game.playerMoveCount(for: player, move: .onePoint))"
        twoPointMoveCount = "\(game.playerMoveCount(for: player, move: .twoPoints))"
        assistMoveCount = "\(game.playerMoveCount(for: player, move: .assist))"
        reboundMoveCount = "\(game.playerMoveCount(for: player, move: .rebound))"
        foulMoveCount = "\(game.playerMoveCount(for: player, move: .foul))"
    }

}
Now, you need to have an object that will create this instance “from the outside,” and set it as a property inside the PlayerScoreboardMoveEditorView.
Remember how HomeViewController was responsible for setting the viewModel property on the GameScoreboardEditorViewController?
In the same way, GameScoreboardEditorViewController is a parent view of your PlayerScoreboardMoveEditorView and that GameScoreboardEditorViewController will be responsible for creating of PlayerScoreboardMoveEditorViewModel objects.
You need to expand your GameScoreboardEditorViewModel first.
Open GameScoreboardEditorViewModel and add these two properties:
var homePlayers: [PlayerScoreboardMoveEditorViewModel] { get }
var awayPlayers: [PlayerScoreboardMoveEditorViewModel] { get }
Also, update the GameScoreboardEditorViewModelFromGame with these two properties just above the initWithGame method:
let homePlayers: [PlayerScoreboardMoveEditorViewModel]
let awayPlayers: [PlayerScoreboardMoveEditorViewModel]
Add these two lines inside initWithGame:
self.homePlayers = GameScoreboardEditorViewModelFromGame.playerViewModels(from: game.homeTeam.players, game: game)
self.awayPlayers = GameScoreboardEditorViewModelFromGame.playerViewModels(from: game.awayTeam.players, game: game)
And of course, add the missing playerViewModelsWithPlayers method:
// MARK: Private Init

fileprivate static func playerViewModels(from players: [Player], game: Game) -> [PlayerScoreboardMoveEditorViewModel] {
    var playerViewModels: [PlayerScoreboardMoveEditorViewModel] = [PlayerScoreboardMoveEditorViewModel]()
    for player in players {
        playerViewModels.append(PlayerScoreboardMoveEditorViewModelFromPlayer(withGame: game, player: player))
    }

    return playerViewModels
}
Great!
You’ve updated your ViewModel (GameScoreboardEditorViewModel) with the home and away players array. You still need to fill these two arrays.
You’ll do this in the same place you used this viewModel to fill up the UI.
Open GameScoreboardEditorViewController and go to the fillUI method. Add these lines at the method end:
homePlayer1View.viewModel = viewModel.homePlayers[0]
homePlayer2View.viewModel = viewModel.homePlayers[1]
homePlayer3View.viewModel = viewModel.homePlayers[2]

awayPlayer1View.viewModel = viewModel.awayPlayers[0]
awayPlayer2View.viewModel = viewModel.awayPlayers[1]
awayPlayer3View.viewModel = viewModel.awayPlayers[2]
For the moment, you have build errors because you didn’t add the actual viewModel property inside the PlayerScoreboardMoveEditorView.
Add the following code above the init method inside the PlayerScoreboardMoveEditorView`.
var viewModel: PlayerScoreboardMoveEditorViewModel? {
    didSet {
        fillUI()
    }
}
And implement the fillUI method:
fileprivate func fillUI() {
    guard let viewModel = viewModel else {
        return
    }

    self.name.text = viewModel.playerName

    self.onePointCountLabel.text = viewModel.onePointMoveCount
    self.twoPointCountLabel.text = viewModel.twoPointMoveCount
    self.assistCountLabel.text = viewModel.assistMoveCount
    self.reboundCountLabel.text = viewModel.reboundMoveCount
    self.foulCountLabel.text = viewModel.foulMoveCount
}
Finally, run the app, and see how the data in the UI elements is the actual data from the Game object.
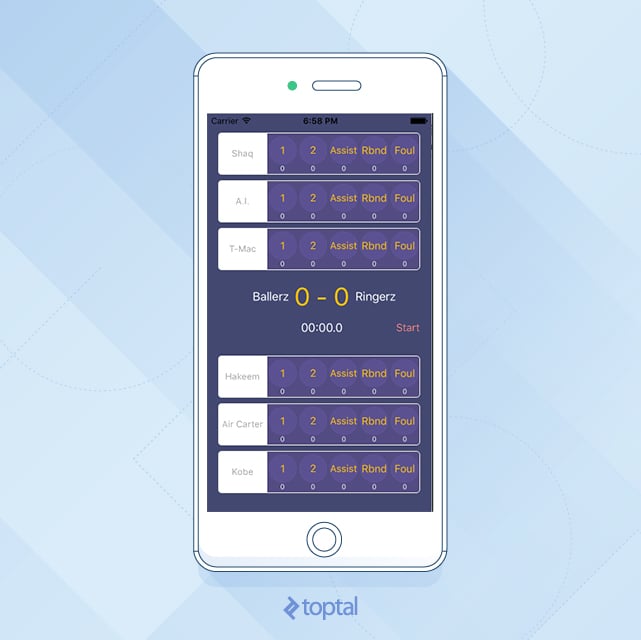
At this point, you have a functional MVVM Swift app.
It nicely hides the Model from the View, and your View is much simpler than you’re used to with the MVC.
Up to this point, you’ve created an app that contains the View and its ViewModel.
That View also has six instances of the same subview (player view) with its ViewModel.
However, as you may notice, you can only display data in the UI once (in the fillUI method), and that data is static.
If your data in the views won’t be changing during the lifetime of that view, then you have a good and clean solution to use MVVM in this way.
Making the ViewModel Dynamic
Because your data will change, you need to make your ViewModel dynamic.
What this means is that when the Model changes, ViewModel should change its public property values; it would propagate the change back to the view, which is the one that will update the UI.
There are a lot of ways to do this.
When Model changes, ViewModel gets notified first.
You need some mechanism to propagate what changes up to the View.
Some of the options include RxSwift, which is a pretty large library and takes some time to get used to.
ViewModel could be firing NSNotifications on each property value change, but this adds a lot of code that needs additional handling, such as subscribing to notifications and unsubscribing when the view gets deallocated.
Key-Value-Observing (KVO) is another option, but users will confirm that its API is not fancy.
In this tutorial, you’ll use Swift generics and closures, which are nicely described in the Bindings, Generics, Swift and MVVM article.
Now, let’s get back to the MVVM Swift example app.
Go to the ViewModel project group, and create a new Swift file, Dynamic.swift.
class Dynamic<T> {
    typealias Listener = (T) -> ()
    var listener: Listener?

    func bind(_ listener: Listener?) {
        self.listener = listener
    }

    func bindAndFire(_ listener: Listener?) {
        self.listener = listener
        listener?(value)
    }

    var value: T {
        didSet {
            listener?(value)
        }
    }

    init(_ v: T) {
        value = v
    }
}
You’ll use this class for properties in your ViewModels that you expect to change during the View lifecycle.
First, start with the PlayerScoreboardMoveEditorView and its ViewModel, PlayerScoreboardMoveEditorViewModel.
Open PlayerScoreboardMoveEditorViewModel and look at its properties.
Because the playerName isn’t expected to change, you can leave it as is.
The other five properties (five move types) will change, so you need to do something about that. The solution? The above mentioned Dynamic class that you just added to the project.
Inside PlayerScoreboardMoveEditorViewModel remove definitions for five Strings that represent move counts and replace it with this:
var onePointMoveCount: Dynamic<String> { get }
var twoPointMoveCount: Dynamic<String> { get }
var assistMoveCount: Dynamic<String> { get }
var reboundMoveCount: Dynamic<String> { get }
var foulMoveCount: Dynamic<String> { get }
This is how the ViewModel protocol should look like now:
import Foundation

protocol PlayerScoreboardMoveEditorViewModel {
    var playerName: String { get }

    var onePointMoveCount: Dynamic<String> { get }
    var twoPointMoveCount: Dynamic<String> { get }
    var assistMoveCount: Dynamic<String> { get }
    var reboundMoveCount: Dynamic<String> { get }
    var foulMoveCount: Dynamic<String> { get }

    func onePointMove()
    func twoPointsMove()
    func assistMove()
    func reboundMove()
    func foulMove()
}
This Dynamic type enables you to change the value of that particular property, and at the same time, notify the change-listener object, which, in this case, will be the View.
Now, update the actual ViewModel implementation PlayerScoreboardMoveEditorViewModelFromPlayer.
Replace this:
var onePointMoveCount: String
var twoPointMoveCount: String
var assistMoveCount: String
var reboundMoveCount: String
var foulMoveCount: String
with the following:
let onePointMoveCount: Dynamic<String>
let twoPointMoveCount: Dynamic<String>
let assistMoveCount: Dynamic<String>
let reboundMoveCount: Dynamic<String>
let foulMoveCount: Dynamic<String>
Note: It’s OK to declare these properties as constants with let since you won’t change the actual property. You will change the value property on the Dynamic object.
Now, there’s build errors because you did not initialize your Dynamic objects.
Inside PlayerScoreboardMoveEditorViewModelFromPlayer’s init method, replace initialization of move properties with this:
self.onePointMoveCount = Dynamic("\(game.playerMoveCount(for: player, move: .onePoint))")
self.twoPointMoveCount = Dynamic("\(game.playerMoveCount(for: player, move: .twoPoints))")
self.assistMoveCount = Dynamic("\(game.playerMoveCount(for: player, move: .assist))")
self.reboundMoveCount = Dynamic("\(game.playerMoveCount(for: player, move: .rebound))")
self.foulMoveCount = Dynamic("\(game.playerMoveCount(for: player, move: .foul))")
Inside PlayerScoreboardMoveEditorViewModelFromPlayer go to the makeMove method, and replace it with the following code:
fileprivate func makeMove(_ move: PlayerInGameMove) {
    game.addPlayerMove(move, for: player)

    onePointMoveCount.value = "\(game.playerMoveCount(for: player, move: .onePoint))"
    twoPointMoveCount.value = "\(game.playerMoveCount(for: player, move: .twoPoints))"
    assistMoveCount.value = "\(game.playerMoveCount(for: player, move: .assist))"
    reboundMoveCount.value = "\(game.playerMoveCount(for: player, move: .rebound))"
    foulMoveCount.value = "\(game.playerMoveCount(for: player, move: .foul))"
}
As you can see, you’ve created instances of Dynamic class, and assigned it String values. When you need to update the data, don’t change the Dynamic property itself; rather update it’s value property.
Great! PlayerScoreboardMoveEditorViewModel is dynamic now.
Let’s make use of it, and go to the view that will actually listen for these changes.
Open PlayerScoreboardMoveEditorView and its fillUI method (you should see build errors in this method at this point since you’re trying to assign String value to the Dynamic object type.)
Replace the “errored” lines:
self.onePointCountLabel.text = viewModel.onePointMoveCount
self.twoPointCountLabel.text = viewModel.twoPointMoveCount
self.assistCountLabel.text = viewModel.assistMoveCount
self.reboundCountLabel.text = viewModel.reboundMoveCount
self.foulCountLabel.text = viewModel.foulMoveCount
with the following:
viewModel.onePointMoveCount.bindAndFire { [unowned self] in self.onePointCountLabel.text = $0 }
viewModel.twoPointMoveCount.bindAndFire { [unowned self] in self.twoPointCountLabel.text = $0 }
viewModel.assistMoveCount.bindAndFire { [unowned self] in self.assistCountLabel.text = $0 }
viewModel.reboundMoveCount.bindAndFire { [unowned self] in self.reboundCountLabel.text = $0 }
viewModel.foulMoveCount.bindAndFire { [unowned self] in self.foulCountLabel.text = $0 }
Next, implement the five methods that represent move actions (Button Action section):
@IBAction func onePointAction(_ sender: Any) {
    viewModel?.onePointMove()
}

@IBAction func twoPointsAction(_ sender: Any) {
    viewModel?.twoPointsMove()
}

@IBAction func assistAction(_ sender: Any) {
    viewModel?.assistMove()
}

@IBAction func reboundAction(_ sender: Any) {
    viewModel?.reboundMove()
}

@IBAction func foulAction(_ sender: Any) {
    viewModel?.foulMove()
}
Run the app, and click on some move buttons. You’ll see how the counter values inside the player views change when you click on the action button.
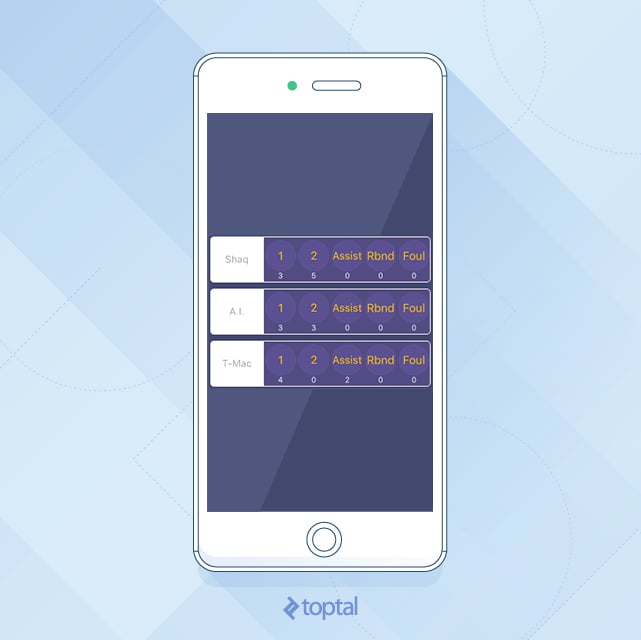
You’re finished with the PlayerScoreboardMoveEditorView and PlayerScoreboardMoveEditorViewModel.
This was simple.
Now, you need to do the same with your main view (GameScoreboardEditorViewController).
First, open GameScoreboardEditorViewModel and see which values are expected to change during the view’s lifecycle.
Replace time, score, isFinished, isPaused definitions with the Dynamic versions:
import Foundation

protocol GameScoreboardEditorViewModel {
    var homeTeam: String { get }
    var awayTeam: String { get }
    var time: Dynamic<String> { get }
    var score: Dynamic<String> { get }
    var isFinished: Dynamic<Bool> { get }

    var isPaused: Dynamic<Bool> { get }
    func togglePause()

    var homePlayers: [PlayerScoreboardMoveEditorViewModel] { get }
    var awayPlayers: [PlayerScoreboardMoveEditorViewModel] { get }
}
Go to the ViewModel implementation (GameScoreboardEditorViewModelFromGame) and do the same with the properties declared in the protocol.
Replace this:
var time: String
var score: String
var isFinished: Bool

var isPaused: Bool
with the following:
let time: Dynamic<String>
let score: Dynamic<String>
let isFinished: Dynamic<Bool>

let isPaused: Dynamic<Bool>
You’ll get a few errors, now, because you changed ViewModel’s type from String and Bool to Dynamic<String> and Dynamic<Bool>.
Let’s fix that.
Fix the togglePause method by replacing it with the following:
func togglePause() {
    if isPaused.value {
        startTimer()
    } else {
        pauseTimer()
    }

    self.isPaused.value = !isPaused.value
}
Notice how the only change is that you no longer set the property value directly on the property. Instead, you set it on the object’s value property.
Now, fix the initWithGame method by replacing this:
self.time = GameScoreboardEditorViewModelFromGame.timeRemainingPretty(game)
self.score = GameScoreboardEditorViewModelFromGame.scorePretty(game)
self.isFinished = game.isFinished
self.isPaused = true
with the following:
self.time = Dynamic(GameScoreboardEditorViewModelFromGame.timeRemainingPretty(for: game))
self.score = Dynamic(GameScoreboardEditorViewModelFromGame.scorePretty(for: game))
self.isFinished = Dynamic(game.isFinished)
self.isPaused = Dynamic(true)
You should get the point now.
You’re wrapping the primitive values, such as String, Int and Bool, with Dynamic<T> versions of those objects, which give you the lightweight binding mechanism.
You have one more error to fix.
In startTimer method, replace the error line with:
self.time.value = GameScoreboardEditorViewModelFromGame.timeRemainingPretty(for: self.game)
You’ve upgraded your ViewModel to be dynamic, just as you did with the player’s ViewModel. But you still need to update your View (GameScoreboardEditorViewController).
Replace the entire fillUI method with this:
fileprivate func fillUI() {
    if !isViewLoaded {
        return
    }

    guard let viewModel = viewModel else {
        return
    }

    self.homeTeamNameLabel.text = viewModel.homeTeam
    self.awayTeamNameLabel.text = viewModel.awayTeam

    viewModel.score.bindAndFire { [unowned self] in self.scoreLabel.text = $0 }
    viewModel.time.bindAndFire { [unowned self] in self.timeLabel.text = $0 }

    viewModel.isFinished.bindAndFire { [unowned self] in
        if $0 {
            self.homePlayer1View.isHidden = true
            self.homePlayer2View.isHidden = true
            self.homePlayer3View.isHidden = true

            self.awayPlayer1View.isHidden = true
            self.awayPlayer2View.isHidden = true
            self.awayPlayer3View.isHidden = true
        }
    }

    viewModel.isPaused.bindAndFire { [unowned self] in
        let title = $0 ? "Start" : "Pause"
        self.pauseButton.setTitle(title, for: .normal)
    }

    homePlayer1View.viewModel = viewModel.homePlayers[0]
    homePlayer2View.viewModel = viewModel.homePlayers[1]
    homePlayer3View.viewModel = viewModel.homePlayers[2]

    awayPlayer1View.viewModel = viewModel.awayPlayers[0]
    awayPlayer2View.viewModel = viewModel.awayPlayers[1]
    awayPlayer3View.viewModel = viewModel.awayPlayers[2]
}
The only difference is that you changed your four dynamic properties and added change listeners to each one of them.
At this point, if you run your app, toggling the Start/Pause button will start and pause the game timer. This is used for time-outs during the game.
You’re almost finished except the score is not changing in the UI, when you press one of the point buttons (1 and 2 points button).
This is because you haven’t really propagated score changes in the underlying Game model object up to the ViewModel.
So, open Game model object for a little examination. Check its updateScore method.
fileprivate func updateScore(_ score: UInt, withScoringPlayer player: Player) {
    if isFinished || score == 0 {
        return
    }

    if homeTeam.containsPlayer(player) {
        homeTeamScore += score
    } else {
        assert(awayTeam.containsPlayer(player))
        awayTeamScore += score
    }

    if checkIfFinished() {
        isFinished = true
    }

    NotificationCenter.default.post(name: Notification.Name(rawValue: GameNotifications.GameScoreDidChangeNotification), object: self)
}
This method does two important things.
First, it sets the isFinished property to true if the game is finished based on the scores of both teams.
After that, it posts a notification that the score has changed. You’ll listen for this notification in the GameScoreboardEditorViewModelFromGame and update dynamic score value in the notification handler method.
Add this line at the bottom of initWithGame method (don’t forget the super.init() call to avoid errors):
super.init()
subscribeToNotifications()
Below initWithGame method, add deinit method, since you want to do the cleanup properly and avoid crashes caused by the NotificationCenter.
deinit {
    unsubscribeFromNotifications()
}
Finally, add the implementations of these methods. Add this section right below the deinit method:
// MARK: Notifications (Private)

fileprivate func subscribeToNotifications() {
    NotificationCenter.default.addObserver(self,
                                           selector: #selector(gameScoreDidChangeNotification(_:)),
                                           name: NSNotification.Name(rawValue: GameNotifications.GameScoreDidChangeNotification),
                                           object: game)
}

fileprivate func unsubscribeFromNotifications() {
    NotificationCenter.default.removeObserver(self)
}

@objc fileprivate func gameScoreDidChangeNotification(_ notification: NSNotification){
    self.score.value = GameScoreboardEditorViewModelFromGame.scorePretty(for: game)

    if game.isFinished {
        self.isFinished.value = true
    }
}
Now, run the app, and click on the player views to change scores. Since you’ve already connected dynamic score and isFinished in the ViewModel with the View, everything should work when you change the score value inside the ViewModel.
How to Further Improve the App
While there’s always room for improvement, this is out of scope of this tutorial.
For example, we do not stop the time automatically when the game is over (when one of the teams reaches 15 points), we just hide the player views.
You can play with the app if you like and upgrade it to have a “game creator” view, which would create a game, assign team names, assign player names and create a Game object that could be used to present GameScoreboardEditorViewController.
We can create another “game list” view that uses the UITableView to show multiple games in progress with some detailed info in the table cell. In cell select, we can show the GameScoreboardEditorViewController with the selected Game.
The GameLibrary has already been implemented. Just remember to pass that library reference to the ViewModel objects in their initializer. For example, “game creator’s” ViewModel would need to have an instance of GameLibrary passed through the initializer so that it would be able to insert the created Game object into the library. “Game list’s” ViewModel would also need this reference to fetch all games from the library, which will be needed by the UITableView.
The idea is to hide all of the dirty (non-UI) work inside the ViewModel and have the UI (View) only act with prepared presentation data.
What now?
After you get used to the MVVM, you can further improve it by using Uncle Bob’s Clean Architecture rules.
An additional good read is a three-part tutorial on Android architecture:
- Android Architecture: Part 1 – Every new beginning is hard,
- Android Architecture: Part 2 – The clean architecture,
- Android Architecture: Part 2 – The clean architecture.
Examples are written in Java (for Android), and if you are familiar with Java (which is much closer to Swift then Objective-C is to Java), you’ll get ideas on how to further refactor your code inside the ViewModel objects so that they don’t import any iOS modules (UIKit or CoreLocation e.g.).
These iOS modules can be hidden behind the pure NSObjects, which is good for code reusability.
MVVM is a good choice for most iOS apps, and hopefully, you will give it a try in your next project. Or, try it in your current project when you are creating a UIViewController.
Dino Bartošak
Zagreb, Croatia
Member since June 29, 2016
About the author
Dino is a software engineer specializing in iOS programming clean code and clean architecture, building iOS apps from scratch and custom UI.
PREVIOUSLY AT

