Next.js Rendering Techniques: How to Optimize Page Speed
Next.js is best known for server-side rendering, but these innovative strategies can help developers configure web apps for more speed, reduced server load, improved SEO, and much more.
Next.js is best known for server-side rendering, but these innovative strategies can help developers configure web apps for more speed, reduced server load, improved SEO, and much more.
Subhakar is a front-end developer with extensive experience using React, Next.js, and TypeScript. He specializes in creating MVPs for startups and has worked on projects ranging from cross-platform progressive web and React Native apps to AI-powered browser extensions and a crypto web app used by more than 10,000 investors.
Expertise
Previous Role
React DeveloperNext.js offers far more than standard server-side rendering capabilities. Software engineers can configure their web apps in many ways to optimize Next.js performance. In fact, Next.js developers routinely employ different caching strategies, varied pre-rendering techniques, and dynamic components to optimize and customize Next.js rendering to meet specific requirements.
When your goal is developing a multipage scalable web app with tens of thousands of pages, it is all the more important to maintain a good balance between Next.js page load speed and optimal server load. Choosing the right rendering techniques is crucial in building a performant web app that won’t waste hardware resources and generate additional costs.
Next.js Pre-rendering Techniques
Next.js pre-renders every page by default, but performance and efficiency can be further improved using different Next.js rendering types and approaches to pre-rendering and rendering. In addition to traditional client-side rendering (CSR), Next.js offers developers a choice between two basic forms of pre-rendering:
-
Server-side rendering (SSR) deals with rendering webpages at runtime when the request is called. This technique increases server load but is essential if the page has dynamic content and needs social visibility.
-
Static site generation (SSG) mainly deals with rendering webpages at build time. Next.js offers additional options for static generation with or without data, as well as automatic static optimization, which determines whether or not a page can be pre-rendered.
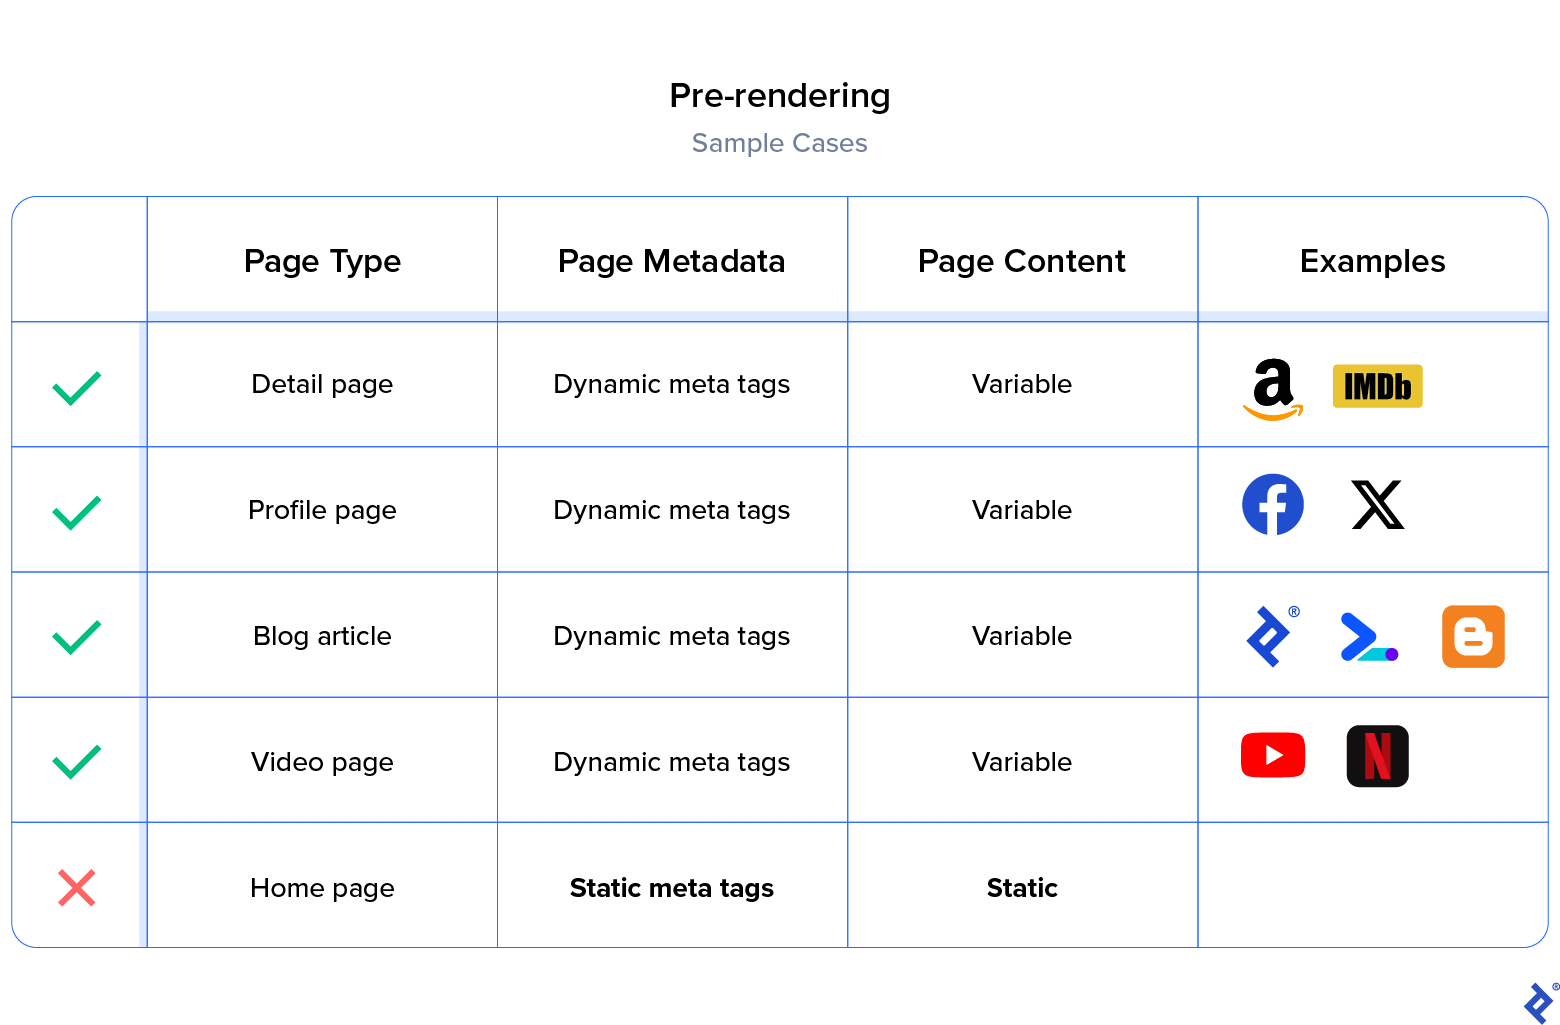
Pre-rendering is useful for pages that need social attention (Open Graph protocol) and good SEO (meta tags) but contain dynamic content based on the route endpoint. For example, an X (formerly Twitter) user page with a /@twitter_name endpoint has page-specific metadata. Hence, pre-rendering all pages in this route is a good option.
Metadata is not the only reason to choose SSR over CSR—rendering the HTML on the server can also lead to significant improvements in first input delay (FID), the Core Web Vitals metric that measures the time from a user’s first interaction to the time when the browser is actually able to process a response. When rendering heavy (data-intensive) components on the client side, FID becomes more noticeable to users, especially those with slower internet connections.
If Next.js performance optimization is the top priority, one must not overpopulate the DOM tree on the server side, which inflates the HTML document. If the content belongs to a list at the bottom of the page and is not immediately visible in the first load, client-side rendering is a better option for that particular component.
Pre-rendering can be further divided into multiple optimal methods by determining factors such as variability, bulk size, and frequency of updates and requests. We must pick the appropriate strategies while keeping in mind the server load; we don’t want to adversely affect the user experience or incur unnecessary hosting costs.
Determining the Factors for Next.js Performance Optimization
Just as traditional server-side rendering imposes a high load on the server at runtime, pure static generation will place a high load at build time. We must make careful decisions to configure the rendering technique depending on the nature of the webpage and route.
When dealing with Next.js optimization, the options provided are abundant and we have to determine the following criteria for each route endpoint:
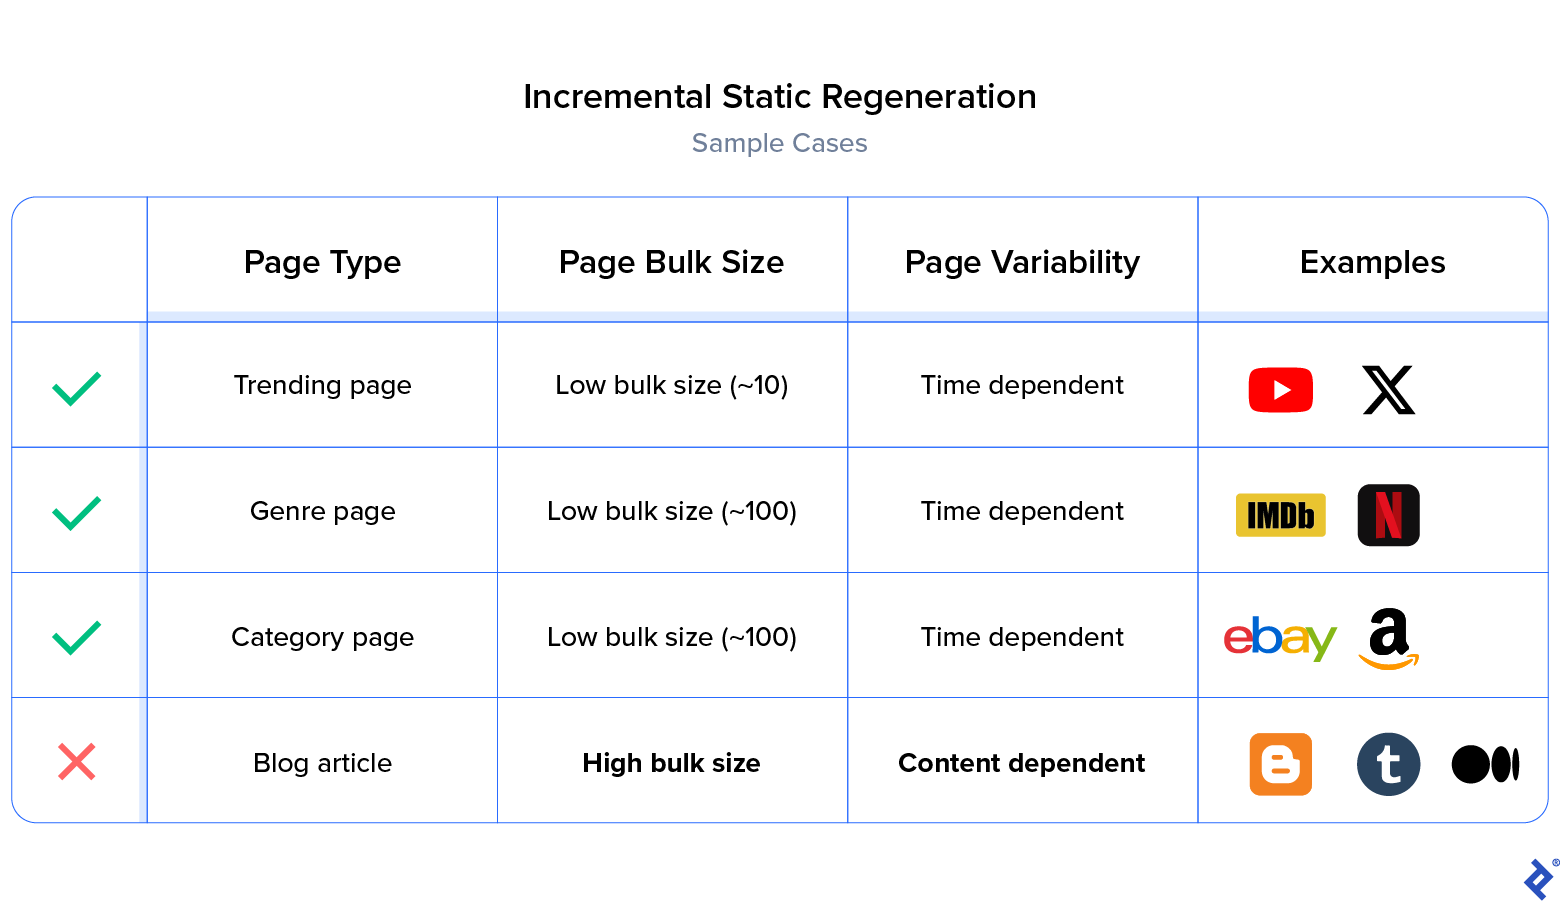
- Variability: The content of the webpage, either time dependent (changes every minute), action dependent (changes when a user creates/updates a document), or stale (doesn’t change until a new build).
- Bulk size: The estimate of the maximum number of pages in that route endpoint (e.g., 30 genres in a streaming app).
- Frequency of updates: The estimated rate of content updates (e.g., 10 updates per month), whether time dependent or action dependent.
- Frequency of requests: The estimated rate of user/client requests to a webpage (e.g., 100 requests per day, 10 requests per second).
Low Bulk Size and Time-dependent Variability
Incremental static regeneration (ISR) revalidates the webpage at a specified interval. This is the best option for standard build pages in a website, where the data is expected to be refreshed at a certain interval. For example, there is a genres/genre_id route point in an over-the-top media app like Netflix, and each genre page needs to be regenerated with fresh content on a daily basis. As the bulk size of genres is small (about 200), it is a better option to choose ISR, which revalidates the page given the condition that the pre-built/cached page is more than one day old.
Here is an example of an ISR implementation:
export async function getStaticProps() {
  const posts = await fetch(url-endpoint).then((data)=>data.json());

  /* revalidate at most every 10 secs */
  return { props: { posts }, revalidate: 10, }
}

export async function getStaticPaths() {

  const posts = await fetch(url-endpoint).then((data)=>data.json());
  const paths = posts.map((post) => (
params: { id: post.id },
  }));

  return { paths, fallback: false }
}
In this example, Next.js will revalidate all these pages every 10 seconds at most. The key here is at most, as the page does not regenerate every 10 seconds, but only when the request comes in. Here’s a step-by-step walkthrough of how it works:
- A user requests an ISR page route.
- Next.js sends the cached (stale) page.
- Next.js tries to check if the stale page has aged more than 10 seconds.
- If so, Next.js regenerates the new page.
High Bulk Size and Time-dependent Variability
Most server-side applications fall into this category. We term them public pages as these routes can be cached for a period of time because their content is not user dependent, and the data does not need to be up to date at all times. In these cases, the bulk size is usually too high (~2 million), and generating millions of pages at build time is not a viable solution.
SSR and Caching:
The better option is always to do server-side rendering, i.e., to generate the webpage at runtime when requested on the server and cache the page for an entire day, hour, or minute, so that any later request will get a cached page. This ensures the app does not need to build millions of pages at build time, nor repetitively build the same page at runtime.
Let’s see a basic example of an SSR and caching implementation:
export async function getServerSideProps({ req, res }) {
  /* setting a cache of 10 secs */
  res.setHeader( 'Cache-Control','public, s-maxage=10')
  const data = fetch(url-endpoint).then((res) => res.json());
  return {
    props: { data },
  }
}
You may examine the Next.js caching documentation if you would like to learn more about cache headers.
ISR and Fallback:
Though generating millions of pages at build time is not an ideal solution, sometimes we do need them generated in the build folder for further configuration or custom rollbacks. In this case, we can optionally bypass page generation at the build step, rendering on-demand only for the very first request or any succeeding request that crosses the stale age (revalidate interval) of the generated webpage.
We start by adding {fallback: 'blocking'} to the getStaticPaths, and when the build starts, we switch off the API (or prevent access to it) so that it will not generate any path routes. This effectively bypasses the phase of needlessly building millions of pages at build time, instead generating them on demand at runtime and keeping results in a build folder (_next/static) for succeeding requests and builds.
Here is an example of restricting static generations at the build phase:
export async function getStaticPaths() {
  // fallback: 'blocking' will try to server-render
  // all pages on demand if the page doesn’t exist already.
  if (process.env.SKIP_BUILD_STATIC_GENERATION) {
	return {paths: [], fallback: 'blocking'};
  }
}
Now we want the generated page to go into the cache for a period of time and revalidate later on when it crosses the cache period. We can use the same approach as in our ISR example:
export async function getStaticProps() {
  const posts = await fetch(<url-endpoint>).then((data)=>data.json());

  // Revalidates every 10 secs.
  return { props: { posts }, revalidate: 10, }
}
If there’s a new request after 10 seconds, the page will be revalidated (or invalidated if the page is not built already), effectively working the same way as SSR and caching, but generating the webpage in a build output folder (/_next/static).
In most cases, SSR with caching is the better option. The downside of ISR and fallback is that the page may initially show stale data. A page won’t be regenerated until a user visits it (to trigger the revalidation), and then the same user (or another user) visits the same page to see the most up-to-date version of it. This does have the unavoidable consequence of User A seeing stale data while User B sees accurate data. For some apps, this is insignificant, but for others, it’s unacceptable.
Content-dependent Variability
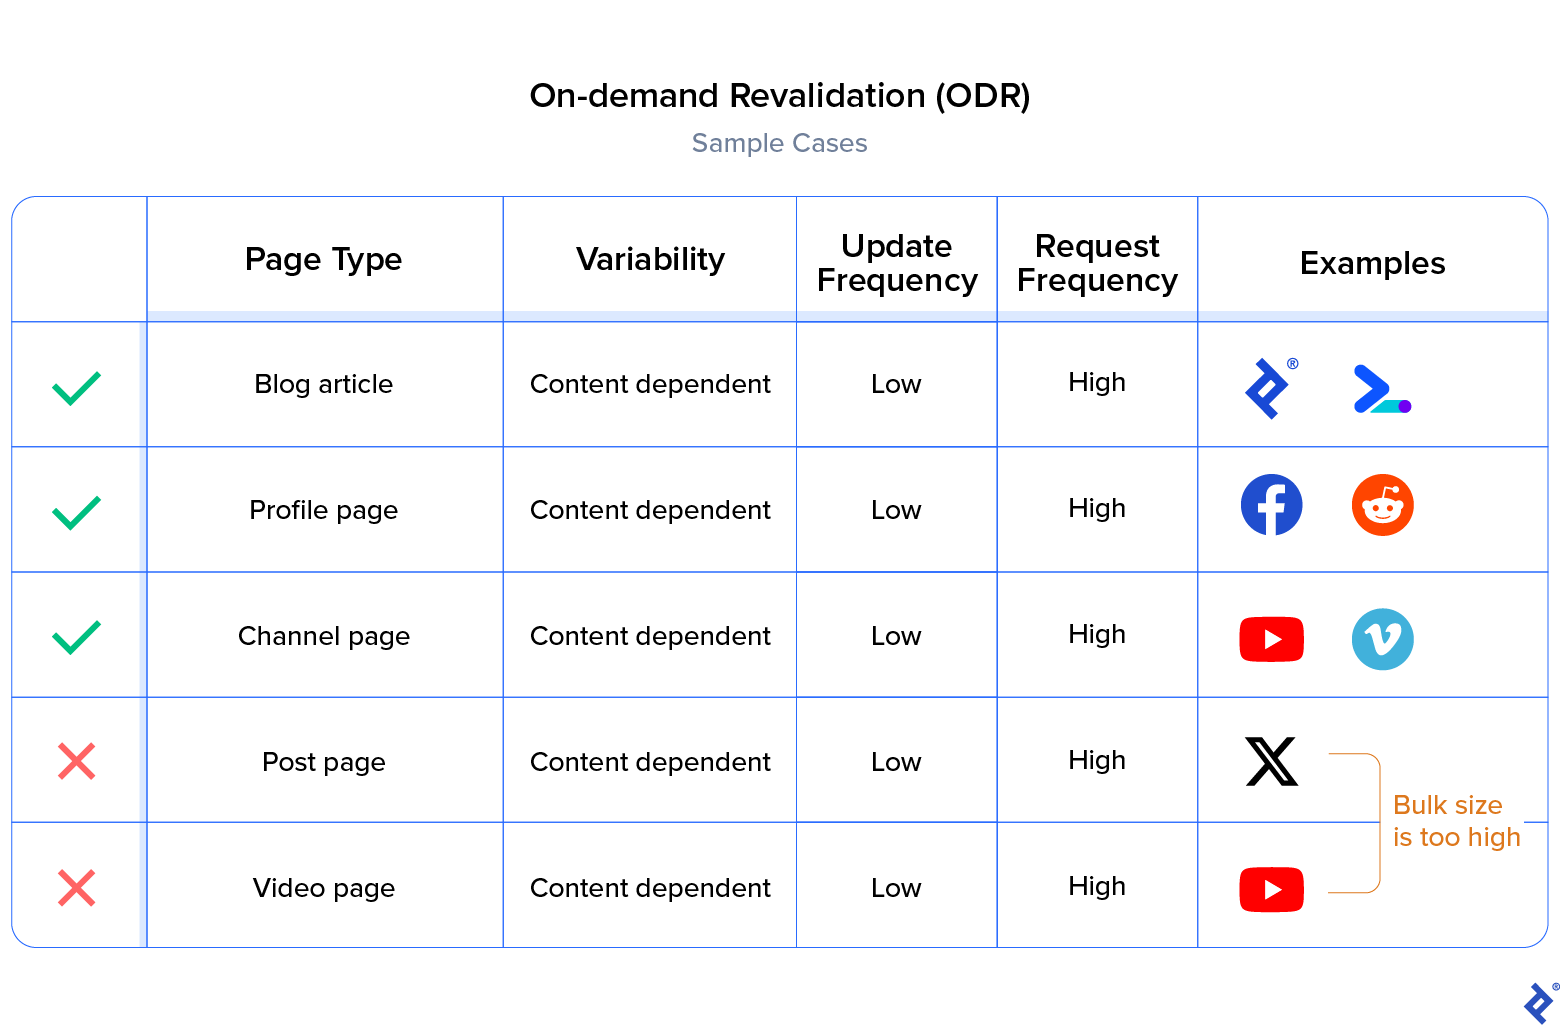
On-demand revalidation (ODR) revalidates the webpage at runtime via a webhook. This is quite useful for Next.js speed optimization in cases in which the page needs to be more truthful to content, e.g., if we are building a blog with a headless CMS that provides webhooks for when the content is created or updated. We can call the respective API endpoint to revalidate a webpage. The same is true for REST APIs in the back end—when we update or create a document, we can call a request to revalidate the webpage.
Let’s see an example of ODR in action:
// Calling this URL will revalidate an article.
// https://<your-site.com>/api/revalidate?revalidate_path=<article_id>&secret=<token>

// pages/api/revalidate.js

export default async function handler(req, res) {
  if (req.query.secret !== process.env.MY_SECRET_TOKEN) {
    return res.status(401).json({ message: 'Invalid token' })
  }

  try {
    await res.revalidate('https://<your-site.com>/'+req.query.revalidate_path)
    return res.json({ revalidated: true })
  } catch (err) {
    return res.status(500).send('Error revalidating')
  }
}
If we have a very large bulk size (~2 million), we might want to skip page generation on the build phase by passing an empty array of paths:
export async function getStaticPaths() {
  const posts = await fetch(url-endpoints).then((res) => res.json());

  // Will try to server-render all pages on demand if the path doesn’t exist.
  return {paths: [], fallback: 'blocking'};
}
This prevents the downside described in ISR. Instead, both User A and User B will see accurate data on revalidation, and the resulting regeneration happens in the background and not on request time.
There are scenarios when a content-dependent variability can be force switched to a time-dependent variability, i.e., if the bulk size and update or request frequency are too high.
Let’s use an IMDB movie details page as an example. Although new reviews may be added or the score may be changed, there is no need to reflect the details within seconds; even if it is an hour late, it doesn’t affect the functionality of the app. However, the server load can be minimized greatly by shifting to ISR, as you do not want to update the movie details page every time a user adds a review. Technically, as long as the update frequency is higher than the request frequency, it can be force switched.
With the launch of React server components in React 18, Layouts RFC is one of the most awaited feature updates in the Next.js platform that will enable support for single-page applications, nested layouts, and a new routing system. Layouts RFC supports improved data fetching, including parallel fetching, which allows Next.js to start rendering before data fetching is complete. With sequential data fetching, content-dependent rendering would be possible only after the previous fetch was completed.
Next.js Hybrid Approaches With CSR
In Next.js, client-side rendering always happens after pre-rendering. It is often treated as an add-on rendering type that is quite useful in those cases in which we need to reduce server load, or if the page has components that can be lazy loaded. The hybrid approach of pre-rendering and CSR is advantageous in many scenarios.
If the content is dynamic and does not require Open Graph integration, we should choose client-side rendering. For example, we can select SSG/SSR to pre-render an empty layout at build time and populate the DOM after the component loads.
In cases like these, the metadata is typically not affected. For example, the Facebook home feed updates every 60 seconds (i.e., variable content). Still, the page metadata remains constant (e.g., the page title, home feed), hence not affecting the Open Graph protocol and SEO visibility.
Dynamic Components
Client-side rendering is appropriate for content not visible in the window frame on the first load, or components hidden by default until an action (e.g., login modals, alerts, dialogues). You can display these components either by loading that content after the render (if the component for rendering is already in jsbundle) or by lazy loading the component itself through next/dynamic.
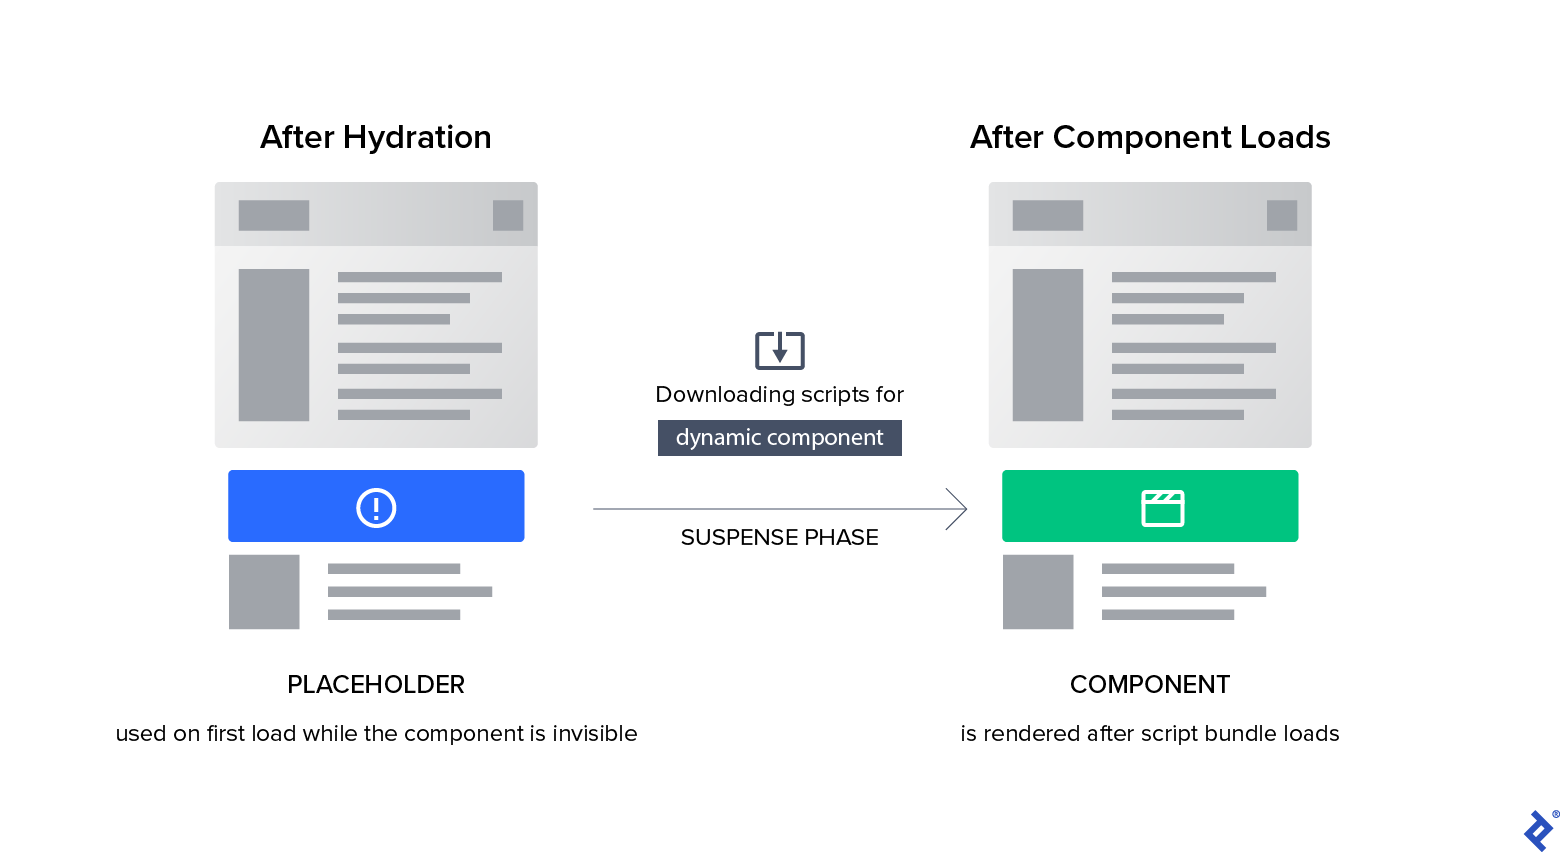
Usually, a website render starts with plain HTML, followed by the hydration of the page and client-side rendering techniques such as content fetching on component loads or dynamic components.
Hydration is a process in which React uses the JSON data and JavaScript instructions to make components interactive (for example, attaching event handlers to a button). This often makes the user feel as if the page is loading a bit slower, like in an empty X profile layout in which the profile content is loading progressively. Sometimes it is better to eliminate such scenarios by pre-rendering, especially if the content is already available at the time of pre-render.
The suspense phase represents the interval period for dynamic component loading and rendering. In Next.js, we are provided with an option to render a placeholder or fallback component during this phase.
An example of importing a dynamic component in Next.js:
/* loads the component on client side */
const DynamicModal = dynamic(() => import('../components/modal'), {
  ssr: false,
})
You can render a fallback component while the dynamic component is loading:
/* prevents hydrations until suspense */
const DynamicModal = dynamic(() => import('../components/modal'), {
  suspense: true,
})
export default function Home() {
  return (
    <Suspense fallback={`Loading...`}>
      <DynamicModal />
    </Suspense>
  )
Note that next/dynamic comes with a Suspense callback to show a loader or empty layout until the component loads, so the header component will not be included in the page’s initial JavaScript bundle (reducing the initial load time). The page will render the Suspense fallback component first, followed by the Modal component when the Suspense boundary is resolved.
Next.js Caching: Tips and Techniques
If you need to improve page performance and reduce server load at the same time, caching is the most useful tool in your arsenal. In SSR and caching, we’ve discussed how caching can effectively improve availability and performance for route points with a large bulk size. Usually, all Next.js assets (pages, scripts, images, videos) have cache configurations that we can add to and tweak to adjust to our requirements. Before we examine this, let’s briefly cover the core concepts of caching. The caching for a webpage must go through three different checkpoints when a user opens any website in a web browser:
- The browser cache is the first checkpoint for all HTTP requests. If there’s a cache hit it will be served directly from the browser cache store, while a cache miss will pass on to the next checkpoint.
- The content delivery network (CDN) cache is the second checkpoint. It is a cache store distributed to different proxy servers across the globe. This is also called caching on the edge.
- The origin server is the third checkpoint, where the request is served and revalidated if the cache store pushes a revalidate request (i.e., the page in the cache has become stale).
Caching headers are added to all immutable assets originating from /_next/static, such as CSS, JavaScript, images, and so on:
Cache-Control: public, maxage=31536000, immutable
The caching header for Next.js server-side rendering is configured by the Cache-Control header in getServerSideProps:
res.setHeader('Cache-Control', 'public', 's-maxage=10', 'stale-while-revalidate=59');
However, for statically generated pages (SSGs), the caching header is autogenerated by the revalidate option in getStaticProps.
Understanding and Configuring a Cache Header
Writing a cache header is straightforward, provided you learn how to configure it properly. Let’s examine what each tag means.
Public vs. Private
One important decision to make is choosing between private and public. public indicates that the response can be stored in a shared cache (CDN, proxy cache, etc.), while private indicates that the response can be stored only in the private cache (local cache in the browser).
If the page is targeted to many users and will look the same to these users, then opt for public, but if it’s targeted to individual users, then choose private.
private is rarely used on the web as most of the time developers try to utilize the edge network to cache their pages, whereas private will primarily prevent that and cache the page locally on the user end. private should be used if the page is user specific and contains private information, i.e., data we would not want cached on public cache stores:
Cache-Control: private, s-maxage=1800
Maximum Age
s-maxage is the maximum age of a cached page (i.e., how long it can be considered fresh), and a revalidation occurs if a request crosses the specified value. While there are exceptions, s-maxage should be suitable for most websites. You can decide its value based on your analytics and the frequency of content change. If the same page has a thousand hits every day and the content is only updated once a day, then choose a s-maxage value of 24 hours.
Must Revalidate vs. Stale While Revalidate
must-revalidate specifies that the response in the cache store can be reused as long as it is fresh, but must be revalidated if it is stale. stale-while-revalidate specifies that the response in the cache store can be reused even if it’s stale for the specified period of time (as it revalidates in the background).
If you know the content will change at a given interval–making preexisting content invalid–use must-revalidate. For example, you would use it for a stock exchange site where prices oscillate daily and old data quickly becomes invalid.
In contrast, stale-while-revalidate is used when we know content changes at every interval, and past content becomes deprecated, but not exactly invalid. Picture a top 10 trending page on a streaming service. The content changes daily, but it’s acceptable to show the first few hits as old data, as the first hit will revalidate the page; technically speaking, this is acceptable if the website traffic is not too high, or the content is of no major importance. If the traffic is very high, then maybe a thousand users will see the wrong page in the fraction of a minute that it takes the page to be revalidated. The rule of thumb is to ensure the content change is not a high priority.
Depending on the level of importance, you can choose to enable the stale page for a certain period. This period is usually 59 seconds, as most pages take up to a minute to rebuild:
Cache-Control: public, s-maxage=3600, stale-while-revalidate=59
Stale If Error
Another helpful configuration is stale-if-error:
Cache-Control: public, s-maxage=3600, stale-while-revalidate=59, stale-if-error=300
Assuming that the page rebuild failed, and keeps failing due to a server error, this limits the time that stale data can be used.
The Future of Next.js Rendering
There is no perfect configuration that suits all needs and purposes, and the best method often depends on the type of web application. However, you can start by determining the factors and picking the right Next.js rendering type and technique for your needs.
Special attention needs to be paid to cache settings depending on the volume of expected users or page views per day. A large-scale application with dynamic content would require a smaller cache period for better performance and reliability, but the opposite is true for small-scale applications.
While the techniques demonstrated in this article should suffice to cover nearly all scenarios, Vercel frequently releases Next.js updates and adds new features. Staying up to date with the latest additions related to rendering and performance (e.g., the app router feature in Next.js 13) is also an essential part of performance optimization.
The editorial team of the Toptal Engineering Blog extends its gratitude to Imad Hashmi for reviewing the code samples and other technical content presented in this article.
Further Reading on the Toptal Blog:
Understanding the basics
What is Next.js used for?
Next.js is a popular React-based framework for production-grade, scalable web applications. It offers unique features like serverless APIs, various pre-render techniques, and code-splitting.
When should you use Next.js?
Next.js should be used when you are working on apps that would benefit from the power of pre-rendering. If performance, scalability, and adaptability are your main requirements for a web app, Next.js should be at the top of your list.
Is Next.js good for client-side rendering?
Yes, it is, despite the common misconception that Next.js is a good choice solely for server-side rendering. Next.js client-side rendering performs comparably to similar frameworks, considering the advantages of scalability offered by different rendering techniques in Next.js.
How do I increase page speed in Next.js?
Next.js pre-rendering techniques can help achieve the best performance, depending on the page type. In most cases, using server-side rendering or static site generation with caching enabled is the best way to increase Next.js page speed.
Vijayawada, Andhra Pradesh, India
Member since September 8, 2022
About the author
Subhakar is a front-end developer with extensive experience using React, Next.js, and TypeScript. He specializes in creating MVPs for startups and has worked on projects ranging from cross-platform progressive web and React Native apps to AI-powered browser extensions and a crypto web app used by more than 10,000 investors.


