
Laravel API Tutorial: Creating and Testing a RESTful API
Laravel 12 modernizes API development with cleaner syntax, streamlined tooling, and developer-first conventions. Learn to build, secure, and test RESTful APIs with best practices and minimal setup.

Laravel 12 modernizes API development with cleaner syntax, streamlined tooling, and developer-first conventions. Learn to build, secure, and test RESTful APIs with best practices and minimal setup.

Alex is a senior full-stack developer specializing in Laravel and modern JavaScript frameworks. For more than a decade, he has partnered with companies like Bank of America and built scalable, data-driven applications that integrate data visualization and machine learning using frameworks like Node.js, React, Next.js, Vue.js, Angular, and Django.
Expertise
Previous Role
Senior Full-stack DeveloperPreviously At

Laravel 12 represents a major update that replaces many of the practices common in earlier versions with stronger, more modern tools. Local development now runs through Sail, a Docker-based environment that replaces older Vagrant setups. Token management has moved from manual database fields to Sanctum’s first-party authentication layer, and string-based route definitions have been replaced with cleaner closure- and controller-based syntax. API Resources now handle response formatting with consistency and clarity, and testing has evolved with Pest, which offers a faster alternative to legacy PHPUnit workflows. Together, these updates offer a lightweight setup that is easy to reproduce out of the box.
Having worked with front- and back-end systems for well over a decade, I count Laravel among my go-to development ecosystems. What keeps me coming back is its developer-first approach. It has clean syntax, it’s intuitive, and it’s built around conventions that minimize friction, such as expressive routing. Documentation is thorough and easy to read, and updates frequently prioritize real developer pain points like productivity and maintainability.
This Laravel API tutorial shows how to build and test fully functional CRUD API with authentication, validation, error handling, pagination, and automated tests, all implemented with Laravel 12 best practices.
What Is a RESTful API? A Deep Dive for Modern Development
Before diving into Laravel specifics, it’s important to clarify what RESTful APIs are and why they remain the backbone of web communication.
REST Architecture and HTTP Verbs
REST (representational state transfer) is an architectural approach emphasizing statelessness, uniform interfaces, and resource-based interactions. Simply put, it structures communication around resources.
REST has three key principles:
- Requests must be stateless (each carries full context)
- The interface must be uniform and provided via URLs and verbs
- APIs should be scalable and cacheable by design
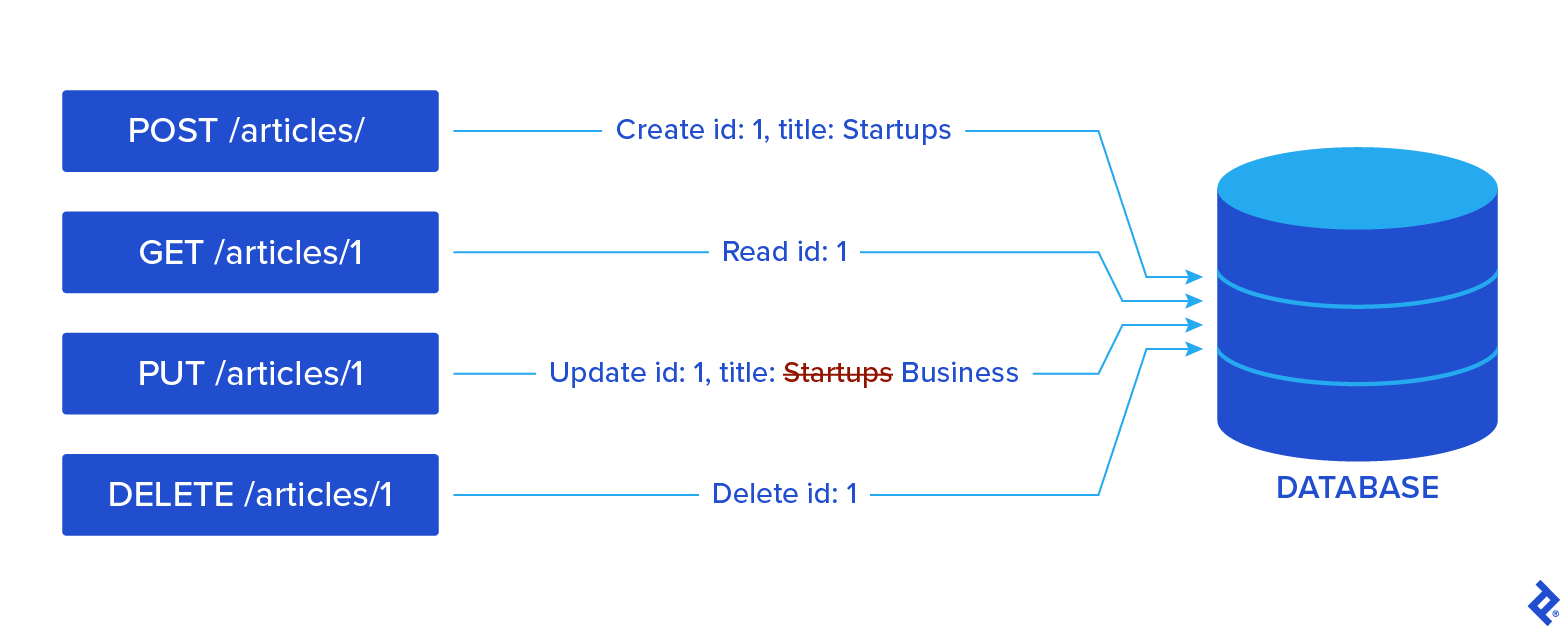
The foundation of REST lies in the use of HTTP verbs that map to common actions used to access them. These are:
- GET: Retrieve resources without modifying them.
- POST: Create new resources.
- PUT/PATCH: Update/partially update an existing resource.
- DELETE: Remove resources.
Here is how endpoints with HTTP actions might look in your Laravel applications:
// GET - Retrieve all articles
Route::get('/insights/all', [ArticleController::class, 'index']);
// GET - Retrieve a specific article
Route::get('/articles/{article}', [ArticleController::class, 'show']);
// POST - Create a new article
Route::post('/insights/all', [ArticleController::class, 'store']);
// PUT - Update an article
Route::put('/articles/{article}', [ArticleController::class, 'update']);
// DELETE - Remove an article
Route::delete('/articles/{article}', [ArticleController::class, 'destroy']);
Why REST Is Still Relevant in Modern Development
Despite the rise of GraphQL and gRPC, REST APIs remain dominant because they are universally understood, easy to integrate with front-end frameworks, and supported by every HTTP client. In my opinion, REST should be the go-to approach for every developer planning to build an API. It’s been around for decades and has established itself as the gold standard of API development.
REST also pairs naturally with Laravel’s resource-oriented conventions: Controllers mirror resources, routing maps cleanly to verbs, and Eloquent gives automatic resource representations. These qualities make REST the most practical starting point for modern API development.
Laravel REST use cases tend to include the following:
- Back-end APIs for single page applications (SPAs), built, for example, for React, Vue.js, and Angular.
- Mobile API back ends with token-based access.
- Headless CMS setups using Laravel as a content hub.
Tutorial Prerequisites and Setup
A well-organized environment is an important first step to a successful Laravel API project. Laravel 12 simplifies setup by emphasizing Sail over older tools, such as Homestead.
Tools Required
To follow the Laravel tutorial, you should have the following installed:
- Composer 2.x for managing PHP dependencies.
- PHP 8.2+ for language compatibility.
- Laravel Sail, a Docker-based local environment that bundles PHP, MySQL, Redis, and more.
- Optional tools, such as Postman or Insomnia for manual API testing.
Installing and Running Laravel 12 With Sail
Laravel Sail provides a containerized environment that requires no configuration, so you can prevent any conflicts on local machines and maintain the same standards across all of your projects.
In your project root, run the following commands:
composer create-project laravel/laravel example-app
cd example-app
./vendor/bin/sail up
These launch PHP and MySQL in Docker containers. Additional services, such as Redis, Mailpit, or Nginx, can be added or swapped in the Sail configuration. In order:
-
composer create-projectscaffolds a fresh Laravel project. -
cd example-appenters the newly created directory (where your app will reside). -
./vendor/bin/sail upstarts Sail and its Docker containers.
Sail also supports customizable service stacks (for example, PostgreSQL or Meilisearch) configured via .env and docker-compose.yml files.
Environment Configuration and Testing
The first step after installation entails configuring your .env file and testing the development environment. Start by adding your database credentials in .env. Then, run migrations to ensure the database connection works:
./vendor/bin/sail artisan migrate
After that, make sure Sail containers are started (./vendor/bin/sail up) before running migrations. Finally, visit http://localhost. You should see Laravel’s welcome screen.
If the migration succeeds and the page loads, it means that your local server is running and your setup is ready. Using detached mode (./vendor/bin/sail up -d) runs containers in the background so that you can use your terminal for other commands and operations.
Building the Data Layer
Your API’s foundation lies in the database schema, models, and seed data. From experience, I recommend having scaffolding ready before you build your models to get a rough idea of the relationship network between your models.
Compared to its predecessors, Laravel 12 introduces cleaner migrations and modern factories.
Creating Models, Migrations, and Seeders
Laravel uses Artisan commands to generate models, migrations, and factories quickly.
php artisan make:model Article -m
This new approach differs from older versions in that you use $table->id() for primary keys instead of the deprecated $table->increments(). Additionally, factories are now class-based, easier to extend and test.
Article::factory()->count(10)->create();
Seeders can leverage Laravel’s default User factory to generate realistic test data.
php artisan db:seed
Using Eloquent ORM for JSON-ready Data
Eloquent’s toArray() and toJson() methods automatically convert results into array formats.
return response()->json(Article::all());
With Laravel’s Eloquent ORM, developers can freely query the database and get JSON directly. This makes it easy to transform models into API-ready responses without requiring boilerplate code for structure. Relationships such as hasMany and belongsTo can automatically load related data.
return response()->json(Article::all());
The above, for example, returns the full dataset as valid JSON.
Defining Routes and Controllers
One advantage of Laravel 12 is that it provides elegant routing options and controller helpers, which eliminate the need for verbose route definitions.
Route Basics and Array Syntax
Laravel 12 encourages array-based controller declarations instead of string-based controller syntax (Controller@method). This modern style makes for cleaner and type-checked routing. For example:
Route::get('/insights/all', [ArticleController::class, 'index']);
Using PHP class constants (::class) in the array syntax means route definitions remain accurate and automatically update when refactoring controller namespaces or class names, which, of course, helps with avoiding breakages.
This array syntax is supported by all HTTP verbs (GET, POST, PUT, PATCH, DELETE, etc.) and for complex routing methods (such as Route::apiResource()). It also integrates with Laravel’s routing features like middleware assignment and named routes.
For example, you can chain a middleware or name your route:
Route::get('/insights/all', [ArticleController::class, 'index'])
    ->name('articles.index')
    ->middleware('auth');
Using Route::apiResource() for CRUD
There is no need to define each endpoint manually. Laravel lets you register all standard CRUD routes with one command. This way, it’s easier to maintain APIs that follow convention and remain easy to navigate.
Route::apiResource('articles', ArticleController::class);
For instance, the above line automatically generates routes for index, store, show, update, and destroy operations, working across all HTTP methods. Each generated route adheres to RESTful principles. Route::apiResource() also supports route naming, and it can be grouped with prefixes or middleware where needed.
Route Model Binding and Versioning
Laravel automatically binds route parameters to Eloquent models:
public function show(Article $article) {
    return new ArticleResource($article);
}
This removes the need for manual querying inside controller methods (e.g., no need for Article::findOrFail($id)). If the model instance is not found, you automatically get a 404 error.
Sometimes you may need even more control, which is where explicit bindings come in. You can define custom logic in the RouteServiceProvider to bind route parameters however you require. You can also nest routes at your convenience:
Route::apiResource('users.posts', UserPostController::class);
One thing I recommend for backward compatibility is API versioning. With Laravel, you can do it under route prefixes:
Route::prefix('api/v1')->group(function ()
{
Route::apiResource('articles', ArticleController::class);
});
Prefixing your routes, like /api/v1, gives your API a clear version number. This means older clients keep working even as you release newer API versions with breaking changes. Each version can live in its own namespace or folder. Thanks to this separation, you can easily maintain legacy and current versions side by side.
Route model binding and versioning work well together. You can customize bindings per API version, adapting to new data structures or keys, all without causing damage to existing clients.
Securing Endpoints With Sanctum
Authentication is a core security layer, and as of Laravel 12, Sanctum is the default system for issuing and validating API tokens.
Why Sanctum Over Manual Tokens or Passport
Previous methods relied on storing plain tokens in database fields, which caused security issues. Now, Laravel 12 uses hashed personal tokens via Sanctum by default. Passport is still available and remains useful in cases where a full OAuth2 setup is preferred, but, due to its complexity, I recommend Sanctum for personal tokens and SPAs.
Personal Access Tokens vs. SPA Cookie Auth
Personal access tokens are useful for mobile clients and external HTTP consumers, while SPA cookie authentication is helpful in browser-managed sessions, where Laravel can handle authentication securely and without CORS complexity (think logging in, registering, etc.).
Example: Registering, Logging in, and Authenticating With Tokens
To generate a token when a user logs in, your application can run the following command:
$token = $user->createToken('api-token')->plainTextToken;
After obtaining a token upon login with the above, it’s a good practice to return the token in a structured JSON response so the client can easily access it.
You can include your token in requests by attaching it to your header:
Authorization: Bearer {token}
When including the token in requests as per above, it’s important to ensure that your client stores the token securely (to prevent cross-site scripting (XSS) attacks), preferably in an HTTP-only cookie or secure storage.
Finally, to protect your routes with Sanctum middleware, you can run:
Route::middleware('auth:sanctum')->get('/user', fn(Request $req) => $req->user());
You can protect more than one route by applying the auth:sanctum middleware:
Route::middleware('auth:sanctum')->group(function ()
{
    Route::get('/user', fn(Request $req) => $req->user());
    Route::post('/posts', [PostController::class, 'store']);
    // More protected routes here
});
Returning Consistent JSON Responses
A professional API should return well-structured and predictable responses. Laravel 12 standardizes this with API Resources.
Using JsonResource for Single Objects
By default, Eloquent models expose all attributes (the database fields or properties stored in a model’s data). To control which attributes are exposed, you can define a resource class. Resources format JSON output so that you can control the visible fields:
return new ArticleResource($article);
You can even override the toArray() method to define exactly which attributes appear in the JSON output. This lets you expose only the fields you need and optionally format or transform their values before returning them.
JsonResource acts as a filter and avoids leaking sensitive data (such as internal IDs).
Using ResourceCollection for Lists
Use ResourceCollection to standardize and paginate lists. Collections unify array responses:
return ArticleResource::collection(Article::paginate(10));
But that’s not all: Along with the data itself, valuable pagination metadata is added. Things like the current page number, the total number of pages, and links to the next or previous pages come through automatically. This metadata is especially handy for front-end developers because it simplifies building pagination interfaces.
Handling Errors With Structured Responses
Sending an error code is typically not enough for a good API experience. Responses should be clear and structured to help developers using your API understand what went wrong and how to fix it.
Structuring a consistent JSON response (using fields like message, status, or errors) improves developer experience for API users:
return response()->json([
  'status' => 'error',
  'message' => 'Invalid input',
  'errors' => $validator->errors()
], 422);
For example, the above error handling tells the client exactly what happened (status and message), and pinpoints the problematic fields (errors). It’s both informative and machine-readable.
You can also standardize error responses across your API by customizing Laravel’s exception handler. This way, all errors follow the same format.
Validating Requests
Validation prevents bad data from reaching your database.
$request->validate() in Controllers
With Laralvel’s helper $request->validate(), inline validation is streamlined, avoiding verbose manual validation.
$validated = $request->validate([
  'title' => 'required|min:3',
  'body' => 'required'
]);
Invalid submissions automatically trigger a JSON 422 response.
Form Request Classes for Larger Apps
For more complex validation needs, consider moving your rules into form request classes. These let you customize validation logic and error messages separately. Plus, form requests support authorization logic, so you can check if users are allowed to make the request before validating.
When building larger applications (that need more articulated APIs), form request helps you keep controllers clean with reusable validation classes:
php artisan make:request StoreArticleRequest
These file away rules, authorization, and any custom error message you might want users to receive upon failure.
Enhancing Your API
Beyond CRUD, production APIs must handle scaling, abuse, and cross-domain access.
Pagination With paginate()
Paginated queries improve usability and performance by preventing clients from being overwhelmed by large result sets.
return ArticleResource::collection(Article::paginate(10));
The paginate() method not only limits the number of records returned but also calculates the total number of records to provide page counts. This is useful to show users how many pages are available. Laravel automatically detects the current page number from the URL query string parameter page, so your users can navigate pages easily by appending ?page=2, ?page=3, etc. to the URL.
Metadata fields like per_page, current_page, and links appear automatically.
Rate Limiting With RateLimiter::for()
To protect APIs from attacks and accidental abuse, you can use Laravel’s RateLimiter. Here is a concise example:
RateLimiter::for('api', fn(Request $req) =>
    Limit::perMinute(60)->by($req->user()?->id ?: $req->ip())
);
This defines a rate limiter named ‘api’ that allows 60 requests per minute per user ID or IP address if the user is unauthenticated.
You then apply this limiter cleanly to your routes using the throttle middleware:
Route::middleware('throttle:api')->group(function () {
    Route::get('/user', fn(Request $req) => $req->user());
    // Other protected routes...
});
You can define different limits based on user roles or time of day. When a client exceeds the limit, Laravel returns a 429 status by default, but you can customize the error message by overriding the exception handler.
CORS Setup and API Versioning Patterns
You can use CORS headers to whitelist cross-origin clients (e.g., SPAs) and let them consume your API. To do this, configure config/cors.php to specify which paths should receive CORS headers as well as the allowed HTTP methods, origins, and headers. For example:
return [
    'paths' => ['api/*', 'sanctum/csrf-cookie'],
    'allowed_methods' => ['*'],
    'allowed_origins' => ['https://your-frontend-domain.com'],
    'allowed_headers' => ['*'],
    'exposed_headers' => [],
    'max_age' => 0,
    'supports_credentials' => false,
];
Here you enable CORS for all API routes (api/*) and for Sanctum’s CSRF cookie endpoint, so that you can attach versioning patterns by prefixing routes (for example, with /api/v1 for the first version of your API, /api/v2 for the second one, and so forth). This readies your codebase for breaking changes without disrupting old clients.
Testing Your Laravel API
Testing ensures your API is reliable and regression-free. Laravel 12 supports both PHPUnit and Pest.
PHPUnit and Pest for API Testing
Both Pest and PHPUnit integrate with Laravel’s testing helpers.
Pest, now shipping by default, offers readable syntax:
it('creates an article', function () {
  $response = $this->postJson('/api/articles', ['title' => 'Test']);
  $response->assertStatus(201);
});
This syntax reduces boilerplate and makes tests easier to read and write.
However, PHPUnit remains fully supported and compatible for those who prefer it. Many PHP developers are familiar with this traditional approach and may feel more comfortable with this setup.
Since Pest is built on top of PHPUnit, you can use both together in the same project. This makes it easy to adopt Pest gradually, migrate tests over time, or run both styles side by side without compatibility issues.
Running your tests regularly, ideally automated via CI/CD pipelines, helps prevent regressions and continually verifies API contracts.
Writing Tests for Authenticated Requests
When writing tests, Laravel supports you with easy-to-read code.
For example, you can use $this->actingAs($user) for session-based authentication.
public function test_authenticated_user_can_create_article()
{
    $user = User::factory()->create();

    $response = $this->actingAs($user)
                     ->postJson('/api/articles', [
                         'title' => 'Test Article',
                         'body' => 'This is the body of the test article.'
                     ]);

    $response->assertStatus(201);
    $this->assertDatabaseHas('articles', ['title' => 'Test Article']);
}
Use $this->withToken($token) for bearer token flows, similar to API token authentication:
public function test_authenticated_request_with_token_can_update_article()
{
    $user = User::factory()->create();
    $token = $user->createToken('api-token')->plainTextToken;

    $article = Article::factory()->create(['user_id' => $user->id]);

    $response = $this->withToken($token)
                     ->putJson("/api/articles/{$article->id}", [
                         'title' => 'Updated Title',
                         'body' => 'Updated body content.'
                     ]);

    $response->assertStatus(200);
    $this->assertDatabaseHas('articles', ['title' => 'Updated Title']);
}
Using factories makes for reproducible test data. If you combine Laravel’s helpers like actingAs and withToken, testing authenticated API flows becomes straightforward and maintainable, and covers CRUD operations with proper authorization simulations.
Here’s a full example of a feature test that demonstrates authenticating a user, performing CRUD operations, and cleaning up after the test:
<?php

namespace Tests\Feature;

use Tests\TestCase;
use App\Models\User;
use App\Models\Article;

class ArticleCrudTest extends TestCase
{
    public function test_full_article_crud_flow()
    {
        // Create a user in the test database
        $user = User::factory()->create();

        // Authenticate as this user using actingAs (session-based)
        $this->actingAs($user);

        // 1. Create an article
        $response = $this->postJson('/api/articles', [
            'title' => 'Test Article',
            'body' => 'This is the body of the test article.'
        ]);
        $response->assertStatus(201);
        $articleId = $response->json('id');

        // 2. Read the article
        $response = $this->getJson("/api/articles/{$articleId}");
        $response->assertStatus(200);
        $response->assertJsonFragment(['title' => 'Test Article']);

        // 3. Update the article
        $response = $this->putJson("/api/articles/{$articleId}", [
            'title' => 'Updated Title',
            'body' => 'Updated body content.'
        ]);
        $response->assertStatus(200);
        $this->assertDatabaseHas('articles', ['id' => $articleId, 'title' => 'Updated Title']);

        // 4. Delete the article
        $response = $this->deleteJson("/api/articles/{$articleId}");
        $response->assertStatus(204);
        $this->assertDatabaseMissing('articles', ['id' => $articleId]);

        // Cleanup: delete the user
        $user->delete();
    }
}
Manual Testing With Postman or Insomnia
Postman and Insomnia are helpful third-party applications used to verify data flow, headers, tokens, endpoints, and response structures before writing formal tests. These clients are great tools for debugging issues during early development.
Postman excels at collaborative testing and team collections, which makes it ideal for larger projects. Insomnia offers a developer-focused interface with strong support for environment variables and quick REST or GraphQL queries. Personally, I enjoy using both, but make sure to pick the one that best suits your project. Using them early ensures your endpoints behave as expected before you commit to automated testing.
Laravel API Best Practices for Error Handling
Clear error handling helps front-end developers integrate APIs smoothly.
Leveraging Laravel’s Exception Handler
Laravel’s exception handler (app/Exceptions/Handler.php) transforms exceptions into structured JSON responses.
public function render($request, Throwable $e)
{
    if ($request->expectsJson()) {
        return response()->json(['message' => $e->getMessage()], 500);
    }
    return parent::render($request, $e);
}
Returning Proper Status Codes
REST conventions dictate which status codes you should use so that your API works the way other developers expect.
- 200 OK / 201 Created for success
- 204 No Content for empty responses
- 401 Unauthorized / 403 Forbidden for access issues
- 422 Unprocessable Entity for validation errors
Try/catch for External Service Calls
Wrapping third-party service calls in try/catch blocks allows you to handle failures gracefully and be clear with clients when an error or failure occurs.
try {
  $response = Http::get('https://api.external-service.com');
} catch (Throwable $e) {
  return response()->json(['error' => 'Service unavailable'], 503);
}
Taking Laravel API Development to the Next Level
In this Laravel REST API tutorial, we’ve covered setup, models, authentication, validation, resources, and tests, and you should now have a working RESTful API built entirely with Laravel 12.
If you are interested in expanding your knowledge and/or your application, the next actionable steps would include learning to:
- Use Laravel Passport if full OAuth 2.0 support is needed.
- Add rate limits for production scale.
- Connect the API with SPA frameworks like React or Vue.js.
- Integrate your API with front-end frameworks like React or Vue.js.
If you are a junior, I recommend focusing on testing and maintainability, diving into authentication mechanisms and security, or delving into advanced database relationships. Fundamentally, you should strive for learning how an API works in depth and how to handle the complexity that comes with creating and managing these systems.
Further Reading on the Toptal Blog:
Understanding the basics
Laravel 12 streamlines API development with built-in conventions. Use Route::apiResource() to generate CRUD routes automatically and Eloquent ORM for clean data handling. Combine these with Laravel Sanctum for authentication to create an API with Laravel with minimal setup and boilerplate.
The Laravel framework offers two authentication systems. Sanctum is the default for SPAs and mobile apps and handles personal access tokens and cookie-based auth. Passport provides full OAuth 2.0 for projects needing third-party access, scopes, or complex permission models. Use Sanctum for simplicity, Passport for advanced integrations.
Laravel 12 introduces Pest as its default test runner and offers simpler syntax that’s fully compatible with PHPUnit. Developers can test authenticated routes using $this->actingAs($user) or $this->withToken($token) to ensure automated coverage for key API actions and reduce regression risk over time.
Laravel’s JsonResource and ResourceCollection classes standardize API responses. JsonResource defines which fields a model exposes, while collections apply consistent formatting to lists and paginated results. Developers can extend these resources to customize headers, status codes, and metadata.
Use Eloquent’s paginate() instead of all() or get() to limit large responses and improve performance. Paginated queries return consistent payloads with metadata like total results and page links, which integrates cleanly with front-end frameworks and simplifies long-term API maintenance.
Versioning ensures older clients keep working as your API changes. Laravel simplifies this with route prefixes like api/v1 or api/v2, allowing each version to maintain separate controllers, resources, and validation logic without disrupting existing integrations.
Chandler, AZ, United States
Member since August 29, 2025
About the author
Alex is a senior full-stack developer specializing in Laravel and modern JavaScript frameworks. For more than a decade, he has partnered with companies like Bank of America and built scalable, data-driven applications that integrate data visualization and machine learning using frameworks like Node.js, React, Next.js, Vue.js, Angular, and Django.
Expertise
Previous Role
Senior Full-stack DeveloperPREVIOUSLY AT