Dive into React Native for Android Development
Despite initial skepticism, React Native is very much in demand today!
In this article, Toptal Freelance React Native Developer, and former React Native skeptic, Alexander Pataridze talks about why he became a React Native advocate instead and introduces us to the technology by illustrating four use-cases.
Alex is a senior mobile developer with years of experience in Android and iOS. He created mobile banking suites and apps for several banks.
Expertise
PREVIOUSLY AT

A few years ago, a coworker of mine told me about React Native. I was very skeptical. I argued that it is just another cross-platform framework which will never work in real life – little did I know how wrong I was.
Years passed and React Native skills became very much in demand. Since it’d been a while that I learned something new, I thought why not give it a shot? Today, I’m a React Native Android app development advocate.
Cons:
- You can’t use Android Studio anymore
- React Native can’t be used for every application or feature
- React Native is a novel framework and updates can have a negative effect on your current codebase
- JavaScript isn’t a strictly typed language
- React Native requires a JavaScript engine to run, which may make it less performant
Pros:
- Easy to learn
- A shared codebase between Android and iOS apps, with only minor tweaks required to match platform experiences
- Live and hot reloading, meaning no more infinite build times
- Native components for both platforms
- Constantly improving
- Actively growing community
- Huge number of libraries
- Expo removes the need to own a Mac to develop for iOS
- Reduction in labor resources—while you may still need some Android/iOS native development, it will be infrequent.
I can go on and on, but let’s stop here and move on to the topic of this blog post. In this post, I’m going to create four React Native Android apps:
- A basic counter with buttons to increment and decrement the counter
- An app to search the r/pics subreddit
- A generic login page
- An app to browse the r/pics subreddit
IDE
As I mentioned above, there’s no way we can use Android Studio for React Native development. We need a substitute. React Native can be developed probably in any modern text editor available out there (Atom, VS Code, Sublime Text, Brackets, etc.) but since we are coming with Android Studio experience my favorite is WebStorm which is built by the same company. Although WebStorm is paid application (129$ per year) you can install Early Access version of it. EAP build of WebStorm is free of charge and quite stable. If you prefer an editor which is completely free go for VS Code. Microsoft even developed amazing React Native plugin for it and it works very well.
Creating a New Project
Prerequisites: Android SDK, Node, and React Native installed on your computer.
There are two ways of creating new React Native project.
- The conventional way. Either with WebStorm GUI or with terminal command:
react-native init AwesomeToptalProject - Easier way “Create React Native App”.
create-react-native-app AwesomeToptalProject
If you use create-react-native-app, the created project will be bootstrapped with expo. I won’t be going into details, but basically, it means that you have no need to have Xcode installed to run the app on iOS. It’s also easier to have the client always up-to-date through expo.io’s functionality and some other features. But you can’t add native code. Thus, if you are developing a specific feature, you may need to eject an app from expo and use a regular React Native project instead.
In this demonstration, I will be using the first method as I explain how to build a React Native app for Android.
Let’s run the project. First, open an emulator or connect the device. If you created the project with WebStorm GUI, all you need to do is to pick a configuration. In the right top corner of WebStorm, click the drop-down to the left of the Run button, choose Android, and click Run or Debug. If you created the project with Terminal, you can either add a new React Native config or run it using Terminal:
cd AwesomeToptalProject
react-native run-android
If everything went well, you’ll be greeted with the following screen:

Structure and Basic Setup
Notable items inside the project are:
- android - Android Studio project preconfigured with React Native support.
- ios - Xcode project preconfigured with React Native support.
- node_modules - A folder containing React Native framework and other Javascript libraries.
- index.js - An entry point for our app.
- App.js - Initial component loaded.
Let’s create a folder “src” inside the root of the project and move App.js there. You’ll have to update index.js imports to match the new App.js location.
import App from './src/App';
Delete everything inside App.js and paste this code:
import React from 'react';
import {Text} from 'react-native';
export default class App extends React.Component {
   render() {
       return (
           <Text>Hello TopTal</Text>
       );
   }
}
The code we pasted is pretty straightforward. We created a class App (child of React.Component) which overrides render() method and returns Text component. React.Component is the base class for building UI using JSX. The export default modifier makes the class public.
We are now ready to start designing our layout.
Layout with Flexbox
Flexbox is similar to LinearLayout, but Flexbox goes way beyond LinearLayout’s abilities.
This snippet of JSX:
<View style={{
  flex: 1,
  flexDirection: 'row'
}}>
<View style={{
  width: 100, height: 100,
  backgroundColor: '#9575CD'
}}/>
<View style={{
  width: 100, height: 100,
  backgroundColor: '#7E57C2'
}}/>
<View style={{
  width: 100, height: 100,
  backgroundColor: '#673AB7'
}}/>
</View>
Renders this layout:
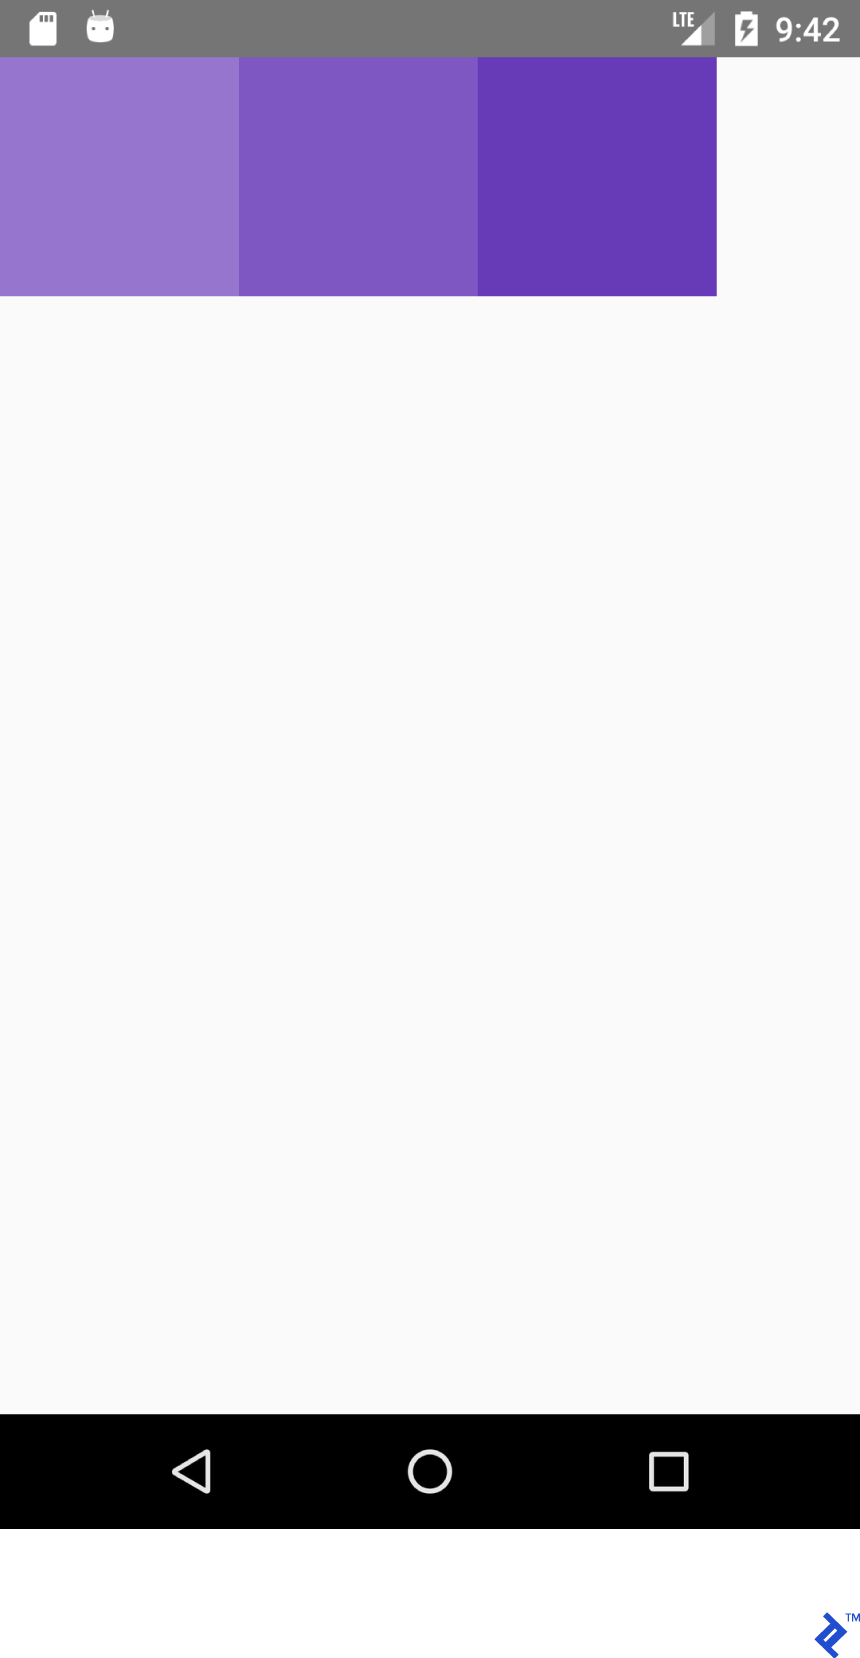
While this XML:
<LinearLayout
  android:layout_width="match_parent"
  android:layout_height="match_parent"
  android:orientation="horizontal">
<View
  android:layout_width="100dp"
  android:layout_height="100dp"
  android:background="#9575CD" />
<View
  android:layout_width="100dp"
  android:layout_height="100dp"
  android:background="#7E57C2" />
<View
  android:layout_width="100dp"
  android:layout_height="100dp"
  android:background="#673AB7" />
</LinearLayout>
Renders this:
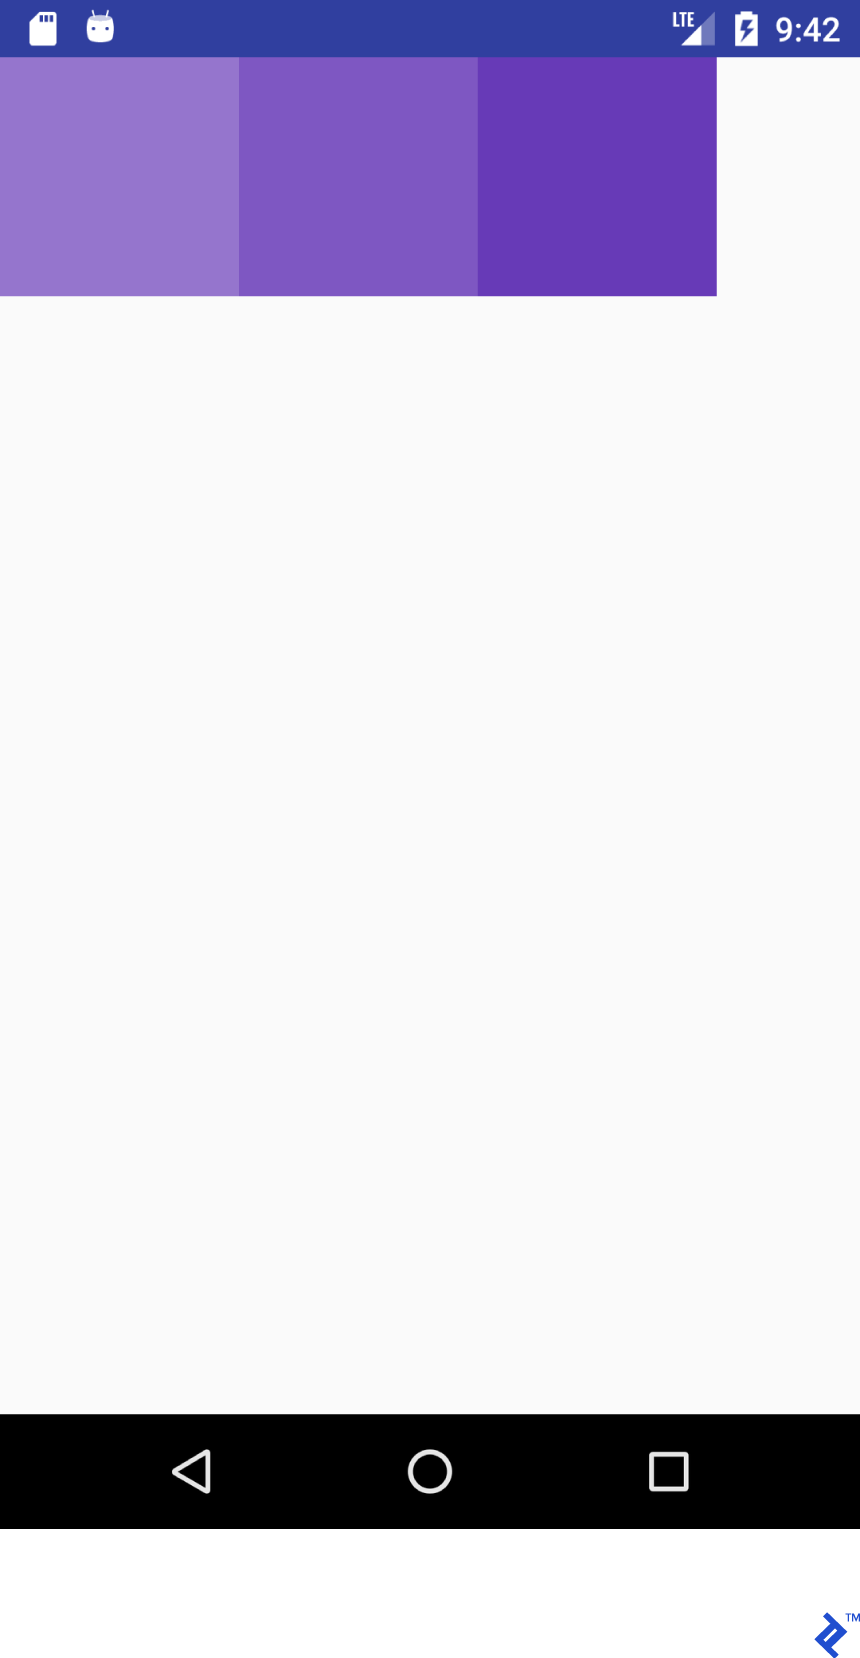
JSX code looks familiar, huh?! Let’s create a “dictionary” (or a cheatsheet) for layouts using that look similar in JSX and Android XML.
Please note the functionalities aren’t necessarily equal. I’m trying to help the React Native newbies to grasp the idea of the layout system in React Native. Please refer official guide for detailed information.
Consider this JSX property:
flex: 1
It’s equivalent to this:
android:layout_width="match_parent"
android:layout_height="match_parent"
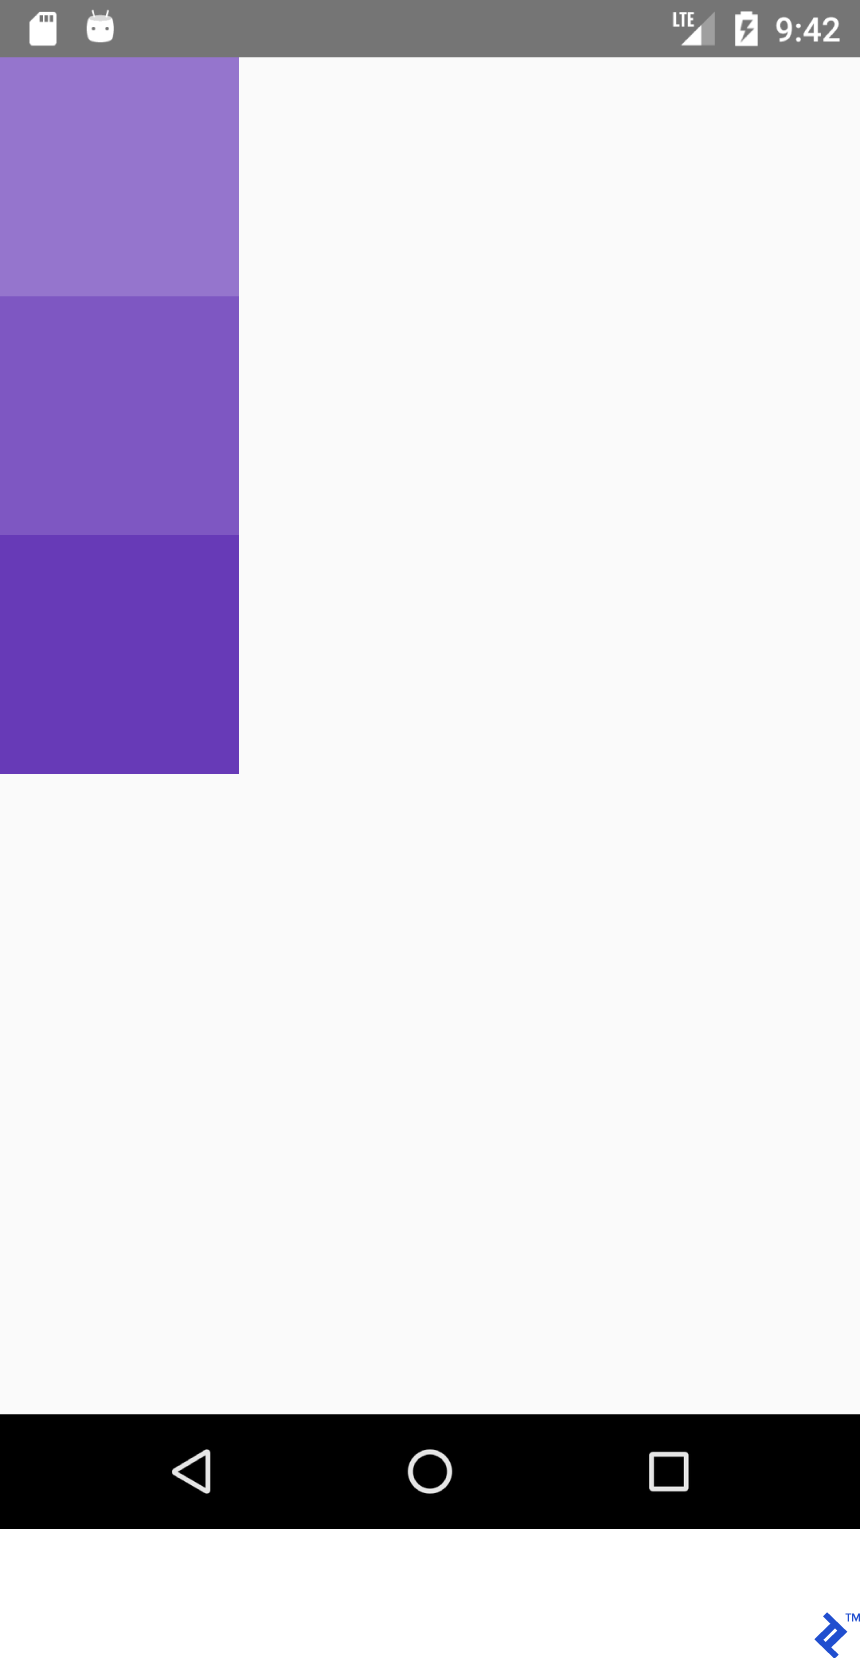
This snippet of JSX:
<View style={{flex: 1,
  flexDirection: 'row'}}>
<View style={{
  width: 100, height: 100,
  backgroundColor: '#9575CD'}}/>
<View style={{
  width: 100, height: 100,
  backgroundColor: '#7E57C2'}}/>
<View style={{
  width: 100, height: 100,
  backgroundColor: '#673AB7'}}/>
</View>
And this XML:
<LinearLayout
  android:layout_width="match_parent"
  android:layout_height="match_parent"
  android:orientation="horizontal">
<View
  android:layout_width="100dp"
  android:layout_height="100dp"
  android:background="#9575CD" />
<View
  android:layout_width="100dp"
  android:layout_height="100dp"
  android:background="#7E57C2" />
<View
  android:layout_width="100dp"
  android:layout_height="100dp"
  android:background="#673AB7" />
</LinearLayout>
Both generate this output:
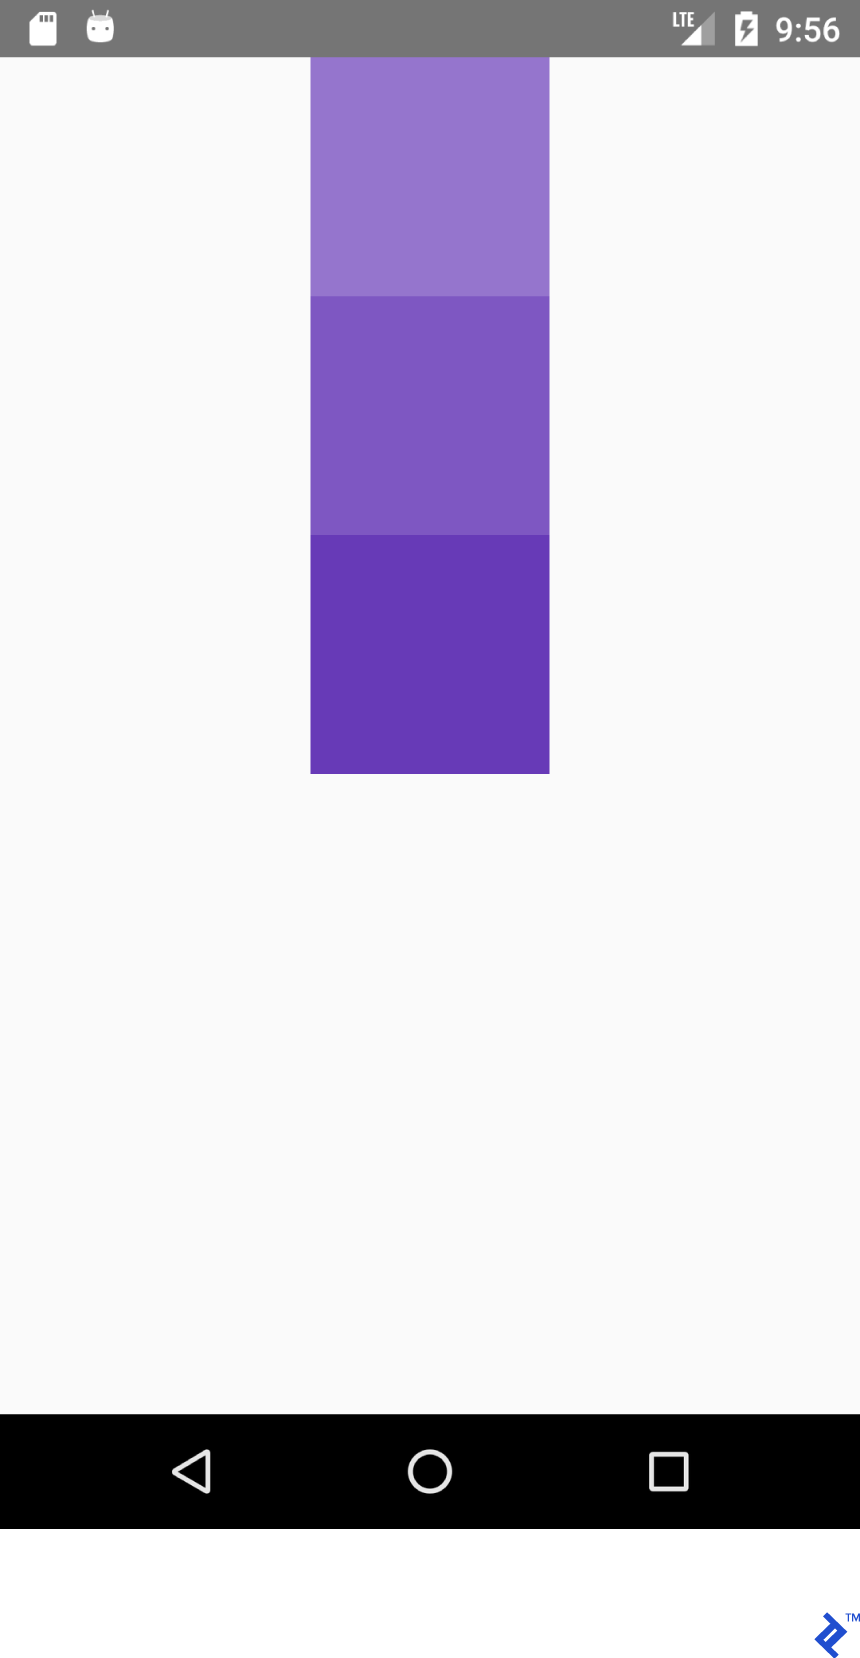
Similarly, this JSX:
<View style={{flex: 1,
  flexDirection: 'column'}}>
<View style={{
  width: 100, height: 100,
  backgroundColor: '#9575CD'}}/>
<View style={{
  width: 100, height: 100,
  backgroundColor: '#7E57C2'}}/>
<View style={{
  width: 100, height: 100,
  backgroundColor: '#673AB7'}}/>
</View>
And this XML:
<LinearLayout
  android:layout_width="match_parent"
  android:layout_height="match_parent"
  android:orientation="vertical">
<View
  android:layout_width="100dp"
  android:layout_height="100dp"
  android:background="#9575CD" />
<View
  android:layout_width="100dp"
  android:layout_height="100dp"
  android:background="#7E57C2" />
<View
  android:layout_width="100dp"
  android:layout_height="100dp"
  android:background="#673AB7" />
</LinearLayout>
Generate this:
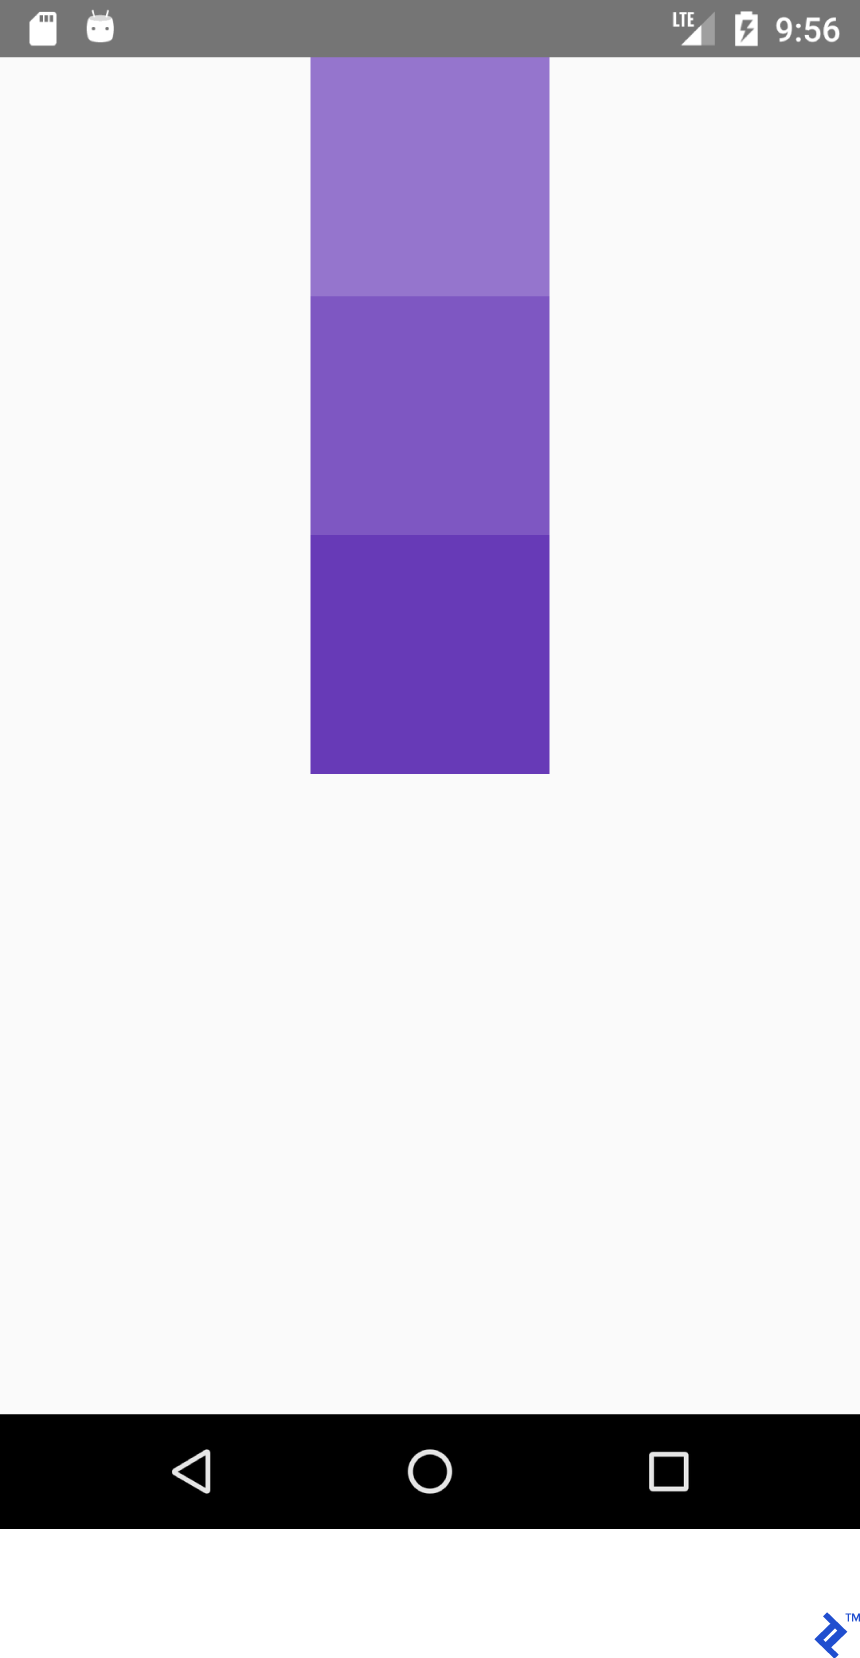
To achieve the right position inside the container, we most commonly will be using a combination of flexDirection, alignItems, and justifyContent properties.
This JSX:
<View style={{flex: 1,
  flexDirection: 'column',
  alignItems: 'center'}}>
<View style={{
  width: 100, height: 100,
  backgroundColor: '#9575CD'}}/>
<View style={{
  width: 100, height: 100,
  backgroundColor: '#7E57C2'}}/>
<View style={{
  width: 100, height: 100,
  backgroundColor: '#673AB7'}}/>
</View>
And this XML:
<LinearLayout
  android:layout_width="match_parent"
  android:layout_height="match_parent"
  android:gravity="center_horizontal"
  android:orientation="vertical">
<View
  android:layout_width="100dp"
  android:layout_height="100dp"
  android:background="#9575CD" />
<View
  android:layout_width="100dp"
  android:layout_height="100dp"
  android:background="#7E57C2" />
<View
  android:layout_width="100dp"
  android:layout_height="100dp"
  android:background="#673AB7" />
</LinearLayout>
Will produce this layout:
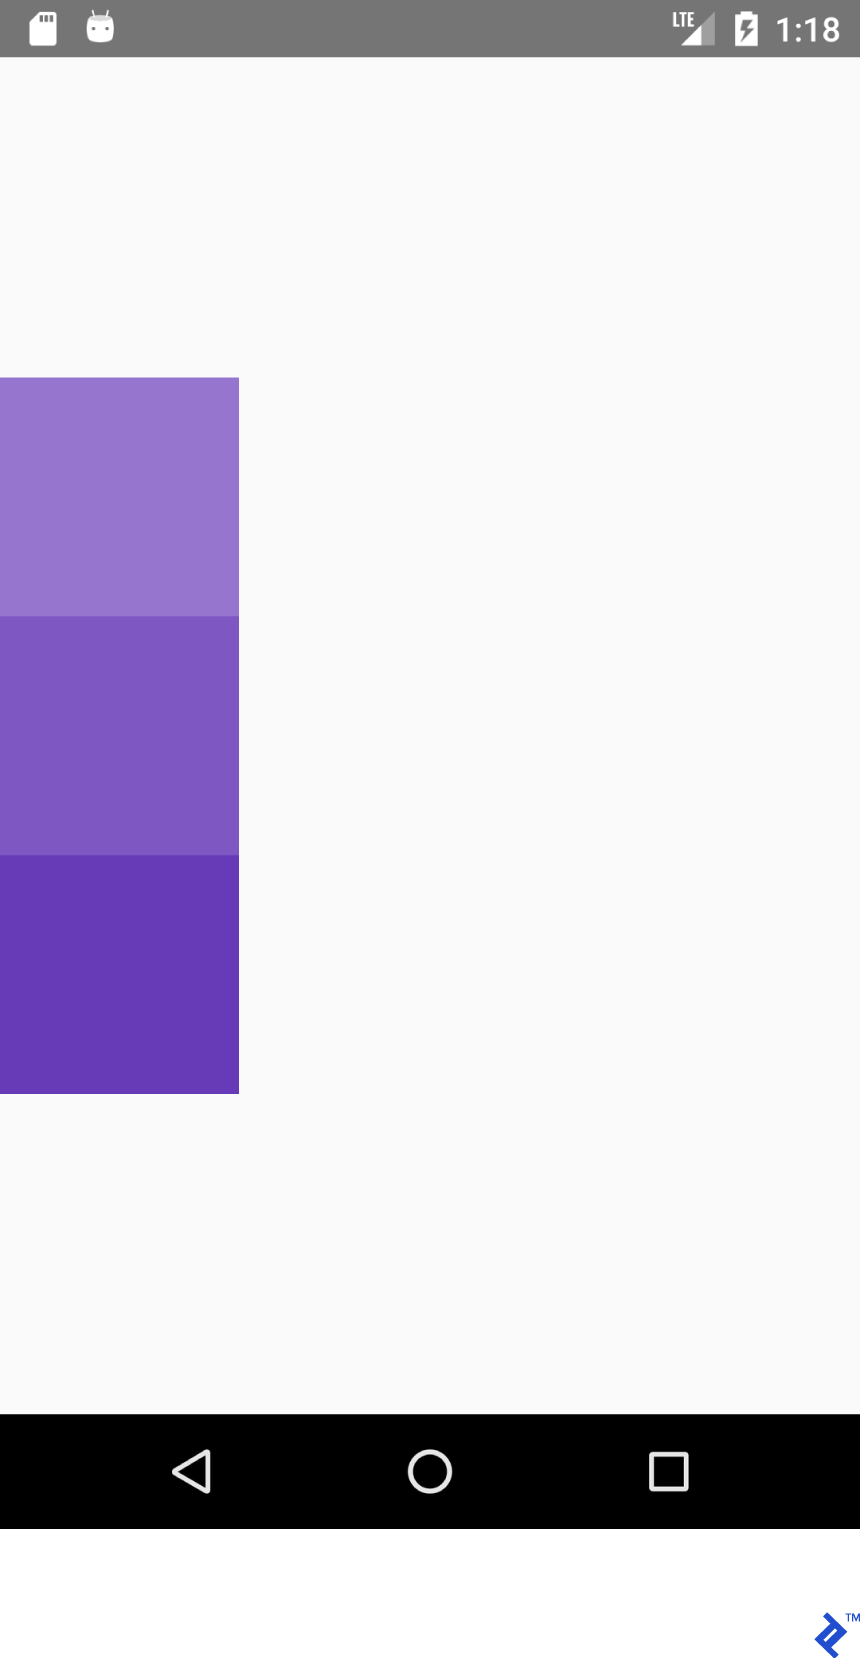
This JSX:
<View style={{flex: 1,
   flexDirection: 'column',
   justifyContent: 'center'}}>
   <View style={{
      width: 100, height: 100,
      backgroundColor: '#9575CD'}}/>
   <View style={{
      width: 100, height: 100,
      backgroundColor: '#7E57C2'}}/>
   <View style={{
      width: 100, height: 100,
      backgroundColor: '#673AB7'}}/>
</View>
And this XML
<LinearLayout
   android:layout_width="match_parent"
   android:layout_height="match_parent"
   android:gravity="center_vertical"
   android:orientation="vertical">
   <View
       android:layout_width="100dp"
       android:layout_height="100dp"
       android:background="#9575CD" />
   <View
       android:layout_width="100dp"
       android:layout_height="100dp"
       android:background="#7E57C2" />
   <View
       android:layout_width="100dp"
       android:layout_height="100dp"
       android:background="#673AB7" />
</LinearLayout>
Will produce this layout:
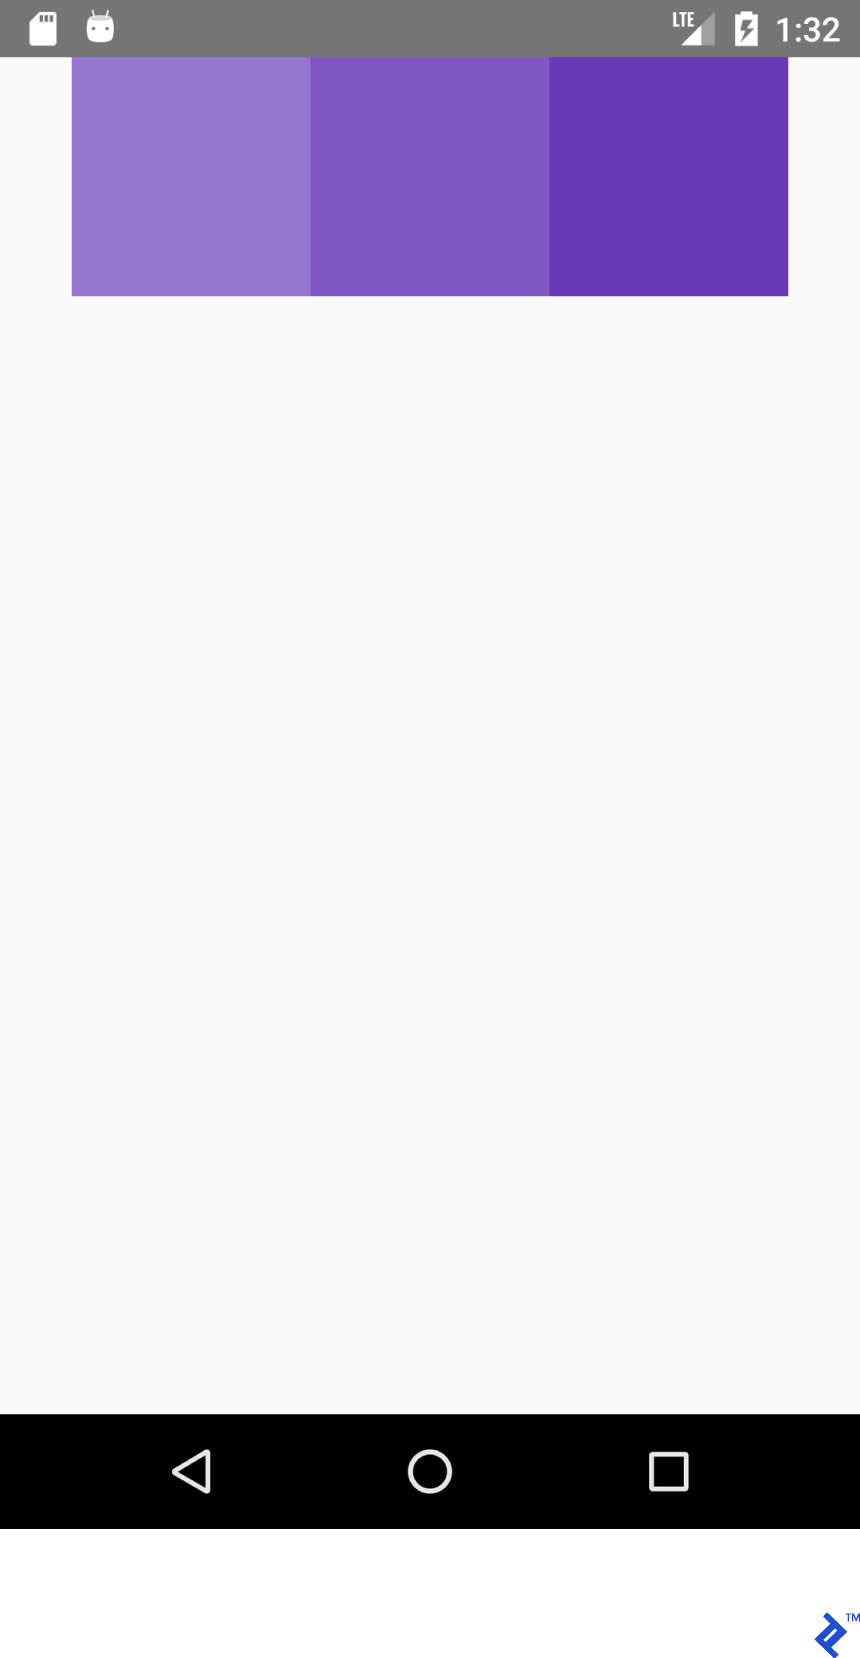
This JSX:
<View style={{flex: 1,
   flexDirection: 'row',
   justifyContent: 'center'}}>
   <View style={{
      width: 100, height: 100,
      backgroundColor: '#9575CD'}}/>
   <View style={{
      width: 100, height: 100,
      backgroundColor: '#7E57C2'}}/>
   <View style={{
      width: 100, height: 100,
      backgroundColor: '#673AB7'}}/>
</View>
And this XML:
<LinearLayout
   android:layout_width="match_parent"
   android:layout_height="match_parent"
   android:gravity="center_horizontal"
   android:orientation="horizontal">
   <View
       android:layout_width="100dp"
       android:layout_height="100dp"
       android:background="#9575CD" />
   <View
       android:layout_width="100dp"
       android:layout_height="100dp"
       android:background="#7E57C2" />
   <View
       android:layout_width="100dp"
       android:layout_height="100dp"
       android:background="#673AB7" />
</LinearLayout>
Will produce this layout:
This JSX:
<View style={{flex: 1,
   flexDirection: 'row',
   justifyContent: 'center',
   alignItems: 'center'}}>
   <View style={{
      width: 100, height: 100,
      backgroundColor: '#9575CD'}}/>
   <View style={{
      width: 100, height: 100,
      backgroundColor: '#7E57C2'}}/>
   <View style={{
      width: 100, height: 100,
      backgroundColor: '#673AB7'}}/>
</View>
and this XML:
<LinearLayout
   android:layout_width="match_parent"
   android:layout_height="match_parent"
   android:gravity="center"
   android:orientation="vertical">
   <View
       android:layout_width="100dp"
       android:layout_height="100dp"
       android:background="#9575CD" />
   <View
       android:layout_width="100dp"
       android:layout_height="100dp"
       android:background="#7E57C2" />
   <View
       android:layout_width="100dp"
       android:layout_height="100dp"
       android:background="#673AB7" />
</LinearLayout>
Will produce this layout:
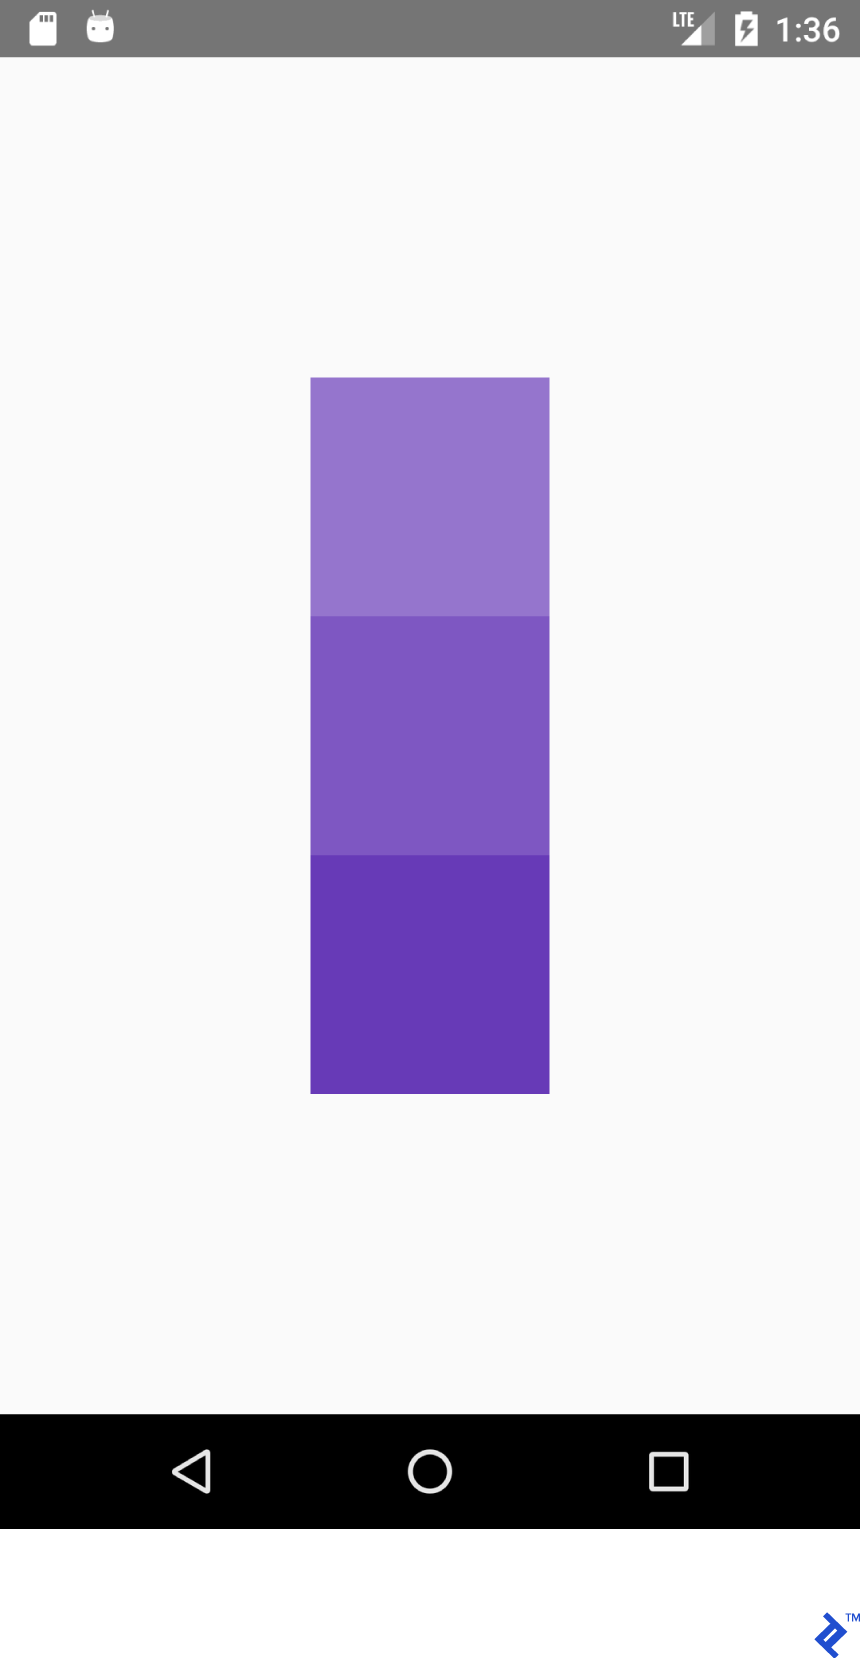
Lesson to be learned: if we have flexDirection: row', alignItems works on Y axis and justifyContent works on X axis. Everything is mirrored for flexDirection: column’ - justifyContent affects Y axis and alignItems affect Y axis.
| justifyContent: 'flex-start' | gravity="start|left" |
| alignItems: 'flex-start' | gravity="start|left" |
| justifyContent: 'flex-end' | gravity="end|right" |
| alignItems: 'flex-end' | gravity="end|right" |
Try it yourself. Set justifyContent value to space-around, space-between, and space-evenly.
State Management
For updating the application state, you are going to use React’s state variable. Whenever state is updated, render() is invoked.
Copy the code below to your app:
import React from 'react';
import {Button, Text, View} from 'react-native';
export default class App extends React.Component {
   /*
   Initialize state object
   with variable 'number'
   set to 0 and variable name
   with value of empty string
   */
   state = {number: 0};
   render() {
       return (
           <View style={{
               flexDirection: 'row',
               justifyContent: 'space-between',
               alignItems: 'center',
               flex: 1,
               padding: 20
           }}>
               <Button title='Decrement'
                       color='#e57373'
                       onPress={() => this.decrement()}/>
               <Text>
                   {/*
                    Text will be automatically
                    updated whenever state.number
                    has changed value
                    */}
                   Value = {this.state.number}
               </Text>
               <Button title='Increment'
                       color='#64B5F6'
                       {/*
                        Set listener for click
                        */}
                       onPress={() => this.increment()}/>
           </View>
       );
   }
   //Declaration of decrement function
   decrement() {
       //To update the state we need invoke this.setState
       //with new value for variable 'number'
       this.setState({number: this.state.number - 1});
   }
   increment() {
       this.setState({number: this.state.number + 1});
   }
}
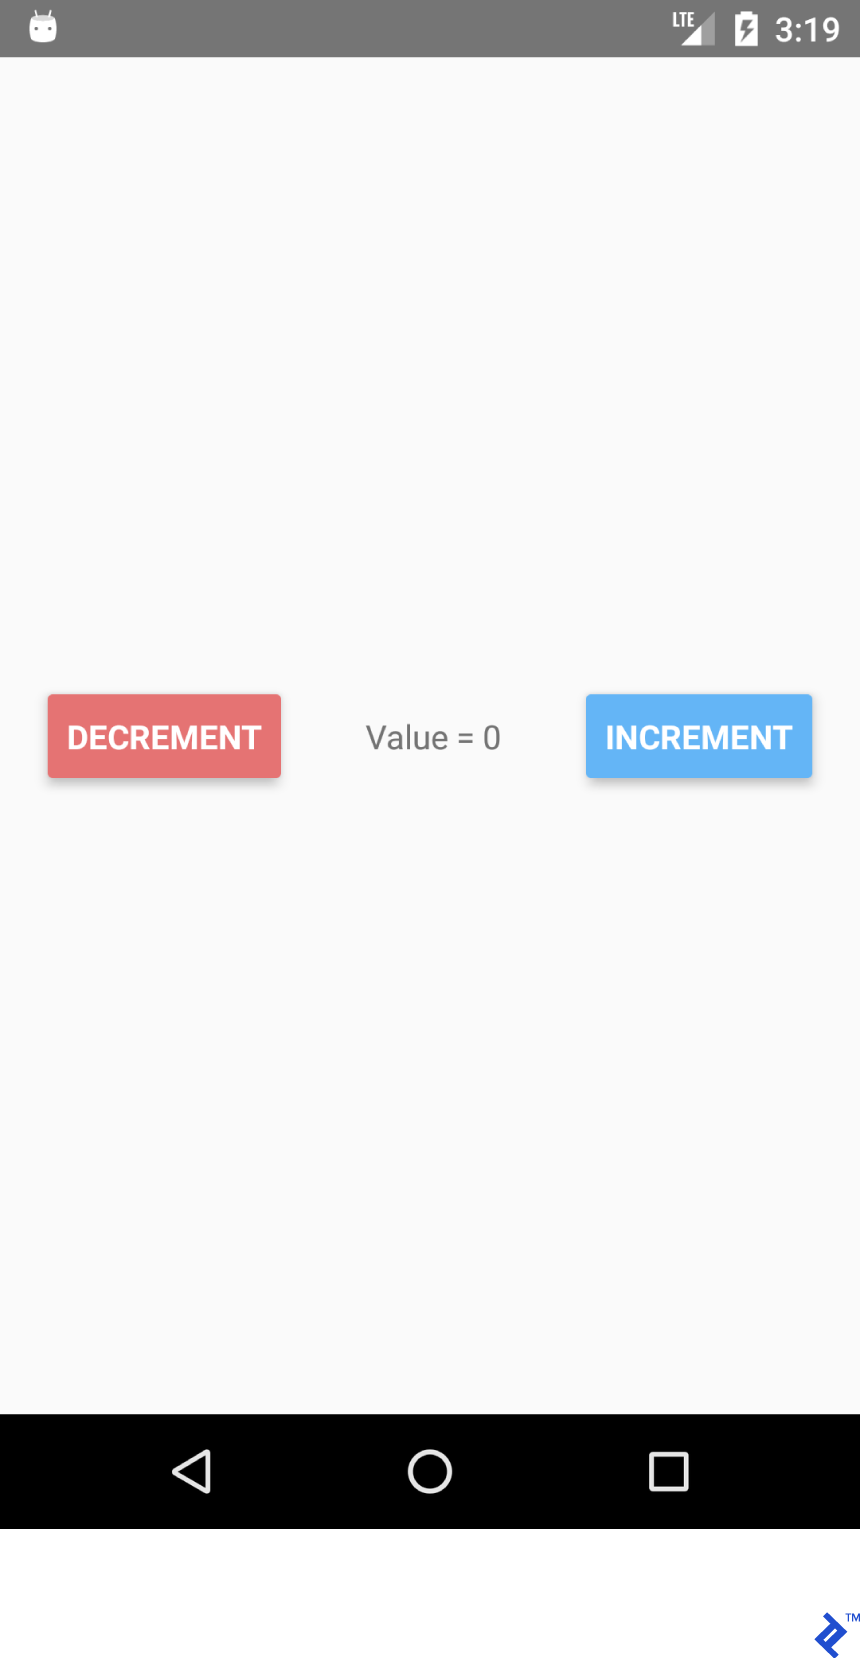
If you click the DECREMENT and INCREMENT buttons, you’ll see that the text is automatically updated for you. There’s no need to explicitly use textView.setText("Value " + number).
State functionality comes handy for multiple reasons:
- Ease of obtaining the value—you always know where and how to obtain the value for a specific variable.
- Data isn’t bound to specific widgets.
- Having multiple widgets dependent upon the common value change.
Creating a Search App for /r/pics
Now that we’ve got a handle on the fundamentals, let’s create something a little more complex: a search app for /r/pics. Reddit provides a straightforward JSON API endpoint, so we won’t have to go on side-quests to get authentication for it to work right.
React Native provides a built-in Fetch API. Since most of us are probably used to Retrofit and its ease of use, we’ll be using axios. You can install axios through a terminal command
using yarn (My preferred method):
yarn add axios
or using npm:
npm install axios
Imports:
import React from 'react';
import {
   TextInput, View, Text, Image,
   ActivityIndicator, Platform, StyleSheet
} from 'react-native';
import axios from 'axios';
TextInput = EditText,
ActivityIndicator = ProgressBar
Platform - Platform detecting module
StyleSheet - Module for creating stylesheets and moving them away from JSX
Create the class:
export default class App extends React.Component {
}
To initialize state. We’ll need:
- loading - For showing a progress bar.
- error - To show if some error yielded when making a REST API request.
- imgUrl - To preview the searched image.
- text - search query.
state = {text: '', loading: false, error: null, imgUrl: null};
Add the JSX code. We have a vertical layout with TextInput and Image components.
render() {
   return (
       //Predefined style. See below
       <View style={styles.containerStyle}>
           {/*
            returnKeyType ~ imeOptions
            onSubmitEditing ~ et.OnEditorActionListener
           */}
           <TextInput
               style={styles.textInputStyle}
               placeholder="Enter text to search an image"
               returnKeyType='search'
               autoFocus={true}
               onChangeText={(text) => this.setState({text})}
               onSubmitEditing={() => this.searchPicture()}/>
           {/*
            Render error Image component
            if this.state.imgUrl is
            not equal to null
           */}
           {
               this.state.imgUrl &&
               <Image
                   source={{uri: this.state.imgUrl}}
                   style={{flex: 1}}/>
           }
       </View>
   );
}
New Stuff:
onChangeText={(text) => this.setState({text})}
onSubmitEditing={() => this.searchPicture()}
{
   this.state.imgUrl &&
   <Image
       source={{uri: this.state.imgUrl}}
       style={{flex: 1}}/>
}
The first method does similar work to EditText with the TextWatcher component. Let’s be honest, it is much nicer in React Native.
The second method is invoked when the return key is pressed on the keyboard (et.OnEditorActionListener) after it triggers searchPicture().
The Image is rendered when imgUrl is not null or undefined since the ‘&&’ operator doesn’t check for a second argument if the first is already false.
You may be wondering why this.state.imgUrl is false. Well, when using logical operators in JavaScript, anything except ‘’ (an empty string), 0, false, null, or undefined are true. There’s no need for a specific check.
searchPicture() {
   //Default state
   this.setState({loading: true, error: null, imgUrl: null});
   axios.get('https://www.reddit.com/r/pics/search.json', {
       params: { //the get param map
           restrict_sr: 'on', //search only /r/pics
           limit: 1, //limit to one search item
           sort: 'new', //sort by creation date
           q: this.state.text //our search query
       }
   }).then(response => { //promise is resolved and 'then' block is triggered
       //set state with new values
       this.setState({
           imgUrl: response.data.data.children[0]
               .data.preview.images[0].source.url,
           error: null, loading: false
       })
   }).catch(error => {//Some error occurred
       //set error
       this.setState({error: error.message, loading: false, imgUrl: null})
   })
}
Here we go. The application should work as expected now. Enter a search string and press return.
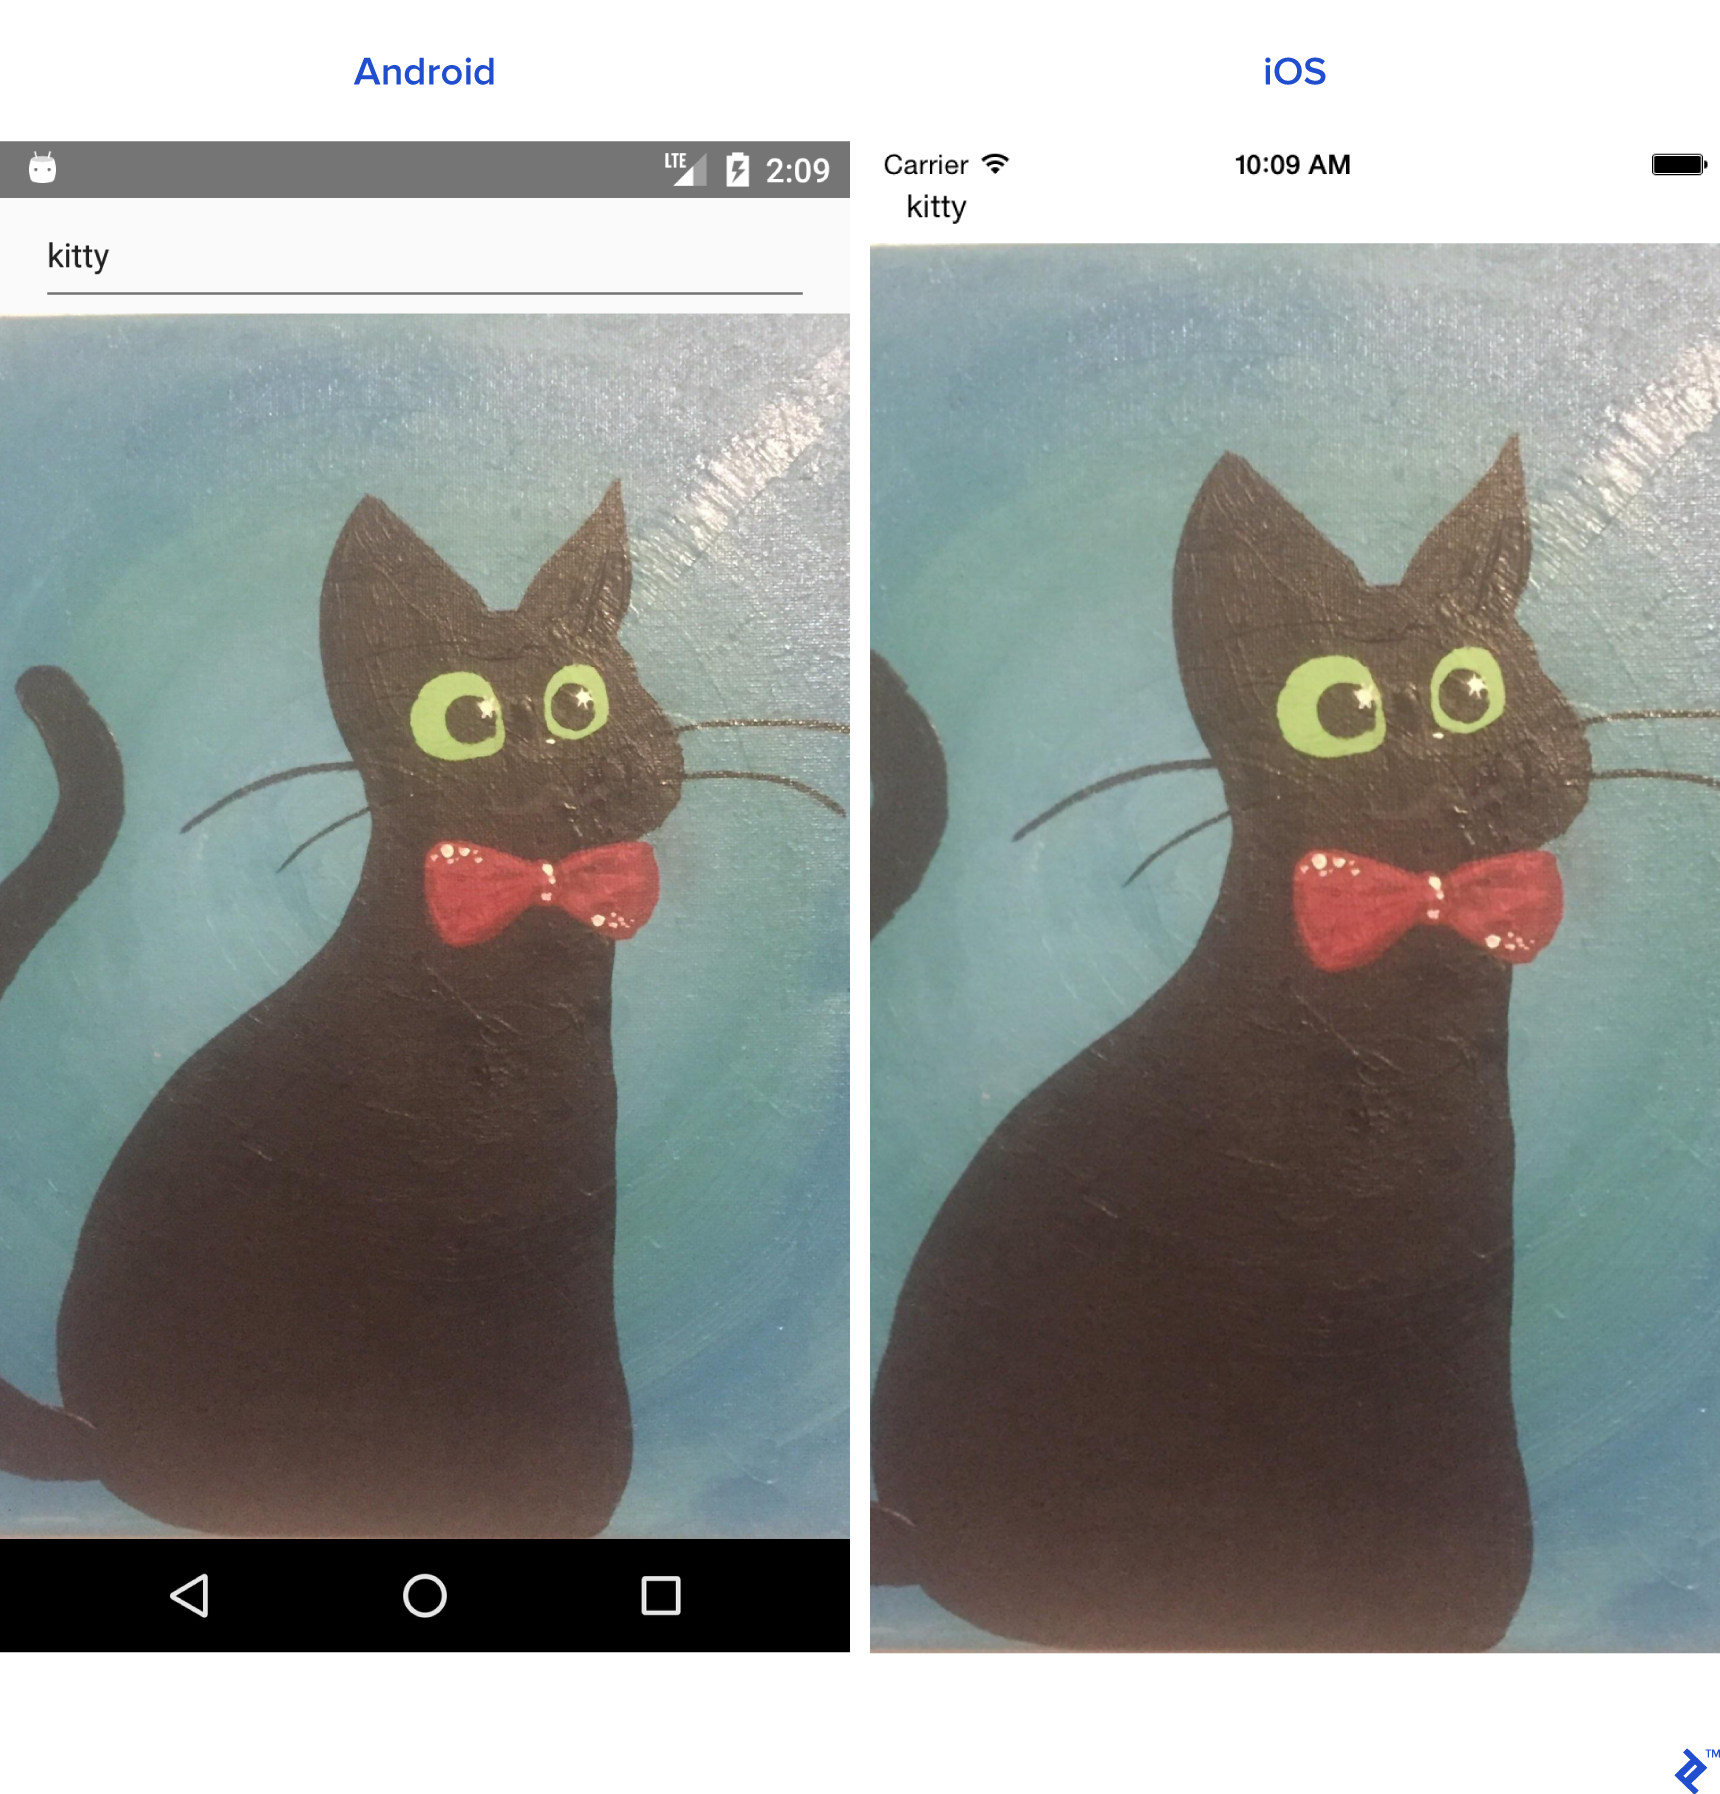
Since our application is also ready to render ActivityIndicator and errors, we need to add some more code after the Image component:
{
   //Separate method
   this.renderProgress()
}
{/*
Render error Text component
if this.state.error is
not equal to null
*/}
{
   this.state.error &&
   <Text style={{margin: 16, color: 'red'}}>
       {this.state.error}
   </Text>
}
You can move render components outside of main render() method, too:
renderProgress() {
   //If this.state.loading is true
   //return View containing a progressbar
   //View takes style array
   if (this.state.loading === true) {
       return (
           <View style={
               [styles.containerStyle,
                   {justifyContent: 'center'}]}>
               <ActivityIndicator color='#e57373'/>
           </View>
       );
   }
}
All is left are styles. Put these outside of the App class.
const styles = StyleSheet.create({
   containerStyle: {
       flexDirection: 'column',
       flex: 1,
       //Since React Native is cross platform
       //let's handle both platforms.
       //Add top margin to fix status bar overlap
       marginTop: Platform.OS === 'ios' ? 20 : 0,
   },
   textInputStyle: {
       marginLeft: 16,
       marginRight: 16,
       height: Platform.OS === 'ios' ? 30 : undefined
   }
});
We can now add some more tweaks like automatically opening the soft keyboard when the application is launched.
Please note there’s an easier way to make TextInput automatically focus (autoFocus={true} prop), but our React Native Android example won’t be using it.
Add reference to the TextInput with prop:
ref={ref => this.searchInput = ref}
And override componentDidMount() lifecycle method like this:
componentDidMount(){
   this.searchInput.focus();
}
Reload the app and the keyboard is automatically open for us.
Component Lifecycle Methods
We’ve already created a component, but let’s go through the life of a component.
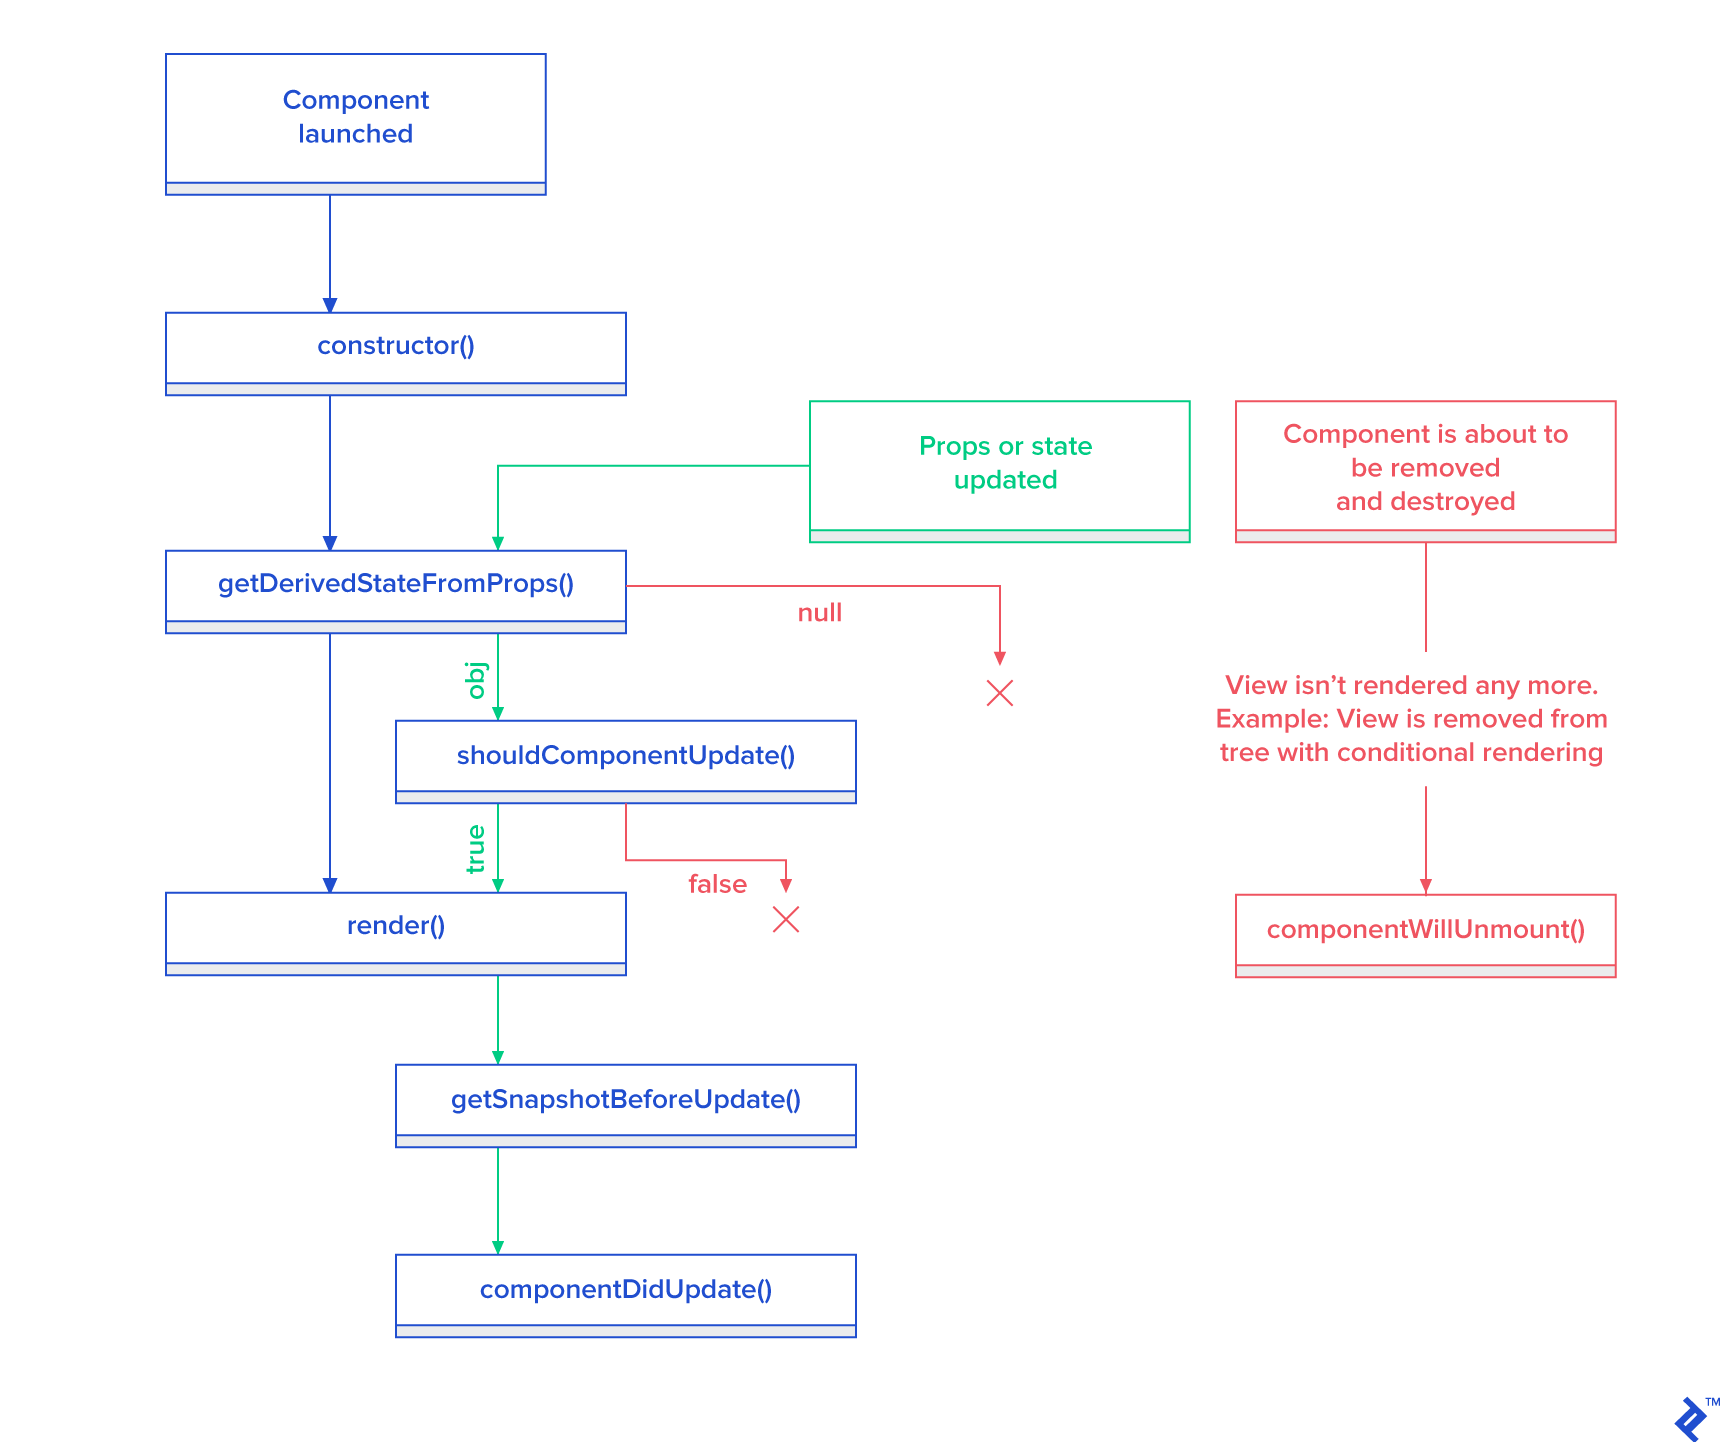
Here’s React’s lifecycle flow:
-
constructor()- Constructor is always called when application is started -
static _getDerivedStateFromProps_(props, state)- Called before render and after update. Returns object for updating the state. Return null to update nothing. -
render()- Render is required for every React Component class. It is used to render View. -
componentDidMount()- Is invoked after the component is rendered and mounted to the view tree. -
shouldComponentUpdate(nextProps, nextState)- Called after state or props change. The return defaults to true after every state update. Invokesrender()if returns true. -
getSnapshotBeforeUpdate(prevProps, prevState)- Called just before rendered output is committed. -
componentDidUpdate(prevProps, prevState, snapshot)- Called after after rendering new update. It is not called after the firstrender(). -
componentWillUnmount()- Called just before component is unmounted and destroyed.
Reusable Components
We often need to create reusable components when working on the project. There are two ways of creating a component:
- Creating a class which extends
React.Component. This method should be used if we need lifecycle methods. - By writing a function which returns View for a simpler syntax.
Since we have already created Component classes let’s create a function for this instance.
Suppose we need an analog to <CardView>. Create a “common” folder under ./src directory.
Create CardView.js.
import React from "react";
import {View} from "react-native";
export default CardView = (props) => {
   return (
       //Style will be merged from default containerStyle
       //and props.style. props.style attributes will override
       //values if parameters are same.
       <View style={{...styles.containerStyle, ...props.style}}>
           {/*
            props.children contain subviews
            add this line if the component is container
           */}
           {props.children}
       </View>
   );
};
const styles = {
   containerStyle: {
       borderRadius: 4,
       margin: 5,
       padding: 5,
       elevation: 5,
       shadowColor: 'black',
       shadowRadius: 5,
       shadowOpacity: 0.5,
       shadowOffset: {width: 0, height: 3},
       backgroundColor: 'white'
   }
};
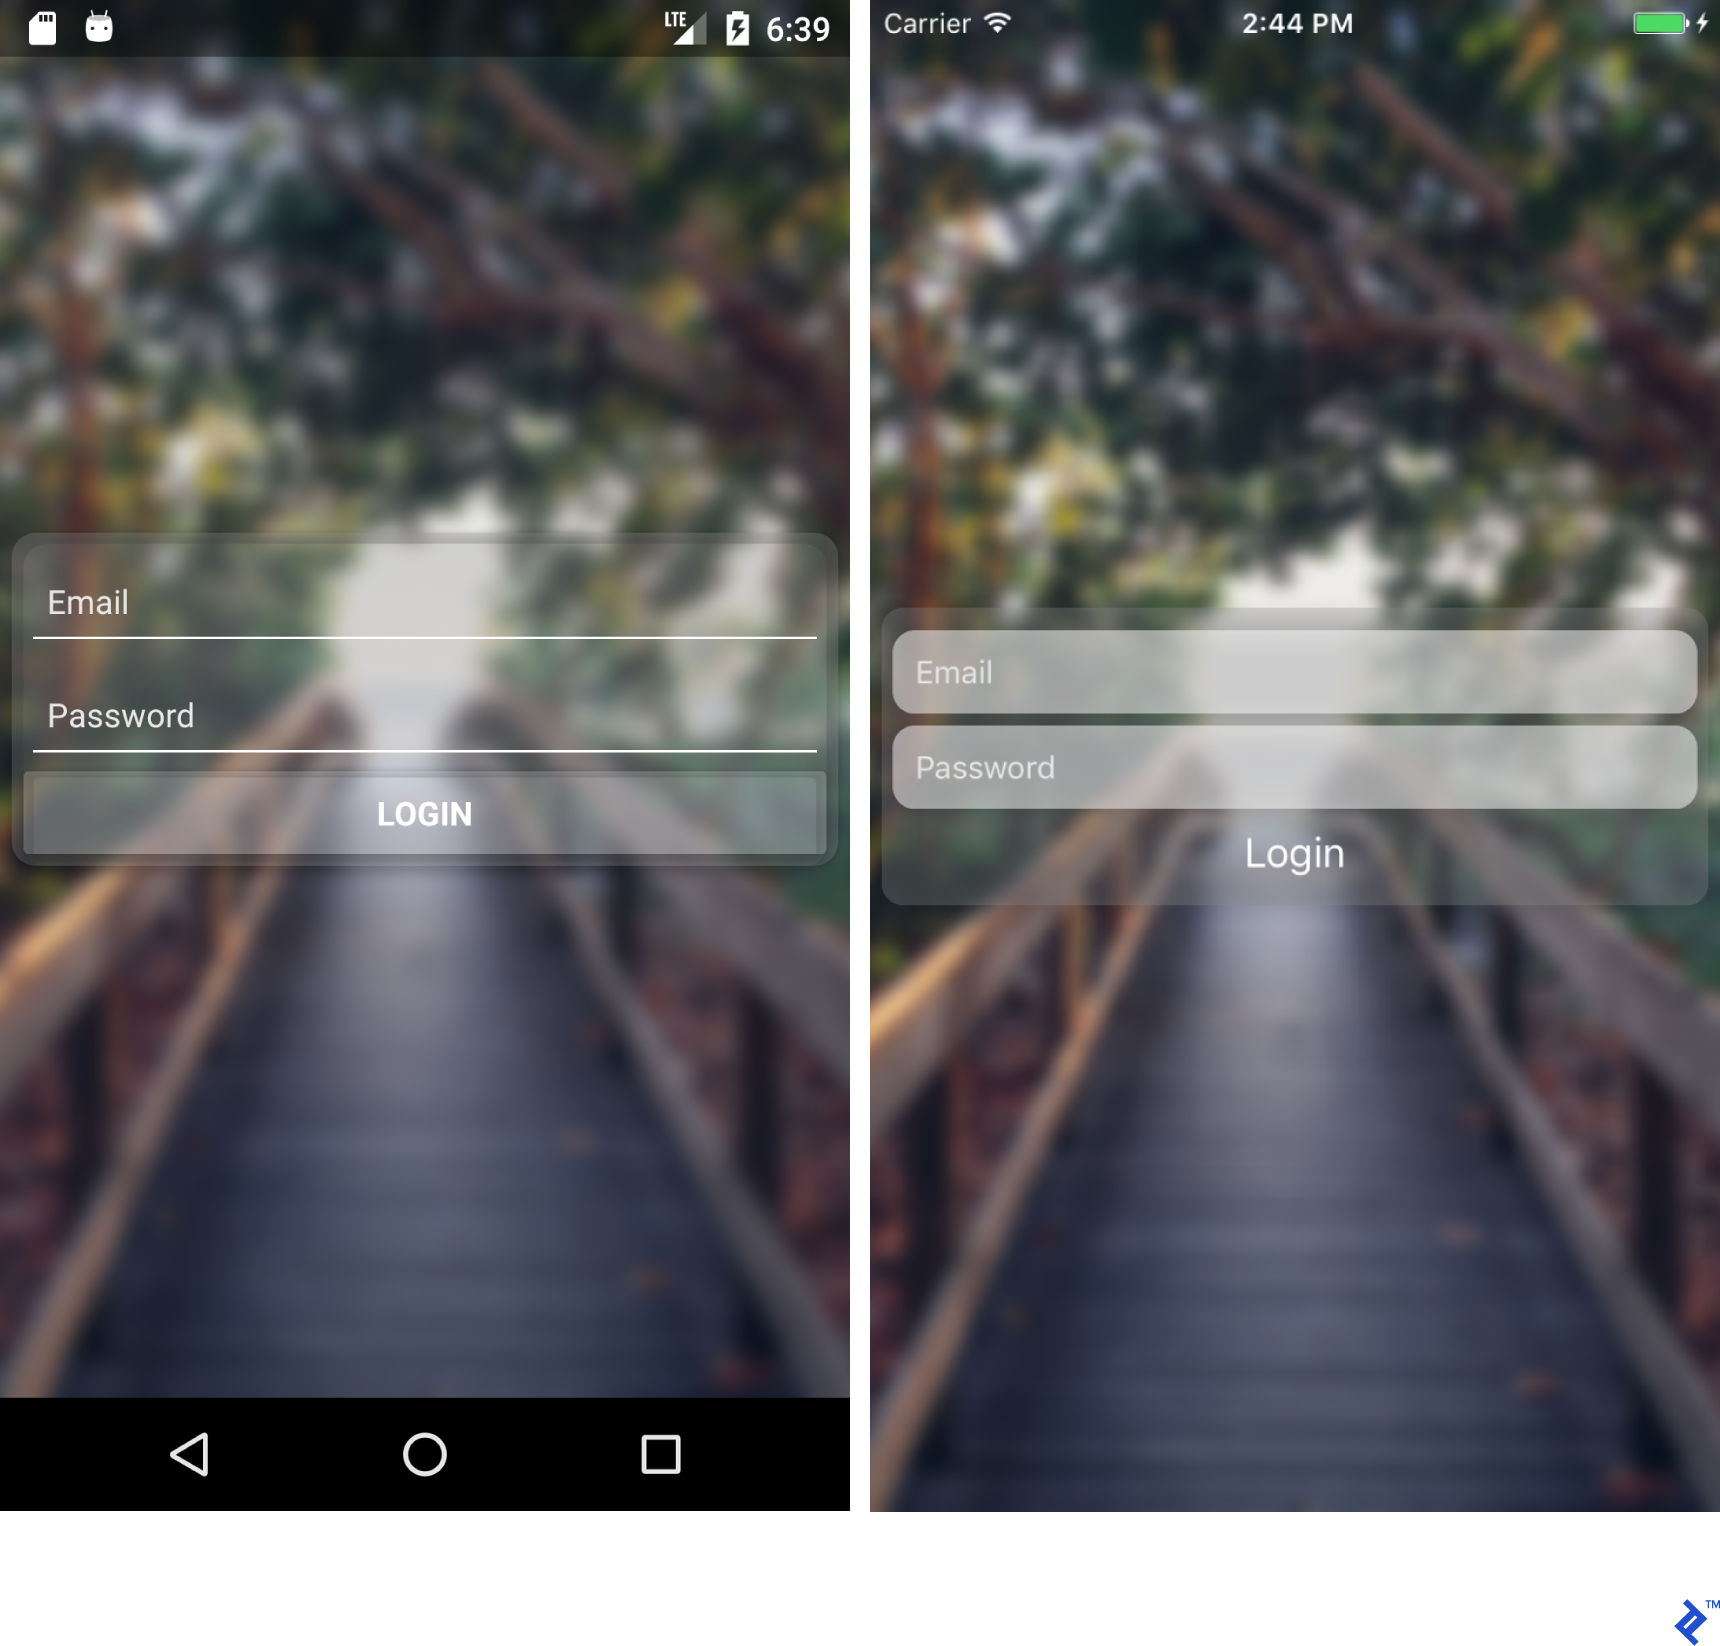
LoginForm using our new CardView layout:
import React from "react";
import {TextInput, Platform, Button, StyleSheet} from "react-native";
import CardView from "../common/components/CardView";
export default class LoginForm extends React._Component _{
   render() {
       return (
    //Override default style
           <CardView style={{
               borderRadius: 4,
               backgroundColor: '#fff'
           }}>
               <TextInput
                   placeholder="Email"
                   style={styles.textInputStyle}/>
               <TextInput
                   placeholder="Password"
                   style={styles.textInputStyle}
                   secureTextEntry={true}/>
               <Button color="#841584"
                       title="Login"
                       onPress={() => console.log("onLoginPress")}
                       buttonStyle={styles.buttonStyle}/>
           </CardView>
       );
   }
}
const styles = StyleSheet.create({
   buttonStyle: {
       elevation: 5,
       height: 40
   },
   textInputStyle: {
       padding: 10,
       //Additional params to make
       //iOS inputs prettier
       ...Platform.select({
           ios: {
               borderRadius: 2,
               marginTop: 5,
               backgroundColor: '#eeeeee'
           }
       })
   }
});
Import the LoginForm class in the App class and wrap it with View
<View style={{flex: 1,  justifyContent: 'center'}}>
   <LoginForm/>
</View>
If you tweak parameters in the styles, you can get something that looks much nicer.
Navigation
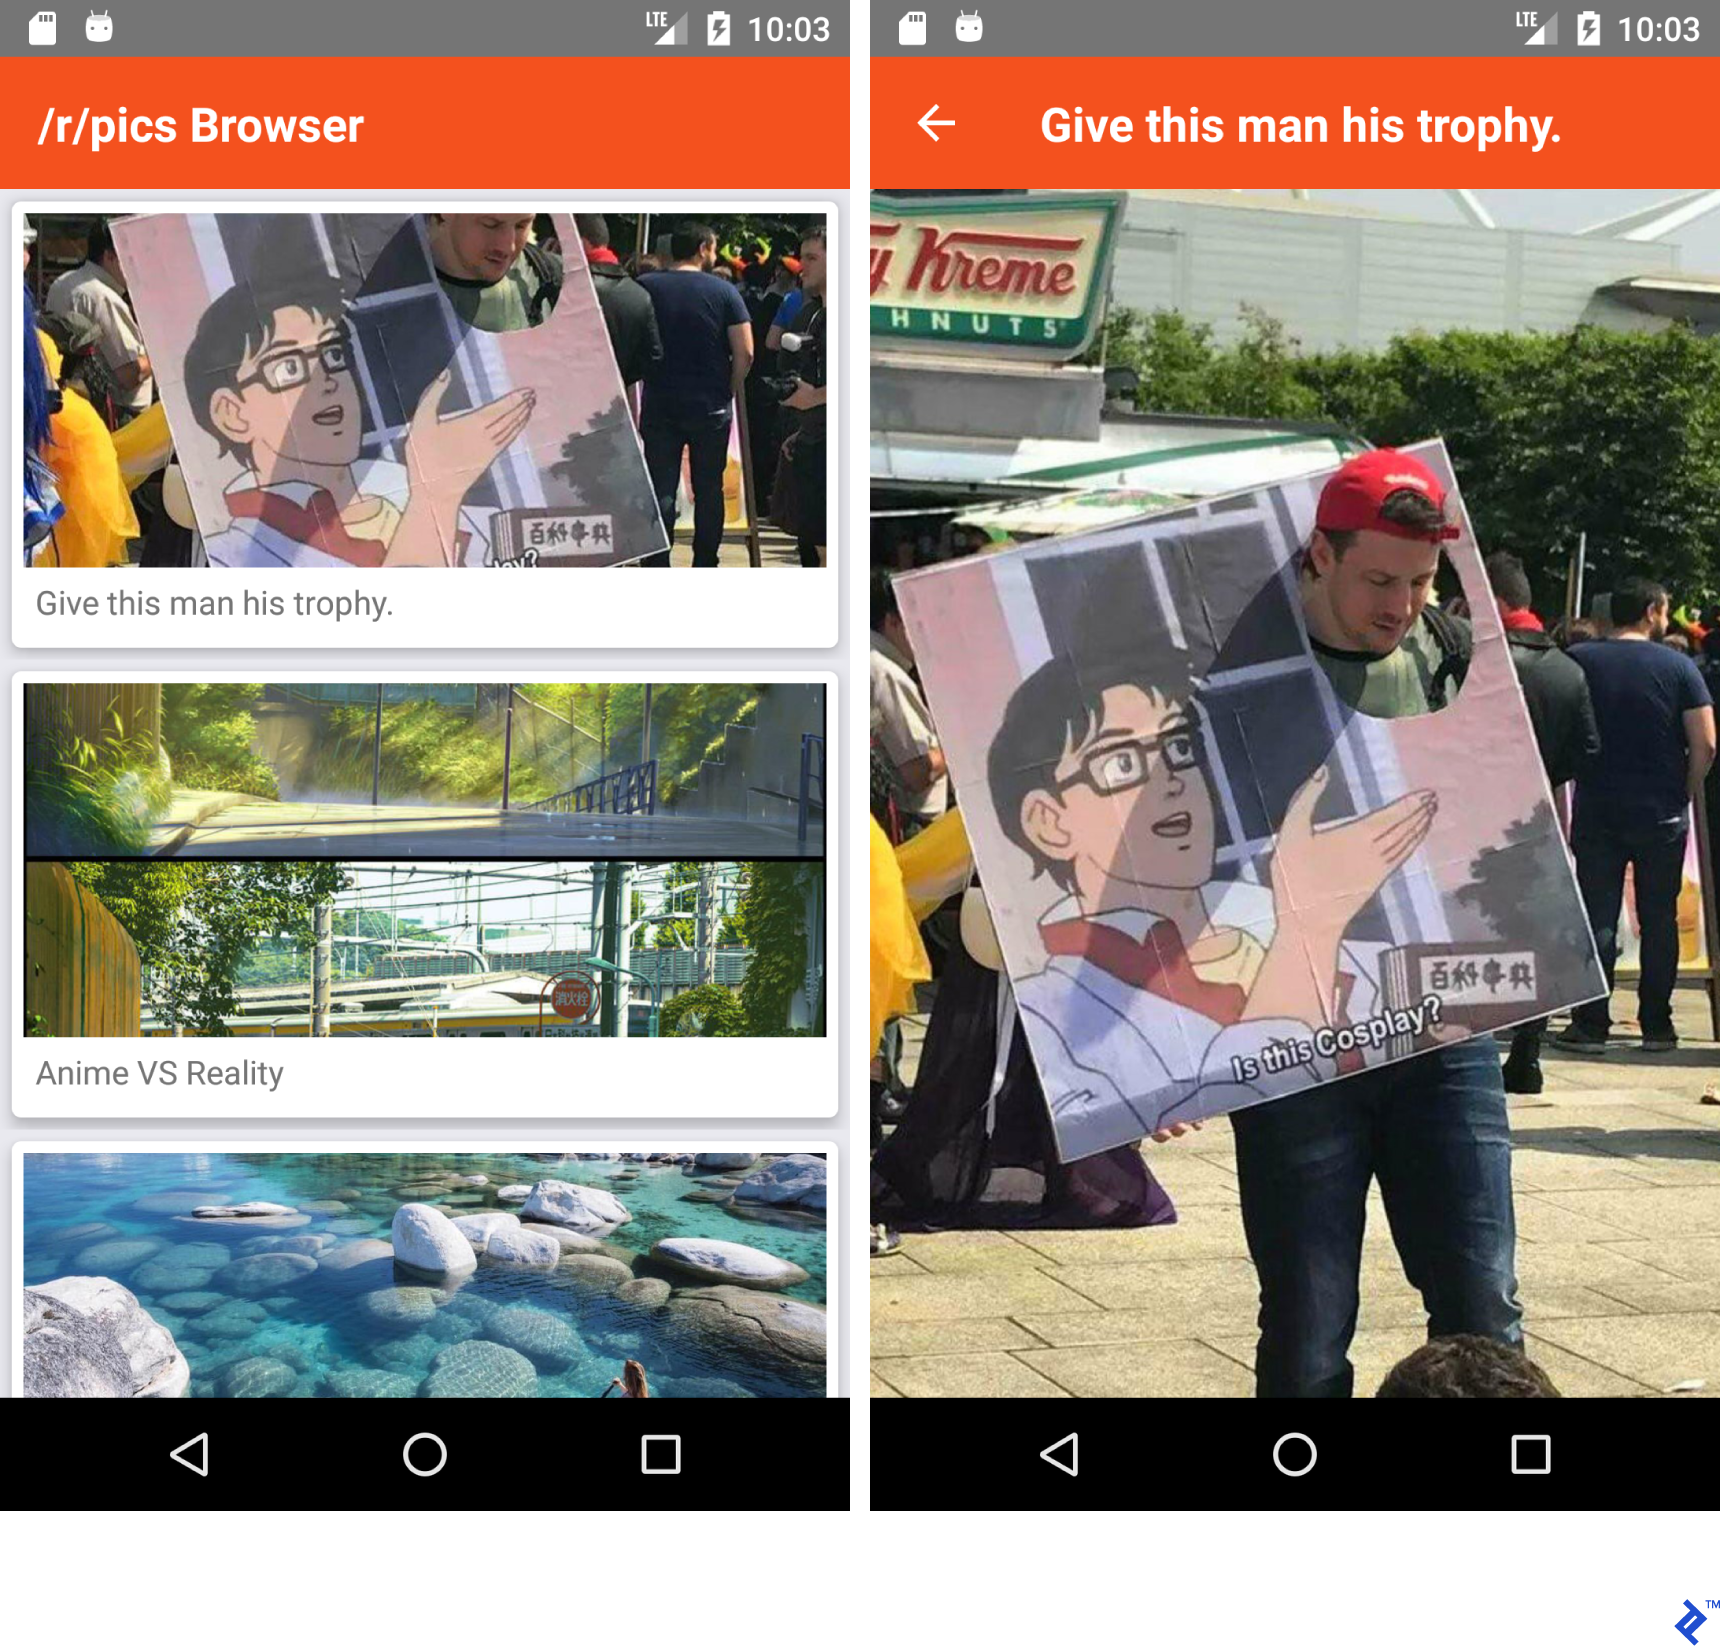
Navigation to different scenes is an essential part for most of the applications. We’re going to create a Reddit /r/pics browser app.
Creating navigation in React Native is fairly easy.
Prerequisites
- Install
react-navigationwithyarnornpm - Install
axioswithyarnornpm
Let’s start by creating two different components.
Note: Most of the code below should already be familiar to you. I will paste the whole class.
PictureList.js:
import React from 'react';
import {
   ActivityIndicator, FlatList,
   Image, Text, TouchableHighlight, View
} from "react-native";
import axios from "axios";
import CardView from "../common/CardView";
export default class PictureList extends React.Component {
   state = {loading: true, error: null, posts: null};
   componentDidMount() {
       axios.get('https://www.reddit.com/r/pics.json')
           .then(response => {
               this.setState({
                   posts: response.data.data.children,
                   loading: false
               })
           }).catch(error => {
           this.setState({
               error: error.message,
               loading: false
           })
       })
   }
   render() {
       return (
           <View style={{flex: 1, justifyContent: 'center'}}>

                // FlatList ~ ListView
                // data - DataSource for the List
                // renderItem - function returns View item
                // keyExtractor - Unique id for items

               {this.state.posts &&
               <FlatList data={this.state.posts}
                         renderItem={this.renderItem.bind(this)}
                         keyExtractor={(item) => (item.data.id + '')}/>}
               {this.state.loading &&
               <ActivityIndicator size="large" color="#f4511e"/>}
           </View>
       );
   }
   navigateToPicture(title, url) {
       this.props.navigation.navigate('PicturePreview', {
           'title': title,
           'url': url
       })
   }
   renderItem(item) {
       //Destructuring values from item
       //Read more 'ES6 destructuring'
       const {data} = item.item;
       const {title} = data;
       const {url} = data.preview.images[0].source;
       return (
           //Clickable view
           <TouchableHighlight onPress={() =>
               this.navigateToPicture(title, url)}>
               {/Reusing our CardView/}
               <CardView>
                   <Image style={{height: 150}}
                          source={{uri: url}}/>
                   <Text style={{padding: 5}}>{title}</Text>
               </CardView>
           </TouchableHighlight>
       )
   }
}
PicturePreview.js:
import React from 'react';
import {Image} from "react-native";
export default class PicturePreview extends React.Component {
   //Destructure navigation
   //Set title to header
   static _navigationOptions = ({navigation}) => ({
       title: navigation.state.params.title
   });
   render() {
       const {url} = this.props.navigation.state.params;
       return (<Image style={{flex: 1}} source={{uri: url}}/>)
   }
}
The navigationOptions will be automatically be invoked by React-Navigation.
Now let’s move to App.js
Note: There are many navigation types in React-Navigation. Today, we’ll be focusing on StackNavigation. Please refer to official website for detailed info.
import React from 'react';
import {createStackNavigator} from "react-navigation";
import PictureList from "./components/PictureList";
import PicturePreview from "./components/PicturePreview";
export default class App extends React.Component {
   render() {
       return (
           <Router/>
       );
   }
}
//Customize the header_
const NavigationOptions = {
   headerTintColor: '#fff',
   headerStyle: {
       backgroundColor: '#f4511e',
   }
};
//Create the router.
const Router = createStackNavigator({
       //Name the screen
       'PictureList': {
           //Link the Component
           screen: PictureList,
           //Additional navigation options
           navigationOptions: {
               title: '/r/pics Browser',
               ...NavigationOptions
           }
       },
       'PicturePreview': {
           screen: PicturePreview,
           navigationOptions: NavigationOptions
       }
   }, {
       //Root
       initialRouterName: 'PictureList'
   }
);
As you can see, all we need to do is create a navigation router and make the app render it. If everything went well, we’ll have a functional Reddit /r/pics browser app.
Android:
iOS:

React Native for Android Developers: Unconventional but Effective
Since I started programming, I have had purely mobile development experiences. But now I can code for pretty much anything with React: mobile, desktop, and web.
If you decide to start developing your next amazing application using React Native, you’ll find that it has its quirks and some bugs here and there, but React Native is very functional and ideal for most projects.
Further Reading on the Toptal Blog:
Understanding the basics
What do you mean by IDE?
Integrated development environment, or code editor.
What apps use React Native?
Many popular applications make use of React Native including Facebook, Tesla, Skype, Instagram, Uber, etc.
What programming language does React Native use?
JavaScript
How do you layout UI in React Native?
Flexbox is the way of creating layouts in React Native.
Is React Native native or hybrid?
In short, neither. Code programming for React Native, which is JavaScript, isn’t really compiled to Java or Swift/Objective C. So it still needs JavaScript engine to run. However, the UI uses native components so it’s native for the user interface.
Is React Native a framework?
Yes. React Native is a framework for building apps which have Native UI.
Alexander Pataridze
Tbilisi, Georgia
Member since June 5, 2018
About the author
Alex is a senior mobile developer with years of experience in Android and iOS. He created mobile banking suites and apps for several banks.
Expertise
PREVIOUSLY AT


