
Separation Anxiety: A Tutorial for Isolating Your System with Linux Namespaces
Linux namespaces make it possible to run a whole range of applications on a single real machine and ensure no two of them can interfere with each other, without having to resort to using virtual machines. In a single-user computer, a single system environment may be fine. But on a server, where you may want to run multiple services, it is essential to security and stability that the services are as isolated from each other as possible.

Linux namespaces make it possible to run a whole range of applications on a single real machine and ensure no two of them can interfere with each other, without having to resort to using virtual machines. In a single-user computer, a single system environment may be fine. But on a server, where you may want to run multiple services, it is essential to security and stability that the services are as isolated from each other as possible.

Mahmud is a software developer with many years of experience and a knack for efficiency, scalability, and stable solutions.
Expertise
With the widespread adoption of tools like Docker, Linux Containers, and Kubernetes, containerization has become a foundational part of modern infrastructure. These technologies make it possible to isolate Linux processes into lightweight environments for deploying and operating applications at scale, and they now underpin much of today’s cloud-native infrastructure, including PaaS offerings and Kubernetes-based systems. But what exactly happens under the hood?
These tools rely on a number of features and components of the Linux kernel. Some of these capabilities have evolved significantly over time, while others still require kernel patching or specialized configuration. But one of the key components, Linux namespaces, has been part of the kernel since Linux 2.6.24 was released in 2008.
We’ll cover the basics: What are Linux namespaces, what are they used for, and how can you create a Linux namespace? Anyone familiar with chroot already has a basic idea of what Linux namespaces can do and how namespaces can be used generally. Just as chroot allows processes to see an arbitrary directory as the root of the system (independent of the rest of the processes), Linux namespaces allow other aspects of the operating system to be independently modified as well. This includes the process tree, networking interfaces, mount points, inter-process communication resources, and more.
Why Use Linux Namespaces for Process Isolation?
What is a namespace in Linux, and why should we use namespaces? In a single-user computer, a single system environment may be fine. But on a server, where you want to run multiple services, it is essential to security and stability that the services are as isolated from each other as possible. Imagine a server running multiple services, one of which gets compromised by an intruder. In such a case, the intruder may be able to exploit that service and work his way to the other services, and may even be able to compromise the entire server. Namespace isolation can provide an important layer of isolation to help reduce this risk.
For example, using namespacing, it is possible to execute arbitrary or unknown programs more safely on your server. Recently, there has been a growing number of programming contests and “hackathon” platforms, such as HackerRank, TopCoder, Codeforces, and many more. A lot of them utilize automated pipelines to run and validate programs that are submitted by the contestants. It is often impossible to know in advance the true nature of contestants’ programs, and some may even contain malicious elements. By running these programs namespaced in complete isolation from the rest of the system, the software can be tested and validated without putting the rest of the machine at risk. Similarly, online continuous integration services, such as GitHub Actions, automatically fetch your code repository and execute test scripts on their own servers. Again, namespace isolation is key to providing these services safely.
Namespacing tools like Docker also allow better control over processes’ use of system resources, making such tools extremely popular for use by PaaS providers. While namespaces isolate things like processes, networking, and mount points, they are typically used together with control groups (cgroups) to limit and account for system resources such as CPU time, memory usage, and I/O bandwidth. Modern Linux systems increasingly rely on cgroups v2, which provides a unified model for resource management across isolated processes. Together, namespaces and cgroups form the basis of container isolation in modern Linux systems.
Services like Heroku and Google App Engine use such tools to isolate and run multiple web server applications on the same real hardware. These tools allow them to run each application (which may have been deployed by any of a number of different users) without worrying about one of them using too many system resources, or interfering and/or conflicting with other deployed services on the same machine. With such process isolation, it is even possible to have entirely different stacks of dependency software (and versions) for each isolated environment!
If you’ve used tools like Docker, you already know that these tools are capable of isolating processes in small “containers”. Running processes in Docker containers is like running them in virtual machines, only these containers are significantly lighter than virtual machines. A virtual machine typically emulates a hardware layer on top of your operating system, and then runs another operating system on top of that. This allows you to run processes inside a virtual machine, in complete isolation from your real operating system. But virtual machines are heavy! In Docker containers, namespaces and some other key features of your real operating system are used, ensuring a similar level of isolation, but without emulating the hardware and running yet another operating system on the same machine. This makes them very lightweight.
Process Namespace
Historically, the Linux kernel has maintained a single process tree. The tree contains a reference to every process currently running in a parent-child hierarchy. A process, given it has sufficient privileges and satisfies certain conditions, can inspect another process by attaching a tracer to it or may even be able to kill it.
With the introduction of Linux namespaces, it became possible to have multiple “nested” process trees. Each process tree can have an entirely isolated set of processes. This can ensure that processes belonging to one process tree cannot inspect or kill—in fact, cannot even know of the existence of—processes in other sibling or parent process trees.
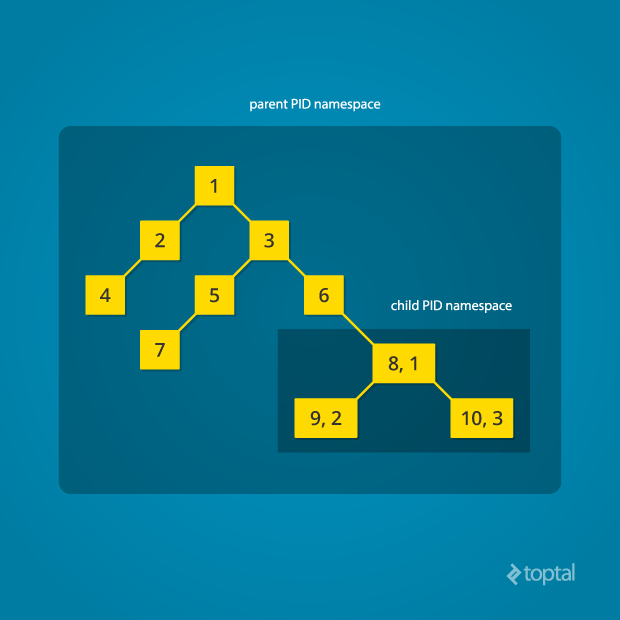
Every time a computer with Linux boots up, it starts with just one process, with process identifier (PID) 1. This process is the root of the process tree, and it initiates the rest of the system by performing the appropriate maintenance work and starting the correct daemons/services. All the other processes start below this process in the tree. The PID namespace allows one to spin off a new tree, with its own PID 1 process. The process that does this remains in the parent namespace, in the original tree, but makes the child the root of its own process tree.
With PID namespace isolation, processes in the child namespace have no way of knowing of the parent process’s existence. However, processes in the parent namespace have a complete view of processes in the child namespace, as if they were any other process in the parent namespace.
It is possible to create a nested set of child namespaces: one process starts a child process in a new PID namespace, and that child process spawns yet another process in a new PID namespace, and so on.
With the introduction of PID namespaces, a single process can now have multiple PIDs associated with it, one for each namespace it falls under. In the Linux source code, we can see that a struct named pid, which used to keep track of just a single PID, now tracks multiple PIDs through the use of a struct named upid:
struct upid {
  int nr;                     // the PID value
  struct pid_namespace *ns;   // namespace where this PID is relevant
  // ...
};

struct pid {
  // ...
  int level;                  // number of upids
  struct upid numbers[];      // array of upids
};
To create a new PID namespace, one must call the clone() system call with a special flag CLONE_NEWPID. (C provides a wrapper to expose this system call, and so do many other popular languages.) Whereas the other namespaces discussed below can also be created using the unshare() system call, a PID namespace can only be created at the time a new process is spawned using clone(). Once clone() is called with this flag, the new process immediately starts in a new PID namespace, under a new process tree. This can be demonstrated with a simple C program:
#define _GNU_SOURCE
#include <sched.h>
#include <stdio.h>
#include <stdlib.h>
#include <sys/wait.h>
#include <unistd.h>

static char child_stack[1048576];

static int child_fn() {
  printf("PID: %ld\n", (long)getpid());
  return 0;
}

int main() {
  pid_t child_pid = clone(child_fn, child_stack+1048576, CLONE_NEWPID | SIGCHLD, NULL);
  printf("clone() = %ld\n", (long)child_pid);

  waitpid(child_pid, NULL, 0);
  return 0;
}
Compile and run this program with root privileges and you will notice an output that resembles this:
clone() = 5304
PID: 1
The PID, as printed from within the child_fn, will be 1.
Even though this namespace tutorial code above is not much longer than “Hello, world” in some languages, a lot has happened behind the scenes. The clone() function, as you would expect, has created a new process by cloning the current one and started execution at the beginning of the child_fn() function. However, while doing so, it detached the new process from the original process tree and created a separate process tree for the new process.
Try replacing the static int child_fn() function with the following, to print the parent PID from the isolated process’s perspective:
static int child_fn() {
  printf("Parent PID: %ld\n", (long)getppid());
  return 0;
}
Running the program this time yields the following output:
clone() = 11449
Parent PID: 0
Notice how the parent PID from the isolated process’s perspective is 0, indicating no parent. Try running the same program again, but this time, remove the CLONE_NEWPID flag from within the clone() function call:
pid_t child_pid = clone(child_fn, child_stack+1048576, SIGCHLD, NULL);
This time, you will notice that the parent PID is no longer 0:
clone() = 11561
Parent PID: 11560
However, this is just the first step in our tutorial. These processes still have unrestricted access to other common or shared resources. For example, the networking interface: if the child process created above were to listen on port 80, it would prevent every other process on the system from being able to listen on it.
Linux Network Namespace
This is where a network namespace becomes useful. A network namespace allows each of these processes to see an entirely different set of networking interfaces. Even the loopback interface is different for each network namespace.
Isolating a process into its own network namespace involves introducing another flag to the clone() function call: CLONE_NEWNET;
#define _GNU_SOURCE
#include <sched.h>
#include <stdio.h>
#include <stdlib.h>
#include <sys/wait.h>
#include <unistd.h>


static char child_stack[1048576];

static int child_fn() {
  printf("New `net` Namespace:\n");
  system("ip link");
  printf("\n\n");
  return 0;
}

int main() {
  printf("Original `net` Namespace:\n");
  system("ip link");
  printf("\n\n");

  pid_t child_pid = clone(child_fn, child_stack+1048576, CLONE_NEWPID | CLONE_NEWNET | SIGCHLD, NULL);

  waitpid(child_pid, NULL, 0);
  return 0;
}
Output:
Original `net` Namespace:
1: lo: <LOOPBACK,UP,LOWER_UP> mtu 65536 qdisc noqueue state UNKNOWN mode DEFAULT group default
    link/loopback 00:00:00:00:00:00 brd 00:00:00:00:00:00
2: enp4s0: <BROADCAST,MULTICAST,UP,LOWER_UP> mtu 1500 qdisc pfifo_fast state UP mode DEFAULT group default qlen 1000
    link/ether 00:24:8c:a1:ac:e7 brd ff:ff:ff:ff:ff:ff


New `net` Namespace:
1: lo: <LOOPBACK> mtu 65536 qdisc noop state DOWN mode DEFAULT group default
    link/loopback 00:00:00:00:00:00 brd 00:00:00:00:00:00
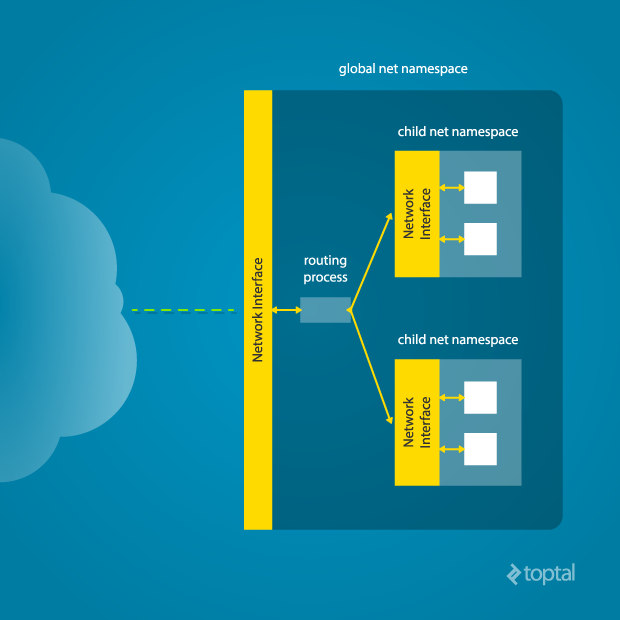
What’s going on here? The physical ethernet device enp4s0 belongs to the global network namespace, as indicated by the ip tool run from this namespace. However, the physical interface is not available in the new network namespace. Moreover, the loopback device is active in the original network namespace, but is “down” in the child network namespace.
In order to provide a usable network interface in the child namespace, it is necessary to set up additional “virtual” network interfaces that span multiple namespaces. Once that is done, it is then possible to create Ethernet bridges, and even route packets between the namespaces. Finally, to make the whole thing work, a “routing process” must be running in the global network namespace to receive traffic from the physical interface, and route it through the appropriate virtual interfaces to the correct child network namespaces. Maybe you can see why tools like Docker, which do all this heavy lifting for you, are so popular!
To do this by hand, you can create a pair of virtual Ethernet connections between a parent and a child namespace by running a single command from the parent namespace:
ip link add name veth0 type veth peer name veth1 netns <pid>
Here, <pid> should be replaced by the process ID of the process in the child namespace as observed by the parent. Running this command establishes a pipe-like connection between these two namespaces. The parent namespace retains the veth0 device, and passes the veth1 device to the child namespace. Anything that enters one of the ends comes out through the other end, just as you would expect from a real Ethernet connection between two real nodes. Accordingly, both sides of this virtual Ethernet connection must be assigned IP addresses.
Mount Namespace
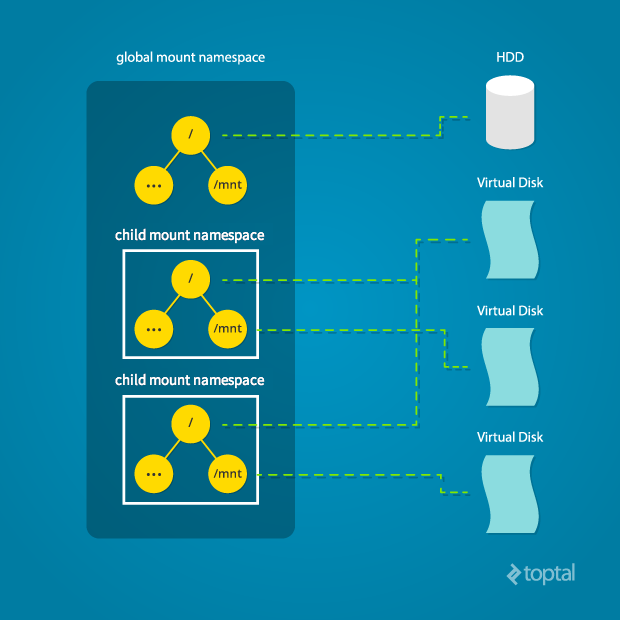
Linux also maintains a data structure for all the mountpoints of the system. It includes information like what disk partitions are mounted, where they are mounted, whether they are read-only, et cetera. With Linux namespaces, one can have this data structure cloned, so that processes under different namespaces can change the mountpoints without affecting each other.
Creating a separate mount namespace has an effect similar to doing a chroot(). chroot() is good, but it does not provide complete isolation, and its effects are restricted to the root mountpoint only. Creating a separate mount namespace allows each of these isolated processes to have a completely different view of the entire system’s mountpoint structure from the original one. This allows you to have a different root for each isolated process, as well as other mountpoints that are specific to those processes. Used with care per this tutorial, you can avoid exposing any information about the underlying system.
The clone() flag required to achieve this is CLONE_NEWNS:
clone(child_fn, child_stack+1048576, CLONE_NEWPID | CLONE_NEWNET | CLONE_NEWNS | SIGCHLD, NULL)
Initially, the child process sees the exact same mountpoints as its parent process would. However, being under a new mount namespace, the child process can mount or unmount whatever endpoints it wants to, and the change will affect neither its parent’s namespace nor any other mount namespace in the entire system. For example, if the parent process has a particular disk partition mounted at root, the isolated process will see the exact same disk partition mounted at the root in the beginning. But the benefit of isolating the mount namespace is apparent when the isolated process tries to change the root partition to something else, as the change will only affect the isolated mount namespace.
Interestingly, this actually makes it a bad idea to spawn the target child process directly with the CLONE_NEWNS flag. A better approach is to start a special init process with the CLONE_NEWNS flag, have that init process change the /, /proc, /dev, or other mountpoints as desired, and then start the target process. This is discussed in a little more detail near the end of this namespace tutorial.
Other Namespaces
There are other namespaces that these processes can be isolated into, including IPC and UTS namespaces. Isolating a process by the IPC namespace gives it its own interprocess communication resources, for example, System V IPC and POSIX messages. The UTS namespace isolates two specific identifiers of the system: nodename and domainname.
A quick example to show how UTS namespace is isolated is shown below:
#define _GNU_SOURCE
#include <sched.h>
#include <stdio.h>
#include <stdlib.h>
#include <sys/utsname.h>
#include <sys/wait.h>
#include <unistd.h>


static char child_stack[1048576];

static void print_nodename() {
  struct utsname utsname;
  uname(&utsname);
  printf("%s\n", utsname.nodename);
}

static int child_fn() {
  printf("New UTS namespace nodename: ");
  print_nodename();

  printf("Changing nodename inside new UTS namespace\n");
  sethostname("GLaDOS", 6);

  printf("New UTS namespace nodename: ");
  print_nodename();
  return 0;
}

int main() {
  printf("Original UTS namespace nodename: ");
  print_nodename();

  pid_t child_pid = clone(child_fn, child_stack+1048576, CLONE_NEWUTS | SIGCHLD, NULL);

  sleep(1);

  printf("Original UTS namespace nodename: ");
  print_nodename();

  waitpid(child_pid, NULL, 0);

  return 0;
}
This program yields the following output:
Original UTS namespace nodename: XT
New UTS namespace nodename: XT
Changing nodename inside new UTS namespace
New UTS namespace nodename: GLaDOS
Original UTS namespace nodename: XT
Here, child_fn() prints the nodename, changes it to something else, and prints it again. Naturally, the change happens only inside the new UTS namespace.
User Namespace
The user namespace isolates user and group identifiers. A process can have different user and group IDs inside the namespace than outside it. In particular, this allows a process to appear to have root privileges within the isolated environment, while remaining an unprivileged user outside the namespace.
This has important security implications. For example, a process running as root inside a user namespace may still have very limited privileges on the host system itself. This capability is commonly used by modern container runtimes to allow containers to run without requiring full root privileges on the host machine.
The clone() flag required for creating a new user namespace is CLONE_NEWUSER.
Cross-Namespace Communication
Often it is necessary to establish some sort of communication between the parent and the child namespace. This might be for doing configuration work within an isolated environment, or it can simply be to retain the ability to peek into the condition of that environment from outside. One way of doing that is to keep an SSH daemon running within that environment. You can have a separate SSH daemon inside each network namespace. However, having multiple SSH daemons running uses a lot of valuable resources like memory. This is where having a special init process proves to be a good idea again.
The init process can establish a communication channel between the parent namespace and the child namespace. This channel can be based on UNIX sockets or can even use TCP. To create a UNIX socket that spans two different mount namespaces, you need to first create the child process, then create the UNIX socket, and then isolate the child into a separate mount namespace. But how can we create the process first, and isolate it later? Linux provides unshare(). This special system call allows a process to isolate itself from the original namespace, instead of having the parent isolate the child in the first place. For example, the following code has the exact same effect as the code previously mentioned in the network namespace section:
#define _GNU_SOURCE
#include <sched.h>
#include <stdio.h>
#include <stdlib.h>
#include <sys/wait.h>
#include <unistd.h>


static char child_stack[1048576];

static int child_fn() {
  // calling unshare() from inside the init process lets you create a new namespace after a new process has been spawned
  unshare(CLONE_NEWNET);

  printf("New net Namespace:\n");
  system("ip link");
  printf("\n\n");
  return 0;
}

int main() {
  printf("Original net Namespace:\n");
  system("ip link");
  printf("\n\n");

  pid_t child_pid = clone(child_fn, child_stack+1048576, CLONE_NEWPID | SIGCHLD, NULL);

  waitpid(child_pid, NULL, 0);
  return 0;
}
And since the init process is something you have devised, you can make it do all the necessary work first, and then isolate itself from the rest of the system before executing the target child.
Conclusion
This tutorial is an overview of how to use namespaces in Linux, with Linux namespaces explained step-by-step. It should give you a basic idea of how a Linux developer might start to implement system isolation, an integral part of the architecture of tools like Docker or Linux Containers. In most cases, it would be best to simply use one of these existing tools, which are already well-known and tested. But in some cases, it might make sense to have your very own, customized process isolation mechanism, and in that case, this namespace tutorial will help you out tremendously.
There is a lot more going on under the hood than I’ve covered in this article, and there are more ways you might want to limit your target processes for added safety and isolation. But, hopefully, this can serve as a useful starting point for someone who is interested in knowing more about how namespace isolation with Linux really works.
Dhaka, Dhaka Division, Bangladesh
Member since January 16, 2014
About the author
Mahmud is a software developer with many years of experience and a knack for efficiency, scalability, and stable solutions.