Programming Visually with Node-RED: Wiring Up the Internet of Things with Ease
Node-RED, built on Node.js, is a tool designed for programming visually without having to write any code. It comes equipped with a browser-based flow editor that allows hardware devices and APIs to be connected with each other easily, making it an ideal tool for rapidly developing programs for IoT devices.
In this article, Toptal freelance software engineer Jesús Darío Rivera walks us through the process of building a simple program using Node-RED and Netbeast along with a virtual light bulb plugin that mimics the capabilities of a real smart bulb.
Jesus is the co-founder of Netbeast.co. He has two years of experience as a full-stack developer and one year as CTO.
Expertise
Through programming, we make machines imitate complex behavior by following sequences of simple instructions. Using textual programming languages such as Assembly, C, Python, and JavaScript is one of the primary way of doing this. Designers of these programming languages have spent countless hours trying to make the experience of writing programs as easy as possible through expressive syntax, robust programming constructs, and powerful toolchains. However, all of these programming languages share a common trait: textual source code.
Writing programs in text works, and in most cases it works well. However, the ability to express programs visually is often desirable. Being able to design the flow of information through various components of a larger system is often all that is needed. Visual programming tools are also lenient towards anyone who is new to programming and struggling to handle various concepts like variables, pointers, signals, scopes, and so on.
Node-RED is a tool for programming visually. It displays relations and functions visually, and allows the user to program without having to type a language. Node-RED is a browser-based flow editor where you can add or remove nodes and wire them together in order to make them communicate with each other.
In Node-RED, every node is one of the following two types: an inject node or a function node. Inject nodes produce a message without requiring any input and push the message to the next node connected to it. Function nodes, on the other hand, take an input and perform some work on it. With a plethora of these nodes to choose from, Node-RED makes wiring together hardware devices, APIs, and online services easier than ever.
Getting Started with Node-RED
Node-RED is built on Node.js. To install Node-RED, you will need to have both Node.js and NPM installed. With NPM, it is super easy to install Node-RED:
npm install -g node-red
Node-RED’s flow editor is a web browser based application. To be able to use it, run Node-RED:
node-red
&hellip and navigate to http://localhost:1880.
Hello, World!
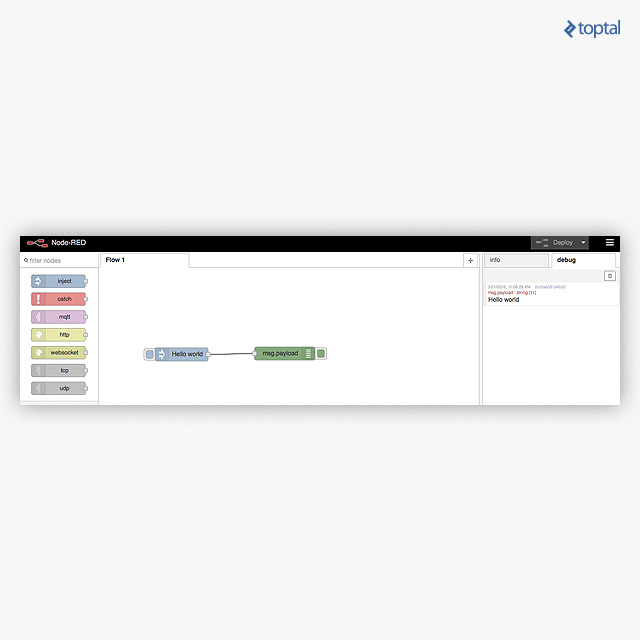
What beginner’s programming tutorial is complete without learning to say “Hello, world”? Let us start by trying out exactly that:
- Drag and drop an inject node on the flow editor. Then double click and set up the payload as string and write “Hello world”.
- Drag and drop a debug node, the same way as you did with the inject one.
- Wire them together.
- Click on the “Deploy” button on the right corner.
- Click on the blue button just left of the inject node.
Try it. You will see something like this:
Just JavaScript
With Node-RED, you are not limited to just simple nodes and functionalities. As Node-RED is built on Node.js, it’s all powered by JavaScript. Nodes are, indeed, Node.js modules. They can be found in http://flows.nodered.org/, so to add them to your left panel you can just “npm install” them. In fact, you can develop your own flow and upload them to the flow repository. Applications can be as complex as you want, because you are able to type JavaScript in function nodes within the code editor that Node-RED provides.
Since the platform is based on Node.js, it takes advantage of the same event-driven, non-blocking model. So an application built on Node-RED can be run on low cost hardware like the Raspberry Pi, as well as in the cloud.
Now Let’s Go Pro: Time for Home Automation
To demonstrate how Node-RED fits into the realm of Internet of Things, let us build an application to change the color of a smart bulb. Not everyone may have the same smart lighting system at their disposal, but there is nothing to worry about, as you can find the appropriate Node-RED module from the official flow repository. However, to make things even easier let us go for something smarter.
Meet Netbeast. It is an open source platform for developing applications for Internet of Things appliances and devices without having to worry about the details like wireless protocols, brand compatibility, or having to know how to deal with each specific API out there. It allows us to use virtual devices that act as real ones! So even if you do not have a smart bulb, you have a virtual one available.
We can install the Netbeast for Node-RED npm package globally like this:
npm install -g node-red-contrib-netbeast
The netbeast-red node will represent the Netbeast Dashboard, which will translate its API primitives to all your smart devices that you have at home. Fortunately it is also available as a module!
Start Netbeast:
npm install -g netbeast-cli
netbeast start
This will make the dashboard available on port 8000 and SSL on 8443. Next open your browser to http://localhost:8000 and navigate to Explore. There we will be able to find lots of apps and plugins. Look for the brands of your smart bulbs (Philips Hue, LIFX, WeMo) or if you don’t have one, try to download the bulb-plugin. Check that your Dashboard plugins contain one of these!
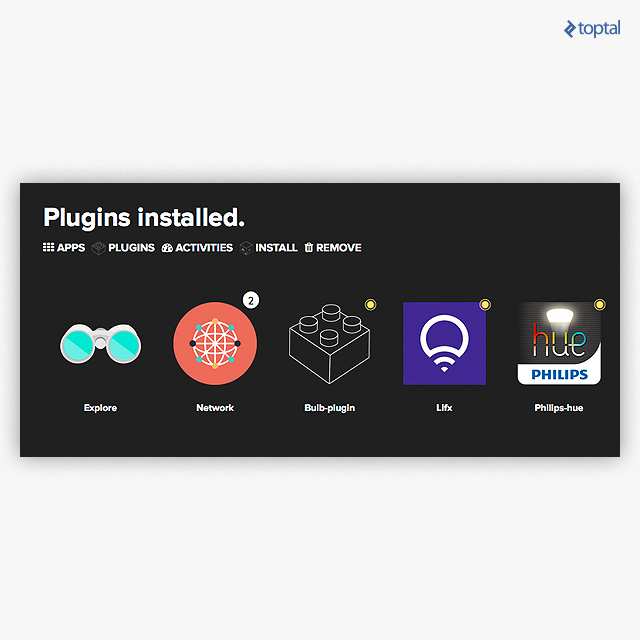
Yellow badge indicates that the plugins are running, but they cannot find any devices. Click on the bulb-plugin to create a virtual bulb. Any other devices discovered should appear under Network.
With everything in place, let’s get back to work. We will make a simple flow:
- Drag and drop an inject node.
- Drag and drop the Netbeast node.
- Drag and drop a debug node.
- Wire it all up as shown below:
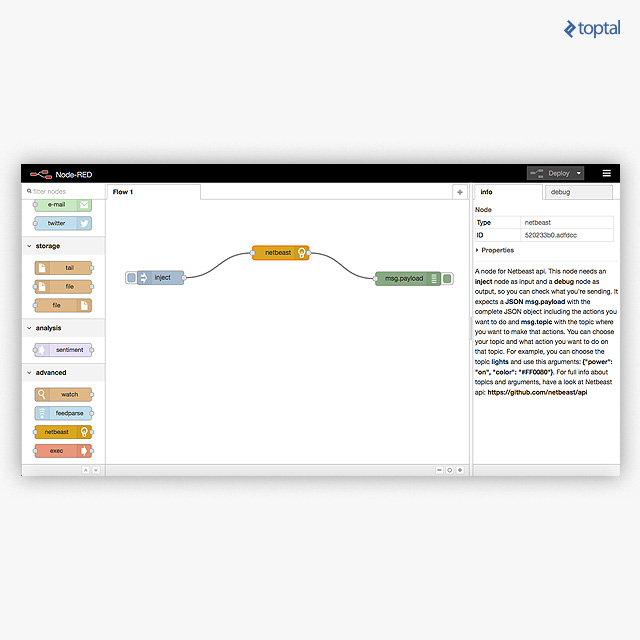
Now let’s send an HTTP request to the Dashboard. Using the Netbeast API we will have to send through the inject node a JSON containing the values we want to trigger on our bulb.
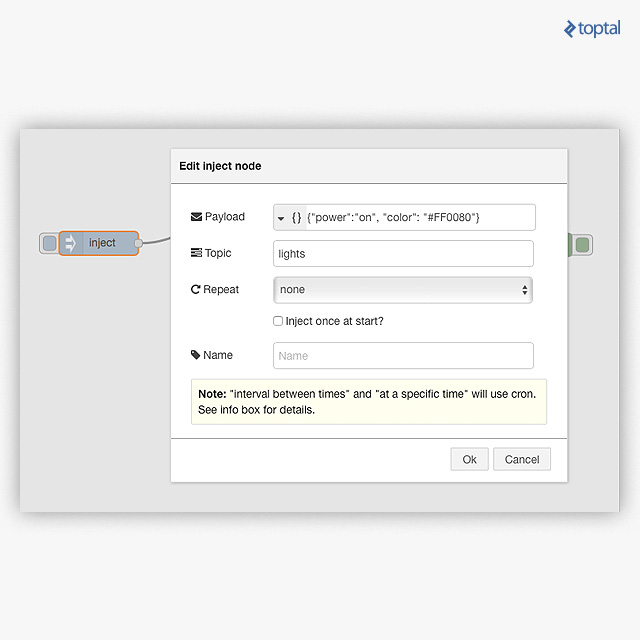
Press the button to inject the color and power to all your smart bulbs!
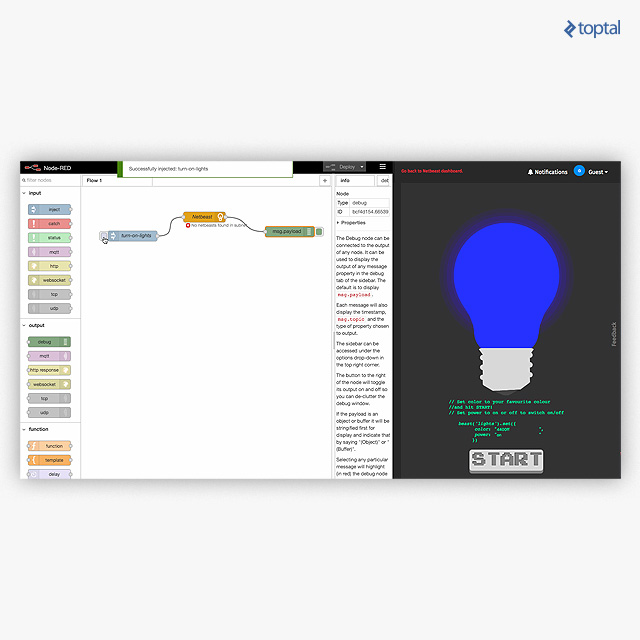
Each topic represents a different kind of device. So there are topics for lights but also for music, heating, and video; as well as sensors for humidity, presence, temperature, and the list continues. You can find in their documentation a list of topics and their recommended structure to be translated to all kinds of devices. This IoT engine is immature, yet powerful. Open source that allows developers to reuse information to create scenarios truly connected, thus being smart.
Let’s Go Deeper
Next, we will create a second flow using another plugin, an ambient noise detector, to use it as a trigger to change the bulb’s color as a noise semaphore. In this tutorial, we will use a virtual one, so there is no need to buy new hardware. Let’s start by clicking the “plus” button in Node-RED editor.
Go again on the Dashboard http://localhost:8000/explore to the Explore section and look for Volume-Plugin. It is a very rudimentary web app that takes advantage of getUserMedia() within the browser to capture media from a simple HTML app. So it will probably only work on modern browsers!
Click on it to open, as with the virtual bulb. It will ask for permission to record from your microphone. Then it will send the messages to the Netbeast’s MQTT broker, which will be shared across all the Dashboard, and so we will be able to subscribe. To do such a thing we will only need to drag and drop a netbeast-trigger node into node-red’s editor. Then we will insert a function between the trigger and the Netbeast node so we decide when it is too loud or not. Also, we should use some debug nodes to check if everything is fine. The scheme now will look somewhat like this:
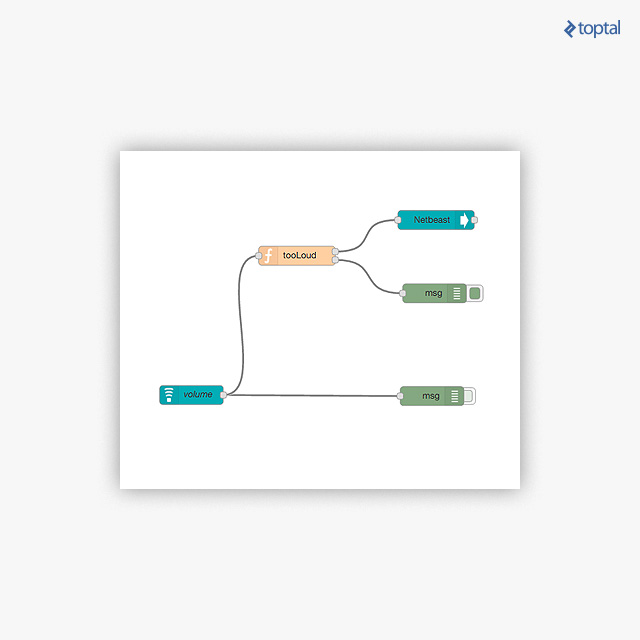
Now, let’s input some code into tooLoud function node. Yes, I know I promised you could program without having to code, but I have already shown you can! And you can try to combine the different elements available or other nodes from the registry to accomplish the following.
var volume = msg.payload.volume

node.log(volume)

if (volume < 50) {
    return { topic: 'lights', payload: { power: 1, color: '#00CC00'}}
} else if (volume < 75) {
    return { topic: 'lights', payload: { power: 1, color: '#CCCC00'}}
} else {
    return { topic: 'lights', payload: { power: 1, color: '#FF0000'}}
}
This rather simple snippet of code is returning one of the three payloads for the next node with a specific color code, depending on the volume level reported by the previous node.
Now we are ready to go! Let’s kick the button Deploy again and make some noise. Let us see how the bulb changes from one colour to another immediately!
Since the microphone and web browser you are using might be different, feel free to adjust the function values and thresholds, and also play with the color values to see how it changes your bulbs.
Creating Your Own Plugins
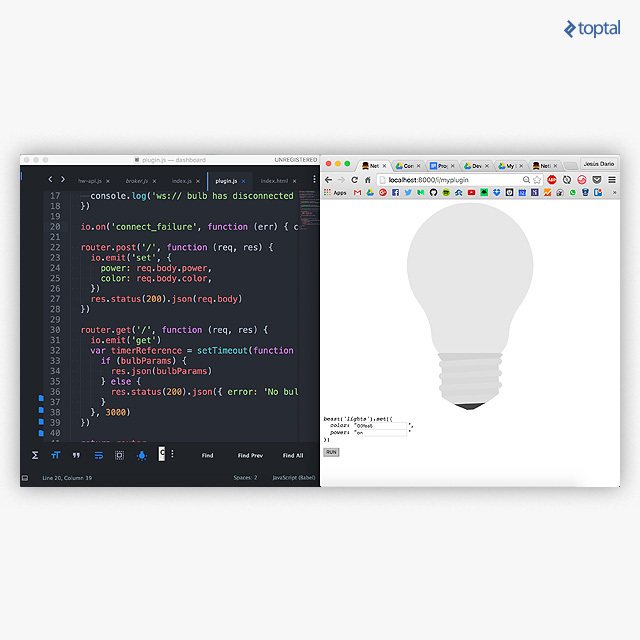
This light-bulb in pure CSS was inspired by this cssdeck.
As you might have noticed, the virtual bulb from before is very rudimentary, so you may want to tweak it. Or even better, you can create your own smart home controllers. So we will go through the process of creating a virtual plugin for Netbeast, which will enable you to create your own controllers for smart devices.
You can use the netbeast-cli package to automagically generate some code. By running netbeast create myplugin --plugin we would end up with a basic project like the following:
myplugin
├── README.md
├── index.js
├── package.json
└── test.js
The Frontend
Now, let’s start mimetizing the bulb with a frontend. Device controllers usually won’t have one, so no public folder is included in the scaffold command yet. Let’s create a public dir inside the project and place there the following HTML, CSS and JS files.
index.html
<head>
  <title>Netbeast Bulb Plugin</title>
  <link rel="stylesheet" href="bulb.css" media="screen" charset="utf-8">
</head>

<body>
  <div class="top-decoration"></div>
  <div id="plugin front-end">
  </div>
  <div class="bulb-container small">
    <div class="bulb light">
      <div id="bulb">
        <div class="bulb top"></div>
        <div class="bulb middle-1"></div>
        <div class="bulb middle-2"></div>
        <div class="bulb middle-3"></div>
        <div class="bulb bottom"></div>
      </div>
      <div id="base">
        <div class="screw-top"></div>
        <div class="screw a"></div>
        <div class="screw b"></div>
        <div class="screw a"></div>
        <div class="screw b"></div>
        <div class="screw a"></div>
        <div class="screw b"></div>
        <div class="screw c"></div>
        <div class="screw d"></div>
      </div>
    </div>
  </div>
    <div class="code-container">
      <pre><i class="txt-red">beast</i>(<i class="txt-green">'lights'</i>).<i class="txt-blue">set</i>({
  <i class="txt-green">color</i>: <i class="txt-green">"<input id="color" type="text" class="color" name="color" value="00fea5">"</i>,
  <i class="txt-green">power</i>: <i class="txt-green">"<input id="power" type="text" class="power" name="power" value="on">"</i>
})</pre>
    <button id="run-btn">
      RUN
    </button>
  </div><!-- wrapper -->

  <!-- declares bulb features and methods -->
  <script type="text/javascript" src="bulb.js"></script>
  <!-- real time comms library -->
  <script type="text/javascript" src="socketio.js"></script>
  <!-- simulates hardware communication -->
  <script type="text/javascript" src="hw-api.js"></script>
</body>
bulb.css
section {
  float: left;
  padding: 20px 50px 20px 50px;
}

.bulb-light {
  border: 0;
  background: transparent;
  margin: 0 auto !important;
  padding: 0 !important;
  display: block;
  z-index: 1;
}

#bulb { opacity: 1; z-index: 3; display: block;}

.bulb.top {
  border: 0;
  width: 300px;
  height: 300px;
  margin: 0 auto;
  padding: 0;
  border-radius: 999px;
  background: #E7E7E7;
}

.bulb.middle-1 {
  margin: -75px auto 0 auto;
  width: 190px;
  border-left: 35px solid transparent;
  border-right: 35px solid transparent;
  border-top: 55px solid #E7E7E7;
}

.bulb.middle-2 {
  margin: -22px auto 0 auto;
  width: 178px;
  border-left: 19px solid transparent;
  border-right: 19px solid transparent;
  border-top: 50px solid #E7E7E7;
}

.bulb.middle-3 {
  margin: -20px auto 0 auto;
  width: 182px;
  border-left: 5px solid transparent;
  border-right: 5px solid transparent;
  border-top: 30px solid #E7E7E7;
}

.bulb.bottom {
  width: 184px;
  height: 65px;
  margin: -8px auto 0 auto;
  padding: 0;
  border-radius: 0 0 999px 999px;
  background: #E7E7E7;
}

#base { position:relative; z-index: 2; }

.screw {
  transform: rotate(-3deg);
  -ms-transform: rotate(-3deg);
  -webkit-transform: rotate(-3deg);
  padding: 0;
}

.screw-top {
  margin: -18px auto -4px auto;
  padding: 0;
  width: 132px;
  height: 0;
  border-left: 15px solid transparent;
  border-right: 15px solid transparent;
  border-top: 21px solid #D3D3D3;
  border-radius: 999px;
}

.screw.a {
  background: #DDD;
  width: 150px;
  height: 15px;
  border-radius: 999px;
  margin: -1px auto 0px;
}

.screw.b {
  background: #D9D9D9;
  width: 135px;
  height: 15px;
  margin: -1px auto 0px;
}

.screw.c {
  margin: -1px auto 0px;
  width: 78px;
  height: 0;
  border-left: 30px solid transparent;
  border-right: 30px solid transparent;
  border-top: 20px solid #DDD;
  border-radius: 8px;
}

.screw.d {
  margin: 0 auto;
  width: 15px;
  height: 0;
  border-left: 30px solid transparent;
  border-right: 30px solid transparent;
  border-top: 15px solid #444;
}

.on #light {
  -moz-opacity: 1;
  -khtml-opacity: 1;
  opacity: 1;
}

.bulb.top, .bulb.bottom {
  transition: all 0.5s ease-in-out;
}

.bulb.middle-1, .bulb.middle-2, .bulb.middle-3 {
  transition: all 0.5s ease-in-out;
}
With these HTML and CSS files, you should be able already to see a bulb shape in your browser. Go ahead and open your HTML file to see it live! Is it working? Great, now let’s give it some functionality.
bulb.js
This file will mimic a bulb behaviour with a simple click on, click off and will set up a couple of functions that will be used in a bit to change its color through Netbeast.
var color = document.getElementById('color')
var power = document.getElementById('power')
var bulb = document.getElementById('bulb')
var button = document.getElementById('run-btn')
var light = document.getElementById('light')

button.onclick = function toggleBulbState () {
  changeBulbParams({ color: color.value, power: power.value })
}

function setBulbParams (params) {
  if (params.power === 'off') {
    params = { color: 'E7E7E7' }
  }
  console.log('set params', params)

  var bulb_parts = ['.bulb.middle-1', '.bulb.middle-2', '.bulb.middle-3']

  document.querySelector('.bulb.top').style.boxShadow = '0px 0px 98px #' + params.color

  document.querySelector('.bulb.top').style.backgroundColor = params.color
  document.querySelector('.bulb.bottom').style.backgroundColor = params.color
  bulb_parts.forEach(function (className) {
    document.querySelector(className).style.borderTopColor = params.color
  })
}

function changeBulbParams (params) {
  console.log('change params', params)
  /* Overwrite html fields if necessary */
  color.value = params.color || color.value
  power.value = params.power || power.value
  setBulbParams({color: color.value, power: power.value})
}
After this, the fields and run button should all make sense. You can start trying out the different colors on your brand new virtual bulb. However, the reason we came all this way was to make it another device of our Internet of Things ecosystem.
hw-api.js
The last of our self-made front-end JS. It mocks a wireless connection with the server, like a WiFi or Bluetooth bulb would do with its remote controller, such as a phone, server or hub. It is the interface the actual plugin code will use to control it!
var socket = io.connect()

socket.on('connect', function () { console.log('ws:// bulb is online') })
socket.on('disconnect', function () { console.log('ws:// connection with bulb lost') })

socket.on('set', function (params) {
   changeBulbParams(params) // uses functions from bulb.js!
})

socket.on('get', function () {
  const params = { power: power.value, color: color.value }
  socket.emit('params', params)
})
Finally, we need the WebSocket library to be included from our HTML, so the frontend is ready. You can copy the source from https://raw.githubusercontent.com/netbeast/bulb-plugin/master/public/socketio.js and paste it into a file called socketio.js. From a terminal with curl or wget, you can do it this simply:
curl https://raw.githubusercontent.com/netbeast/bulb-plugin/master/public/socketio.js > public/socketio.js
We would have by now a file structure that looks like this:
myplugin
├── README.md
├── index.js
├── package.json
├── public
│   ├── bulb.css
│   ├── bulb.js
│   ├── hw-api.js
│   ├── index.html
│   └── socketio.js
└── test.js
The Backend
Now we are going to implement the interface with the device and register it into the Netbeast engine. It will listen for websockets to detect that a bulb has been installed on the network, and then will make a POST to the Dashboard API so the new resources are available.
For that, let’s take a look at the files we generated before:
package.json
This file contains all the dependencies and information needed to run your app. Netbeast uses the regular package.json also to retrieve some information, as name or the type. It is important to specify that this package is a plugin!
{
  "name": "myplugin",
  "version": "0.0.0",
  "description": "Netbeast plugin for... <your description>",
  "main": "index.js",
  "netbeast": {
    "bootOnLoad": true,
    "type": "plugin"
  },
  "dependencies": {
    "bluebird": "^3.3.5",
    "body-parser": "^1.15.0",
    "express": "^4.13.4",
    "minimist": "^1.2.0",
    "mocha": "^2.3.2",
    "morgan": "^1.6.1",
    "netbeast": "^1.0.6",
    "socket.io": "^1.4.5",
    "superagent": "^1.8.3"
  },
  "devDependencies": {},
  "scripts": {
    "test": "node test.js",
    "start": "node index.js"
  },
  "repository": {
    "type": "git",
    "url": "GITHUB_REPOSITORY"
  },
  "keywords": [
    "iot",
    "netbeast",
    "plugin"
  ],
  "author": "YOUR_EMAIL",
  "license": "GPL 3",
  "bugs": {
    "url": "ISSUES_CHANNEL"
  },
  "homepage": "HOMEPAGE"
}
index.js
This is the code that is called from Netbeast dashboard to launch the plugin! It will need to accept the port by command line arguments to know where to accept incoming requests. It will be launched as if we typed node myplugin.js --port <a free port number>. Please note the hashbang at the beginning as well! #!/usr/bin/env node.
#!/usr/bin/env node

var io = require('socket.io')()
var express = require('express')
var bodyParser = require('body-parser')

var app = express()

// Netbeast apps need to accept the port to be launched by parameters
var argv = require('minimist')(process.argv.slice(2))

app.use(express.static('public')) // will serve our app in an HTTP server
app.use(bodyParser.json()) // will parse JSON API calls
app.use('/api', require('./plugin')(io))

var server = app.listen(argv.port || 31416, function () {
  console.log('Bulb plugin listening at http://%s:%s', server.address().address,
  server.address().port)
})

// we need websockets to push updates to browser view
io.listen(server)
As you can see we were missing a file to launch it, the one that actually implements the socket.io controllers. Nothing fancy!
plugin.js
var express = require('express')
var netbeast = require('netbeast')

var router = express.Router()
var bulbParams // auxiliar variable, nasty way to transmit changes, but works

module.exports = function (io) {
  io = io

  // Create resource that works on lights topic and listens on /api route
  netbeast('lights').create({ app: 'myplugin', hook: '/api' })

  io.on('connection', function () {
  	console.log('ws:// bulb has connected to plugin')
  })

  io.on('disconnection', function () {
  	console.log('ws:// bulb has disconnected from plugin')
  })

  io.on('connect_failure', function (err) { console.trace(err) })

  router.post('/', function (req, res) {
    io.emit('set', {
      power: req.body.power,
      color: req.body.color,
    })
    res.status(200).json(req.body)
  })

  router.get('/', function (req, res) {
    io.emit('get')
    var timerReference = setTimeout(function () {
      if (bulbParams) {
        res.json(bulbParams)
      } else {
        res.status(200).json({ error: 'No bulb available' })
      }
    }, 3000)
  })

  return router
}
Launch Your App
Now it is time you test your app. You can do so by packaging it in a tar.gz format and uploading it to your dashboard in the drag-and-drop section http://localhost:8000/install.
beast package # Compresses your app when ran in myplugin dir
Voilà! You can now go to your plugins and test it out. Go to the network section (http://localhost:8000/devices) to see it running and change its color from there.
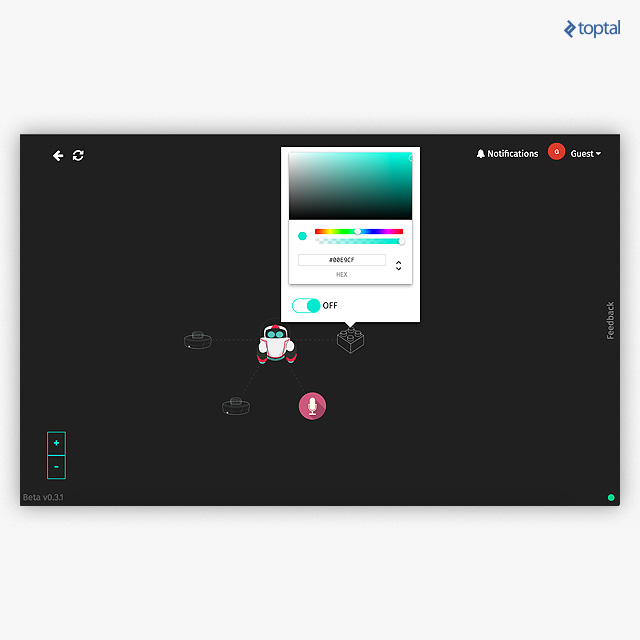
If something goes wrong or you think you might have missed a detail, try to run it locally with node index.js, and maybe it will be easier to debug than within the netbeast start log.
Publish Your Work
If you want your app displayed on the Netbeast dashboard Explore section, you must create a repository in GitHub with the Netbeast app or Netbeast plugin, both included in the description and README.md.
To find the apps we make use of GitHub’s search API. We see the same results that appear when you make a GET request to: https://api.github.com/search/repositories?q=netbeast+language:javascript
You’ll know that your app will be shown if it appears there!
What’s Next?
Both projects are open source and have really involved communities. If you want to start creating your own flows or nodes to Node-RED, take a peek at their official documentation. Follow the steps as described there and you should be able to publish your own node or flow in no time.
On the other hand, if you want to dive inside Netbeast, you can follow their documentation as well or take a look at the Dashboard repository. Using the Netbeast API you do not have to focus on individual devices, brands, or technologies anymore, so give it a try. You can learn more about it here, or join their Slack channel and discuss Node-RED, IoT or Node.js.
If you want to install this stuff on a Raspberry Pi, Beagle Bone or old server, you would turn them into a hackable Smart Hub, with no code! There are premade builds for them in both sites.
Happy hacking.
Seville, Spain
Member since October 29, 2015
About the author
Jesus is the co-founder of Netbeast.co. He has two years of experience as a full-stack developer and one year as CTO.
