The Many Applications of Gradient Descent in TensorFlow
TensorFlow is one of the leading tools for training deep learning models. Outside that space, it may seem intimidating and unnecessary, but it has many creative uses—like producing highly effective adversarial input for black-box AI systems.
TensorFlow is one of the leading tools for training deep learning models. Outside that space, it may seem intimidating and unnecessary, but it has many creative uses—like producing highly effective adversarial input for black-box AI systems.
Alan’s ML expertise covers visual target recognition models for missile defense systems, real-time NLP, and financial evaluation tools.
Expertise
PREVIOUSLY AT

Google’s TensorFlow is one of the leading tools for training and deploying deep learning models. It’s able to optimize wildly complex neural-network architectures with hundreds of millions of parameters, and it comes with a wide array of tools for hardware acceleration, distributed training, and production workflows. These powerful features can make it seem intimidating and unnecessary outside of the domain of deep learning.
But TensorFlow can be both accessible and usable for simpler problems not directly related to training deep learning models. At its core, TensorFlow is just an optimized library for tensor operations (vectors, matrices, etc.) and the calculus operations used to perform gradient descent on arbitrary sequences of calculations. Experienced data scientists will recognize “gradient descent” as a fundamental tool for computational mathematics, but it usually requires implementing application-specific code and equations. As we’ll see, this is where TensorFlow’s modern “automatic differentiation” architecture comes in.
TensorFlow Use Cases
- Example 1: Linear Regression with Gradient Descent in TensorFlow 2.0
- Example 2: Maximally Spread Unit Vectors
- Example 3: Generating Adversarial AI Inputs
- Final Thoughts: Gradient Descent Optimization
- Gradient Descent in TensorFlow: From Finding Minimums to Attacking AI Systems
Example 1: Linear Regression with Gradient Descent in TensorFlow 2.0
Before getting to the TensorFlow code, it’s important to be familiar with gradient descent and linear regression.
What Is Gradient Descent?
In the simplest terms, it’s a numerical technique for finding the inputs to a system of equations that minimize its output. In the context of machine learning, that system of equations is our model, the inputs are the unknown parameters of the model, and the output is a loss function to be minimized, that represents how much error there is between the model and our data. For some problems (like linear regression), there are equations to directly calculate the parameters that minimize our error, but for most practical applications, we require numerical techniques like gradient descent to arrive at a satisfactory solution.
The most important point of this article is that gradient descent usually requires laying out our equations and using calculus to derive the relationship between our loss function and our parameters. With TensorFlow (and any modern auto-differentiation tool), the calculus is handled for us, so we can focus on designing the solution, and not have to spend time on its implementation.
Here’s what it looks like on a simple linear regression problem. We have a sample of the heights (h) and weights (w) of 150 adult males, and start with an imperfect guess of the slope and standard deviation of this line. After about 15 iterations of gradient descent, we arrive at a near-optimal solution.

Let’s see how we produced the above solution using TensorFlow 2.0.
For linear regression, we say that weights can be predicted by a linear equation of heights.

We want to find parameters α and β (slope and intercept) that minimize the average squared error (loss) between the predictions and the true values. So our loss function (in this case, the “mean squared error,” or MSE) looks like this:

We can see how the mean squared error looks for a couple of imperfect lines, and then with the exact solution (α=6.04, β=-230.5).
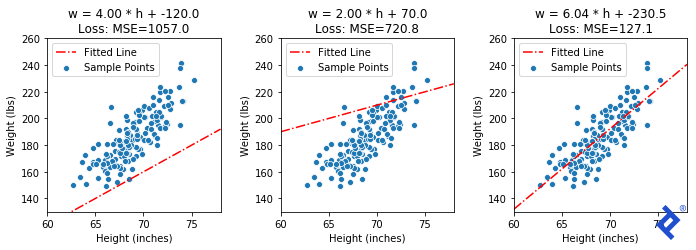
Let’s put this idea into action with TensorFlow. The first thing to do is code up the loss function using tensors and tf.* functions.
def calc_mean_sq_error(heights, weights, slope, intercept):
    predicted_wgts = slope * heights + intercept
    errors = predicted_wgts - weights
    mse = tf.reduce_mean(errors**2)
    return mse
This looks pretty straightforward. All the standard algebraic operators are overloaded for tensors, so we only have to make sure the variables we are optimizing are tensors, and we use tf.* methods for anything else.
Then, all we have to do is put this into a gradient descent loop:
def run_gradient_descent(heights, weights, init_slope, init_icept, learning_rate):

    # Any values to be part of gradient calcs need to be vars/tensors
    tf_slope = tf.Variable(init_slope, dtype='float32')
    tf_icept = tf.Variable(init_icept, dtype='float32')

    # Hardcoding 25 iterations of gradient descent
    for i in range(25):

        # Do all calculations under a "GradientTape" which tracks all gradients
        with tf.GradientTape() as tape:
            tape.watch((tf_slope, tf_icept))

            # This is the same mean-squared-error calculation as before
            predictions = tf_slope * heights + tf_icept
            errors = predictions - weights
            loss = tf.reduce_mean(errors**2)

        # Auto-diff magic!  Calcs gradients between loss calc and params
        dloss_dparams = tape.gradient(loss, [tf_slope, tf_icept])

        # Gradients point towards +loss, so subtract to "descend"
        tf_slope = tf_slope - learning_rate * dloss_dparams[0]
        tf_icept = tf_icept - learning_rate * dloss_dparams[1]
Let’s take a moment to appreciate how neat this is. Gradient descent requires calculating derivatives of the loss function with respect to all variables we are trying to optimize. Calculus is supposed to be involved, but we didn’t actually do any of it. The magic is in the fact that:
- TensorFlow builds a computation graph of every calculation done under a
tf.GradientTape(). - TensorFlow knows how to calculate the derivatives (gradients) of every operation, so that it can determine how any variable in the computation graph affects any other variable.
How does the process look from different starting points?

Gradient descent gets remarkably close to the optimal MSE, but actually converges to a substantially different slope and intercept than the optimum in both examples. In some cases, this is simply gradient descent converging to local minimum, which is an inherent challenge with gradient descent algorithms. But linear regression provably only has one global minimum. So how did we end up at the wrong slope and intercept?
In this case, the issue is that we oversimplified the code for the sake of demonstration. We didn’t normalize our data, and the slope parameter has a different characteristic than the intercept parameter. Tiny changes in slope can produce massive changes in loss, while tiny changes in intercept have very little effect. This huge difference in scale of the trainable parameters leads to the slope dominating the gradient calculations, with the intercept parameter almost being ignored.
So gradient descent effectively finds the best slope very close to the initial intercept guess. And since the error is so close to optimum, the gradients around it are tiny, so each successive iteration moves only a tiny bit. Normalizing our data first would have dramatically improved this phenomenon, but it wouldn’t have eliminated it.
This was a relatively simple example, but we’ll see in the next sections that this “auto-differentiation” capability can handle some pretty complex stuff.
Example 2: Maximally Spread Unit Vectors
This next example is based on a fun deep learning exercise in a deep learning course I took last year.
The gist of the problem is that we have a “variational auto-encoder” (VAE) that can produce realistic faces from a set of 32 normally distributed numbers. For suspect identification, we want to use the VAE to produce a diverse set of (theoretical) faces for a witness to choose from, then narrow the search by producing more faces similar to the ones that were chosen. For this exercise, it was suggested to randomize the initial set of vectors, but I wanted to find an optimal initial state.
We can phrase the problem like this: Given a 32-dimensional space, find a set of X unit vectors that are maximally spread apart. In two dimensions, this is easy to calculate exactly. But for three dimensions (or 32 dimensions!), there is no straightforward answer. However, if we can define a proper loss function that is at its minimum when we have achieved our target state, maybe gradient descent can help us get there.
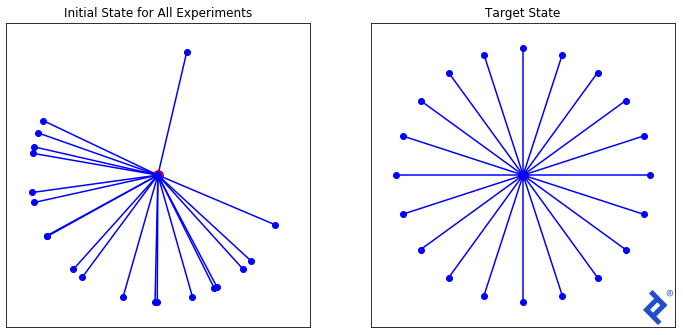
We will start with a randomized set of 20 vectors as shown above and experiment with three different loss functions, each one with increasing complexity, to demonstrate TensorFlow’s capabilities.
Let’s first define our training loop. We will put all the TensorFlow logic under the self.calc_loss() method, and then we can simply override that method for each technique, recycling this loop.
# Define the framework for trying different loss functions
# Base class implements loop, sub classes override self.calc_loss()
class VectorSpreadAlgorithm:
    # ...
    def calc_loss(self, tensor2d):
        raise NotImplementedError("Define this in your derived class")

    def one_iter(self, i, learning_rate):
        # self.vecs is an 20x2 tensor, representing twenty 2D vectors
        tfvecs = tf.convert_to_tensor(self.vecs, dtype=tf.float32)

        with tf.GradientTape() as tape:
            tape.watch(tfvecs)
            loss = self.calc_loss(tfvecs)

        # Here's the magic again. Derivative of spread with respect to
        # input vectors
        gradients = tape.gradient(loss, tfvecs)
        self.vecs = self.vecs - learning_rate * gradients
The first technique to try is the simplest. We define a spread metric that is the angle of the vectors that are closest together. We want to maximize spread, but it is conventional to make it a minimization problem. So we simply take the negative of the spread metric:
class VectorSpread_Maximize_Min_Angle(VectorSpreadAlgorithm):
    def calc_loss(self, tensor2d):
        angle_pairs = tf.acos(tensor2d @ tf.transpose(tensor2d))
        disable_diag = tf.eye(tensor2d.numpy().shape[0]) * 2 * np.pi
        spread_metric = tf.reduce_min(angle_pairs + disable_diag)

        # Convention is to return a quantity to be minimized, but we want
        # to maximize spread. So return negative spread
        return -spread_metric
Some Matplotlib magic will yield a visualization.
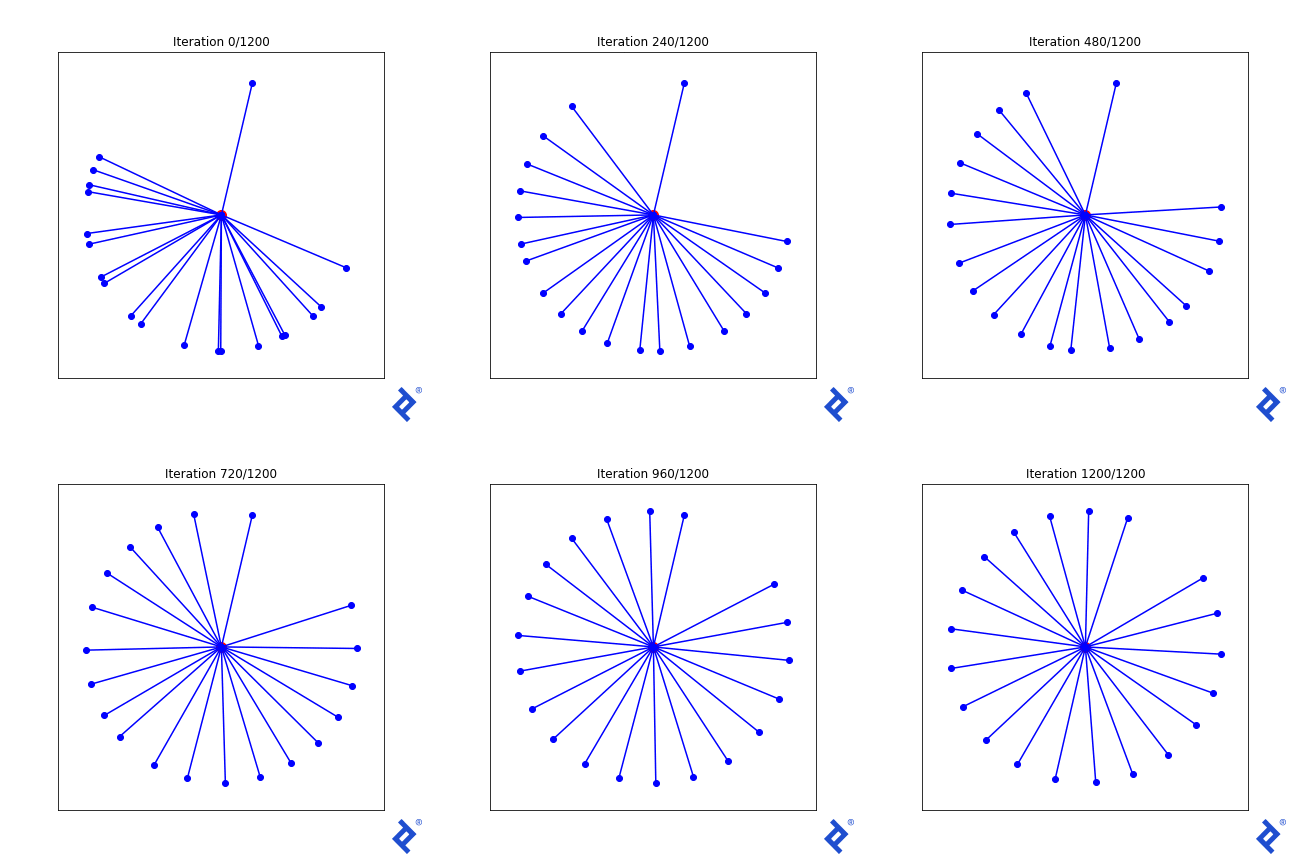
This is clunky (quite literally!) but it works. Only two of the 20 vectors are updated at a time, growing the space between them until they are no longer the closest, then switching to increasing the angle between the new two-closest vectors. The important thing to notice is that it works. We see that TensorFlow was able to pass gradients through the tf.reduce_min() method and the tf.acos() method to do the right thing.
Let’s try something a bit more elaborate. We know that at the optimal solution, all vectors should have the same angle to their closest neighbors. So let’s add “variance of minimum angles” to the loss function.
class VectorSpread_MaxMinAngle_w_Variance(VectorSpreadAlgorithm):
    def spread_metric(self, tensor2d):
        """ Assumes all rows already normalized """
        angle_pairs = tf.acos(tensor2d @ tf.transpose(tensor2d))
        disable_diag = tf.eye(tensor2d.numpy().shape[0]) * 2 * np.pi
        all_mins = tf.reduce_min(angle_pairs + disable_diag, axis=1)

        # Same calculation as before: find the min-min angle
        min_min = tf.reduce_min(all_mins)

        # But now also calculate the variance of the min angles vector
        avg_min = tf.reduce_mean(all_mins)
        var_min = tf.reduce_sum(tf.square(all_mins - avg_min))

        # Our spread metric now includes a term to minimize variance
        spread_metric = min_min - 0.4 * var_min

        # As before, want negative spread to keep it a minimization problem
        return -spread_metric
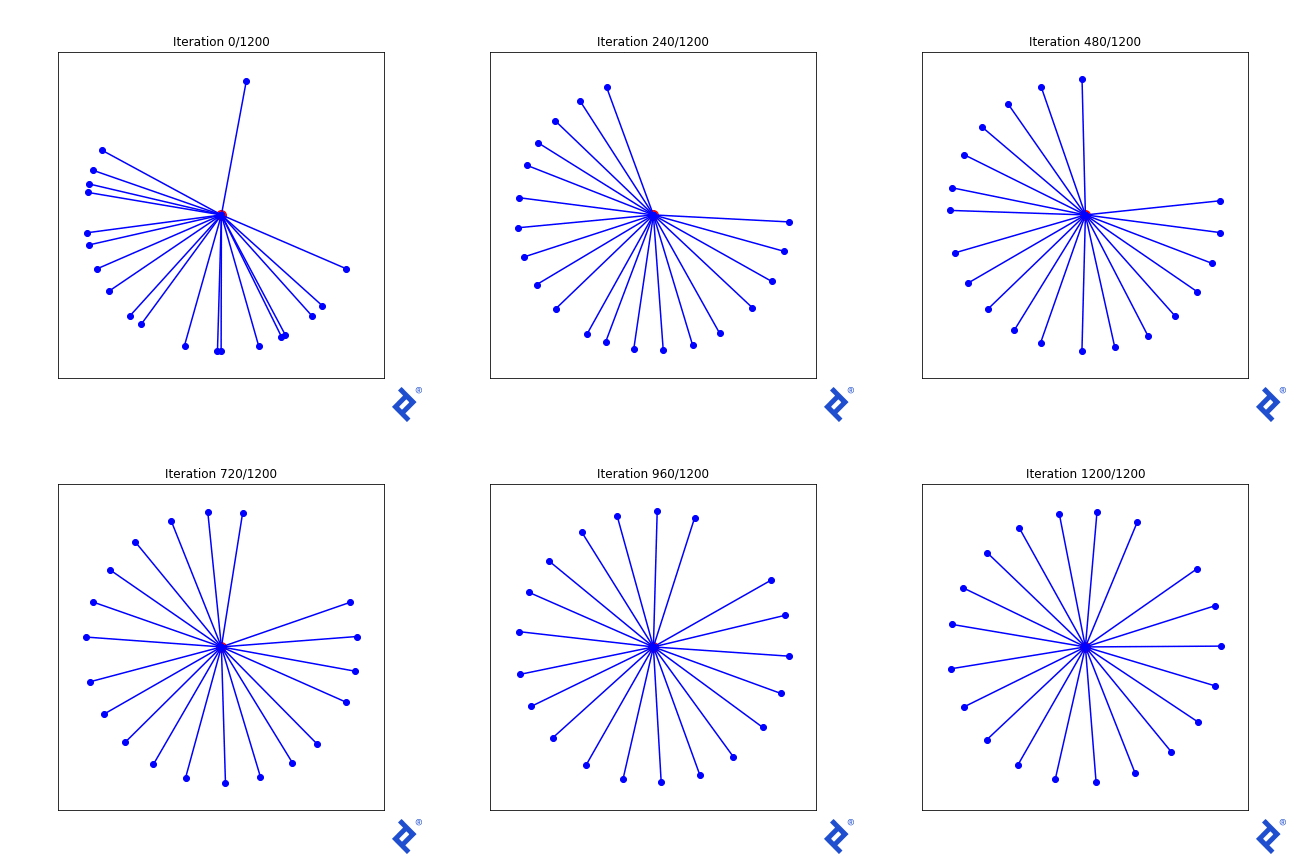
That lone northward vector now rapidly joins its peers, because the angle to its closest neighbor is huge and spikes the variance term which is now being minimized. But it’s still ultimately driven by the globally-minimum angle which remains slow to ramp up. Ideas I have to improve this generally work in this 2D case, but not in any higher dimensions.
But focusing too much on the quality of this mathematical attempt is missing the point. Look at how many tensor operations are involved in the mean and variance calculations, and how TensorFlow successfully tracks and differentiates every computation for every component in the input matrix. And we didn’t have to do any manual calculus. We just threw some simple math together, and TensorFlow did the calculus for us.
Finally, let’s try one more thing: a force-based solution. Imagine that every vector is a small planet tethered to a central point. Each planet emits a force that repels it from the other planets. If we were to run a physics simulation of this model, we should end up at our desired solution.
My hypothesis is that gradient descent should work, too. At the optimal solution, the tangent force on every planet from every other planet should cancel out to a net zero force (if it weren’t zero, the planets would be moving). So let’s calculate the magnitude of force on every vector and use gradient descent to push it toward zero.
First, we need to define the method that calculates force using tf.* methods:
class VectorSpread_Force(VectorSpreadAlgorithm):

    def force_a_onto_b(self, vec_a, vec_b):
        # Calc force assuming vec_b is constrained to the unit sphere
        diff = vec_b - vec_a
        norm = tf.sqrt(tf.reduce_sum(diff**2))
        unit_force_dir = diff / norm
        force_magnitude = 1 / norm**2
        force_vec = unit_force_dir * force_magnitude

        # Project force onto this vec, calculate how much is radial
        b_dot_f = tf.tensordot(vec_b, force_vec, axes=1)
        b_dot_b = tf.tensordot(vec_b, vec_b, axes=1)
        radial_component =  (b_dot_f / b_dot_b) * vec_b

        # Subtract radial component and return result
        return force_vec - radial_component
Then, we define our loss function using the force function above. We accumulate the net force on each vector and calculate its magnitude. At our optimal solution, all forces should cancel out and we should have zero force.
def calc_loss(self, tensor2d):
    n_vec = tensor2d.numpy().shape[0]
    all_force_list = []

    for this_idx in range(n_vec):

        # Accumulate force of all other vecs onto this one
        this_force_list = []
        for other_idx in range(n_vec):

            if this_idx == other_idx:
                continue

            this_vec = tensor2d[this_idx, :]
            other_vec = tensor2d[other_idx, :]

            tangent_force_vec = self.force_a_onto_b(other_vec, this_vec)
            this_force_list.append(tangent_force_vec)

        # Use list of all N-dimensional force vecs. Stack and sum.
        sum_tangent_forces = tf.reduce_sum(tf.stack(this_force_list))
        this_force_mag = tf.sqrt(tf.reduce_sum(sum_tangent_forces**2))

        # Accumulate all magnitudes, should all be zero at optimal solution
        all_force_list.append(this_force_mag)

    # We want to minimize total force sum, so simply stack, sum, return
    return tf.reduce_sum(tf.stack(all_force_list))

Not only does the solution work beautifully (besides some chaos in the first few frames), but the real credit goes to TensorFlow. This solution involved multiple for loops, an if statement, and a huge web of calculations, and TensorFlow successfully traced gradients through all of it for us.
Example 3: Generating Adversarial AI Inputs
At this point, readers may be thinking, "Hey! This post wasn't supposed to be about deep learning!" But technically, the introduction refers to going beyond "training deep learning models." In this case, we're not training, but instead exploiting some mathematical properties of a pre-trained deep neural-network to fool it into giving us the wrong results. This turned out to be far easier and more effective than imagined. And all it took was another short blob of TensorFlow 2.0 code.
We start by finding an image classifier to attack. We’ll use one of the top solutions to the Dogs vs. Cats Kaggle Competition; specifically, the solution presented by Kaggler “uysimty.” All credit to them for providing an effective cat-vs-dog model and providing great documentation. This is a powerful model consisting of 13 million parameters across 18 neural network layers. (Readers are welcome to read more about it in the corresponding notebook.)
Please note that the goal here isn’t to highlight any deficiency in this particular network but to show how any standard neural network with a large number of inputs is vulnerable.
With a little tinkering, I was able to figure out how to load the model and pre-process the images to be classified by it.

This looks like a really solid classifier! All sample classifications are correct and above 95% confidence. Let’s attack it!
We want to produce an image that is obviously a cat but have the classifier decide that it is a dog with high confidence. How can we do that?
Let’s start with a cat picture that it classifies correctly, then figure out how tiny modifications in each color channel (values 0-255) of a given input pixel affect the final classifier output. Modifying one pixel probably won’t do much, but perhaps the cumulative tweaks of all 128x128x3 = 49,152 pixel values will achieve our goal.
How do we know which way to push each pixel? During normal neural network training, we try to minimize the loss between the target label and the predicted label, using gradient descent in TensorFlow to simultaneously update all 13 million free parameters. In this case, we’ll instead leave the 13 million parameters fixed, and adjust the pixel values of the input itself.
What’s our loss function? Well, it’s how much the image looks like a cat! If we calculate the derivative of the cat value with respect to each input pixel, we know which way to push each one to minimize the cat classification probability.
def adversarial_modify(victim_img, to_dog=False, to_cat=False):
    # We only need four gradient descent steps
    for i in range(4):

        tf_victim_img = tf.convert_to_tensor(victim_img, dtype='float32')

        with tf.GradientTape() as tape:
            tape.watch(tf_victim_img)

            # Run the image through the model
            model_output = model(tf_victim_img)

            # Minimize cat confidence and maximize dog confidence
            loss = (model_output[0] - model_output[1])

        dloss_dimg = tape.gradient(loss, tf_victim_img)

        # Ignore gradient magnitudes, only care about sign, +1/255 or -1/255
        pixels_w_pos_grad = tf.cast(dloss_dimg > 0.0, 'float32') / 255.
        pixels_w_neg_grad = tf.cast(dloss_dimg < 0.0, 'float32') / 255.

        victim_img = victim_img - pixels_w_pos_grad + pixels_w_neg_grad
Matplotlib magic again helps to visualize the results.

Wow! To the human eye, each one of these pictures is identical. Yet after four iterations, we’ve convinced the classifier this is a dog, with 99.4 percent confidence!
Let’s make sure this isn’t a fluke and it works in the other direction too.

Success! The classifier originally predicted this correctly as a dog with 98.4 percent confidence, and now believes it is a cat with 99.8 percent confidence.
Finally, let’s look at a sample image patch and see how it changed.
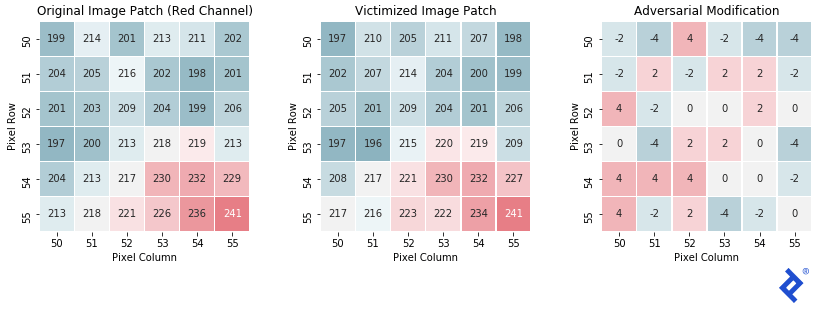
As expected, the final patch is very similar to the original, with each pixel only shifting -4 to +4 in the red channel’s intensity value. This shift is not enough for a human to distinguish the difference, but completely changes the output of the classifier.
Final Thoughts: Gradient Descent Optimization
Throughout this article, we’ve looked at manually applying gradients to our trainable parameters for the sake of simplicity and transparency. However, in the real world, data scientists should jump right into using optimizers, because they tend to be much more effective, without adding any code bloat.
There are many popular optimizers, including RMSprop, Adagrad, and Adadelta, but the most common is probably Adam. Sometimes, they are called “adaptive learning rate methods” because they dynamically maintain a different learning rate for each parameter. Many of them use momentum terms and approximate higher-order derivatives, with the goal of escaping local minima and achieving faster convergence.
In an animation borrowed from Sebastian Ruder, we can see the path of various optimizers descending a loss surface. The manual techniques we have demonstrated are most comparable to “SGD.” The best-performing optimizer won’t be the same one for every loss surface; however, more advanced optimizers do typically perform better than the simpler ones.

However, it is rarely useful to be an expert on optimizers—even for those keen on providing artificial intelligence development services. It is a better use of developers’ time to familiarize themselves with a couple, just to understand how they improve gradient descent in TensorFlow. After that, they can just use Adam by default and try different ones only if their models aren’t converging.
For readers who are really interested in how and why these optimizers work, Ruder’s overview—in which the animation appears—is one of the best and most exhaustive resources on the topic.
Let’s update our linear regression solution from the first section to use optimizers. The following is the original gradient descent code using manual gradients.
# Manual gradient descent operations
def run_gradient_descent(heights, weights, init_slope, init_icept, learning_rate):

    tf_slope = tf.Variable(init_slope, dtype='float32')
    tf_icept = tf.Variable(init_icept, dtype='float32')

    for i in range(25):
        with tf.GradientTape() as tape:
            tape.watch((tf_slope, tf_icept))
            predictions = tf_slope * heights + tf_icept
            errors = predictions - weights
            loss = tf.reduce_mean(errors**2)

        gradients = tape.gradient(loss, [tf_slope, tf_icept])

        tf_slope = tf_slope - learning_rate * gradients[0]
        tf_icept = tf_icept - learning_rate * gradients[1]
Now, here is the same code using an optimizer instead. You will see that it’s hardly any extra code (changed lines are highlighted in blue):
# Gradient descent with Optimizer (RMSprop)
    def run_gradient_descent(heights, weights, init_slope, init_icept, learning_rate):

        tf_slope = tf.Variable(init_slope, dtype='float32')
        tf_icept = tf.Variable(init_icept, dtype='float32')

        # Group trainable parameters into a list
        trainable_params = [tf_slope, tf_icept]

        # Define your optimizer (RMSprop) outside of the training loop
        optimizer = keras.optimizers.RMSprop(learning_rate)

        for i in range(25):
            # GradientTape loop is the same
            with tf.GradientTape() as tape:
                tape.watch(trainable_params)
                predictions = tf_slope * heights + tf_icept
                errors = predictions - weights
                loss = tf.reduce_mean(errors**2)

            # We can use the trainable parameters list directly in gradient calcs
            gradients = tape.gradient(loss, trainable_params)

            # Optimizers always aim to *minimize* the loss function
            optimizer.apply_gradients(zip(gradients, trainable_params))
That’s it! We defined an RMSprop optimizer outside of the gradient descent loop, and then we used the optimizer.apply_gradients() method after each gradient calculation to update the trainable parameters. The optimizer is defined outside of the loop because it will keep track of historical gradients for calculating extra terms like momentum and higher-order derivatives.
Let’s see how it looks with the RMSprop optimizer.

Looks great! Now let’s try it with the Adam optimizer.

Whoa, what happened here? It appears the momentum mechanics in Adam cause it to overshoot the optimal solution and reverse course multiple times. Normally, this momentum mechanic helps with complex loss surfaces, but it hurts us in this simple case. This emphasizes the advice to make the choice of optimizer one of the hyperparameters to tune when training your model.
Anyone wanting to explore deep learning will want to become familiar with this pattern, as it is used extensively in custom TensorFlow architectures, where there’s a need to have complex loss mechanics that are not easily wrapped up in the standard workflow. In this simple TensorFlow gradient descent example, there were only two trainable parameters, but it is necessary when working with architectures containing hundreds of millions of parameters to optimize.
Gradient Descent in TensorFlow: From Finding Minimums to Attacking AI Systems
All code snippets and images were produced from the notebooks in the corresponding GitHub repo. It also contains a summary of all the sections, with links to the individual notebooks, for readers who want to see the complete code. For the sake of simplifying the message, a lot of details were left out that can be found in the extensive inline documentation.
I hope this article was insightful and it got you thinking about ways to use gradient descent in TensorFlow. Even if you don’t use it yourself, it hopefully makes it clearer how all modern neural network architectures work—create a model, define a loss function, and use gradient descent to fit the model to your dataset.

As a Google Cloud Partner, Toptal’s Google-certified experts are available to companies on demand for their most important projects.
Understanding the basics
What can TensorFlow be used for?
TensorFlow is typically used for training and deploying AI agents for a variety of applications, such as computer vision and natural language processing (NLP). Under the hood, it’s a powerful library for optimizing massive computational graphs, which is how deep neural networks are defined and trained.
What is TensorFlow and how does it work?
Tensorflow is a deep learning framework created by Google for both cutting-edge AI research as well as deployment of AI applications at scale. Under the hood, it is an optimized library for doing tensor calculations and tracking gradients through them for the purposes of applying gradient descent algorithms.
What is gradient descent in machine learning?
Gradient descent is a calculus-based numerical technique used to optimize machine learning models. The error of a given model is defined as a function of the model’s parameters, and gradient descent is applied to adjust those parameters to minimize that error.
How does gradient descent work?
Gradient descent works by representing a model’s error as a function of its parameters. Using calculus, one can compute how this error would change in response to adjustments in each parameter—its gradient—then adjust those parameters iteratively until the error of the model is minimized.
Why is gradient descent used?
Gradient descent is a numerical technique to find approximate minimal values of a function. It is most commonly associated with training artificial neural networks where the goal is to minimize an error or loss function.
Alan Reiner
Columbia, MD, United States
Member since February 14, 2020
About the author
Alan’s ML expertise covers visual target recognition models for missile defense systems, real-time NLP, and financial evaluation tools.
Expertise
PREVIOUSLY AT


