How to Build a Raspberry Pi Server for Development
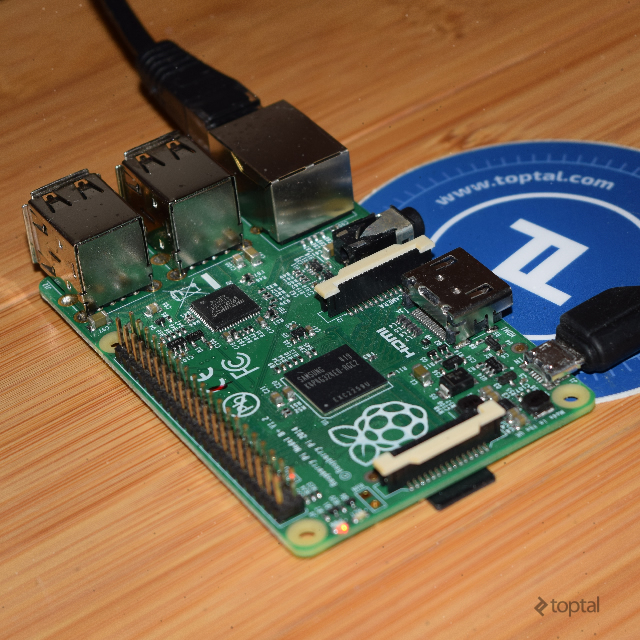
The Raspberry Pi is a little computer that you can get for as low as USD $5 and on which you can run many different types of software and build many different projects. In this article, I’m going to guide you through the process of setting it up as a home development server and deploying a full-stack JavaScript application that you can access from outside your network. This is great for setting up your own remote digital workspace, or simply to have control over the hardware you use for development.
The Raspberry Pi is a little computer that you can get for as low as USD $5 and on which you can run many different types of software and build many different projects. In this article, I’m going to guide you through the process of setting it up as a home development server and deploying a full-stack JavaScript application that you can access from outside your network. This is great for setting up your own remote digital workspace, or simply to have control over the hardware you use for development.
Pablo’s BSCE means he’s had top coding standards while crafting numerous front ends. He’s also a MongoDB Certified Dev and Toptal Mentor.
Expertise
PREVIOUSLY AT

The Raspberry Pi is a little computer that you can get for as low as USD $5 and on which you can run many different types of software and build many different projects.
In this article, I’m going to guide you through the process of setting it up as a home development server and deploying a full-stack JavaScript application that you can access from outside your network. This is great for setting up your own remote digital workspace, or simply to have control over the hardware you use for development.
What Do You Need for This Raspberry Pi Home Server?
While this is now a Raspberry Pi 3 tutorial in particular, it should still work with models going back to the first generation—if you have an older model or a Raspberry Pi Zero, please let us know your experience in the comments below.
In addition to the Raspberry Pi board itself, you will need:
- A Micro USB charger
- An Ethernet cable
- A microSD card (minimum 8GB, and cards up to 32GB seem to work fine)
These will also come in handy during the initial setup:
- A USB keyboard
- An HDMI cable and monitor
The Raspberry Pi OS: Raspbian
Installing an operating system onto a Raspberry Pi is simple. First, using your computer, install the boot image onto a microSD card. Then simply insert the card into the Raspberry Pi and boot from there.
Raspbian is a Linux distribution ported from Debian 7.0 (Wheezy), and is the official OS for Raspberry Pi optimized for the device’s architecture. While there are other options for running your favorite OS on the Pi, we’ll use Raspbian because of its simplicity.
This tutorial has been updated to work with this version (or later) of Raspbian:
Kernel version : #1 SMP Debian 4.9.110-3+deb9u4 (2018-08-21)
Kernel release : 4.9.0-8-amd64
To install Raspbian, head to the official download page and download the zip file with the latest Raspbian version.
Then, insert the microSD card into your computer’s SD card slot or adapter. Depending on your computer’s operating system, follow the instructions provided on Raspberry’s website for Linux, Mac OS, or Windows.
Once the process is finished, eject the SD card from your computer and insert it into the Raspberry Pi. Connect the Raspberry Pi to your router using the Ethernet cable, and plug in the Micro USB charger, which will start the Raspberry Pi booting.
For the initial configuration, there are two options:
- If you have a USB keyboard and an HDMI monitor, you can plug them into the Raspberry Pi for the initial setup.
- Your Pi should recognize these devices as soon as they are plugged in.
- The first time the Pi boots, it will automatically run
raspi-config. After the first boot, you will need to runsudo raspi-configyourself in order to configure the device.
- If you don’t have them, you can connect to your Raspberry Pi while it is on using SSH:
- First, you need to find the IP address of your Raspberry Pi in your local network. This can be done by connecting to your router’s admin page, or by using a network tool like
nmap. - Once you have the device’s IP address, connect to it using SSH from your terminal (or through Putty if you’re using Windows). The default user is
pi, and the default password israspberry. So, for example, if the IP address is 192.168.1.16, runssh pi@192.168.1.16and enter the password when prompted. - When you are connected, run
sudo raspi-config.
- First, you need to find the IP address of your Raspberry Pi in your local network. This can be done by connecting to your router’s admin page, or by using a network tool like
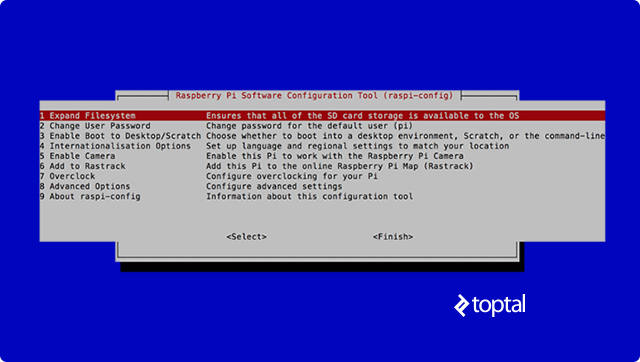
raspi-config will walk you through the final setup. You can configure all the options but the most important are the first two: to expand the filesystem, ensuring that all the SD card storage is available for the OS, and to change the password for the default Pi user, so that your server will be protected from intruders.
Install a Web Server (Nginx) on Your Raspberry Pi
Next, you’ll install the web server. I prefer Nginx because it has a small memory footprint, and because it plays well with Node.js (which you’ll be setting up later). Other web servers, such as Apache or lighttpd, would work as well, but we’ll use Nginx for this demonstration.
Before you start installing anything, you need to be sure everything is up-to-date by running these commands on the Pi:
sudo apt-get update
sudo apt-get upgrade
Then you can install Nginx using apt-get:
sudo apt-get install nginx
Once installation is completed, start the server by running:
sudo service nginx start
If you didn’t have to figure out the local IP of your Raspberry Pi in the previous step, it’s time to find out by running ifconfig. The output for your ethernet adaptor will be under eth0, and with its local IP address labeled inet addr.
Once you know the IP address, you can point your computer’s browser at it, where you should see the default “Welcome to Nginx” message.
Open to the Web: Port Forwarding
You can skip this step if you are not planning to access your Raspberry Pi from outside your local network. But for those wanting to access their server from other locations, let’s make sure that’s possible.
In a typical home network, devices connected to the router are invisible to the outside world. Only your router can be reached from outside, using your network’s external IP address. Your router is responsible for determining which incoming traffic is allowed into the network, and which device it should be sent to.
When a device on the local network initiates a connection (for example, when you open a website on your browser), the router recognizes the incoming response traffic as being part of this connection, and allows it through. However, if the router receives incoming traffic that is not part of an open connection (for example, when an outside device attempts to initiate a connection with an inside device), it will block the incoming traffic from crossing into the network. This is an important security feature to protect the network!
So how can you connect to your Pi from outside? The answer is port forwarding. The router must be configured to allow incoming connections on specific ports to pass through, and be sent to the correct device. By the default, the HTTP protocol uses port 80, and SSH uses port 22, so these are the two ports that you need to open on your router in order to access your web application, and allow secure connections for managing your server.
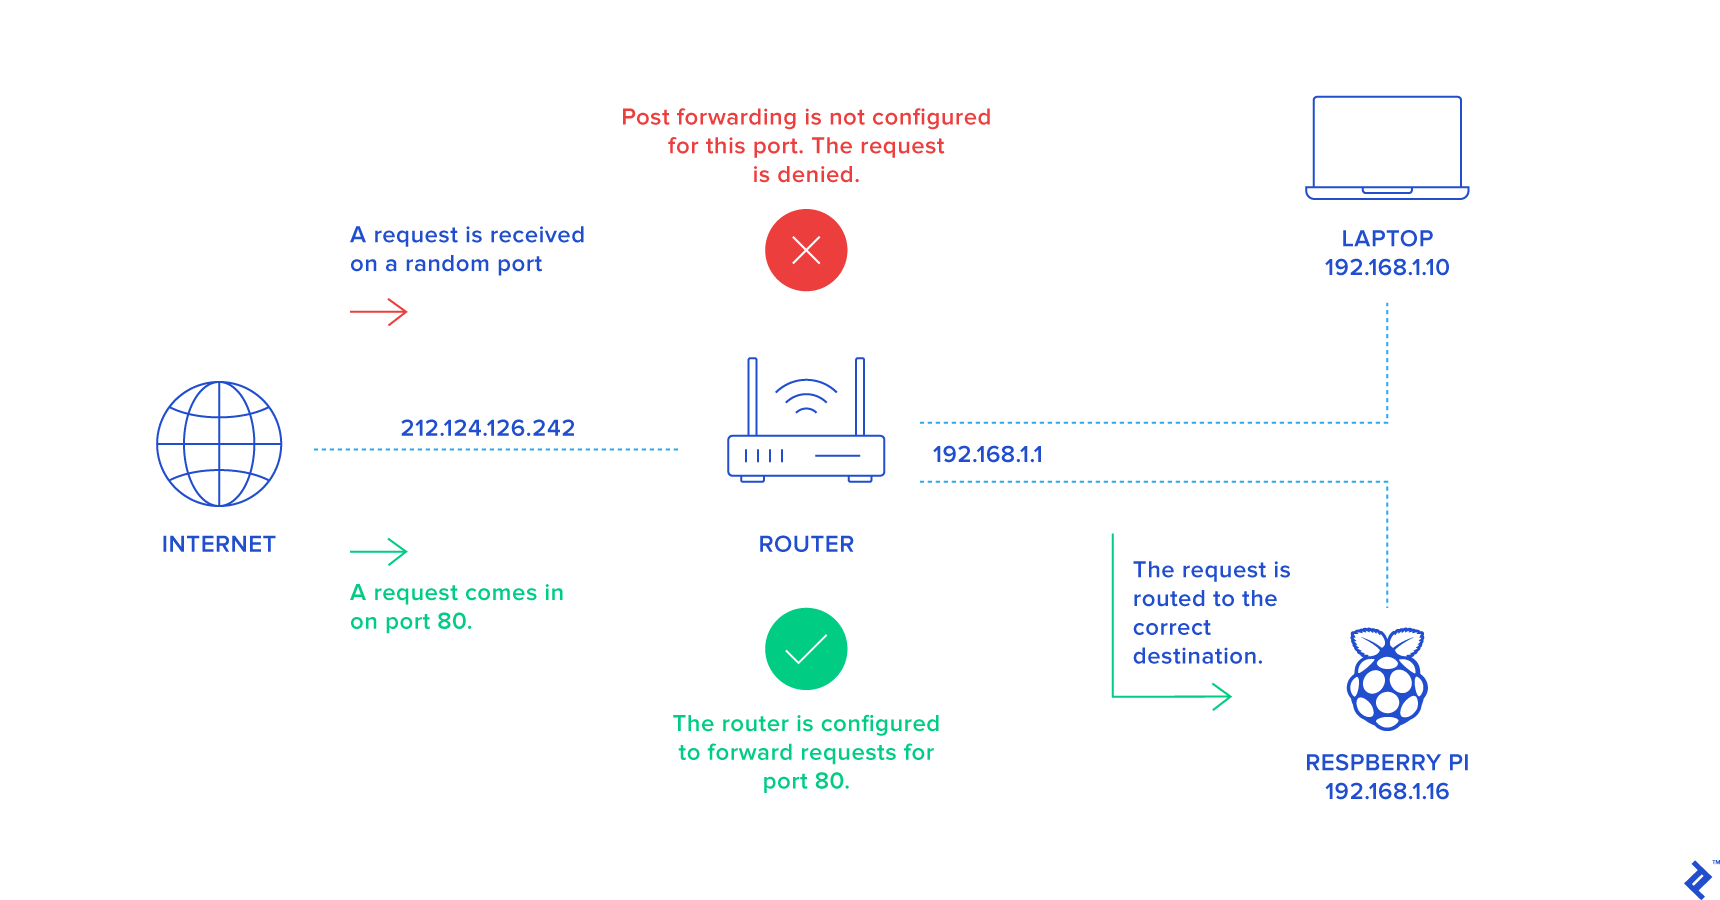
The steps to configure your router to open and forward the ports may vary depending on your internet provider and the brand of your router, but in any case, you should be able to accomplish it through the advanced configuration options of your router’s admin page. Just look for an option with a name like “Forwarding,” “Port Forwarding,” or “Network Address Translation.”
You need to open a port for HTTP connections, and another one for SSH. The basic idea consists of forwarding data addressed to these two external ports to your Raspberry Pi, with web traffic going to port 80 where Nginx is listening, and SSH traffic going to port 22, where the SSH server accepts connections from external computers. Here’s an example of how this might look in your router’s configuration page:
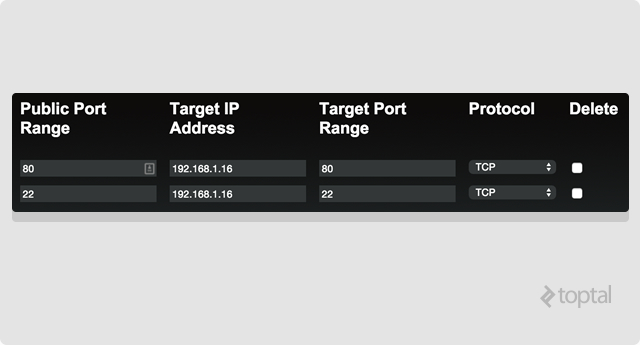
192.168.1.16. All incoming traffic bound for ports 80 or 22 are forwarded to this internal address.You can determine your router’s external IP address by simply typing “what’s my ip address” into Google. If you then move outside your router’s network, you can test that port forwarding is working by opening an SSH connection with ssh pi@{external IP address}. Likewise, HTTP port forwarding can be tested by entering the external IP address into your browser’s address bar. Just keep in mind that port forwarding allows anyone from outside to access the device on these ports if they know your router’s external IP.
If you don’t have a static IP, then you can set up dynamic DNS. It’s a very simple and easy step. You can set up dynamic DNS from your router or you can configure your Raspberry Pi for it. I’m not going to cover how to configure DDNS here, but BitPi.co has a good tutorial on the subject if needed.
Install the Framework: Full-stack JavaScript
You can run most web frameworks on top of Nginx, but let’s see how to go full-stack with JavaScript. To do this, you need to install Node.js and MongoDB.
Nowadays, Node.js is easily installed onto a Raspberry Pi with:
sudo apt-get install nodejs
Once it finishes installing, you can check if it’s working by running node -v.
Now you can install MongoDB just by typing:
sudo apt-get install mongodb
Just be aware that if you ever need to turn off the Raspberry Pi, you need to shut down the service first in order to avoid database corruption:
sudo service mongodb stop
Deploy Your App
You can develop on your local machine, and then push your changes to a Git repository on BitBucket. Since Raspbian comes with Git pre-installed, you can then pull your latest application code onto the device and run it.
Scaffold the Project
First let’s set up some application code and push it to a Git repository. There are many ways of starting an application, but one of my favorites is generator-angular-fullstack, which scaffolds both server and client code.
Install generator-angular-fullstack on your computer:
npm install -g generator-angular-fullstack
Create a new directory for your application:
mkdir my-app
cd my-app
And scaffold the application:
yo angular-fullstack my-app
Create the Repository and Push the Code
Now create a repository in BitBucket, as described here. Then set up your local directory:
git init
git remote add origin git@bitbucket.org:USER/REPO.git
So you can commit and push the code:
git add .
git commit -m 'Initial commit'
git push -u origin master
The generator comes with the grunt-build-control plugin, which allows you to commit the build code to a specific branch in your repository. Just add the configuration for BitBucket to Gruntfile.js in your application’s root directory:
buildcontrol: {
   options: {
      dir: 'dist',
      commit: true,
      push: true,
      connectCommits: false,
      message: 'Built %sourceName% from commit %sourceCommit% on branch %sourceBranch%'
   },
   bitbucket: {
      options: {
         remote: 'git@bitbucket.org:USER/REPO.git',
         branch: 'build'
      }
   }
},
// ...
Now run:
grunt build
…to create the distribution folder, followed by this:
grunt buildcontrol:bitbucket
…to commit and push the code to the build branch in your repository.
Generate the SSH Key
You now have your code hosted. Before you can deploy it to your Raspberry Pi, you need to generate an SSH key for the Raspberry Pi and add it to your BitBucket account. We’ll run through this step quickly, but if you have any trouble, please follow the BitBucket guide. So, log back into your Raspberry Pi terminal, and generate the public/private key pair:
ssh-keygen
Then, start the agent:
ssh-agent /bin/bash
And add the key to the agent:
ssh-add /home/pi/.ssh/id_rsa
Now you just need to output the content of the public key:
cat /home/pi/.ssh/id_rsa.pub
…so you can copy and paste it into BitBucket.
In BitBucket, click on your profile picture and go to Manage account. Under SECURITY, find SSH keys, and click the button Add key.
Clone the Repository
There isn’t a convention for where to place the code of your apps, but you can create a /var/www directory and put all your projects there.
cd /var
sudo mkdir www
To avoid the use of sudo when you want to place files in the webroot, you can change the owner to your Pi user, and the group to www-data, which is used by Nginx:
sudo chown -R pi:www-data www
cd www
Now, you can clone the build branch of your repository and install the dependencies:
git clone git@bitbucket.org:USER/REPO.git --branch build --single-branch
cd REPO
npm install --production
Once it’s finished, you can start your app, setting the environment to production:
export NODE_ENV=production; node server/app.js &
Now, point your computer browser to the device IP address to check if it works.
Configure Nginx Reverse Proxy
There is one more step remaining to make your application accessible from the outside. Although Nginx is listening on port 80, where it will receive HTTP requests for your Pi, the Node application itself is listening on a different port (for example, port 8080). Therefore, you need to configure Nginx to act as a reverse proxy, recognizing requests intended for your application, and passing them to Node.
Nginx keeps the configuration file for each application it serves in the sites-available folder:
cd /etc/nginx/sites-available/
Here, you can copy the default configuration file and edit at your convenience:
sudo cp default my-app
sudo nano my-app
The final configuration file should look like this, with Nginx acting as a proxy to the Node.js server:
server {
   listen 80;
   root /var/www/my-app/;                  # identifies the location of the application you are configuring
   server_name my-app.dev;                 # identifies the hostname used by this application's traffic
   location / {
      proxy_pass http://localhost:8080/;   # configures the back-end destination for this traffic
   }
}
In order to enable this configuration, you need to create a symlink in the sites-enabled folder, where Nginx looks for active configurations during runtime:
sudo ln -s /etc/nginx/sites-available/my-app /etc/nginx/sites-enabled/my-app
And reload the service to activate these changes:
sudo service nginx reload
At this point, your application is ready to receive HTTP traffic intended for the my-app.dev domain (thanks to the server_name my-app.dev directive you configured above). The final issue you need to solve is how to make traffic you send from outside match this domain name. Although you could buy a domain name and point it to your IP, the hosts file comes to the rescue and makes that unnecessary.
On the workstation from which you will access the site, simply add your router’s external IP address, and match it with the host name my-app.dev. Any HTTP traffic you generate for my-app.dev will then be sent directly to your router, with the correct host name in the Host HTTP header.
On Windows, with administrator privileges, you can edit the file located in c:\windows\system32\drivers\etc\hosts with the notepad. On Linux and Mac you can use the terminal with sudo nano /etc/hosts and sudo nano /private/etc/hosts respectively.
##
# Host Database
#
# localhost is used to configure the loopback interface
# when the system is booting. Do not change this entry.
##
127.0.0.1       localhost
255.255.255.255 broadcasthost
::1             localhost

212.124.126.242 my-app.dev    # add your host name to the list
What’s Next?
Now that everything is set up, you can deploy as many applications as you want to your Raspberry Pi, and install forever or pm2 to keep your Node.js servers alive.
And just remember that if something goes wrong, you can just wipe the SD card and start again from scratch!
Further Reading on the Toptal Blog:
- Control Your Climate With This Raspberry Pi Thermostat Tutorial
- Software Development Anywhere: My Distributed Remote Workplace
- Creating a Secure REST API in Node.js
- Programming Visually with Node-RED: Wiring Up the Internet of Things with Ease
- Keep It Encrypted, Keep It Safe: Working with ESNI, DoH, and DoT
Understanding the basics
What do I need to start with a Raspberry Pi?
A monitor with the correct cable and adapter; a micro USB power supply; a wired keyboard and mouse—or a wireless keyboard and mouse with a Bluetooth adapter; a micro SD card; and, of course, a Raspberry Pi.
Can you run Windows on a Raspberry Pi?
There is no direct Windows desktop OS for Raspberry Pi. Windows has a slimmed down version aimed at Internet of Things (IoT) devices. It’s primarily designed for developers and hardware hackers who want to prototype IoT appliances.
Why use a Raspberry Pi?
There are lots of things we can use a Raspberry Pi for. We can build home automation servers, remote-controlled robots, network-attached storage (NAS) devices, mini web servers, media centers, music boxes, retro gaming consoles, Raspberry cluster servers, VPN servers, and much more.
What is Internet of Things (IoT) Raspberry Pi?
No such thing. The IoT consists of specialized in-situ internet-connected devices, as opposed to general-purpose ones like phones and laptops. One of the key platforms for the IoT is the Raspberry Pi. It’s a popular platform because it offers a complete Linux server in a tiny embedded package for a very low cost.
What is a Raspberry Pi and what does it do?
It’s a single-board computer or some call it a mini-computer. You can do anything with it—pretty much everything you can imagine with a desktop or a server machine.
What is the difference between Arduino and Raspberry Pi?
Arduino is a micro-controller and a self-hosted chip—it’s not a full computer, so you need a separate computer to write code for it. The Raspberry Pi is a bona fide computer: It has a CPU, GPU, and ports for HDMI, sound, display, and LAN. It requires an OS (e.g., Linux) and a hard drive (or SD card) to store it.
What is the use of a home server?
You can use a Raspberry Pi as a home server for multiple purposes, like multimedia storage, or as a backup workstation, email server, surveillance camera, test site, Jenkins host, subversion server, wiki host, and many more things.
Can you run a server on a Raspberry Pi?
Yes, you can run pretty much any type of server on a Raspberry Pi.
Pablo Villoslada Puigcerber
Logroño, Spain
Member since December 6, 2014
About the author
Pablo’s BSCE means he’s had top coding standards while crafting numerous front ends. He’s also a MongoDB Certified Dev and Toptal Mentor.
Expertise
PREVIOUSLY AT

