
Future-proof Your Android Code, Part 2: Functional Reactive Programming in Action
The functional reactive programming (FRP) paradigm is becoming increasingly mainstream. In this installment, we discuss FRP essentials like system design and libraries, and implement a sample application.

The functional reactive programming (FRP) paradigm is becoming increasingly mainstream. In this installment, we discuss FRP essentials like system design and libraries, and implement a sample application.

Iliyan is an Android developer and CTO who has founded four startups and created several top-rated apps, including Ivy Wallet, which has received 10 YouTube tech community “best UI/UX” awards. He specializes in functional programming, UX, Kotlin, and Haskell.
Expertise
Previously At

Functional reactive programming (FRP) is a paradigm that combines the reactivity from reactive programming with the declarative function composition from functional programming. It simplifies complex tasks, creates elegant user interfaces, and manages state smoothly. Due to these and many other clear benefits, the use of FRP is going mainstream in mobile and web development.
That doesn’t mean understanding this programming paradigm is easy—even seasoned developers may wonder: “What exactly is FRP?” In Part 1 of this tutorial, we defined FRP’s foundational concepts: functional programming and reactive programming. This installment will prepare you to apply it, with an overview of useful libraries and a detailed sample implementation.
This article is written with Android developers in mind, but the concepts are relevant and beneficial to any developer with experience in general programming languages.
Getting Started with FRP: System Design
The FRP paradigm is an endless cycle of states and events: State -> Event -> State' -> Event' -> State'' -> …. (As a reminder, ', pronounced “prime,” indicates a new version of the same variable.) Every FRP program starts with an initial state that will be updated with each event it receives. This program includes the same elements as those in a reactive program:
- State
- Event
- The declarative pipeline (indicated as
FRPViewModel function) - Observable (indicated as
StateFlow)
Here, we’ve replaced the general reactive elements with real Android components and libraries:

Exploring FRP Libraries and Tools
There are a variety of Android libraries and tools that can help you get started with FRP, and that are also relevant to functional programming:
- Ivy FRP: This is a library I wrote that will be used for educational purposes in this tutorial. It is meant as a starting point for your approach to FRP but is not intended for production use as is since it lacks proper support. (I am currently the only engineer maintaining it.)
- Arrow: This is one of the best and most popular Kotlin libraries for FP, one we will also use in our sample app. It provides almost everything you need to go functional in Kotlin while remaining relatively lightweight.
- Jetpack Compose: This is Android’s current development toolkit for building native UI and is the third library we’ll use today. It is essential for modern Android developers—I’d recommend learning it and even migrating your UI if you haven’t already.
- Flow: This is Kotlin’s asynchronous reactive datastream API; althought we’re not working with it in this tutorial, it is compatible with many common Android libraries such as RoomDB, Retrofit, and Jetpack. Flow works seamlessly with coroutines and provides reactivity. When used with RoomDB, for example, Flow ensures that your app will always work with the latest data. If a change in a table occurs, the flows dependent on this table will receive the new value immediately.
- Kotest: This test platform offers property-based testing support relevant to pure FP domain code.
Implementing a Sample Feet/Meters Conversion App
Let’s see an example of FRP at work in an Android app. We’ll create a simple app that converts values between meters (m) and feet (ft).
For the purposes of this tutorial, I’m only covering the portions of code vital to understanding FRP, modified for simplicity’s sake from my full converter sample app. If you want to follow along in Android Studio, create your project with a Jetpack Compose activity, and install Arrow* and Ivy FRP. You will need a minSdk version of 28 or higher and a language version of Kotlin 1.6+.
* Disclaimer: There’s now a newer version of Arrow but the rest of this tutorial has not been tested against it yet.
State
Let’s start by defining the state of our app.
// ConvState.kt
enum class ConvType {
	METERS_TO_FEET, FEET_TO_METERS
}

data class ConvState(
    val conversion: ConvType,
    val value: Float,
    val result: Option<String>
)
Our state class is fairly self-explanatory:
-
conversion: A type describing what we’re converting between—feet to meters or meters to feet. -
value: The float that the user inputs, which we will convert later. -
result: An optional result that represents a successful conversion.
Next, we need to handle the user input as an event.
Event
We defined ConvEvent as a sealed class to represent the user input:
// ConvEvent.kt
sealed class ConvEvent {
    data class SetConversionType(val conversion: ConvType) : ConvEvent()

    data class SetValue(val value: Float) : ConvEvent()

    object Convert : ConvEvent()
}
Let’s examine its members’ purposes:
-
SetConversionType: Chooses whether we are converting from feet to meters or from meters to feet. -
SetValue: Sets the numeric values, which will be used for the conversion. -
Convert: Performs the conversion of the inputted value using the conversion type.
Now, we will continue with our view model.
The Declarative Pipeline: Event Handler and Function Composition
The view model contains our event handler and function composition (declarative pipeline) code:
// ConverterViewModel.kt
@HiltViewModel
class ConverterViewModel @Inject constructor() : FRPViewModel<ConvState, ConvEvent>() {
    companion object {
        const val METERS_FEET_CONST = 3.28084f
    }

    // set initial state
    override val _state: MutableStateFlow<ConvState> = MutableStateFlow(
        ConvState(
            conversion = ConvType.METERS_TO_FEET,
            value = 1f,
            result = None
        )
    )

    override suspend fun handleEvent(event: ConvEvent): suspend () -> ConvState = when (event) {
        is ConvEvent.SetConversionType -> event asParamTo ::setConversion then ::convert
        is ConvEvent.SetValue -> event asParamTo ::setValue
        is ConvEvent.Convert -> stateVal() asParamTo ::convert
    }
// ...
}
Before analyzing the implementation, let’s break down a few objects specific to the Ivy FRP library.
FRPViewModel<S,E> is an abstract view model base that implements the FRP architecture. In our code, we need to implement to following methods:
-
val _state: Defines the initial value of the state (Ivy FRP is using Flow as a reactive data stream). -
handleEvent(Event): suspend () -> S: Produces the next state asynchronously given anEvent. The underlying implementation launches a new coroutine for each event. -
stateVal(): S: Returns the current state. -
updateState((S) -> S): SUpdates theViewModel’s state.
Now, let’s look at a few methods related to function composition:
-
then: Composes two functions together. -
asParamTo: Produces a functiong() = f(t)fromf(T)and a valuet(of typeT). -
thenInvokeAfter: Composes two functions and then invokes them.
updateState and thenInvokeAfter are helper methods shown in the next code snippet; they will be used in our remaining view model code.
The Declarative Pipeline: Additional Function Implementations
Our view model also contains function implementations for setting our conversion type and value, performing the actual conversions, and formatting our end result:
// ConverterViewModel.kt
@HiltViewModel
class ConverterViewModel @Inject constructor() : FRPViewModel<ConvState, ConvEvent>() {
// ...
    private suspend fun setConversion(event: ConvEvent.SetConversionType) =
        updateState { it.copy(conversion = event.conversion) }

    private suspend fun setValue(event: ConvEvent.SetValue) =
        updateState { it.copy(value = event.value) }

    private suspend fun convert(
        state: ConvState
    ) = state.value asParamTo when (stateVal().conversion) {
        ConvType.METERS_TO_FEET -> ::convertMetersToFeet
        ConvType.FEET_TO_METERS -> ::convertFeetToMeters
    } then ::formatResult thenInvokeAfter { result ->
        updateState { it.copy(result = Some(result)) }
    }

    private fun convertMetersToFeet(meters: Float): Float = meters * METERS_FEET_CONST
    private fun convertFeetToMeters(ft: Float): Float = ft / METERS_FEET_CONST

    private fun formatResult(result: Float): String =
        DecimalFormat("###,###.##").format(result)
}
With an understanding of our Ivy FRP helper functions, we’re ready to analyze the code. Let’s start with the core functionality: convert. convert accepts the state (ConvState) as input and produces a function that outputs a new state containing the result of the converted input. In pseudocode, we can summarize it as: State (ConvState) -> Value (Float) -> Converted value (Float) -> Result (Option<String>).
The Event.SetValue event handling is straightforward; it simply updates the state with the value from the event (i.e., the user inputs a number to be converted). However, handling the Event.SetConversionType event is a bit more interesting because it does two things:
- Updates the state with the selected conversion type (
ConvType). - Uses
convertto convert the current value based on the selected conversion type.
Using the power of composition, we can use the convert: State -> State function as input for other compositions. You may have noticed that the code demonstrated above is not pure: We’re mutating protected abstract val _state: MutableStateFlow<S> in FRPViewModel, resulting in side effects whenever we use updateState {}. Completely pure FP code for Android in Kotlin isn’t feasible.
Since composing functions that aren’t pure can lead to unpredictable results, a hybrid approach is the most practical: Use pure functions for the most part, and make sure any impure functions have controlled side effects. This is exactly what we’ve done above.
Observable and UI
Our final step is to define our app’s UI and bring our converter to life.
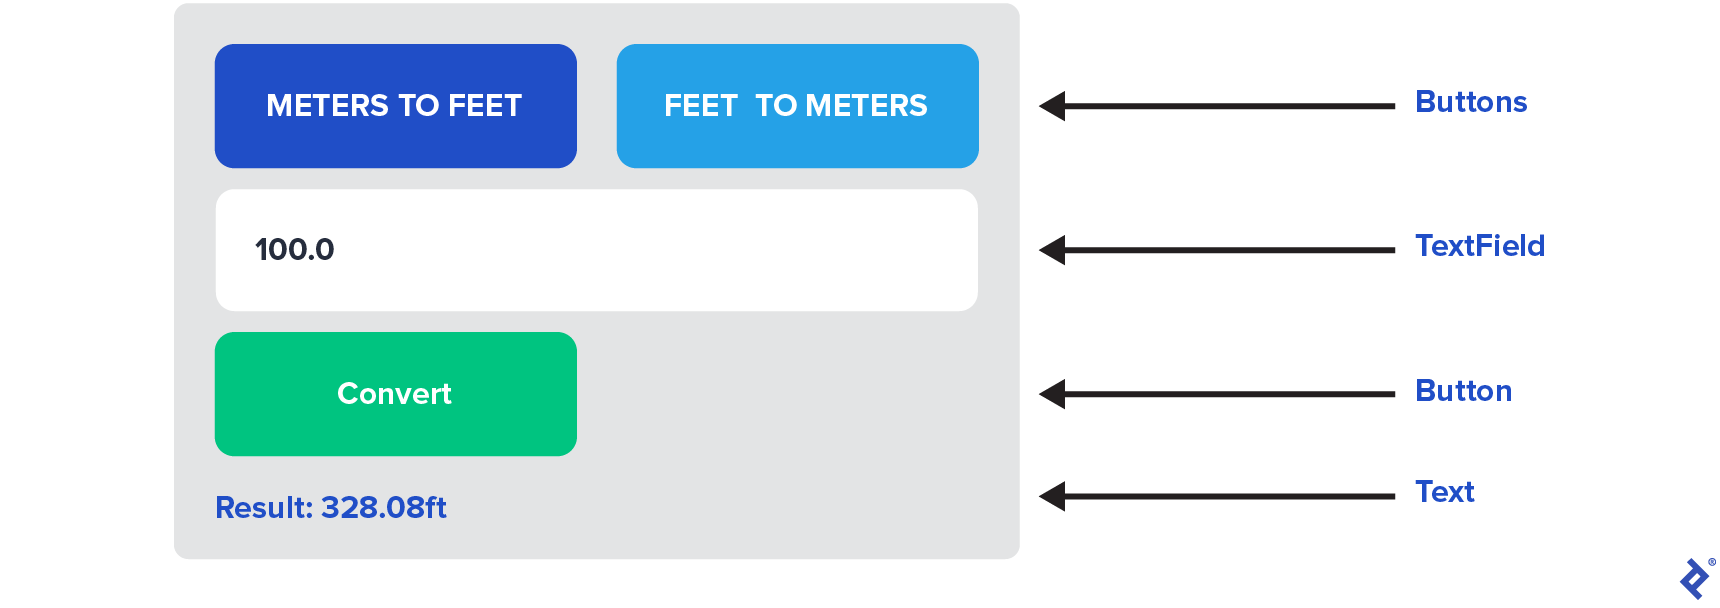
Our app’s UI will be a bit “ugly,” but the goal of this example is to demonstrate FRP, not to build a beautiful design using Jetpack Compose.
// ConverterScreen.kt
@Composable
fun BoxWithConstraintsScope.ConverterScreen(screen: ConverterScreen) {
    FRP<ConvState, ConvEvent, ConverterViewModel> { state, onEvent ->
        UI(state, onEvent)
    }
}
Our UI code uses basic Jetpack Compose principles in the fewest lines of code possible. However, there’s one interesting function worth mentioning: FRP<ConvState, ConvEvent, ConverterViewModel>. FRP is a composable function from the Ivy FRP framework, which does several things:
- Instantiates the view model using
@HiltViewModel. - Observes the view model’s
Stateusing Flow. - Propagates events to the
ViewModelwith the codeonEvent: (Event) -> Unit). - Provides a
@Composablehigher-order function that performs event propagation and receives the latest state. - Optionally provides a way to pass
initialEvent, which is called once the app starts.
Here’s how the FRP function is implemented in the Ivy FRP library:
@Composable
inline fun <S, E, reified VM : FRPViewModel<S, E>> BoxWithConstraintsScope.FRP(
    initialEvent: E? = null,
    UI: @Composable BoxWithConstraintsScope.(
        state: S,
        onEvent: (E) -> Unit
    ) -> Unit
) {
    val viewModel: VM = viewModel()
    val state by viewModel.state().collectAsState()

    if (initialEvent != null) {
        onScreenStart {
            viewModel.onEvent(initialEvent)
        }
    }

    UI(state, viewModel::onEvent)
}
You can find the full code of the converter example in GitHub, and the entire UI code can be found in the UI function of the ConverterScreen.kt file. If you’d like to experiment with the app or the code, you can clone the Ivy FRP repository and run the sample app in Android Studio. Your emulator may need increased storage before the app can run.
Cleaner Android Architecture With FRP
With a strong foundational understanding of functional programming, reactive programming, and, finally, functional reactive programming, you are ready to reap the benefits of FRP and build cleaner and more maintainable Android architecture.
The Toptal Engineering Blog extends its gratitude to Tarun Goyal for reviewing the code samples presented in this article.
Further Reading on the Toptal Blog:
- Meet RxJava: The Missing Reactive Programming Library for Android
- The Foundations of Functional Reactive Programming in Android
- Introduction to Functional Programming: JavaScript Paradigms
- How to Simplify Concurrency with Reactive Modelling on Android
- Building Reactive Apps with Redux, RxJS, and Redux-Observable in React Native
Understanding the basics
Functional programming (FP) uses declarative style, which yields improved readability among other advantages. In addition, FP functions are pure and therefore do not produce side effects.
In reactive programming, the application reacts to data or event changes instead of requesting information about changes. This produces a more responsive UI and improved user experience.
Reactive programming and functional programming are two separate paradigms. However, functional reactive programming combines the two and reaps the benefits of both.
Functional reactive programming (FRP) is a reactive programming pattern that uses declarative function composition.
Iliyan Germanov
Sofia, Bulgaria
Member since March 30, 2022
About the author
Iliyan is an Android developer and CTO who has founded four startups and created several top-rated apps, including Ivy Wallet, which has received 10 YouTube tech community “best UI/UX” awards. He specializes in functional programming, UX, Kotlin, and Haskell.
Expertise
PREVIOUSLY AT