Optimize Your Environment for Development and Production: A Pydantic Tutorial, Part 2
Learn how to develop a Django application coupled with pydantic where the development environment matches production.
Learn how to develop a Django application coupled with pydantic where the development environment matches production.
Arjaan is a senior engineer and data scientist who creates mission-critical cloud solutions focused on Rasa for international banks and insurance companies. He architects and teaches large-scale Kubernetes solutions.
PREVIOUSLY AT

This is the second installment in a series on leveraging pydantic for Django-based projects. In the series’ first installment, we focused on pydantic’s use of Python type hints to streamline Django settings management.
Developers can be their own worst enemies. I have seen countless examples of engineers developing on a system that doesn’t match their production environment. This dissonance leads to extra work and not catching system errors until later in the development process. Aligning these setups will ultimately ease continuous deployments. With this in mind, we will create a sample application on our Django development environment, simplified through Docker, pydantic, and conda.
A typical development environment uses:
- A local repository.
- A Docker-based PostgreSQL database.
- A conda environment (to manage Python dependencies).
Pydantic and Django are suitable for projects both simple and complex. The following steps showcase a simple solution that highlights how to mirror our environments.
Git Repository Configuration
Before we begin writing code or installing development systems, let’s create a local Git repository:
mkdir hello-visitor
cd hello-visitor

git init
We’ll start with a basic Python .gitignore file in the repository root. Throughout this tutorial, we’ll add to this file before adding files we don’t want Git to track.
Django PostgreSQL Configuration Using Docker
Django requires a relational database and, by default, uses SQLite. We typically avoid SQLite for mission-critical data storage as it does not handle concurrent user access well. Most developers opt for a more typical production database, like PostgreSQL. Regardless, we should use the same database for development and production. This architectural mandate is part of The Twelve-factor App.
Luckily, operating a local PostgreSQL instance with Docker and Docker Compose is a breeze.
To avoid polluting our root directory, we’ll put the Docker-related files in separate subdirectories. We’ll start by creating a Docker Compose file to deploy PostgreSQL:
# docker-services/docker-compose.yml
version: "3.9"

services:
  db:
    image: "postgres:13.4"
    env_file: .env
    volumes:
      - hello-visitor-postgres:/var/lib/postgresql/data
    ports:
      - ${POSTGRES_PORT}:5432

volumes:
  hello-visitor-postgres:
Next, we’ll create a docker-compose environment file to configure our PostgreSQL container:
# docker-services/.env

POSTGRES_USER=postgres
POSTGRES_PASSWORD=MyDBPassword123

# The 'maintenance' database
POSTGRES_DB=postgres

# The port exposed to localhost
POSTGRES_PORT=5432
The database server is now defined and configured. Let’s start our container in the background:
sudo docker compose --project-directory docker-services/ up -d
It is important to note the use of sudo in the previous command. It will be required unless specific steps are followed in our development environment.
Database Creation
Let’s connect to and configure PostgreSQL using a standard tool suite, pgAdmin4. We’ll use the same login credentials as previously configured in the environment variables.
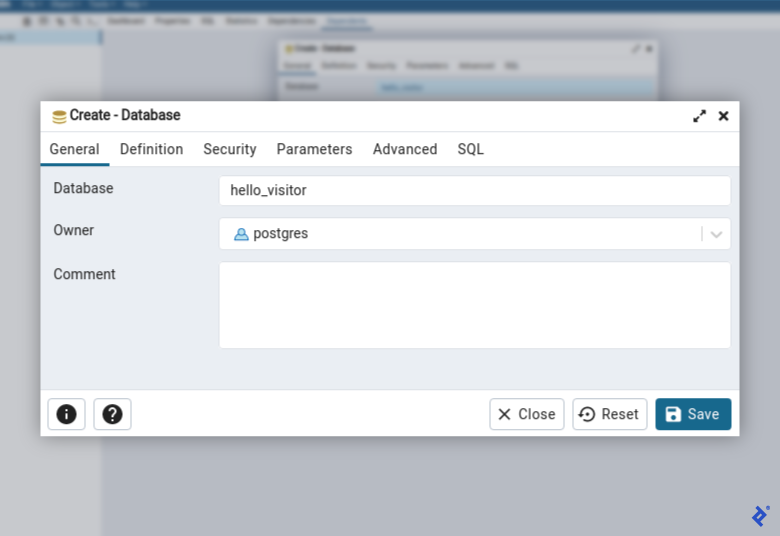
Now let’s create a new database named hello_visitor:
With our database in place, we are ready to install our programming environment.
Python Environment Management via Miniconda
We now need to set up an isolated Python environment and required dependencies. For simplicity of setup and maintenance, we chose Miniconda.
Let’s create and activate our conda environment:
conda create --name hello-visitor python=3.9
conda activate hello-visitor
Now, we’ll create a file, hello-visitor/requirements.txt, enumerating our Python dependencies:
django
# PostgreSQL database adapter:
psycopg2
# Pushes .env key-value pairs into environment variables:
python-dotenv
pydantic
# Utility library to read database connection information:
dj-database-url
# Static file caching:
whitenoise
# Python WSGI HTTP Server:
gunicorn
Next, we’ll ask Python to install these dependencies:
cd hello-visitor

pip install -r requirements.txt
Our dependencies should now be installed in preparation for the application development work.
Django Scaffolding
We’ll scaffold our project and app by first running django-admin, then running a file it generates, manage.py:
# From the `hello-visitor` directory
mkdir src
cd src

# Generate starter code for our Django project.
django-admin startproject hello_visitor .

# Generate starter code for our Django app.
python manage.py startapp homepage
Next, we need to configure Django to load our project. The settings.py file requires an adjustment to the INSTALLED_APPS array to register our newly created homepage app:
# src/hello_visitor/settings.py

# ...

INSTALLED_APPS = [
    "homepage.apps.HomepageConfig",
    "django.contrib.admin",
    # ...
]

# ...
Application Setting Configuration
Using the pydantic and Django settings approach shown in the first installment, we need to create an environment variables file for our development system. We’ll move our current settings into this file as follows:
- Create the file
src/.envto hold our development environment settings. - Copy the settings from
src/hello_visitor/settings.pyand add them tosrc/.env. - Remove those copied lines from the
settings.pyfile. - Ensure the database connection string uses the same credentials that we previously configured.
Our environment file, src/.env, should look like this:
DATABASE_URL=postgres://postgres:MyDBPassword123@localhost:5432/hello_visitor
DATABASE_SSL=False

SECRET_KEY="django-insecure-sackl&7(1hc3+%#*4e=)^q3qiw!hnnui*-^($o8t@2^^qqs=%i"
DEBUG=True
DEBUG_TEMPLATES=True
USE_SSL=False
ALLOWED_HOSTS='[
    "localhost",
    "127.0.0.1",
    "0.0.0.0"
]'
We’ll configure Django to read settings from our environment variables using pydantic, with this code snippet:
# src/hello_visitor/settings.py
import os
from pathlib import Path
from pydantic import (
    BaseSettings,
    PostgresDsn,
    EmailStr,
    HttpUrl,
)
import dj_database_url

# Build paths inside the project like this: BASE_DIR / 'subdir'.
BASE_DIR = Path(__file__).resolve().parent.parent

class SettingsFromEnvironment(BaseSettings):
    """Defines environment variables with their types and optional defaults"""

    # PostgreSQL
    DATABASE_URL: PostgresDsn
    DATABASE_SSL: bool = True

    # Django
    SECRET_KEY: str
    DEBUG: bool = False
    DEBUG_TEMPLATES: bool = False
    USE_SSL: bool = False
    ALLOWED_HOSTS: list

    class Config:
        """Defines configuration for pydantic environment loading"""

        env_file = str(BASE_DIR / ".env")
        case_sensitive = True

config = SettingsFromEnvironment()

os.environ["DATABASE_URL"] = config.DATABASE_URL
DATABASES = {
    "default": dj_database_url.config(conn_max_age=600, ssl_require=config.DATABASE_SSL)
}

SECRET_KEY = config.SECRET_KEY
DEBUG = config.DEBUG
DEBUG_TEMPLATES = config.DEBUG_TEMPLATES
USE_SSL = config.USE_SSL
ALLOWED_HOSTS = config.ALLOWED_HOSTS

# ...
If you encounter any issues after completing the previous edits, compare our crafted settings.py file with the version in our source code repository.
Model Creation
Our application tracks and displays the homepage visitor count. We need a model to hold that count and then use Django’s object-relational mapper (ORM) to initialize a single database row via a data migration.
First, we’ll create our VisitCounter model:
# hello-visitor/src/homepage/models.py
"""Defines the models"""
from django.db import models


class VisitCounter(models.Model):
    """ORM for VisitCounter"""

    count = models.IntegerField()

    @staticmethod
    def insert_visit_counter():
        """Populates database with one visit counter. Call from a data migration."""
        visit_counter = VisitCounter(count=0)
        visit_counter.save()

    def __str__(self):
        return f"VisitCounter - number of visits: {self.count}"
Next, we’ll trigger a migration to create our database tables:
# in the `src` folder
python manage.py makemigrations
python manage.py migrate
To verify that the homepage_visitcounter table exists, we can view the database in pgAdmin4.
Next, we need to put an initial value in our homepage_visitcounter table. Let’s create a separate migration file to accomplish this using Django scaffolding:
# from the 'src' directory
python manage.py makemigrations --empty homepage
We’ll adjust the created migration file to use the VisitCounter.insert_visit_counter method we defined at the beginning of this section:
# src/homepage/migrations/0002_auto_-------_----.py
# Note: The dashes are dependent on execution time.
from django.db import migrations
from ..models import VisitCounter

def insert_default_items(apps, _schema_editor):
    """Populates database with one visit counter."""
    # To learn about apps, see:
    # https://docs.djangoproject.com/en/3.2/topics/migrations/#data-migrations
    VisitCounter.insert_visit_counter()


class Migration(migrations.Migration):
    """Runs a data migration."""

    dependencies = [
        ("homepage", "0001_initial"),
    ]

    operations = [
        migrations.RunPython(insert_default_items),
    ]
Now we’re ready to execute this modified migration for the homepage app:
# from the 'src' directory
python manage.py migrate homepage
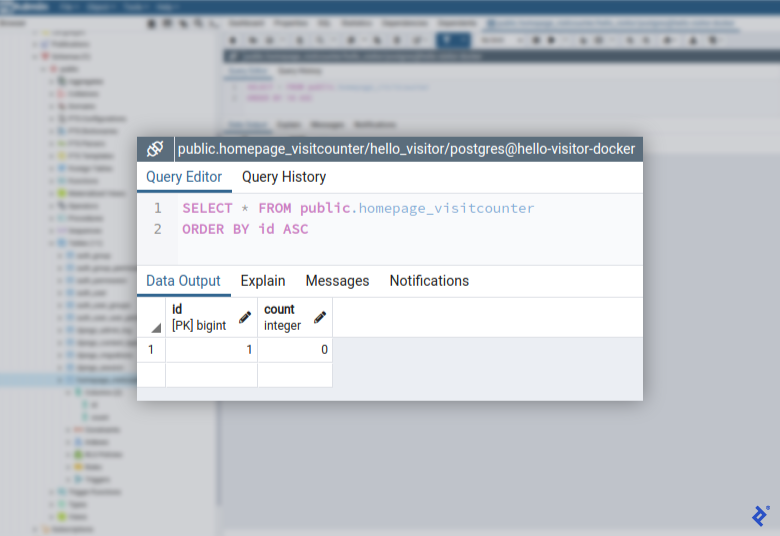
Let’s verify that the migration was executed correctly by looking at our table’s contents:
We see that our homepage_visitcounter table exists and has been populated with an initial visit count of 0. With our database squared away, we’ll focus on creating our UI.
Create and Configure Our Views
We need to implement two main parts of our UI: a view and a template.
We create the homepage view to increment the visitor count, save it to the database, and pass that count to the template for display:
# src/homepage/views.py
from django.shortcuts import get_object_or_404, render
from .models import VisitCounter

def index(request):
    """View for the main page of the app."""
    visit_counter = get_object_or_404(VisitCounter, pk=1)

    visit_counter.count += 1
    visit_counter.save()

    context = {"visit_counter": visit_counter}
    return render(request, "homepage/index.html", context)
Our Django application needs to listen to requests aimed at homepage. To configure this setting, we’ll add this file:
# src/homepage/urls.py
"""Defines urls"""
from django.urls import path

from . import views

# The namespace of the apps' URLconf
app_name = "homepage"  # pylint: disable=invalid-name

urlpatterns = [
    path("", views.index, name="index"),
]
For our homepage application to be served, we must register it in a different urls.py file:
# src/hello_visitor/urls.py
from django.contrib import admin
from django.urls import include, path

urlpatterns = [
    path("", include("homepage.urls")),
    path("admin/", admin.site.urls),
]
Our project’s base HTML template will live in a new file, src/templates/layouts/base.html:
<!DOCTYPE html>
{% load static %}

<html lang="en">
  <head>
    <!-- Required meta tags -->
    <meta charset="utf-8">
    <meta name="viewport" content="width=device-width, initial-scale=1">

    <!-- Bootstrap CSS -->
    <link href="https://cdn.jsdelivr.net/npm/bootstrap@5.0.1/dist/css/bootstrap.min.css" rel="stylesheet" integrity="sha384-+0n0xVW2eSR5OomGNYDnhzAbDsOXxcvSN1TPprVMTNDbiYZCxYbOOl7+AMvyTG2x" crossorigin="anonymous">

    <title>Hello, visitor!</title>
    <link rel="shortcut icon" type="image/png" href="{% static 'favicon.ico' %}"/>
  </head>
  <body>

    {% block main %}{% endblock %}

    <!-- Option 1: Bootstrap Bundle with Popper -->
    <script src="https://cdn.jsdelivr.net/npm/bootstrap@5.0.1/dist/js/bootstrap.bundle.min.js" integrity="sha384-gtEjrD/SeCtmISkJkNUaaKMoLD0//ElJ19smozuHV6z3Iehds+3Ulb9Bn9Plx0x4" crossorigin="anonymous"></script>

  </body>
</html>
We’ll extend the base template for our homepage app in a new file, src/templates/homepage/index.html:
{% extends "layouts/base.html" %}

{% block main %}
  <main>
    <div class="container py-4">
      <div class="p-5 mb-4 bg-dark text-white text-center rounded-3">
        <div class="container-fluid py-5">
          <h1 class="display-5 fw-bold">Hello, visitor {{ visit_counter.count }}!</h1>
        </div>
      </div>
    </div>
  </main>
{% endblock %}
The last step in creating our UI is to tell Django where to find these templates. Let’s add a TEMPLATES['DIRS'] dictionary item to our settings.py file:
# src/hello_visitor/settings.py
TEMPLATES = [
    {
        ...
        'DIRS': [BASE_DIR / 'templates'],
        ...
    },
]
Our user interface is now implemented and we are almost ready to test our application’s functionality. Before we do our testing, we need to put into place the final piece of our environment: static content caching.
Our Static Content Configuration
To avoid taking architectural shortcuts on our development system, we’ll configure static content caching to mirror our production environment.
We’ll keep all of our project’s static files in a single directory, src/static, and instruct Django to collect those files before deployment.
We’ll use Toptal’s logo for our application’s favicon and store it as src/static/favicon.ico:
# from `src` folder
mkdir static
cd static
wget https://frontier-assets.toptal.com/83b2f6e0d02cdb3d951a75bd07ee4058.png
mv 83b2f6e0d02cdb3d951a75bd07ee4058.png favicon.ico
Next, we’ll configure Django to collect the static files:
# src/hello_visitor/settings.py
# Static files (CSS, JavaScript, images)
# a la https://docs.djangoproject.com/en/3.2/howto/static-files/
#
# Source location where we'll store our static files
STATICFILES_DIRS = [BASE_DIR / "static"]
# Build output location where Django collects all static files
STATIC_ROOT = BASE_DIR / "staticfiles"
STATIC_ROOT.mkdir(exist_ok=True)

# URL to use when referring to static files located in STATIC_ROOT.
STATIC_URL = "/static/"

STATICFILES_STORAGE = "whitenoise.storage.CompressedManifestStaticFilesStorage"
We only want to store our original static files in the source code repository; we do not want to store the production-optimized versions. Let’s add the latter to our .gitignore with this simple line:
staticfiles
With our source code repository correctly storing the required files, we now need to configure our caching system to work with these static files.
Static File Caching
In production—and thus, also in our development environment—we’ll use WhiteNoise to serve our Django application’s static files more efficiently.
We register WhiteNoise as middleware by adding the following snippet to our src/hello_visitor/settings.py file. Registration order is strictly defined, and WhiteNoiseMiddleware must appear immediately after SecurityMiddleware:
MIDDLEWARE = [
    'django.middleware.security.SecurityMiddleware',
    'whitenoise.middleware.WhiteNoiseMiddleware',
    # ...
]

STATICFILES_STORAGE = 'whitenoise.storage.CompressedManifestStaticFilesStorage'
Static file caching should now be configured in our development environment, enabling us to run our application.
Running Our Development Server
We have a fully coded application and can now launch our Django’s embedded development web server with this command:
# in the `src` folder
python manage.py runserver
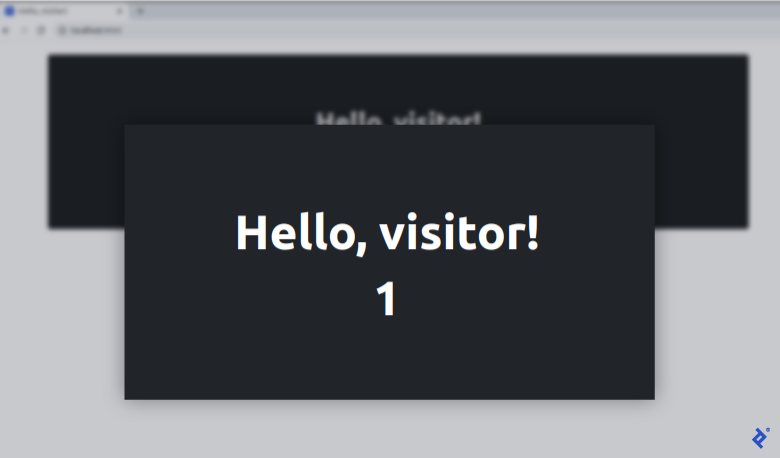
When we navigate to http://localhost:8000, the count will increase each time we refresh the page:
We now have a working application that will increment its visit count as we refresh the page.
Ready To Deploy
This tutorial has covered all the steps needed to create a working app in a beautiful Django development environment that matches production. In Part 3, we’ll cover deploying our application to its production environment. It’s also worth exploring our additional exercises highlighting the benefits of Django and pydantic: They’re included in the code-complete repository for this pydantic tutorial.
The Toptal Engineering Blog extends its gratitude to Stephen Davidson for reviewing and beta testing the code samples presented in this article.
Further Reading on the Toptal Blog:
- High-performing Apps With Python: A FastAPI Tutorial
- Streamline Your Django Settings With Type Hints: A Pydantic Tutorial, Part 1
- Top 10 Mistakes That Django Developers Make
- A Guide to Performance Testing and Optimization With Python and Django
- Security in Django Applications: A Pydantic Tutorial, Part 4
Understanding the basics
How fast is pydantic?
Out of the box, pydantic is faster than other validation libraries. There are published benchmarks available in the official pydantic documentation.
Can I use pydantic with Django?
Yes. Pydantic is a regular Python package and can be used with Django simply by installing it with pip.
Which environment is best for Django?
We define “environment” as the system where our application is developed or hosted. In this case, the best development environment is defined as one that matches what is being used in production.
Why are there separate development and production environments?
User-facing websites should always run in a secure environment that is updated with new code only after the new code has been tested extensively. New code is created in a separate development environment and often tested in one or more staging environments before it is deployed to the production environment.
Arjaan Buijk
Plymouth, MI, United States
Member since June 4, 2018
About the author
Arjaan is a senior engineer and data scientist who creates mission-critical cloud solutions focused on Rasa for international banks and insurance companies. He architects and teaches large-scale Kubernetes solutions.
PREVIOUSLY AT


