Building Real-time, Multiplatform Mobile Applications: Examples Using Ionic Framework and Firebase
This article provides step by step guide for building hybrid multiplatform real-time mobile application using the Ionic Framework and the Firebase.
This article provides step by step guide for building hybrid multiplatform real-time mobile application using the Ionic Framework and the Firebase.
Avinash is a senior developer with experience designing & developing data visualizations.
PREVIOUSLY AT

One of the major problems companies encounter when making a smartphone application is multiplicative cost of building a native application across different platforms. While savvy front-end developers have tuned into the development of several hybrid platforms that promise to help address this issue, Ionic Framework and Firebase are a dynamic duo that jointly really do give us amazing flexibility in building real-time smartphone applications using JavaScript and HTML5.
This tutorial introduces the capabilities of these multiplatform mobile development tools and even provides some Ionic and Firebase examples.

(Note: This article assumes some familiarity with the basics of the AngularJS framework. Here’s a great introductory post on AngularJS for those without that background.)
Introducing the Ionic Framework
The Ionic Framework consists of three main components:
- A SASS-based UI framework designed and optimized for mobile UIs.
- An AngularJS front-end JavaScript framework used to rapidly build scalable and fast applications.
- A compiler (Cordova or PhoneGap) for native mobile applications with CSS, HTML, and JavaScript.
The Ionic framework is also packed with lots of useful CSS components out-of-the-box.
Kudos to Ionic for providing extensive documentation, examples, and starter videos to help simplify the learning curve and get developers up and running quickly.
Introducing Firebase
Firebase is a backend-as-a-service schema-less data system that provides real-time data syncing without requiring any custom code to be written. Firebase makes much of your back-end development obsolete, thereby significantly reducing multiplatform development time.
Key features and benefits include:
- Data changes without code changes. All data changes are published to clients immediately, without any backend code modification needed.
- Lots of adapters. There are adapters, with good support and documentation, for all popular JavaScript frameworks and mobile platform SDKs. (We used AngularFire, which is the AngularJS binding for Firebase, in this article.)
- Ease of authentication. Authentication in Firebase is as simple as a single method call, regardless of the authentication method. Supports simple email and password, Google, Facebook, Twitter, or GitHub based logins.
- Offline enabled. All Firebase data is offline enabled, so an application can be fully (or close to fully) functional in disconnected mode. Applications are automatically synchronized when the connection is restored.
- Configuration dashboard. Much of Firebase (security rules, for example) can be easily configured through Firebase’s intuitive dashboard interface.
- JSON-centric. In Firebase, all data is stored and retrieved in the form of JSON objects.
Firebase also offers cloud services for hosting the front-end code, which can save significant time in deployment and maintenance.
It is also worth noting that Firebase was acquired by Google this past October, which has given it significantly more attention and visibility.
A Simple Use Case Example: Expense Tracking
Roommates often share expenses and rely on one another in times of need. So, let’s help roommates track their expenses and help them reconcile at the end of the month.
To make things even more interesting, let’s build a multiplatform mobile application that will provide real-time updates, so they can each monitor expenses as they occur.

Now that we’ve decided what we want to build and we’ve been introduced to the tools, let’s get started!
Getting Started With Ionic and Firebase
The first thing we need to do is install Ionic. Follow the installation instructions provided on the Ionic Getting Started page. (Note that Ionic has a dependency on NodeJS, so the instructions will require you to install that as well if you don’t already have it on your machine).
The AngularFire 5-minute tutorial is a great place to begin getting familiar with Firebase. And if you’re a “tinkerer” or a tactile learner like me, you may want to pull my implementation from GitHub and start playing with the code.
Coding Our Multiplatform App
For this tutorial, we’re going to use the sample tabs app provided as part of the Ionic installation as the basis for our app. (You can run the sample app with the command ionic start myApp tabs.)
Open the sample tabs app in your favorite IDE (I’m using Webstorm), and let’s start modifying it to build our roommates app.
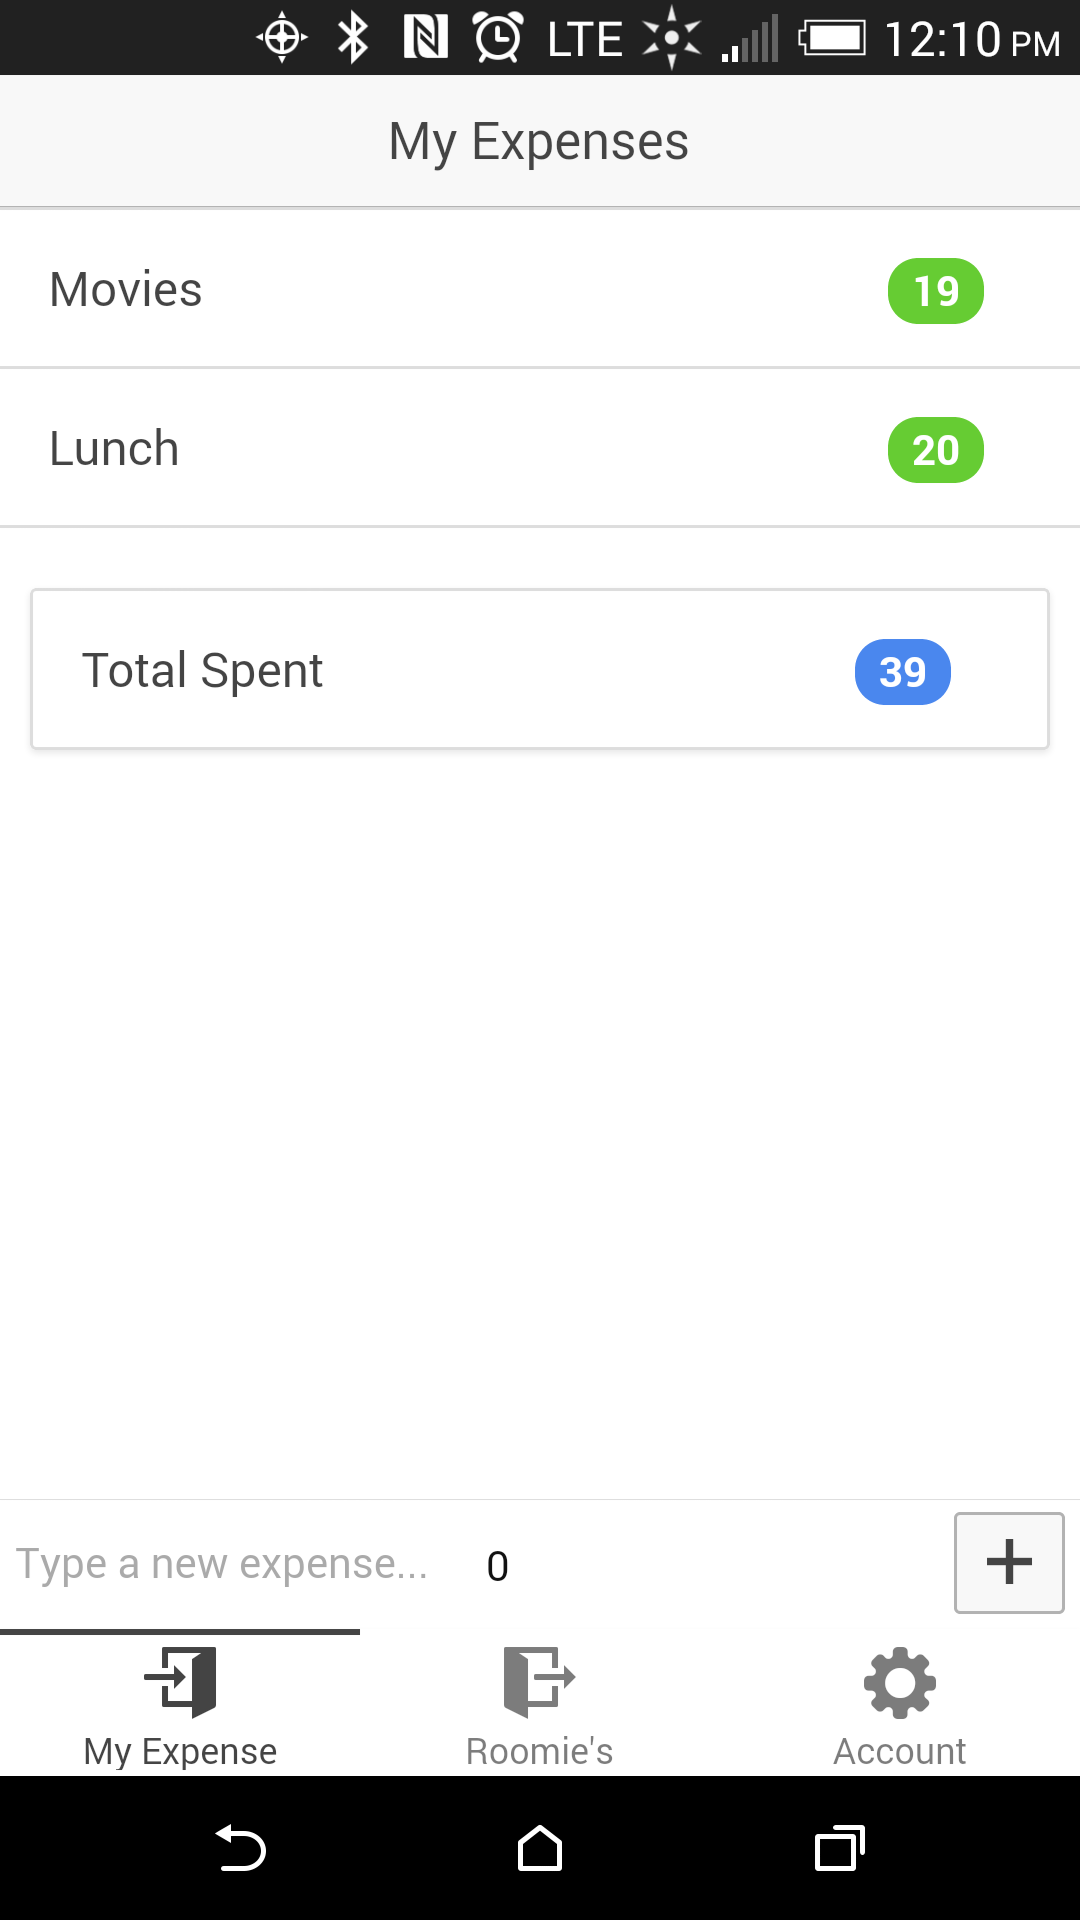
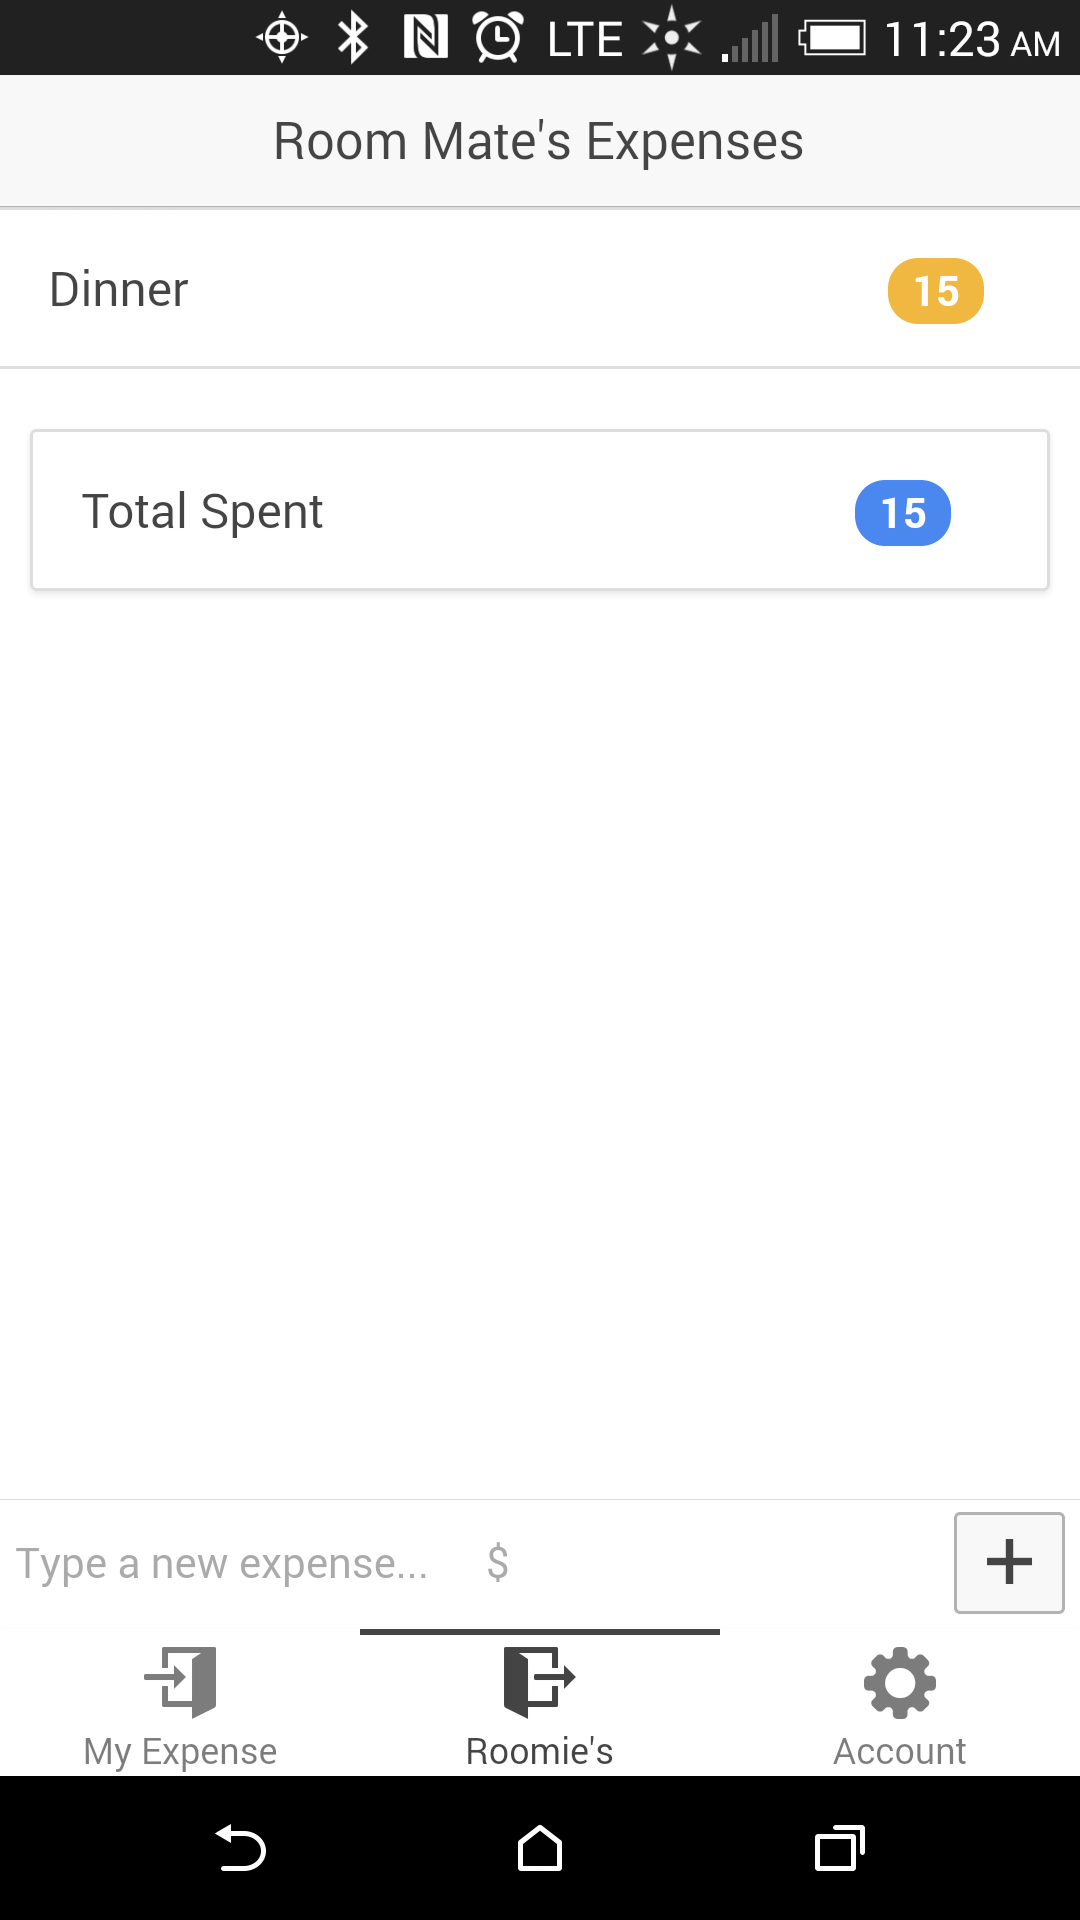
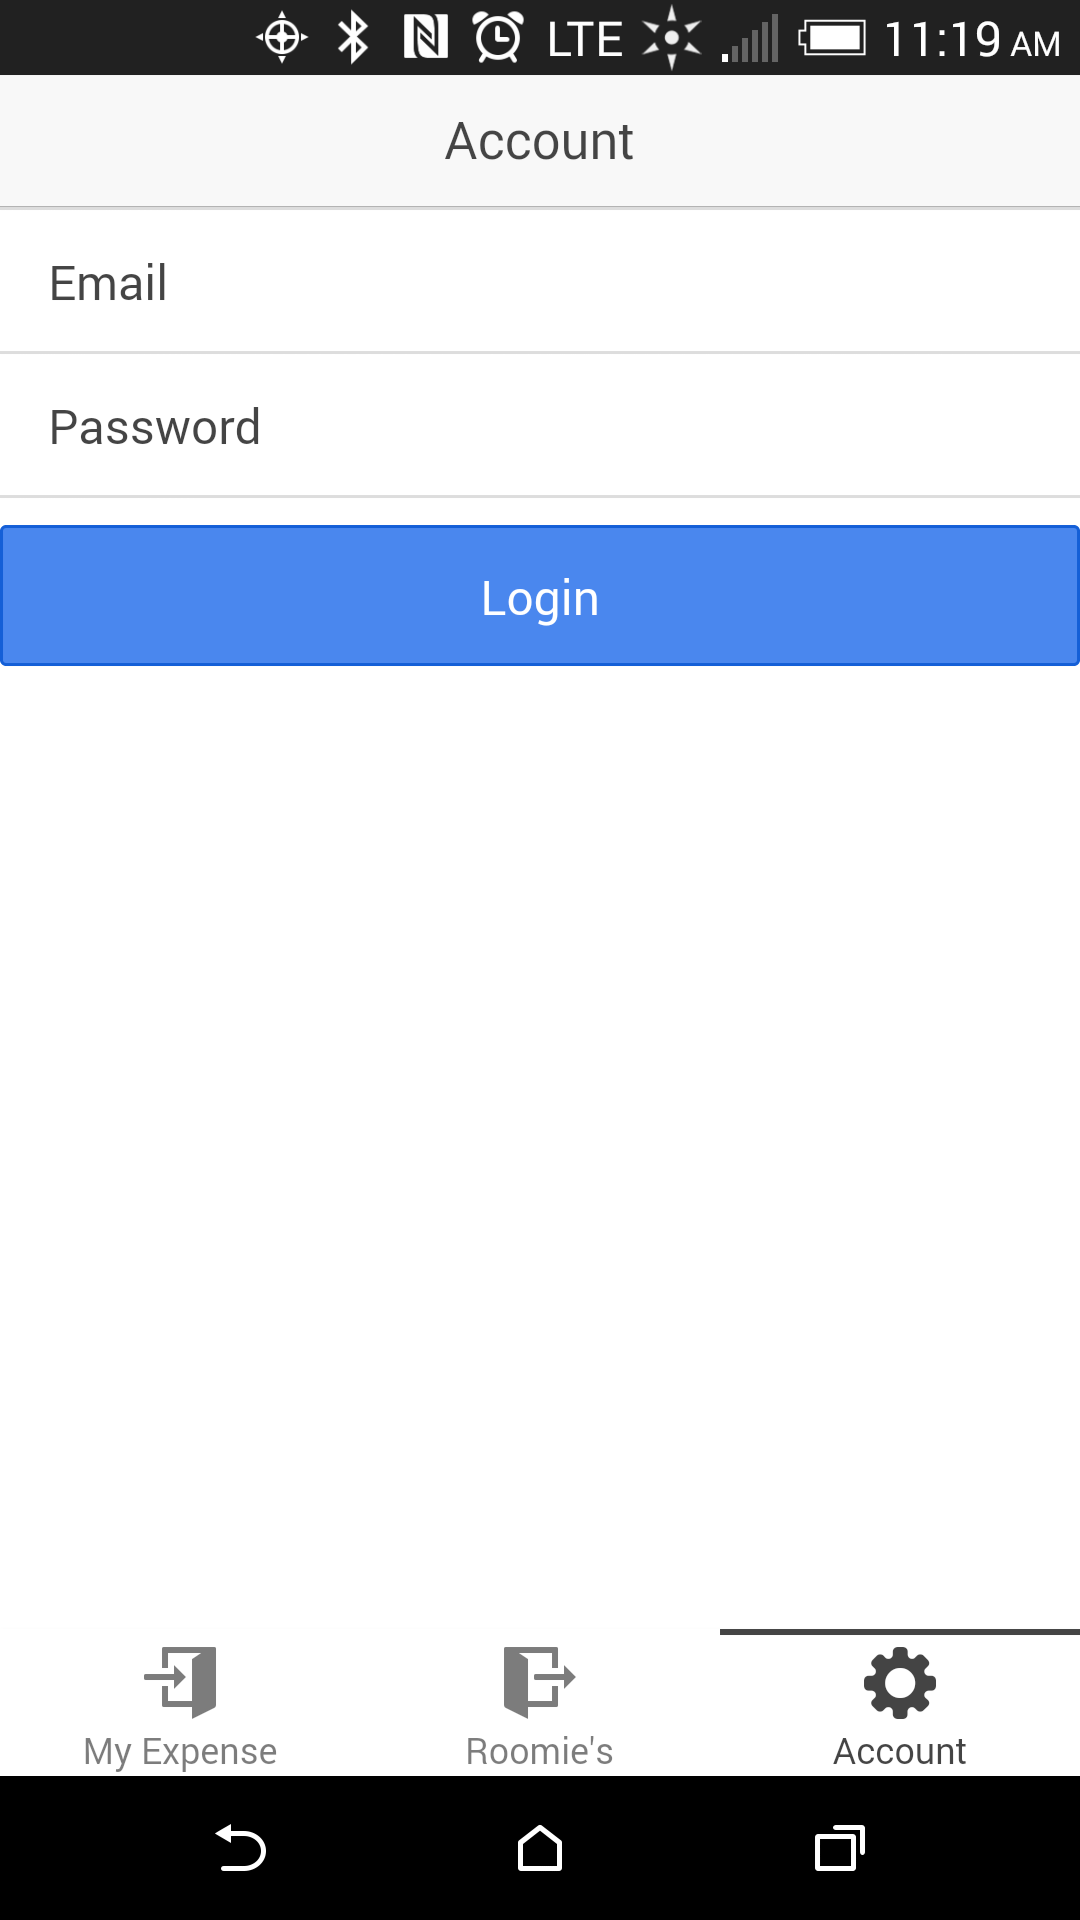
For our example Ionic and Firebase app, we’ll need the following three screens:
 |
 |
 |
Before creating these screens, let’s remove the “Friends detail screen” provided by default with the sample app as follows:
- Delete the
www/templates/friend-detail.htmlfile. - In
www/js/app.js, remove (or comment out) the state forfriend-detail.html. - In
www/js/controllers.js, remove theFriendDetailCtrlcontroller that is referenced in the state we deleted.
Now let’s change the icons and the text of the tab selectors at the bottom of our screen to be the following:

This is simply done by making the following changes in www/templates/tabs.html:
<ion-tabs class="tabs-icon-top">

  <!-- My Tab -->
  <ion-tab title="My Expense" icon="icon ion-log-in" href="#/tab/dash">

    <ion-nav-view name="tab-dash"></ion-nav-view>

  </ion-tab>

  <!-- Friends Tab -->
  <ion-tab title="Roomie's" icon="icon ion-log-out" href="#/tab/friends">
    <ion-nav-view name="tab-friends"></ion-nav-view>

  </ion-tab>

  <!-- Account -->
  <ion-tab title="Account" icon="icon ion-ios7-gear" href="#/tab/account">

    <ion-nav-view name="tab-account"></ion-nav-view>

  </ion-tab>

</ion-tabs>
Before we hook up our data to the Firebase, let’s create a list and bind it to an array called expenses by adding the following code to www/templates/tab-dash.html:
<ion-view title="My Expenses">
  <ion-content>
    <ion-list>
      <ion-item ng-repeat="expense in expenses|filter:user.password.email"
                type="item-text-wrap">
{{expense.label}}
        <span class="badge badge-balanced">{{expense.cost}}</span>
      </ion-item>
    </ion-list>
    <div class="card assertive">
      <div class="item item-text-wrap">
        Total Spent <span class="badge badge-positive">{{getTotal()}}</span>
      </div>
    </div>
  </ion-content>
  <ion-footer-bar>
    <input ng-model='label' type='text' id='labelInput'
           placeholder='Type a new expense...' />
    <input ng-model='cost' type="number" id="costInput" placeholder='$' />
    <button class="button icon-left ion-plus" ng-click="addExpense($event)">Add</button>
  </ion-footer-bar>
</ion-view>
We’ll also need to extend the DashCtrl in www/js/controllers.js to include the expenses array, as well as an addExpense method and a getTotal method, as follows:
.controller('DashCtrl', function($scope) {
    $scope.expenses = [{
        by: ‘email’,
        label: ’test’,
        cost: 10
    }];
    $scope.addExpense = function(e) {
        $scope.expenses.push({
            by: < some email > label: $scope.label,
            cost: $scope.cost
        });
        $scope.label = "";
        $scope.cost = 0;
    };
    $scope.getTotal = function() {
        var rtnTotal = 0;
        for (var i = 0; i < $scope.expenses.length; i++) {
            rtnTotal += $scope.expenses[i].cost;
        }
        return rtnTotal;
    };
})
The expenses array is what stores the items in the expense list, the addExpense() method adds a new value to the expenses array, and the getTotal() method gives us the total of all items in the array.
A similar set of changes now needs to be made to tab-friends.html. Try doing this on your own, but if you run into problems or want to verify that you’ve done this properly, you can refer to my implementation on GitHub.
Hooking in Firebase
You will need a Firebase account. You can sign up here for a free Firebase “Hacker Plan”.
Once you sign up, you will receive your root URL, which will look something like https://<yourfirebase>.firebaseio.com.
Enabling Firebase in our app requires two small mods to our app.
First, we need to include the Firebase scripts in the app’s www/index.html file as follows:
<script src='https://cdn.firebase.com/js/client/1.1.1/firebase.js'></script>
<script src='https://cdn.firebase.com/libs/angularfire/0.8.0/angularfire.min.js'></script>
<script src="js/app.js"></script>
Next, we need to add the Firebase module to our application by adding 'firebase' to the list in our AngularJS 'starter' module:
angular.module('starter', ['ionic', 'starter.controllers', 'starter.services', 'firebase'])
Firebase is now enabled, just like any other AngularJS module.
The AngularFire 5 minute tutorial will teach you to create data references in controllers. For our demo app, though, I decided to keep these references in a separate service (since this makes it much easier to maintain and update if the root URL is changed). To create this service, add the following to www/js/services.js:
.factory('fireBaseData', function($firebase) {
    var ref = new Firebase("https://luminous-fire-3429.firebaseio.com/"),
        refExpenses = new Firebase("https://luminous-fire-3429.firebaseio.com/expenses"),
        refRoomMates = new Firebase("https://luminous-fire-3429.firebaseio.com/room-mates");
    return {
        ref: function() {
            return ref;
        },
        refExpenses: function() {
            return refExpenses;
        },
        refRoomMates: function() {
            return refRoomMates;
        }
    }
});
The above code adds three reference URLs. One for the root and two for collections that we have named expenses and room-mates.
Adding a new collection to Firebase is simply done by adding its name to the end of your root URL. So to create the expenses collection that we’ll need, all we need is the following:
https://<yourfirebase>.firebaseio.com/expenses
This will create the expenses collection, and we can then start adding objects to it.
OK, now we can hook in the expenses collection from Firebase to replace the “dummy” expenses array we created earlier. This is done by modifying DashCtrl in www/js/controllers.js as follows:
.controller('DashCtrl', function($scope, fireBaseData, $firebase) {
    $scope.expenses = $firebase(fireBaseData.refExpenses()).$asArray();
    $scope.addExpense = function(e) {
        $scope.expenses.$add({
            by: < someemail > ,
            label: $scope.label,
            cost: $scope.cost
        });
        $scope.label = "";
        $scope.cost = 0;
    };

    $scope.getTotal = function() {
        var rtnTotal = 0;
        for (var i = 0; i < $scope.expenses.length; i++) {
            rtnTotal += $scope.expenses[i].cost;
        }
        return rtnTotal;
    };
})
A similar set of changes needs to be made to FriendsCtrl. I again recommend that you try doing this on your own, but if you run into problems, or want to verify that you’ve done this properly, you can refer to my implementation on GitHub.
To verify that it’s working, while running the app on two different clients, add a new expense, and see that it shows up in the list on both clients. If it works… woo-hoo! You’ve now successfully hooked up your Ionic app with Firebase!
You can test your multiplatform app on different devices by connecting a device to your system and running ionic run android or ionic emulate ios. Refer to the Ionic documentation for more information on testing your app.
Account Management and Security With Firebase
Although the basic functionality is now working, one serious issue is that our app is currently completely insecure. The entire world can see your expenses without any permissions or logins being required. This obviously needs to be addressed.
Firebase provides a powerful yet simple authentication framework using “rules”. There is a lot that can be done using Firebase’s Rules Language. (Refer to the Firebase security documentation for more detail.)
In our case, we will write a very simple rule to block unauthorized users from accessing our data. To do this, open your root URL, click on “Security & Rules” in your left action bar, paste the code below in your rules, and click Save.
{
    "rules": {
        ".read": "auth != null",
        ".write": "auth != null"
    }
}
If you run your application now, you will notice that there is no data. You can even try to inspect your request by using browser tools, and you should see a message in your console stating that you are not authorized to view the data.
Creating User Accounts and Enabling Login
You can authenticate your users by letting them create their own email/password combination or use any of their existing Google, Facebook, Twitter, or Github login credentials. For email/password authentication, Firebase offers a full set of API methods for password change, reset, etc. More information about authentication using Firebase can be found in the Firebase guide.
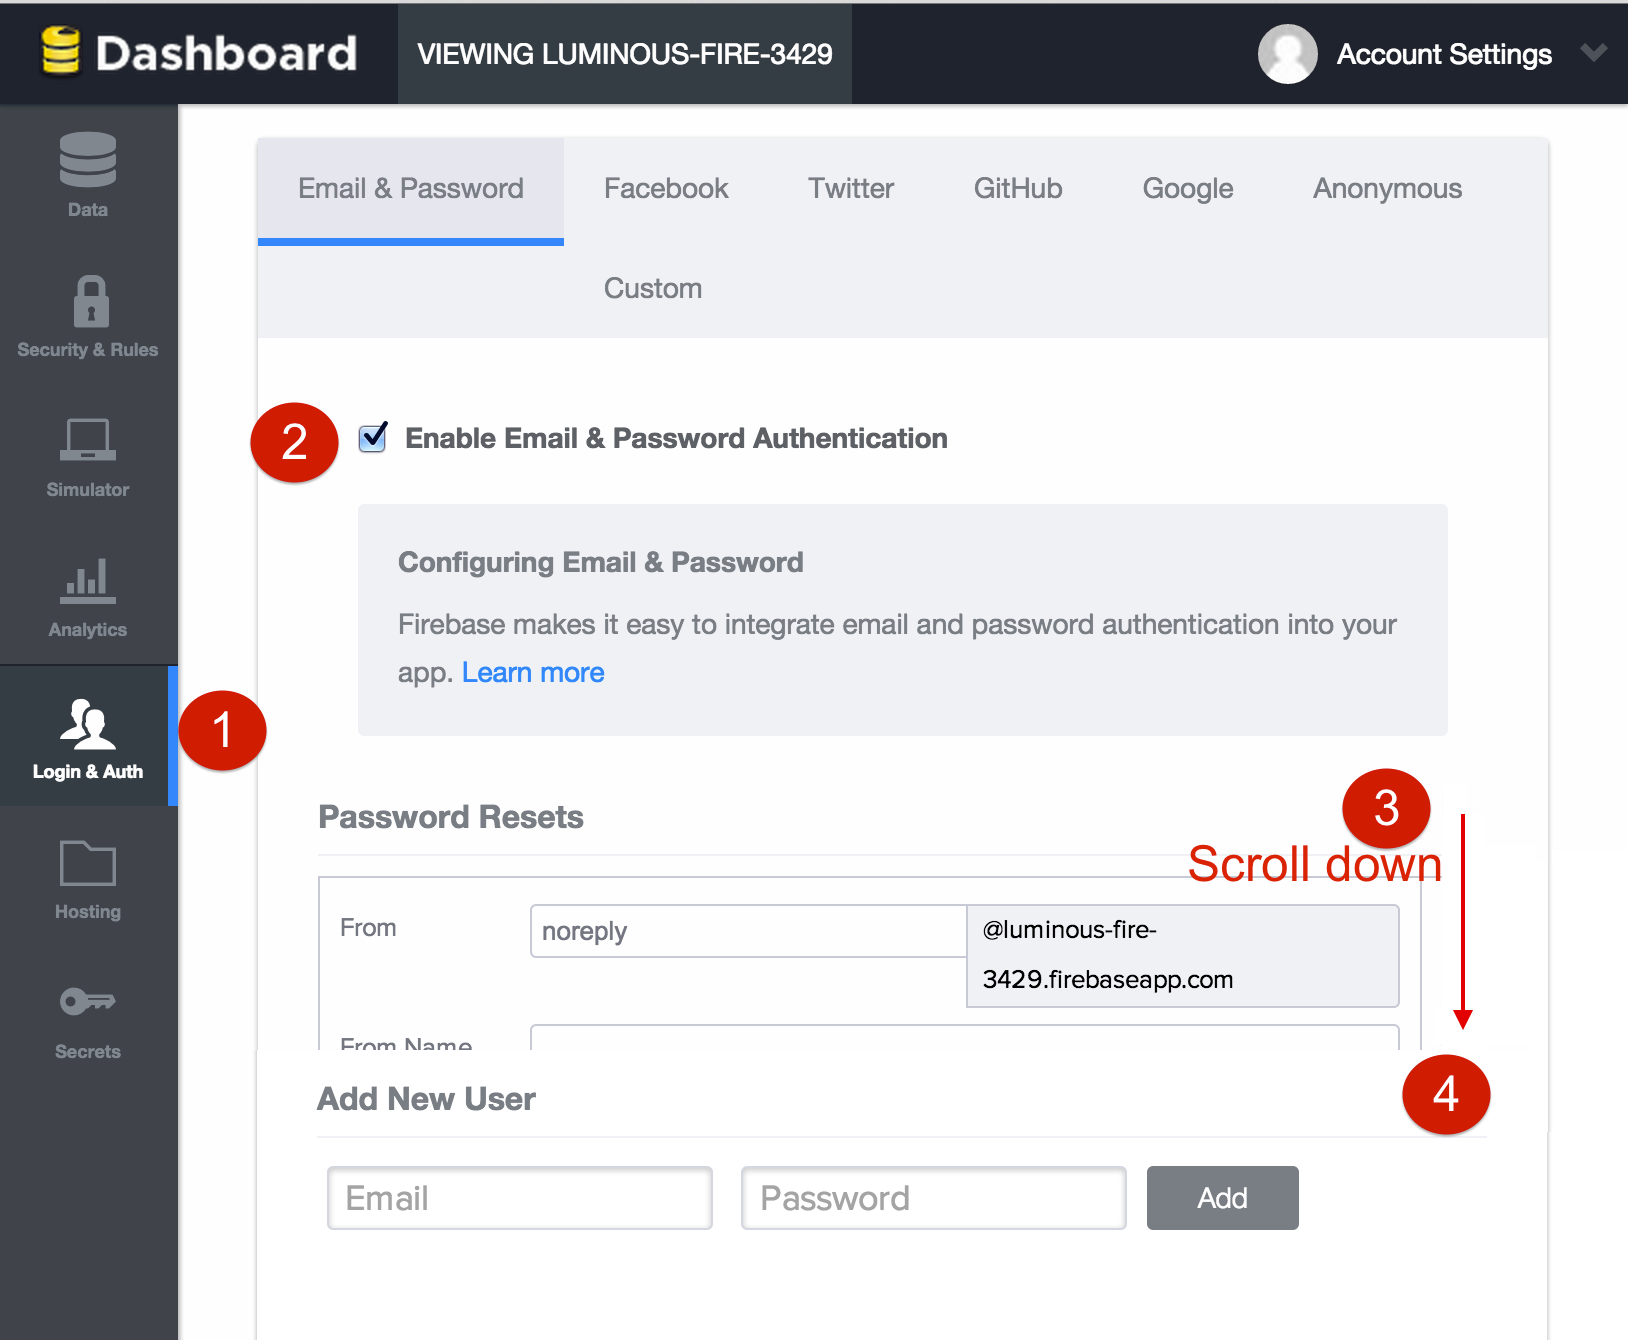
For our demo app, we will create two user accounts via the Firebase interface. This can be done by going to your Firebase root URL and doing the following:
- Click the Login & Auth on the left side action bar.
- Select the checkbox to Enable Email & Password Authentication.
- Scroll down to find the “Add New Accounts Form”
- Add your accounts using “Add New User”.

To enable the login interface for your users, first add the following code to www/templates/tab-account.html:
<ion-view title="Account">
  <ion-content>
    <div class="list" ng-show="showLoginForm">
      <label class="item item-input">
        <span class="input-label">Email</span><input type="text" ng-model="em"/>
      </label>
      <label class="item item-input">
        <span class="input-label">Password</span><input type="password" ng-model="pwd"/>
      </label>
      <button class="button button-block button-positive" ng-click="login(em, pwd)">Login</button>
    </div>
    <div class="card" ng-hide="showLoginForm">
      <div class="item item-text-wrap">You are logged in as {{user.password.email}}</div>
    </div>
    <button class="button button-stable" ng-click="logout()" ng-hide="showLoginForm">Logout</button>
  </ion-content>
</ion-view>
Then add the following to AccountCtrl in www/controller.js:
.controller('AccountCtrl', function($scope, fireBaseData) {
    $scope.showLoginForm = false; //Checking if user is logged in
    $scope.user = fireBaseData.ref().getAuth();
    if (!$scope.user) {
        $scope.showLoginForm = true;
    }
    //Login method
    $scope.login = function (em, pwd) {
        fireBaseData.ref().authWithPassword({
            email    : em,
            password : pwd
        },function(error, authData) {
            if (error === null) {
                console.log("User ID: " + authData.uid +
                            ", Provider: " + authData.provider);
                $scope.user = fireBaseData.ref().getAuth();
                $scope.showLoginForm = false;
                $scope.$apply();
            } else {
                console.log("Error authenticating user:", error);
            }
        });
    };

    // Logout method
    $scope.logout = function () {
        fireBaseData.ref().unauth();
        $scope.showLoginForm = true;
    };
});
One important thing to be aware of from a security standpoint is that Firebase logins are persistent by default. Therefore, if you want your user to need to log in each time the application is started, you will need to modify the Firebase configuration accordingly. To do this, just one time after a successful login, execute the following code:
var r = $firebase(fireBaseData.refRoomMates()).$asArray();
// NOTE: Substitute the email addresses of your two user accounts in the line below
r.$add(["user1@mail.com","user2@mail.com"]);
You can add this in the account controller after successful login or put a break point after successful login and run it in your console inspector.
Filtering Based on User
The multiplatform mobile app is still missing one important feature, though. We want to distinguish your expenses from those of your roommate. Now that we have created two accounts, we just need to filter the data on our views.
We first need to modify the dashCtrl in www/js/controllers.js in order to (a) get the data for the current user into $scope and (b) save any added expenses for the current user:
.controller('DashCtrl', function($scope, fireBaseData, $firebase) {
    $scope.expenses = $firebase(fireBaseData.refExpenses()).$asArray();
    $scope.user = fireBaseData.ref().getAuth();
    // ADD MESSAGE METHOD
    $scope.addExpense = function(e) {
        $scope.expenses.$add({
            by: $scope.user.password.email,
            label: $scope.label,
            cost: $scope.cost
        });
        $scope.label = "";
        $scope.cost = 0;
    };
    $scope.getTotal = function () {
        var rtnTotal = 0;
        for (var i = 0; i < $scope.expenses.length; i++) {
            rtnTotal += $scope.expenses[i].cost;
        }
        return rtnTotal;
    };
})
Next, we need to add a filter in www/templates/tab-dash.html to show only the current user’s expenses:
<ion-item ng-repeat="expense in expenses|filter:user.password.email" type="item-text-wrap">
OK, the Home screen is now perfect. A user can only see and add his or her own expenses.
The last and final step is to enable sharing of the complete expense list between roommates. To do so, change the www/templates/tab-friends.html to add this filter:
<ion-item ng-repeat="expense in expenses|filter:roomiesEmail" type="item-text-wrap">
Then modify FriendsCtrl in www/controllers.js as follows:
.controller('FriendsCtrl', function($scope, fireBaseData, $firebase) {
    $scope.user = fireBaseData.ref().getAuth();
    $scope.expenses = $firebase(fireBaseData.refExpenses()).$asArray();
    $scope.roomies = $firebase(fireBaseData.refRoomMates()).$asArray();
    $scope.roomies.$loaded().then(function(array) {
        //array = [[set1_rm1_email, set1_rm2_email], [set2_rm1_email, set2_rm2_email] ...]
        for (var i = 0; i < array.length; i++) {
            if (array[i][0] === $scope.user.password.email) {
                $scope.roomiesEmail = array[i][1];
            } else if (array[i][1] === $scope.user.password.email) {
                $scope.roomiesEmail = array[i][0];
            }
        }
        $scope.$apply();
        // NOTE: For simplicity, this demo only supports the 2-roommate use case
    });
    $scope.addExpense = function(e) {
        $scope.expenses.$add({
            by: $scope.roomiesEmail,
            label: $scope.label,
            cost: $scope.cost
        });
        $scope.label = "";
        $scope.cost = 0;
    };
    $scope.getTotal = function () {
        var rtnTotal = 0;
        for (var i = 0; i < $scope.expenses.length; i++) {
            rtnTotal += $scope.expenses[i].cost;
        }
        return rtnTotal;
    };
})
That’s it! Install/update the app on both your device and your roommate’s device, and you should be all set!
Wrap Up
Our simple example only begins to scratch the surface of what can be accomplished—and how easily it can be accomplished—using Ionic and Firebase. They truly are a powerful duo for building real-time, multiplatform smartphone applications using JavaScript and HTML5.
Avinash Kaza
Leesburg, VA, United States
Member since November 6, 2013
About the author
Avinash is a senior developer with experience designing & developing data visualizations.
PREVIOUSLY AT


