
How to Write Automated Tests for iOS
In this tutorial, you will learn how automated testing works for the iOS platform and how to implement it in your project.

In this tutorial, you will learn how automated testing works for the iOS platform and how to implement it in your project.

Josip has developed a keen sense for building scalable, maintainable, and user-friendly applications. His platform of choice is iOS.
Expertise
As a good developer, you do your best to test all the functionality and every possible code path and outcome in the software that you write. But it is extremely rare and unusual to be able to manually test every possible outcome and every possible path a user might take.
As the application gets bigger and more complex, the likelihood that you are going to miss something through manual testing increases significantly.
Automated testing for iOS, both of the UI and the back-end service APIs, will make you more confident that everything works as intended and will reduce stress when developing, refactoring, adding new features, or changing existing ones.
With automated tests, you can:
- Reduce bugs: There is no method that will completely remove any possibility of bugs in your code, but automated tests can greatly reduce the number of bugs.
- Make changes confidently: Avoid bugs when adding new features, which means, you can make changes quickly and painlessly.
- Document our code: When looking through tests, we can clearly see what is expected of certain functions, what are conditions, and what are corner cases.
- Refactor painlessly: As a developer, you may sometimes be afraid of refactoring, especially if you need to refactor a large chunk of code. Unit tests are here to ensure that the refactored code still works as intended.
This article teaches you how to structure and execute automated testing on the iOS platform.
Unit Testing vs. UI Testing in iOS
It’s important to differentiate between unit and UI tests.
A unit test tests a specific function under a specific context. Unit tests verify that the tested part of the code (usually a single function) does what it’s supposed to do. There are lots of books and articles about unit tests, so we won’t cover that in this post.
UI testing in iOS allows engineers to test the user interface of their apps. For example, it lets you test whether a view is updated as intended or a specific action is triggered as it should be when the user interacts with a certain UI element.
Each UI test tests a specific user interaction with the application’s UI. Automated testing can, and should, be performed at both the unit test and UI test levels.
Setting up iOS App Automated Testing
Since XCode supports unit and UI testing out of the box, it is easy and straightforward to add them to your project. When creating a new project, simply check “Include Unit Tests” and “Include UI Tests.”
When the project is created, two new targets will be added to your project when these two options have been checked. New target names have “Tests” or “UITests” appended at the end of the name.
That’s it. You are ready to write automated tests for your project.

If you already have an existing project and want to add the UI and Unit tests support, you will have to do a little more work, but it’s also very straightforward and simple.
Go to File → New → Target and select iOS Unit Testing Bundle for Unit tests or iOS UI Testing Bundle for UI tests.

Press Next.
In the target options screen, you can leave everything as it is (if you have multiple targets and want to test only specific targets, select the target in the Target to be tested dropdown).
Press Finish. Repeat this step for UI tests, and you’ll have everything ready to start writing automated tests in your existing project.
Writing Unit Tests
Before we can start writing unit tests, we must understand their anatomy. When you include unit tests in your project, an example test class will be created. In our case, it will look like this:
import XCTest
class TestingIOSTests: XCTestCase {

    override func setUp() {
        super.setUp()
        // Put setup code here. This method is called before the invocation of each test method in the class.
    }

    override func tearDown() {
        // Put teardown code here. This method is called after the invocation of each test method in the class.
        super.tearDown()
    }

    func testExample() {
        // This is an example of a functional test case.
        // Use XCTAssert and related functions to verify your tests produce the correct results.
    }

    func testPerformanceExample() {
        // This is an example of a performance test case.
        self.measure {
            // Put the code you want to measure the time of here.
        }
    }
}
The most important methods to understand are setUp and tearDown. The setUp method is called before every test method, while the tearDown method is called after every test method. If we run tests defined in this example test class, the methods would run like this:
setUp → testExample → tearDown setUp → testPerformanceExample → tearDown
Tip: Tests are run by pressing cmd + U, by selecting Product → Test, or by clicking and holding down the Run button until the options menu appears, then select Test from the menu.
If you want to run only one specific test method, press on the button to the left of the method’s name (shown on the image below).

Now, when you have everything ready for writing tests, you can add an example class and some methods to test.
Add a class that will be responsible for user registration. A user enters an email address, password, and password confirmation. Our example class will validate input, check availability of the email address, and attempt user registration.
Note: this example is using the MVVM (or Model-View-ViewModel) architectural pattern.
MVVM is used because it makes an application’s architecture cleaner and easier to test.
With MVVM, it’s easier to separate business logic from presentation logic, thus avoiding massive view controller issue.
Details about MVVM architecture are out of the scope of this article, but you can read more about it in this article.
Let’s create a view-model class responsible for user registration.
class RegisterationViewModel {

    var emailAddress: String? {
        didSet {
            enableRegistrationAttempt()
        }
    }
    var password: String? {
        didSet {
            enableRegistrationAttempt()
        }
    }
    var passwordConfirmation: String? {
        didSet {
            enableRegistrationAttempt()
        }
    }
    var registrationEnabled = Dynamic(false)
    var errorMessage = Dynamic("")
    var loginSuccessful = Dynamic(false)

    var networkService: NetworkService
    init(networkService: NetworkService) {
        self.networkService = networkService
    }
}
First, we have added a few properties, dynamic properties, and an init method.
Don’t worry about the Dynamic type. It’s part of the MVVM architecture.
When a Dynamic<Bool> value is set to true, a view controller that is bound (connected) to the RegistrationViewModel will enable the registration button. When loginSuccessful is set to true, the connected view will update itself.
Let’s now add a few methods to check validity of the password and email format.
    func enableRegistrationAttempt() {
        registrationEnabled.value = emailValid() && passwordValid()
    }

    func emailValid() -> Bool {
        let emailRegEx = "[A-Z0-9a-z._%+-]+@[A-Za-z0-9.-]+\\.[A-Za-z]{2,}"
        let emailTest = NSPredicate(format:"SELF MATCHES %@", emailRegEx)
        return emailTest.evaluate(with: emailAddress)
    }

    func passwordValid() -> Bool {
        guard let password = password,
            let passwordConfirmation = passwordConfirmation else {
            return false
        }
        let isValid = (password == passwordConfirmation) &&
            password.characters.count >= 6
        return isValid
    }
Every time the user types something in the email or the password field, the enableRegistrationAttempt method will check whether an email and password are in the correct format and enable or disable the registration button through the registrationEnabled dynamic property.
To keep the example simple, add two simple methods – one to check an email availability and one to attempt the registration with given username and password.
    func checkEmailAvailability(email: String, withCallback callback: @escaping (Bool?)->(Void)) {
        networkService.checkEmailAvailability(email: email) {
            (available, error) in
            if let _ = error {
                self.errorMessage.value = "Our custom error message"
            } else if !available {
                self.errorMessage.value = "Sorry, provided email address is already taken"
                self.registrationEnabled.value = false
                callback(available)
            }
        }
    }

    func attemptUserRegistration() {
        guard registrationEnabled.value == true else { return }
        // To keep the example as simple as possible, password won't be hashed
        guard let emailAddress = emailAddress,
            let passwordHash = password else { return }

        networkService.attemptRegistration(forUserEmail: emailAddress, withPasswordHash: passwordHash) {
            (success, error) in
            // Handle the response
            if let _ = error {
                self.errorMessage.value = "Our custom error message"
            } else {
                self.loginSuccessful.value = true
            }
        }
    }
These two methods are using the NetworkService to check whether an email is available and to attempt the registration.
To keep this example simple, the NetworkService implementation is not using any back-end API, but is just a stub that fakes the results. NetworkService is implemented as a protocol and its implementation class.
typealias RegistrationAttemptCallback = (_ success: Bool, _ error: NSError?) -> Void
typealias EmailAvailabilityCallback = (_ available: Bool, _ error: NSError?) -> Void
protocol NetworkService {
    func attemptRegistration(forUserEmail email: String, withPasswordHash passwordHash: String,
                             andCallback callback: @escaping RegistrationAttemptCallback)

    func checkEmailAvailability(email: String, withCallback callback: @escaping EmailAvailabilityCallback)
}
NetworkService is a very simple protocol containing only two methods: registration attempt and email availability check methods. The protocol implementation is the NetworkServiceImpl class.
class NetworkServiceImpl: NetworkService {
    func attemptRegistration(forUserEmail email: String,
                             withPasswordHash passwordHash: String,
                             andCallback callback: @escaping RegistrationAttemptCallback) {
        // Make it look like method needs some time to communicate with the server
        DispatchQueue.main.asyncAfter(deadline: DispatchTime.now() + .seconds(1), execute: {
            callback(true, nil)
        })
    }

    func checkEmailAvailability(email: String, withCallback callback: @escaping EmailAvailabilityCallback) {
        // Make it look like method needs some time to communicate with the server
        DispatchQueue.main.asyncAfter(deadline: DispatchTime.now() + .seconds(1), execute: {
            callback(true, nil)
        })
    }
}
Both methods simply wait for some time (faking the time delay of a network request) and then call the appropriate callback methods.
Tip: It’s good practice to use protocols (also known as interfaces in other programming languages). You can read more about it if you search for ‘programming to interfaces principle’. You’ll also see how it plays well with iOS unit testing.
Now, when an example is set, we can write unit tests to cover methods of this class.
-
Create a new test class for our view model. Right click on the
TestingIOSTestsfolder in the Project Navigator pane, select New File → Unit Test Case Class, and name itRegistrationViewModelTests. -
Delete the
testExampleandtestPerformanceExamplemethods, since we want to create our own test methods. -
Since Swift uses modules and our tests are in a different module than our application’s code, we have to import our application’s module as
@testable. Below the import statement and class definition, add@testable import TestingIOS(or your application’s module name). Without this, we wouldn’t be able to reference any of our application’s classes or methods. -
Add the
registrationViewModelvariable.
This is how our empty test class looks now:
import XCTest
@testable import TestingIOS

class RegistrationViewModelTests: XCTestCase {
    var registrationViewModel: RegisterationViewModel?

    override func setUp() {
        super.setUp()
    }

    override func tearDown() {
        super.tearDown()
    }
}
Let’s try to write a test for the emailValid method. We’ll create a new test method called testEmailValid. It’s important to add the test keyword at the beginning of the name. Otherwise, the method won’t be recognized as a test method.
Our test method looks like this:
func testEmailValid() {
        let registrationVM = RegisterationViewModel(networkService: NetworkServiceImpl())
        registrationVM.emailAddress = "email.test.com"
        XCTAssertFalse(registrationVM.emailValid(), "\(registrationVM.emailAddress) shouldn't be correct")

        registrationVM.emailAddress = "email@test"
        XCTAssertFalse(registrationVM.emailValid(), "\(registrationVM.emailAddress) shouldn't be correct")

        registrationVM.emailAddress = nil
        XCTAssertFalse(registrationVM.emailValid(), "\(registrationVM.emailAddress) shouldn't be correct")

        registrationVM.emailAddress = "email@test.com"
        XCTAssert(registrationVM.emailValid(), "\(registrationVM.emailAddress) should be correct")
    }
Our test method uses an assertion method, XCTAssert, which in our case checks if a condition is true or false.
If the condition is false, assert will fail (together with the test), and our message will be written out.
There are lot of assert methods you can use in your tests. Describing and showing each assert method can easily make it’s own article, so I won’t go into details here.
Some examples of available assert methods are: XCTAssertEqualObjects, XCTAssertGreaterThan, XCTAssertNil, XCTAssertTrue or XCTAssertThrows.
You can read more about available assert methods here.
If you run the test now, the test method will pass. You’ve successfully created your first test method, but it’s not quite ready for prime time yet. This test method still has three issues (one big and two smaller ones), as detailed below.
Issue 1: You are using the real implementation of the NetworkService protocol
One of the core principles of unit testing is that every test should be independent of any outside factors or dependencies. Unit tests should be atomic.
If you are testing a method, which at some point calls an API method from the server, your test has a dependency on your networking code and on the availability of the server. If the server is not working at the time of the testing, your test will fail, thus wrongly accusing your tested method of not working.
In this case, you are testing a method of the RegistrationViewModel.
RegistrationViewModel depends on the NetworkServiceImpl class, even though you know that your tested method, emailValid, is not depending on the NetworkServiceImpl directly.
When writing unit tests, all outside dependencies should be removed. But how should you remove the NetworkService dependency without changing the implementation of the RegistrationViewModel class?
There is an easy solution to this problem, and it’s called Object Mocking. If you look closely at the RegistrationViewModel, you’ll see that it actually depends on the NetworkService protocol.
class RegisterationViewModel {
…
    // It depends on NetworkService. RegistrationViewModel doesn't even care if NetworkServiceImple exists
    var networkService: NetworkService
    init(networkService: NetworkService) {
        self.networkService = networkService
    }
...
When the RegistrationViewModel is being initialized, an implementation of the NetworkService protocol is given (or injected) to the RegistrationViewModel object.
This principle is called dependency injection via constructor (there are more types of dependency injections).
There are a lot of interesting articles about dependency injection online, such as this article on objc.io.
There is also a short, but interesting article explaining dependency injection in a simple and straightforward way here.
In addition, a great article about single responsibility principle and DI is available on the Toptal blog.
When the RegistrationViewModel is instantiated, it’s injecting a NetworkService protocol implementation in its constructor (hence the name of the dependency injection principle):
let registrationVM = RegisterationViewModel(networkService: NetworkServiceImpl())
Since our view model class only depends on the protocol, there is nothing stopping us from creating our custom (or mocked) NetworkService implementation class and injecting the mocked class into our view model object.
Let’s create our mocked NetworkService protocol implementation.
Add a new Swift file to our test target by right clicking on the TestingIOSTests folder in the Project Navigator, choose “New File”, select ”Swift file”, and name it NetworkServiceMock.
This is how our mocked class should look:
import Foundation
@testable import TestingIOS

class NetworkServiceMock: NetworkService {
    func attemptRegistration(forUserEmail email: String,
                             withPasswordHash passwordHash: String,
                             andCallback callback: @escaping RegistrationAttemptCallback) {
        // Make it look like method needs some time to communicate with the server
        DispatchQueue.main.asyncAfter(deadline: DispatchTime.now() + .seconds(1), execute: {
            callback(true, nil)
        })
    }

    func checkEmailAvailability(email: String, withCallback callback: @escaping EmailAvailabilityCallback) {
        // Make it look like method needs some time to communicate with the server
        DispatchQueue.main.asyncAfter(deadline: DispatchTime.now() + .seconds(1), execute: {
            callback(false, nil)
        })
    }
}
At this point, it’s not much different from our actual implementation (NetworkServiceImpl), but in a real-world situation, the actual NetworkServiceImpl would have a networking code, response handling, and similar functionality.
Our mocked class doesn’t do anything, which is the point of a mocked class. If it doesn’t do anything than it won’t interfere with our tests.
To fix our test’s first issue, let’s update our test method by replacing:
let registrationVM = RegisterationViewModel(networkService: NetworkServiceImpl())
with:
let registrationVM = RegisterationViewModel(networkService: NetworkServiceMock())
Issue 2: You are instantiating the registrationVM in the test method body
There’s the setUp and tearDown methods for a reason.
Those methods are used to init or setup all required objects required in a test. You should use those methods to avoid code duplication by writing the same init or setup methods in every test method. Not using setup and tearDown methods is not always a big issue, especially if you have a really specific configuration for a specific test method.
Since our initialization of the RegistrationViewModel class is pretty simple, you’ll refactor your test class to use the setup and tearDown methods.
RegistrationViewModelTests should look like this:
class RegistrationViewModelTests: XCTestCase {
    var registrationVM: RegisterationViewModel!
    override func setUp() {
        super.setUp()
        registrationVM = RegisterationViewModel(networkService: NetworkServiceMock())
    }
    override func tearDown() {
        registrationVM = nil
        super.tearDown()
    }
    func testEmailValid() {
        registrationVM.emailAddress = "email.test.com"
        XCTAssertFalse(registrationVM.emailValid(), "\(registrationVM.emailAddress) shouldn't be correct")
        ...
    }
}
Issue 3: You have multiple asserts in one test method
Even though this is not a big issue, there are some advocates of having one assert per method.
The main reasoning for this principle is error detection.
If one test method has multiple asserts and the first one fails, the entire test method will be marked as failed. Other asserts won’t even be tested.
This way you would discover only one error at a time. You wouldn’t know if other asserts would fail or succeed.
It’s not always a bad thing to have multiple asserts in one method because you can only fix one error at a time, so detecting one error at a time might not be that big of an issue.
In our case, a validity of an email format is tested. Since this is only one function, it might be more logical to group all asserts together in one method to make the test easier to read and understand.
As this issue is not actually a big issue and some might even argue that it’s not an issue at all, you will keep your test method as it is.
When you write your own unit tests, it is up to you to decide which path you want to take for each test method. Most likely, you’ll find that there are places where the one assert per test philosophy makes sense, and others where it does not.
Testing Methods with Asynchronous Calls
No matter how simple the application is, there is a high chance there will be a method that needs to be executed on another thread asynchronously, especially since you typically like to have the UI executing in its own thread..
The main issue with unit testing and asynchronous calls is that an asynchronous call takes time to finish, but the unit test will not wait until it finishes. Because the unit test is finished before any of the code inside of an async block is executed, our test will always end with the same result (no matter what you write in your async block).
To demonstrate this, let’s create a test for the checkEmailAvailability method.
func testCheckEmailAvailability() {
        registrationVM.registrationEnabled.value = true
        registrationVM.checkEmailAvailability(email: "email@test.com") {
            available in
            XCTAssert(self.registrationVM.registrationEnabled.value == false, "Email address is not available, registration should be disabled")
        }
    }
Here you want to test if a registrationEnabled variable will be set to false after our method tells you that email is not available (already taken by another user).
If you run this test, it will pass. But just try one more thing. Change your assert to:
XCTAssert(self.registrationVM.registrationEnabled.value == true, "Email address is not available, registration should be disabled")
If you run the test again, it passes again.
This is because our assert wasn’t even asserted. The unit test ended before the callback block was executed (remember, in our mocked network service implementation, it is set to wait for one second before it returns).
Fortunately, with Xcode 6, Apple has added test expectations to the XCTest framework as the XCTestExpectation class. The XCTestExpectation class works like this:
- At the beginning of the test you set your test expectation - with a simple text describing what you expected from the test.
- In an async block after your test code is executed, you then fulfill the expectation.
- At the end of the test you need to set the
waitForExpectationWithTimerblock. It will be executed when the expectation is fulfilled or if the timer runs out - whichever happens first. - Now, the unit test won’t finish until the expectation is fulfilled or until the expectation timer runs out.
Let’s rewrite our test to use the XCTestExpectation class.
func testCheckEmailAvailability() {
        // 1. Setting the expectation
        let exp = expectation(description: "Check email availability")
        registrationVM.registrationEnabled.value = true
        registrationVM.checkEmailAvailability(email: "email@test.com") {
            available in
            XCTAssert(self.registrationVM.registrationEnabled.value == true, "Email address is not available, registration should be disabled")
            // 2. Fulfilling the expectation
            exp.fulfill()
        }
        // 3. Waiting for expectation to fulfill
        waitForExpectations(timeout: 3.0) {
            error in
            if let _ = error {
                XCTAssert(false, "Timeout while checking email availability")
            }
        }
    }
If you run the test now, it will fail - as it should. Let’s fix the test to make it pass. Change the assert to:
XCTAssert(self.registrationVM.registrationEnabled.value == false, "Email address is not available, registration should be disabled")
Run the test again to see it pass. You can try changing the delay time in the network service mocked implementation to see what happens if the expectation timer runs out.
Testing Methods with Asynchronous Calls without a Callback
Our example project method attemptUserRegistration uses the NetworkService.attemptRegistration method that includes code that is executed asynchronously. The method tries to register a user with the backend service.
In our demo application, the method will just wait for one second to simulate a network call, and fake successful registration. If registration was successful the loginSuccessful value will be set to true. Let’s make a unit test to verify this behavior.
func testAttemptRegistration() {
        registrationVM.emailAddress = "email@test.com"
        registrationVM.password = "123456"
        registrationVM.attemptUserRegistration()
        XCTAssert(registrationVM.loginSuccessful.value, "Login must be successful")
    }
If ran, this test will fail because the loginSuccessful value won’t be set to true until the asynchronous networkService.attemptRegistration method is finished.
Since you have created a mocked NetworkServiceImpl where the attemptRegistration method will wait for one-second before returning a successful registration, you can just use Grand Central Dispatch (GCD), and utilize the asyncAfter method to check your assert after one second. After adding the GCD’s asyncAfter our test code will look like this:
func testAttemptRegistration() {
        registrationVM.emailAddress = "email@test.com"
        registrationVM.password = "123456"
        registrationVM.passwordConfirmation = "123456"
        registrationVM.attemptUserRegistration()

        DispatchQueue.main.asyncAfter(deadline: .now() + .seconds(2)) {
            XCTAssert(self.registrationVM.loginSuccessful.value, "Login must be successful")
        }
    }
If you’ve paid attention, you’ll know that this still won’t work because the test method will execute before the asyncAfter block is executed and method will always successfully pass as a result. Fortunately, there is the XCTestException class.
Let’s rewrite our method to use the XCTestException class:
 func testAttemptRegistration() {
        let exp = expectation(description: "Check registration attempt")
        registrationVM.emailAddress = "email@test.com"
        registrationVM.password = "123456"
        registrationVM.passwordConfirmation = "123456"
        registrationVM.attemptUserRegistration()

        DispatchQueue.main.asyncAfter(deadline: .now() + .seconds(2)) {
            XCTAssert(self.registrationVM.loginSuccessful.value, "Login must be successful")
            exp.fulfill()
        }
        waitForExpectations(timeout: 4.0) {
            error in
            if let _ = error {
                XCTAssert(false, "Timeout while attempting a registration")
            }
        }
    }
With unit tests covering our RegistrationViewModel, you can now be more confident that adding new, or updating existing, functionality won’t break anything.
Important Note: Unit tests will lose their value if they are not updated when functionality of the methods that they cover changes. Writing unit tests is a process that has to keep up with the rest of the application.
Tip: Don’t postpone writing tests until the end. Write tests while developing. This way you will have a better understanding of what needs to be tested and what are the border cases.
Writing UI Tests
After all unit tests are fully developed and executed successfully, you can be very confident that each unit of code is working correctly, but does it mean that your application as a whole is working as intended?
That’s where integration tests come in, of which UI tests are an essential component.
Before starting with UI testing, there needs to be some UI elements and interactions (or user stories) to test. Let’s create a simple view and its view controller.
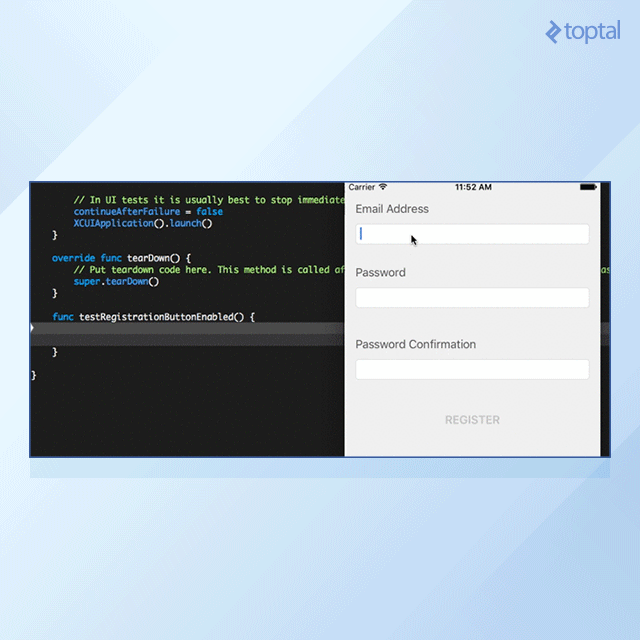
- Open the
Main.storyboardand create a simple view controller that will look like the one in the image below.

Set the email text field tag to 100, password text field tag to 101, and the password confirmation tag to 102.
- Add a new view controller file
RegistrationViewController.swiftand connect all outlets with the storyboard.
import UIKit
class RegistrationViewController: UIViewController, UITextFieldDelegate {

    @IBOutlet weak var emailTextField: UITextField!
    @IBOutlet weak var passwordTextField: UITextField!
    @IBOutlet weak var passwordConfirmationTextField: UITextField!
    @IBOutlet weak var registerButton: UIButton!

    private struct TextFieldTags {
        static let emailTextField = 100
        static let passwordTextField = 101
        static let confirmPasswordTextField = 102
    }

    var viewModel: RegisterationViewModel?

    override func viewDidLoad() {
        super.viewDidLoad()
        emailTextField.delegate = self
        passwordTextField.delegate = self
        passwordConfirmationTextField.delegate = self

        bindViewModel()
    }
}
Here you are adding IBOutlets and a TextFieldTags struct to the class.
This will make it possible for you to identify which text field is being edited. To make use of the Dynamic properties in the view-model, you have to ‘bind’ dynamic properties in the view controller. You can do that in the bindViewModel method:
    fileprivate func bindViewModel() {
        if let viewModel = viewModel {
            viewModel.registrationEnabled.bindAndFire {
                self.registerButton.isEnabled = $0
            }
        }
    }
Let’s now add a text field delegate method to keep track of when any of the text fields are being updated:
    func textField(_ textField: UITextField, shouldChangeCharactersIn range: NSRange, replacementString string: String) -> Bool {
        guard let viewModel = viewModel else {
            return true
        }
        let newString = (textField.text! as NSString).replacingCharacters(in: range, with: string)
        switch textField.tag {
        case TextFieldTags.emailTextField: viewModel.emailAddress = newString
        case TextFieldTags.passwordTextField: viewModel.password = newString
        case TextFieldTags.confirmPasswordTextField: viewModel.passwordConfirmation = newString
        default:
            break
        }
        return true
    }
- Update
AppDelegateto bind the view controller to the appropriate view model (note that this step is a requirement of the MVVM architecture). The updatedAppDelegatecode should then look like this:
func application(_ application: UIApplication, didFinishLaunchingWithOptions launchOptions: [UIApplicationLaunchOptionsKey: Any]?) -> Bool {
        initializeStartingView()
        return true
    }

    fileprivate func initializeStartingView() {
        if let rootViewController = window?.rootViewController as? RegistrationViewController {
            let networkService = NetworkServiceImpl()
            let viewModel = RegisterationViewModel(networkService: networkService)
            rootViewController.viewModel = viewModel
        }
    }
The storyboard file and the RegistrationViewController are really simple, but they are adequate to demonstrate how automated UI testing works.
If everything is setup properly, the registration button should be disabled when the app starts. When, and only when, all fields are filled and valid, the registration button should be enabled.
Once this is set up, you can create your first UI test.
Our UI test should check if the Register button will become enabled if and only if a valid email address, a valid password, and a valid password confirmation have all been entered. Here’s how to set this up:
- Open the
TestingIOSUITests.swiftfile. - Delete the
testExample()method and add atestRegistrationButtonEnabled()method. - Put the cursor in the
testRegistrationButtonEnabledmethod like you are going to write something there. - Press the Record UI test button (red circle at the bottom of the screen).

- When the Record button is pressed, the application will be launched
- After the application is launched, tap in the email text field and write ‘email@test.com’. You will notice that the code is automatically appearing inside the test method body.
You can record all UI instructions using this feature, but you might find that writing simple instructions manually will be much quicker.
This is an example of a recorder instruction for tapping on a password text field and entering an email address ‘email@test.com’
let emailTextField = XCUIApplication().otherElements.containing(.staticText, identifier:"Email Address").children(matching: .textField).element
        emailTextField.tap()
        emailTextField.typeText("email@test.com")
- After the UI interactions you want to test have been recorded, press the stop button again (the record button label changed to stop when you began recording) to stop the recording.
- After you have your UI interactions recorder, you can now add various
XCTAssertsto test various states of the application or UI elements.
Recorded instructions are not always self explanatory and might even make the whole test method a little hard to read and understand. Luckily, you can manually enter UI instructions.
Let’s create the following UI instructions manually:
- User taps on the password text field.
- User enters a ‘password’.
To reference a UI element, you can use a placeholder identifier. A placeholder identifier can be set in the storyboard in the Identity Inspector pane under Accessibility. Set the password text field’s accessibility identifier to ‘passwordTextField’.
The password UI interaction can now be written as:
let passwordTextField = XCUIApplication().secureTextFields["passwordTextField"]
        passwordTextField.tap()
        passwordTextField.typeText("password")
There is one more UI interaction left: the confirm password input interaction. This time, you’ll reference the confirm password text field by its placeholder. Go to storyboard and add the ‘Confirm Password’ placeholder for the confirm password text field. The user interaction can now be written like this:
let confirmPasswordTextField = XCUIApplication().secureTextFields["Confirm Password"]
        confirmPasswordTextField.tap()
        confirmPasswordTextField.typeText("password")
Now, when you have all required UI interactions, all that is left is to write a simple XCTAssert (the same as you did in unit testing) to verify if the Register button’s isEnabled state is set to true. The register button can be referenced using its title. Assert to check a button’s isEnabled property looks like this:
let registerButton = XCUIApplication().buttons["REGISTER"]
XCTAssert(registerButton.isEnabled == true, "Registration button should be enabled")
The whole UI test should now look like this:
func testRegistrationButtonEnabled() {
        // Recorded by Xcode
        let emailTextField = XCUIApplication().otherElements.containing(.staticText, identifier:"Email Address").children(matching: .textField).element
        emailTextField.tap()
        emailTextField.typeText("email@test.com")

        // Queried by accessibility identifier
        let passwordTextField = XCUIApplication().secureTextFields["passwordTextField"]
        passwordTextField.tap()
        passwordTextField.typeText("password")

        // Queried by placeholder text
        let confirmPasswordTextField = XCUIApplication().secureTextFields["Confirm Password"]
        confirmPasswordTextField.tap()
        confirmPasswordTextField.typeText("password")

        let registerButton = XCUIApplication().buttons["REGISTER"]
        XCTAssert(registerButton.isEnabled == true, "Registration button should be enabled")
    }
If the test is run, Xcode will start the simulator and launch our test application. After the application is launched, our UI interaction instructions will be run one by one and at the end the assert will be successfully asserted.
To improve the test, let’s also test that the isEnabled property of the register button is false whenever any of the required fields have not been not entered correctly.
The complete test method should now look like this:
func testRegistrationButtonEnabled() {
        let registerButton = XCUIApplication().buttons["REGISTER"]
        XCTAssert(registerButton.isEnabled == false, "Registration button should be disabled")

        // Recorded by Xcode
        let emailTextField = XCUIApplication().otherElements.containing(.staticText, identifier:"Email Address").children(matching: .textField).element
        emailTextField.tap()
        emailTextField.typeText("email@test.com")
        XCTAssert(registerButton.isEnabled == false, "Registration button should be disabled")

        // Queried by accessibility identifier
        let passwordTextField = XCUIApplication().secureTextFields["passwordTextField"]
        passwordTextField.tap()
        passwordTextField.typeText("password")
        XCTAssert(registerButton.isEnabled == false, "Registration button should be disabled")

        // Queried by placeholder text
        let confirmPasswordTextField = XCUIApplication().secureTextFields["Confirm Password"]
        confirmPasswordTextField.tap()
        confirmPasswordTextField.typeText("pass")
        XCTAssert(registerButton.isEnabled == false, "Registration button should be disabled")

        confirmPasswordTextField.typeText("word") // the whole confirm password word will now be "password"
        XCTAssert(registerButton.isEnabled == true, "Registration button should be enabled")
    }
Tip: The preferred way to identify UI elements is by using accessibility identifiers. If names, placeholders, or some other property that can be localized is used, the element won’t be found if a different language is used in which case the test would fail.
The example UI test is very simple, but it demonstrates the power of automated UI testing in iOS.
The best way to discover all possibilities (and there are many) of the UI testing framework included in Xcode is to start writing UI tests in your projects. Start with simple user stories, like the one shown, and slowly move to more complex stories and tests.
Become a Better Developer by Writing Good Tests
From my experience, learning and trying to write good tests will make you think about other aspects of development. Mastering Swift automated testing will help you become a better iOS developer altogether.
To write good tests, you will have to learn how to better organize your code.
Organized, modular, well-written code is the main requirement for successful and stress-free unit and UI testing.
In some cases, it is even impossible to write tests when code is not organized well.
When thinking about application structure and code organization, you’ll realize that by using MVVM, MVP, VIPER, or other such patterns, your code will be better structured, modular, and easy to test (you will also avoid Massive View Controller issues).
When writing tests, you will undoubtedly, at some point, have to create a mocked class. It will make you think and learn about the dependency injection principle and protocol-oriented coding practices. Knowing and using those principles will notably increase your future projects’ code quality.
Once you begin writing tests, you will probably notice yourself thinking more about corner cases and edge conditions as you write your code. This will help you eliminate possible bugs before they become bugs. Thinking about possible issues and negative outcomes of methods, you won’t only test positive outcomes, but you will also start to test negative outcomes too.
As you can see, unit tests can have impact on different development aspects, and by writing good unit and UI tests, you will likely become a better and happier developer (and you won’t have to spend as much time fixing bugs).
Start writing automated tests, and eventually you’ll see the benefits on your iPhone. Automated testing on iOS is a rewarding experience, and once you see it in action, you’ll become its strongest advocate.
Zagreb, Croatia
Member since July 25, 2016
About the author
Josip has developed a keen sense for building scalable, maintainable, and user-friendly applications. His platform of choice is iOS.