
Using Spring Boot for WebSocket Implementation with STOMP
The WebSocket protocol is one of the ways to make your application handle real-time messages. The most common alternatives are long polling and server-sent events. This article shows how to implement WebSockets with the Spring Boot framework and use STOMP for effective client-server communication.

The WebSocket protocol is one of the ways to make your application handle real-time messages. The most common alternatives are long polling and server-sent events. This article shows how to implement WebSockets with the Spring Boot framework and use STOMP for effective client-server communication.

Tomasz has more than 20 years of experience with Java apps, and worked for companies like Hewlett-Packard, as well as Silicon Valley startups.
Expertise
Previously At

The WebSocket protocol is one of the ways to make your application handle real-time messages. The most common alternatives are long polling and server-sent events. Each of these solutions has its advantages and drawbacks. In this article, I will show Java developers how to implement WebSockets with the Spring Boot framework. I will cover both the server-side and the client-side setup, and we will use the STOMP over WebSocket protocol to communicate with each other.
The server-side will be coded purely in Java. But in the case of the client, I will show snippets written both in Java and in JavaScript (SockJS) since, typically, WebSocket clients are embedded in front-end applications. The code examples will demonstrate how to broadcast messages to multiple users using the pub-sub model as well as how to send messages only to a single user. In a further part of the article, I will briefly discuss securing WebSockets and how we can ensure that our WebSocket-based solution will stay operational even when the environment does not support the WebSocket protocol.
Please note that the topic of securing WebSockets will only briefly be touched on here since it is complex enough for a separate article. Due to this, and several other factors that I touch on in the WebSocket in Production? section at the end, I recommend making modifications before using this setup in production. Read until the end for guidance on building a more production-ready setup with appropriate security measures.
WebSocket and STOMP Protocols
The WebSocket protocol allows you to implement bidirectional communication between applications. It is important to know that HTTP is used only for the initial handshake. After it happens, the HTTP connection is upgraded to a newly opened TCP/IP connection that is used by a WebSocket.
The WebSocket protocol is a rather low-level protocol. It defines how a stream of bytes is transformed into frames. A frame may contain a text or binary message. Because the message itself does not provide additional information on how to route or process it, it is difficult to implement more complex applications without writing additional code. Fortunately, the WebSocket specification allows the use of sub-protocols that operate at a higher application level. One of them, supported by the Spring Framework, is STOMP.
STOMP is a simple text-based messaging protocol that was initially created for scripting languages such as Ruby, Python, and Perl to connect to enterprise message brokers. Thanks to STOMP, clients and brokers developed in different languages can send and receive messages to and from each other. The WebSocket protocol is sometimes called TCP for Web. Analogically, STOMP is called HTTP for Web. It defines a handful of frame types that are mapped onto WebSocket frames, e.g., CONNECT, SUBSCRIBE, UNSUBSCRIBE, ACK, or SEND. On one hand, these commands are very handy to manage communication while, on the other, they allow us to implement solutions with more sophisticated features like message acknowledgment.
The Server-side: Spring Boot and WebSockets
To build the WebSocket server-side, we will utilize the Spring Boot framework, which significantly speeds up the development of standalone and web applications in Java. Spring Boot includes the spring-boot-starter-websocket module, which integrates with Spring’s messaging infrastructure and the Jakarta WebSocket APIs used by modern servlet containers. (As of Spring Boot 3.x, the framework uses jakarta.* instead of the older javax.* packages.)
Implementing the WebSocket server-side with Spring Boot is not a very complex task and includes only a couple of steps.
Step 1: Add the WebSocket Dependency
First, we need to add the WebSocket library dependency.
<dependency>
  <groupId>org.springframework.boot</groupId>
  <artifactId>spring-boot-starter-websocket</artifactId>
</dependency>
If you plan to use JSON format for transmitted messages, you may want to include Jackson:
<dependency>
  <groupId>com.fasterxml.jackson.core</groupId>
  <artifactId>jackson-databind</artifactId>
</dependency>
Quite likely, you may also include Spring Security for authentication and authorization.
Step 2: Configure WebSocket and STOMP Messaging
Next, we configure Spring to enable WebSocket messaging.
@Configuration
@EnableWebSocketMessageBroker
public class WebSocketConfig implements WebSocketMessageBrokerConfigurer {

  @Override
  public void registerStompEndpoints(StompEndpointRegistry registry) {

    registry.addEndpoint("/mywebsockets")
        .setAllowedOriginPatterns("https://mydomain.com")
        .withSockJS();
  }

  @Override
  public void configureMessageBroker(MessageBrokerRegistry config) {

    config.enableSimpleBroker("/topic", "/queue");
    config.setApplicationDestinationPrefixes("/developers/app");
  }
}
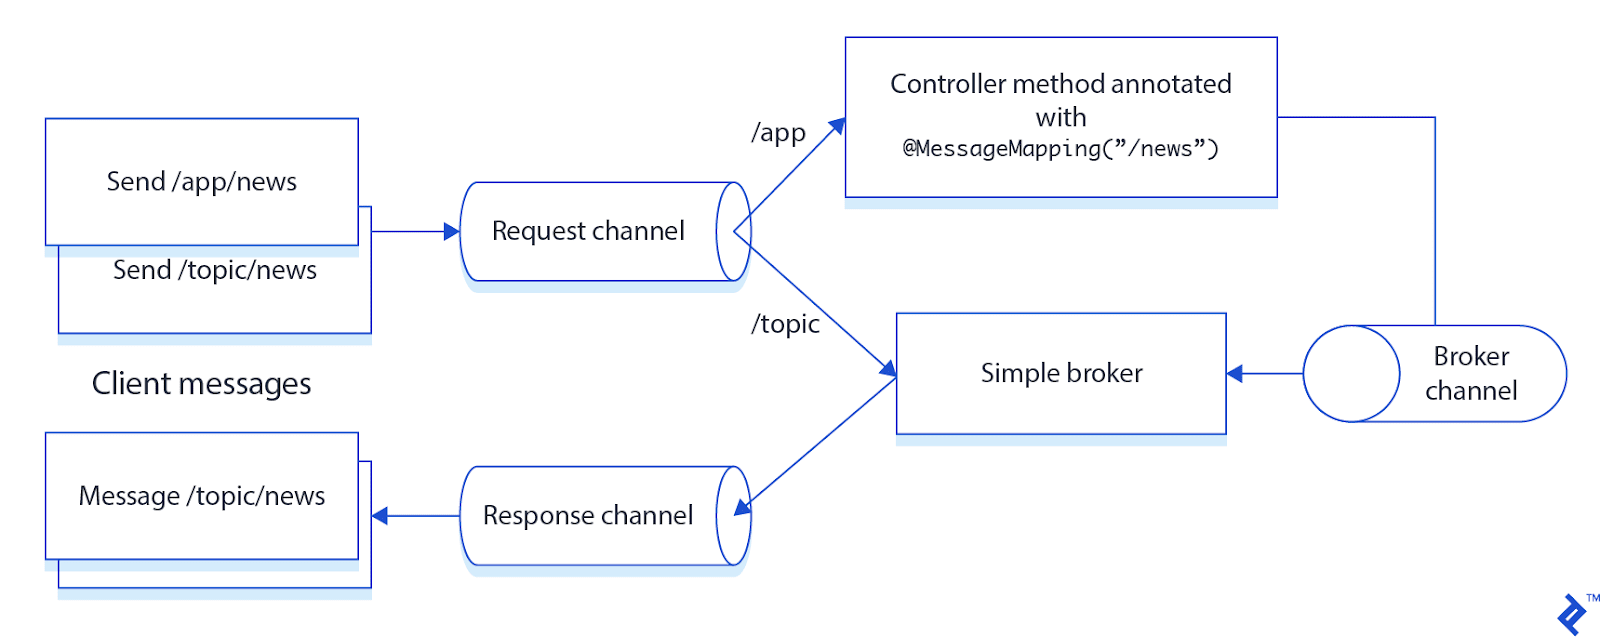
The configureMessageBroker method does two things:
-
Creates the in-memory message broker with destinations for sending and receiving messages. Destinations prefixed with
/topictypically broadcast messages to all subscribed users. Destinations prefixed with/queueare usually used for private messaging. -
Defines the application prefix
/app, which filters destinations handled by methods annotated with@MessageMappingthat are implemented in a controller. After processing the message, the controller sends it to the broker.
Going back to the snippet above—probably you have noticed a call to the method withSockJS()—it enables SockJS fallback options. SockJS provides alternative transport mechanisms when WebSockets are not available. Modern browsers widely support WebSockets, so many applications no longer require fallback transports unless they must operate in restrictive network environments or support legacy clients. I will discuss this topic in greater detail a bit further.
There is one more thing that needs clarifying—why we call setAllowedOriginPatterns() method on the endpoint. It is often required because the default behavior of WebSocket and SockJS is to accept only same-origin requests. So, if your client and the server-side use different domains, this method needs to be called to allow the communication between them.
Step 3: Implement a Controller
We then implement a controller that will handle user requests. It will broadcast the received message to all users subscribed to a given topic.
Here is a sample method that sends messages to the destination /topic/news.
@MessageMapping("/news")
@SendTo("/topic/news")
public String broadcastNews(@Payload String message) {
  return message;
}
Instead of the annotation @SendTo, you can also use SimpMessagingTemplate, which you can autowire inside your controller.
@MessageMapping("/news")
public void broadcastNews(@Payload String message) {
  this.simpMessagingTemplate.convertAndSend("/topic/news", message);
}
In later steps, you may want to add Spring Security configuration to secure your endpoints. Also, it is often beneficial to implement the message model so that the transmitted JSON can be mapped to objects.
Building the WebSocket Client
Implementing a client is an even simpler task.
First, autowire the Spring STOMP client.
@Autowired
private WebSocketStompClient stompClient;
Then open a connection.
StompSessionHandler sessionHandler = new CustomStompSessionHandler();

StompSession stompSession =
    stompClient.connect(loggerServerQueueUrl, sessionHandler).get();
Once this is done, it is possible to send a message to a destination, which will be delivered to all users subscribed to that topic.
stompSession.send("/app/news", "Hello new user");
It is also possible to subscribe to a topic and handle incoming frames:
stompSession.subscribe("/topic/news", this);

@Override
public void handleFrame(StompHeaders headers, Object payload) {
    Message msg = (Message) payload;
    logger.info("Received : " + msg.getText() + " from : " + msg.getFrom());
}
Sending Messages to Specific Users
Sometimes it is needed to send a message only to a dedicated user (for instance when implementing a chat). Then, the client and the server-side must use a separate destination dedicated to this private conversation. The name of the destination may be created by appending a unique identifier to a general destination name, e.g., /queue/chat-user123. HTTP session or STOMP session identifiers can be used for this purpose.
Spring makes sending private messages a lot easier. We only need to annotate a controller method with @SendToUser. Then, this destination will be handled by UserDestinationMessageHandler, which relies on a session identifier. On the client side, when a client subscribes to a destination prefixed with /user, this destination is transformed into a destination unique for this user. On the server side, a user destination is resolved based on a user’s Principal.
Sample server-side code with the @SendToUser annotation:
@MessageMapping("/greetings")
@SendToUser("/queue/greetings")
public String reply(@Payload String message, Principal user) {
    return "Hello " + message;
}
Or you can use SimpMessagingTemplate:
String username = ...;

this.simpMessagingTemplate.convertAndSendToUser(
    username,
    "/queue/greetings",
    "Hello " + username
);
Let’s now look at how to implement a JavaScript (SockJS) client capable of receiving these private messages that could be sent by the Java code in the example above. Modern applications often use the @stomp/stompjs library, which provides an updated STOMP client and can connect directly over WebSockets without requiring SockJS. The example below uses the classic stomp.js client for simplicity.
function connect() {
  var socket = new SockJS('/mywebsockets');
  stompClient = Stomp.over(socket);

  stompClient.connect({}, function (frame) {
    stompClient.subscribe('/user/queue/greetings', function (greeting) {
      showGreeting(JSON.parse(greeting.body).name);
    });
  });
}

function sendName() {
  stompClient.send("/app/greetings", {}, $("#name").val());
}
As you have probably noted, to receive private messages, the client needs to subscribe to the general destination /queue/greetings prefixed with /user. It does not have to bother with any unique identifiers. However, the client needs to log in to the application beforehand so that the Principal is available on the server side.
Securing WebSockets
Many web applications use cookie-based authentication. For instance, we can use Spring Security to restrict access to certain pages or controllers only to logged-in users. The user security context is then maintained through a cookie-based HTTP session that is later associated with WebSocket or SockJS sessions created for that user. WebSocket endpoints can be secured like other requests using Spring Security configuration.
Nowadays, web applications often use REST APIs as their back end and OAuth/JWT tokens for user authentication and authorization. The WebSocket protocol does not describe how servers should authenticate clients during the HTTP handshake. In practice, standard HTTP headers (e.g., Authorization) are often used for this purpose. However, not all STOMP clients support setting custom headers during the WebSocket handshake.
Spring’s Java STOMP client allows headers to be set for the handshake:
WebSocketHttpHeaders handshakeHeaders = new WebSocketHttpHeaders();
handshakeHeaders.add("Authorization", "Bearer " + token);
However, the SockJS JavaScript client does not support sending custom Authorization headers with a SockJS request. A common workaround is to send the token as a query parameter during the connection request. The server can then extract and validate the token before establishing the WebSocket session.
In modern Spring applications, authentication is often performed when the STOMP CONNECT frame is received rather than relying solely on the HTTP handshake, typically by validating a JWT token in a custom ChannelInterceptor. This allows the application to associate the authenticated user with the WebSocket session.
It is also important to ensure that tokens are not logged together with requests (or that logs are properly protected), since exposing tokens in logs could introduce a serious security vulnerability.
SockJS Fallback Options
Integration with WebSocket may not always go smoothly. In some environments, WebSocket connections may fail due to issues like restrictive proxies or firewalls that block HTTP upgrades or terminate long-lived connections. While modern browsers widely support WebSockets, fallback mechanisms may still be useful in environments with restrictive network policies or legacy infrastructure. SockJS addresses these issues by providing fallback transport mechanisms:
- WebSockets
- HTTP streaming
- HTTP long polling
Communication starts with the client sending GET /info to the server. Based on the response and the client’s capabilities, SockJS selects the most appropriate transport. The first choice is WebSockets. If WebSockets are not available, SockJS falls back to HTTP streaming. If streaming is also not possible, HTTP long polling is used.
Reactive WebSocket Applications With Spring WebFlux
The approach described in this article uses Spring MVC and Spring Messaging, which work well for many real-time messaging applications. However, applications requiring very high concurrency or non-blocking architectures may benefit from using Spring WebFlux. Unlike the STOMP-based messaging approach described earlier, WebFlux WebSockets typically implement direct message handling without an intermediate message broker.
Spring WebFlux is based on reactive programming and typically runs on non-blocking runtimes such as Netty, although it can also run on servlet containers that support non-blocking I/O.
The following example shows a simple reactive WebSocket handler:
@Component
public class ReactiveWebSocketHandler implements WebSocketHandler {

  @Override
  public Mono<Void> handle(WebSocketSession session) {

    Flux<WebSocketMessage> output =
        session.receive()
               .map(msg -> session.textMessage("Echo: " + msg.getPayloadAsText()));

    return session.send(output);
  }
}
Because WebFlux is built on the Reactive Streams specification, it supports backpressure, which can help manage high-throughput message streams more efficiently.
While traditional Spring MVC applications handle many real-time workloads effectively (such as chat applications, dashboards, and notifications), WebFlux may be preferred for large-scale, event-driven systems or reactive microservices that must manage very large numbers of concurrent connections.
WebSocket in Production?
While this setup works, it is not always the “best” option for production environments. Spring Boot allows you to use any full-fledged messaging system with the STOMP protocol (e.g., ActiveMQ, RabbitMQ), and an external broker may support more STOMP operations (e.g., acknowledgments, receipts) than the simple broker we used.
STOMP Over WebSocket provides interesting information about WebSockets and the STOMP protocol. It lists messaging systems that handle the STOMP protocol and could be a better solution to use in production. This is especially important if, due to the high number of requests, the message broker needs to be clustered. (Spring’s simple message broker is not suitable for clustering.) Then, instead of enabling the simple broker in WebSocketConfig, it is required to enable the STOMP broker relay that forwards messages to and from an external message broker. To sum up, an external message broker may help you build a more scalable and robust solution.
Further Reading on the Toptal Blog:
Understanding the basics
STOMP is the Simple (or Streaming) Text Oriented Messaging Protocol. It uses a set of commands like CONNECT, SEND, or SUBSCRIBE to manage the conversation. STOMP clients, written in any language, can talk with any message broker supporting the protocol.
WebSockets are typically used to make web applications more interactive. They can be helpful when implementing social feeds, online chats, news updates, or location-based apps.
WebSockets provide bidirectional communication channel over a single TCP connection. The client establishes a persistent connection through a process known as the WebSocket handshake. The connection allows exchanging messages in real time.
Spring Boot is a Java-based framework that makes it easier to implement standalone applications or microservices. It is commonly used because it greatly simplifies integration with various products and frameworks. It also contains an embedded web server so there is no need to deploy WAR files.
Warsaw, Poland
Member since October 30, 2015
About the author
Tomasz has more than 20 years of experience with Java apps, and worked for companies like Hewlett-Packard, as well as Silicon Valley startups.
Expertise
PREVIOUSLY AT