
Computer Vision Pipeline Architecture: A Tutorial
Build a simple, reusable foundation for your video processing apps and alleviate the common challenges of video manipulation.

Build a simple, reusable foundation for your video processing apps and alleviate the common challenges of video manipulation.

Nathan is a front-end developer and video processing expert. He developed Hypetrigger, an open-source computer vision tool for use with streaming services. Nathan also spent five years as a full-stack engineer at Motorola Solutions, where he worked with React, Angular, Svelte, and native web components, and led the development of the company’s internal design system.
Expertise
Previous Role
Lead Design System EngineerPreviously At

Video and all of its moving parts can be a lot for a developer to contend with. An expert developer’s deep understanding of data structures, encoding techniques, and image and signal processing plays a major role in the outcomes of allegedly simple, everyday video processing tasks such as compression or editing.
To work effectively with video content, you must understand the properties and distinctions between its primary file formats (e.g., .mp4, .mov, .wmv, .avi) and their version-specific codecs (e.g., H.264, H.265, VP9, AV1). The tools necessary for effective video processing are seldom neatly packaged as comprehensive libraries, leaving the developer to navigate the vast, intricate ecosystem of open-source tools to deliver engaging computer vision applications.
Computer Vision Applications Explained
Computer vision applications are based on the implementation of the spectrum of techniques—from simple heuristics to complex neural networks—by which we feed an image or video to a computer as input and produce meaningful output, such as:
- Facial recognition features in smartphone cameras, useful for organizing and searching photo albums and for tagging individuals in social media apps.
- Road marking detection, as implemented in self-driving cars moving at high speeds.
- Optical character recognition technology that allows visual search apps (like Google Lens) to recognize the shapes of text characters in photos.
The preceding examples are as different as can be, each showcasing an entirely distinctive function, but sharing one simple commonality: Images are their primary input. Each application transforms unstructured—sometimes chaotic—images or frames into intelligible and ordered data that provides a benefit to end users.
Size Matters: Common Challenges of Working With Video
An end user who views a video may regard it as a single entity. But a developer must approach it as a collection of individual, sequential frames. For example, before an engineer writes a program to detect real-time traffic patterns in a video of moving vehicles, they must first extract individual frames from that video, and then apply an algorithm that detects the cars on the road.
In its raw state, a video file is huge in size, making it too large to hold in a computer’s memory, unwieldy for the developer to handle, difficult to share, and costly to store. A single minute of 60 frames per second (fps) raw, uncompressed video requires more than 22 gigabytes of storage space, for example:
60 seconds * 1080 px (height) * 1920 px (width) * 3 bytes per pixel * 60 fps = 22.39 GB
Video is, therefore, compressed before it is processed, as a matter of course. But there is no guarantee that an individual compressed video frame will display an image in its entirety. This is because the parameters applied at compression time define the quality and detail a video’s individual frame will retain. While the compressed video, as a whole, may play well enough to provide a terrific viewing experience, that is not the same as the individual frames comprising it being interpretable as complete images.
In this tutorial, we will use popular open-source computer vision tools to solve some basic challenges of video processing. This experience will position you to customize a computer vision pipeline to your exact use cases. (To keep things simple, we will not describe the audio components of video in this article.)
A Simple Computer Vision App Tutorial: Calculating Brightness
To deliver a computer vision application, an engineering team develops and implements an efficient and powerful computer vision pipeline whose architecture includes, at a minimum:
Step 1: Image acquisition | Images or videos can be acquired from a wide range of sources, including cameras or sensors, digital videos saved on disk, or videos streamed over the internet. |
Step 2: Image preprocessing | The developer chooses preprocessing operations, such as denoising, resizing, or conversion into a more accessible format. These are intended to make the images easier to work with or analyze. |
Step 3: Feature extraction | In the representation or extraction step, information in the preprocessed images or frames is captured. This information may consist of edges, corners, or shapes, for instance. |
Step 4: Interpretation, analysis, or output | In the final step we accomplish the task at hand. |
Let’s imagine you were hired to build a tool that calculates the brightness of a video’s individual frames. We’ll align the project’s pipeline architecture to match the simple computer vision model shared above.
The program we will produce in this tutorial has been included as an example within Hypetrigger, an open-source Rust library I developed. Hypetrigger includes everything you’d need to run a computer vision pipeline on streaming video from the internet: TensorFlow bindings for image recognition, Tesseract for optical character recognition, and support for using GPU-accelerated video decoding for a 10x speed boost. To install, clone the Hypetrigger repo and run the command cargo add hypetrigger.
To maximize the learning and experience to be gained, we will construct a computer vision pipeline from scratch in this tutorial, rather than implementing user-friendly Hypetrigger.
Our Tech Stack
For our project, we will use:
Tool | Description |
|---|---|
Touted as one of the best tools out there for working with video, FFmpeg—the Swiss Army knife of video—is an open-source library written in C and used for encoding, decoding, conversion, and streaming. It is used in enterprise software like Google Chrome, VLC Media Player, and Open Broadcast Software (OBS), among others. FFmpeg is available for download as an executable command-line tool or a source code library, and can be used with any language that can spawn child processes. | |
A major strength of Rust is its ability to detect memory errors (e.g., null pointers, segfaults, dangling references) at compile time. Rust offers high performance with guaranteed memory safety, and is also highly performant, making it a good choice for video processing. |
Step 1: Image Acquisition
In this scenario, a previously acquired animated sample video is ready to be processed.
Step 2: Image Preprocessing
For this project, image preprocessing consists of converting the video from its H.264 encoded format to raw RGB, a format that is much easier to work with.
Let’s decompress our video using FFmpeg’s portable, executable command-line tool from inside a Rust program. The Rust program will open and convert our sample video to RGB. For optimal results, we’ll append the appropriate FFmpeg syntax to the ffmpeg command:
Argument* | Description | Use Case |
|---|---|---|
-i | Indicates the file name or URL of the source video. |
The URL of the sample video or another of your choosing |
-f | Sets the output format. | The rawvideo format to obtain raw video frames |
-pix_fmt | Sets the pixel format. | rgb24 to produce RGB color channels with eight bits per channel |
-r | Sets the output frame rate. | 1 to produce one frame per second |
<output> | Tells FFmpeg where to send output; it is a required final argument. | The identifier pipe:1 to output on standard output instead of to file |
*For a complete screen listing of arguments, enter ffmpeg -help.
These arguments combined at the command line or terminal give us ffmpeg -i input_video.mp4 -f rawvideo -pix_fmt rgb24 pipe:1 and serve as our starting point to process the video’s frames:
use std::{
    io::{BufReader, Read},
    process::{Command, Stdio},
};

fn main() {
    // Test video provided by https://gist.github.com/jsturgis/3b19447b304616f18657.
    let test_video =
        "http://commondatastorage.googleapis.com/gtv-videos-bucket/sample/BigBuckBunny.mp4";


    // Video is in RGB format; 3 bytes per pixel (1 red, 1 blue, 1 green).
    let bytes_per_pixel = 3;

    let video_width = 1280;
    let video_height = 720;

    // Create an FFmpeg command with the specified arguments.
    let mut ffmpeg = Command::new("ffmpeg")
        .arg("-i")
        .arg(test_video) // Specify the input video
        .arg("-f") // Specify the output format (raw RGB pixels)
        .arg("rawvideo")
        .arg("-pix_fmt")
        .arg("rgb24") // Specify the pixel format (RGB, 8 bits per channel)
        .arg("-r")
        .arg("1") // Request rate of 1 frame per second
        .arg("pipe:1") // Send output to the stdout pipe
        .stderr(Stdio::null())
        .stdout(Stdio::piped())
        .spawn() // Spawn the command process
        .unwrap(); // Unwrap the result (i.e., panic and exit if there was an error)
}
Our program will receive one video frame at a time, each decoded into raw RGB. To avoid accumulating huge volumes of data, let’s allocate a frame-sized buffer that will release memory as it finishes processing each frame. Let’s also add a loop that fills the buffer with data from FFmpeg’s standard output channel:
fn main() {
    // …

    // Read the video output into a buffer.
    let stdout = ffmpeg.stdout.take().unwrap();
    let buf_size = video_width * video_height * bytes_per_pixel;
    let mut reader = BufReader::new(stdout);
    let mut buffer = vec![0u8; buf_size];
    let mut frame_num = 0;

    while let Ok(()) = reader.read_exact(buffer.as_mut_slice()) {
        // Retrieve each video frame as a slice of raw RGB pixels.
        let raw_rgb = buffer.as_slice();
    }
}
Notice that the while loop contains a reference to raw_rgb, a slice containing the frame’s RGB pixel data. Because the slice references the existing buffer, we don’t need to create a new copy of the frame each time through the loop.
Step 3: Feature Extraction
To calculate the average brightness of each frame preprocessed in Step 2, let’s add the following function to our program. Rather than simply averaging the red, green, and blue channels, we’ll use a luminance calculation based on the Rec. 709 standard. This provides a more realistic estimate of brightness because different color channels do not contribute equally to how bright an image appears.
/// Calculate the average brightness of an image,
/// returned as a float between 0 and 1.
fn average_brightness(raw_rgb: &[u8]) -> f64 {
    let mut sum = 0.0;

    for (i, _) in raw_rgb.iter().enumerate().step_by(3) {
        let r = raw_rgb[i] as f64 / 255.0;
        let g = raw_rgb[i + 1] as f64 / 255.0;
        let b = raw_rgb[i + 2] as f64 / 255.0;

        // Rec. 709 luminance coefficients.
        let pixel_brightness =
            0.2126 * r +
            0.7152 * g +
            0.0722 * b;

        sum += pixel_brightness;
    }

    sum / (raw_rgb.len() as f64 / 3.0)
}
Then, at the end of the while loop, we can calculate and print the frames’ brightness to the console:
fn main() {
    // …

    while let Ok(()) = reader.read_exact(buffer.as_mut_slice()) {
        // Retrieve each video frame as a slice of raw RGB pixels.
        let raw_rgb = buffer.as_slice();

       // Calculate the average brightness of the frame.
        let brightness = average_brightness(raw_rgb);
        println!("frame {frame_num} has brightness {brightness}");
        frame_num += 1;
    }
}
The code, at this point, will match this example file.
And now we run the program on our sample video to produce the following output:
frame 0 has brightness 0.055048076377046
frame 1 has brightness 0.467577447011064
frame 2 has brightness 0.878193112575386
frame 3 has brightness 0.859071674156269
frame 4 has brightness 0.820603467400872
frame 5 has brightness 0.766673757205845
frame 6 has brightness 0.717223347005918
frame 7 has brightness 0.674823835783496
frame 8 has brightness 0.656084418402863
frame 9 has brightness 0.656437488652946
[500+ more frames omitted]
Step 4: Interpretation
Here’s a graphical representation of these numbers:
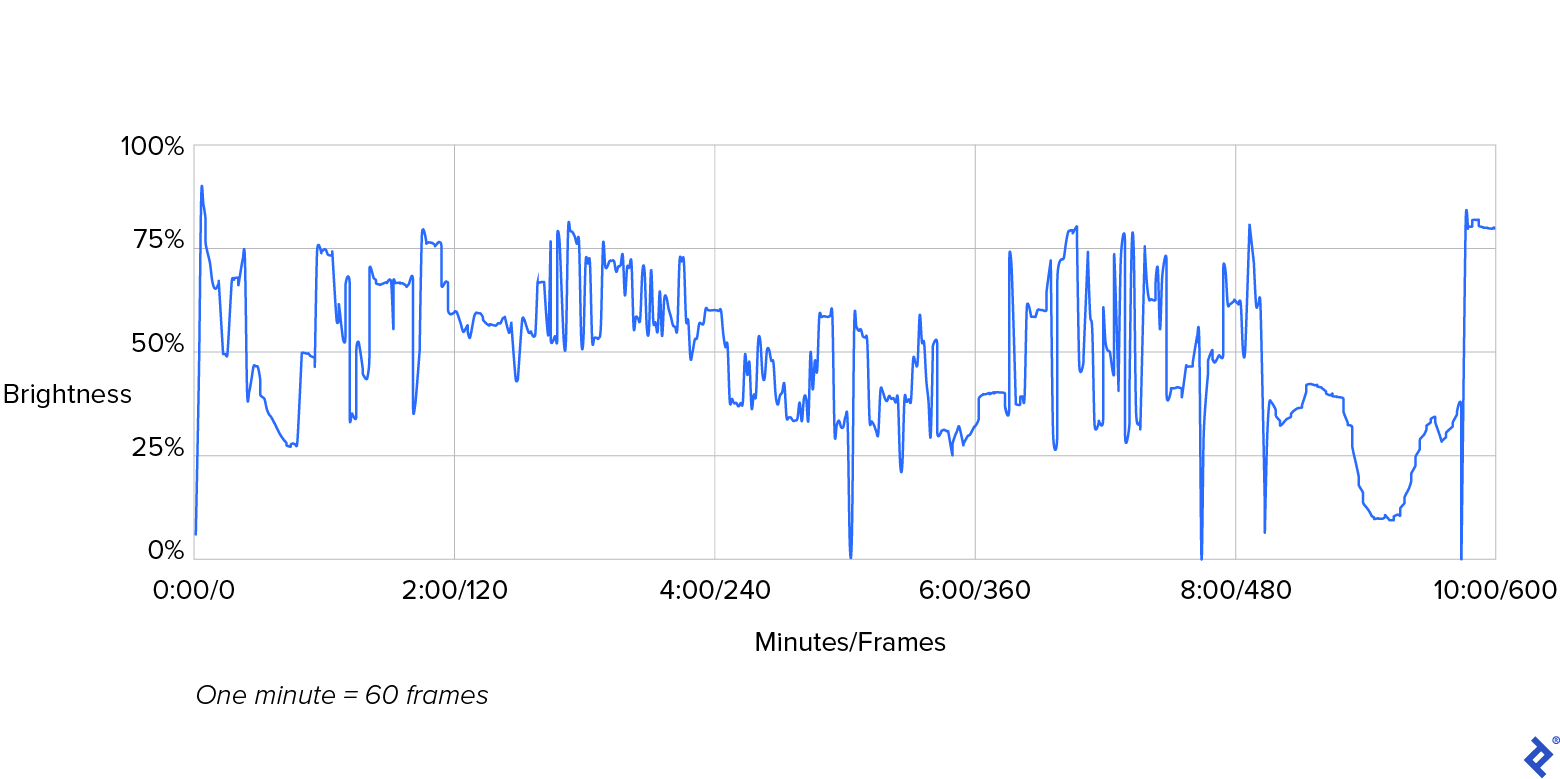
In the preceding graph, note the plotted line that represents our video’s brightness. Its sharp peaks and valleys represent the dramatic transitions in brightness that occur between consecutive frames. The brightness of frame 0, depicted at the graph’s far left, measures at 5% (i.e., quite dark) and peaks sharply at 87% (i.e., remarkably bright), just two frames later. Equally prominent transitions occur around 5:00, 8:00, and 9:40 minutes into the video. In this case, such intense variations in brightness represent normal movie scene transitions, as seen in the video.
Real-world Use Cases for Calculating Brightness
In the real world, we would likely continue to analyze the brightness levels detected and, conditionally, trigger an action. In true postproduction processing, the filmmaker, videographer, or video editor would analyze this data and retain all frames whose values for brightness fall within the project’s agreed-upon range. Alternatively, a professional may pull and review frames whose brightness values are iffy, and may ultimately approve, re-render, or exclude individual frames from the video’s final output.
Another interesting use case for analyzing frame brightness can be illustrated by considering a scenario that involves security camera footage from an office building. By comparing the frames’ brightness levels to the building’s in/out logs, we can determine whether the last person to leave actually shuts off the lights as they are supposed to. If our analysis indicates that lights are being left on after all people have gone for the day, we could send reminders encouraging folks to turn off the lights when they leave in order to conserve energy.
This tutorial details some basic computer vision processing and lays the foundation for more advanced techniques, such as graphing multiple features of the input video to correlate using more advanced statistical measures or using those measurements as input to machine learning models. Developers frequently integrate pretrained models through inference engines such as ONNX Runtime, allowing computer vision systems to combine simple analyses with more sophisticated image recognition capabilities. Such work marks a crossing from the world of video into the domain of statistical inference and machine learning, which is the essence of computer vision.
By following the steps laid out in this tutorial and leveraging the tools presented, you can minimize the obstacles (large file sizes or complicated video formats) that we commonly associate with decompressing video and interpreting RGB pixels. And when you’ve simplified working with video and computer vision, you can better focus on what matters: delivering intelligent and robust video capabilities in your applications.
The editorial team of the Toptal Engineering Blog extends its gratitude to Martin Goldberg for reviewing the code samples and other technical content presented in this article.
Further Reading on the Toptal Blog:
Understanding the basics
Computer vision works by trying to mimic the human brain’s capability of recognizing visual information.
Computer vision takes image or video as an input and extracts a meaningful interpretation of some feature or aspect of the input.
Computer vision is used in a wide range of applications today, including self-driving cars, mobile check deposits in online banking, and facial recognition for tagging on social media.
The optimal choice of framework depends heavily on what information you’re trying to extract from the visual input. There are a few general-purpose libraries (e.g., Python OpenCV) that cover a broad range of use cases.
NLP (natural language processing) is concerned with extracting information from text inputs. Computer vision, on the other hand, extracts information from visual input such as images or videos. You can combine NLP and computer vision by scanning an image to recognize the shapes of text characters to be shared with an NLP framework.
Although its underpinnings are complex and involve a lot of math, using computer vision in practice doesn’t require any more math knowledge or use than typical software engineering. The substantial ecosystem of open-source tools means that you can leverage computer vision techniques without needing to understand the underlying mathematics.
Chicago, IL, United States
Member since December 29, 2021
About the author
Nathan is a front-end developer and video processing expert. He developed Hypetrigger, an open-source computer vision tool for use with streaming services. Nathan also spent five years as a full-stack engineer at Motorola Solutions, where he worked with React, Angular, Svelte, and native web components, and led the development of the company’s internal design system.
Expertise
Previous Role
Lead Design System EngineerPREVIOUSLY AT