
Machine Learning Number Recognition: From Zero to Application
Harnessing the potential of machine learning for computer vision is not a new concept but recent advances and the availability of new tools and datasets have made it more accessible to developers.
In this article, Toptal Software Developer Teimur Gasanov demonstrates how you can create an app capable of identifying handwritten digits in under 30 minutes, including the API and UI.

Teimur is passionate about writing composite interfaces using React and building extensible APIs with Go. He excels at finding solutions for atypical problems.
Expertise
Previously At

Machine learning, computer vision, building powerful APIs, and creating beautiful UIs are exciting fields witnessing a lot of innovation.
The first two require extensive mathematics and science, while API and UI development center on algorithmic thinking and designing flexible architectures. They are very different, so deciding which one you want to learn next may be challenging. The purpose of this article is to demonstrate how all four can be employed in creating an image processing application.
The application we are going to build is a simple digit recognizer. You draw, the machine predicts the digit. Simplicity is essential because it allows us to see the big picture rather than focus on details.
For the sake of simplicity, we’ll use the most popular and easy-to-learn technologies. The machine learning part will use Python for the back-end application. As for the app’s interactional side, we’ll operate via a JavaScript library that needs no introduction: React.
Machine Learning to Guess Digits
The core part of our app is the algorithm guessing the drawn number. Machine learning will be the tool used to achieve a good guess quality. This kind of basic artificial intelligence allows a system to learn automatically with a given amount of data. In broader terms, machine learning is a process of finding a coincidence or set of coincidences in the data to rely on them to guess the result.
Our image recognition process contains three steps:
- Get images of drawn digits for training
- Train the system to guess the numbers via training data
- Test the system with new/unknown data
Environment
We’ll need a virtual environment to work with machine learning in Python. This approach is practical because it manages all the required Python packages, so you don’t need to worry about them.
Let’s install it with the following terminal commands:
python3 -m venv virtualenv
source virtualenv/bin/activate
Training Model
Before we start writing the code, we need to choose a proper “teacher” for our machines. Usually, data science professionals try different models before choosing the best one. We’ll skip very advanced models that require a lot of skill and proceed with the k-nearest neighbors algorithm.
It’s an algorithm that gets some data samples and arranges them on a plane ordered by a given set of characteristics. To understand it better, let’s review the following image:

To detect the type of the Green Dot, we should check the types of k nearest neighbors where k is the argument set. Considering the image above, if k is equal to 1, 2, 3, or 4, the guess will be a Black Triangle as most of the green dot’s closest k neighbors are black triangles. If we increase k to 5, then the majority of the objects are blue squares, hence the guess will be a Blue Square.
There are some dependencies needed to create our machine learning model:
- sklearn.neighbors.KNeighborsClassifier is the classifier we’ll use.
- sklearn.model_selection.train_test_split is the function that will help us split the data into training data and data used to check the model’s correctness.
- sklearn.model_selection.cross_val_score is the function to get a mark for the model’s correctness. The higher the value, the better the correctness.
- sklearn.metrics.classification_report is the function to show a statistical report of the model’s guesses.
- sklearn.datasets is the package used to get data for training (images of digits).
- numpy is a package widely used in science as it offers a productive and comfortable way to manipulate multidimensional data structures in Python.
- matplotlib.pyplot is the package used to visualize data.
Let’s start by installing and importing all of them:
pip install sklearn numpy matplotlib scipy

from sklearn.datasets import load_digits
from sklearn.neighbors import KNeighborsClassifier
from sklearn.model_selection import train_test_split, cross_val_score
import numpy as np
import matplotlib.pyplot as plt
Now, we need to load the MNIST Database. MNIST is a classic dataset of handwritten images used by thousands of novices in the machine learning field:
digits = load_digits()
Once the data is fetched and ready, we can move to the next step of splitting the data into two parts: training and testing.
We’ll use 75% of the data to train our model to guess digits and we shall use the rest of the data to test the model’s correctness:
(X_train, X_test, y_train, y_test) = train_test_split(
    digits.data, digits.target, test_size=0.25, random_state=42
)
The data is now arranged and we’re ready to use it. We’ll try to find the best parameter k for our model so the guesses will be more precise. We can’t keep the k value off our mind at this stage, as we have to evaluate the model with different k values.
Let’s see why it is essential to consider a range of k values and how this improves our model’s accuracy:
ks = np.arange(2, 10)
scores = []
for k in ks:
    model = KNeighborsClassifier(n_neighbors=k)
    score = cross_val_score(model, X_train, y_train, cv=5)
    score.mean()
    scores.append(score.mean())

plt.plot(scores, ks)
plt.xlabel('accuracy')
plt.ylabel('k')
plt.show()
Executing this code will show you the following plot describing the algorithm’s accuracy with different k values.

As you can see, a k value of 3 ensures the best accuracy for our model and dataset.
Using Flask to Build an API
The application core, which is an algorithm predicting the digits from images, is now ready. Next, we need to decorate the algorithm with an API layer to make it available for usage. Let’s use the popular Flask web framework to do this cleanly and concisely.
We’ll start by installing Flask and the dependencies related to image processing in the virtual environment:
pip install Flask Pillow scikit-image
When the installation completes, we move to the creation of the app’s entry point file:
touch app.py
The content of the file will look like this:
import os

from flask import Flask
from views import PredictDigitView, IndexView

app = Flask(__name__)

app.add_url_rule(
    '/api/predict',
    view_func=PredictDigitView.as_view('predict_digit'),
    methods=['POST']
)

app.add_url_rule(
    '/',
    view_func=IndexView.as_view('index'),
    methods=['GET']
)

if __name__ == 'main':
    port = int(os.environ.get("PORT", 5000))
    app.run(host='0.0.0.0', port=port)
You will get an error saying that PredictDigitView and IndexView are not defined. The next step is creating a file that will initialize these views:
from flask import render_template, request, Response
from flask.views import MethodView, View

from flask.views import View

from repo import ClassifierRepo
from services import PredictDigitService
from settings import CLASSIFIER_STORAGE

class IndexView(View):
    def dispatch_request(self):
        return render_template('index.html')

class PredictDigitView(MethodView):
    def post(self):
        repo = ClassifierRepo(CLASSIFIER_STORAGE)
        service = PredictDigitService(repo)
        image_data_uri = request.json['image']
        prediction = service.handle(image_data_uri)
        return Response(str(prediction).encode(), status=200)
Once again, we will encounter an error about an unresolved import. The Views package relies on three files we do not have yet:
- Settings
- Repo
- Service
We’ll implement them one by one.
Settings is a module with configurations and constant variables. It will store the path to the serialized classifier for us. It begs a logical question: Why do I need to save the classifier?
Because it is a simple way to improve the performance of your app. Instead of training the classifier every time you receive a request, we’ll store the classifier’s prepared version, enabling it to work out of the box:
import os

BASE_DIR = os.getcwd()
CLASSIFIER_STORAGE = os.path.join(BASE_DIR, 'storage/classifier.txt')
The mechanism for settings — getting the classifier — will be initialized in the next package on our list, the Repo. It’s a class with two methods to retrieve and update the trained classifier using Python’s built-in pickle module:
import pickle

class ClassifierRepo:
    def __init__(self, storage):
        self.storage = storage

    def get(self):
        with open(self.storage, 'wb') as out:
            try:
                classifier_str = out.read()
                if classifier_str != '':
                    return pickle.loads(classifier_str)
                else:
                    return None
            except Exception:
                return None

    def update(self, classifier):
        with open(self.storage, 'wb') as in_:
            pickle.dump(classifier, in_)
We are close to finalizing our API. Now it lacks only the Service module. What’s its purpose?
- Get the trained classifier from storage
- Transform the image passed from UI to a format the classifier understands
- Calculate the prediction with the formatted image via the classifier
- Return the prediction
Let’s code this algorithm:
from sklearn.datasets import load_digits

from classifier import ClassifierFactory
from image_processing import process_image

class PredictDigitService:
    def __init__(self, repo):
        self.repo = repo

    def handle(self, image_data_uri):
        classifier = self.repo.get()
        if classifier is None:
            digits = load_digits()
            classifier = ClassifierFactory.create_with_fit(
                digits.data,
                digits.target
            )
            self.repo.update(classifier)

        x = process_image(image_data_uri)
        if x is None:
            return 0

        prediction = classifier.predict(x)[0]
        return prediction
Here you can see that PredictDigitService has two dependencies: ClassifierFactory and process_image.
We’ll start by creating a class to create and train our model:
from sklearn.model_selection import train_test_split
from sklearn.neighbors import KNeighborsClassifier

class ClassifierFactory:
    @staticmethod
    def create_with_fit(data, target):
        model = KNeighborsClassifier(n_neighbors=3)
        model.fit(data, target)
        return model
The API is ready for action. Now we can proceed to the image processing step.
Image Processing
Image processing is a method of performing certain operations on an image to enhance it or extract some useful information from it. In our case, we need to smoothly transition the image drawn by a user to the machine learning model format.

Let’s import some helpers to achieve that goal:
import numpy as np
from skimage import exposure
import base64
from PIL import Image, ImageOps, ImageChops
from io import BytesIO
We can split the transition into six distinct parts:
1. Replace a transparent background with a color

def replace_transparent_background(image):
    image_arr = np.array(image)

    if len(image_arr.shape) == 2:
        return image

    alpha1 = 0
    r2, g2, b2, alpha2 = 255, 255, 255, 255

    red, green, blue, alpha = image_arr[:, :, 0], image_arr[:, :, 1], image_arr[:, :, 2], image_arr[:, :, 3]
    mask = (alpha == alpha1)
    image_arr[:, :, :4][mask] = [r2, g2, b2, alpha2]

    return Image.fromarray(image_arr)
2. Trim open borders

def trim_borders(image):
    bg = Image.new(image.mode, image.size, image.getpixel((0,0)))
    diff = ImageChops.difference(image, bg)
    diff = ImageChops.add(diff, diff, 2.0, -100)
    bbox = diff.getbbox()
    if bbox:
        return image.crop(bbox)

    return image
3. Add borders of equal size

def pad_image(image):
    return ImageOps.expand(image, border=30, fill='#fff')
4. Convert the image to grayscale mode
def to_grayscale(image):
    return image.convert('L')
5. Invert colors

def invert_colors(image):
    return ImageOps.invert(image)
6. Resize the image to 8x8 format

def resize_image(image):
    return image.resize((8, 8), Image.LINEAR)
Now you can test the app. Run the application and enter the command below to send a request with this iStock image to the API:

export FLASK_APP=app
flask run
curl "http://localhost:5000/api/predict" -X "POST" -H "Content-Type: application/json" -d "{\"image\": \"data:image/png;base64,$(curl "https://media.istockphoto.com/vectors/number-eight-8-hand-drawn-with-dry-brush-vector-id484207302?k=6&m=484207302&s=170667a&w=0&h=s3YANDyuLS8u2so-uJbMA2uW6fYyyRkabc1a6OTq7iI=" | base64)\"}" -i
You should see the following output:
HTTP/1.1 100 Continue

HTTP/1.0 200 OK
Content-Type: text/html; charset=utf-8
Content-Length: 1
Server: Werkzeug/0.14.1 Python/3.6.3
Date: Tue, 27 Mar 2018 07:02:08 GMT

8
The sample image depicted the number 8, and our app correctly identified it as such.
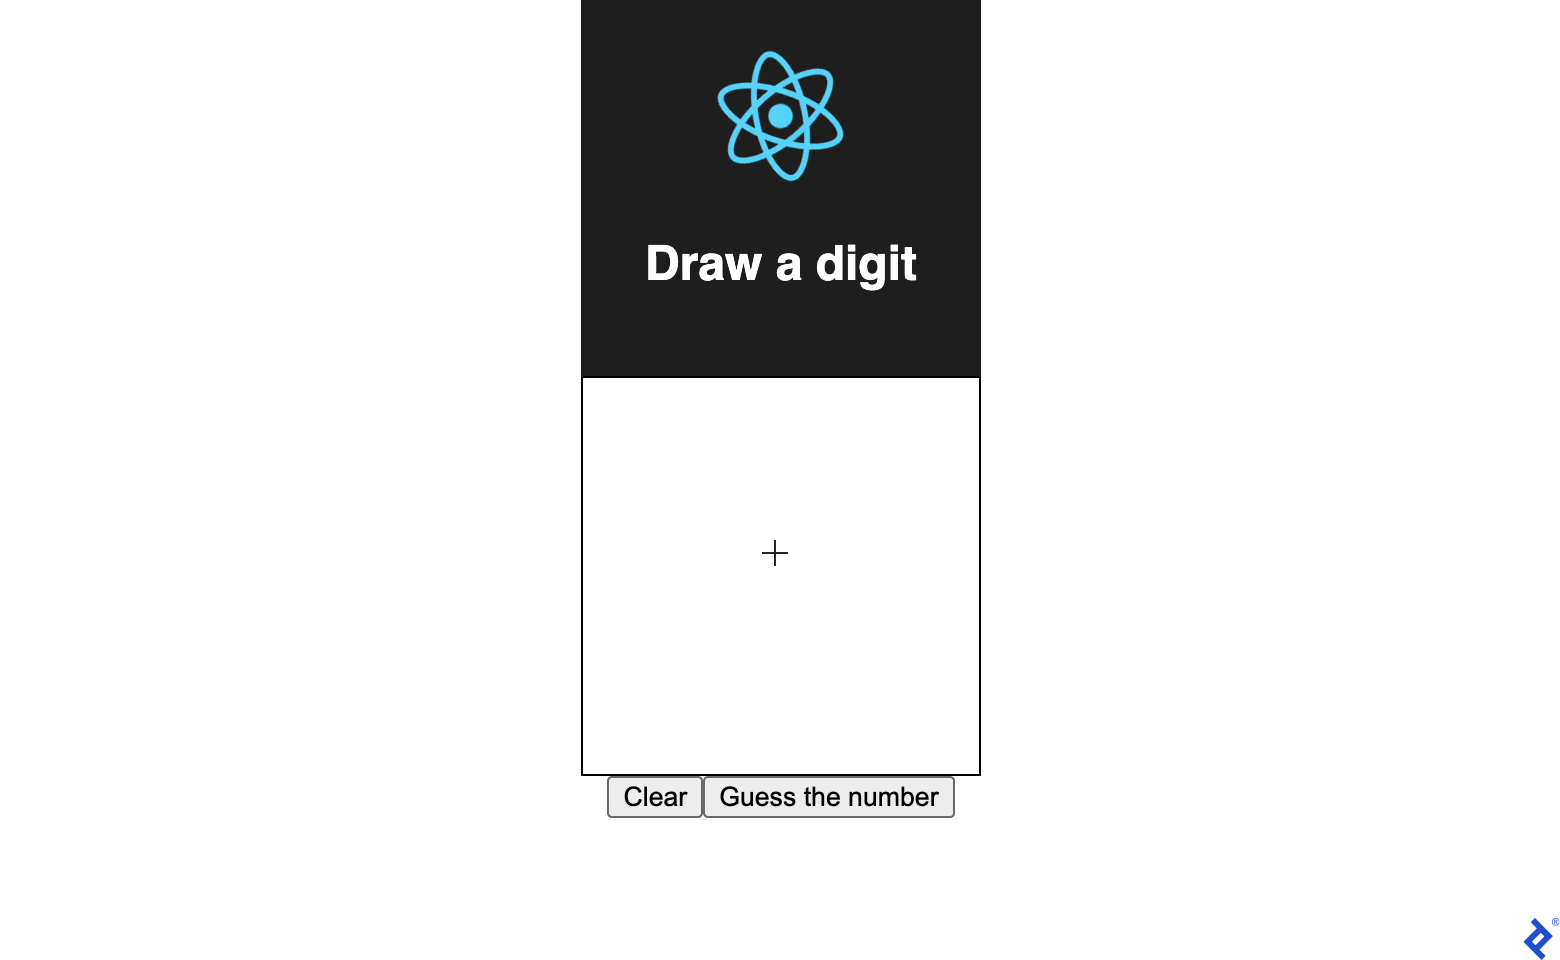
Creating a Drawing Pane Via React
To quickly bootstrap the frontend application, we’ll use CRA boilerplate:
create-react-app frontend
cd frontend
After setting up the workplace, we also need a dependency to draw digits. The react-sketch package matches our needs perfectly:
npm i react-sketch
The application has only one component. We can divide this component into two parts: logic and view.
The view part is responsible for representing the drawing pane, Submit and Reset buttons. When interacted, we should also represent a prediction or an error. From the logic perspective, it has the following duties: submit images and clear the sketch.
Whenever a user clicks Submit, the component will extract the image from the sketch component and appeal to the API module’s makePrediction function. If the request to the back end succeeds, we’ll set the prediction state variable. Otherwise, we’ll update the error state.
When a user clicks on Reset, the sketch will clear:
import React, { useRef, useState } from "react";

import { makePrediction } from "./api";

const App = () => {
  const sketchRef = useRef(null);
  const [error, setError] = useState();
  const [prediction, setPrediction] = useState();

  const handleSubmit = () => {
    const image = sketchRef.current.toDataURL();

    setPrediction(undefined);
    setError(undefined);

    makePrediction(image).then(setPrediction).catch(setError);
  };

  const handleClear = (e) => sketchRef.current.clear();

  return null
}
The logic is sufficient. Now we can add the visual interface to it:
import React, { useRef, useState } from "react";
import { SketchField, Tools } from "react-sketch";

import { makePrediction } from "./api";

import logo from "./logo.svg";
import "./App.css";

const pixels = (count) => `${count}px`;
const percents = (count) => `${count}%`;

const MAIN_CONTAINER_WIDTH_PX = 200;
const MAIN_CONTAINER_HEIGHT = 100;
const MAIN_CONTAINER_STYLE = {
  width: pixels(MAIN_CONTAINER_WIDTH_PX),
  height: percents(MAIN_CONTAINER_HEIGHT),
  margin: "0 auto",
};

const SKETCH_CONTAINER_STYLE = {
  border: "1px solid black",
  width: pixels(MAIN_CONTAINER_WIDTH_PX - 2),
  height: pixels(MAIN_CONTAINER_WIDTH_PX - 2),
  backgroundColor: "white",
};

const App = () => {
  const sketchRef = useRef(null);
  const [error, setError] = useState();
  const [prediction, setPrediction] = useState();

  const handleSubmit = () => {
    const image = sketchRef.current.toDataURL();

    setPrediction(undefined);
    setError(undefined);

    makePrediction(image).then(setPrediction).catch(setError);
  };

  const handleClear = (e) => sketchRef.current.clear();

  return (
    <div className="App" style={MAIN_CONTAINER_STYLE}>
      <div>
        <header className="App-header">
          <img src={logo} className="App-logo" alt="logo" />
          <h1 className="App-title">Draw a digit</h1>
        </header>
        <div style={SKETCH_CONTAINER_STYLE}>
          <SketchField
            ref={sketchRef}
            width="100%"
            height="100%"
            tool={Tools.Pencil}
            imageFormat="jpg"
            lineColor="#111"
            lineWidth={10}
          />
        </div>
        {prediction && <h3>Predicted value is: {prediction}</h3>}
        <button onClick={handleClear}>Clear</button>
        <button onClick={handleSubmit}>Guess the number</button>
        {error && <p style={{ color: "red" }}>Something went wrong</p>}
      </div>
    </div>
  );
};

export default App;
The component is ready, test it out by executing and going to localhost:3000 after:
npm run start
The demo application is available here. You can also browse the source code on GitHub.
Wrapping Up
The quality of this classifier is not perfect, and I do not pretend that it is. The difference between the data we used for training and the data coming from the UI is enormous. Despite that, we created a working application from scratch in less than 30 minutes.
In the process, we honed our skills in four fields:
- Machine learning
- Back-end development
- Image processing
- Frontend development
There is no shortage of potential use cases for software capable of recognizing handwritten digits, ranging from education and administrative software to postal and financial services.
Therefore, I hope this article will motivate you to improve your machine learning abilities, image processing, and front-end and back-end development, and use those skills to design wonderful and useful applications.
If you’d like to broaden your knowledge of machine learning and image processing, you may want to check out our Adversarial Machine Learning Tutorial.
Further Reading on the Toptal Blog:
Understanding the basics
MNIST is one of the most popular entry-level datasets in computer vision. It contains thousands of images of handwritten digits.
Machine learning models learn from data. To make the model smart enough, we need to provide data we have with the expected results. The model will use this data to detect relationships between the data parameters and the desired result.
Image processing is a method to perform some operations on an image to get an enhanced image or extract useful information.
Teimur Gasanov
Bishkek, Chuy Province, Kyrgyzstan
Member since May 1, 2018
About the author
Teimur is passionate about writing composite interfaces using React and building extensible APIs with Go. He excels at finding solutions for atypical problems.
Expertise
PREVIOUSLY AT