Unity With MVC: How to Level Up Your Game Development
In this article I’ll relate my experience with the popular Unity game development platform and the Model-View-Controller (MVC) pattern for game development. In my seven years of development, having wrestled with my fair share of game dev spaghetti, I’ve been achieving great code structure and development speed using this design pattern.
In this article I’ll relate my experience with the popular Unity game development platform and the Model-View-Controller (MVC) pattern for game development. In my seven years of development, having wrestled with my fair share of game dev spaghetti, I’ve been achieving great code structure and development speed using this design pattern.

Eduardo is a developer with 12+ years of experience focused on client and front-end applications. He is always open to learning new things.
Expertise
PREVIOUSLY AT

First-time programmers usually start learning the trade with the classic Hello World program. From there, bigger and bigger assignments are bound to follow. Each new challenge drives home an important lesson:
The bigger the project, the bigger the spaghetti.
Soon, it is easy to see that in large or small teams, one cannot recklessly do as one pleases. Code must be maintained and may last for a long time. Companies you’ve worked for can’t just look up your contact information and ask you every time they want to fix or improve the codebase (and you don’t want them to either).
This is why software design patterns exist; they impose simple rules to dictate the overall structure of a software project. They help one or more programmers separate core pieces of a large project and organize them in a standardized way, eliminating confusion when some unfamiliar part of the codebase is encountered.
These rules, when followed by everyone, allow legacy code to be better maintained and navigated, and new code to be added more swiftly. Less time is spent planning the methodology of development. Since problems don’t come in one flavor, there isn’t a silver bullet design pattern. One must carefully consider the strong and weak points of each pattern, and find the best fit for the challenge at hand.
In this tutorial, I’ll relate my experience with the popular Unity game development platform and the Model-View-Controller (MVC) pattern for game development. In my seven years of development, having wrestled with my fair share of game dev spaghetti, I’ve been achieving great code structure and development speed using this design pattern.
I’ll start by explaining a bit of Unity’s base architecture, the Entity-Component pattern. Then I’ll move on to explain how MVC fits on top of it, and use a little mock project as an example.
Motivation
In the literature of software, we will find a great number of design patterns. Even though they have a set of rules, developers will usually do a little rule-bending in order to better adapt the pattern to their specific problem.
This “freedom of programming” is proof that we haven’t yet found a single, definitive method for designing software. Thus, this article isn’t meant to be the ultimate solution to your problem, but rather, to show the benefits and possibilities of two well-known patterns: Entity-Component and Model-View-Controller.
The Entity-Component Pattern
Entity-Component (EC) is a design pattern where we first define the hierarchy of elements that make up the application (Entities), and later, we define the features and data each will contain (Components). In more “programmer” terms, an Entity can be an object with an array of 0 or more Components. Let’s depict an Entity like this:
some-entity [component0, component1, ...]
Here’s a simple example of an EC tree.
- app [Application]
   - game [Game]
      - player [KeyboardInput, Renderer]
      - enemies
         - spider [SpiderAI, Renderer]
         - ogre [OgreAI, Renderer]
      - ui [UI]
         - hud [HUD, MouseInput, Renderer]
         - pause-menu [PauseMenu, MouseInput, Renderer]
         - victory-modal [VictoryModal, MouseInput, Renderer]
         - defeat-modal [DefeatModal, MouseInput, Renderer]
EC is a good pattern for alleviating the problems of multiple inheritance, where a complex class structure can introduce problems like the diamond problem where a class D, inheriting two classes, B and C, with the same base class A, can introduce conflicts because how B and C modify A’s features differently.
These kinds of problems can be common in game development where inheritance is often used extensively.
By breaking down the features and data handlers into smaller Components, they can be attached and reused in different Entities without relying on multiple inheritances (which, by the way, isn’t even a feature of C# or Javascript, the main languages used by Unity).
Where Entity-Component Falls Short
Being one level above OOP, EC helps to defragment and better organize your code architecture. However, in large projects, we are still “too free” and we can find ourselves in a “feature ocean”, having a hard time finding the right Entities and Components, or figuring out how they should interact. There are infinite ways to assemble Entities and Components for a given task.
One way to avoid a mess is to impose some additional guidelines on top of Entity-Component. For example, one way I like to think about software is to divide it up into three different categories:
- Some handle the raw data, allowing it to be created, read, updated, deleted or searched (i.e., the CRUD concept).
- Others implement the interface for other elements to interact with, detecting events related to their scope and triggering notifications when they occur.
- Finally, some elements are responsible for receiving these notifications, making business logic decisions, and deciding how the data should be manipulated.
Fortunately, we already have a pattern that behaves in this exact way.
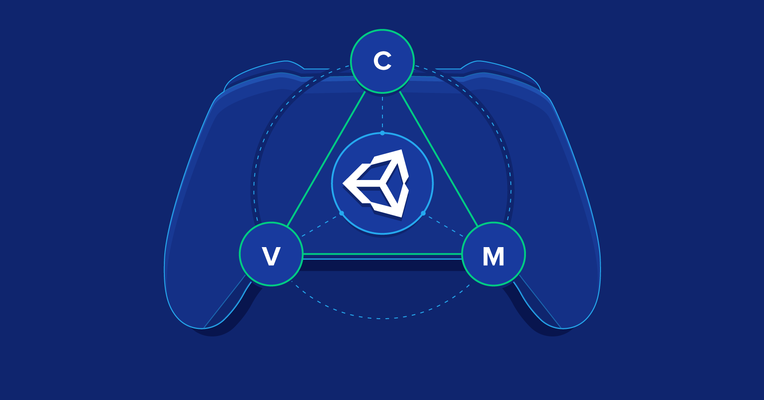
The Model-View-Controller (MVC) Pattern
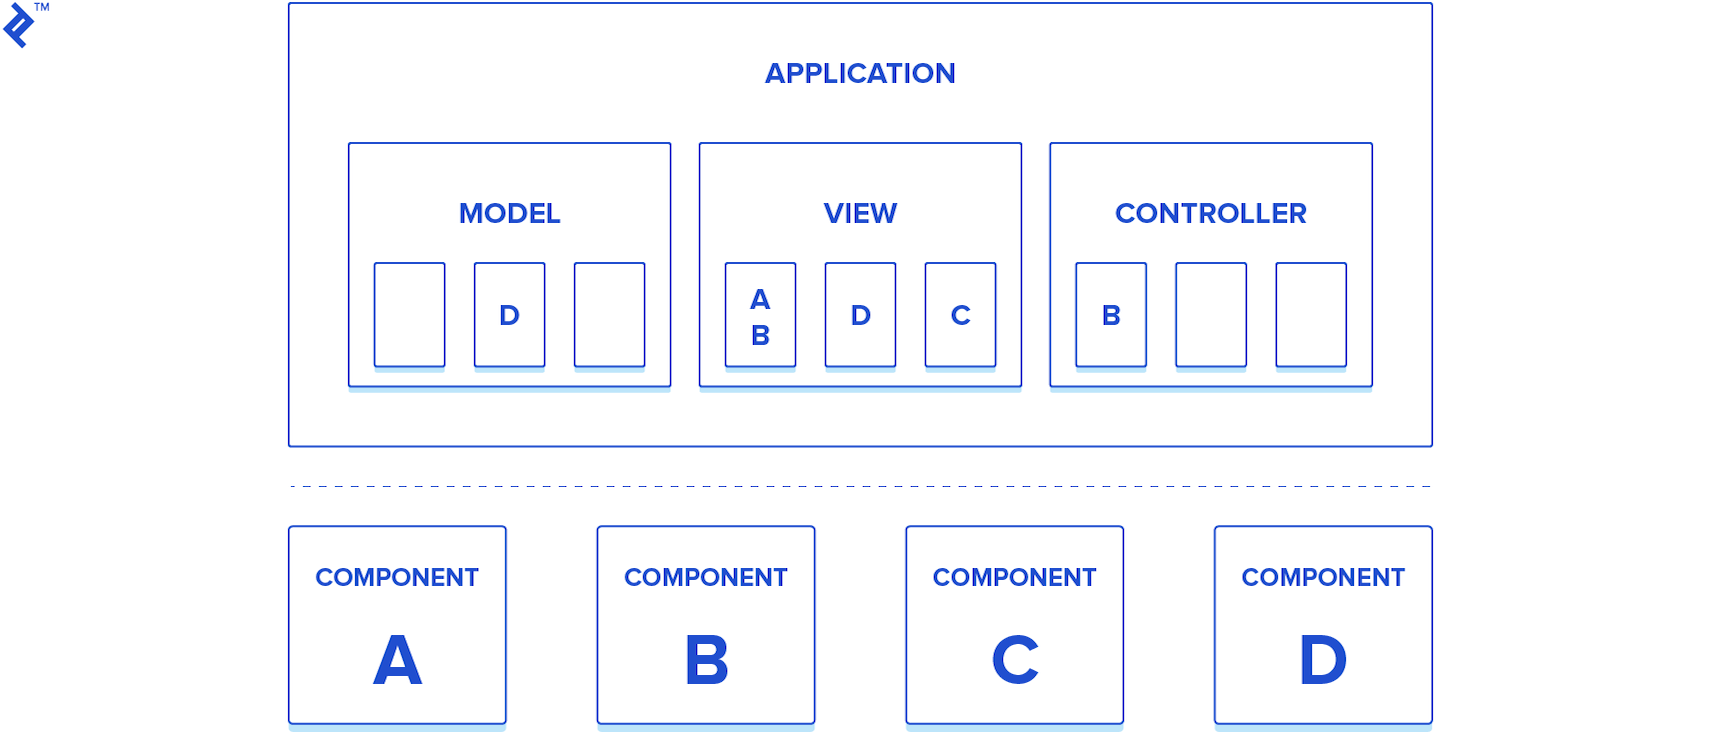
The Model-View-Controller pattern (MVC) splits the software into three major components: Models (Data CRUD), Views (Interface/Detection) and Controllers (Decision/Action). MVC is flexible enough to be implemented even on top of ECS or OOP.
Game and UI development have the usual workflow of waiting for a user’s input, or other triggering condition, sending notification of those events somewhere appropriate, deciding what to do in response, and updating the data accordingly. These actions clearly show the compatibility of these applications with MVC.
This methodology introduces another abstraction layer that will help with the software planning, and also allow new programmers to navigate even in a bigger codebase. By splitting the thinking process into data, interface, and decisions, developers can reduce the number of source files that must be searched in order to add or fix functionality.
Unity and EC
Let’s first take a closer look at what Unity gives us up front.
Unity is an EC-based development platform, where all Entities are instances of GameObject and the features that make them be “visible,” “moveable,” “interactable,” and so on, are provided by classes extending Component.
The Unity editor’s Hierarchy Panel and Inspector Panel provide a powerful way to assemble your application, attach Components, configure their initial state and bootstrap your game with a lot less source code than it would normally.
Still, as we’ve discussed, we can hit the “too many features” problem and find ourselves in a gigantic hierarchy, with features scattered everywhere, making the life of a developer a lot harder.
Thinking in the MVC way, we can, instead, start by dividing things according to their function, structuring our application like the example below:

Adapting MVC to a Game Development Environment
Now, I would like to introduce two small modifications to the generic MVC pattern, which help adapt it to unique situations I’ve come across building Unity projects with MVC:
- The MVC class references easily get scattered throughout the code.
- Within Unity, developers typically must drag and drop instances around to make them accessible, or else reach them through cumbersome find statements like
GetComponent( ... ). - Lost-reference hell will ensue if Unity crashes or some bug makes all the dragged references disappear. - This makes it necessary to have a single root reference object, through which all instances in the Application can be reached and recovered. - Some elements encapsulate general functionality that should be highly reusable, and which does not naturally fall into one of the three main categories of Model, View, or Controller. These I like to call simply Components. They are also “Components” in the Entity-Component sense but merely act as helpers in the MVC framework.
- For example, a
RotatorComponent, which only rotates things by a given angular velocity and doesn’t notify, store, or decide anything.
To help alleviate these two issues, I came up with a modified pattern I call AMVCC, or Application-Model-View-Controller-Component.
- Application - Single entry point to your application and container of all critical instances and application-related data.
- MVC - You should know this by now. :)
- Component - Small, well-contained script that can be reused.
These two modifications have satisfied my needs for all projects I’ve used them in.
Example: 10 Bounces
As a simple example, let’s look at a small game called 10 Bounces, where I’ll make use of the core elements of the AMVCC pattern.
The game setup is simple: A Ball with a SphereCollider and a Rigidbody (which will start to fall after “Play”), a Cube as ground and 5 scripts to make up the AMVCC.
Hierarchy
Before scripting, I usually start at the hierarchy and create an outline of my class and assets. Always following this new AMVCC style.
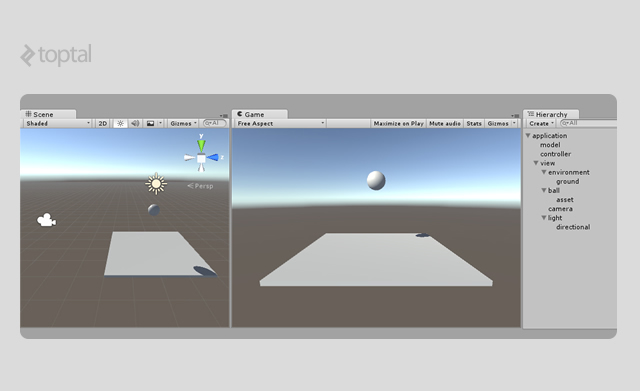
As we can see, the view GameObject contains all visual elements and also ones with other View scripts. The model and controller GameObjects, for small projects, usually contain only their respective scripts. For bigger projects, they will contain GameObjects with more specific scripts.
When someone navigating your project wants to access:
-
Data: Go to
application > model > ... -
Logic/Workflow: Go to
application > controller > ... -
Rendering/Interface/Detection: Go to
application > view > ...
If all teams follow these simple rules, legacy projects shouldn’t become a problem.
Note that there is no Component container because, as we’ve discussed, they are more flexible and can be attached to different elements at the developer’s leisure.
Scripting
Note: The scripts shown below are abstract versions of real-world implementations. A detailed implementation wouldn’t benefit the reader much. However, if you would like to explore more, here’s the link to my personal MVC framework for Unity, Unity MVC. You will find core classes that implement the AMVCC structural framework needed for most applications.
Let’s take a look at the structure of the scripts for 10 Bounces.
Before starting, for those not familiar with Unity’s workflow, let’s clarify briefly how scripts and GameObjects work together. In Unity, “Components,” in the Entity-Component sense, are represented by the MonoBehaviour class. For one to exist during runtime, the developer should either drag and drop its source file into a GameObject (which is the “Entity” of the Entity-Component pattern) or use the command AddComponent<YourMonobehaviour>(). After this, the script will be instantiated and ready to use during execution.
To begin, we define the Application class (the “A” in AMVCC), which will be the main class containing references to all instantiated game elements. We’ll also create a helper base class called Element, which gives us access to the instance of the Application and its children’s MVC instances.
With this in mind, let’s define the Application class (the “A” in AMVCC), which will have a unique instance. Inside it, three variables, model, view, and controller, will give us access points for all MVC instances during runtime. These variables should be MonoBehaviours with public references to the desired scripts.
Then, we’ll also create a helper base class called Element, which gives us access to the instance of the Application. This access will allow every MVC class to reach every other.
Note that both classes extend MonoBehaviour. They are “Components” that will be attached to GameObject “Entities”.
// BounceApplication.cs

// Base class for all elements in this application.
public class BounceElement : MonoBehaviour
{
   // Gives access to the application and all instances.
   public BounceApplication app { get { return GameObject.FindObjectOfType<BounceApplication>(); }}
}

// 10 Bounces Entry Point.
public class BounceApplication : MonoBehaviour
{
   // Reference to the root instances of the MVC.
   public BounceModel model;
   public BounceView view;
   public BounceController controller;

   // Init things here
   void Start() { }
}
From BounceElement we can create the MVC core classes. The BounceModel, BounceView, and BounceController scripts usually act as containers for more specialized instances, but since this is a simple example only the View will have a nested structure. The Model and Controller can be done in one script for each:
// BounceModel.cs

// Contains all data related to the app.
public class BounceModel : BounceElement
{
   // Data
   public int bounces;
   public int winCondition;
}
// BounceView .cs

// Contains all views related to the app.
public class BounceView : BounceElement
{
   // Reference to the ball
   public BallView ball;
}
// BallView.cs

// Describes the Ball view and its features.
public class BallView : BounceElement
{
   // Only this is necessary. Physics is doing the rest of work.
   // Callback called upon collision.
   void OnCollisionEnter() { app.controller.OnBallGroundHit(); }
}
// BounceController.cs

// Controls the app workflow.
public class BounceController : BounceElement
{
   // Handles the ball hit event
   public void OnBallGroundHit()
   {
      app.model.bounces++;
      Debug.Log(“Bounce ”+app.model.bounce);
      if(app.model.bounces >= app.model.winCondition)
      {
         app.view.ball.enabled = false;
         app.view.ball.GetComponent<RigidBody>().isKinematic=true; // stops the ball
         OnGameComplete();
      }
   }

   // Handles the win condition
   public void OnGameComplete() { Debug.Log(“Victory!!”); }
}
With all scripts created, we can proceed to attaching and configuring them.
The hierarchy layout should be like this:
- application [BounceApplication]
    - model [BounceModel]
    - controller [BounceController]
    - view [BounceView]
        - ...
        - ball [BallView]
        - ...
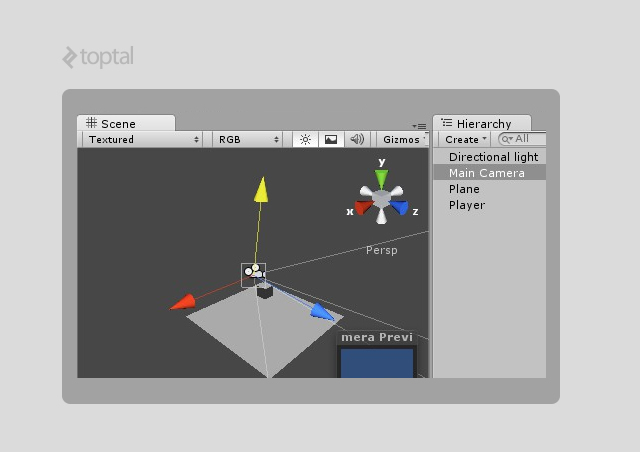
Using the BounceModel as an example, we can see how it looks in Unity’s editor:
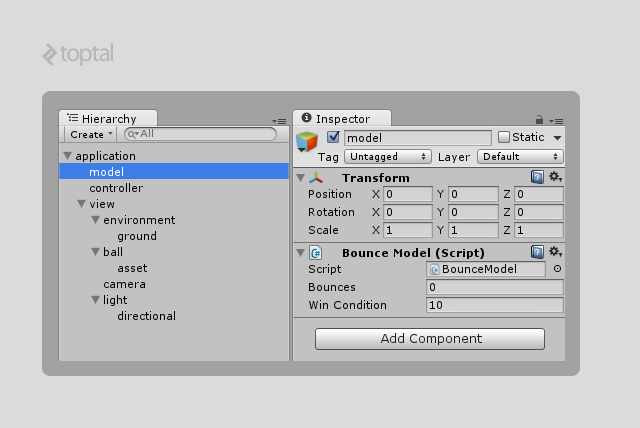
BounceModel with the bounces and winCondition fields.
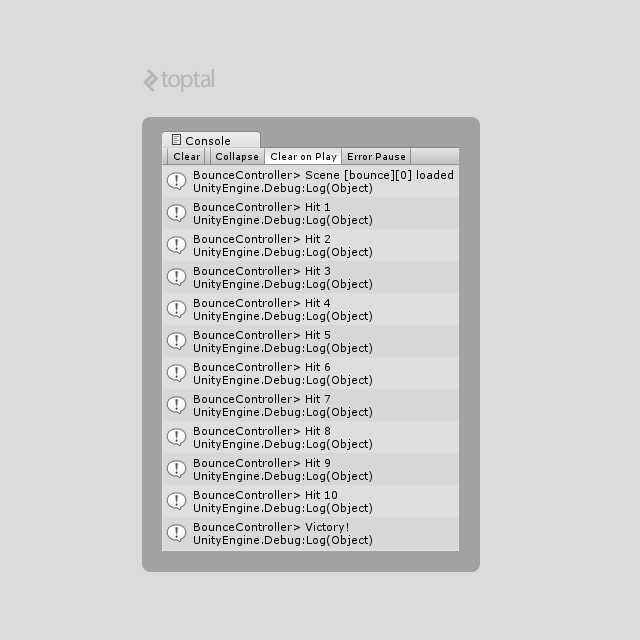
With all scripts set and the game running, we should get this output in the Console Panel.
Notifications
As shown in the example above, when the ball hits the ground its view executes app.controller.OnBallGroundHit() which is a method. It isn’t, by any means, “wrong” to do that for all notifications in the application. However, in my experience, I’ve achieved better results using a simple notification system implemented in the AMVCC Application class.
To implement that, let’s update the layout of the BounceApplication to be:
// BounceApplication.cs

class BounceApplication
{
   // Iterates all Controllers and delegates the notification data
   // This method can easily be found because every class is “BounceElement” and has an “app”
   // instance.
   public void Notify(string p_event_path, Object p_target, params object[] p_data)
   {
      BounceController[] controller_list = GetAllControllers();
      foreach(BounceController c in controller_list)
      {
         c.OnNotification(p_event_path,p_target,p_data);
      }
   }

   // Fetches all scene Controllers.
   public BounceController[] GetAllControllers() { /* ... */ }
}
Next, we need a new script where all developers will add the notification event’s names, which can be dispatched during execution.
// BounceNotifications.cs

// This class will give static access to the events strings.
class BounceNotification
{
   static public string BallHitGround = “ball.hit.ground”;
   static public string GameComplete  = “game.complete”;
   /* ...  */
   static public string GameStart     = “game.start”;
   static public string SceneLoad     = “scene.load”;
   /* ... */
}
It is easy to see that, this way, the code legibility is improved because developers don’t need to search all over the source code for controller.OnSomethingComplexName methods in order understand what kind of actions can happen during execution. By only checking one file, it is possible to understand the overall behavior of the application.
Now, we only need to adapt the BallView and BounceController to handle this new system.
// BallView.cs

// Describes the Ball view and its features.
public class BallView : BounceElement
{
   // Only this is necessary. Physics is doing the rest of work.
   // Callback called upon collision.
   void OnCollisionEnter() { app.Notify(BounceNotification.BallHitGround,this); }
}
// BounceController.cs

// Controls the app workflow.
public class BounceController : BounceElement
{
   // Handles the ball hit event
   public void OnNotification(string p_event_path,Object p_target,params object[] p_data)
   {
      switch(p_event_path)
      {
         case BounceNotification.BallHitGround:
            app.model.bounces++;
            Debug.Log(“Bounce ”+app.model.bounce);
            if(app.model.bounces >= app.model.winCondition)
            {
               app.view.ball.enabled = false;
               app.view.ball.GetComponent<RigidBody>().isKinematic=true; // stops the ball
               // Notify itself and other controllers possibly interested in the event
               app.Notify(BounceNotification.GameComplete,this);
            }
         break;

         case BounceNotification.GameComplete:
            Debug.Log(“Victory!!”);
         break;
      }
   }
}
Bigger projects will have a lot of notifications. So, to avoid getting a big switch-case structure, it is advisable to create different controllers and make them handle different notification scopes.
AMVCC in the Real World
This example has shown a simple use case for the AMVCC pattern. Adjusting your way of thinking in terms of the three elements of MVC, and learning to visualize the entities as an ordered hierarchy, are the skills that ought to be polished.
In bigger projects, developers will be faced with more complex scenarios and doubts about whether something should be a View or a Controller, or if a given class should be more thoroughly separated in smaller ones.
Rules of Thumb (by Eduardo)
There isn’t any “Universal Guide for MVC sorting” anywhere. But there are some simple rules that I typically follow to help me determine whether to define something as a Model, View, or Controller and also when to split a given class into smaller pieces.
Usually, this happens organically while I think about the software architecture or during scripting.
Class Sorting
Models
- Hold the application’s core data and state, such as player
healthor gunammo. - Serialize, deserialize, and/or convert between types.
- Load/save data (locally or on the web).
- Notify Controllers of the progress of operations.
- Store the Game State for the Game’s Finite State Machine.
- Never access Views.
Views
- Can get data from Models in order to represent up-to-date game state to the user. For example, a View method
player.Run()can internally usemodel.speedto manifest the player abilities. - Should never mutate Models.
- Strictly implements the functionalities of its class. For example:
- A
PlayerViewshould not implement input detection or modify the Game State. - A View should act as a black box that has an interface and notifies of important events.
- Does not store core data (like speed, health, lives,…).
- A
Controllers
- Do not store core data.
- Can sometimes filter notifications from undesired Views.
- Update and use the Model’s data.
- Manages Unity’s scene workflow.
Class Hierarchy
In this case, there aren’t a lot of steps I follow. Usually, I perceive that some class needs to be split when variables start to show too many “prefixes,” or too many variants of the same element start to appear (like Player classes in an MMO or Gun types in an FPS).
For example, a single Model containing the Player data would have a lot of playerDataA, playerDataB,... or a Controller handling Player notifications would have OnPlayerDidA,OnPlayerDidB,....
We want to reduce the script size and get rid of player and OnPlayer prefixes.
Let me demonstrate using a Model class because it is more simple to understand using data only.
During programming, I usually start with a single Model class holding all data for the game.
// Model.cs

class Model
{
   public float playerHealth;
   public int playerLives;

   public GameObject playerGunPrefabA;
   public int playerGunAmmoA;

   public GameObject playerGunPrefabB;
   public int playerGunAmmoB;

   // Ops Gun[C D E ...] will appear...
   /* ... */

   public float gameSpeed;
   public int gameLevel;
}
It is easy to see that the more complex the game, the more numerous variables will get. With enough complexity, we could end up with a giant class containing model.playerABCDFoo variables. Nesting elements will simplify the code completion and also give room to switch between variations of data.
// Model.cs

class Model
{
   public PlayerModel player;  // Container of the Player data.
   public GameModel game;      // Container of the Game data.
}
// GameModel.cs

class GameModel
{
   public float speed;         // Game running speed (influencing the difficulty)
   public int level;           // Current game level/stage loaded
}
// PlayerModel.cs

class PlayerModel
{
   public float health;        // Player health from 0.0 to 1.0.
   public int lives;           // Player “retry” count after he dies.
   public GunModel[] guns;     // Now a Player can have an array of guns to switch ingame.
}
// GunModel.cs
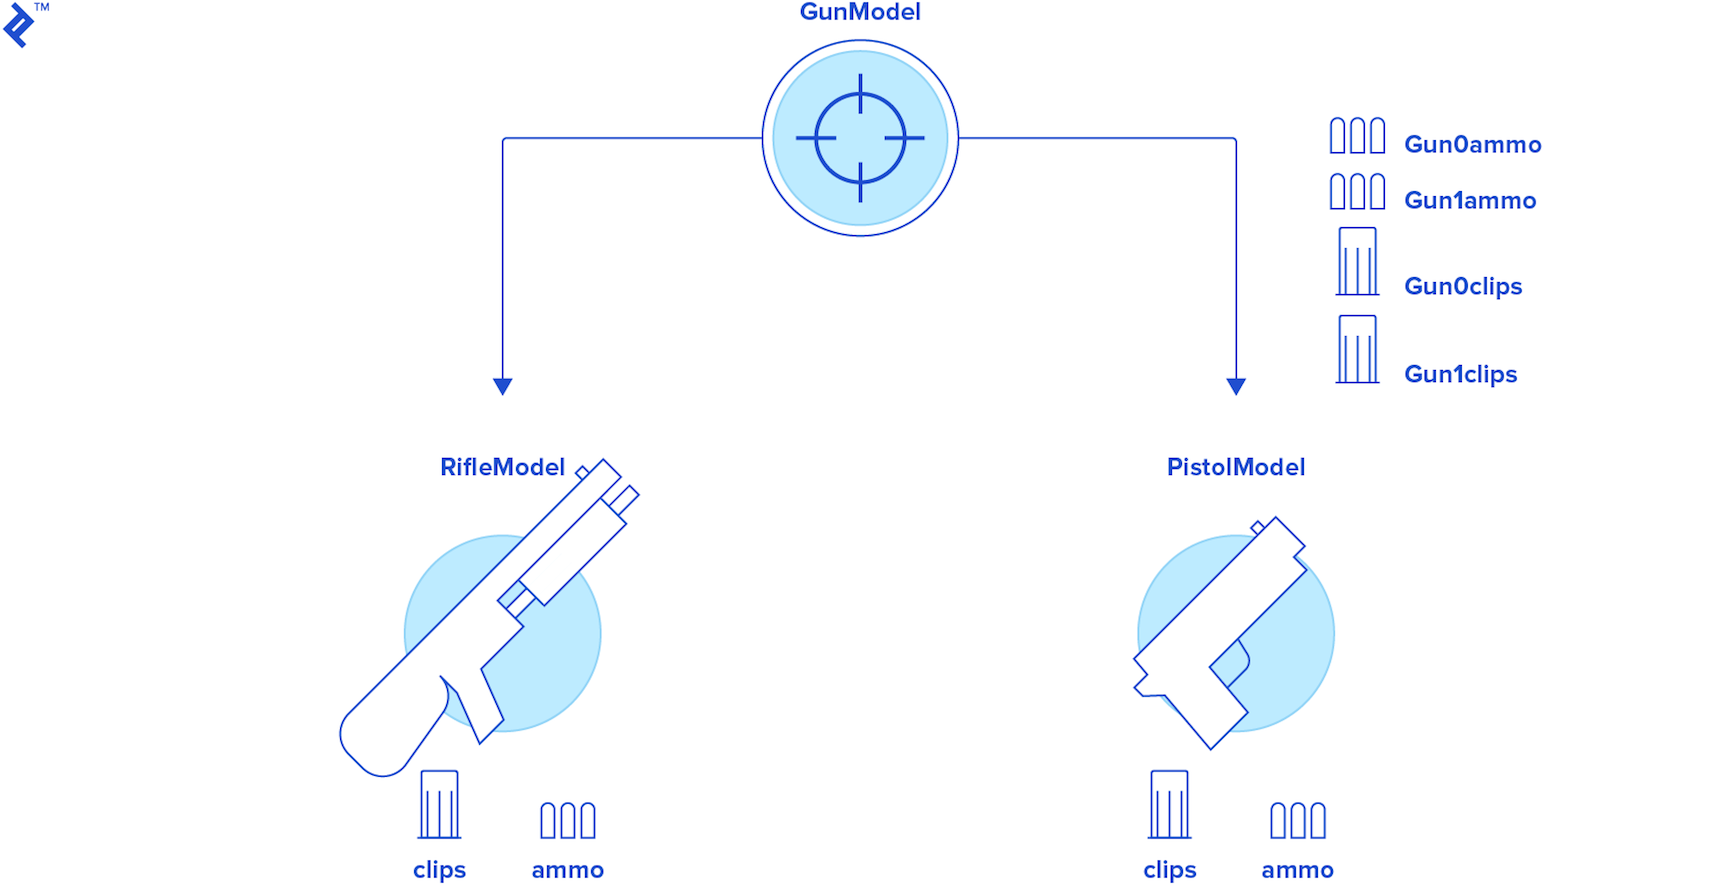
class GunModel
{
public GunType type; // Enumeration of Gun types.
public GameObject prefab; // Template of the 3D Asset of the weapon.
public int ammo; // Current number of bullets
public int clips; // Number of reloads possible
}
With this configuration of classes, developers can intuitively navigate in the source code one concept at a time. Let’s assume a first-person shooter game, where weapons and their configurations can get really numerous. The fact that GunModel is contained in a class allows the creation of a list of Prefabs (preconfigured GameObjects to be quickly duplicated and reused in-game) for each category and stored for later use.
In contrast, if the gun information was all stored together in the single GunModel class, in variables like gun0Ammo, gun1Ammo, gun0Clips, and so on, then the user, when faced with the need to store Gun data, would need to store the entire Model including the unwanted Player data. In this case, it would be obvious that a new GunModel class would be better.
As with everything, there are two sides of the coin. Sometimes one can unnecessarily over-compartmentalize and increase the code complexity. Only experience can hone your skills enough to find the best MVC sorting for your project.
Conclusion
There are tons of software patterns out there. In this post, I tried to show the one that helped me most in past projects. Developers should always absorb new knowledge but always question it, too. I hope this tutorial helps you to learn something new, and at the same time, serves as a stepping stone as you develop your own style.
Also, I really encourage you to research other patterns and find the one that suits you best. One good starting point is this Wikipedia article, with its excellent list of patterns and their characteristics.
If you like the AMVCC pattern and would like to test it out, don’t forget to try out my library, Unity MVC, which contains all the core classes necessary to start an AMVCC application.
Further Reading on the Toptal Blog:
Eduardo Dias da Costa
Porto Alegre - State of Rio Grande do Su, Brazil
Member since May 20, 2015
About the author
Eduardo is a developer with 12+ years of experience focused on client and front-end applications. He is always open to learning new things.
Expertise
PREVIOUSLY AT