How to Create Custom Loading Animations to Decrease Bounce Rates
Nobody likes staring at an empty screen while content loads. A well-crafted animation helps people stay engaged while they wait. This tutorial will show how loading animations can be done with ease.
Nobody likes staring at an empty screen while content loads. A well-crafted animation helps people stay engaged while they wait. This tutorial will show how loading animations can be done with ease.
Tidjane is a UX/UI design leader who connects user’s needs and goals to deliver strategic solutions for companies like Adobe and Google.
Originally known as a throbber, a loading animation is used to indicate the progress of data collection or interface rendering. While you could once get by using a dull progress bar to indicate this, those days are gone.
Today, a well-crafted animation leveraging CSS, jQuery, or simple animated GIFs is an opportunity to enliven your interfaces and add personality to your product.
Thoughtful animations can entertain your users while they wait for your content to load. A good loading animation helps manage expectations and improves the user experience by maintaining interest.
In this tutorial, we’ll use Sketch to create basic shapes and Principle to quickly create simple custom loading animations. (Both of these apps are for Mac.) You’ll learn how to create the colorful loading animations used by Trello, Flickr, Slack, and more.
Let’s get to it.
Slack Loading Animation
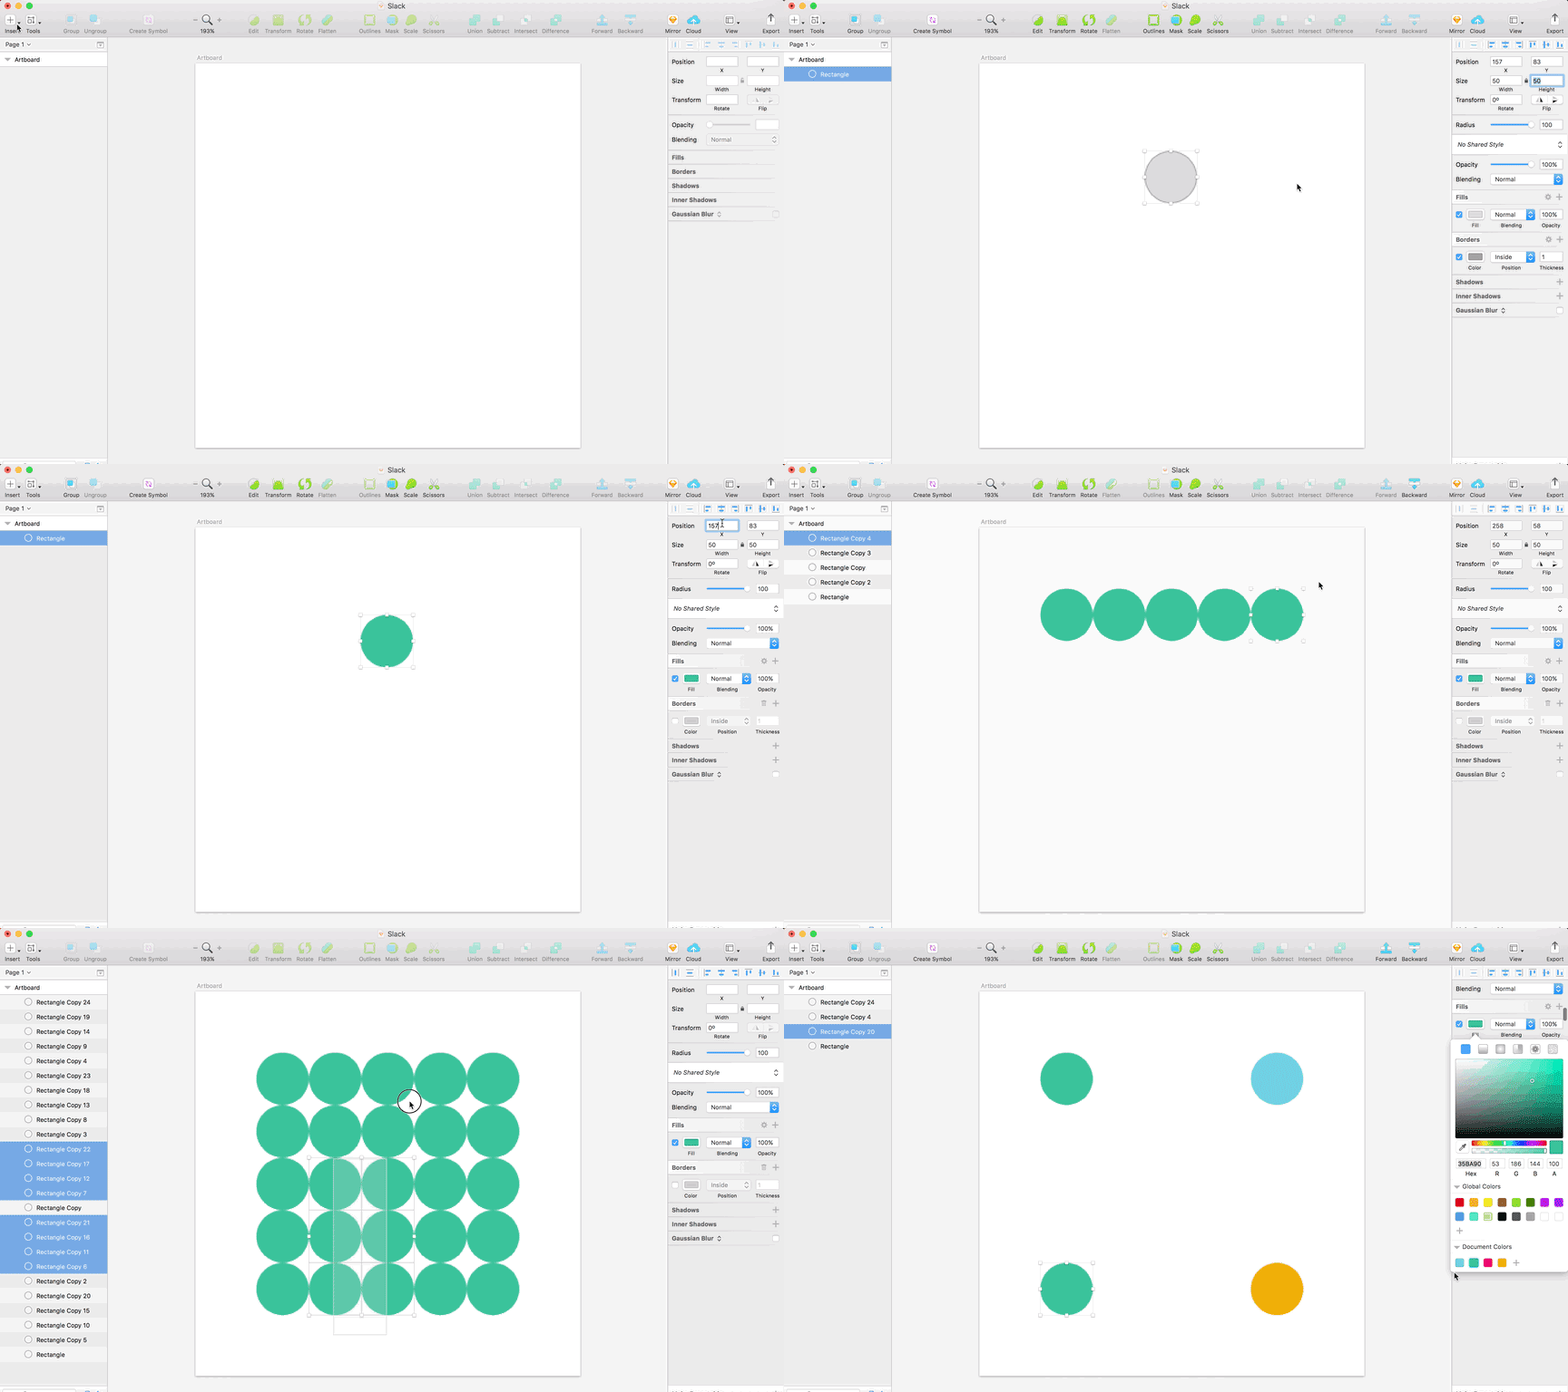
On Sketch, trace four rounded squares with 50px sides, or a 100px radius each. They should look like perfect circles, but we’re using squares with rounded corners to create the line stretching effect in the animation.
Place the four shapes in such a way as to create an imaginary square with 150px of space between each side. Apply four different colors (#35BA90 green, #69CADD blue, #EBA900 yellow, and #E20661 pink).
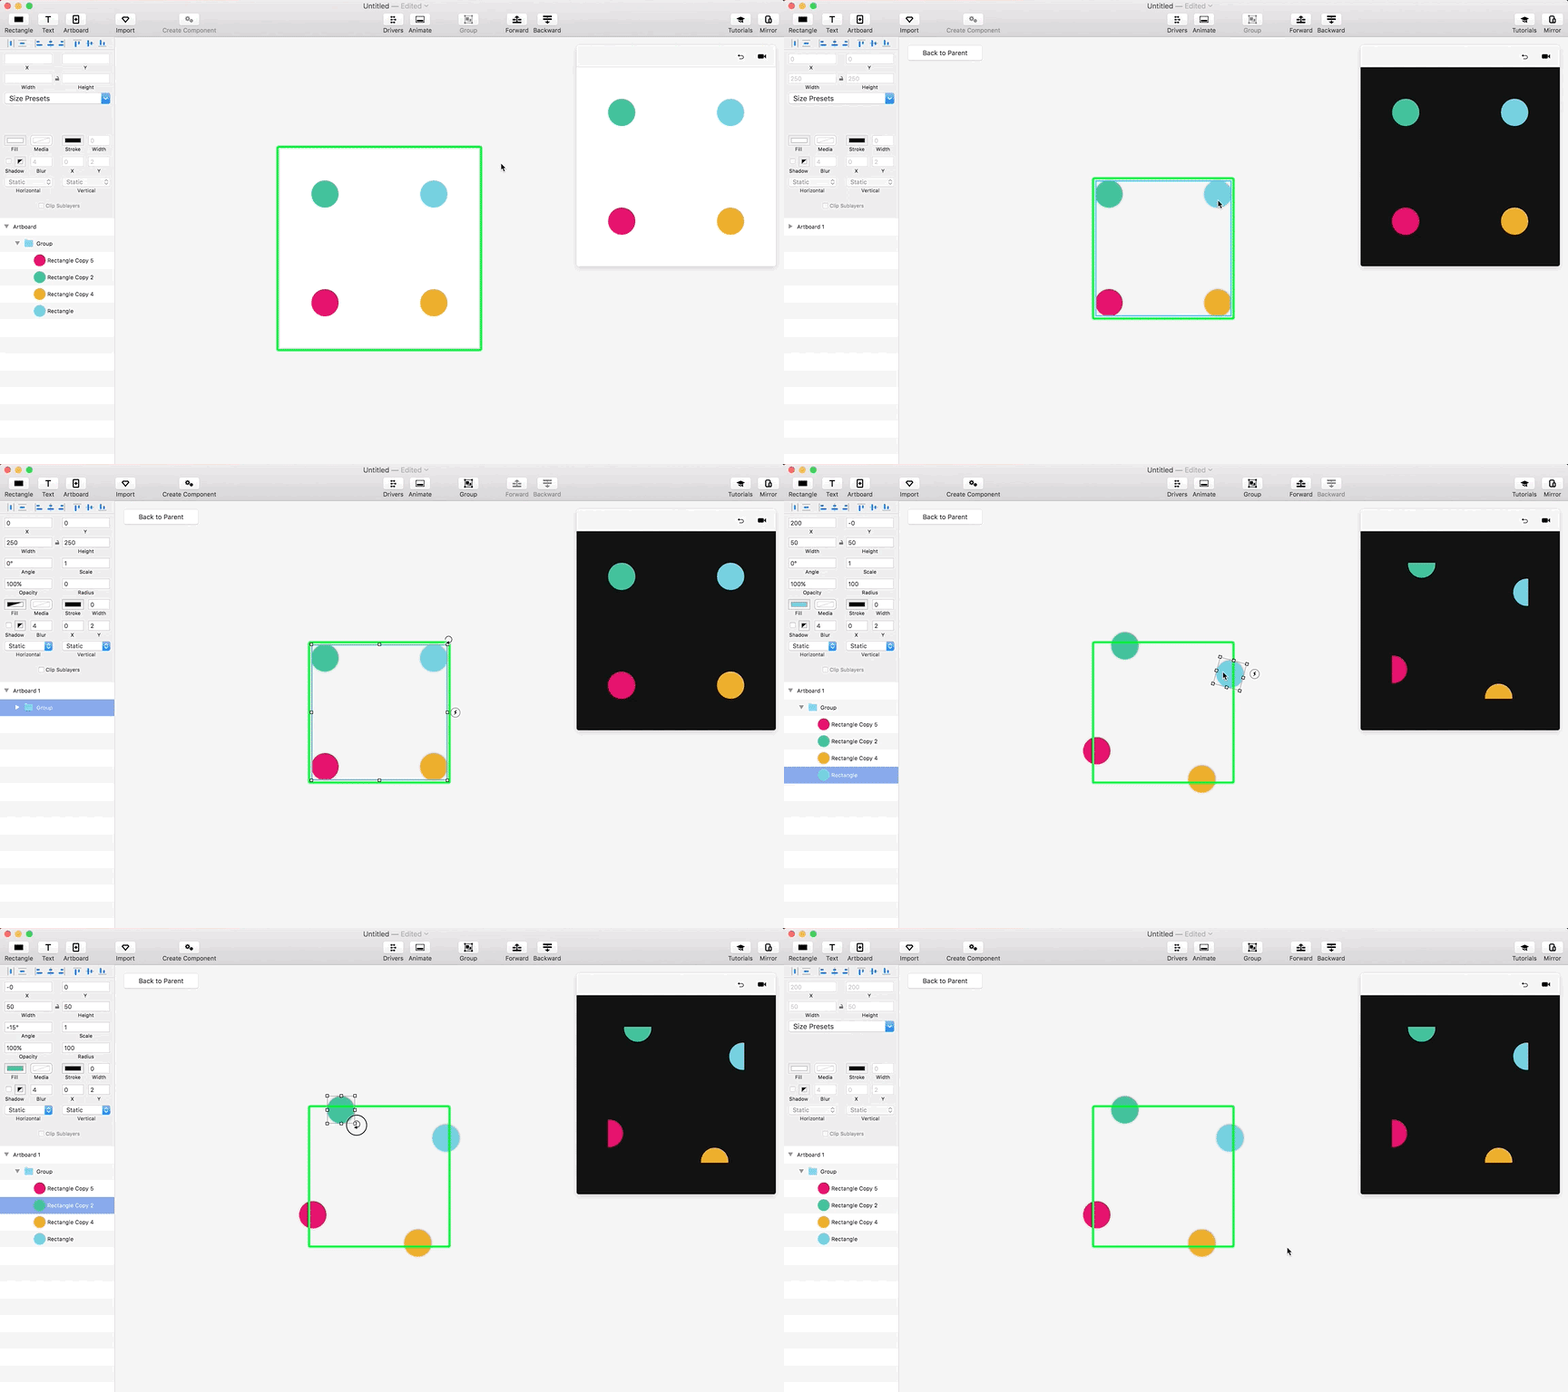
Import the shapes to Principle, group them, and click “Create Component” to nest the group.
Go inside the nested group and rotate the artboard by 15 degrees. Then select each individual circle and rotate it back to its original position (backward 15 degrees). This creates the stretching effect in a straight line.
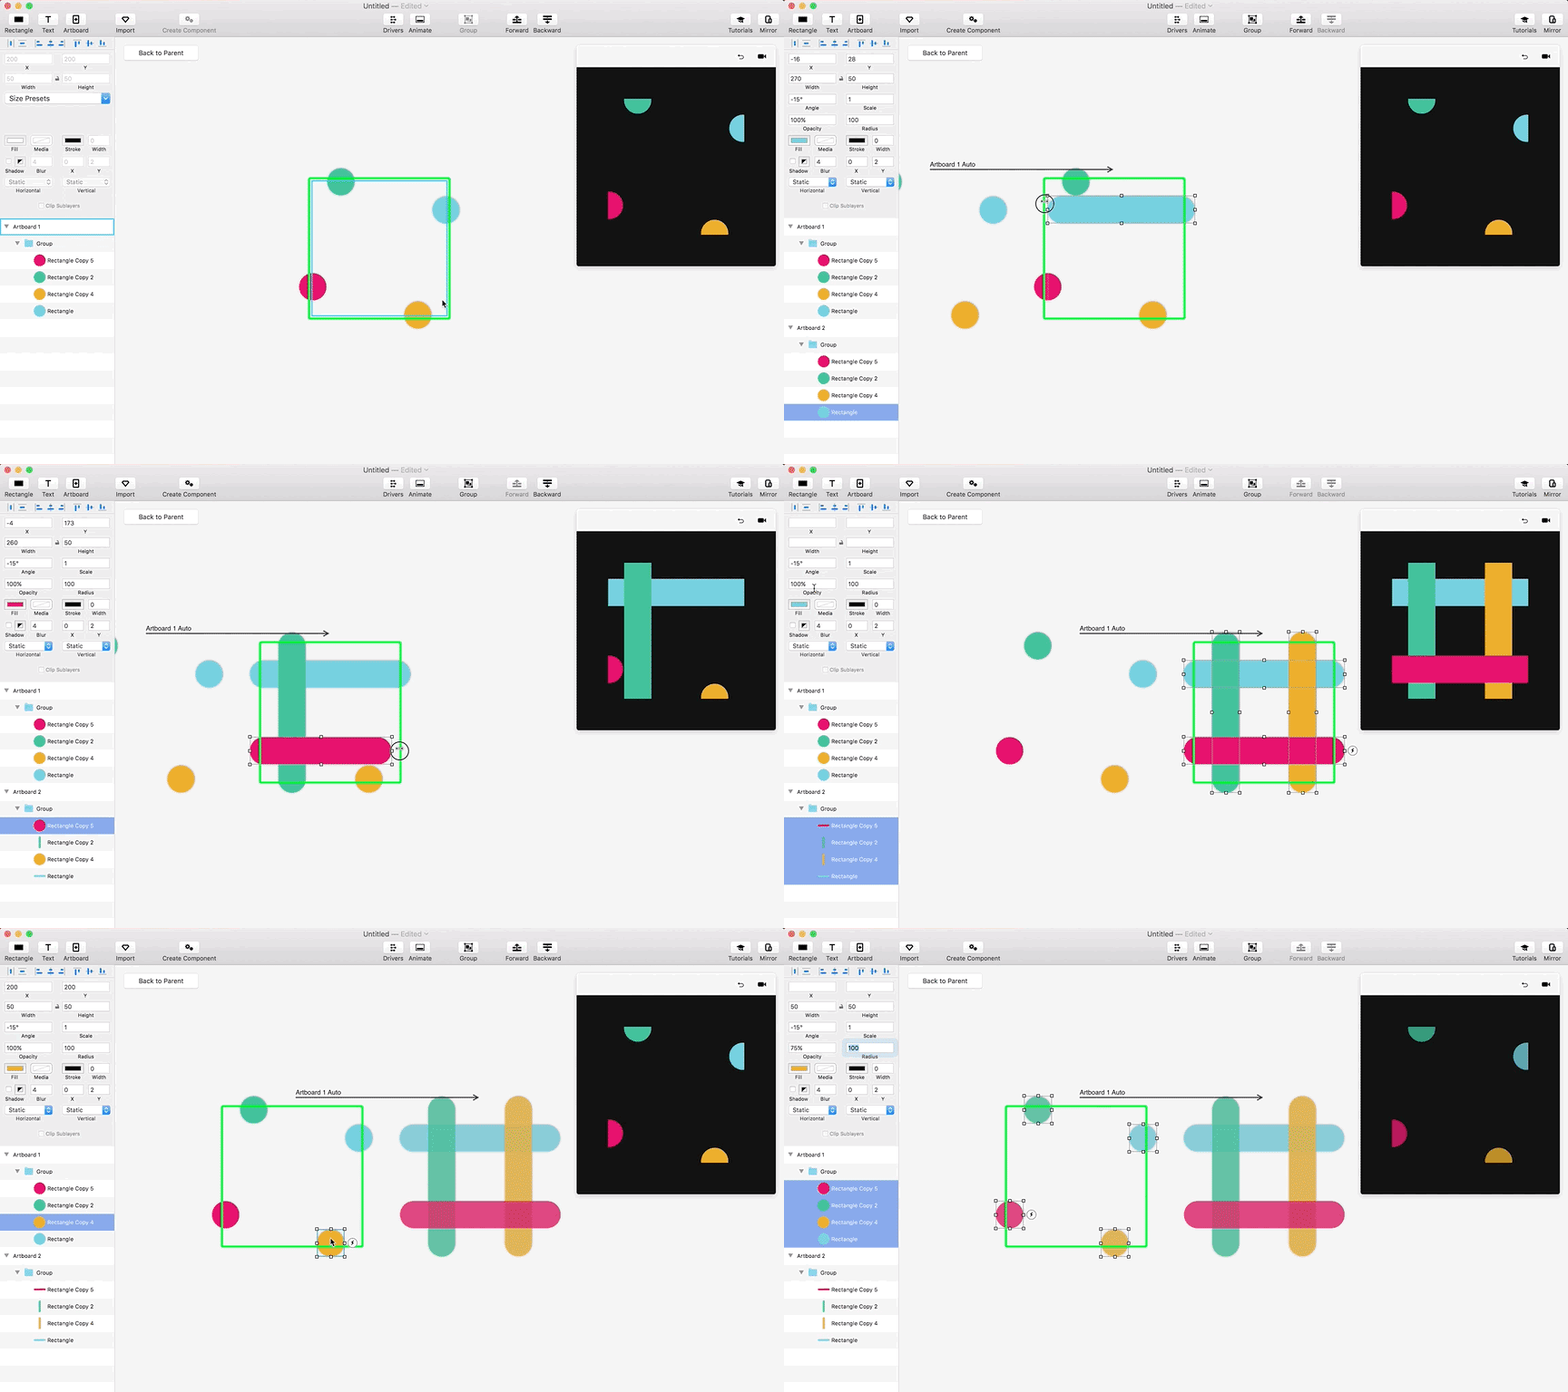
Apply an “Auto” trigger to the artboard, and then stretch each rounded rectangle to the opposite side of the artboard to a length of 295px. Give a 75% opacity to each shape on both artboards.
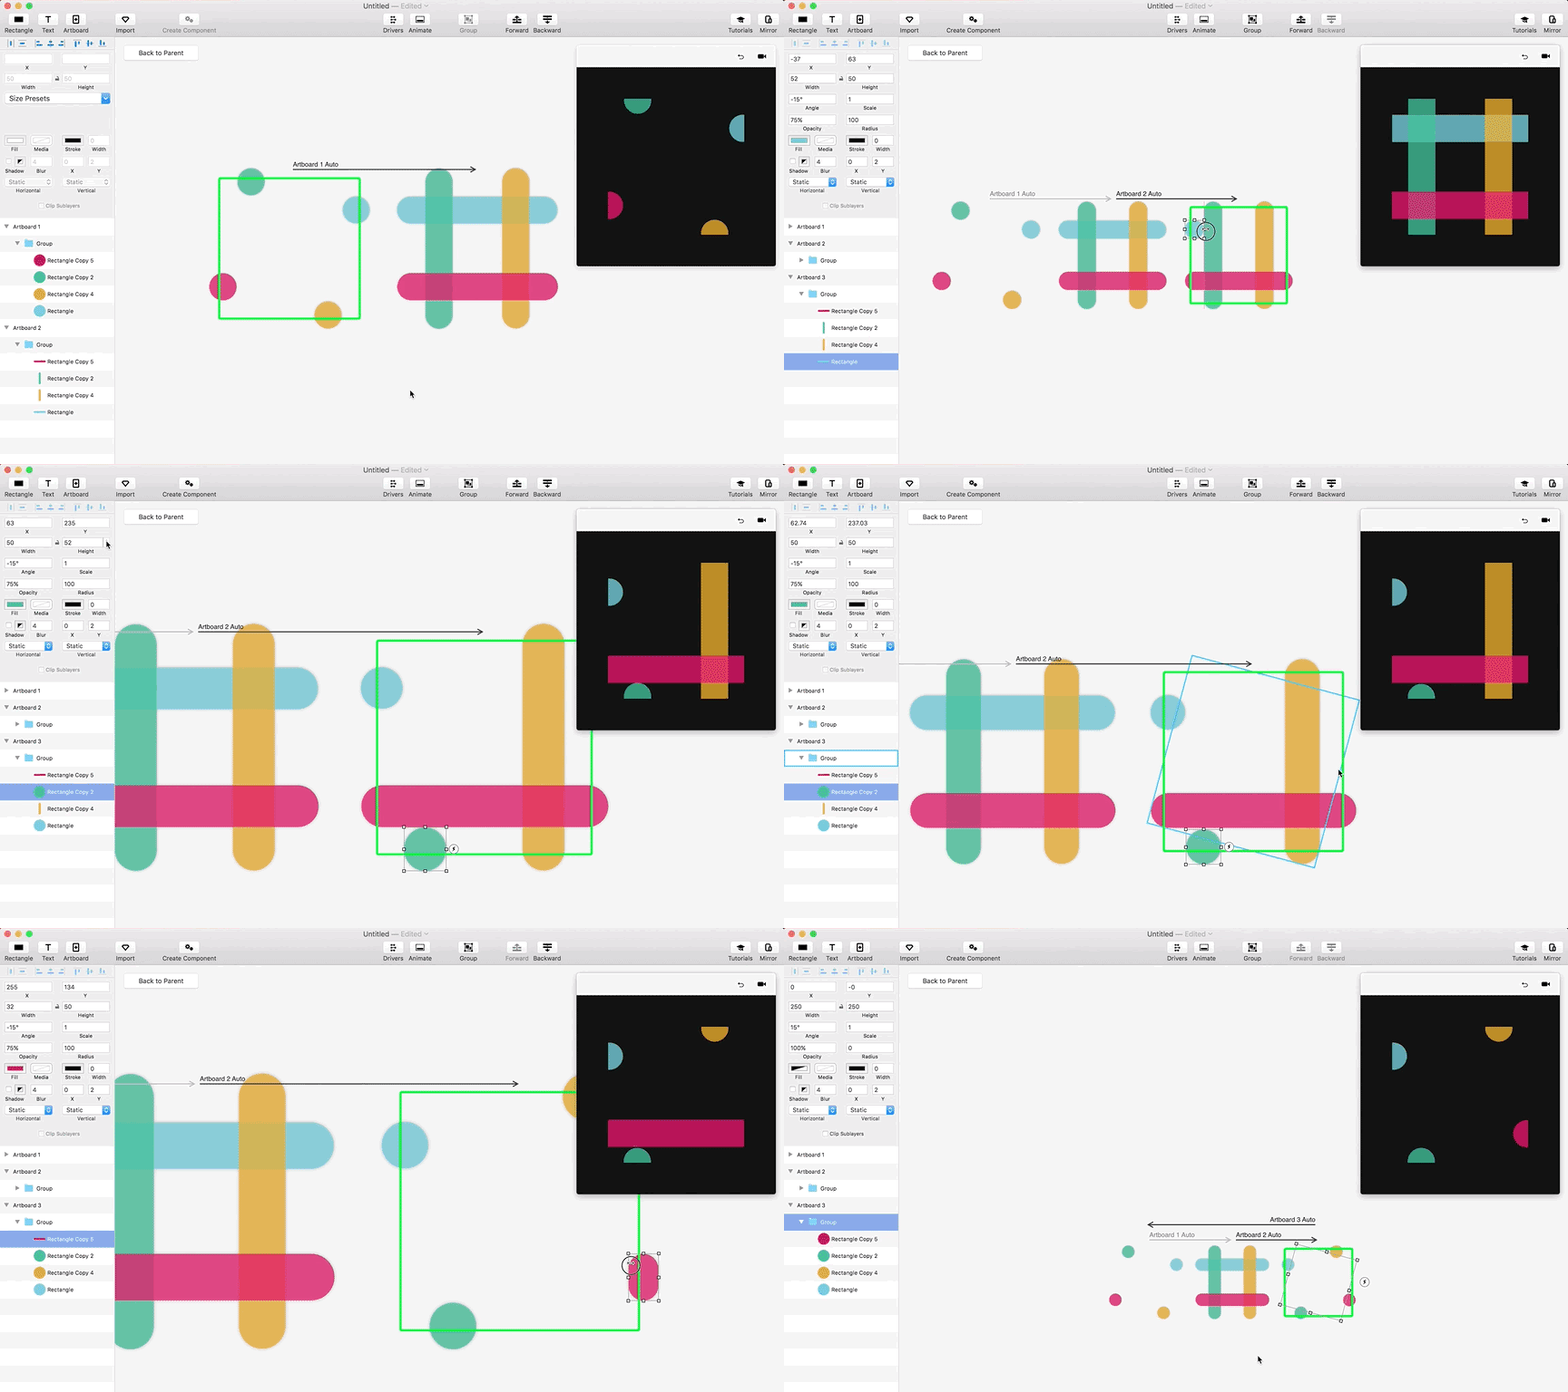
Apply another “Auto” trigger to the second artboard. On the new artboard, reduce each line to its original 50px width, but on the opposite side from its original position.
Link the last artboard to the first with an “Auto” trigger. Click the “Back to Parent” button to preview the end result.
Tip: When you go “Back to Parent,” you can rotate the main group by -30 degrees to look more like Slack. Also, you can change the animation pace inside the “Animate” panel and apply an “Ease Both” effect to smooth out the transitions.
Trello Loading Animation

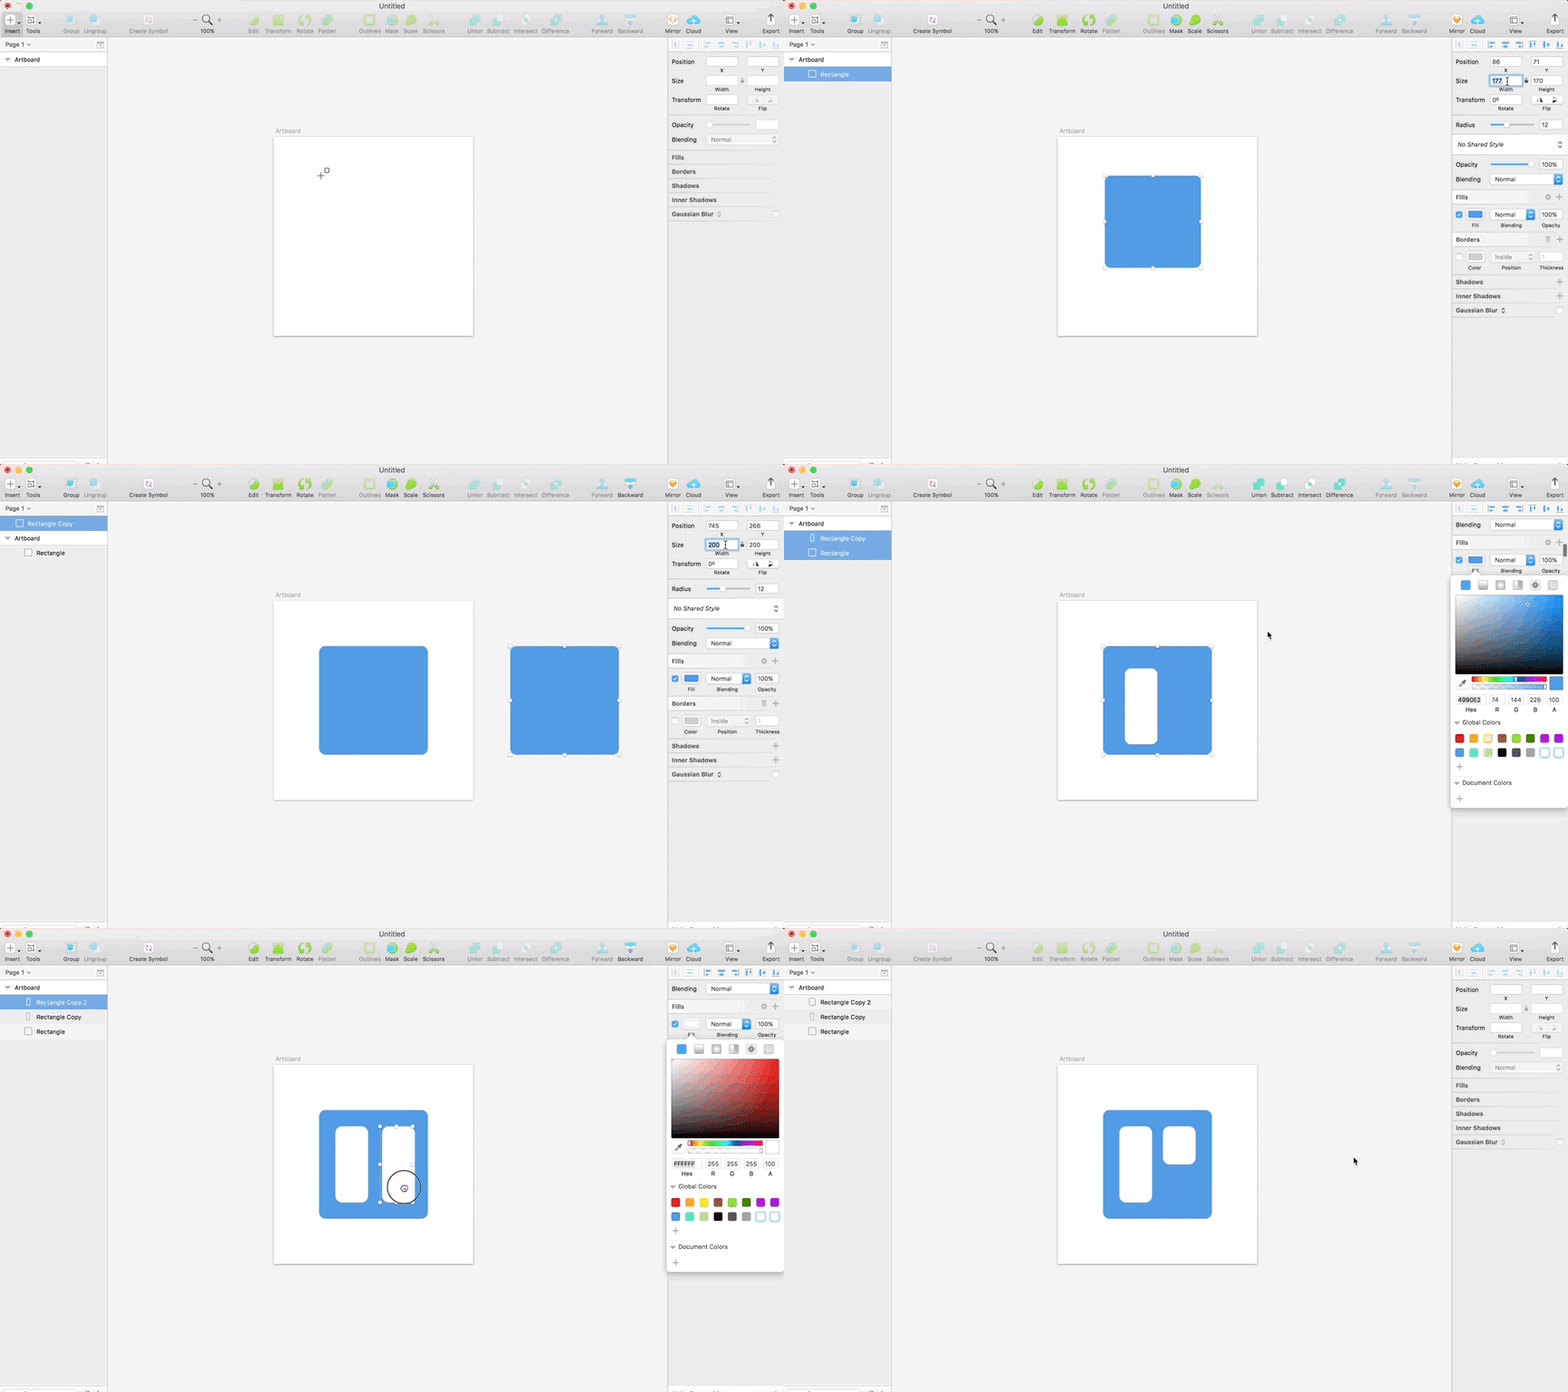
Using Sketch, trace a 100px blue square. Draw a white rectangle 60px wide by 140px high. Align it with the top left of the previous square with a 30px top and left margin. Duplicate that white rectangle, align it to the right of the square with a 30px right margin, and reduce its height to 70px.
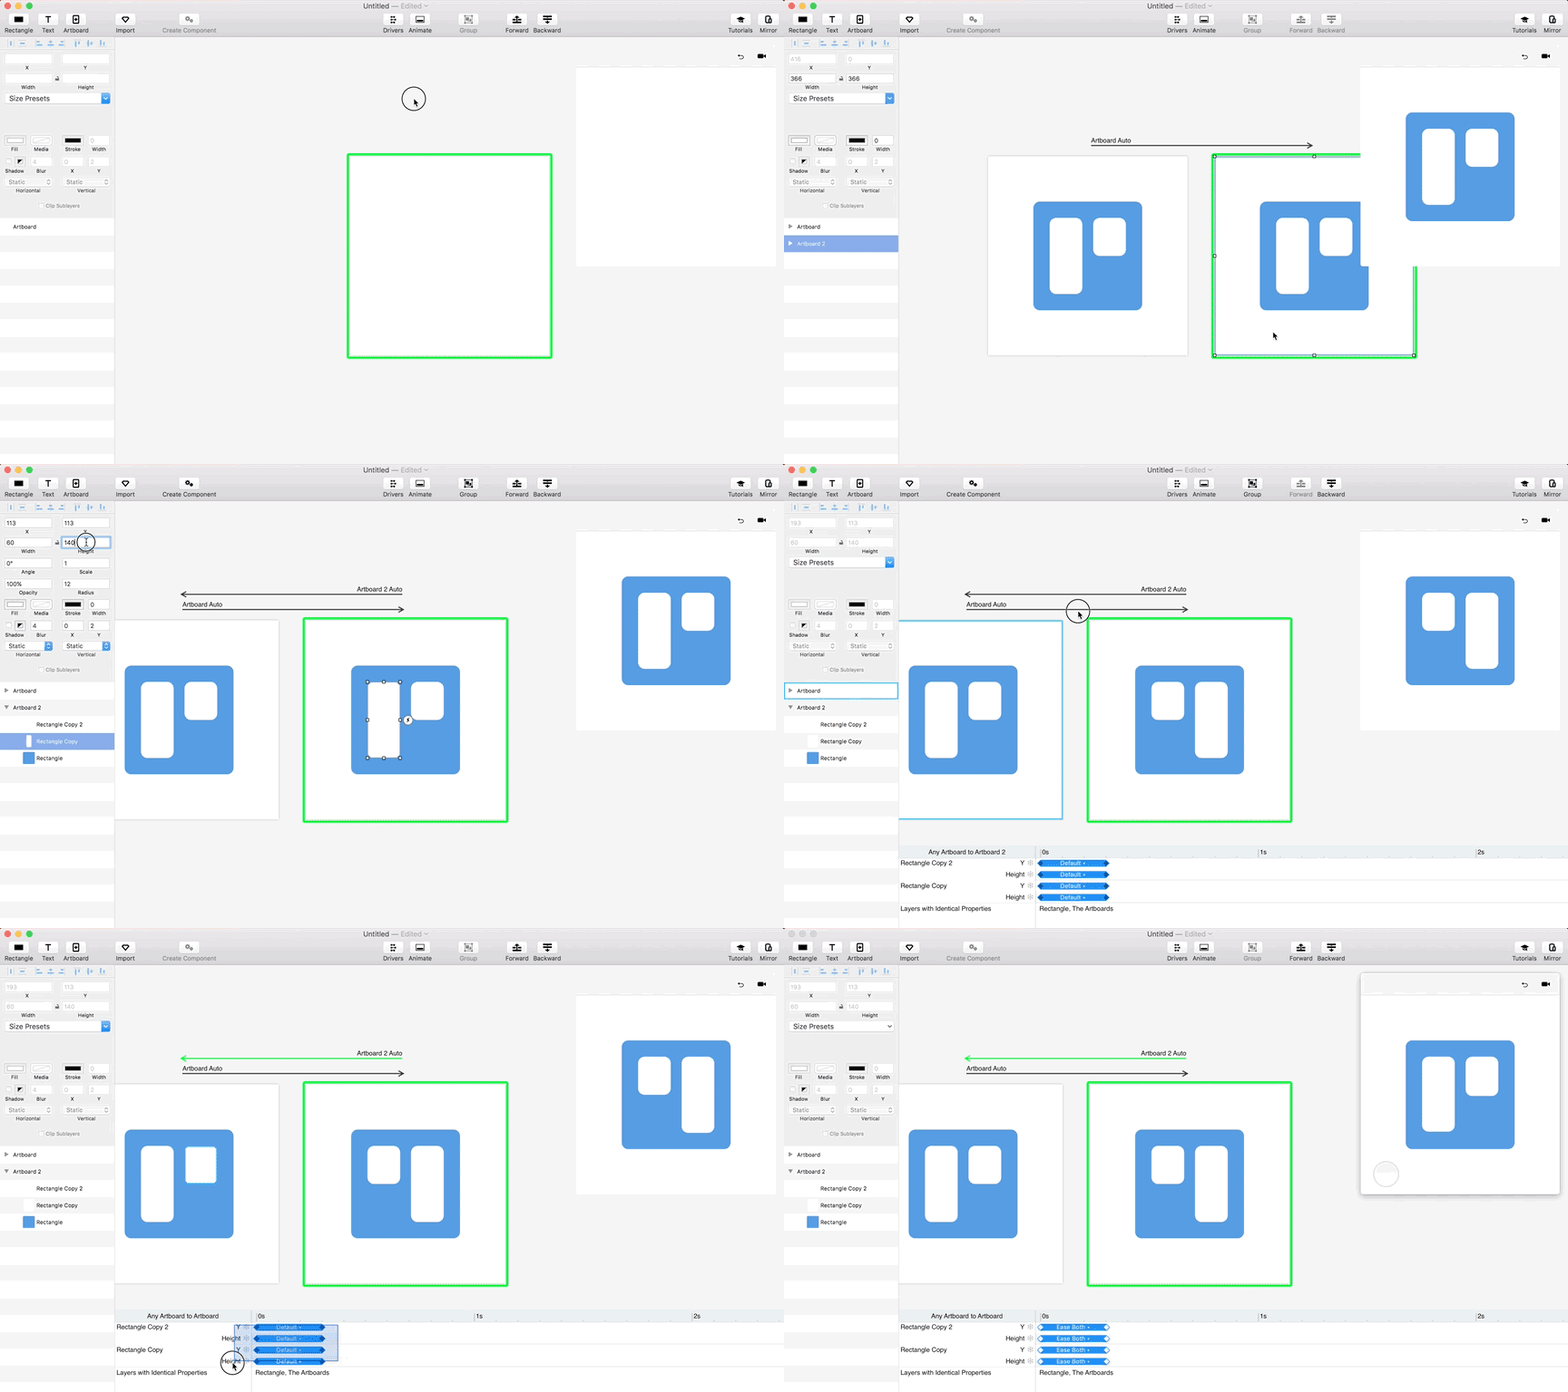
Import the artboard into Principle and apply the “Auto” trigger to create a new keyframe. On the new art-board, reverse the white rectangles’ heights (make the left rectangle 70px high and the right rectangle 140px). Apply an “Ease-Both” effect in the “Animate” panel to smooth out the transition.
Rolling Circle

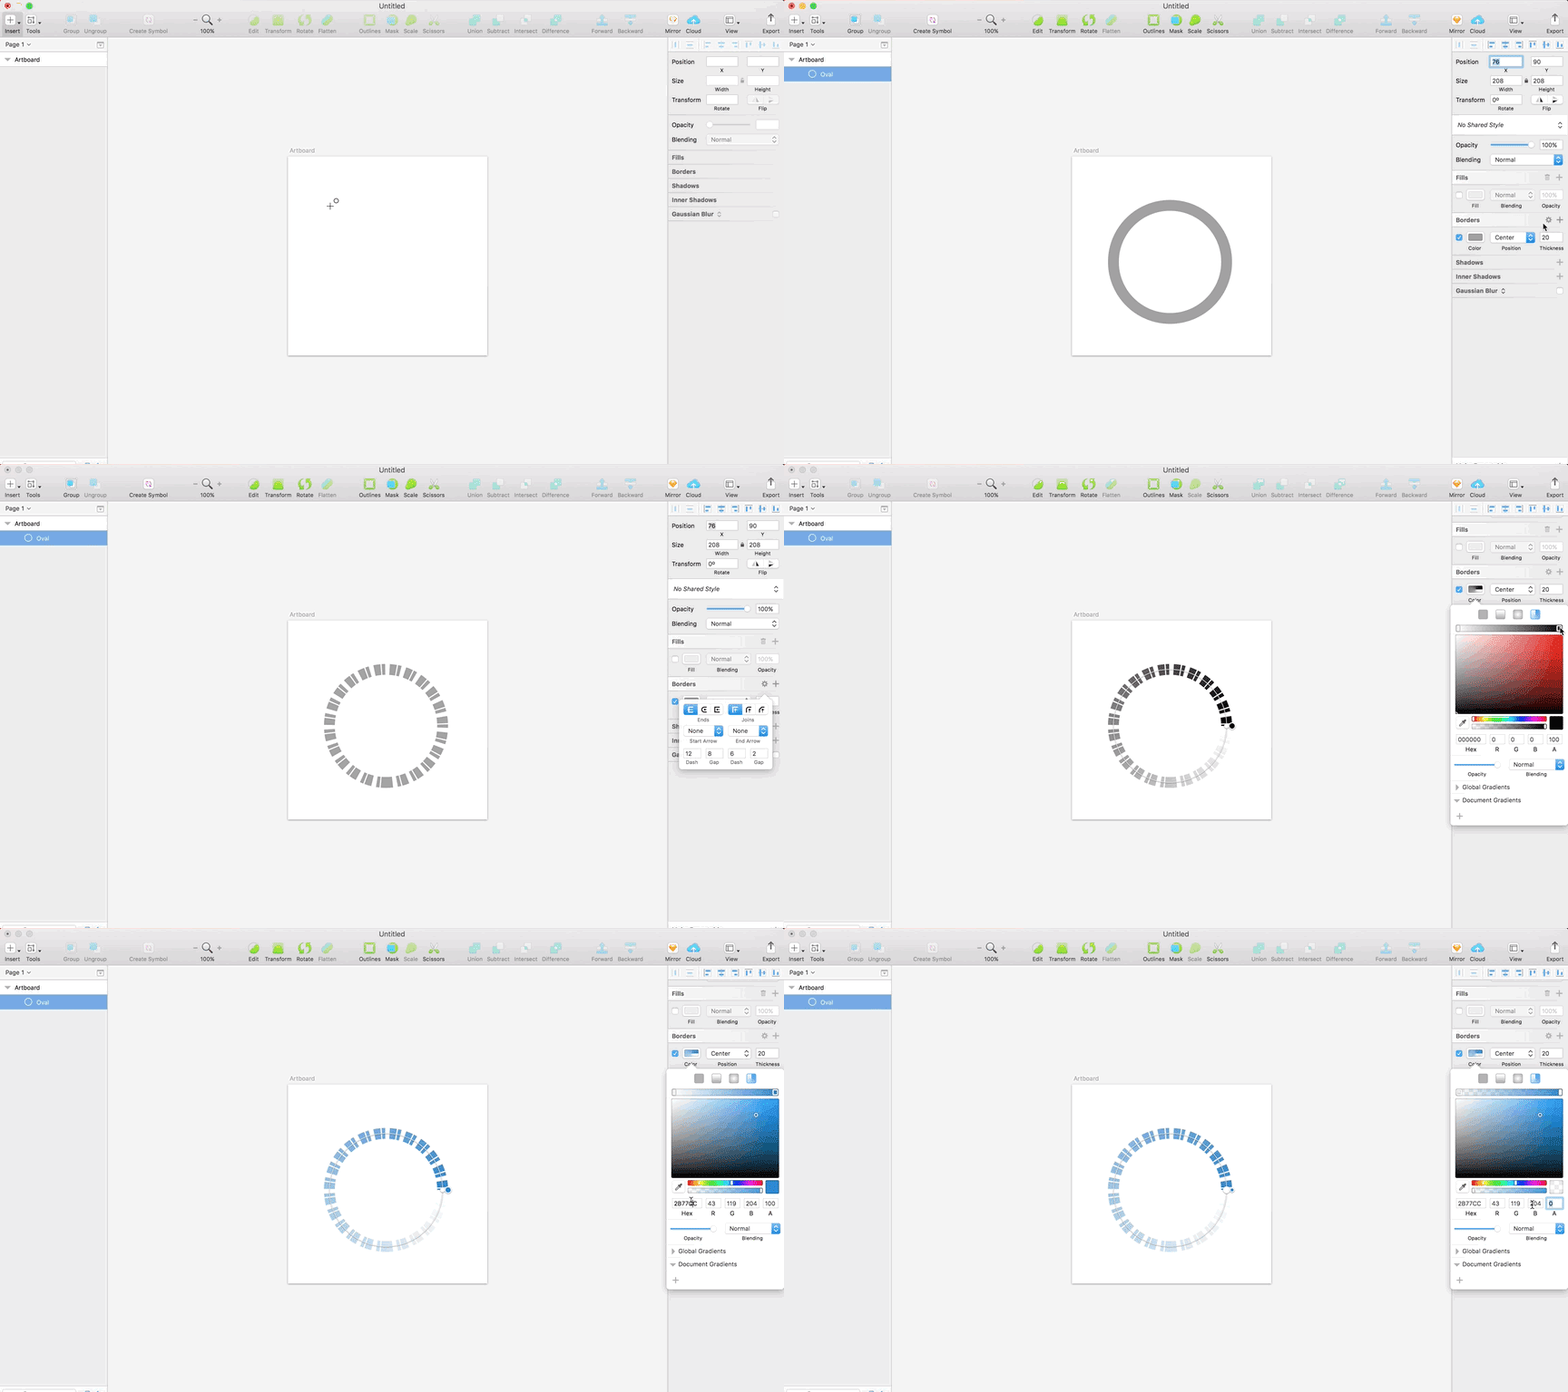
Trace a circle on Sketch. Apply a 10px border with “Dash” and “Gap” values and no fill. Use an “Angular Gradient” color for the border that will accentuate the rotation effect that you’ll create later.
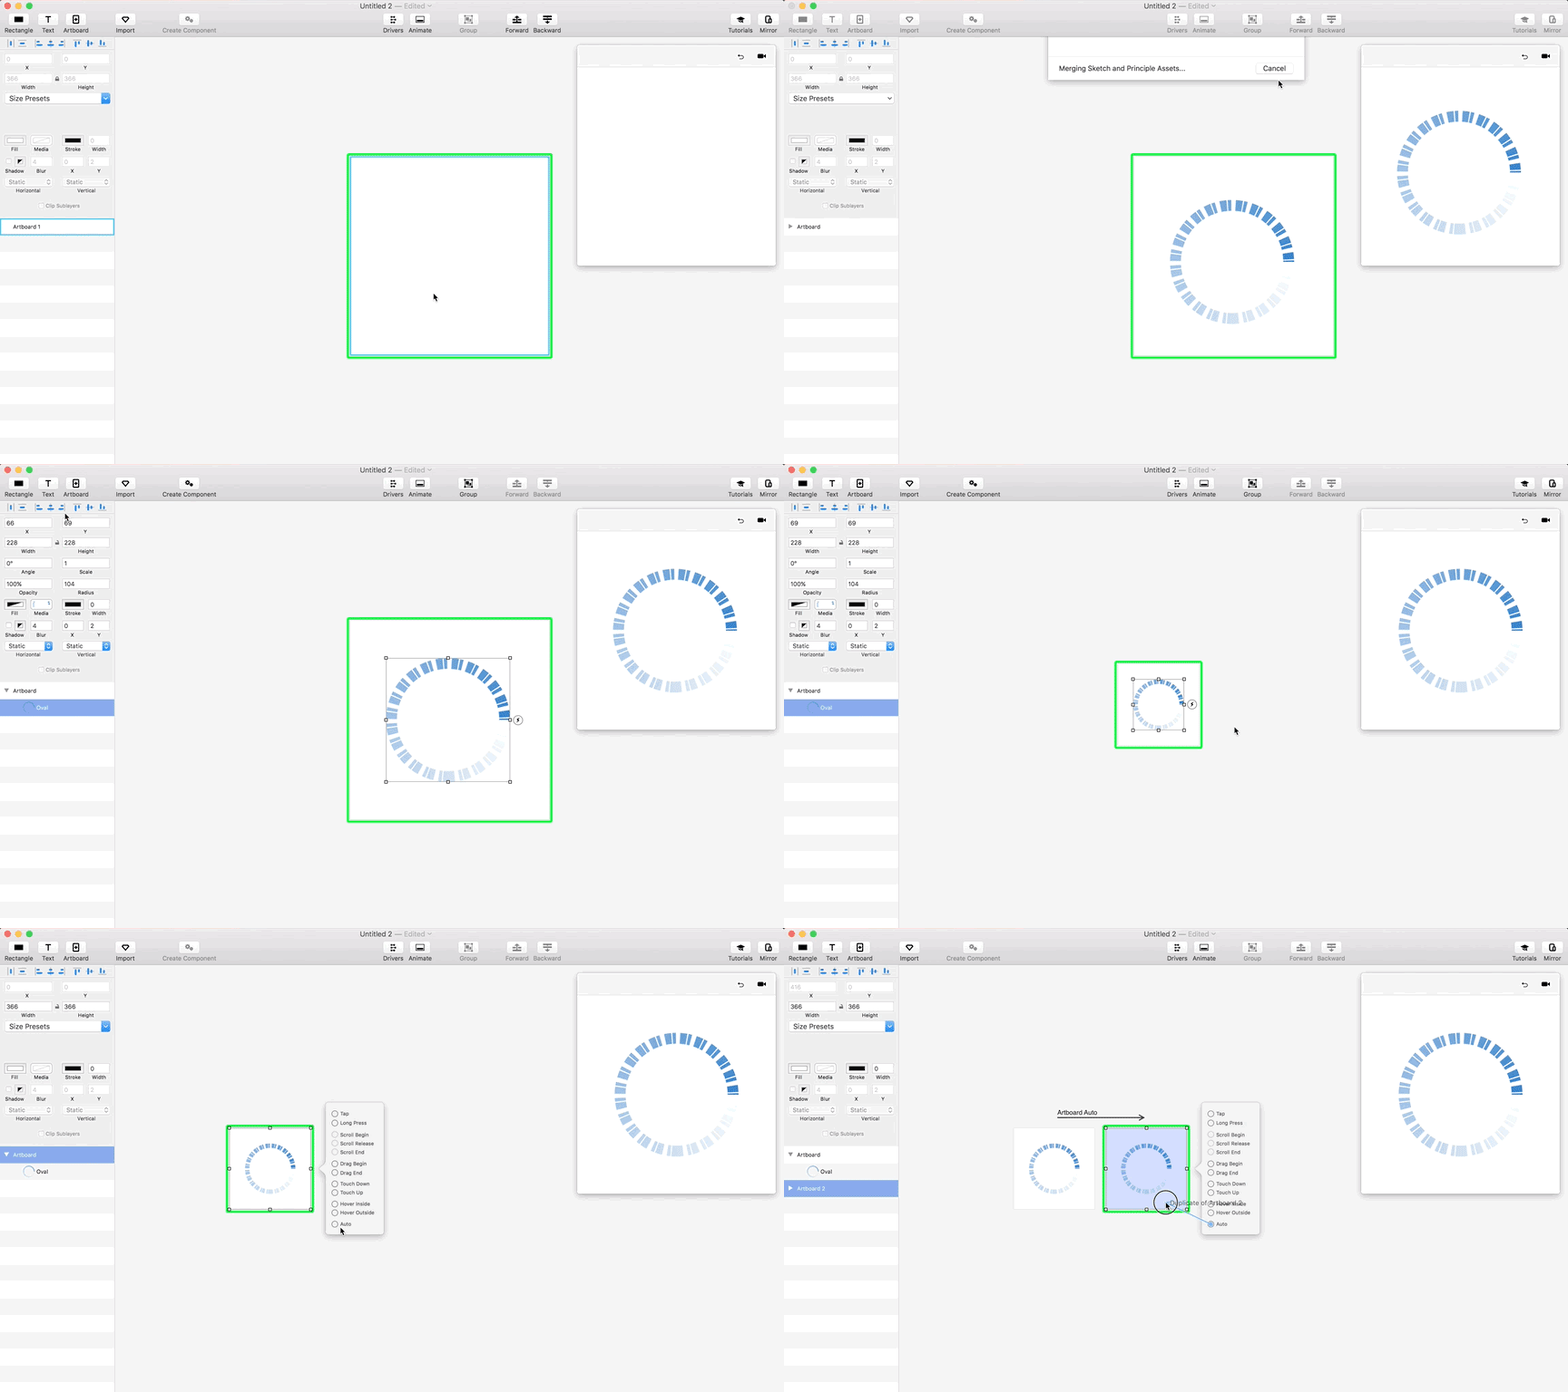
Open a new Principle file and use the “Import” button to transfer the circle from Sketch. Apply two “Auto” triggers in a row.
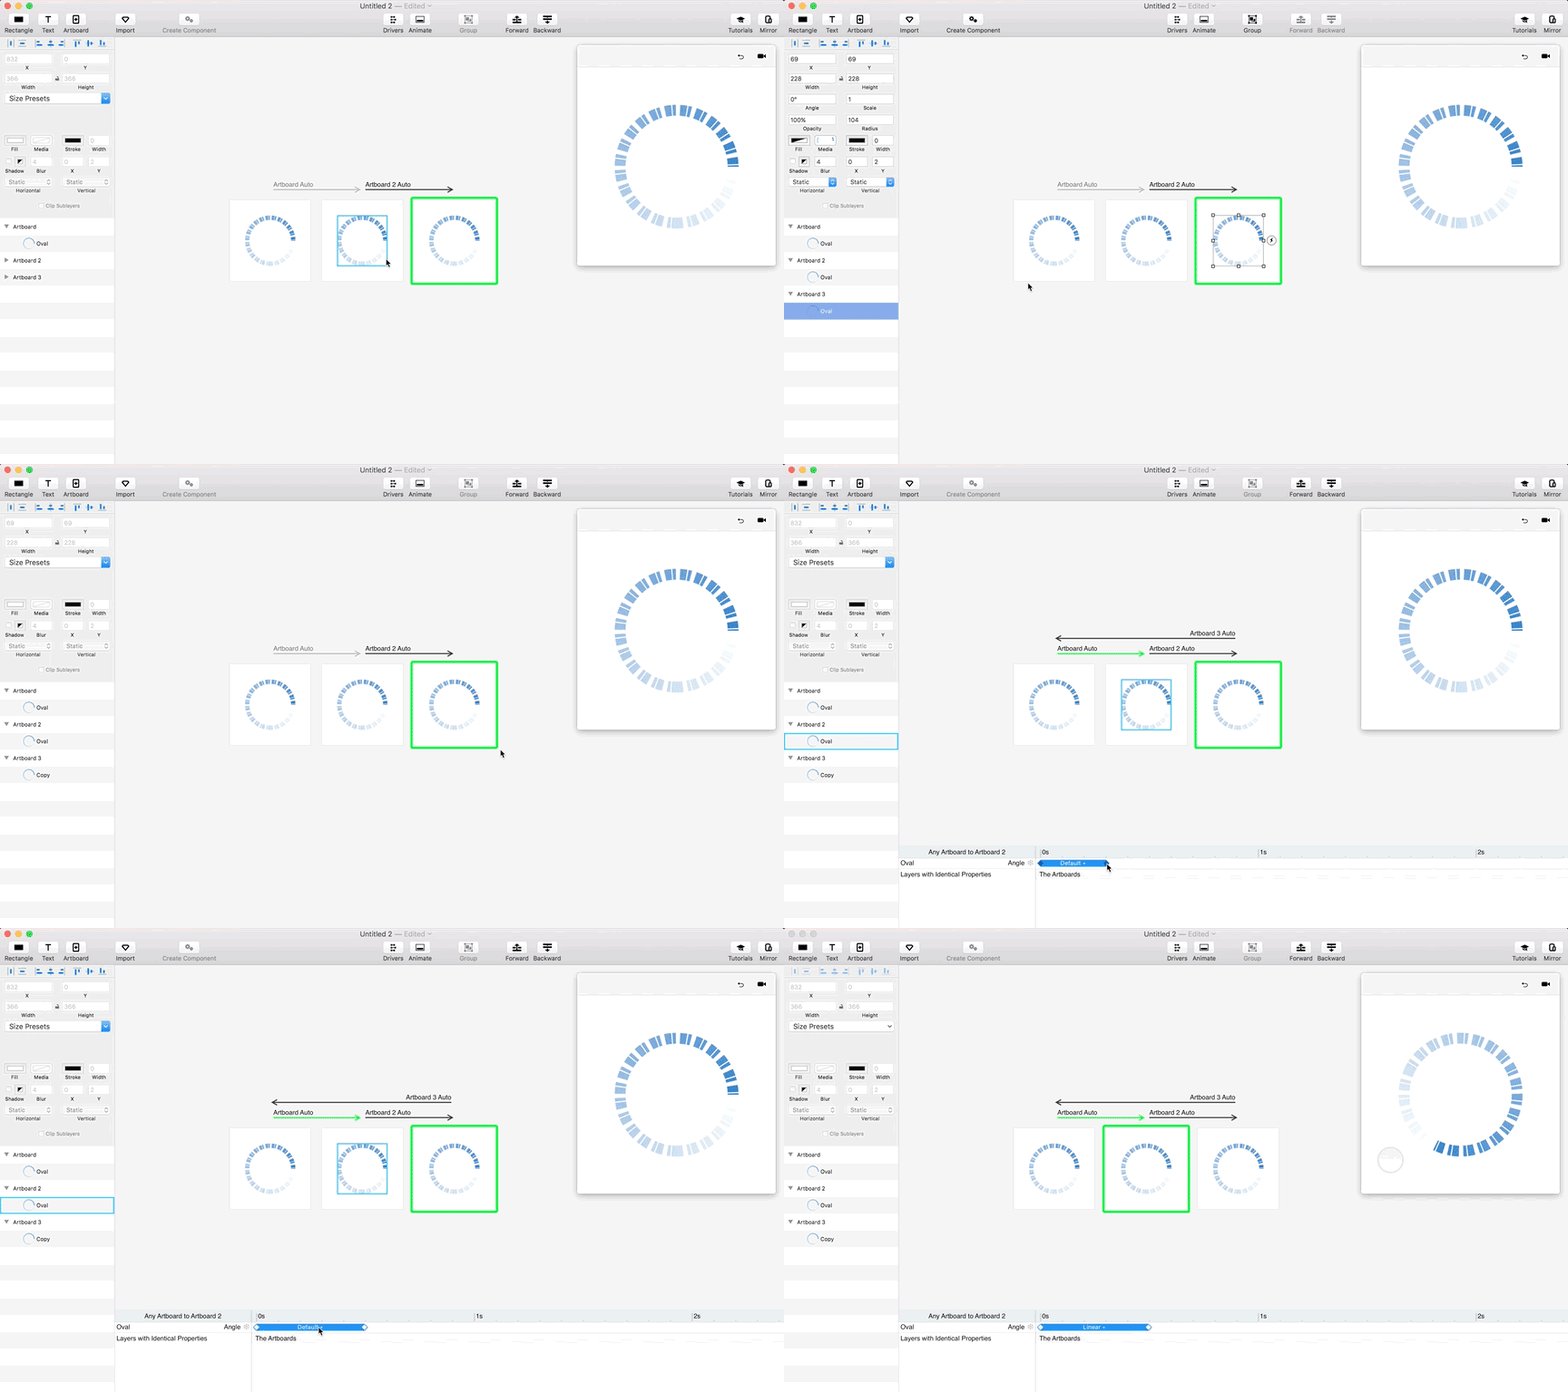
To create the rotation effect, select the circle in the middle artboard and change its “Angle” value to 360 degrees. Then select the third circle and give it a different name (i.e., “copy”) inside the left panel. This will fake the infinite rotation.
Finally, link back the third artboard to the initial one with another “Auto” trigger. Apply a “Linear” transition to the timeline between artboards 1 and 2. Check the animation you just created in the preview window.
Flickr Loading Animation
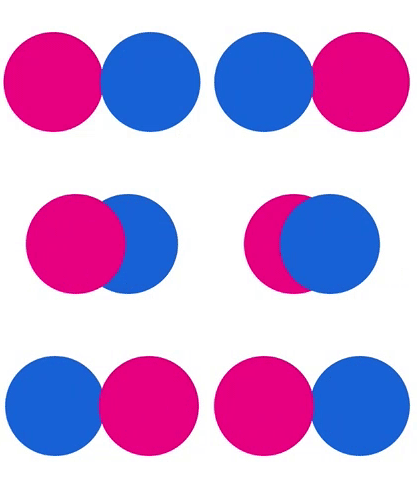
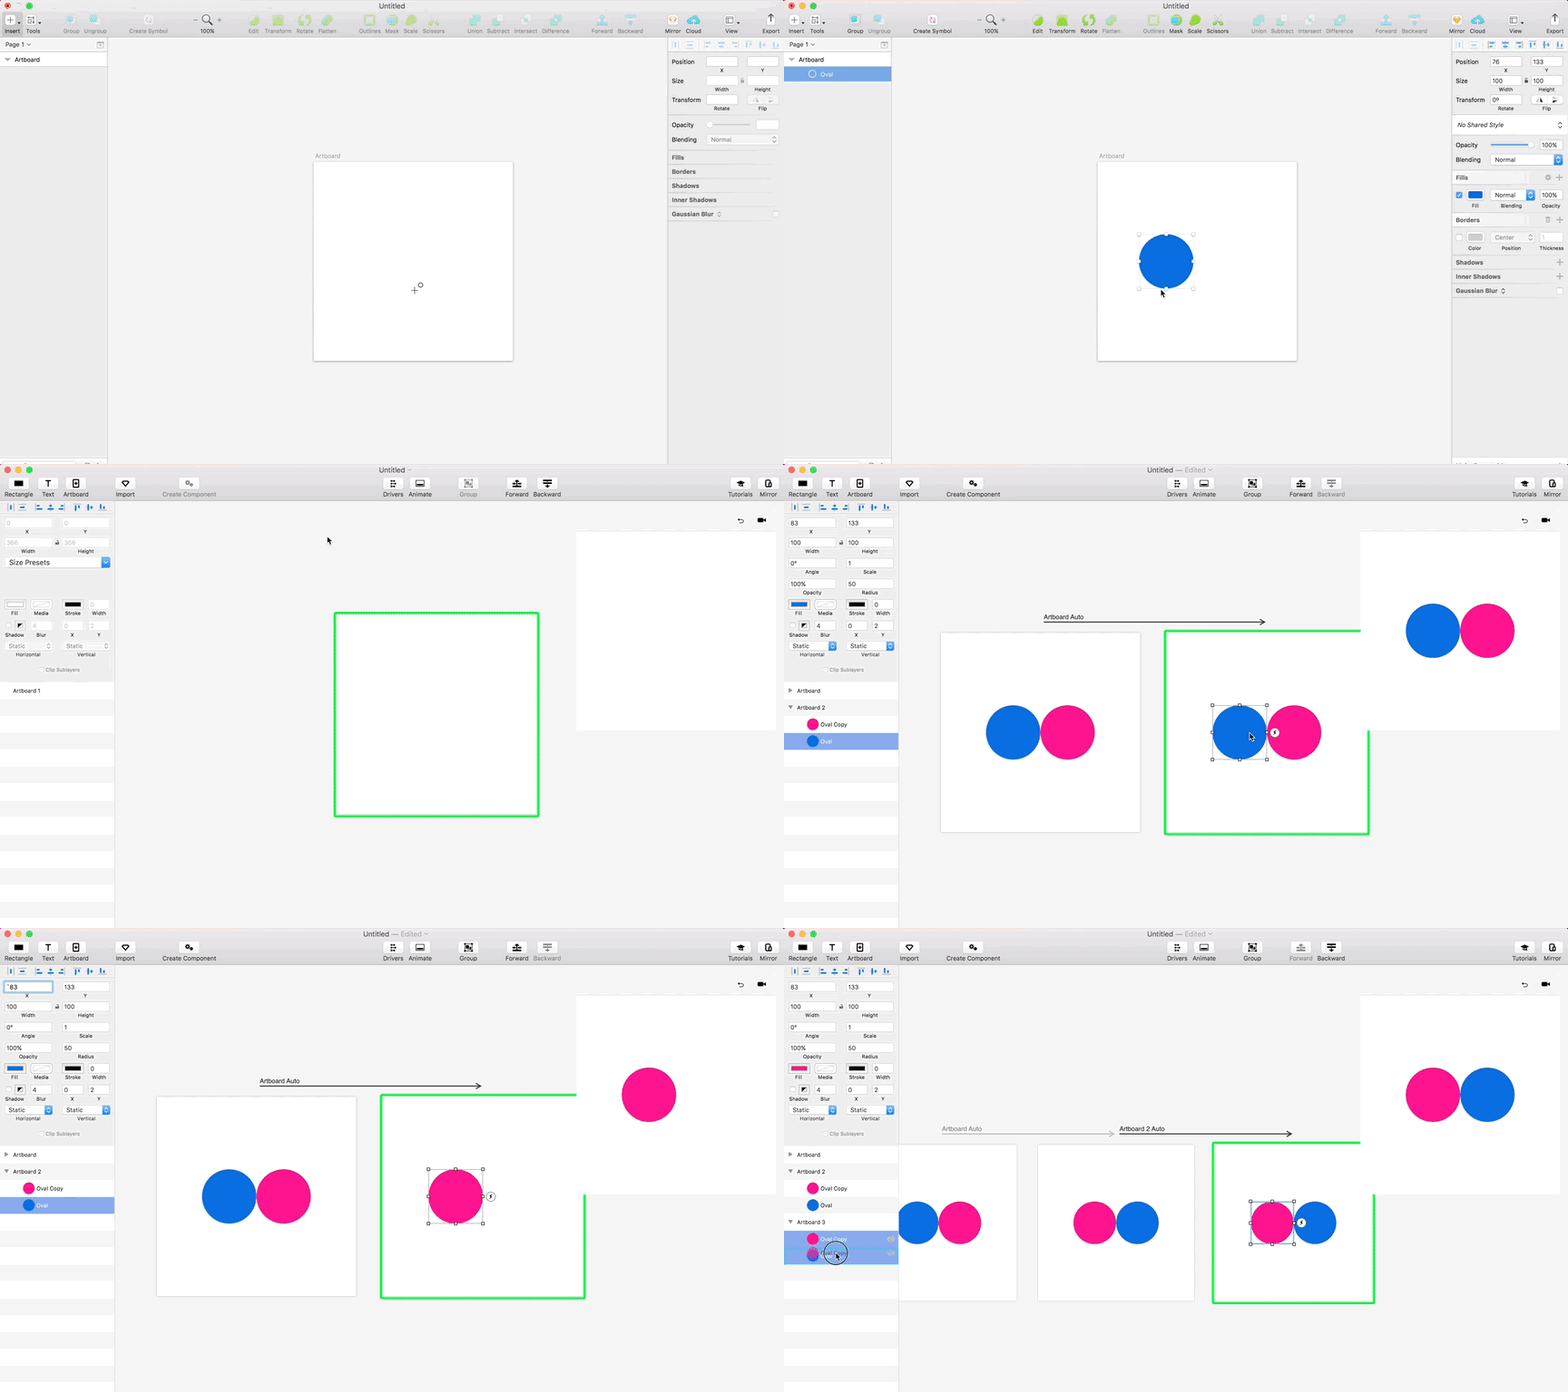
Trace a blue circle and a pink circle side-by-side. Import them into Principle and apply an “Auto” trigger to create a new artboard.
Invert the circles’ positions and apply a new “Auto” trigger to create a third artboard. On that new artboard, invert the order of the circles’ layer on the left panel.
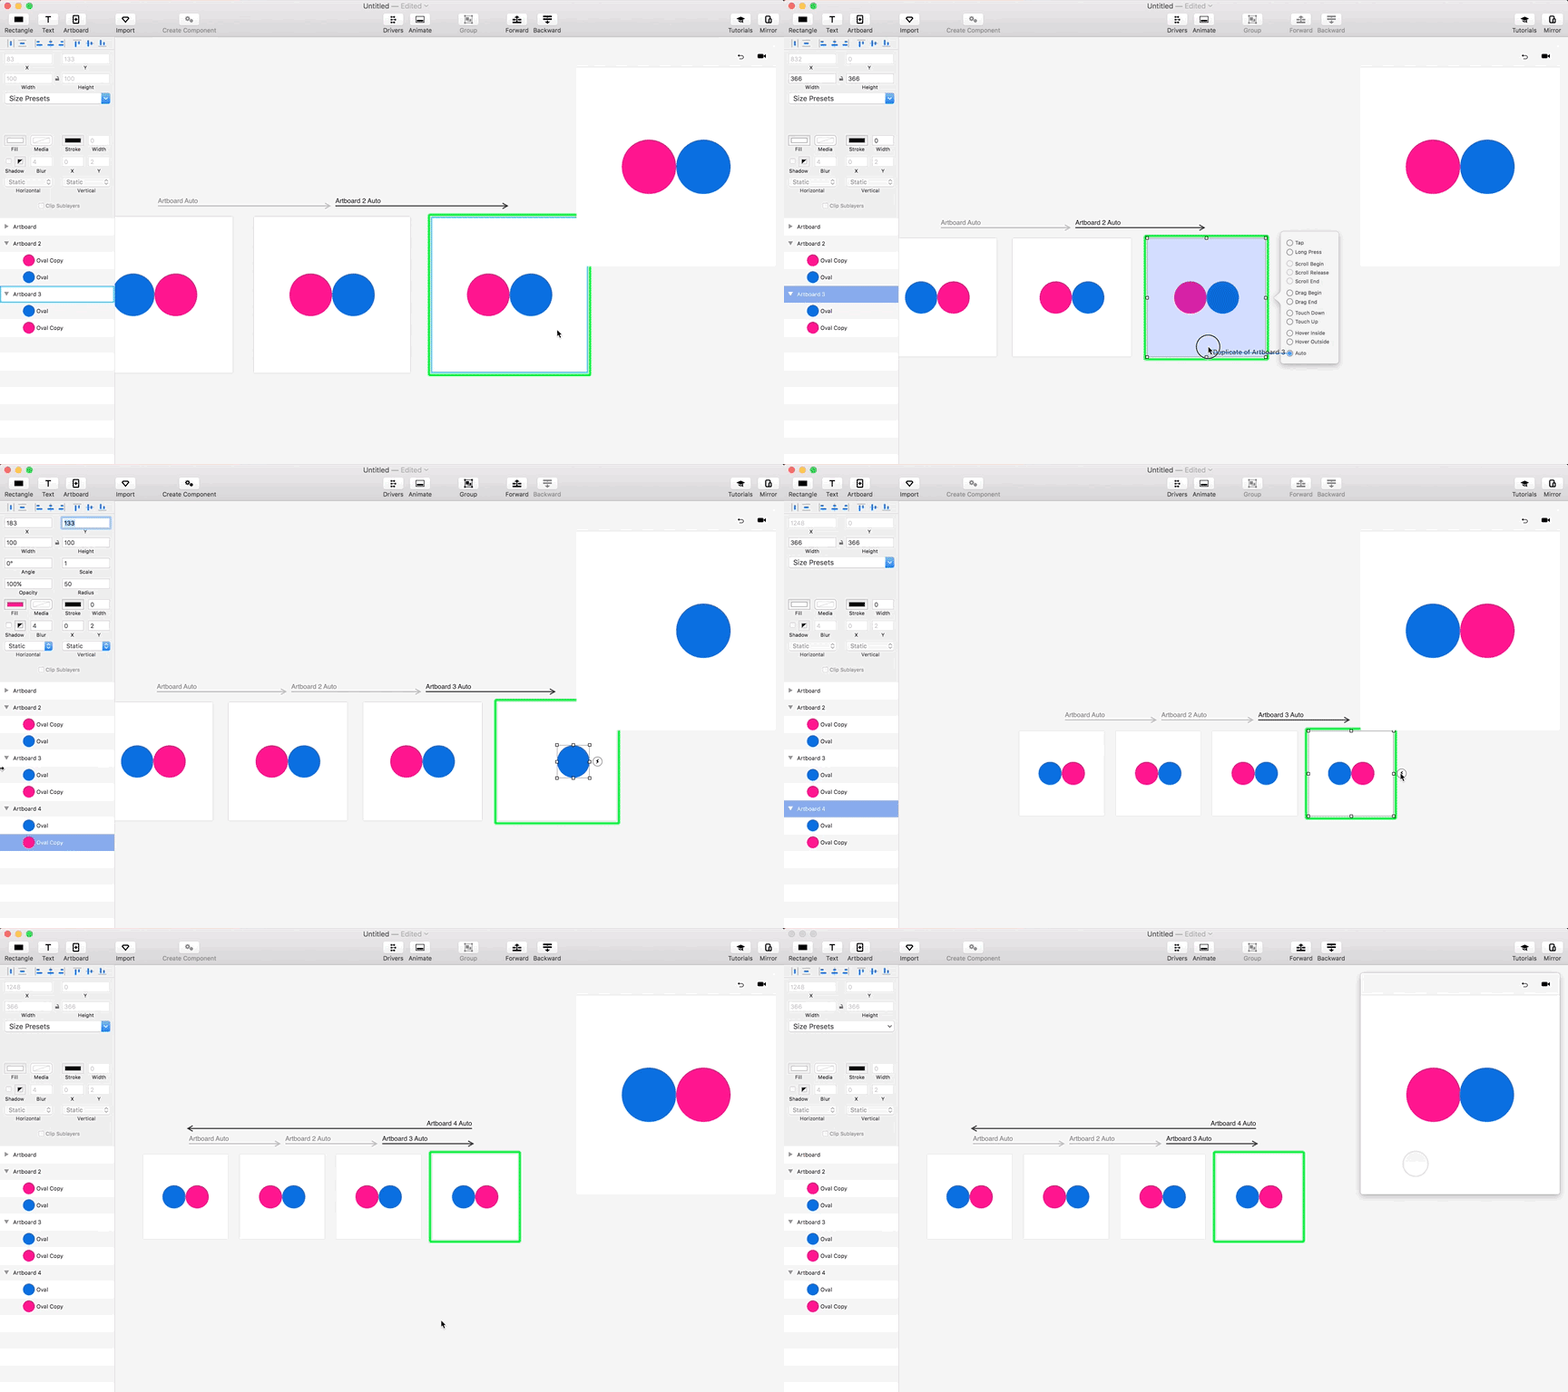
Apply a third “Auto” trigger to create a fourth artboard. On that last artboard, invert the position of the circles once more, and apply a final “Auto” trigger from the last artboard back to the initial one.
Loading Type

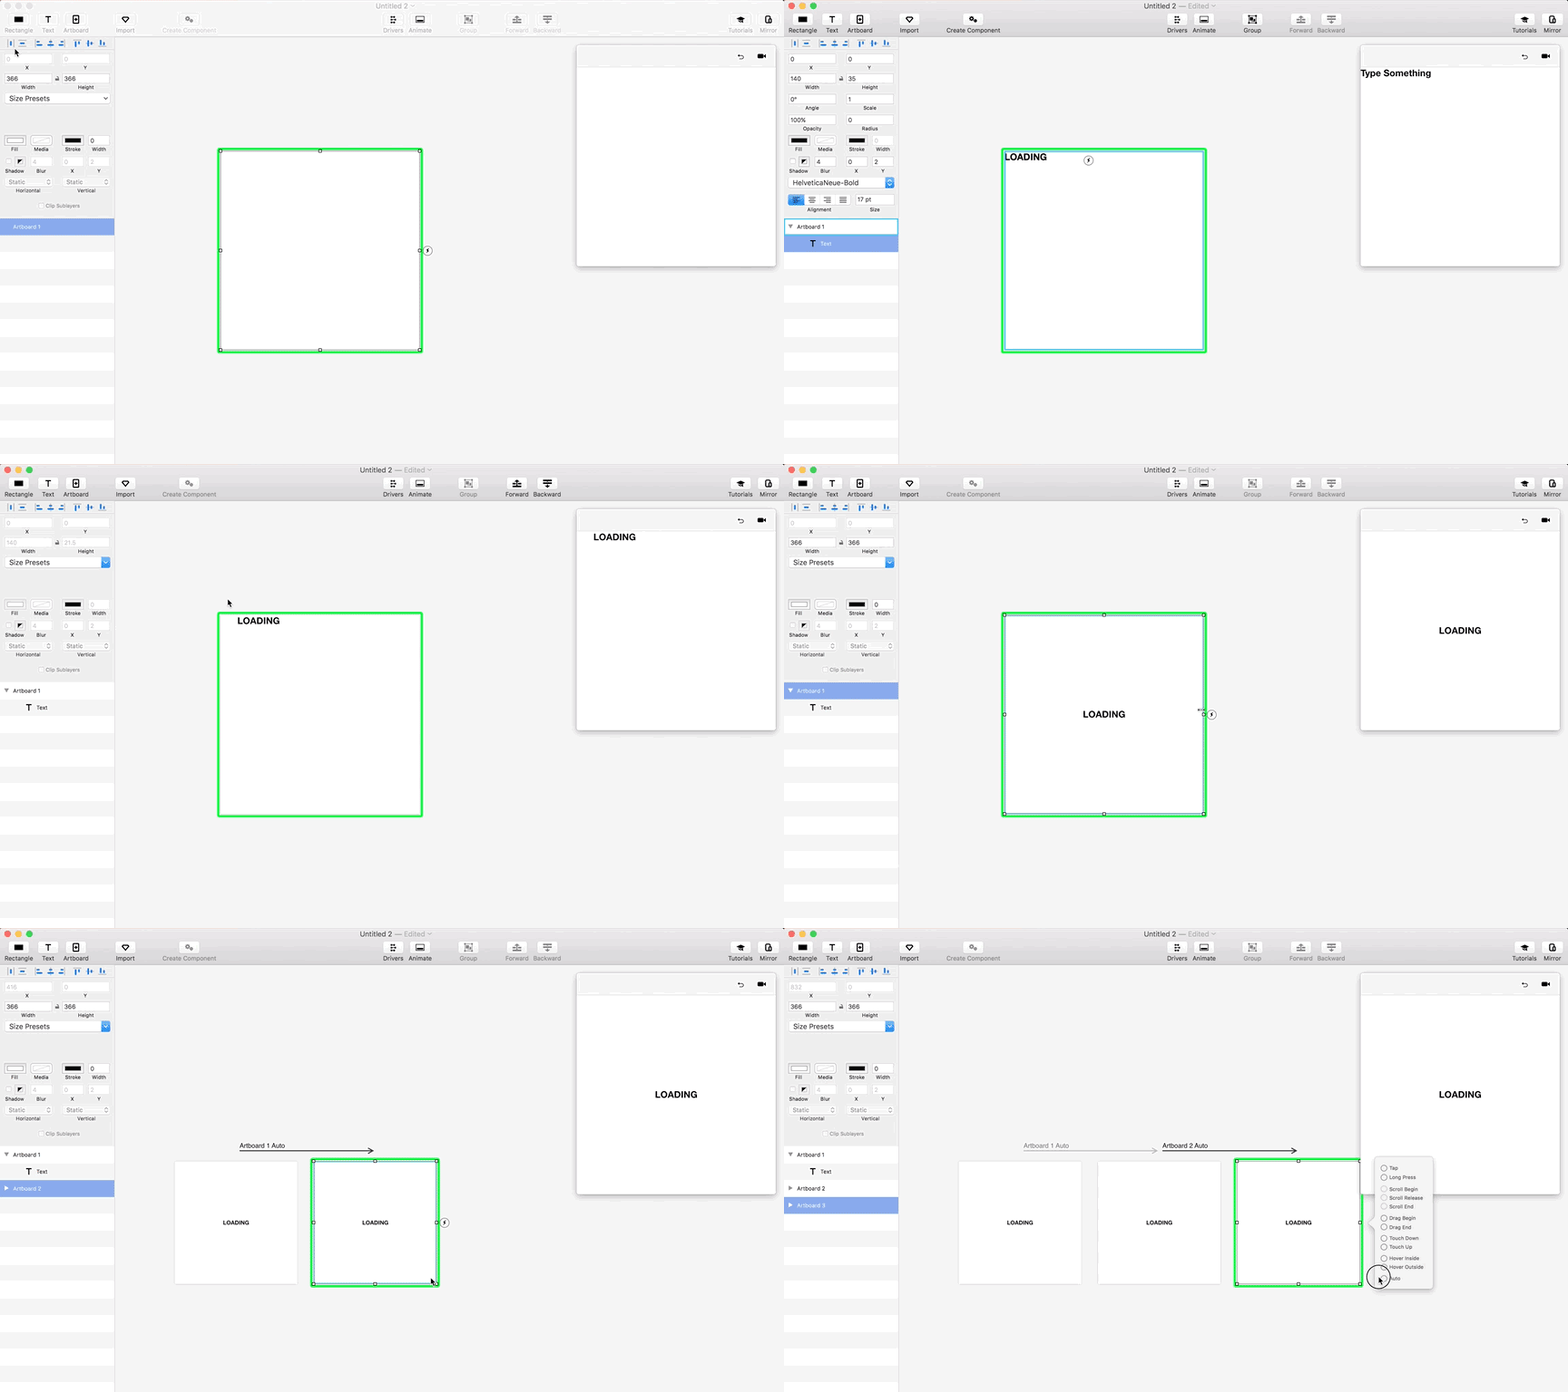
Create a new project on Principle, and using the Text tool, write “LOADING.” Align the text to the left and center it vertically in the artboard.
Apply an “Auto” trigger five times in a row. Have the fifth trigger from the last artboard loop back to the initial artboard.
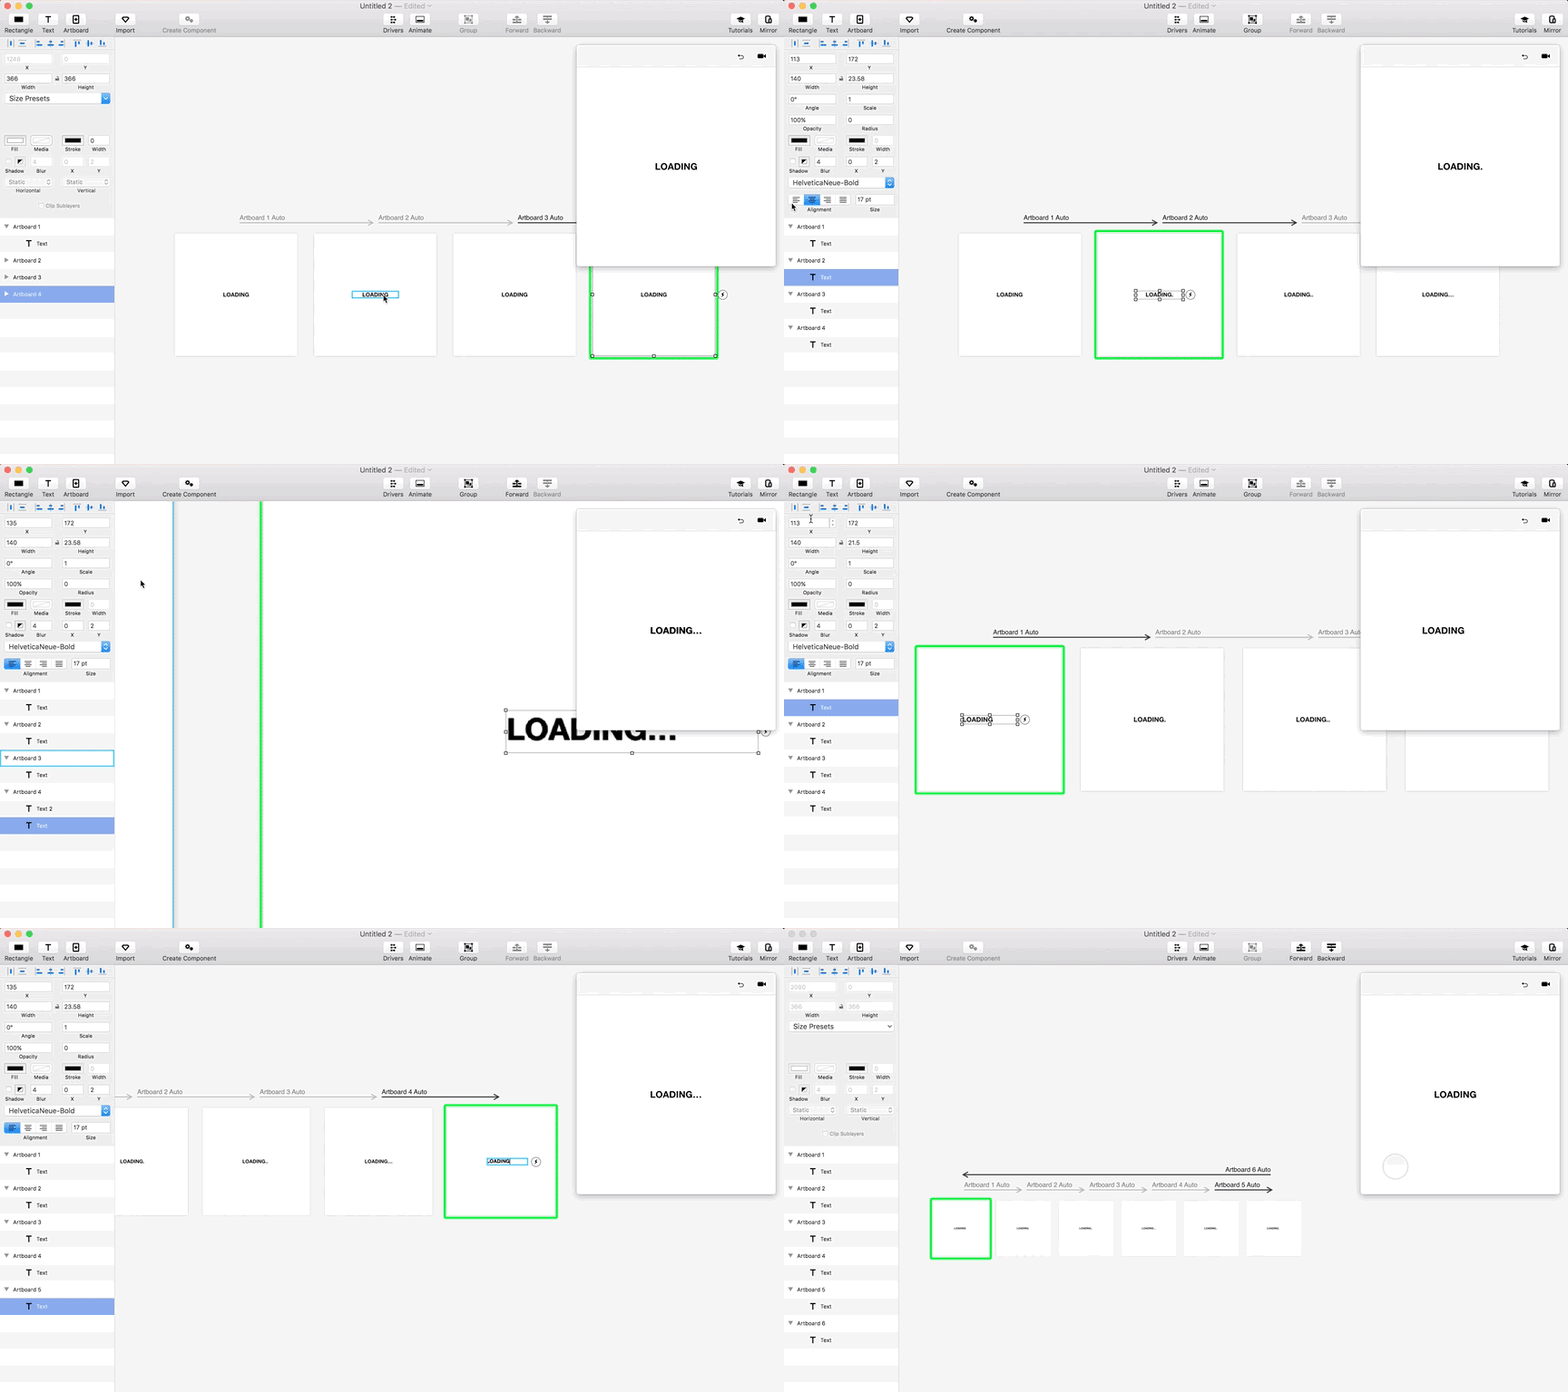
Starting from the initial artboard and moving right, edit the text on each artboard to add zero, one, two, three, two, and one periods, respectively, next to the original “LOADING” text. The progression of artboards should look something like this:
LOADING LOADING. LOADING.. LOADING… LOADING.. LOADING.
Now you can preview the animation you just created.
Pulsating Dots
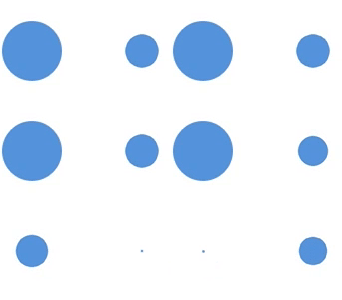
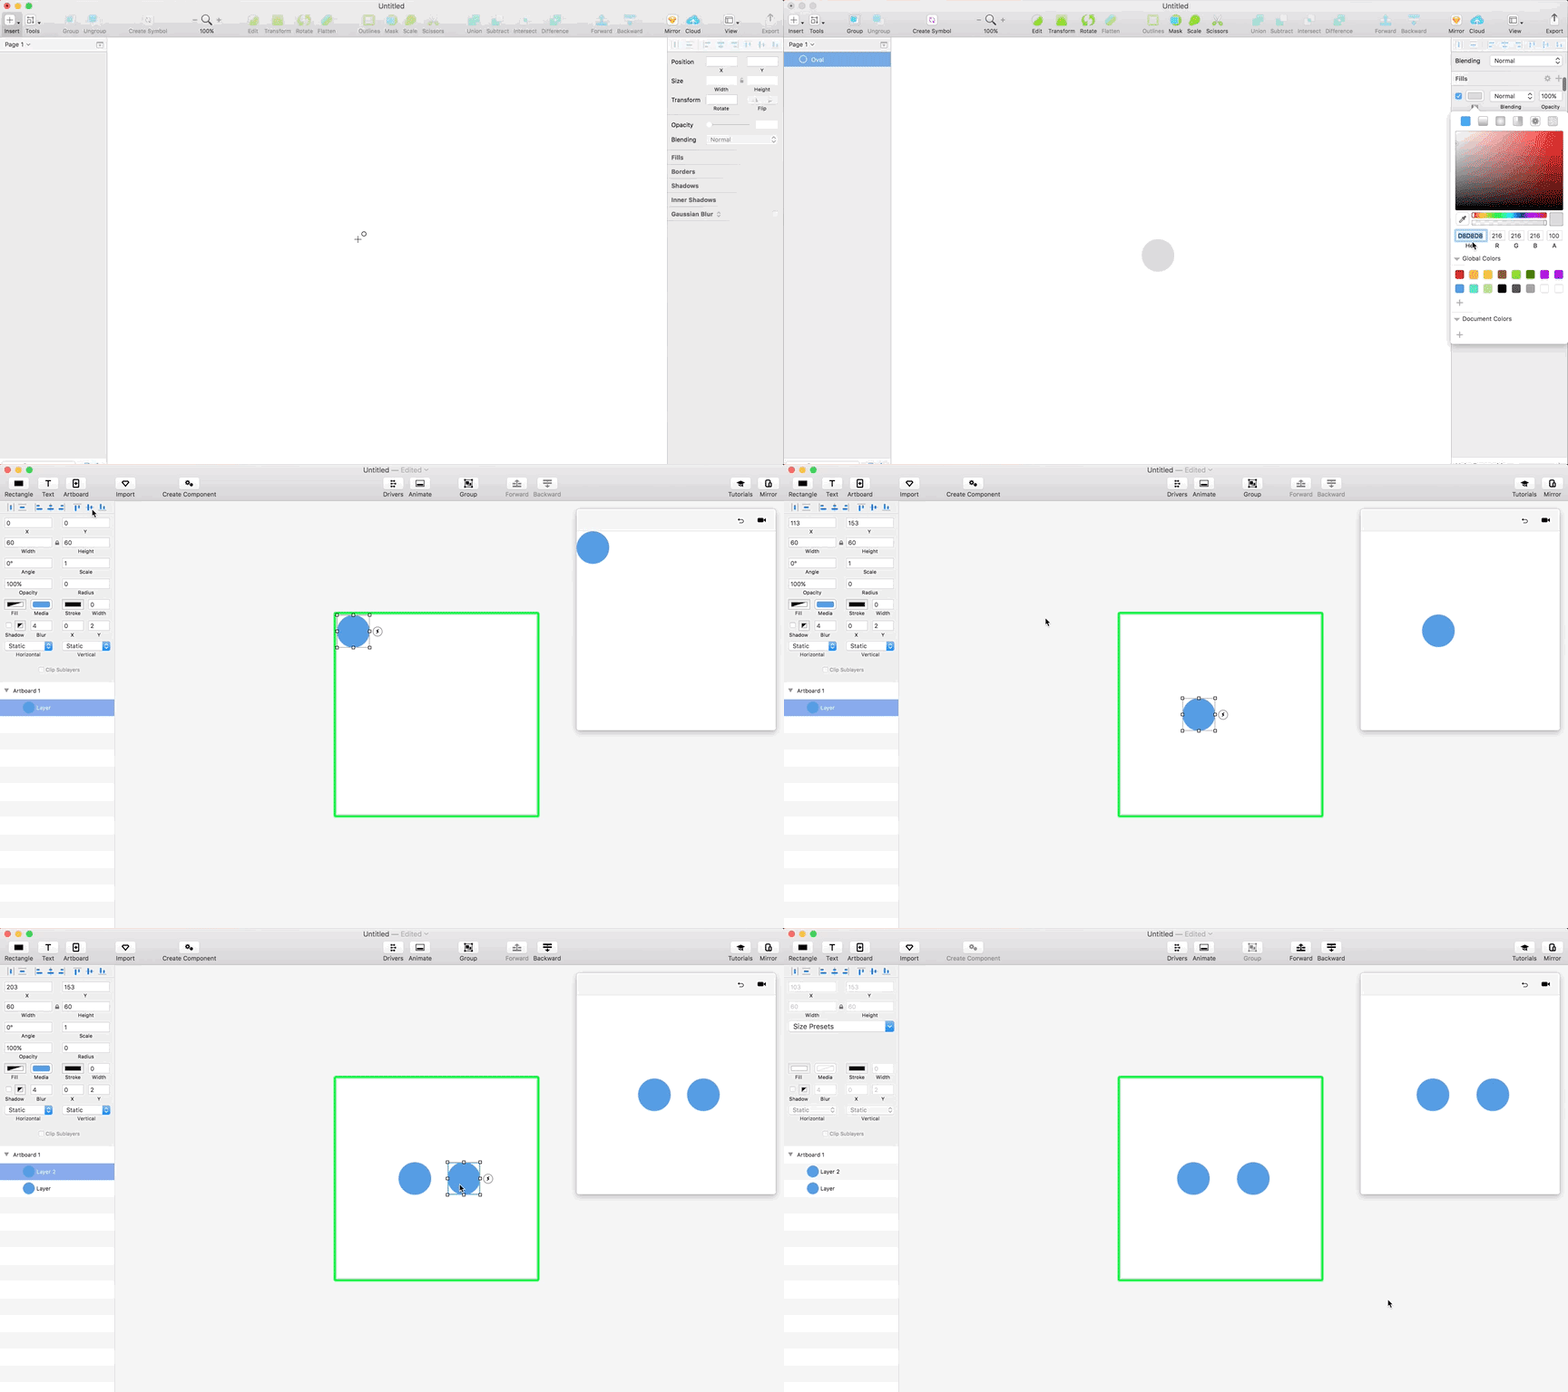
Trace a 60px dot. Copy and paste one more dot and place it 60px to the right. Make sure both dots, including the 60px gap, are perfectly centered in your artboard.
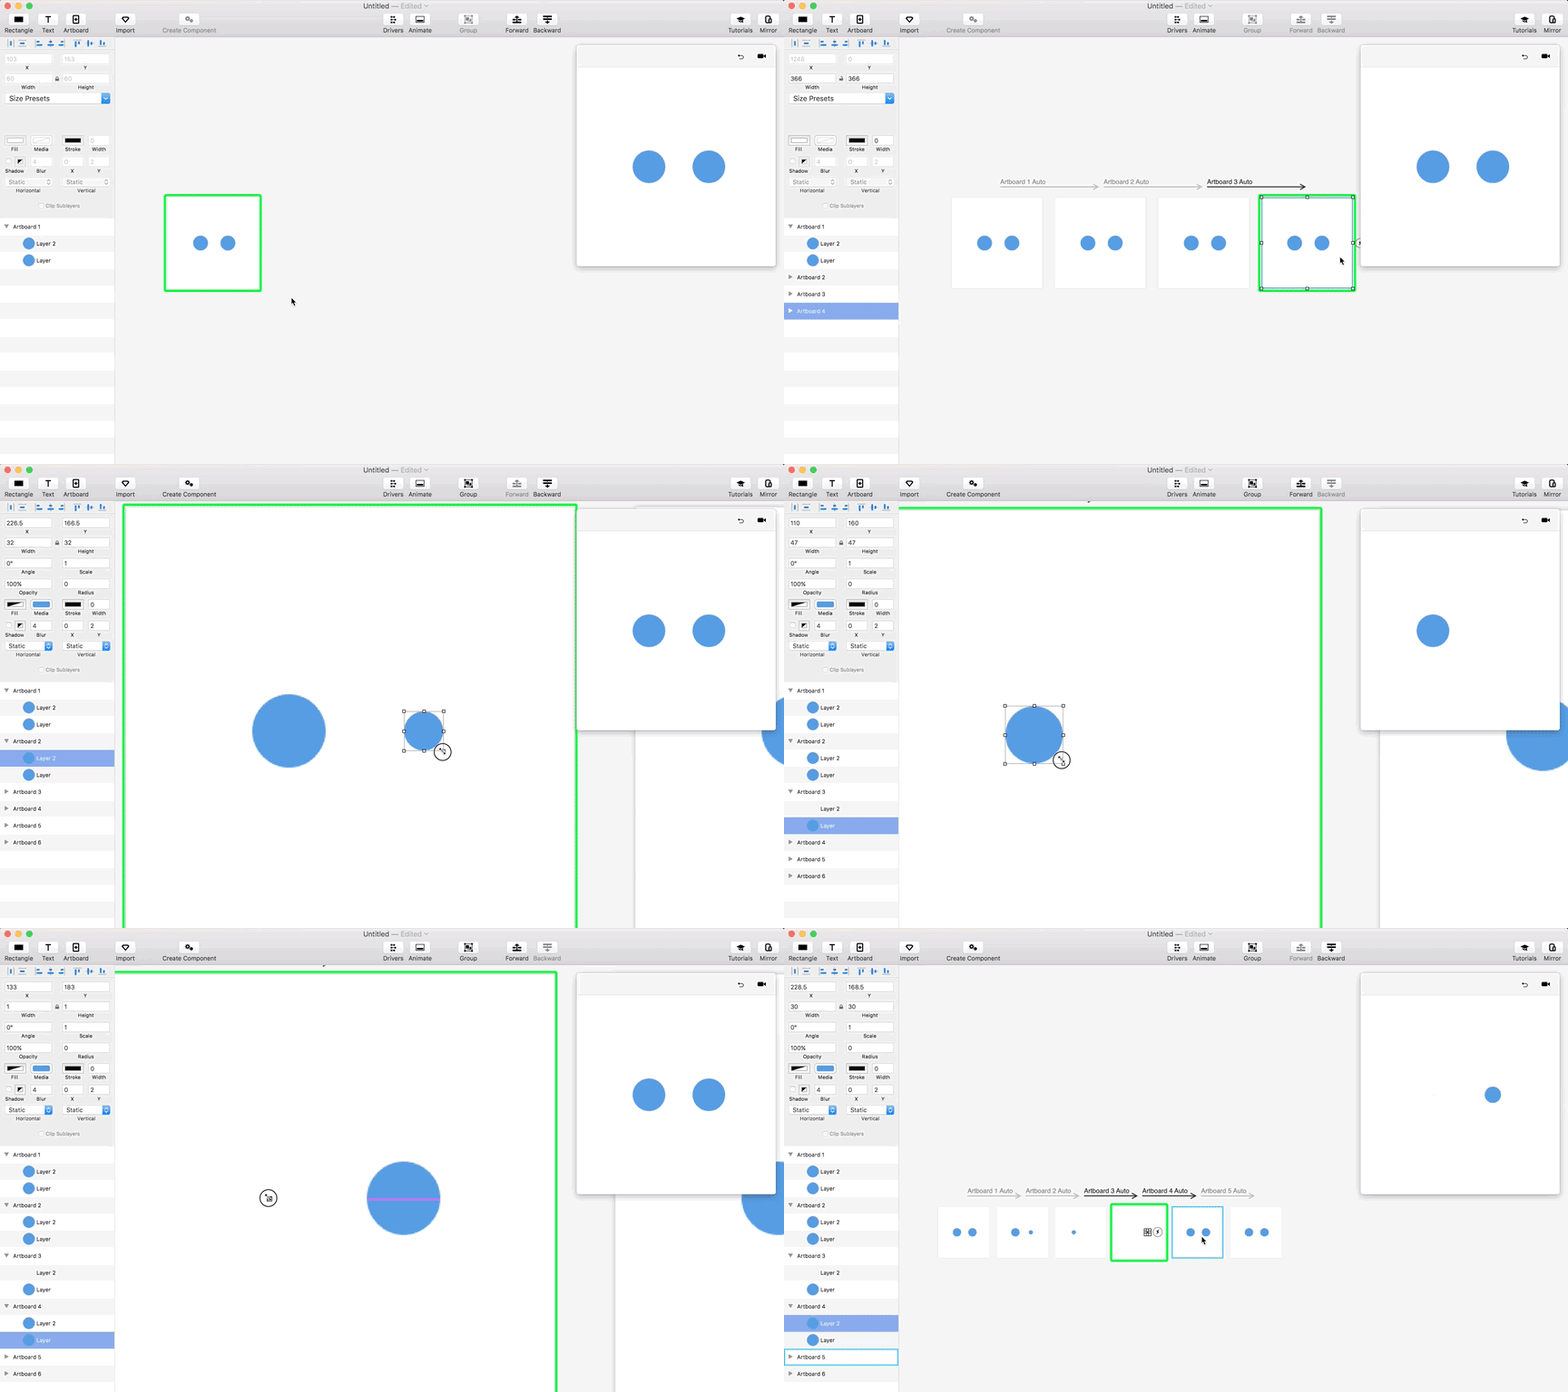
Apply an “Auto” trigger four times in a row.
On the second artboard, reduce the second dot to 30px.
On the third artboard, reduce the second dot to 0px and the first one down to 30px.
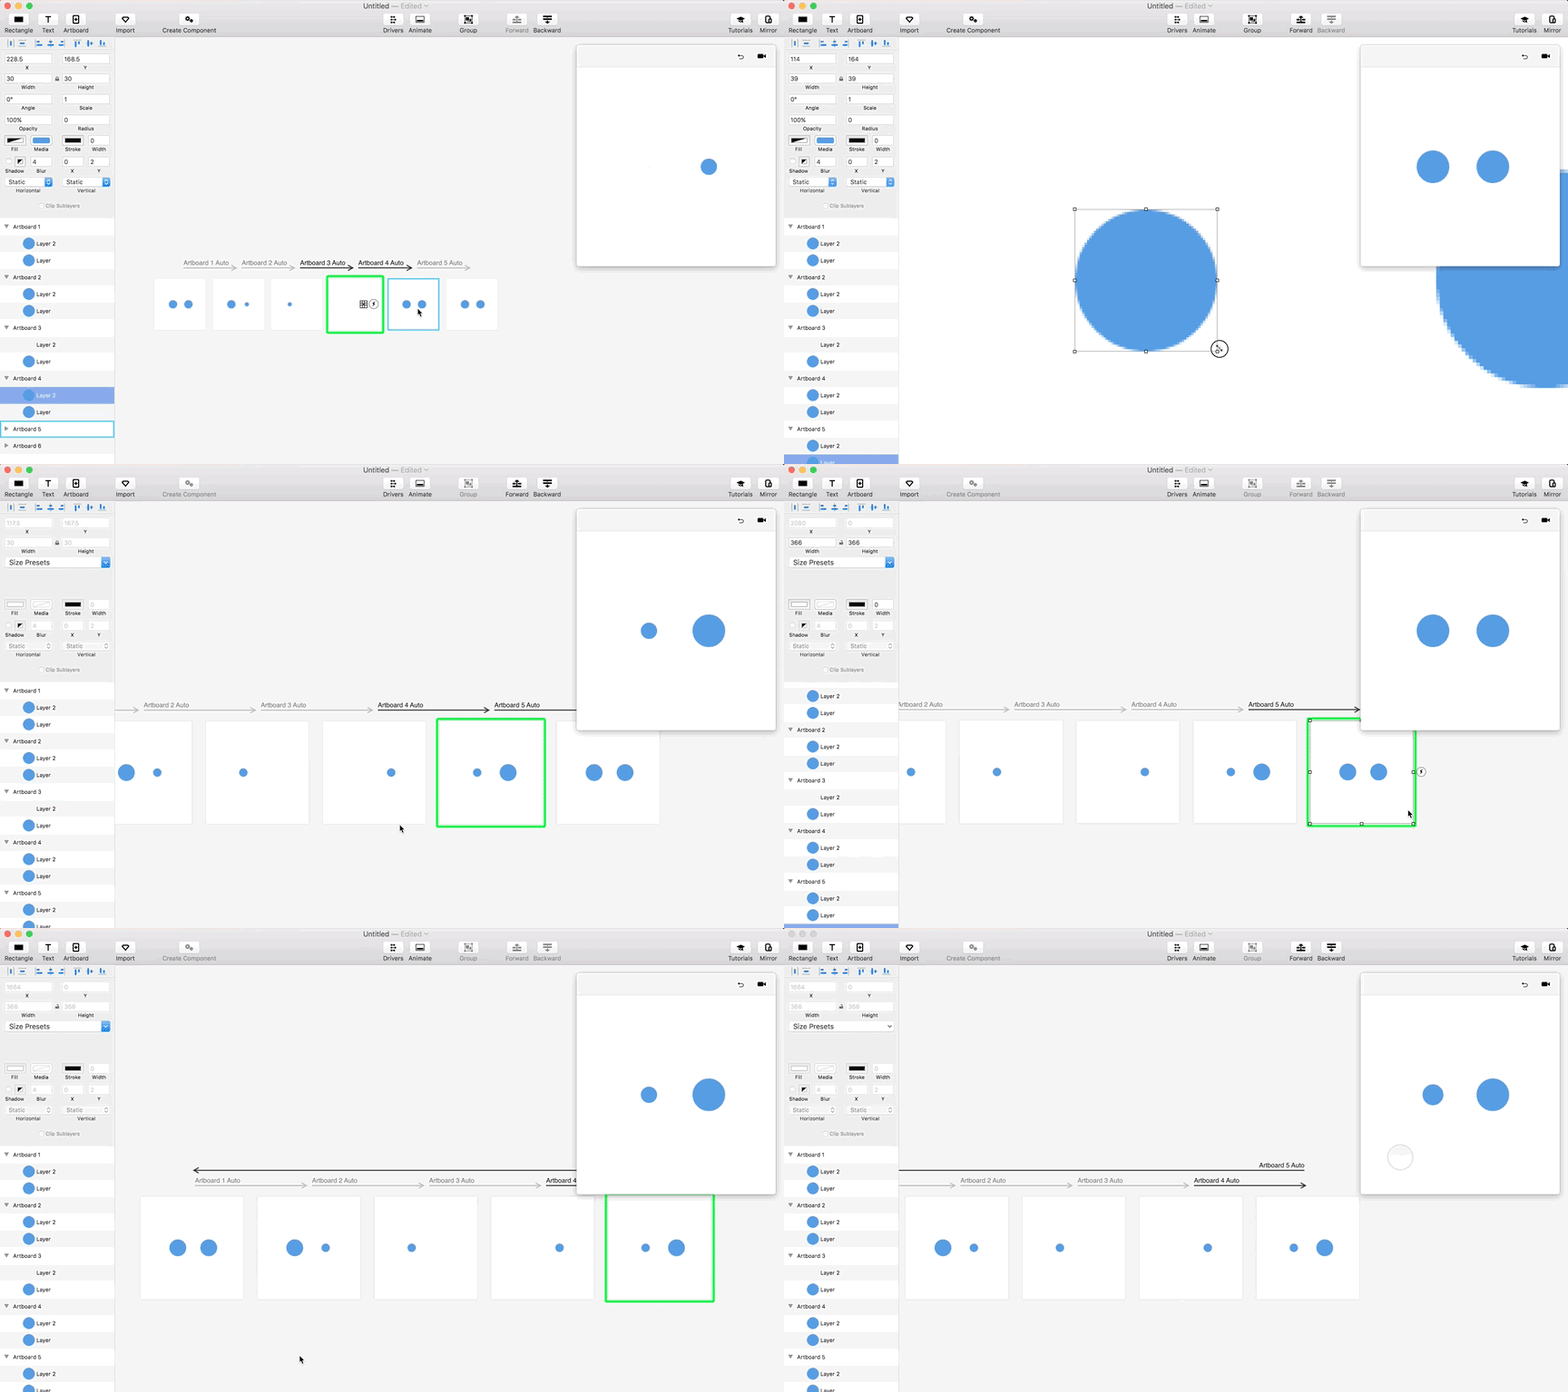
On the fourth artboard, scale the second dot back up to 30px and reduce the first dot down to 0px.
On the fifth artboard, scale the first dot down to 30px and link the artboard back to the first board with an “Auto” trigger.
Rolling Dots

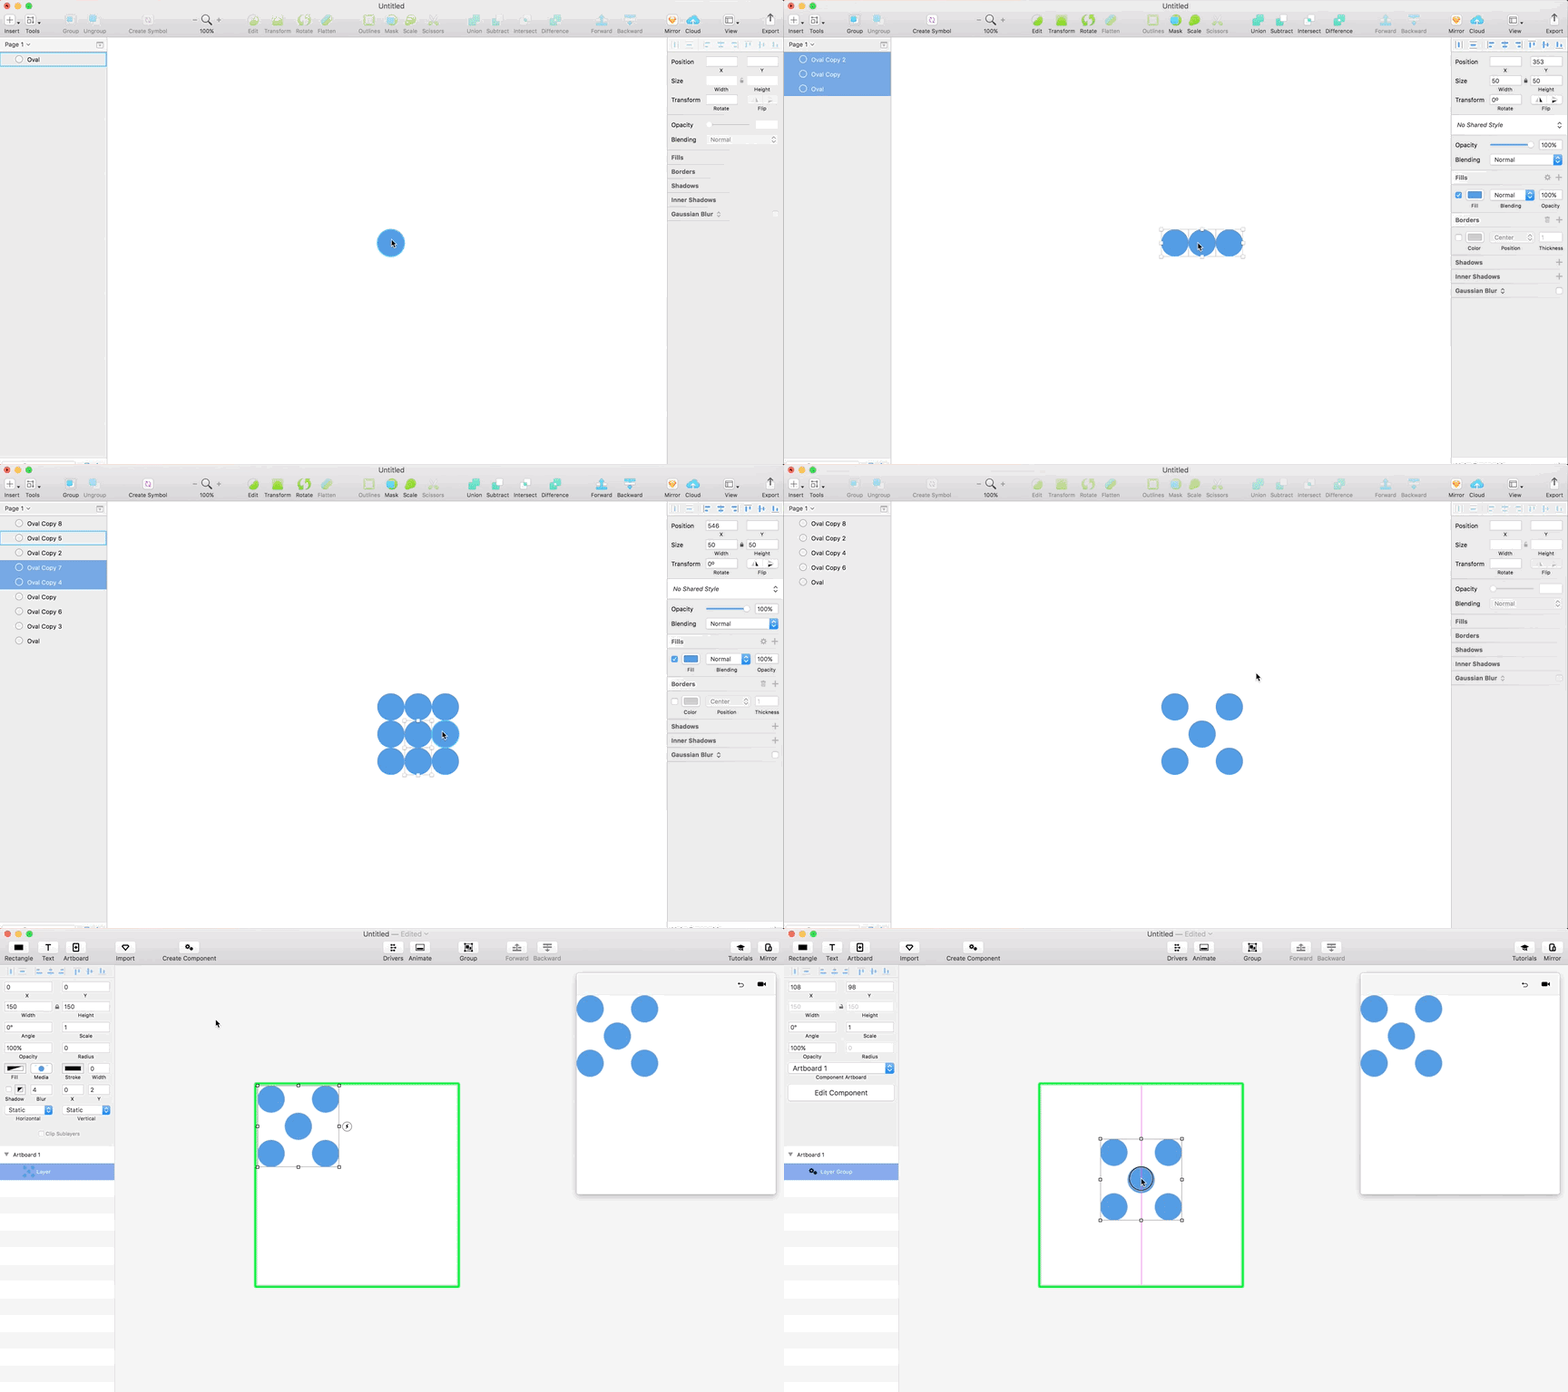
Place five dots in the arrangement you would find on a six-sided die. Import the artboard to Principle and center it.
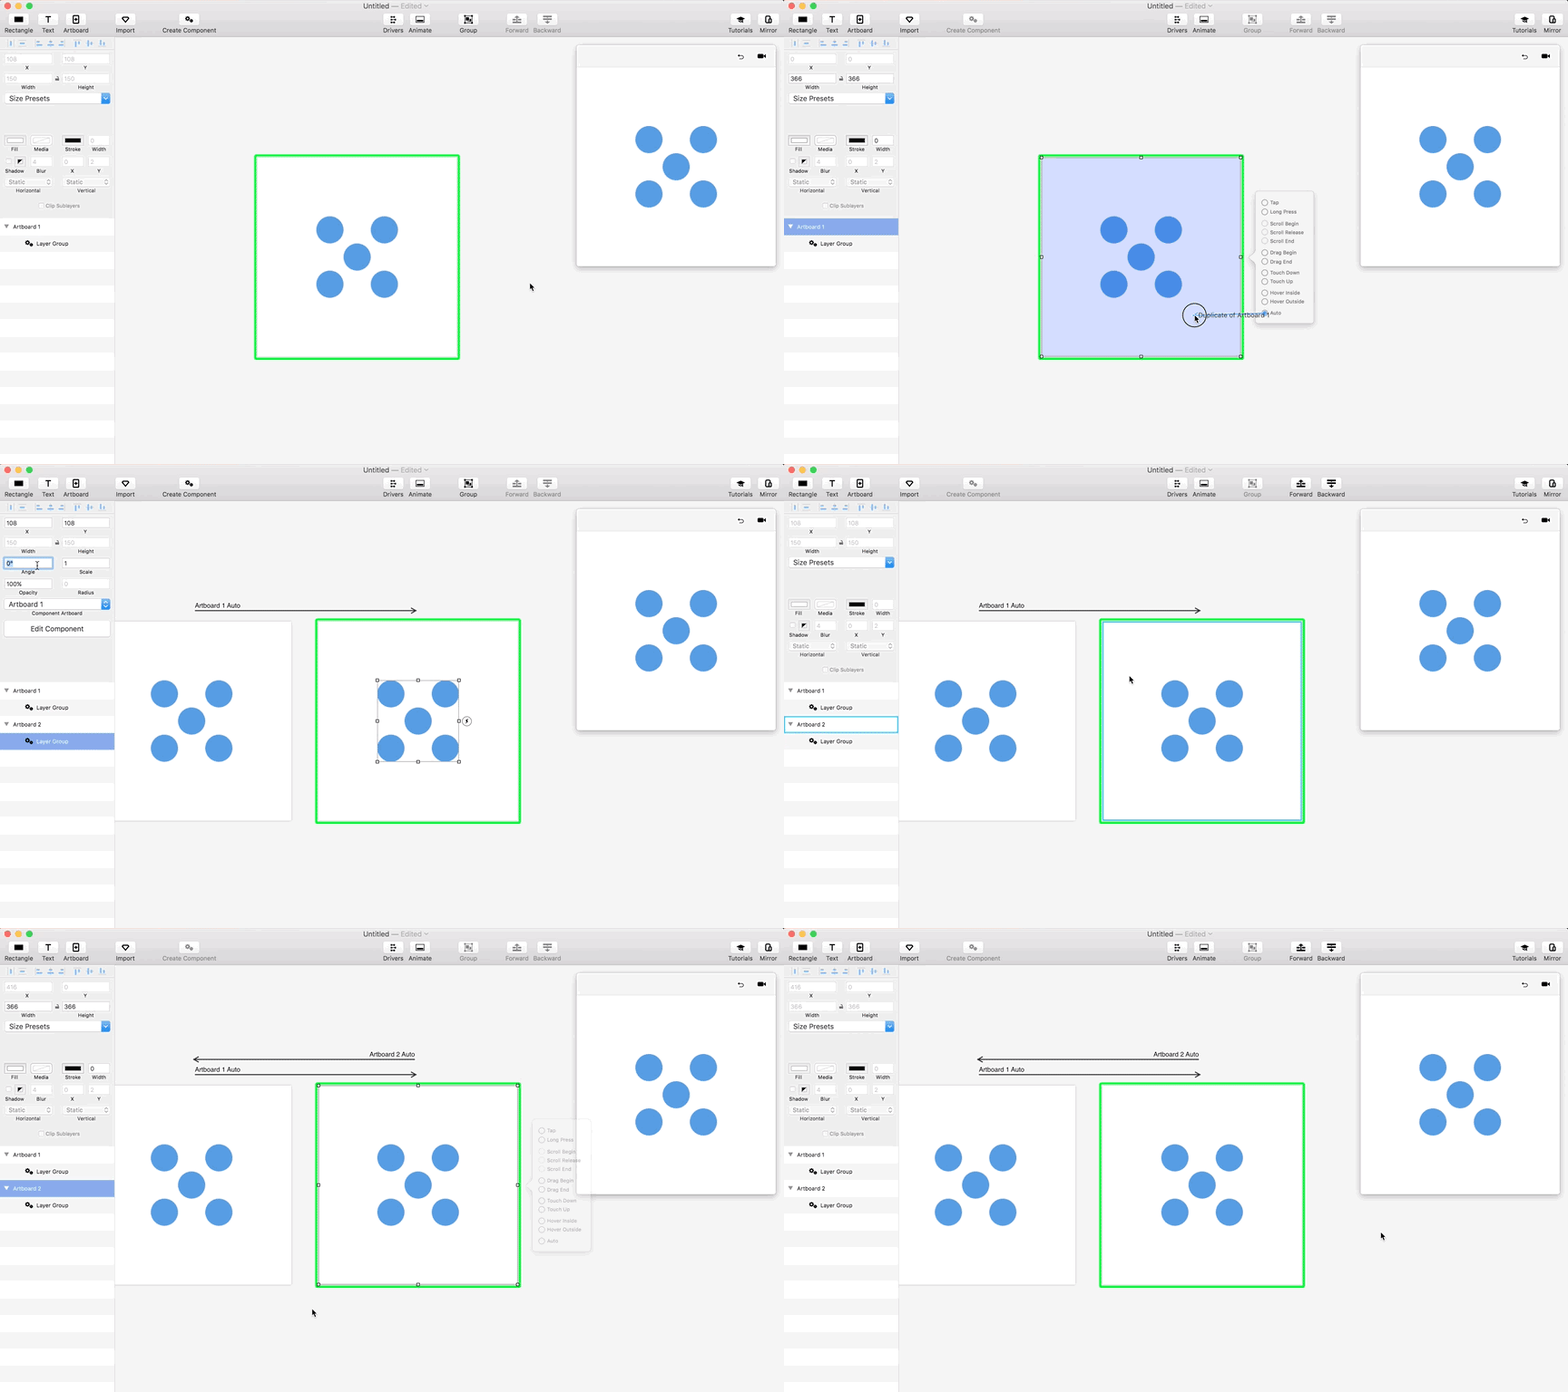
Apply an “Auto” trigger on the artboard.
On the new artboard, rotate the group of dots by 360 degrees.
Link the second artboard back to the first with an “Auto” trigger.
Pulsating Circle

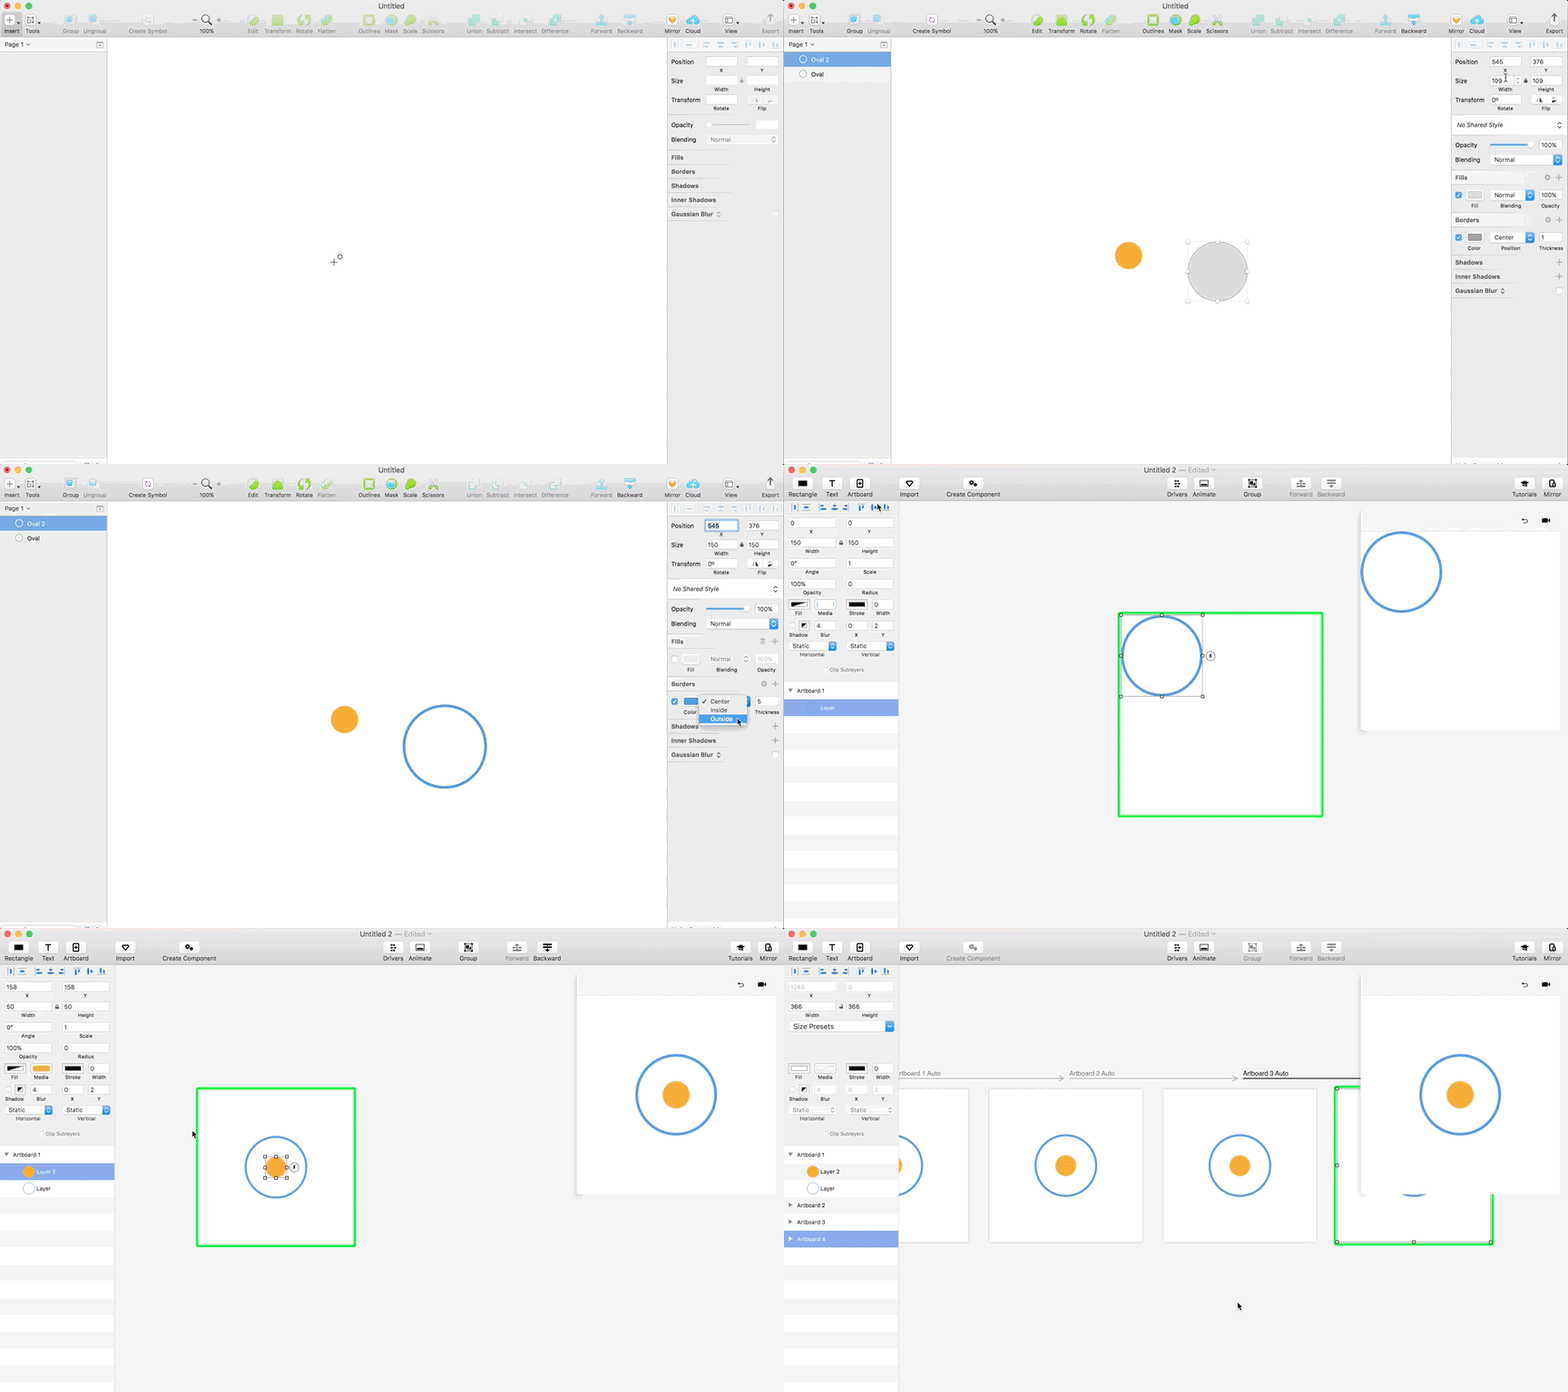
Start with a 50px circle center-aligned within a 150px circle that has a 5px border but no fill.
Apply an “Auto” trigger three times in a row.
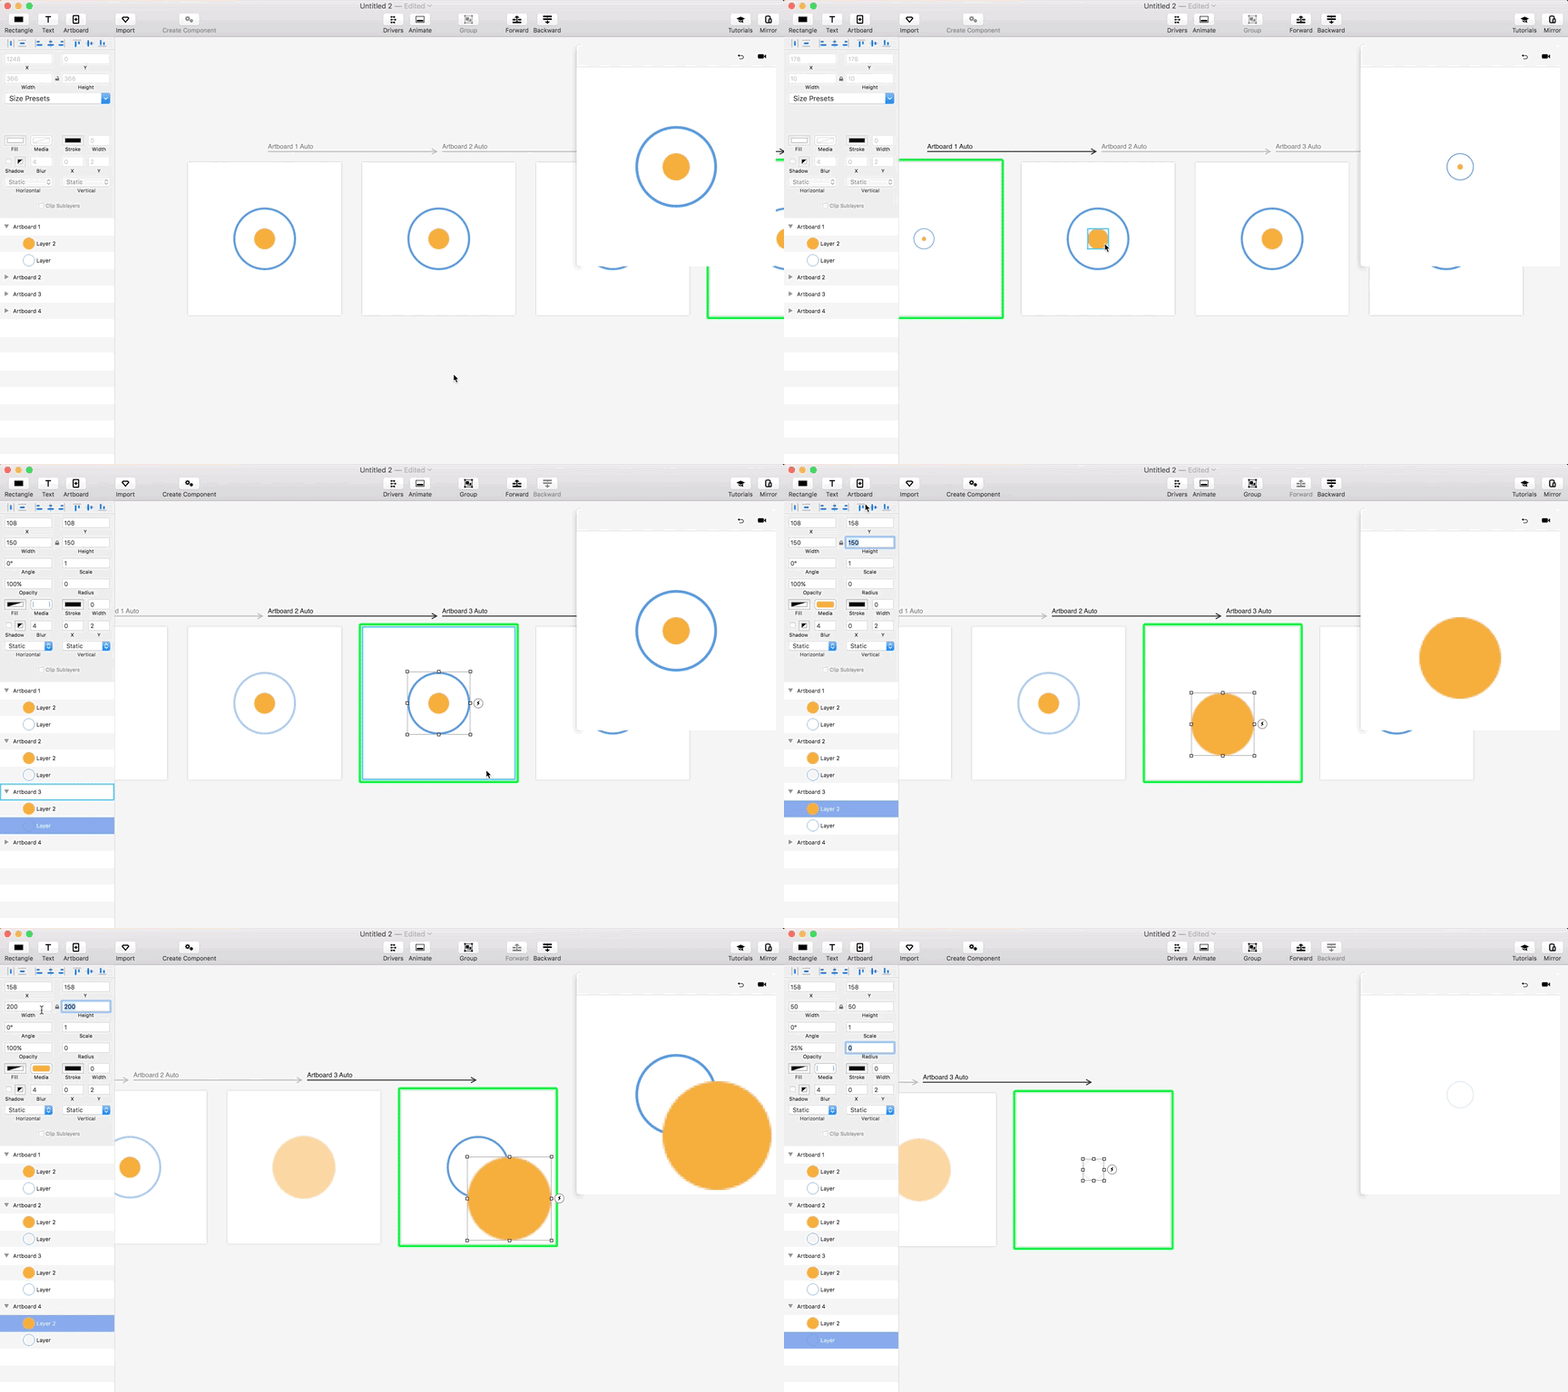
On the first artboard, scale the line circle down to 50px and the inner circle down to 10px.
On the third artboard, scale the line circle up to 200px and give it 0% opacity. Scale the inner circle up to 150px and give it 50% opacity.
On the last artboard, scale the inner circle up to 200px and give it 0% opacity. Scale the line circle down to 50px and give it 25% opacity.
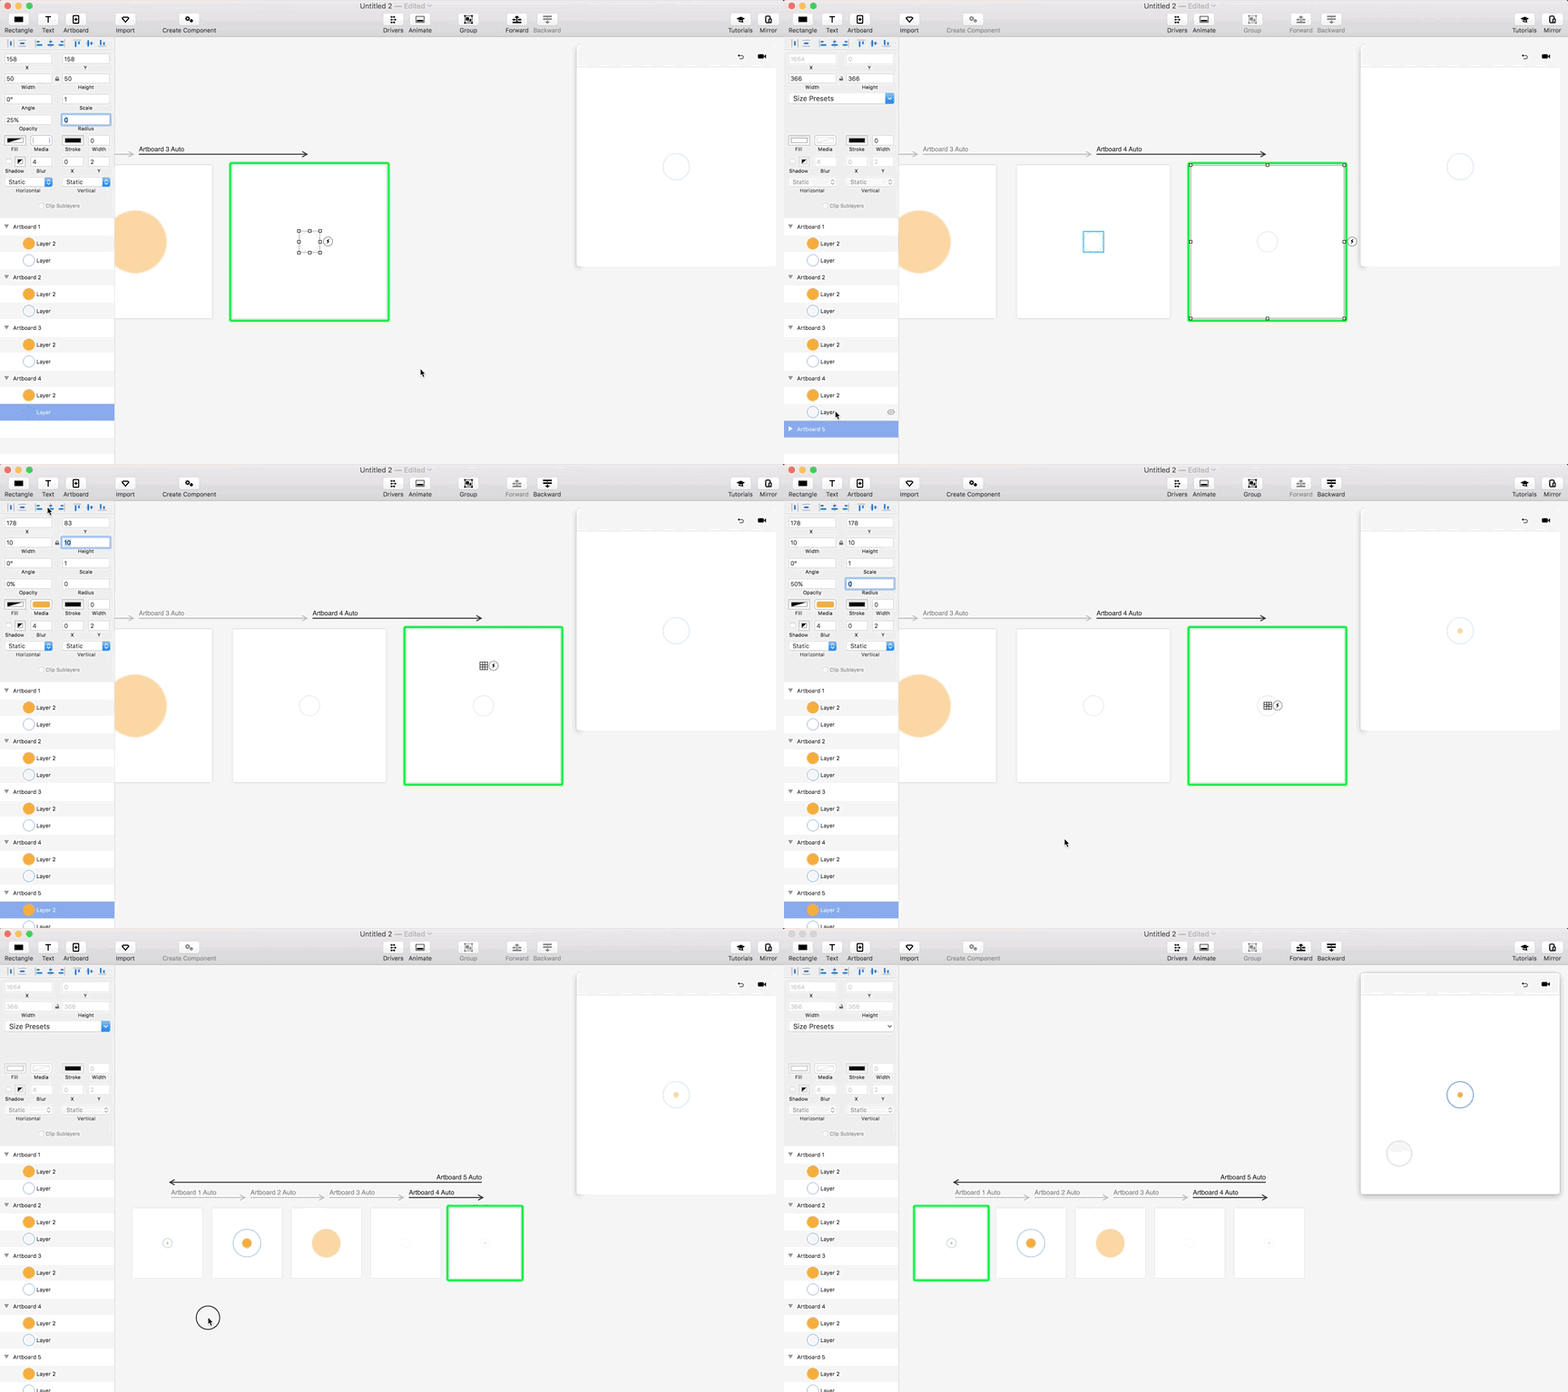
Apply an “Auto” trigger to the last artboard. Scale down the inner circle to 10px with 50% opacity.
Link the last artboard to the first one with an “Auto” trigger.
Jumping Dots
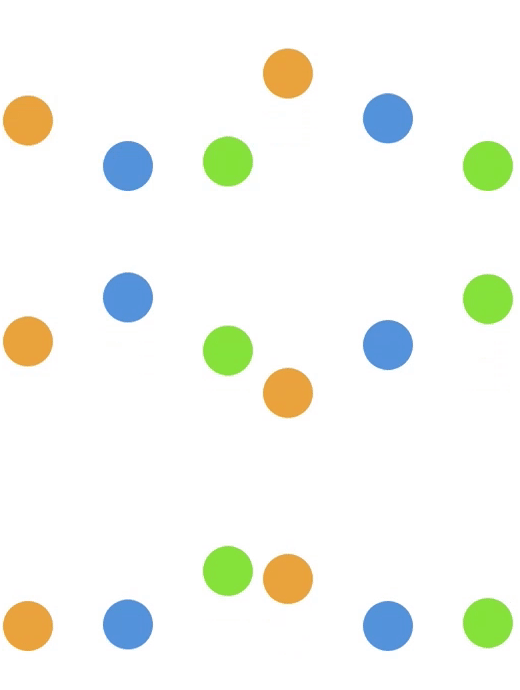
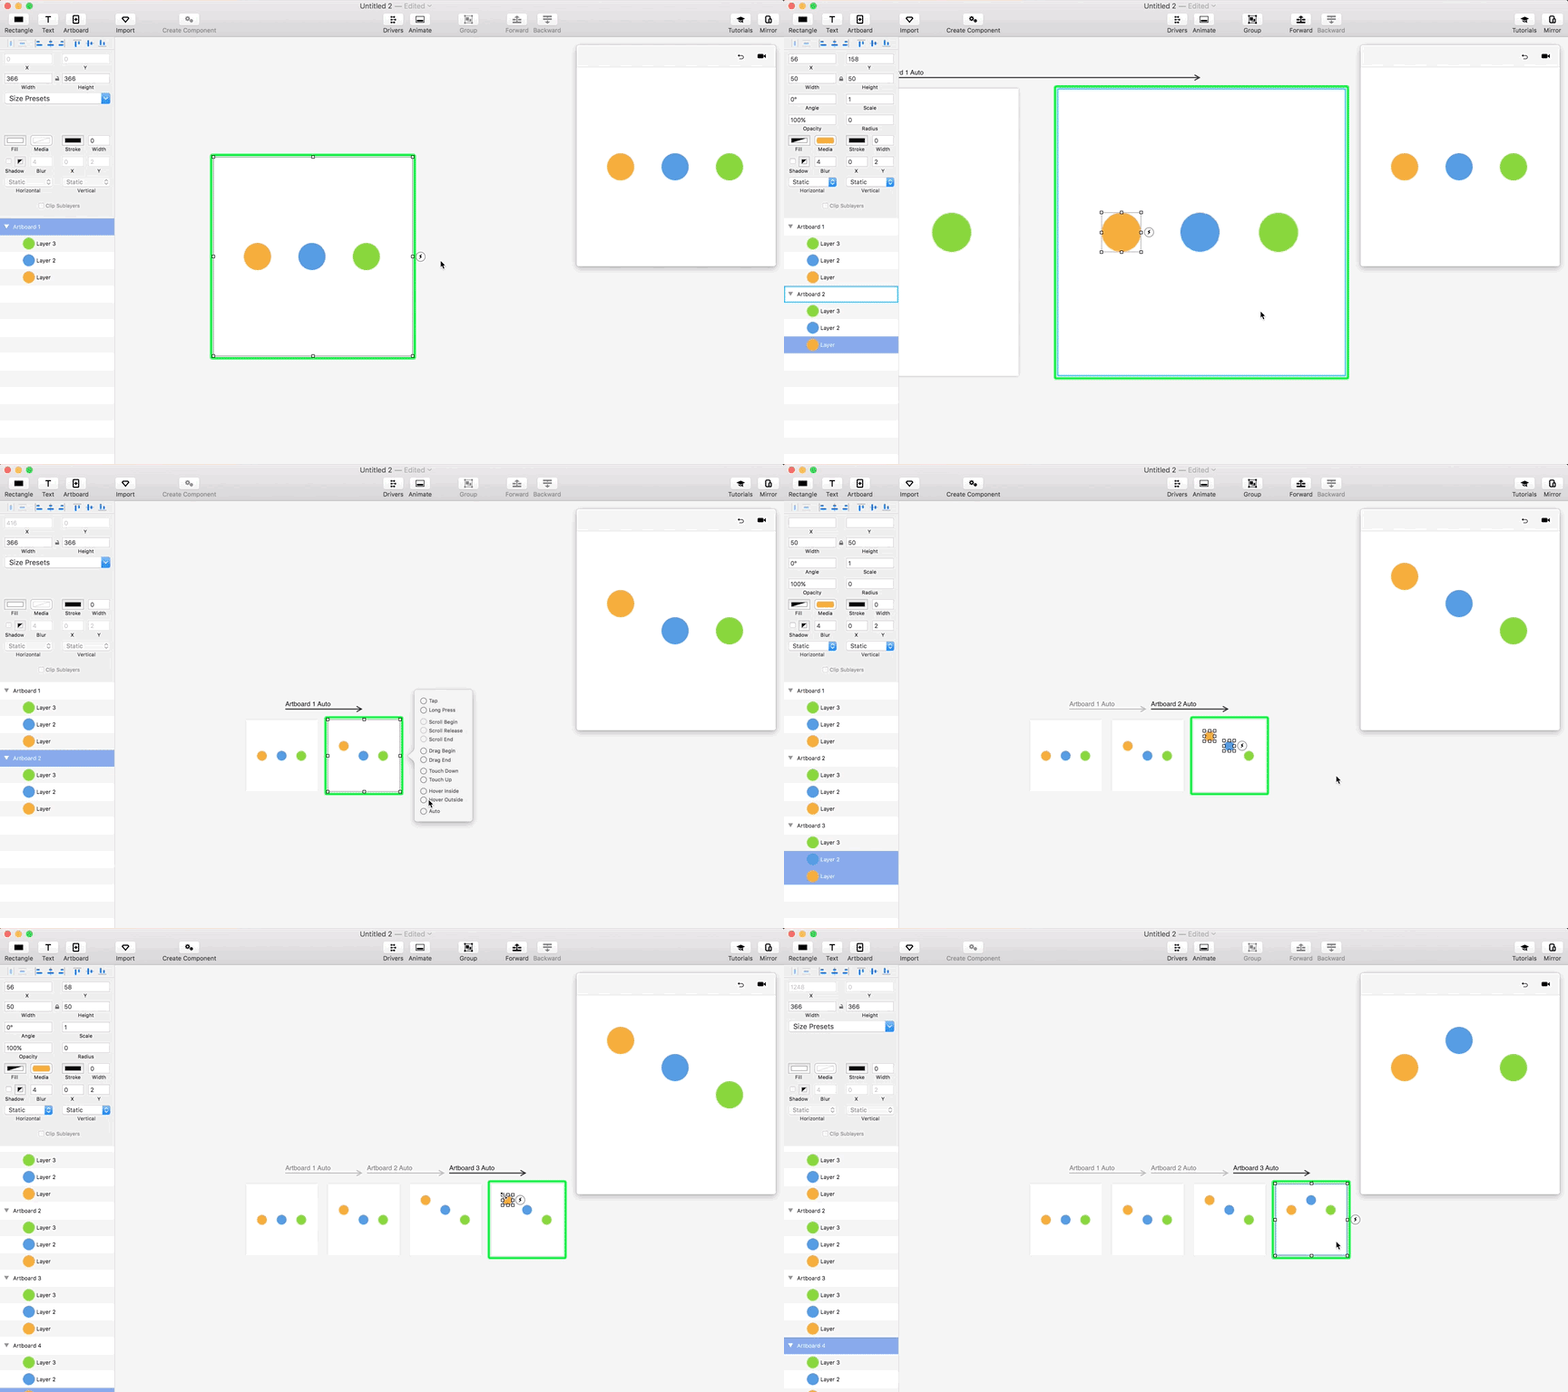
Line up three perfect circles of 50px height with 50px spacing between them.
Apply an “Auto” trigger. On the second artboard, move the first circle up by 50px.
Apply an “Auto” trigger to the second board. On the third artboard, select the first two circles and move them up 50px. The three circles should lie in a diagonal line.
Apply an “Auto” trigger to the third board. On the fourth artboard, move the first circle down 50px. Select the last two circles and move them up 50px.
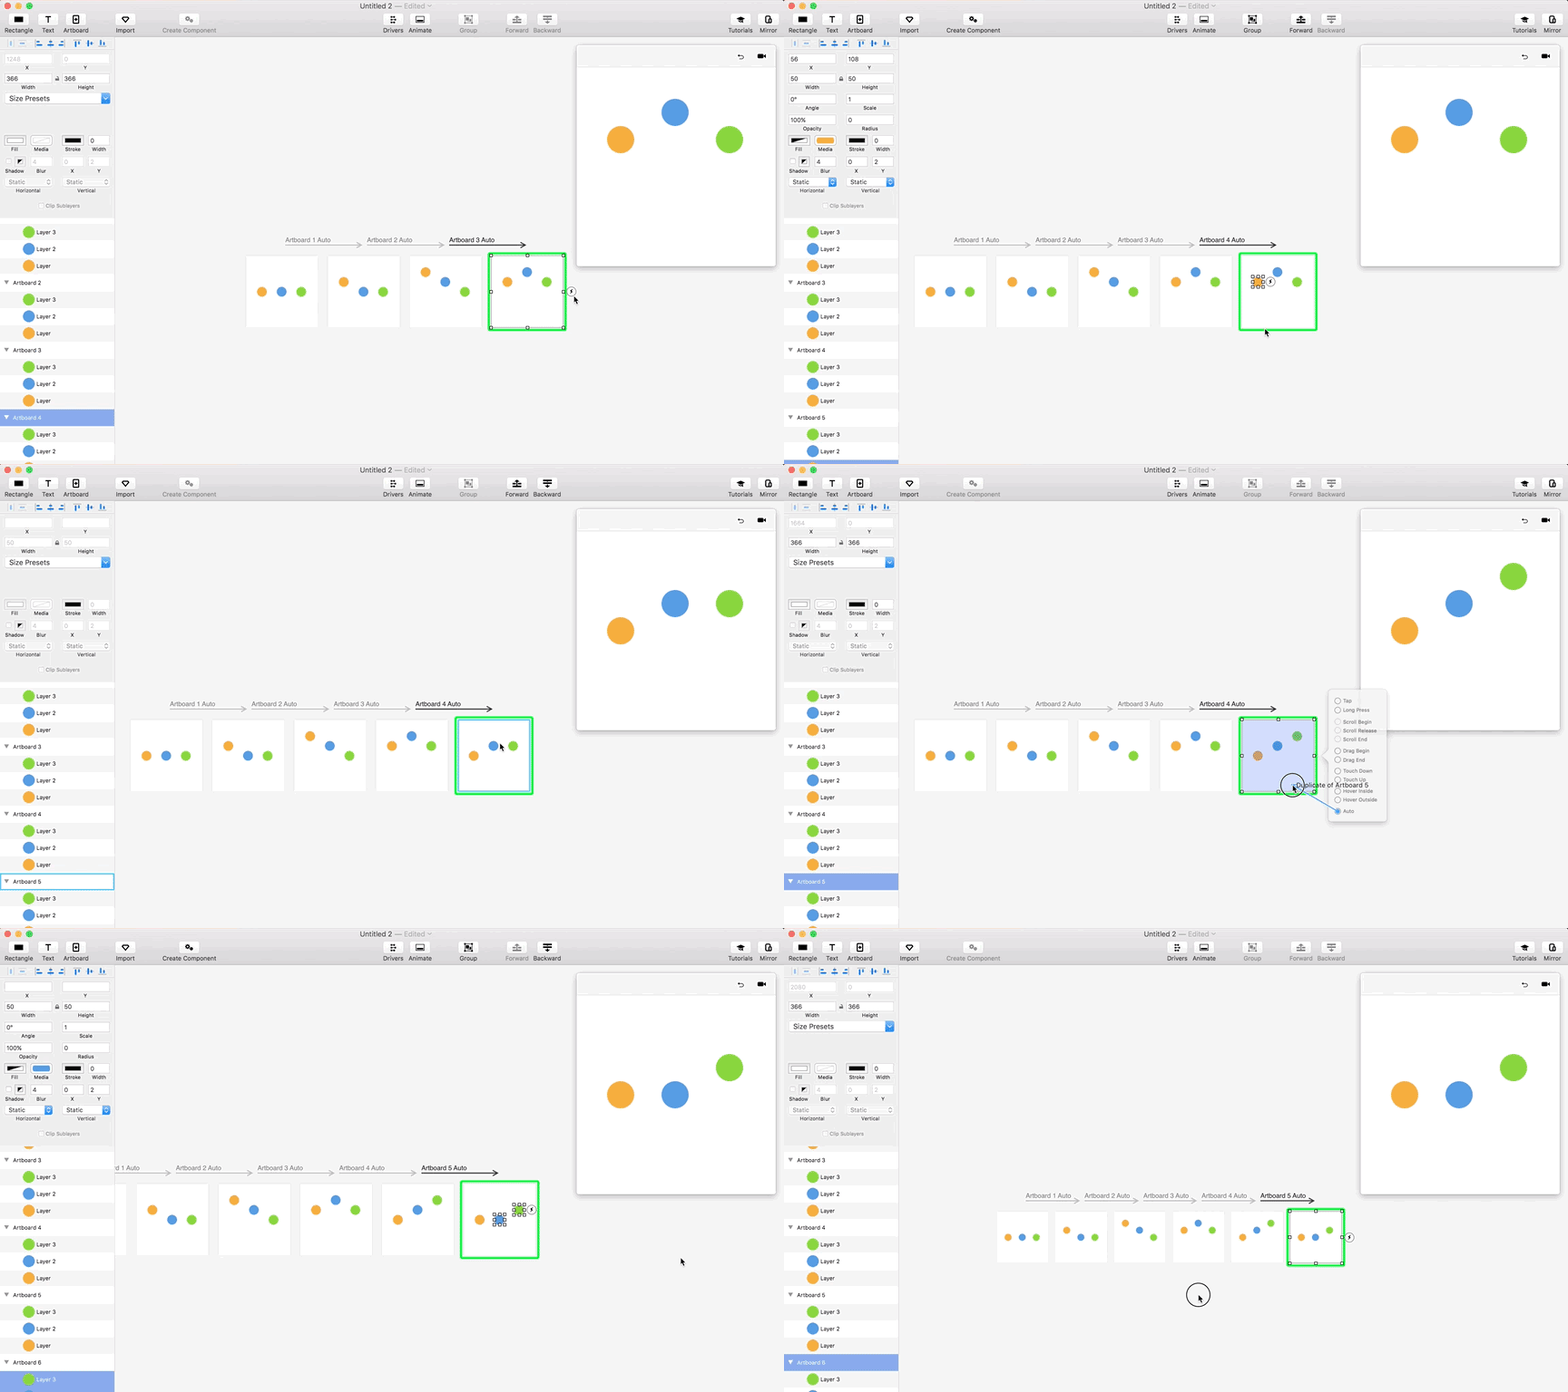
Apply an “Auto” trigger on the fourth board. On the fifth artboard, move the first two circles 50px down. Select the last circle and move it up 50px.
Apply an “Auto” trigger on the fifth board. On the sixth artboard, move the last two circles down 50px.
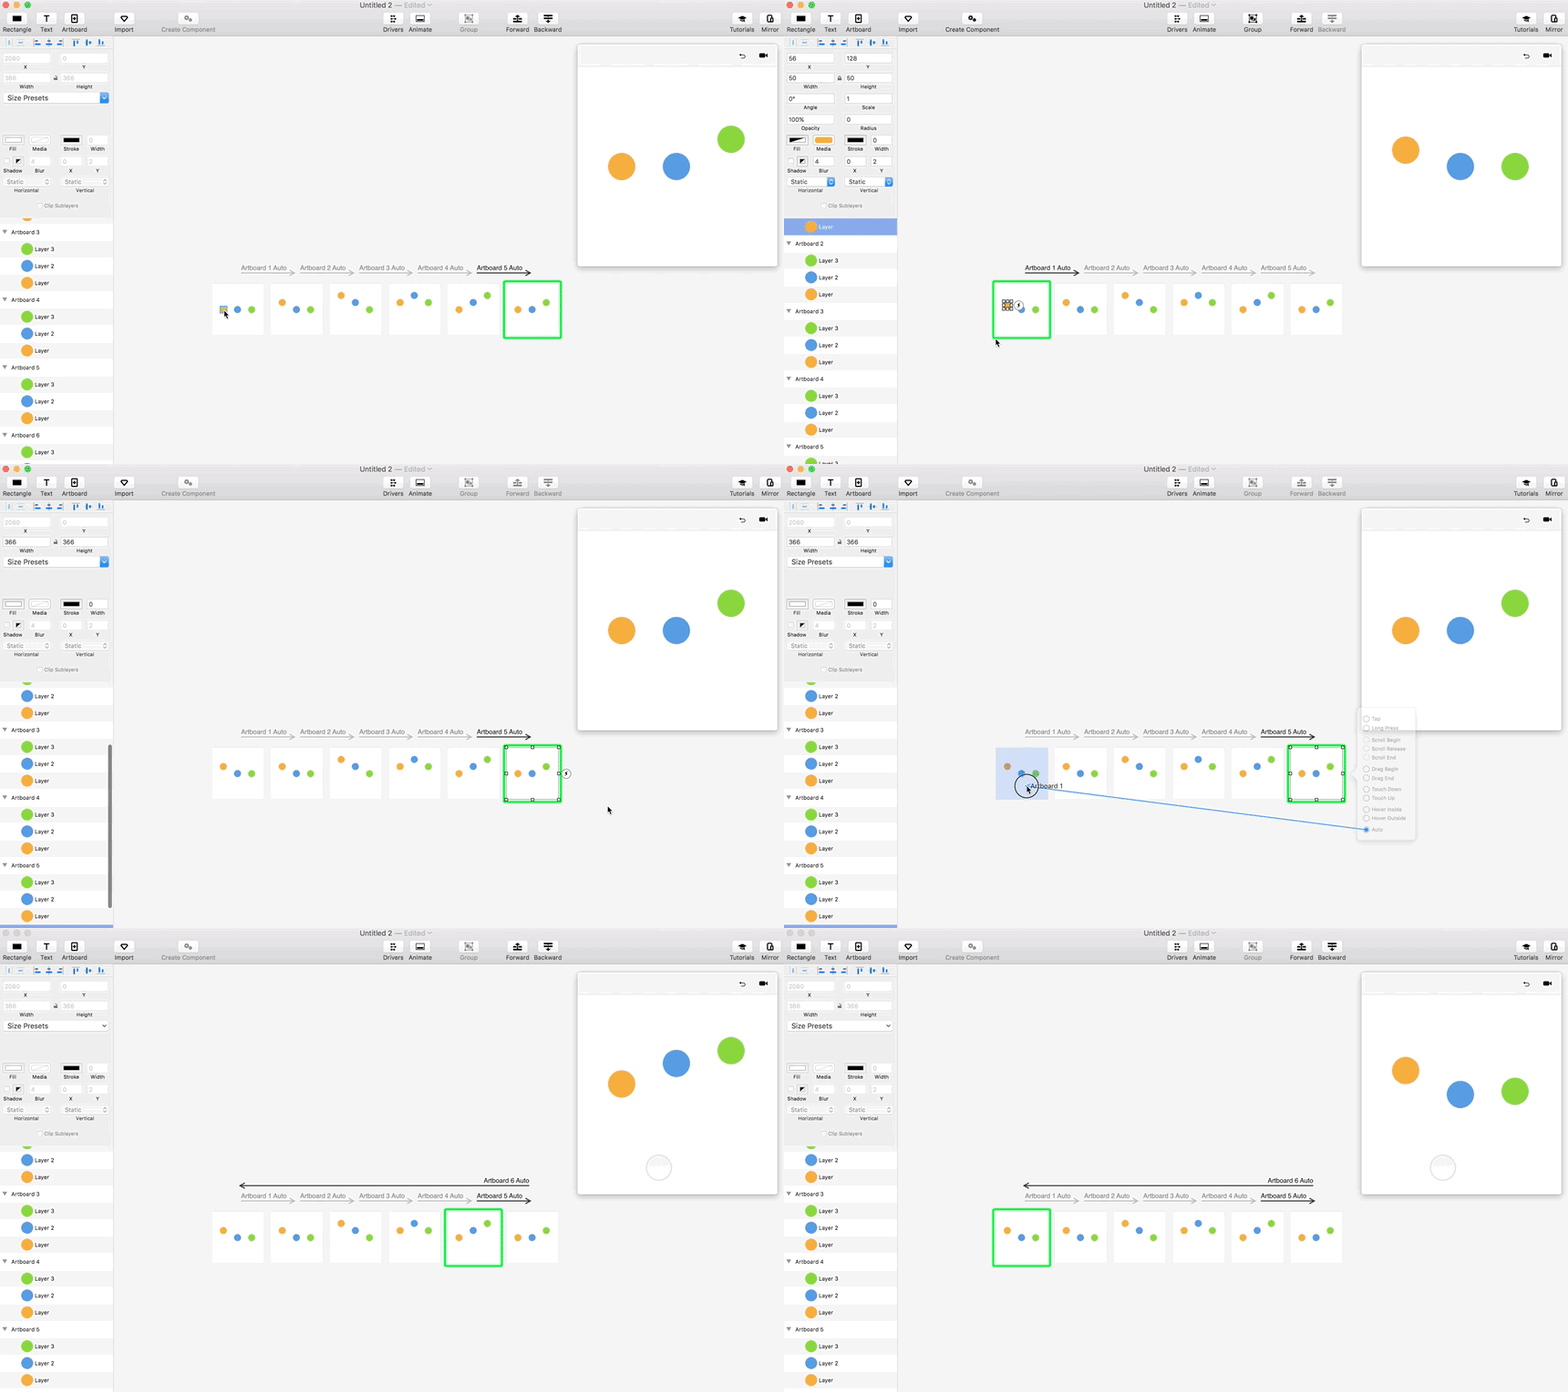
Finally, go back to the very first artboard, move the first dot 50px up, and link the last artboard to the first one with an “Auto” trigger. You can preview the end result.
Classic Loader
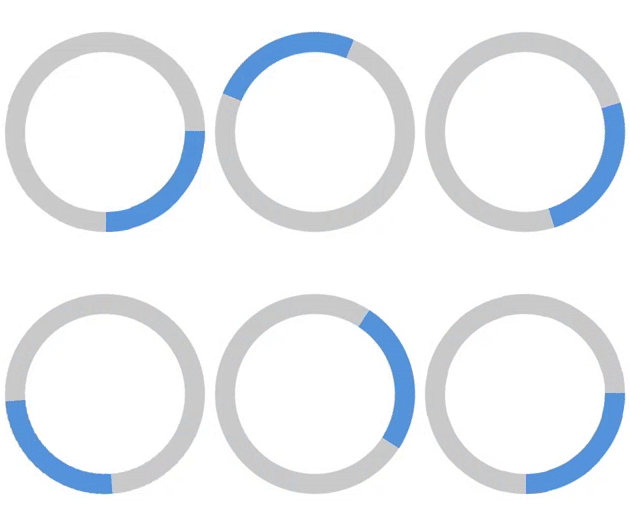
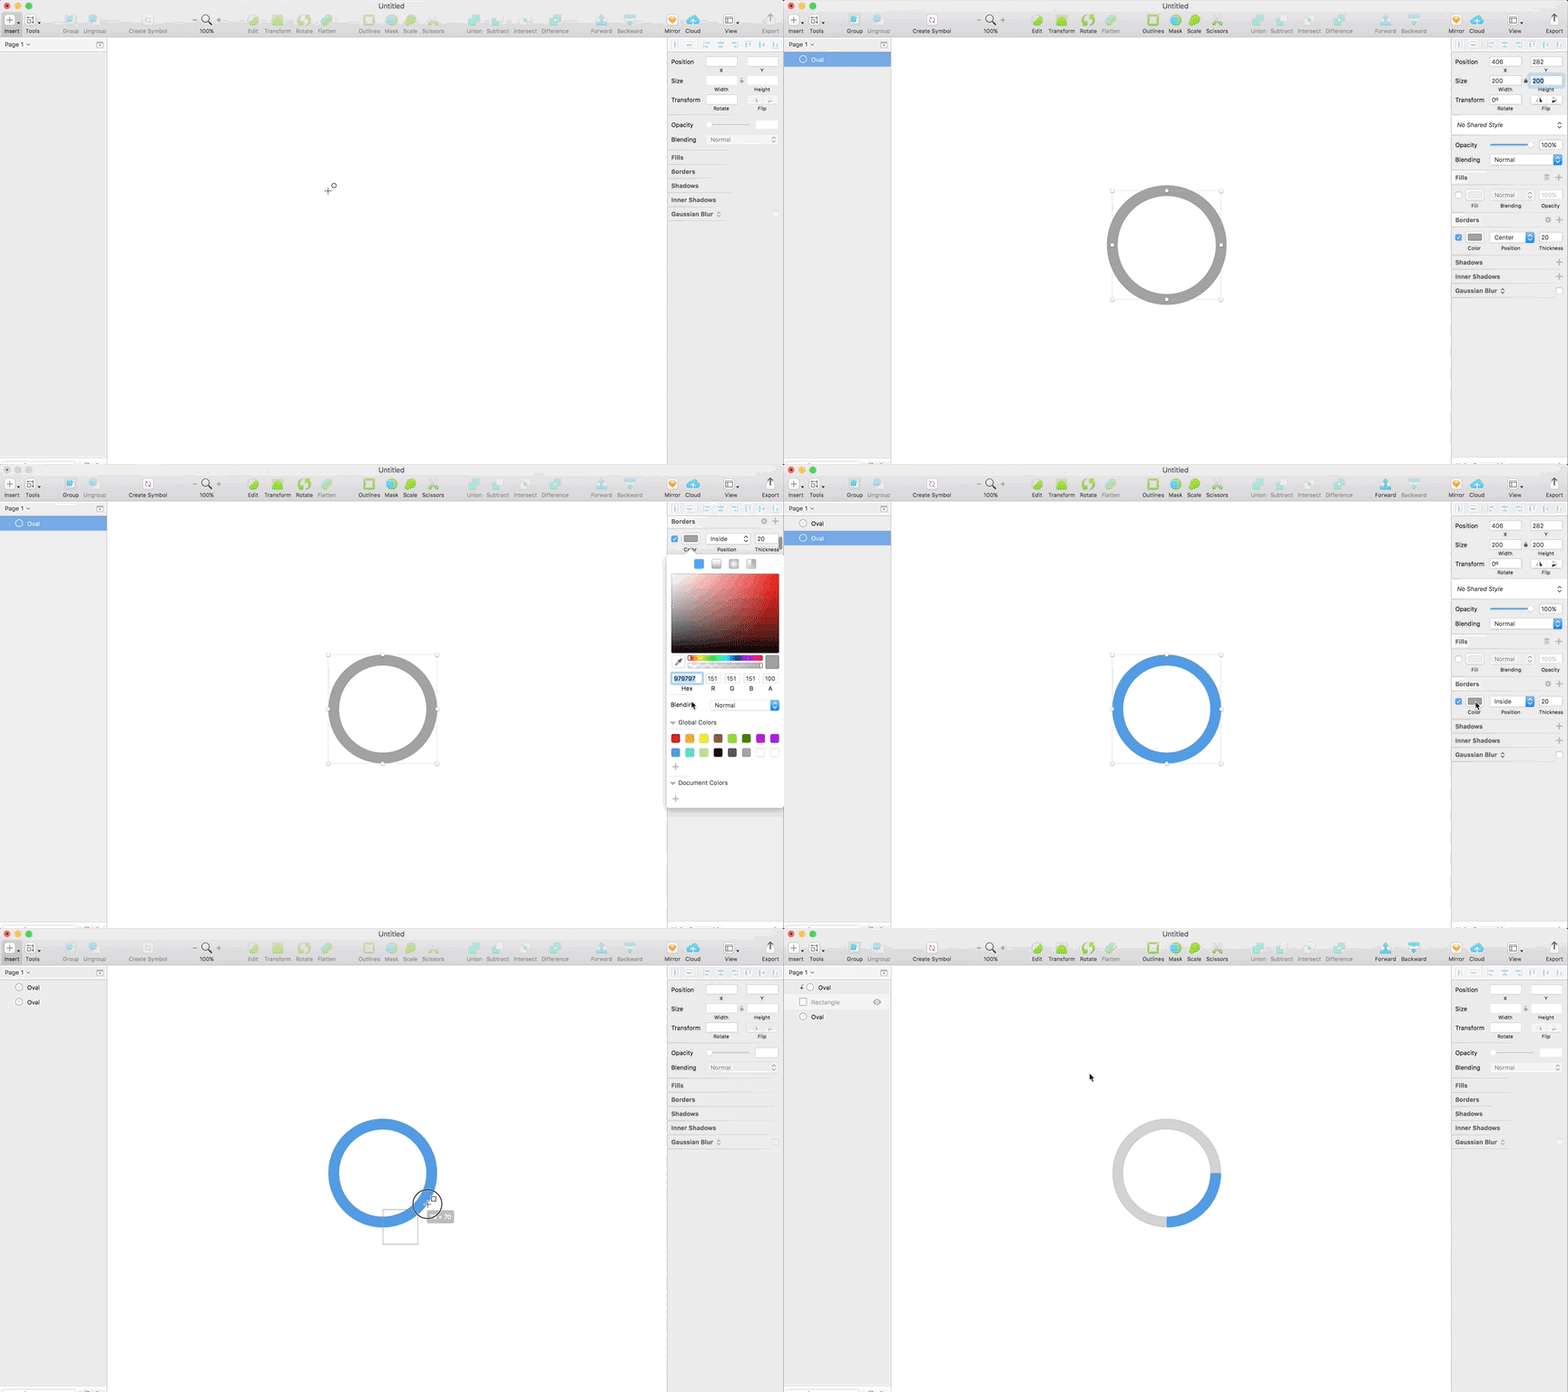
Trace a circle in Sketch, and give it a 20px grey border with no fill.
Paste a copy of the same circle on top of it and change the copy fill to a different color. For this example, we’ll use blue.
Trace a square overlapping one quarter of the blue circle. Move the rectangle layer below the circle layer, and apply “Mask” to the rectangle layer.
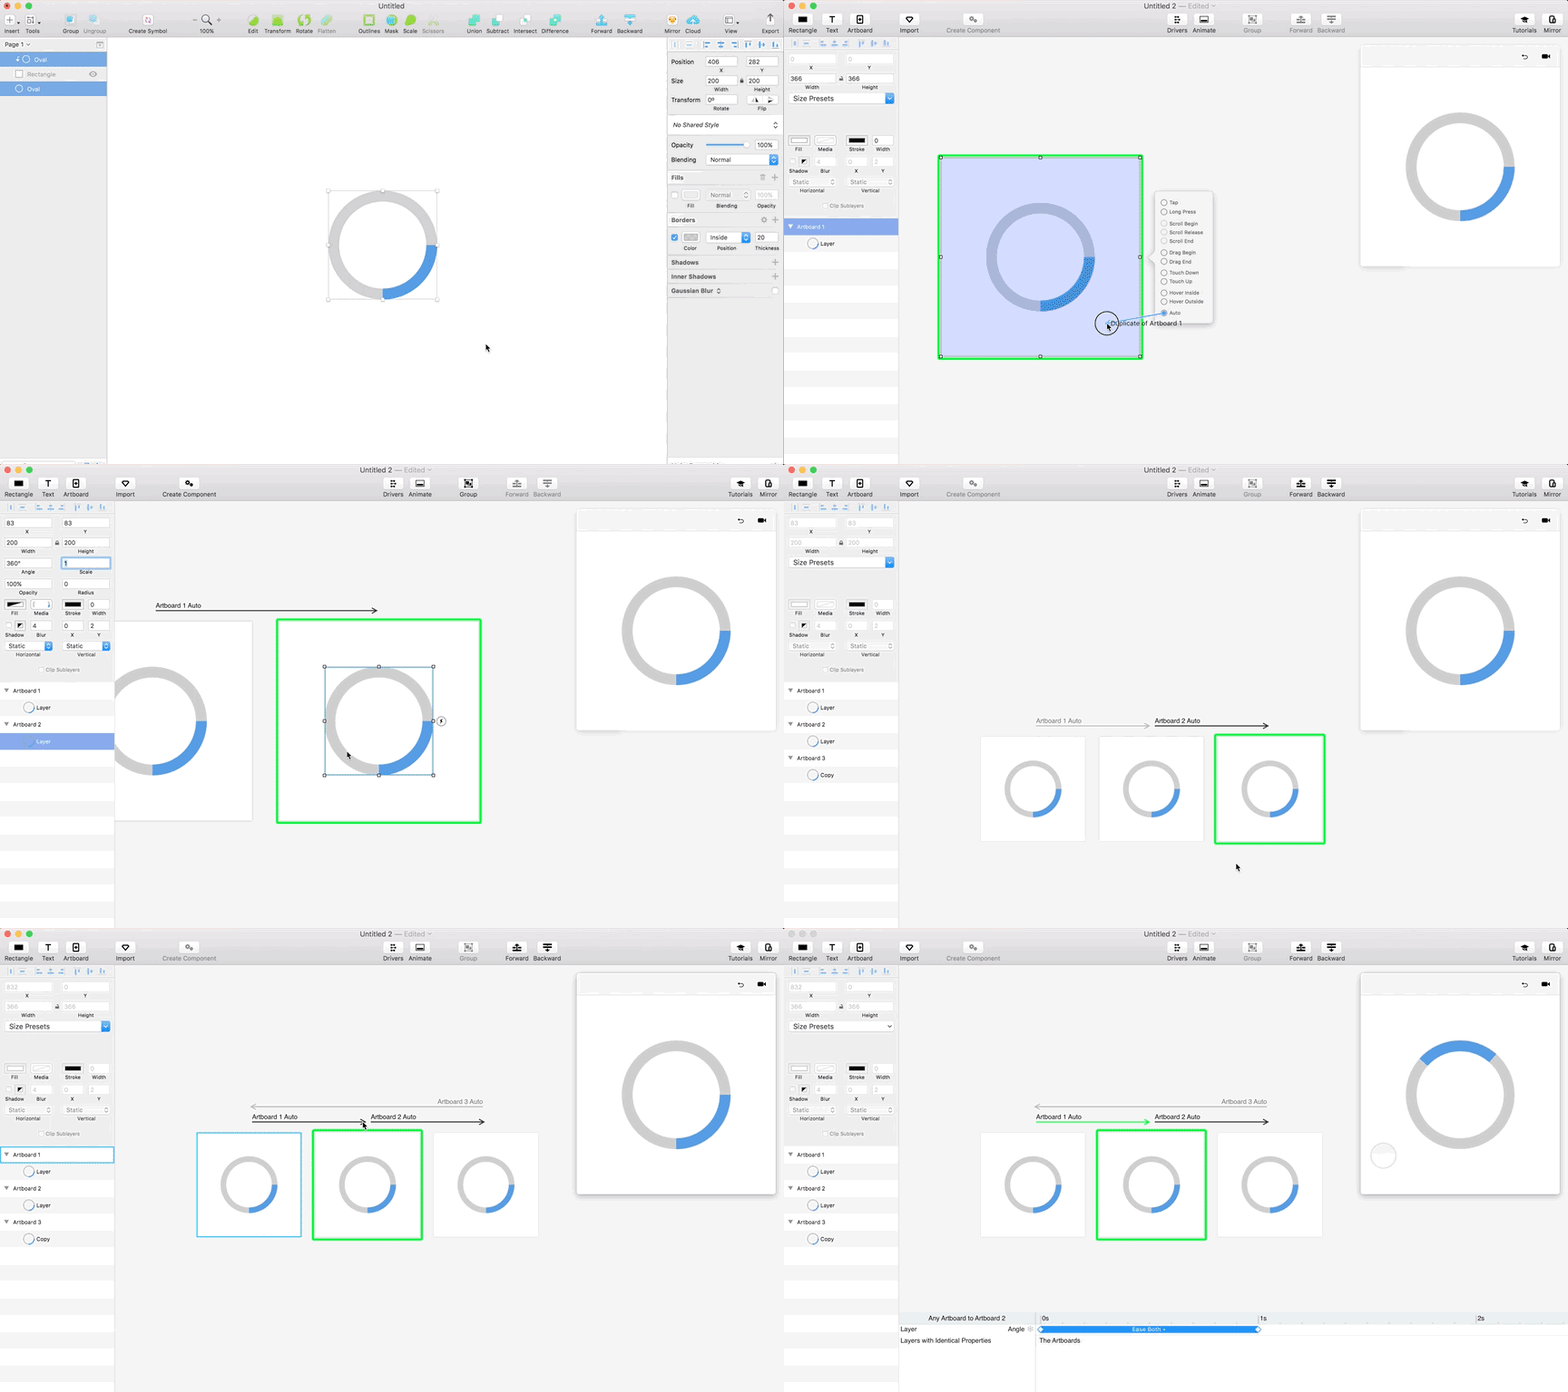
Move to Principle and import the Sketch artwork with the “Import” button.
Apply an “Auto” trigger to the first artboard and rotate the blue circle 360 degrees.
Apply a second “Auto” trigger to the second artboard. Rename the generated third circle layer to “copy” and link it back to the first artboard with an “Auto” trigger.
Conclusion
Once you’ve practiced creating a few of these tried-and-true loading animations, you should feel confident in your abilities to create a unique animation for your own apps using the skills learned here.
With a bit of imagination and the handy tools found in Sketch and Principle, you can create a unique loading animation that matches the design of your app in a matter of minutes. Your users will appreciate the professional look and the friendly indicator that your app is hard at work.
Further Reading on the Toptal Blog:
About the author
Tidjane is a UX/UI design leader who connects user’s needs and goals to deliver strategic solutions for companies like Adobe and Google.


