A Step-by-Step Guide to Creating Animated Product Explainer Videos
In this tutorial, we will give a simple breakdown of the steps that you need to create an animated explainer video like the slick masterpieces built by Slack.
In this tutorial, we will give a simple breakdown of the steps that you need to create an animated explainer video like the slick masterpieces built by Slack.
Matt is an illustrator and designer with 10+ years experience. He tells stories in digital spaces by using creative coding and animation.
Expertise
PREVIOUSLY AT

Everyone loves a good product video. An animated explainer video that shows off the functionality of your new product can capture the attention and imagination of customers much more effectively than written descriptions.
But, you say, I don’t know how to make an animated explainer video.
Not to worry. It’s actually a lot easier than you might think. Using Adobe After Effects, I’m going to give you all the guidance you need to create your own animated product video.

What I aim to tackle:
How to repurpose your current assets and artwork to create animated elements for product videos using Adobe After Effects. I will show you the basic concepts of animation and simple tricks to give your videos that professional touch.
What I won’t cover:
How to conceptualize and script your video, or how to add voiceover or music. Those elements are obviously important, but they aren’t what we’re here to talk about today. Focus, people!
We’re going to use a fictional Slack-style product (let’s call it Quack) for this tutorial. You can download the files to follow along with me here. Let’s get started…
1. Exporting from Photoshop
Try to make everything double size and put each part you want animated on a separate layer. Layers within folders cause problems (for the sake of this tutorial at least). Make sure you name your layers—doing so will really help later on.
My document size is 3840px x 2160px. When saving, make sure the file format is PSD with layer export enabled.
2. Importing the File into After Effects
Fire up After Effects. Click New Project on the welcome screen or in the menu bar by going to File > New > New Project.
Now, go to File > Import > File.
Select your Photoshop file and hit the Open button. Make sure the Editable Layer Styles button is selected and that the Import Kind is Composition (NOT Footage).
You should now see a new Composition and a folder in your project browser panel (the left-hand panel of your After Effects workspace. Press cmd+0 on a Mac or ctrl+0 in Windows to view the panel if you can’t see it).

You should see a preview of your composition and, much like Photoshop, a list of layers at the bottom. But these aren’t layers, they’re timelines.
We are almost ready to get animating! A few last things before we get to the fun stuff.
3. Checking Your Video Settings
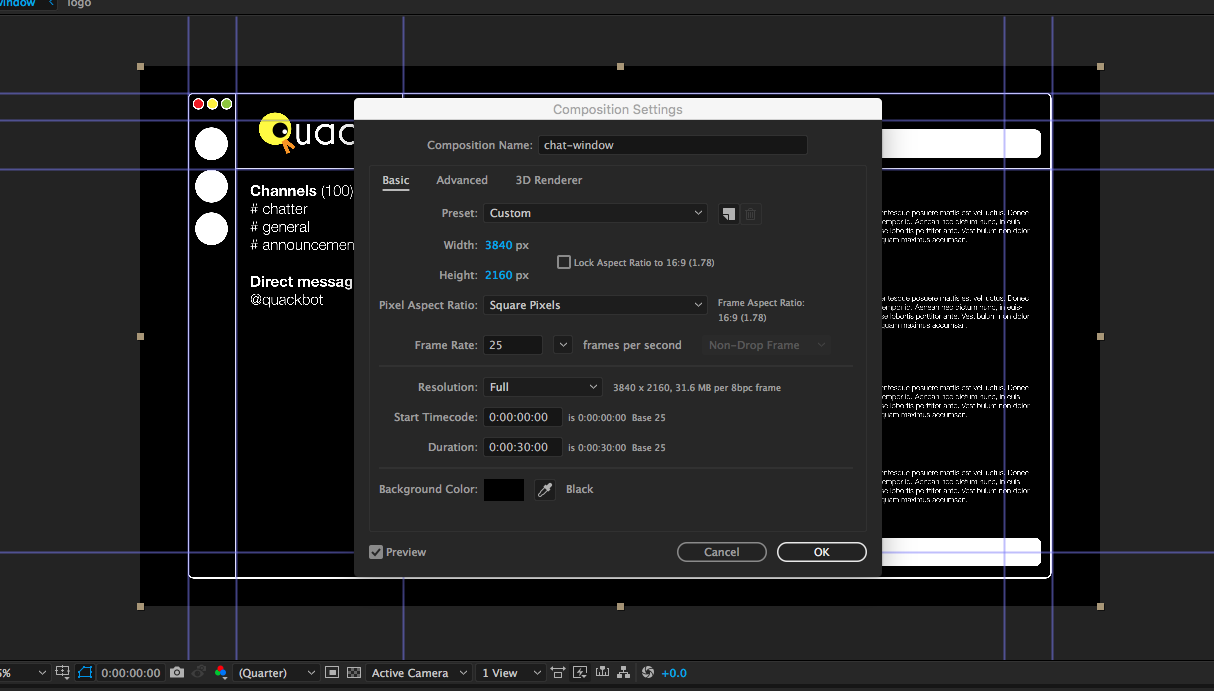
Select Composition in the main menu, and then Composition Settings. We want to make sure we have enough time to animate everything, so find the duration box and set it to 0:00:30:00 (this is the normal timecode format—hours, minutes, seconds, then split seconds).
You should also make sure that the frame rate is set to 25 and, for now, that the resolution is set to Full (you can lower this later if your computer starts being sluggish).
(A quick guide to the timeline)
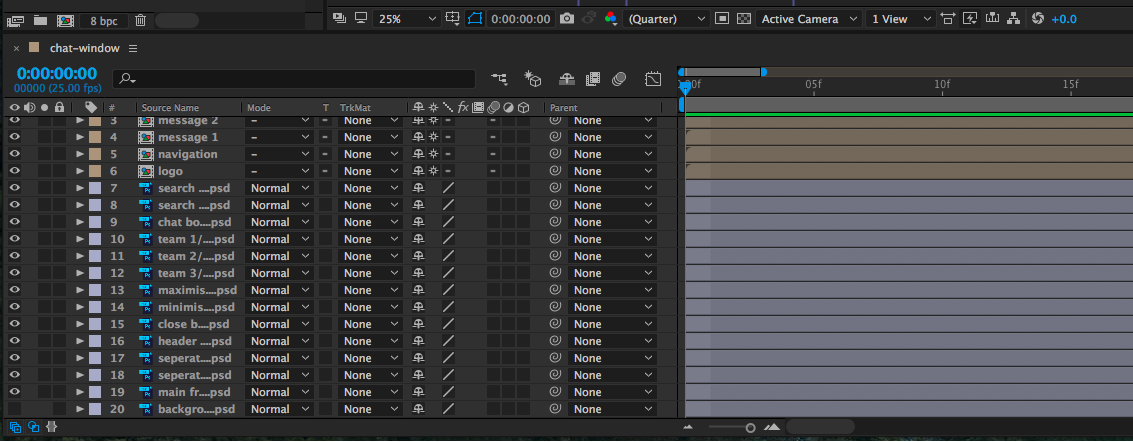
As this is for animation beginners and people with little knowledge of After Effects, here is what you should see on the timeline:
- The eye icon to the left to show/hide each layer
- The right facing triangle, which is how you access all of the layer properties and ultimately animate them
- Each layer’s timeline where keyframes (the start or end-point of a transition in animation) will be marked on the right hand side
- Underneath these, you will see a zoom bar (small mountain and a large mountain). Zoom out as far as you can.
4. Keyframes and Transforms
Now we are going to make each element of our video fade into view on screen. We are going to create a keyframe for each layer, affecting the opacity and transitioning it from 0% to 100%. We can do this layer by layer, but we want to work quickly—so let’s do every layer together!
Click on the first layer (the top one) in the timeline, and Select All (cmd+a, or Menu: Edit > Select All). Then, in the first layer, click the right facing triangle I mentioned earlier. The transform option should roll out. Click the triangle next to the transform option.

You should now have all of the transform options available to you.
With the playhead (the bigger blue, downward facing arrow you can drag left to right across the second markers like you would on a video) at zero, click the stopwatch to the left of Opacity, and then set the value to 0% by typing it or clicking and dragging the marker until it reaches zero.
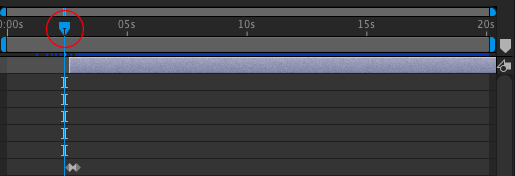
Move the playhead to one second, and then set the opacity back to 100%. A keyframe will automatically be added.
You can now preview the fade by dragging the playhead back to the start of the timeline and hitting the spacebar.

Now we want to offset these slightly so they all fade in separately.
First we need to check that all of the layers fill the timeline. With all the layers selected and fully zoomed out in the timeline, hover over the right hand side of the colored bar. You should get a resize handle. Click and drag all the way to the right of the timeline. Each layer should now last the full 30 seconds.
Now, to offset the fades, you can either manually drag each layer along a bit (making sure you only have one layer selected at a time).

Or you can use a little trick (this is assuming your composition is set up the same as mine). Select the bottom layer, hold down shift, and then select the top layer (the order of selection really matters here).
Next, in the menu, select Animation > Keyframe Assistant > Sequence Layers.

Check the box that says Overlap and enter 00:00:29:20. This will offset each layer by five frames. (thirty seconds of animation at 25 frames per second minus 29 seconds and twenty frames).
If everything has gone well, hit 0 on your number pad (or drag the playhead back to the start of the timeline and hit space bar) to see your video constructing itself.
5. Anchor Points and Scale
In this step, we are going to import a mouse cursor in the form of a transparent PNG and make it move across the screen.
Using cursor.png from the source files you downloaded at the top, import the file the same way we imported the Photoshop file. Then drag and drop it from the project pane to the preview window (or onto the timeline, if you wish).

We need to set this asset up a bit so it looks a little more, um… believable. It needs to be smaller, so let me show you the scale property and, more importantly, the anchor point.
The anchor point
In case you don’t know, an anchor point is the position where all transformations on an element originate from. It looks like a crosshair in the center of the bounding box of the element.
For the anchor point, you have two choices—the Pan Behind tool (keyboard shortcut Y), or the anchor point property.
The pan behind tool (shortcut **Y)**
Make sure the cursor layer is selected, then drag the crosshair to the top left corner of the element. That’s it.

Properties
This method is more accurate if you know exactly where you want the anchor point to be. We want it in the top left, so hit the Transform rollout (the little arrow we used earlier) on the cursor layer in the timeline panel. In the Anchor Point property, change both values to zero (these represent x and y coordinates relative to the layer).
Scaling
You have two options here, too. You can either use the transform handles—hold shift, click, and drag the bottom-right corner of the bounding box to a scale that looks correct. The second option is to use the Scale property in the Transform rollout of the timeline and set the value to around 25%. (The width and height values are linked. Click the little chain link icon to the left if you want to set the values separately.)
6. Making Things Move!
Drag the cursor element outside the bounds of the composition (so we can bring it on later).
Set the playhead on the timeline to five seconds, and then click the stopwatch icon next to Position on the cursor layer Transform rollout. Move the playhead to six seconds, and drag the cursor layer to the desired position—we’re going for the big white text box at the bottom. A new keyframe will be made.
While you are here, hit the stopwatch next to Scale, move forward a few frames on the timeline, and drop the scale by 5%. Then move forward a few more frames and put the scale back to what it was.
While on this frame of the animation, click the diamond to the left of Position. This will create a new keyframe of the position exactly where it is. Go forward a second or so and drag the cursor outside the composition.
When you preview what you have, it should look something like this:

7. Text and Presets
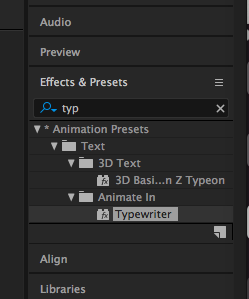
Let’s add some text to this—animated text, obviously.
Select the Type tool in the top toolbar, and add some text in that white box we just pointed to. Adding text works the same way that it does in Photoshop.
If the panel is not open (it probably isn’t if you are in the default workspace setup), go to Main Menu > Window > Effects & Presets. Then select Animation Presets > Text > Animate In > Typewriter.
With your text layer selected, double-click the Typewriter preset, or drag-and-drop the Typewriter preset onto the layer.
Preview the animation. You should see the text slowly typed onto screen.
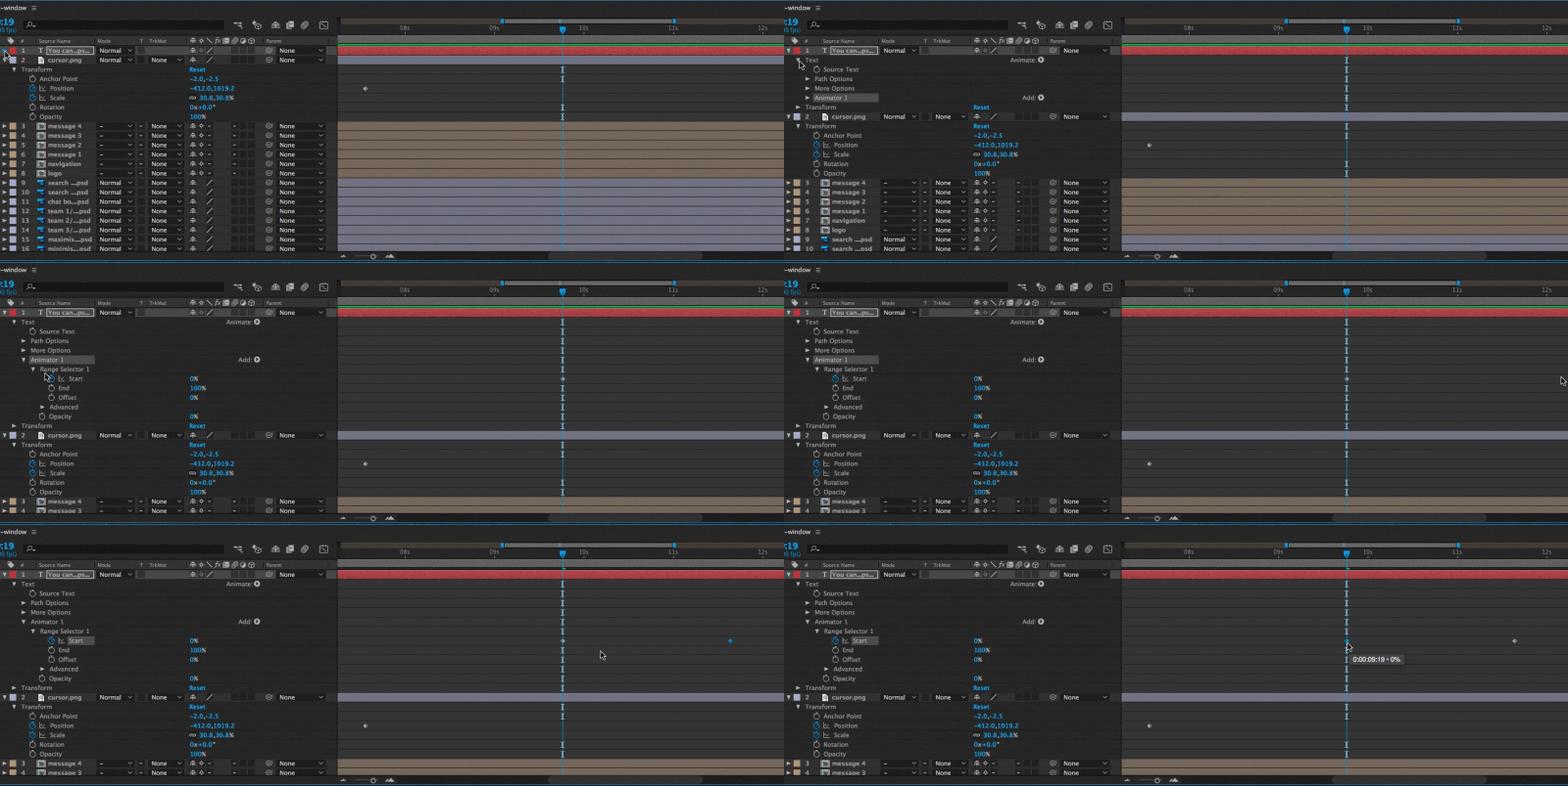
Now, let’s speed it up a bit. Roll out the layer options (using the sideways triangle), and a new option should be listed—Text. Expand that, and then expand Animator 1, and finally Range Selector 1. You can now drag the start and end keyframes of the text animation to a duration you like.
8. Nesting Compositions
Now we are going to look at nesting compositions. In the main menu, click Composition > New Composition. Use the following settings:
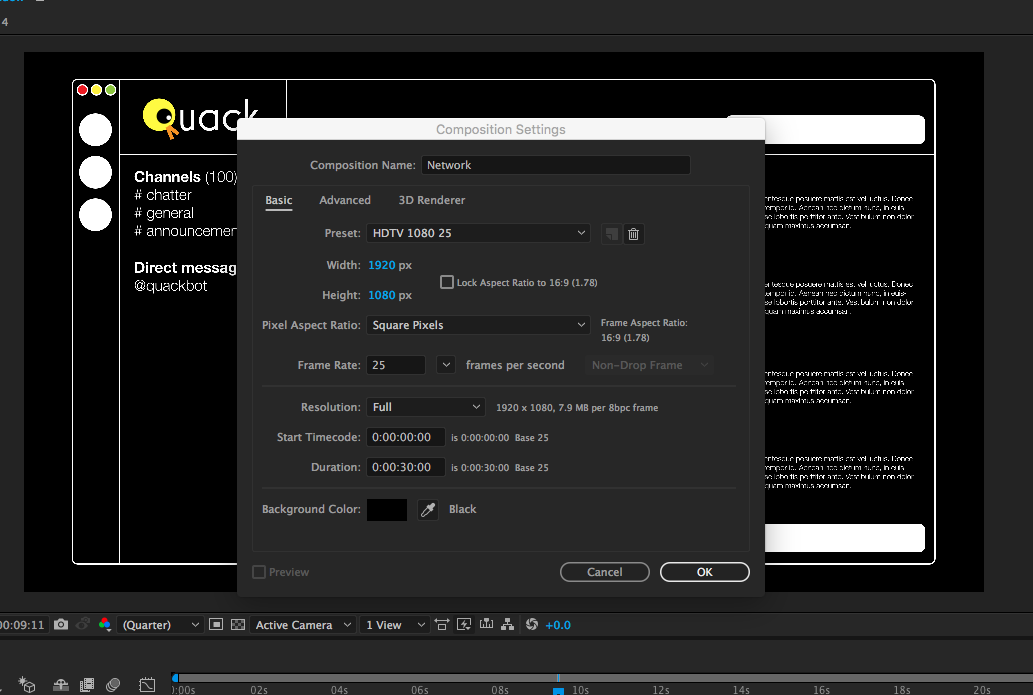
Click OK. You should now have a blank thirty second composition at a reasonable size.
Drag and drop your chat window composition onto your new blank composition. While we are at it, press command+option+F (or ctrl+alt+F) to fit your animation to the new size. Preview what you have. It should look the same as before, just scaled down.
Play around with keyframing the size and position. You can zoom in on the various elements, the text box, etc. See why we made the PSD so big?

You can now copy and paste your layers in the timeline pane and scale each layer down to a new position to show multiple windows. (Pro tip: Use J and K on the keyboard to skip forward and backward between keyframes on a layer.)
9. Transitions
You should have the hang of keyframing now, so go ahead and make your chat window elements disappear (using the opacity settings, scale—set to 0%—or by positioning the composition off screen), and let’s put our end-board logo up.
Import the logo.psd as you learned how to do earlier and drop it into our composition. Drag it off screen, and create a position keyframe somewhere in the timeline after the other elements have left the screen. Move forward half a second, and move the logo to the center of the screen (cmd+option+F).
Preview your animation to see the logo transition in.
The graph editor
Now we are going to make everything flow a bit better using the graph editor, which allows you to tweak the transitions between keyframes.
Select your two position keyframes on the logo, and press the button that looks like a graph (see the blue highlighted button below):
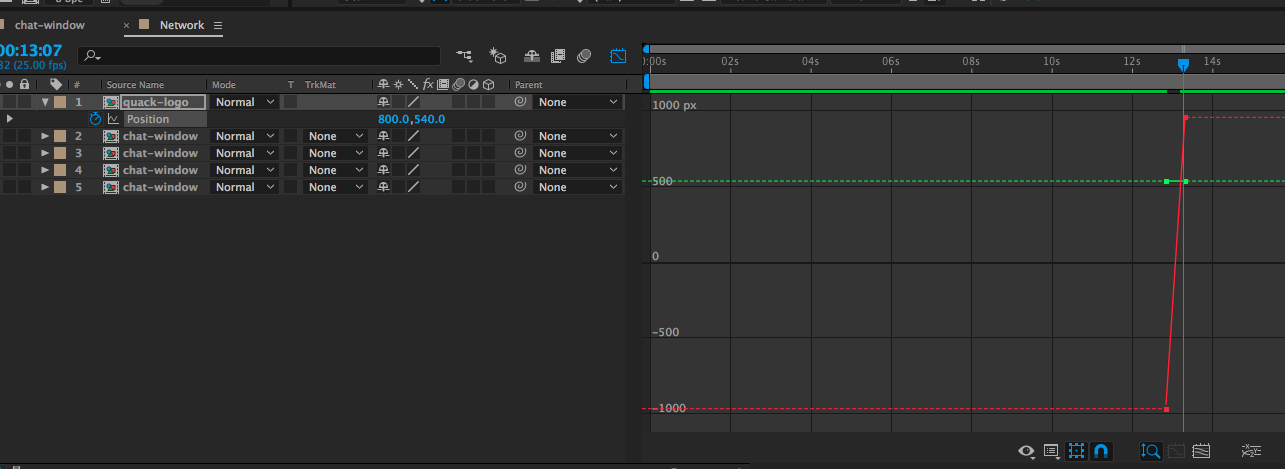
For positions, we need to split the X and Y values. Press the Separate Dimensions button (bottom right of picture above).
Select the last red (X) keyframe, and drag the bezier (yellow) handle up until you get a nice peak.

Preview your animation. You should have a nice bounce now.
10. Tightening Everything Up
Now you have a functional (if a bit bland) section of animated video and the building blocks for creating numerous types of animation. At this point, I would advise spending some time going back though our simple setup, playing with the graph editor on keyframes, and tightening up timings and positions.
You can add in background colors, animate text to explain each scene, etc.
11. Rendering
Finally, make sure you have the correct composition selected and go to Main Menu > Composition > Add to Render Queue.
The render queue should come up. Fiddle about with the settings if you wish, but the default settings should be fine for now. Then click the blue text next to Output to: and select where to save your animation. Finally press the Render button in the top right of the panel.
That’s it! You’ve just created your first animated explainer video in After Effects. It only gets easier from here.

Matt Barringer
Brighton, United Kingdom
Member since February 29, 2016
About the author
Matt is an illustrator and designer with 10+ years experience. He tells stories in digital spaces by using creative coding and animation.
Expertise
PREVIOUSLY AT

