Google Apps Script Tutorial for Mastering Macros
Google Apps Script may appear familiar to those with knowledge of Microsoft’s Visual Basic for Applications (VBA) language. However, Google’s coding offers more integrations and the ability to harness workflows seamlessly across spreadsheets, documents, and presentations.
Google Apps Script may appear familiar to those with knowledge of Microsoft’s Visual Basic for Applications (VBA) language. However, Google’s coding offers more integrations and the ability to harness workflows seamlessly across spreadsheets, documents, and presentations.
Stefan is the Director of Data-Driven Insights and Analytics for Cargotec, a leading provider of cargo and loading solutions. He has also served as an M&A director and a startup CFO, and led financial modeling and analysis as a leveraged finance manager at the Royal Bank of Scotland.
Expertise
PREVIOUSLY AT

Effective executives know that time is the limiting factor… Nothing else, perhaps, distinguishes effective executives as much as their tender loving care of time.
Peter Drucker
Time is our most valuable resource. We want to spend it on the highest-impact and most value-accretive activities that we can, not only because those usually carry the highest monetary value, but also to continually challenge ourselves and maximize our job satisfaction.
There are many ways to improve your efficiency and productivity in order to make better use of your time. In a previous article about Google Sheets, I elaborated on how the power of online collaboration is one such key to increased productivity.
In another article, I demonstrated how the Python programming language can be a powerful analysis and task automation tool for finance professionals.
Taking inspiration from this, I now want to present a Google Apps Script tutorial. Google Apps Script allows you to write scripts and programs in JavaScript to automate, connect and extend the products in Google’s G Suite, including Sheets, Docs, Slides, Gmail, Drive, and several others. Learning it requires an investment in time, as does writing the scripts, but the productivity increases and additional opportunities that it opens up make it well worth it.
As a first step, let’s start by looking at a familiar concept: macros.
Recording and Using Macros in Google Sheets
If you have spent significant time working with Excel, then you are bound to have come into contact with Excel’s VBA (Visual Basic for Applications) macro interface at some point. Either through recording or writing them yourself or piggybacking off ones created by others.
Macros are a great way to automate repetitive and tedious workflows. VBA might not be a language you dedicated a lot of time to learn, but its beauty was that you didn’t really need to in order to become productive and create your own macros. You could simply record the workflow you want to automate, and then go into the code and make whatever small changes were needed to make the macro more general.
In some ways, VBA is a great and forgotten lesson for how to introduce non-technical people to coding. The way you could record actions and then have the code populated for later review is indeed a far more pragmatic way of learning over reading textbooks and passively watching tutorials.
The same recording functionality of VBA is available in Google Sheets. Here is a simple example of how to use it:
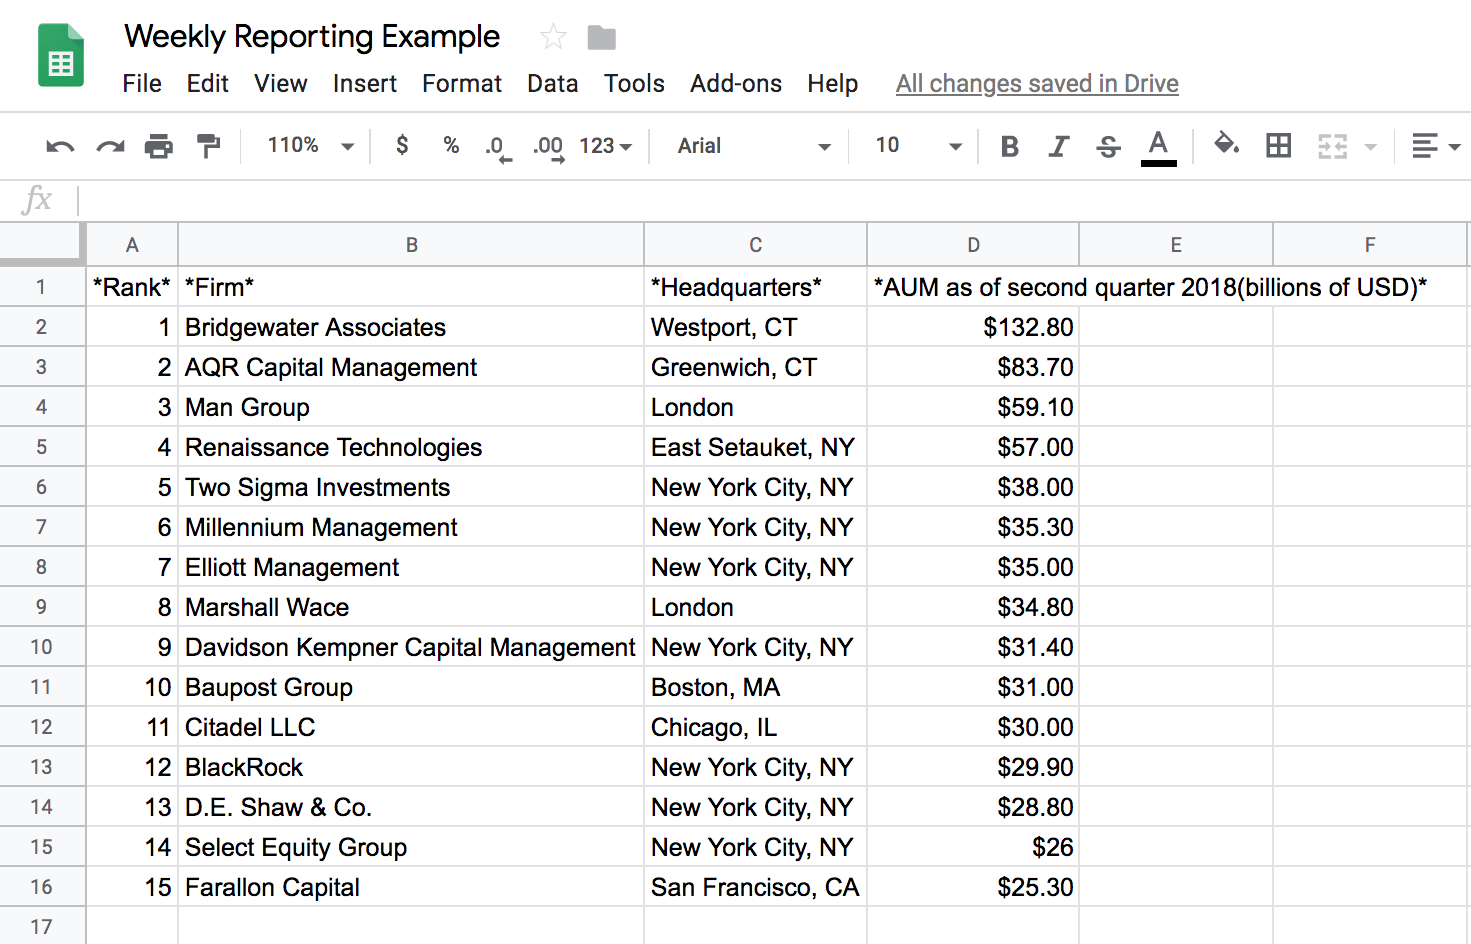
Let’s start with some sample data, using an IMPORTHTML query to import a table. In this example, I have downloaded a list from Wikipedia of the 15 largest hedge funds in the world. It goes without saying, but, this is an arbitrary example; the intention is for you to focus more on the application, over the subject.

The macro recording process is instigated via the following menu path: Tools > Macros > Record macro.
We then walk through the actions (PC format) that we want to record:
- Select the first row
- Press Shift + Ctrl + Down Arrow to select everything
- Ctrl + C to copy
- Shift + F11 to create a new sheet
- Give the sheet a new name
- Press Shift + Control + V to paste values
Once done, press the Save button on the macro window at the bottom, give it a name and an optional keyboard shortcut.
For simpler actions that can be replicated exactly through these same steps, the process would end here and you can start using your macro straight away. In this case, though, we need to make some changes before the code is usable. For example, the sheet we copy to will need to have a different name each time. Let’s see how to do this.
Writing Google Apps Script Manually
Now we will see the bones of Google Apps Script for the first time; the programming platform that runs on Google’s servers. This powers our macros and allows you to create very complex workflows, and even add-ons, for the applications themselves. It can be used to automate not only spreadsheet work but actually almost anything interconnected within Google’s G Suite.
The programming language of Apps Script is JavaScript, one of the most popular programming languages, which means there’s a wealth of resources out there for anyone wanting to extensively learn. But, just as with VBA, you don’t really need to: you can use the same Record functionality and simply do the steps you want to be able to repeat automatically. The output from the recording might look crude and most likely won’t match perfectly with what you want to get done, but it will provide a solid enough starting point. Let’s now do it for the script we just recorded.
When recording, it makes sense to be careful not to record any additional steps by accident that you don’t want to be captured in the final recording, but it’s sometimes difficult to avoid: something as simple as selecting a different cell before pressing the Stop Recording button will be captured and subsequently repeated every time you run the script. The first step when editing our script would be to clean it up and remove any such steps. Let’s dive in by going to Tools > Script editor in the file menu.

If you know JavaScript, you will recognize this instantly, and you might also be surprised to see the “var” keyword instead of “let” or “const” as you would see in modern JavaScript. This reflects the fact that the JavaScript version in Apps Script is quite old and doesn’t support many of the language’s more recent features. Towards the end, I will introduce a workaround however for those who would like to use the most recent language features.
When you run the script the first time it will ask for authorization, which makes sense, since scripts can modify (and potentially delete) all your data. You will most likely recognize the authorization process from other Google products.
Now we can begin to modify the code. The changes we need to make are minor, but if you do this for the first time, it may still require some quick searching through the Sheets Apps Script documentation and/or a quick lookup of a JavaScript concept, such as working with dates. Here the fact that JavaScript is such a widespread language comes in handy: A solution for whatever issue you face or functionality comes to mind can usually be found quickly if you phrase your search term in a straightforward way.
The changes made in this version of the script from the original recorded version are that instead of the hardcoded name for the new sheet that we create, we now name it with today’s date instead. In addition, we also change the copy path at the end to refer to this new sheet. The last four rows also demonstrate how to perform some formatting operations, such as changing the value of a cell, resizing columns and hiding gridlines.
function createSnapshot() {
  var spreadsheet = SpreadsheetApp.getActive();
  var date = new Date().toISOString().slice(0,10);
  var destination = spreadsheet.insertSheet(date);

  spreadsheet.getRange('HTML!A1:F1').activate();
  spreadsheet.getSelection()
    .getNextDataRange(SpreadsheetApp.Direction.DOWN)
    .activate();

  spreadsheet.getActiveRange()
    .copyTo(SpreadsheetApp.setActiveSheet(destination)
    .getRange(1,1),
    SpreadsheetApp.CopyPasteType.PASTE_VALUES,false);

  var sheet = spreadsheet.setActiveSheet(destination)
  sheet.getRange("D1").setValue("AUM $bn")
  sheet.setHiddenGridlines(true);
  sheet.getRange("A1:D1").setFontWeight("bold");
  sheet.autoResizeColumns(1, 4);
};
Running the script now will show that the new sheet is indeed named with today’s date and contains the information copied as values (not formulas) from the main sheet.
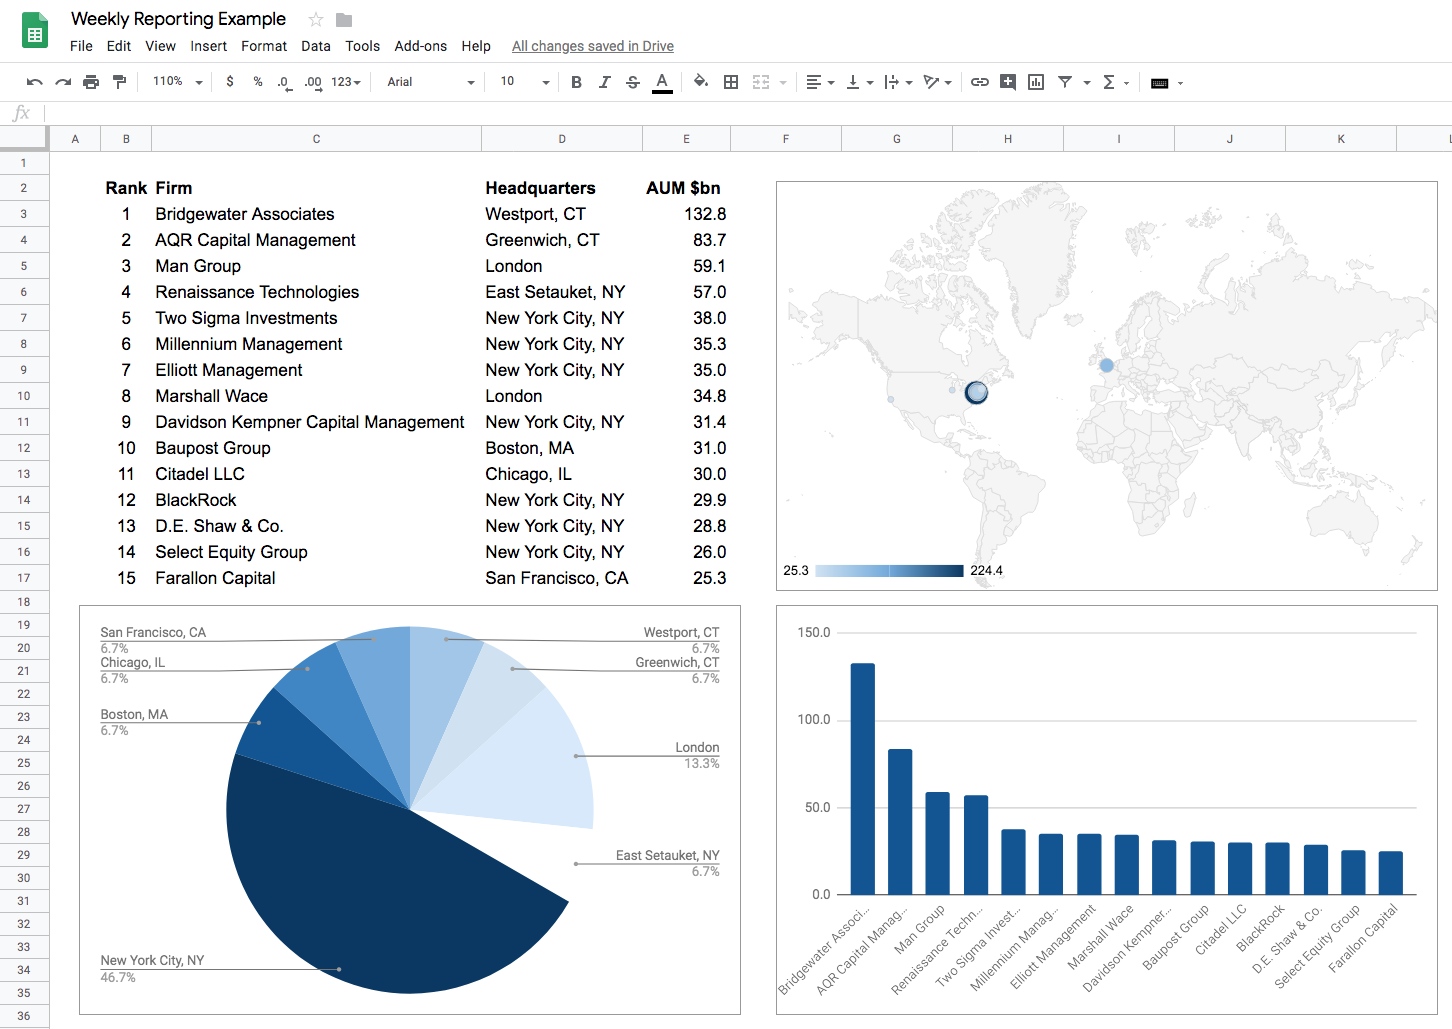
Charting visualizations can now be added by using the same record process. I used this to create three simple charts.

Cleaning up code for each will look something like this:
function createColumnChart() {
  var spreadsheet = SpreadsheetApp.getActive();
  spreadsheet.getRange('C1:D16').activate();
  var sheet = spreadsheet.getActiveSheet();
  chart = sheet.newChart()
  .asColumnChart()
  .addRange(spreadsheet.getRange('B1:D16'))
  .setMergeStrategy(Charts.ChartMergeStrategy.MERGE_COLUMNS)
  .setTransposeRowsAndColumns(false)
  .setNumHeaders(-1)
  .setHiddenDimensionStrategy(Charts.ChartHiddenDimensionStrategy.IGNORE_BOTH)
  .setOption('useFirstColumnAsDomain', true)
  .setOption('curveType', 'none')
  .setOption('domainAxis.direction', 1)
  .setOption('isStacked', 'absolute')
  .setOption('series.0.color', '#0b5394')
  .setOption('series.0.labelInLegend', 'AUM $bn')
  .setPosition(19, 6, 15, 5)
  .build();
  sheet.insertChart(chart);
};
Again, don’t worry if some of the options look confusing: this is all auto-generated, you just need to understand enough to remove the unnecessary steps and perhaps make small tweaks later.
Advanced Google Apps Script Examples: Connecting Sheets to Google Drive and Slides
Everything is now starting to take shape, but what if the actual output we want is not a spreadsheet but a presentation? If that is the case, then most of the work from here might still be manual, and we haven’t saved much time if we need to do this on a recurring basis.
Let’s now explore what it might look like to automate the creation of a presentation using the example data from our spreadsheet.
This exercise now becomes more advanced for two reasons:
- We will need to familiarize ourselves with how to work with Google Slides (and Google Drive) in addition to Sheets.
- In Slides, or when working between G Suite Apps in general, there is no “Record macro” functionality available. This means that you need to know enough about Apps Script (and be comfortable navigating the documentation for each of the G Suite products) to write scripts from scratch.
This next example is meant to provide some basic building blocks to get you started and familiarized.
To begin with, let’s create a template that we later want to fill with content using our script. Here are two simple presentation slides that I put together:

Next, you will need to get the ID of this template because you will have to refer to it in your script. Subconsciously you will have seen this ID many times because it is, in fact, the random-looking sequence of characters and numbers that you see in the URL of your browser:
https://docs.google.com/presentation/p/this_is_your_presentation_ID/edit#slide=id.p.
Now we have to add the following lines to our original script. This will again prompt for authorization, this time to access your Google Drive.
function createPresentation() {
  var templateId = "insert_your_template_presentation_id_here";
  var template = DriveApp.getFileById(templateId);
  var copy = template.makeCopy("Weekly report " + date).getId();
  var presentation = SlidesApp.openById(copy);
}
You won’t see any immediate visual feedback if you run this code snippet, but if you look in the folder of your Google Drive where you had stored the template you will find that a copy of it has indeed been created, and it has today’s date in the filename. We are off to a good start!
Let’s now use more building blocks to start filling it with content, programmatically instead of by hand. Add the following rows to the same function:
  presentation.getSlides()[0]
    .getPageElements()[0]
    .asShape()
    .getText()
    .setText("Weekly Report " + date);
Now things are getting a bit more interesting, as we have changed the first page to include today’s date. In Slides, as in Sheets, you work with objects (represented by classes) that each have properties and methods (i.e. attached functionality). These are organized in a hierarchy, with SpreadsheetsApp, DriveApp or SlidesApp being the top-level object. In the code snippet above, we need to move through this hierarchy step-by-step to reach the element we want to edit, in this case: The text in a text box. Practically speaking, this means reaching through Presentation, Slide, PageElement, and Shape objects, until we finally get to the TextRange object that we want to edit.
Keeping track of which type of object you are dealing with can be confusing and the bugs that result from trying to apply an operation to the wrong object can be hard to solve. Unfortunately, the help functionality and error messages in the Script Editor itself don’t always provide a lot of guidance here, the silver lining being that such attention will at least improve your quality control practices.
Having created the presentation and updated the title, it’s now time to insert one of our new charts into it. Keeping the hierarchy of objects in mind, the following code should now make sense:
  var spreadsheet = SpreadsheetApp.getActive();
  var sheet = spreadsheet.getSheetByName(date);
  var chart = sheet.getCharts()[0];

  var position = {left: 25, top: 75};
  var size = {width: 480, height: 300};

  presentation.getSlides()[1]
    .insertSheetsChart(chart,
      position.left,
      position.top,
      size.width,
      size.height);
If you run the full script the output presentation should look something like this:

Hopefully, this example illustrates the principles and provides inspiration to get you started with your own experimentation. If you think about it, I’m sure you can find at least a few examples of manual work done in your company today that really should be automated in this way. Serving to free up time to think, analyze, and apply judgment, rather than on mechanically shuffling data from one format and/or place to another. Improving the Development Experience As mentioned previously, the JavaScript version supported in Google Apps Script is old and the functionality of the online Script Editor is very limited. If you are just recording a macro or writing a few dozen lines you won’t really notice. If however, you do have ambitious plans to automate all aspects of your weekly or monthly reporting, or want to build plugins, then you will be glad to know that there is a command-line tool that allows you to develop using your favorite development environment.
If you are at such levels of proficiency, then you’ll probably also want to take advantage of the most recent features that JavaScript has to offer, and potentially even more, since with the command-line tool you can also develop in TypeScript.
Using Python for Google Sheets Programming
If you find that working with Apps Script is not your cup of tea, then there are other options, depending on the use case. If you want to do more advanced number crunching, connect with APIs or databases, or simply prefer the Python programming language over JavaScript, then Google’s Colaboratory is a priceless product. It gives you a Jupyter notebook running on Google’s servers that allows you to write Python scripts that integrate seamlessly with your Google Drive files and, through the ‘gspread’ library, makes it easy to work with your spreadsheet data.
I outlined many of the benefits of Python in an article about how to use it for financial functions, which also serves as a gentle introduction to working with Python and Jupyter notebooks in a business and financial context. One very important benefit to me is that unlike with Apps Script, the Python notebook in Colaboratory is interactive, so you see the results (or error message) after executing each line or small block of code.

Automation is Addictive
This Google Apps Script tutorial showed a glimpse of what is possible through Google’s coding language. The possibilities are virtually endless. However, if you don’t have a technical background, the code examples may look daunting and you might be thinking to yourself that the productivity gains earned from learning Google Apps Script might not be sufficient enough to outweigh the significant investment in terms of time needed to learn it.
This, of course, depends on many factors, including what type of role you have, or expect to have, in the future. But even if you don’t expect to do anything similar to the examples shown here, having an understanding of what is possible and roughly how much work it would take to implement can trigger thoughts and ideas around how to improve productivity in your company, for your clients, or yourself personally.
Personally, I can attest to the satisfaction of sitting back and hitting a button that completes an hour’s worth of tedious manual work in under a minute. After doing this for the 50th time you will be grateful for the couple of hours spent cobbling it all together in the first place, which ultimately has served to free up your time for more value-additive pursuits. After a while, these scalability benefits do become addictive.
Understanding the basics
How do I use Google App scripts?
Google Apps Script is accessed from the Script Editor functionality in Google’s software products. Coding can be recorded to follower user steps, or directly written/edited in the Script Editor.
Stefan Thelin
Lund, Sweden
Member since September 20, 2017
About the author
Stefan is the Director of Data-Driven Insights and Analytics for Cargotec, a leading provider of cargo and loading solutions. He has also served as an M&A director and a startup CFO, and led financial modeling and analysis as a leveraged finance manager at the Royal Bank of Scotland.
Expertise
PREVIOUSLY AT


