
SSH Logging and Session Management Using AWS SSM
A comprehensive tutorial on how to log SSH activity—minus sensitive input, like passwords—occurring in Linux AWS EC2 instances to either CloudWatch Logs or S3 buckets.

A comprehensive tutorial on how to log SSH activity—minus sensitive input, like passwords—occurring in Linux AWS EC2 instances to either CloudWatch Logs or S3 buckets.

A certified AWS expert with a master’s degree in computer security, Vimal specializes in automating the cloud with Terraform, Kubernetes, and Python.
Previously At

Setting up custom tools or scripts to keep an SSH log on Linux can be tedious and error-prone.
Engineers can use rootsh, screen, or another utility to log user activity but if the user permissions are not set correctly, a skilled user can erase audit logs to cover their tracks. Another option would be to set up logging at the kernel level, but the expertise needed for that isn’t so common.
Thankfully, there’s a way to log user activity without writing even a single Linux command! We’ll need these services:
- EC2
- IAM (Identity and Access Management)
- KMS (Key Management Service)
- CloudWatch Logs (and/or S3)
- AWS Systems Manager (formerly known as SSM)
Let’s see how to set up each of them.
EC2 and IAM
Launching an EC2 instance is normally fairly easy, but there’s one key task that must be done during launch: We need to attach an IAM role to our instance, otherwise we won’t be able to achieve the expected results detailed at the end of this article.
The IAM role we associate with our EC2 instance must have the built-in AmazonSSMManagedInstanceCore policy, plus this policy (attached as inline or customer-managed):
{
    "Version": "2012-10-17",
    "Statement": [
        {
            "Action": [
                "logs:CreateLogStream",
                "logs:DescribeLogStreams",
                "logs:DescribeLogGroups",
                "logs:PutLogEvents"
            ],
            "Effect": "Allow",
            "Resource": "*"
        }
    ]
}
Aside from the IAM role, we generally use this EC2 instance configuration:
- The OS is Amazon Linux 3, AWS’s current general-purpose Linux distribution for EC2 workloads. It comes with the Systems Manager Agent preinstalled, making it a straightforward choice for Session Manager-based access and logging.
- The Instance Type is t3.micro (but any type will do).
- The default Security Group that AWS assigns to the VPC will work, as we don’t need an SSH port open for this exercise.
We can start to set up KMS without waiting for the EC2 instance to boot up.
Default Host Management Configuration
AWS now offers Default Host Management Configuration (DHMC), which can automatically configure eligible EC2 instances for use with AWS Systems Manager without requiring administrators to manually attach the AmazonSSMManagedInstanceCore policy to each instance profile.
This can simplify onboarding and reduce administrative overhead, particularly in environments that manage large numbers of EC2 instances. Organizations that use DHMC may not need to perform the manual instance-role configuration described in this tutorial.
KMS
We need a KMS key if we want all session logs delivered to CloudWatch to be stored encrypted. Let’s head over to the KMS service and create a key.


We recommend assigning an administrator so that the key can be managed by users other than the AWS account root user, but if others won’t need access, we can skip Step 3.
Here we chose the IAM user “admin” as a key administrator, but we’re free to choose any user or role. We can also opt to disable key deletion permission for the administrator.
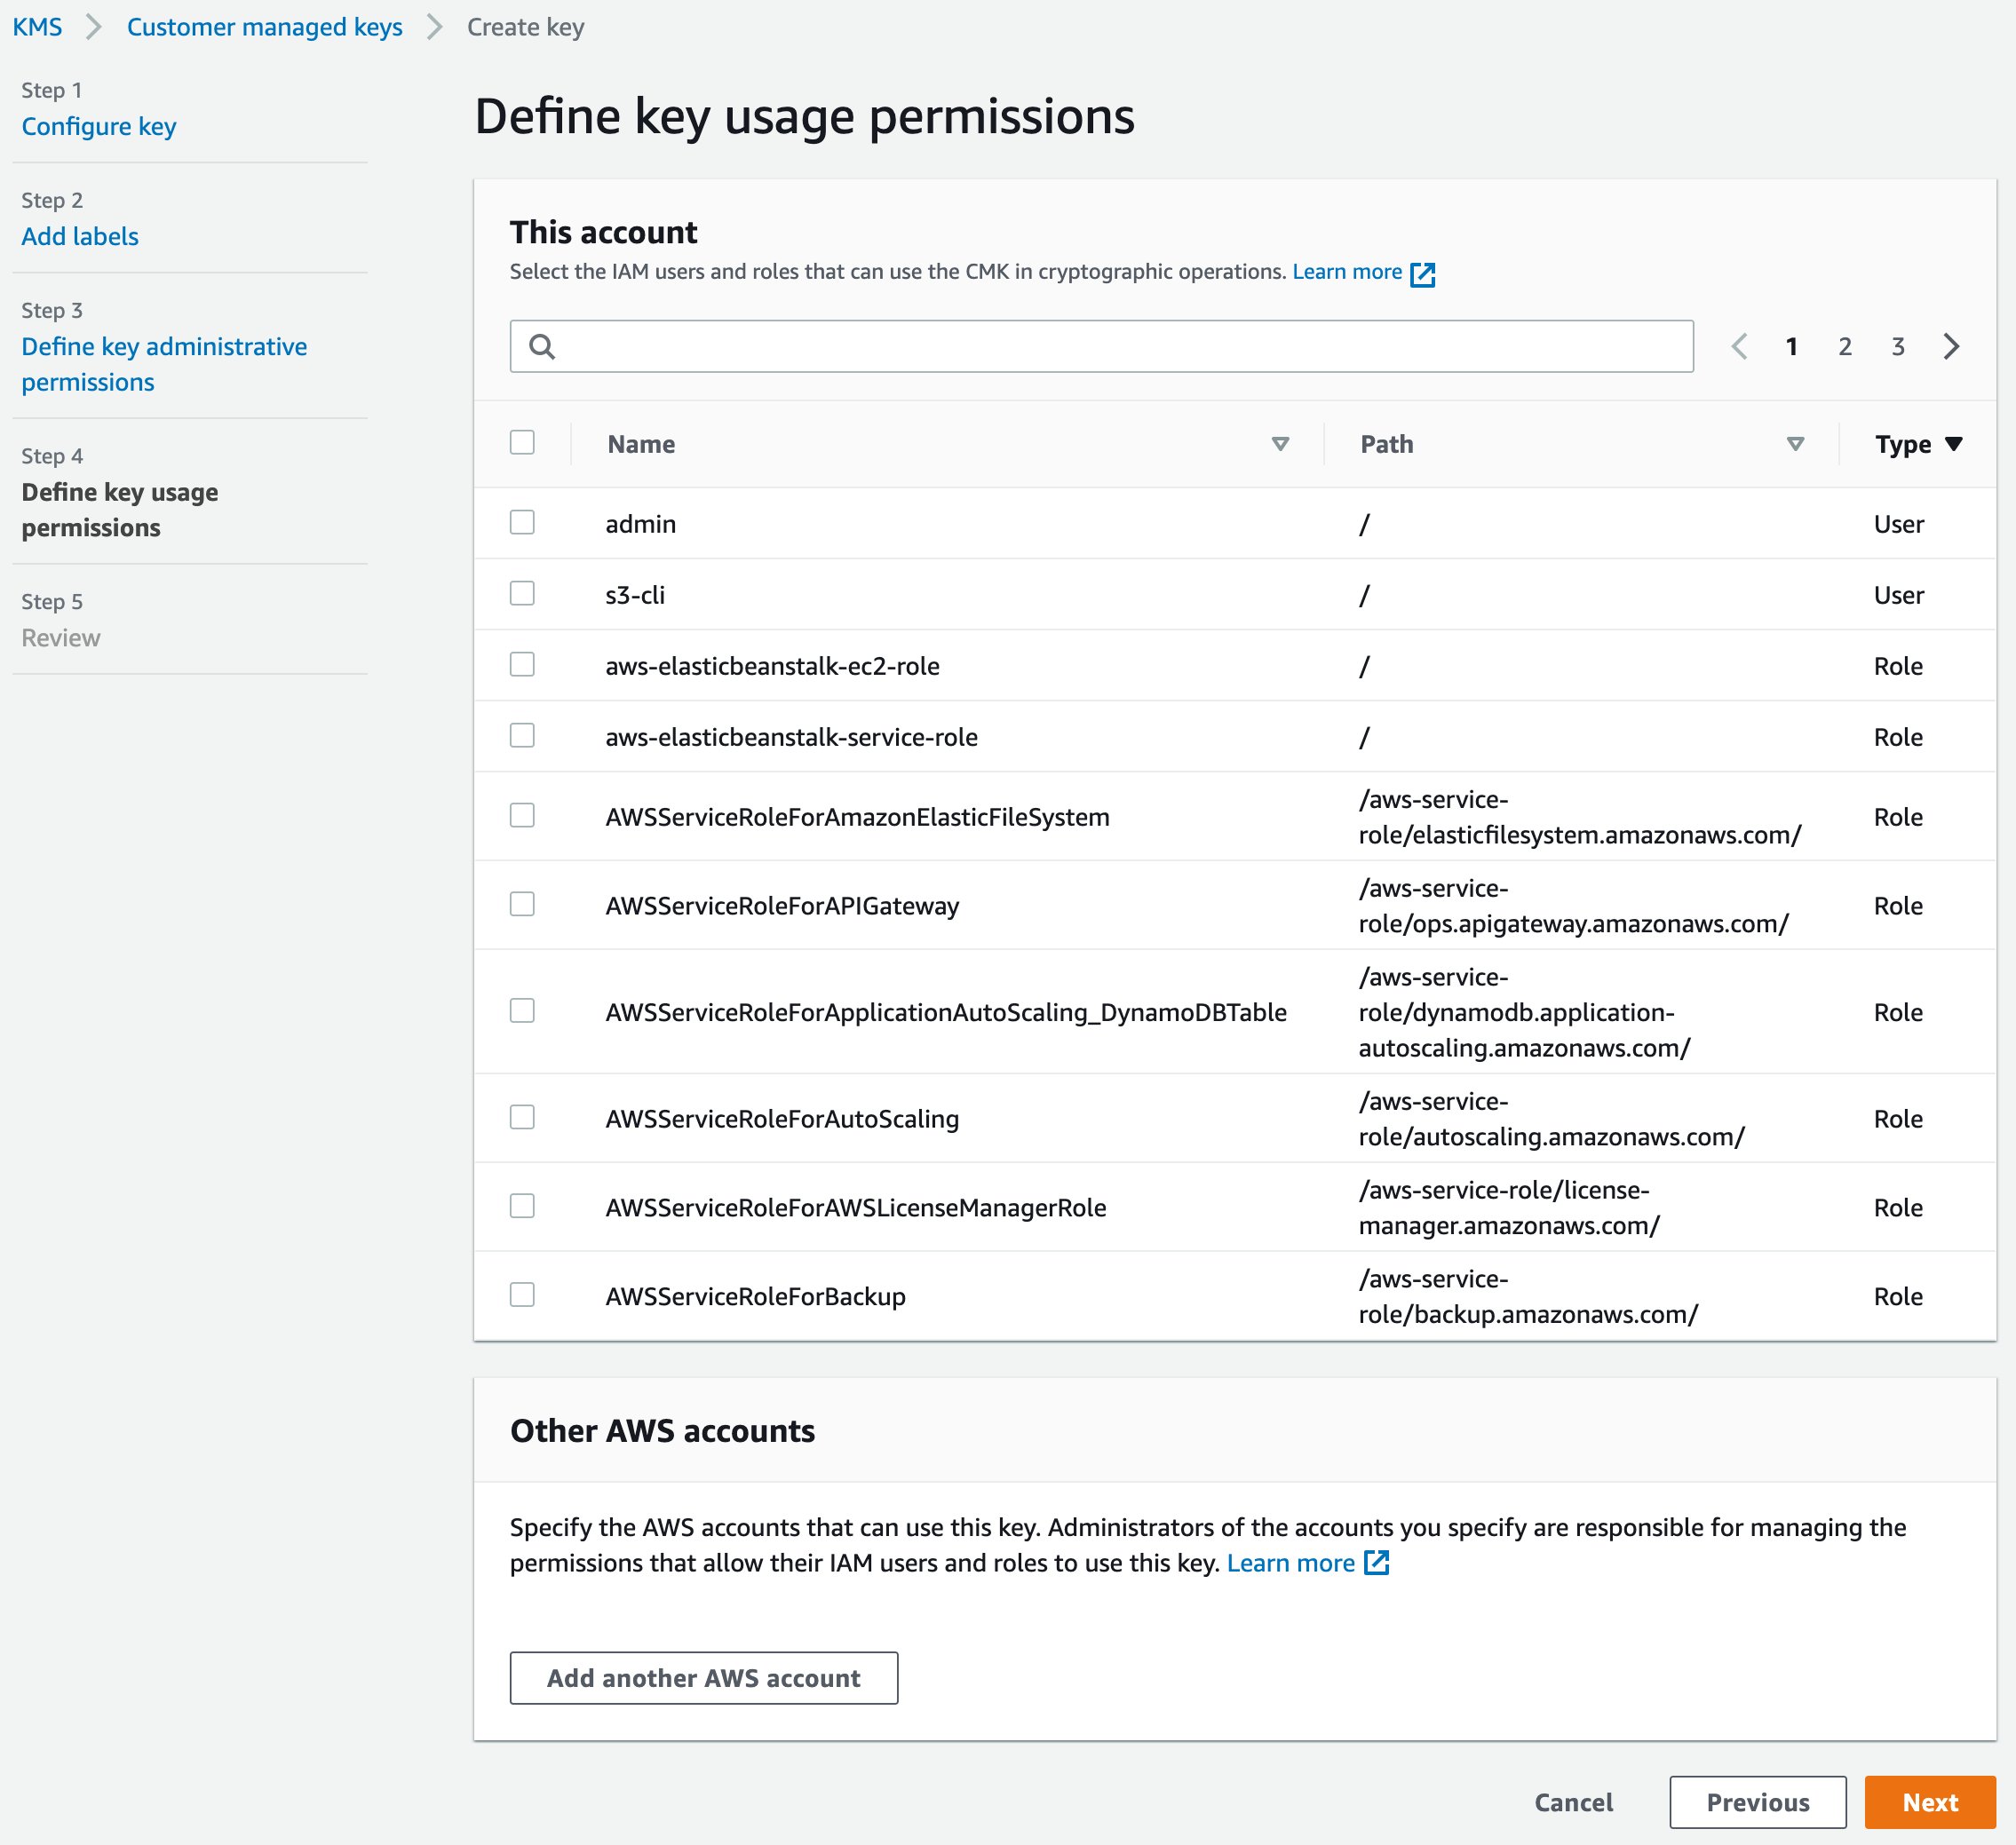
We won’t be assigning any users to this key because we want this key to be used only by the CloudWatch Logs service for SSH log encryption and decryption operations.
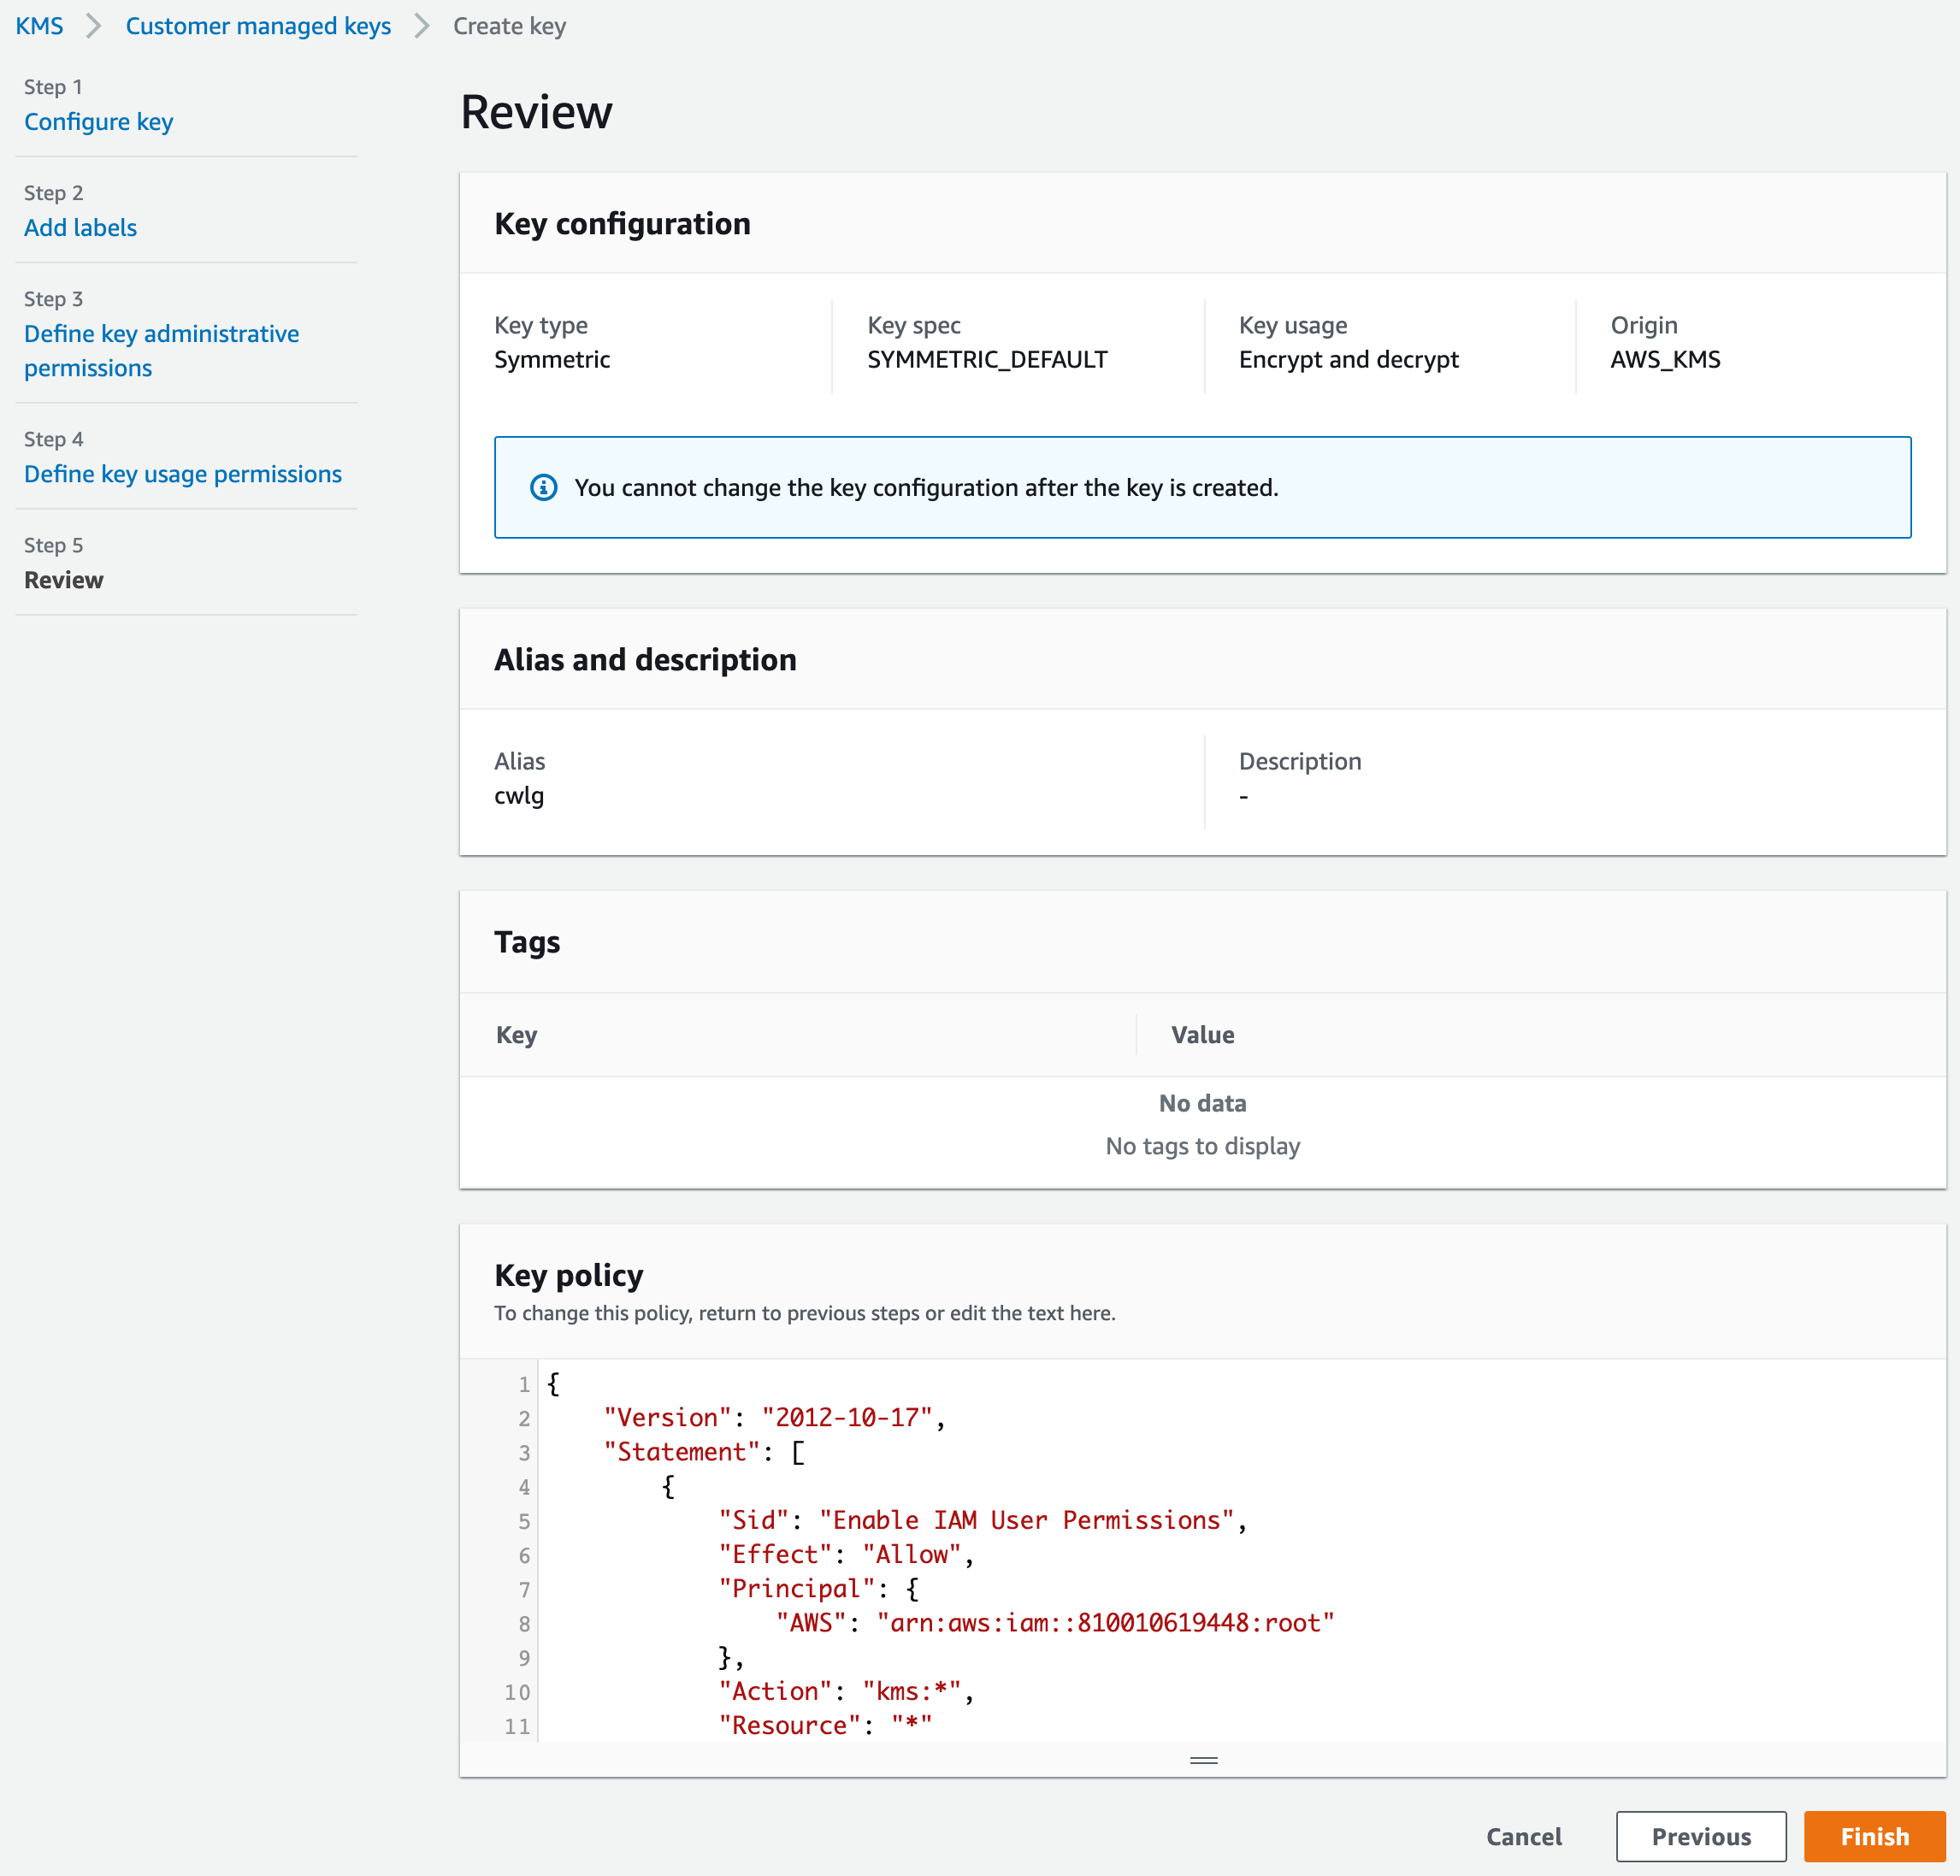
On the Review page, we will need to change the KMS-generated key policy because it doesn’t include permissions for CloudWatch Logs to use the key. We’ll replace it with this policy:
{
    "Version": "2012-10-17",
    "Statement": [
        {
            "Sid": "Enable IAM User Permissions",
            "Effect": "Allow",
            "Principal": {
                "AWS": "arn:aws:iam::ACCOUNT_ID:root"
            },
            "Action": "kms:*",
            "Resource": "*"
        },
        {
            "Sid": "Allow access for Key Administrators",
            "Effect": "Allow",
            "Principal": {
                "AWS": "arn:aws:iam::ACCOUNT_ID:user/USERNAME"
            },
            "Action": [
                "kms:Create*",
                "kms:Describe*",
                "kms:Enable*",
                "kms:List*",
                "kms:Put*",
                "kms:Update*",
                "kms:Revoke*",
                "kms:Disable*",
                "kms:Get*",
                "kms:Delete*",
                "kms:TagResource",
                "kms:UntagResource",
                "kms:ScheduleKeyDeletion",
                "kms:CancelKeyDeletion"
            ],
            "Resource": "*"
        },
        {
            "Sid": "Allow access to CloudWatch Log",
            "Effect": "Allow",
            "Principal": {
                "Service": "logs.REGION.amazonaws.com"
            },
            "Action": [
                "kms:Encrypt",
                "kms:Decrypt",
                "kms:ReEncrypt*",
                "kms:GenerateDataKey*",
                "kms:DescribeKey"
            ],
            "Resource": "*",
            "Condition": {
                "ArnLike": {
                    "kms:EncryptionContext:aws:logs:arn": "arn:aws:logs:REGION:ACCOUNT_ID:*"
                },
                "StringEquals": {
                    "kms:ViaService": "logs.REGION.amazonaws.com"
                }
            }
Make sure to replace all the placeholders:
-
ACCOUNT_IDbecomes our AWS account ID. -
USERNAMEbecomes the administrator username selected in Step 3. If we opted out of that step, here we remove the second statement block (the one with"Sid": "Allow access for Key Administrators"). -
REGIONbecomes the regional identifier code we are deploying services to (e.g.,us-west-1).
With that, KMS is ready to go.
CloudWatch Log Group
Next we need a CloudWatch Log group (and/or an S3 bucket—see below) where SSM Agent can send SSH session logs. Let’s create it.

Note the KMS key ARN field: AWS provides us with the value needed here after the key is created in Step 5 of the KMS section.
(If we didn’t associate the correct policy to our KMS key earlier, allowing the CloudWatch Logs service to use the key, we’ll receive an error related to the KMS key at this point.)
Storing SSH Logs in an S3 Bucket
For storing activity logs with S3 instead of—or in addition to—CloudWatch Logs, we need to add these permissions to our EC2 instance profile as a separate policy (or manually combine them with other permissions we may need associated):
{
    "Version": "2012-10-17",
    "Statement": [
        {
            "Effect": "Allow",
            "Action": [
                "s3:PutObject"
            ],
            "Resource": "arn:aws:s3:::BUCKET_NAME/*"
        },
        {
            "Effect": "Allow",
            "Action": [
                "s3:GetEncryptionConfiguration"
            ],
            "Resource": "*"
        },
        {
            "Effect": "Allow",
            "Action": "kms:GenerateDataKey",
            "Resource": "*"
        }
    ]
}
In the above snippet, be sure to replace the BUCKET_NAME placeholder.
Now that we’ve set up somewhere to store the logs—CloudWatch Logs, an S3 bucket, or both—we’re ready to tap into SSH sessions.
AWS Systems Manager Session Manager
This is the final key step, where we configure secure access to our Linux machine for SSH session monitoring and logging. We’ll start at the Session Manager dashboard.

On the dashboard, click on the white “Configure Preferences” button in the upper-right “Start a session” box to enable session logging.
On the Preferences page, we will find multiple sections that we could explore, but our focus will be on streaming SSH session logs to CloudWatch or S3 to allow us to quickly see what is happening within our Linux machine.

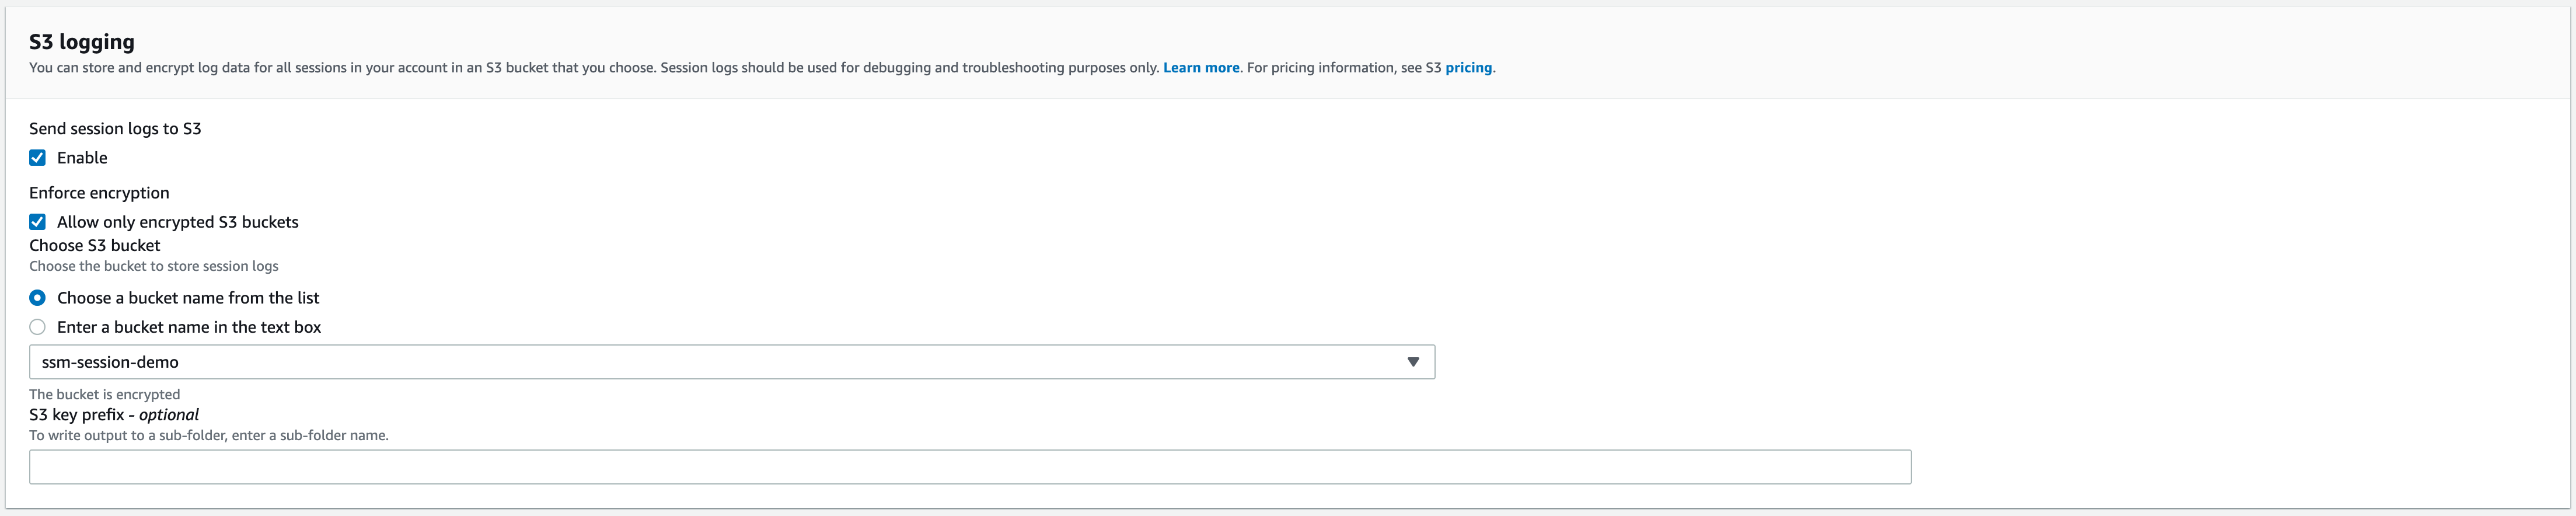
Just after the “CloudWatch logging” section, there’s an “S3 logging” section where we can select the bucket.
Once SSH logging is configured, we can SSH into our Linux machine and execute some commands to see if the activity is getting captured or not.
So, let’s start a session. On the same page, we will find a “Sessions” tab where we can start a session. Clicking the “Start session” button will give us a list of EC2 machines on which we can initiate a session:

If we don’t see our EC2 Linux instance in the list, we should check whether it’s in a running state and has the IAM permissions associated with it that we described earlier.
Handling an SSM Agent “Doesn’t Support Streaming Logs” Error
In case we receive an error saying the SSM Agent version installed on our EC2 machine does not support streaming CloudWatch logs, not to worry. There’s a painless way to fix this.

To update the SSM Agent, we need to navigate to Run Command in the left panel of the AWS Systems Manager service.

Once we’re there, we can click on the orange “Run a Command” button, leading to a new page where we can fill in some parameters.

We’ll start by selecting AWS-UpdateSSMAgent from the list.

Once that’s selected, we’ll scroll down until we see the “Targets” section. There we need to select the EC2 instance on which we want to update the SSM Agent, then hit the “Run” button at the end. This will send us to a page where we can monitor the progress of the update.

The agent update shouldn’t take more than five minutes. Once that’s done, we should be able to create a session back in the Session Manager.
At this point, we should have an SSH session started.
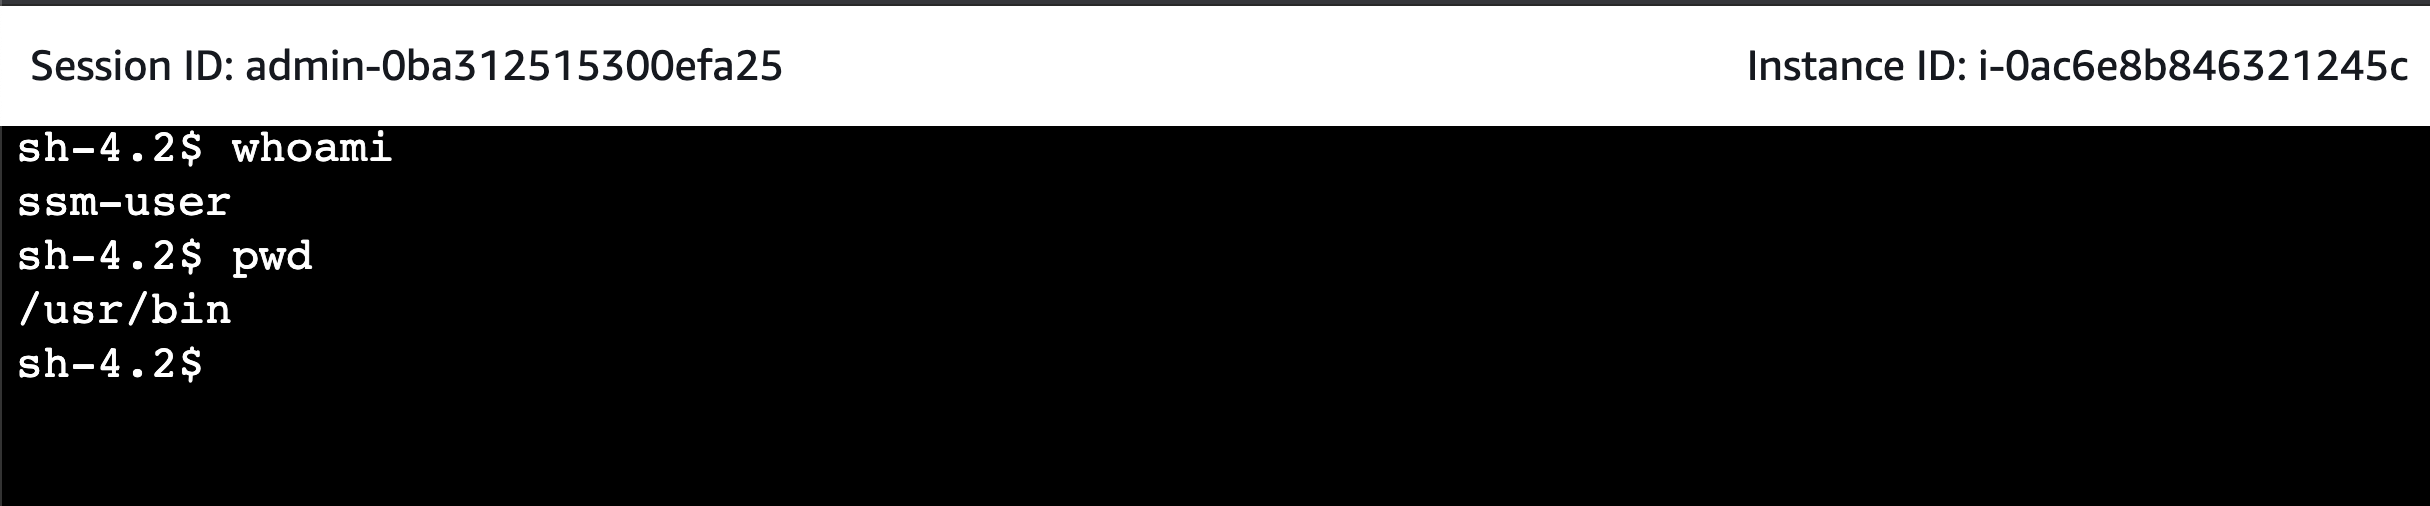
After executing a few commands, let’s navigate to the CloudWatch Logs log group (or our S3 bucket, not shown) and confirm that the activity is being recorded.
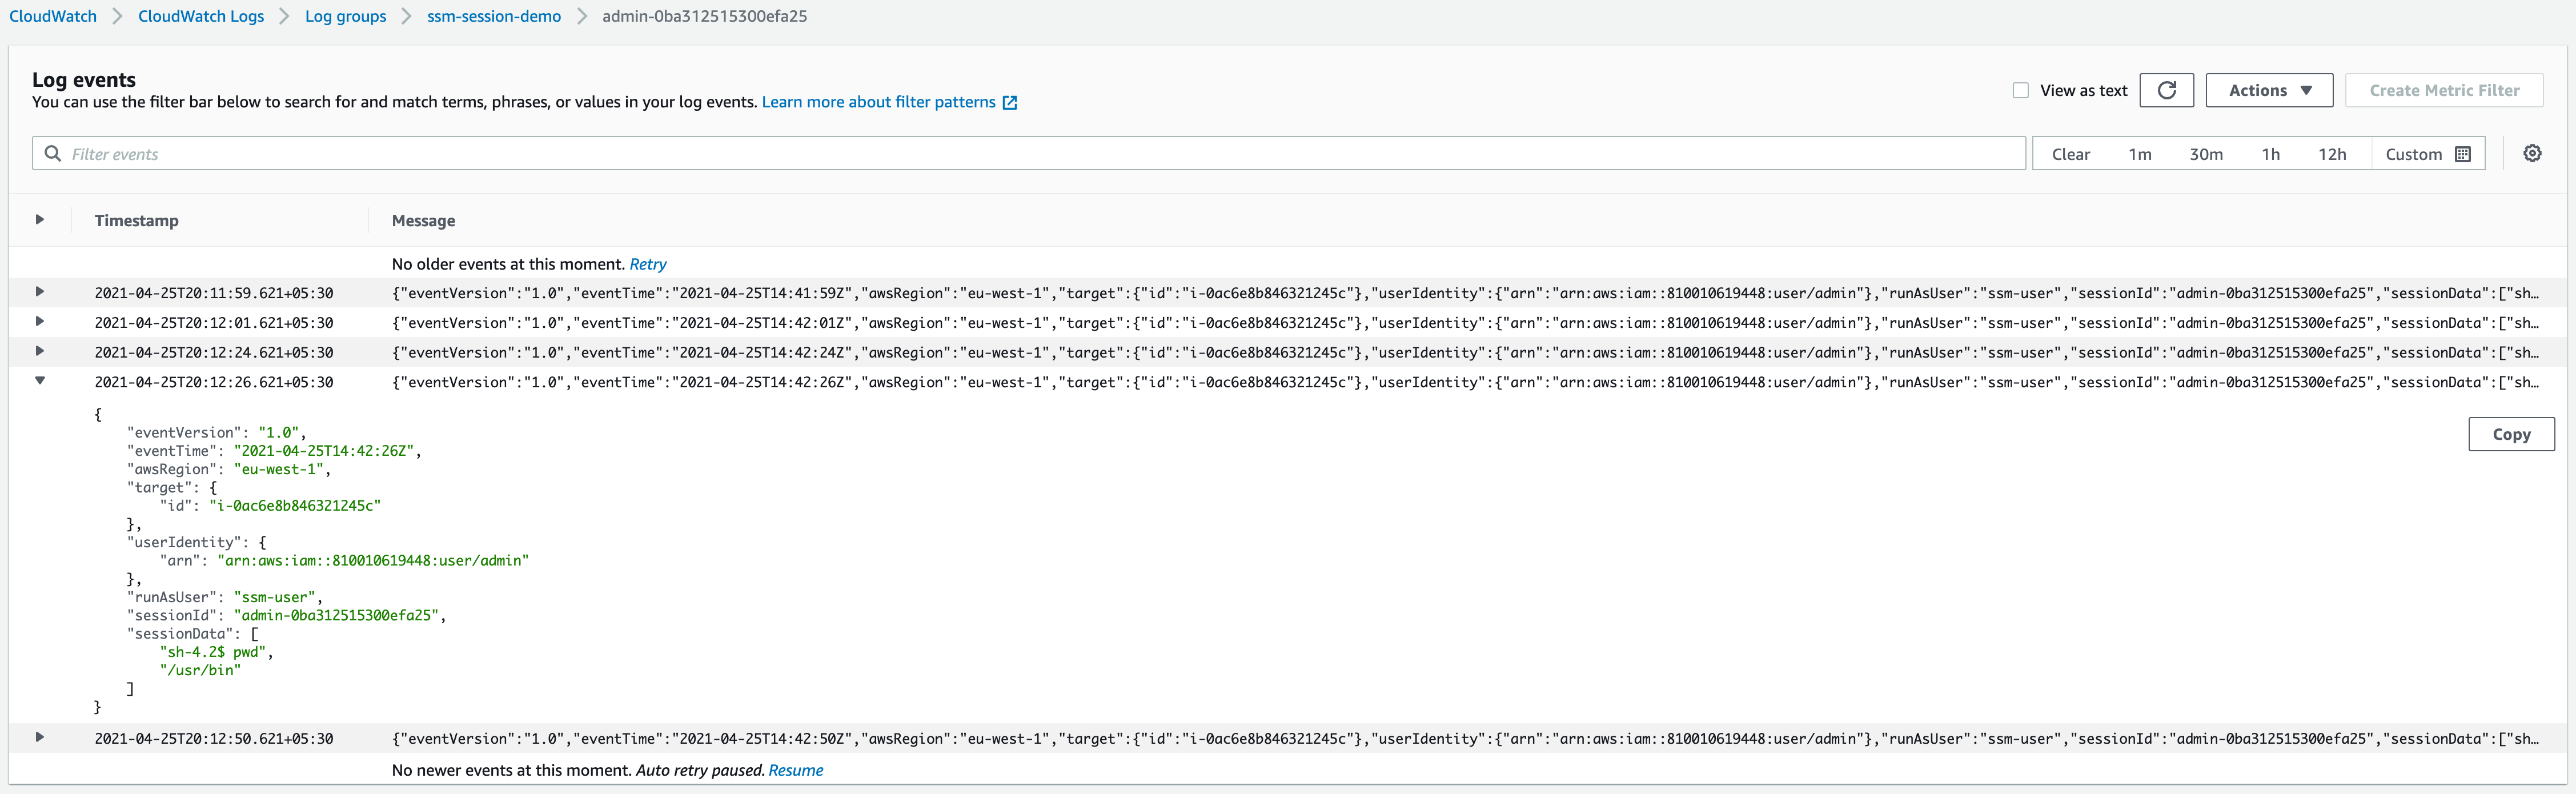
We now have a setup, with at-rest encryption enabled, recording every command fired in our Linux machine.
In fact, every command may be more than we want: Any secrets provided or generated during the session will be recorded in CloudWatch or S3 and can be seen by anyone who has the required permissions. To prevent that, we can use stty -echo; read passwd; stty echo; for each secret we need to provide during the session.
A Great SSM/SSH AWS Logging Solution With Minor Caveats
Session Manager is a useful tool to gain remote access to our virtual machines in AWS without having to open port 22. In fact, we can’t generate SSH logs this way if we use port forwarding or a direct SSH connection, as the Session Manager documentation notes.
Nonetheless, combining Session Manager with session logging is a robust solution for controlling and monitoring activity within VMs. Moreover, we’re not charged for using the Session Manager service. We only pay for our EC2 instance and CloudWatch Logs or an S3 bucket for storing logs.
For readers who prefer video tutorials, I’ve covered a very similar procedure a bit more thoroughly on YouTube.
Further Reading on the Toptal Blog:
Understanding the basics
SSH (Secure Shell) is used for accessing other machines securely even over an unsecured network, as the communication between client and server is encrypted. It’s also used for transferring files to or from a server via the SFTP protocol, which uses SSH under the hood. SSH listens by default on port 22.
There are multiple ways to find active SSH sessions, including the commands w, who, and “ss grep ssh”. With AWS Systems Manager they can be viewed in the Session Manager console or via “aws ssm describe-sessions –state Active” in a terminal. AWS CloudWatch Logs is a fully managed log aggregation service. You can query, monitor, filter, and trigger condition-based alarms, e.g., when more than 10% of HTTP requests are receiving a 5xx error code. Moreover, CloudWatch Logs Insights presents log data in helpful bar, line, and stacked area charts.
AWS IAM is responsible for authenticating and authorizing requests made to AWS resources. It supports both RBAC and ABAC authorization models. In RBAC, permissions are granted based on job roles. In ABAC, permissions are granted based on an attribute, e.g., assigning permissions to a principal based on tags.
Amazon EC2 (Elastic Compute Cloud) lets developers launch virtual machines in the cloud. Highly scalable in nature, EC2 allows for instances to go from 1vCPU to 20 and vice versa in just a couple of minutes. Instances can use Intel, AMD, or ARM processors and run workloads on Linux, Windows, or macOS.
EC2 instances are virtual machines in the cloud, used to run workloads without needing management of the underlying hardware, yet still providing full control of computational resources. EC2 offers a wide range of processors, OSs, and storage for running anything from a small web app to a huge SAP HANA database.
Vimal Paliwal
London, United Kingdom
Member since April 27, 2020
About the author
A certified AWS expert with a master’s degree in computer security, Vimal specializes in automating the cloud with Terraform, Kubernetes, and Python.
PREVIOUSLY AT