How to Make a Discord Bot: an Overview and Tutorial
Discord is a popular real-time messaging platform with robust support for programmable bots. Bots are ubiquitous on Discord and provide a wide range of services, including moderation assistance, games, music, internet searches, payment processing, and more.
In this article, Toptal Freelance Software Engineer and Chatbot Developer Randall Schmidt discusses the Discord UI and APIs for bots and presents a Discord bot tutorial. ImBursting, the developer of Rythm—one of Discord’s most popular bots—shares his experiences on developing and maintaining his significant infrastructure and codebase.
Randall has more than eight years of development experience working across various domains and languages and is known for his attention to detail.
Expertise
PREVIOUSLY AT

Editor’s note: This article was updated on August 22, 2022 by our editorial team. It has been modified to include recent sources and to align with our current editorial standards.
Discord is a real-time messaging platform that bills itself as an “all-in-one voice and text chat for gamers.” Due to its slick interface, ease of use, and extensive features, Discord has experienced rapid growth and is becoming increasingly popular even among those with little interest in video games. Between 2018 and 2022, its user base exploded from 56 million users to more than 150 million.
Bots are one of the most attractive features of Discord. Discord offers robust support for programmable bots that help to integrate Discord with the outside world and provide users with a more engaging experience. Bots are ubiquitous on Discord and enable a wide range of services, including moderation assistance, games, music, internet searches, payment processing, and more.
In this Discord bot development tutorial, we’ll review the Discord user interface, and its REST and WebSocket APIs for bots before moving on to a tutorial where we’ll write a simple Discord bot in JavaScript. Finally, the developer of one of Discord’s most popular bots will share his insights about developing and maintaining his significant infrastructure and codebase.
Discord User Interface
Before we dive into technical details, it’s important to understand how a user interacts with Discord and how Discord presents to a user. (The way it presents itself to bots is conceptually similar but, of course, non-visual). Official Discord applications are built on the same APIs that bots use. It is technically possible to run a bot inside of a regular user account with little modification, but this is forbidden by Discord’s terms of service. Bots are required to run in bot accounts.
Here’s a look at the browser version of the Discord application running inside Chrome:
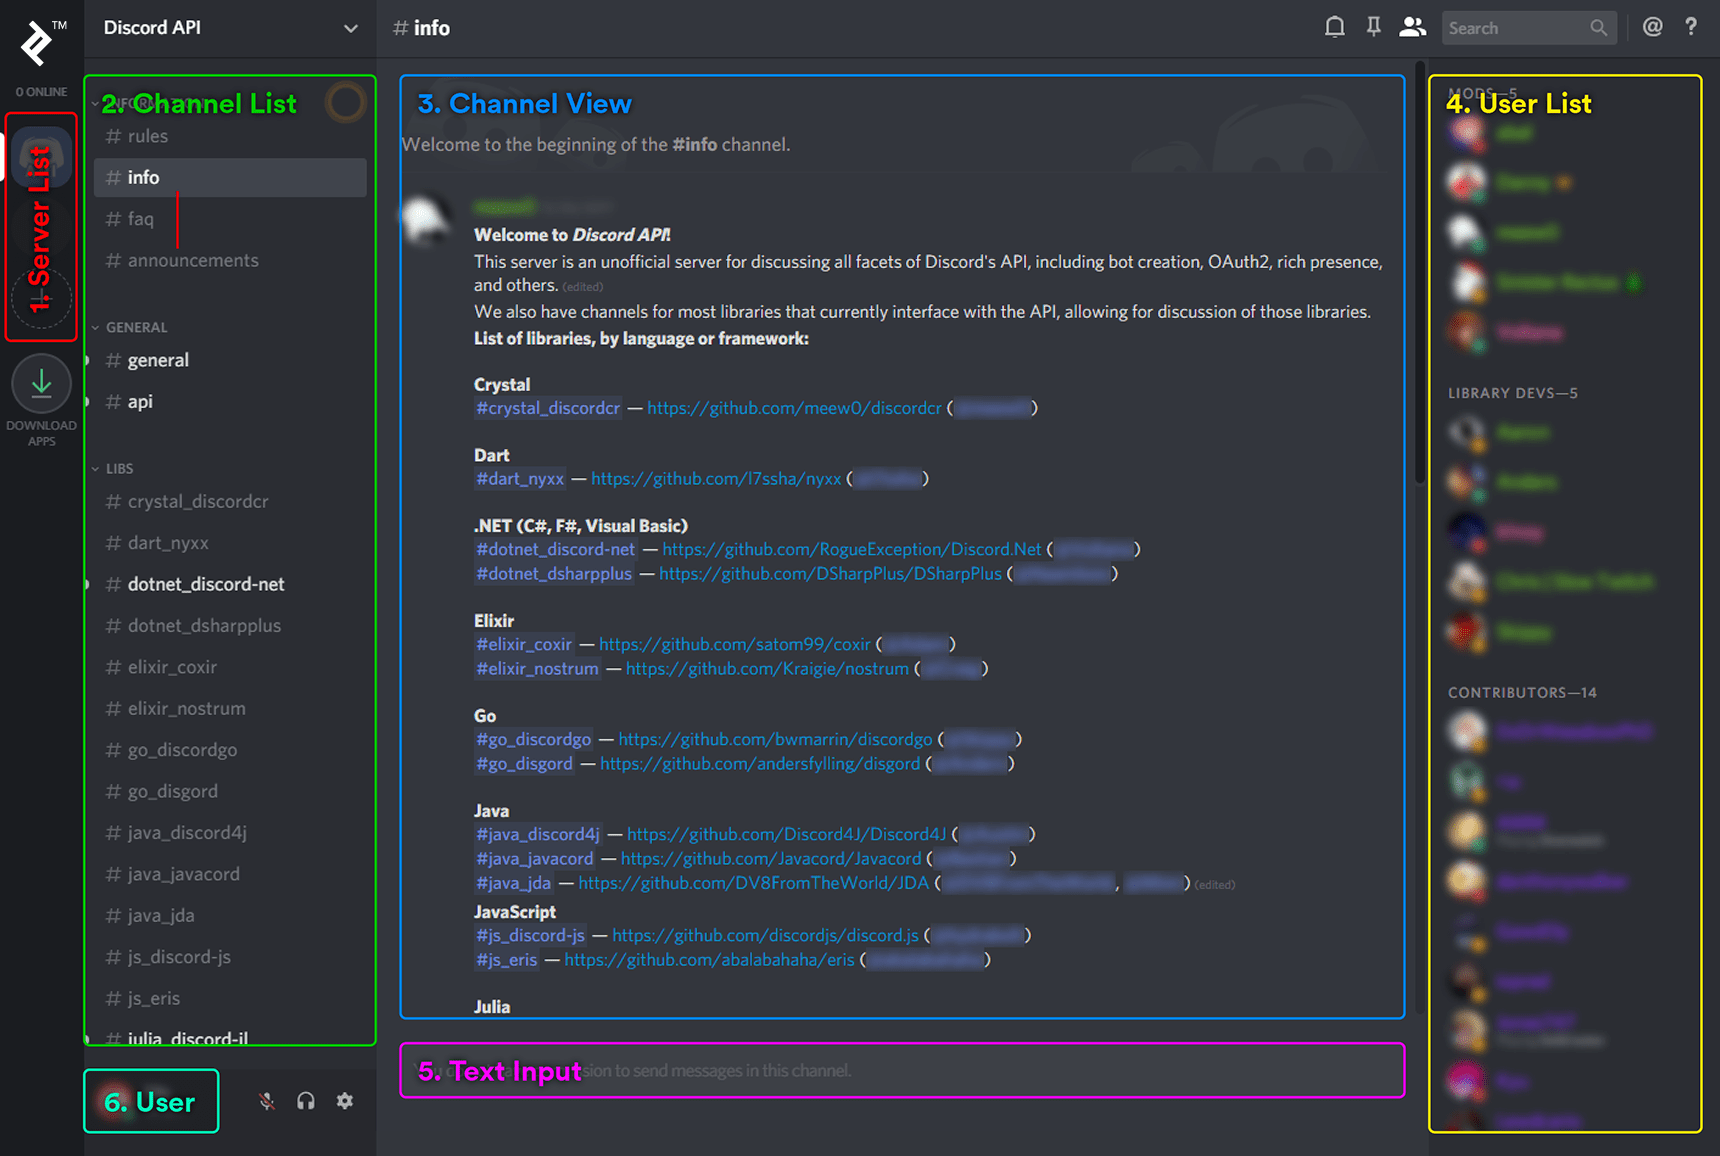
Note: The Discord UI for the desktop application is virtually the same as the web application, packaged with Electron. The iOS application is built with React Native. The Android application is native Android Java code.
Let’s break it down.
1. Server List
To the far left is the list of servers where I am a member. If you’re familiar with Slack, a server is analogous to a Slack workspace and represents a group of users who can interact with each other within one or more channels on a particular server. A server is managed by its creator and/or staff with designated permissions. The creator and/or staff define the rules of the server, define the structure of the channels in the server, and manage users.
In my case, the Discord API server tops my server list. It’s a great place to get help and talk with other developers. Below that is a server that I created called Test. Later, when we create a bot, we’ll test it there. Below Test is a button to create a new server. Anyone can create a server with a few clicks.
Note that while the term used in Discord’s user interface is Server, the term used in the developer documentation and API is Guild. The terms are interchangeable.
2. Channel List
Next to the server list is the list of channels for the server I am currently viewing (in this case, the Discord API server). Channels can be sorted into an arbitrary number of categories. In the Discord API server, the categories include INFORMATION, GENERAL, and LIBS, as shown. Each channel functions as a chat room where users can discuss a dedicated topic. The channel we are currently viewing (“info”) has a slightly lighter background. When new messages post, the names of the channels render in white.
3. Channel View
The channel view details topics users have been discussing. We can see the preview of one message, a list of links to support servers for individual Discord bot libraries. The server has been configured to prevent regular users from posting messages. Administrators use this channel as a bulletin board to post important information where it will be noticed, not drowned out by chat.
4. User List
To the far right is the list of users currently online in this server. The users are organized into different categories and their names have different colors. This is a result of the roles that they have. A role describes what category (if any) the user should appear under, what their name color should be, and what permissions they have in the server. A user can have more than one role (and very often does), and there is some precedence math that determines what happens in that case. At a minimum, every user has the @everyone role. Other roles are created and assigned by server staff.
5. Text Input
This is the text input where I could type and send messages, if I were allowed to. Since I don’t have permission to send messages in this channel, I can’t type in here.
6. User
This is the current user. I set my username to “Me” to help keep me from getting confused and because I’m terrible at choosing names. Below my username is a number (#9484), which is my discriminator. There may be many other users named “Me,” but I’m the only “Me#9484.” It is also possible for me to set a nickname for myself on a per-server basis, so I can appear as different names in different servers.
These are the basic parts of the Discord user interface, but there’s a lot more. It’s easy to start using Discord even without creating an account, so feel free to take a minute to poke around. Visit the Discord homepage, click “open Discord in a browser,” and choose a username.
The Discord API
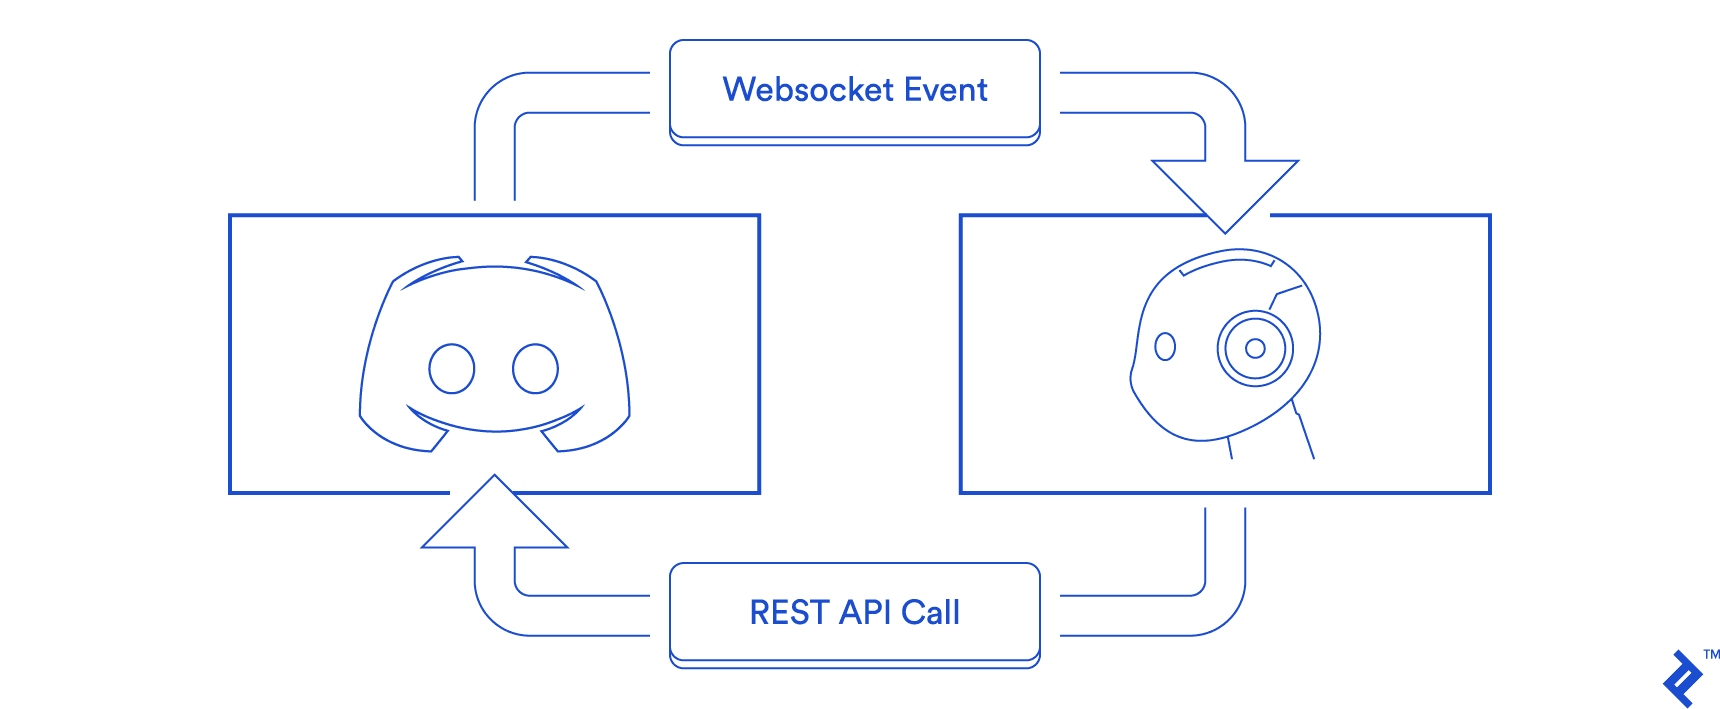
The Discord API consists of two pieces: the WebSocket API and the REST API. Broadly speaking, the WebSocket API is used to receive events from Discord in real time while the REST API is used to perform actions inside of Discord.
The WebSocket API
The WebSocket API focuses on receiving Discord events, including message creation, message deletion, user kick/ban events, user permission updates, and more. Communication from a bot to the WebSocket API, on the other hand, is more limited. A bot uses the WebSocket API to request a connection, identify itself, maintain a heartbeat, manage voice connections, and do a few more fundamental things. You can read more details in Discord’s gateway documentation (a single connection to the WebSocket API is referred to as a gateway). The REST API is used to perform other actions.
Events from the WebSocket API contain a payload, including information that depends on the type of the event. For example, all Message Create events will be accompanied by a user object representing the author of the message. However, the user object alone does not contain all of the information there is to know about the user. For example, there is no information included about the user’s permissions. If you require more information, you could query the REST API for it, but for reasons explained in the next section, you should generally access the cache that you should have built from payloads received from previous events. There are a number of events that deliver payloads relevant to a user’s permissions, including but not limited to Guild Create, Guild Role Update, and Channel Update.
A bot can be present in a maximum of 2,500 guilds per WebSocket connection. In order to allow a bot to be present in more guilds, the bot must implement sharding and open several separate WebSocket connections to Discord. If your bot runs inside of a single process on a single node, this added complexity may seem unnecessary. But if your bot is very popular and needs to have its back-end distributed across separate nodes, Discord’s sharding support makes this much easier than it would be otherwise.
The REST API
The Discord REST API is used by bots to perform most actions, such as sending messages, kicking/banning users, and updating user permissions (broadly analogous to the events received from the WebSocket API). The REST API can also be used to query for information; however, bots mainly rely on events from the WebSocket API instead and cache the information received from the WebSocket events.
Why? There are two main reasons. Querying the REST API to get user information every time a Message Create event is received, for example, does not scale due to the REST API’s rate limits. It’s also redundant in most cases, as the WebSocket API delivers the necessary information and you should have it in your cache.
There are some exceptions, however, and you may sometimes need information that is not present in your cache. When a bot initially connects to a WebSocket gateway, one Ready event and one Guild Create event per guild are initially sent to the bot so that it can populate its cache with the current state. The Guild Create events for heavily populated guilds only include information about online users. If your bot needs to get information about an offline user, the relevant information may not be present in your cache. In this case, it makes sense to make a request to the REST API. Or, if you find yourself frequently needing to get information about offline users, you can opt to send a Request Guild Members opcode to the WebSocket API to request offline guild members.
Another exception is if your application isn’t connected to the WebSocket API at all. For example, if your bot has a web dashboard that users can log into to change the bot’s settings on their server. The web dashboard could be running in a separate process without any connections to the WebSocket API and with no cache of data from Discord. It may only need to occasionally make a few REST API requests. In this scenario, it makes sense to rely on the REST API to get the information you need.
API Wrappers
While it’s always a good idea to have some understanding of every level of your technology stack, using the Discord WebSocket and REST APIs directly is time-consuming, error-prone, generally unnecessary—and, in fact, dangerous.
Discord provides a curated list of officially vetted libraries and warns that:
Using custom implementations or non-compliant libraries that abuse the API or cause excessive rate limits may result in a permanent ban.
The libraries officially vetted by Discord are generally mature, well-documented, and feature full coverage of the Discord API. Most bot developers will never have a good reason to develop a custom implementation, except out of curiosity.
At this time, the officially vetted libraries include implementations for Crystal, C#, D, Go, Java, JavaScript, Lua, Nim, PHP, Python, Ruby, Rust, and Swift. There may be two or more libraries for your language of choice. Choosing which to use can be a difficult decision. In addition to checking out the respective documentation, you might want to join the unofficial Discord API server and get a feel for what kind of community is behind each library.
How to Make a Discord Bot
Let’s get down to business. We’re going to create a Discord bot that hangs out in our server and listens for webhooks from Ko-fi. Ko-fi is a service that allows you to accept donations to your PayPal account easily. It’s straightforward to set up webhooks there, unlike PayPal, where you need to have a business account, so it’s great for demonstration purposes or small-scale donation processing.
When a user donates $10 or more, the bot will assign them a Premium Member role that changes their name color and moves them to the top of the online users’ list. For this project, we’re going to use Node.js and a Discord API library called Eris. Eris is not the only JavaScript library. You could choose discord.js instead. Regardless of which library you choose, the code will look very similar.
As an aside, Patreon, another donation processor, provides an official Discord bot and supports configuring Discord roles as contributor benefits. We’re going to implement something similar but it will be more basic.
The code for every step of the tutorial is available on GitHub (https://github.com/mistval/premium_bot). Some of the steps shown in this post omit unchanged code for brevity, so follow the provided links to GitHub if you think you might be missing something.
Creating a Discord Bot Account
Before we can start writing code, we need a bot account. Before we can create a bot account, we need a user account. To create a user account, follow the instructions here.
Then, to create a bot account, we:
1) Create an application in the developer portal.
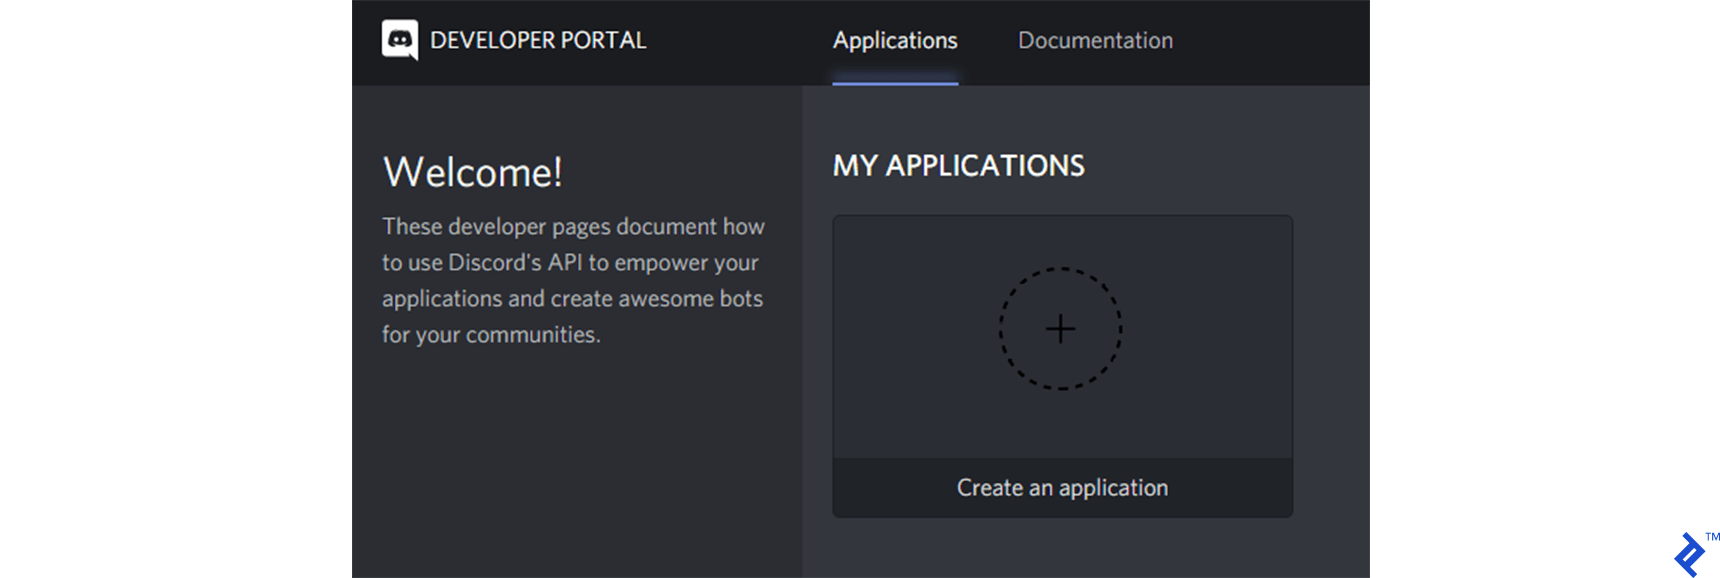
2) Fill in some basic details about the application (note the CLIENT ID shown here—we’ll need it later).
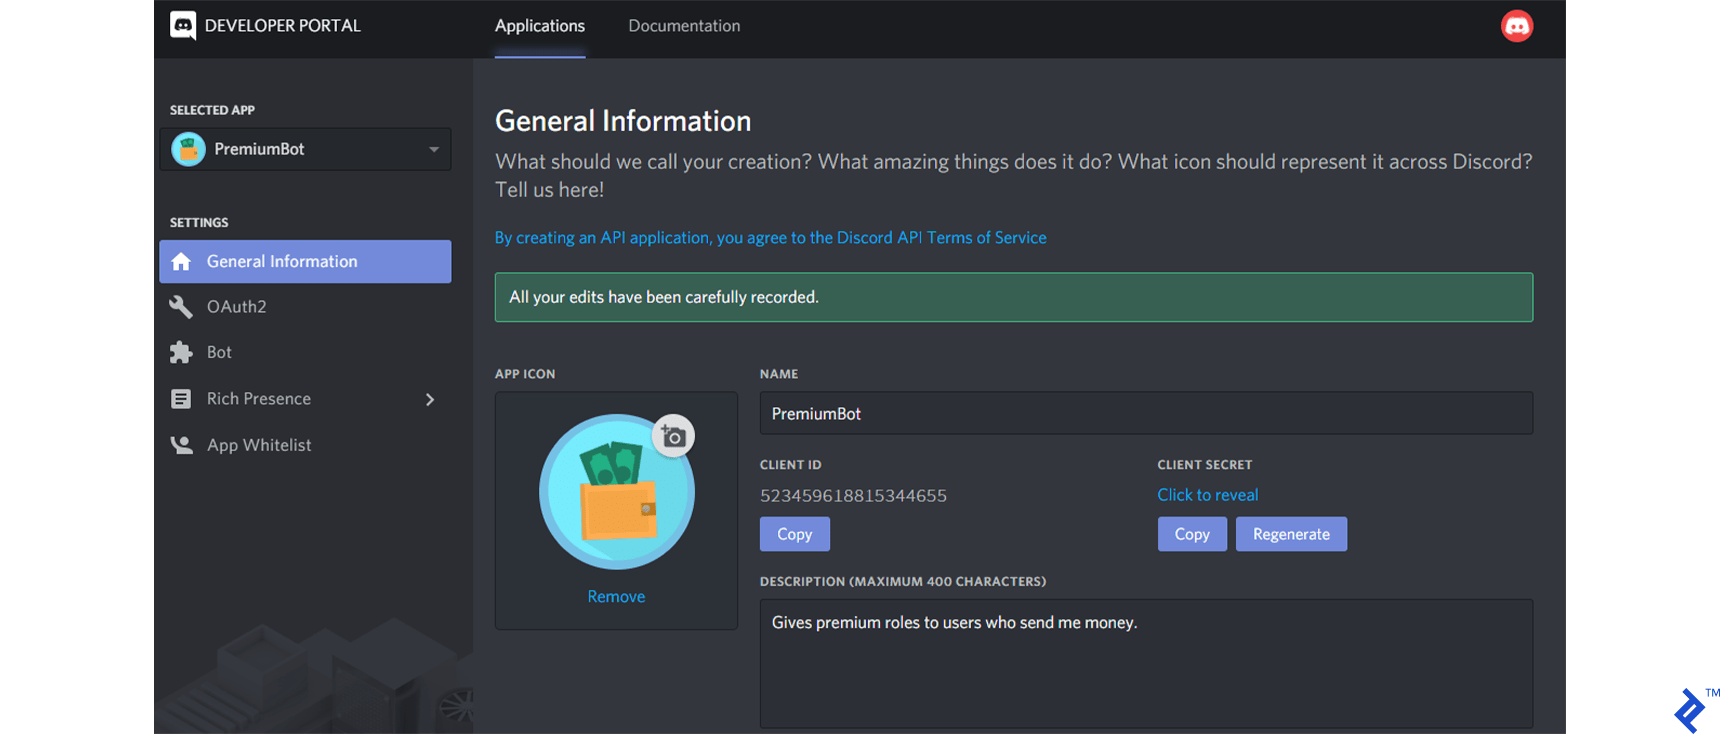
3) Add a bot user connected to the application.
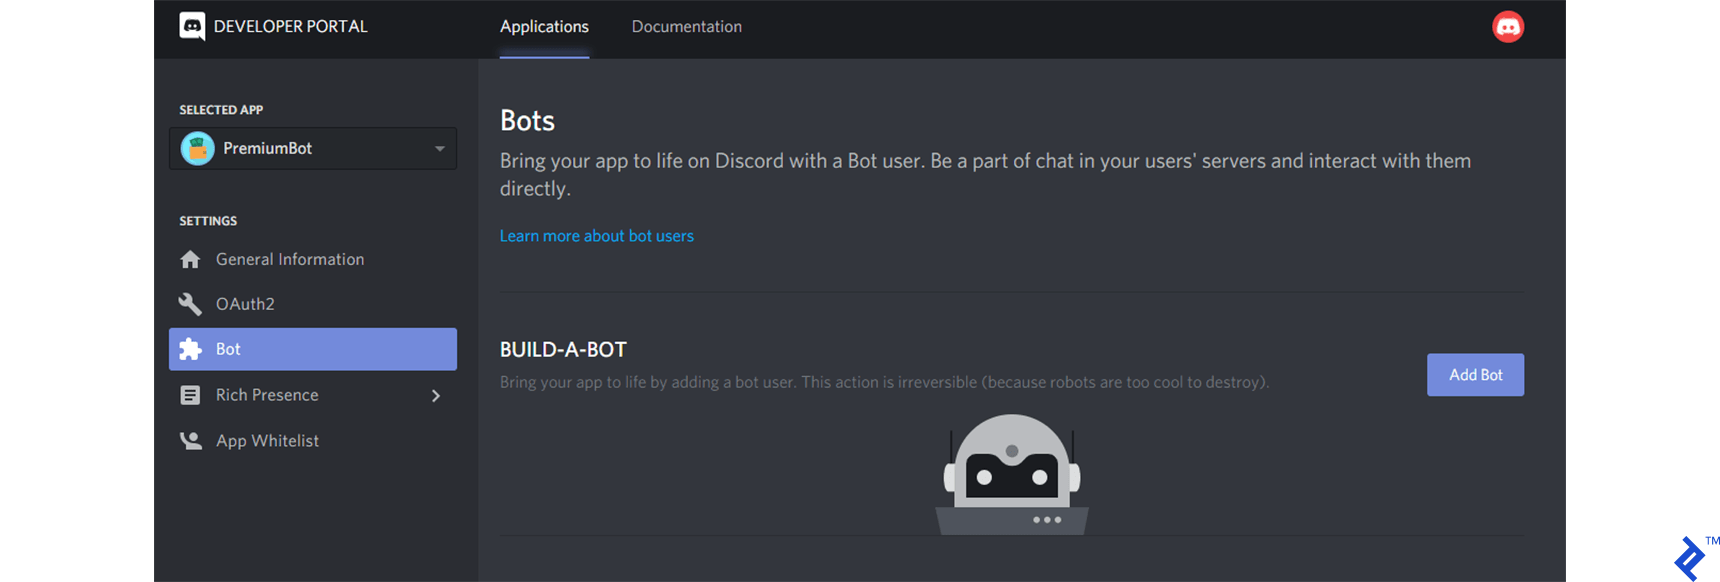
4) Turn off the PUBLIC BOT switch and note the bot token shown (we’ll need this later as well). If you ever leak your bot token, for example by publishing it in an image in a Toptal Blog post, it is imperative that you regenerate it immediately. Anyone in possession of your bot token can control your bot’s account and cause potentially serious and permanent trouble for you and your users.
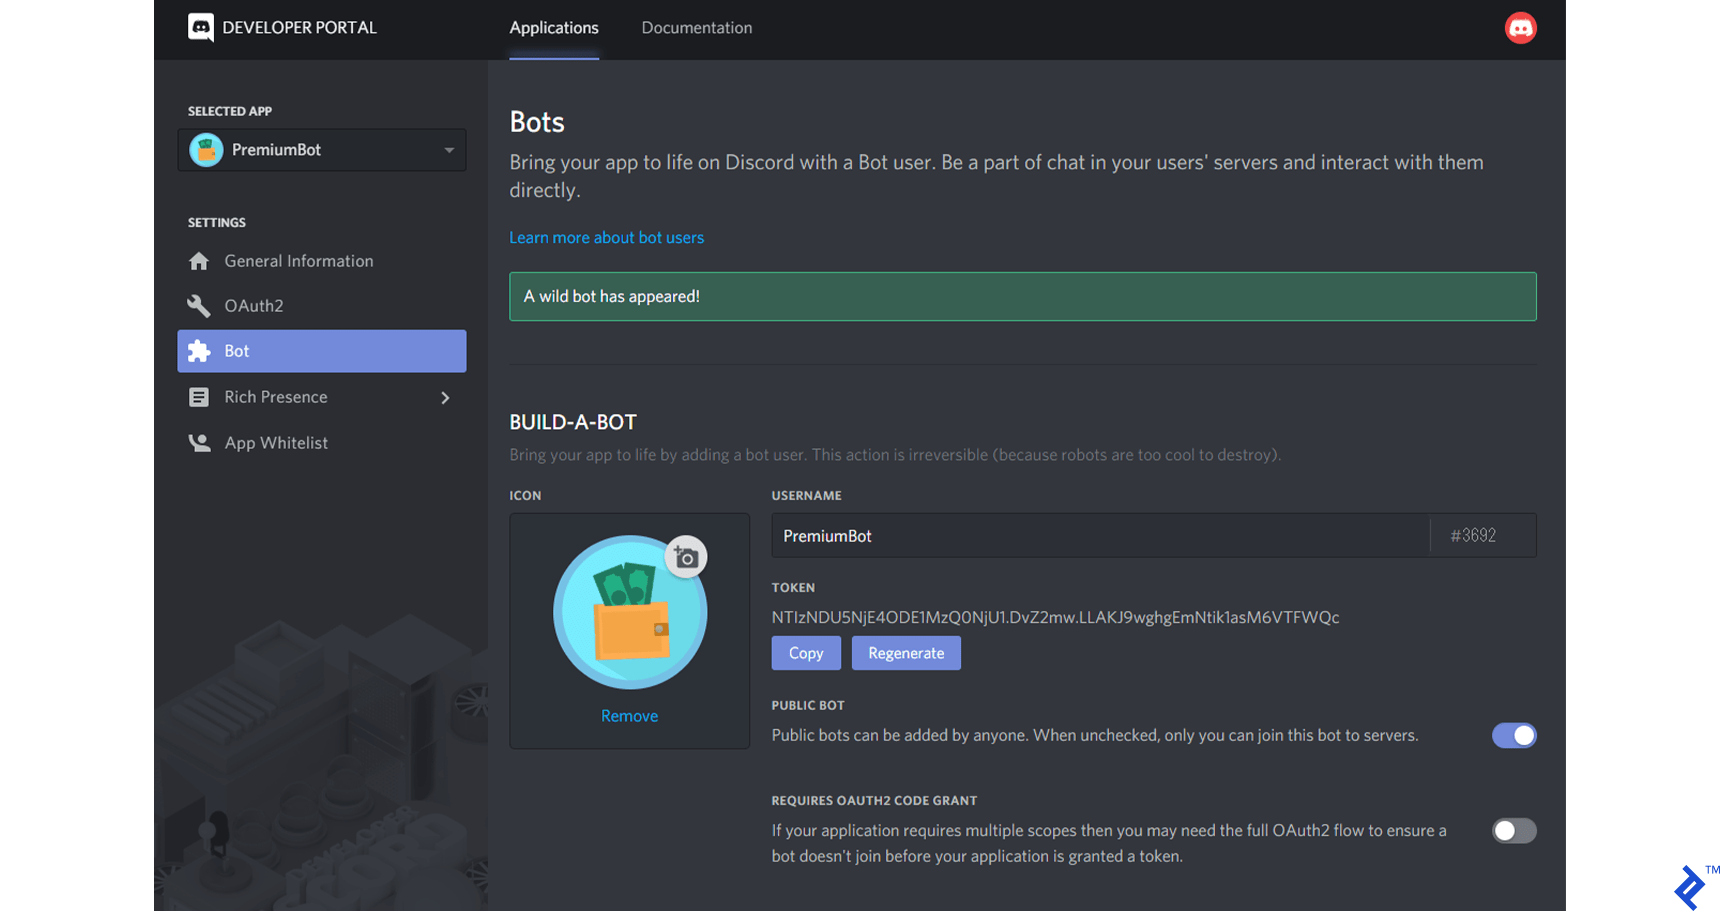
5) Add the bot to your test guild. To add a bot to a guild, substitute its client ID (shown earlier) into the following URI and navigate to it in a browser.
https://discordapp.com/api/oauth2/authorize?scope=bot&client_id=XXX
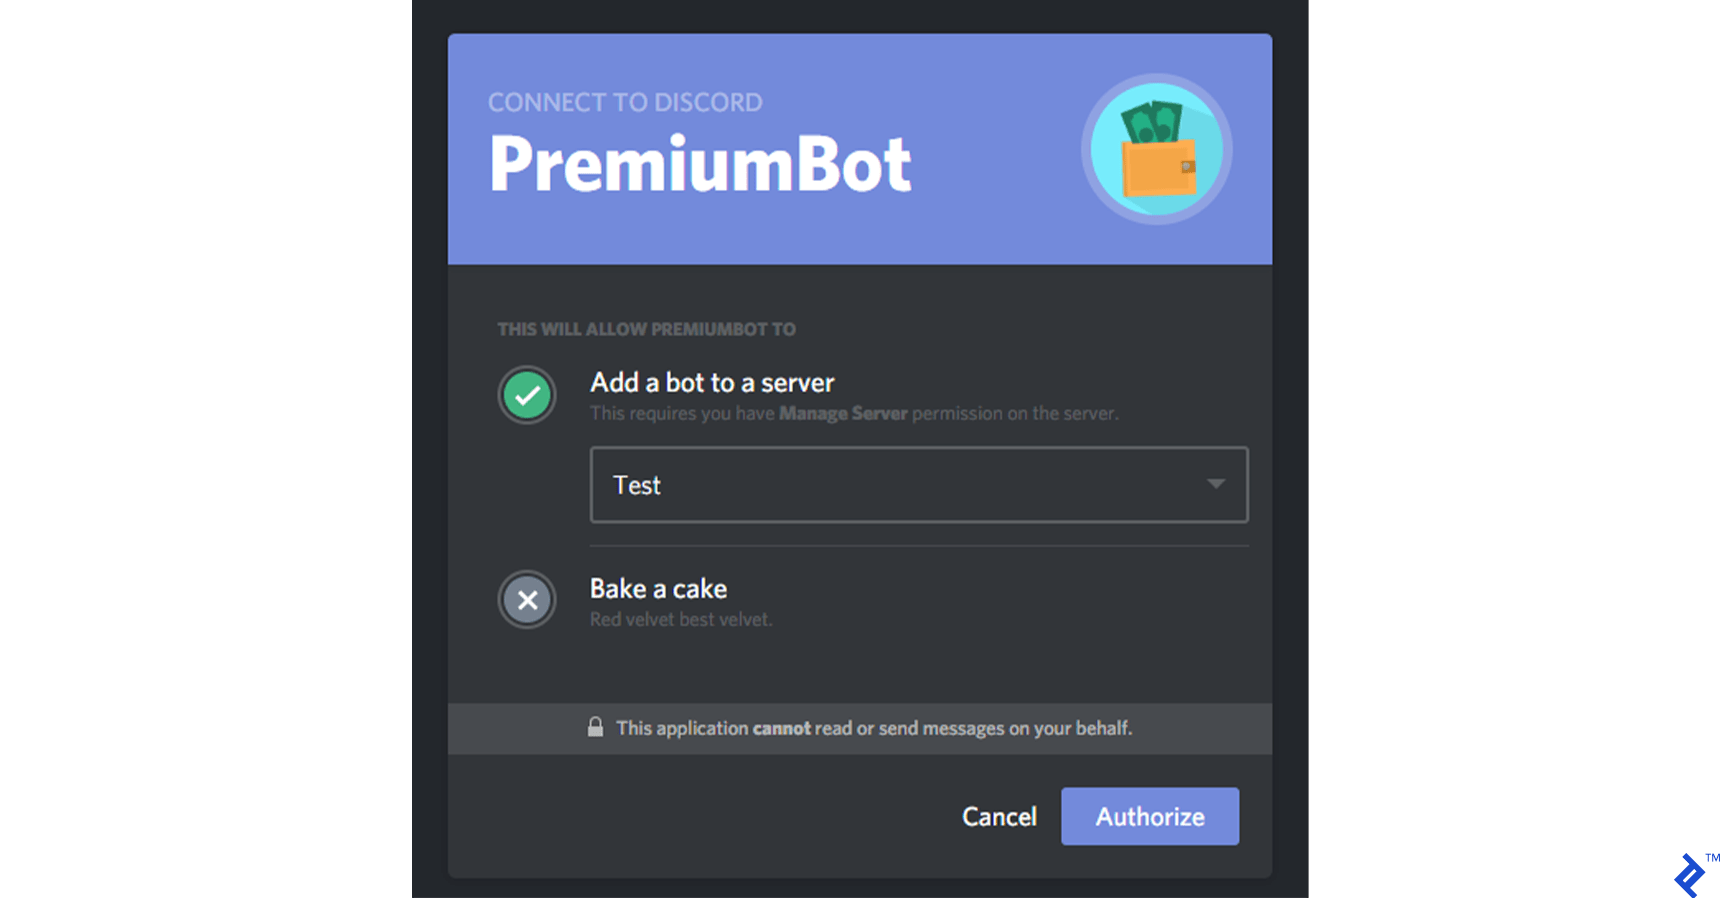
After clicking Authorize, the bot is now in my test guild and I can see it in the users list. It’s offline, but we’ll fix that soon.
Creating the Project
Assuming you have Node.js installed, create a project and install Eris (the bot library we’ll use), Express (a web application framework we’ll use to create a webhook listener), and body-parser (for parsing webhook bodies).
mkdir premium_bot
cd premium_bot
npm init
npm install eris express body-parser
Getting the Bot Online and Responsive
Let’s start with baby steps. First, we will get the bot online and responding to us. We can do this in 10-20 lines of code. Inside of a new bot.js file, we need to create an Eris Client instance, pass it our bot token (acquired when we created a bot application above), subscribe to some events on the Client instance, and tell it to connect to Discord. For demonstration purposes, we’ll hard-code our bot token into the bot.js file, but creating a separate config file and exempting it from source control is good practice.
(GitHub code link: https://github.com/mistval/premium_bot/blob/master/src/bot_step1.js)
const eris = require('eris');

// Create a Client instance with our bot token.
const bot = new eris.Client('my_token');

// When the bot is connected and ready, log to console.
bot.on('ready', () => {
   console.log('Connected and ready.');
});

// Every time a message is sent anywhere the bot is present,
// this event will fire and we will check if the bot was mentioned.
// If it was, the bot will attempt to respond with "Present".
bot.on('messageCreate', async (msg) => {
   const botWasMentioned = msg.mentions.find(
       mentionedUser => mentionedUser.id === bot.user.id,
   );

   if (botWasMentioned) {
       try {
           await msg.channel.createMessage('Present');
       } catch (err) {
           // There are various reasons why sending a message may fail.
           // The API might time out or choke and return a 5xx status,
           // or the bot may not have permission to send the
           // message (403 status).
           console.warn('Failed to respond to mention.');
           console.warn(err);
       }
   }
});

bot.on('error', err => {
   console.warn(err);
});

bot.connect();
If all goes well, when you run this code with your own bot token, Connected and ready. will be printed to the console and you will see your bot come online in your test server. You can mention2 your bot either by right-clicking it and selecting Mention or by typing its name preceded by @. The bot should respond with “Present.”

2Mentioning is a way to get another user’s attention even if they aren’t present. A regular user, when mentioned, will be notified by desktop notification, mobile push notification, and/or the appearance of a little red icon over Discord’s icon in the system tray. The manner(s) in which a user is notified depends on their settings and their online state. On the other hand, bots do not get any kind of special notification when they are mentioned. They receive a regular Message Create event like they do for any other message, and they can check the mentions attached to the event to determine if they were mentioned.
Record Payment Command
Now that we know we can get a bot online, let’s get rid of our current Message Create event handler and create a new one that lets us inform the bot that we’ve received payment from a user.
To inform the bot of payment, we will issue a command that looks like this:
pb!addpayment @user_mention payment_amount
For example, pb!addpayment @Me 10.00 to record a payment of $10.00 made by Me.
The pb! part is a command prefix. It is a good convention to choose a prefix that must apply to all commands to your bot. This creates a measure of namespacing for bots and helps avoid collision with other bots. Most bots include a help command, but imagine the mess if you had 10 bots in your guild and they all responded to help! That said, using pb! as a prefix is not a foolproof solution, as there may be other bots that also use the same prefix. Most popular bots allow their prefix to be configured on a per-guild basis to help prevent collision. Another option is to use the bot’s own mention as its prefix, although this makes issuing commands more verbose.
(GitHub code link: https://github.com/mistval/premium_bot/blob/master/src/bot_step2.js)
const eris = require('eris');

const PREFIX = 'pb!';

const bot = new eris.Client('my_token');

const commandHandlerForCommandName = {};
commandHandlerForCommandName['addpayment'] = (msg, args) => {
  const mention = args[0];
  const amount = parseFloat(args[1]);

  // TODO: Handle invalid command arguments, such as:
  // 1. No mention or invalid mention.
  // 2. No amount or invalid amount.

  return msg.channel.createMessage(`${mention} paid $${amount.toFixed(2)}`);
};

bot.on('messageCreate', async (msg) => {
  const content = msg.content;

  // Ignore any messages sent as direct messages.
  // The bot will only accept commands issued in
  // a guild.
  if (!msg.channel.guild) {
    return;
  }

  // Ignore any message that doesn't start with the correct prefix.
  if (!content.startsWith(PREFIX)) {
      return;
  }

  // Extract the parts of the command and the command name
  const parts = content.split(' ').map(s => s.trim()).filter(s => s);
  const commandName = parts[0].substr(PREFIX.length);

  // Get the appropriate handler for the command, if there is one.
  const commandHandler = commandHandlerForCommandName[commandName];
  if (!commandHandler) {
      return;
  }

  // Separate the command arguments from the command prefix and command name.
  const args = parts.slice(1);

  try {
      // Execute the command.
      await commandHandler(msg, args);
  } catch (err) {
      console.warn('Error handling command');
      console.warn(err);
  }
});

bot.on('error', err => {
  console.warn(err);
});

bot.connect();
Let’s try it.

Not only did we get the bot to respond to the pb!addpayment command, but we created a generalized pattern for handling commands. We can add more commands just by adding more handlers to the commandHandlerForCommandName dictionary. We have the makings of a simple command framework here. Handling commands is such a fundamental part of making a bot that many people have written and open-sourced command frameworks that you could use instead of writing your own. Command frameworks often allow you to specify cooldowns, required user permissions, command aliases, command descriptions and usage examples (for an automatically generated help command), and more. Eris comes with a built-in command framework.
Speaking of permissions, our bot has a bit of a security problem. Anyone can execute the addpayment command. Let’s restrict it so that only the bot’s owner can use it. We’ll refactor the commandHandlerForCommandName dictionary and have it contain JavaScript objects as its values. Those objects will contain an execute property with a command handler and a botOwnerOnly property with a boolean value. We’ll also hardcode our user ID into the constants section of the bot so that its owner is defined. You can find your user ID by enabling Developer Mode in your Discord settings, then right-clicking your username and selecting Copy ID.
(GitHub code link: https://github.com/mistval/premium_bot/blob/master/src/bot_step3.js)
const eris = require('eris');

const PREFIX = 'pb!';
const BOT_OWNER_ID = '123456789';

const bot = new eris.Client('my_token');

const commandForName = {};
commandForName['addpayment'] = {
  botOwnerOnly: true,
  execute: (msg, args) => {
      const mention = args[0];
      const amount = parseFloat(args[1]);

      // TODO: Handle invalid command arguments, such as:
      // 1. No mention or invalid mention.
      // 2. No amount or invalid amount.

      return msg.channel.createMessage(`${mention} paid $${amount.toFixed(2)}`);
  },
};

bot.on('messageCreate', async (msg) => {
  try {
      const content = msg.content;

      // Ignore any messages sent as direct messages.
      // The bot will only accept commands issued in
      // a guild.
      if (!msg.channel.guild) {
          return;
      }

      // Ignore any message that doesn't start with the correct prefix.
      if (!content.startsWith(PREFIX)) {
          return;
      }

      // Extract the parts and name of the command
      const parts = content.split(' ').map(s => s.trim()).filter(s => s);
      const commandName = parts[0].substr(PREFIX.length);

      // Get the requested command, if there is one.
      const command = commandForName[commandName];
      if (!command) {
          return;
      }

      // If this command is only for the bot owner, refuse
      // to execute it for any other user.
      const authorIsBotOwner = msg.author.id === BOT_OWNER_ID;
      if (command.botOwnerOnly && !authorIsBotOwner) {
          return await msg.channel.createMessage('Hey, only my owner can issue that command!');
      }

      // Separate the command arguments from the command prefix and name.
      const args = parts.slice(1);

      // Execute the command.
      await command.execute(msg, args);
  } catch (err) {
      console.warn('Error handling message create event');
      console.warn(err);
  }
});

bot.on('error', err => {
 console.warn(err);
});

bot.connect();
Now the bot will refuse to execute the addpayment command if anyone other than the bot owner tries to execute it.
Next, let’s have the bot assign a Premium Member role to anyone who donates $10 or more. Insert the following to the top part of the bot.js file:
(GitHub code link: https://github.com/mistval/premium_bot/blob/master/src/bot_step4.js)
const eris = require('eris');

const PREFIX = 'pb!';
const BOT_OWNER_ID = '523407722880827415';
const PREMIUM_CUTOFF = 10;

const bot = new eris.Client('my_token');

const premiumRole = {
   name: 'Premium Member',
   color: 0x6aa84f,
   hoist: true, // Show users with this role in their own section of the member list.
};

async function updateMemberRoleForDonation(guild, member, donationAmount) {
   // If the user donated more than $10, give them the premium role.
   if (guild && member && donationAmount >= PREMIUM_CUTOFF) {
       // Get the role, or if it doesn't exist, create it.
       let role = Array.from(guild.roles.values())
           .find(role => role.name === premiumRole.name);

       if (!role) {
           role = await guild.createRole(premiumRole);
       }

       // Add the role to the user, along with an explanation
       // for the guild log (the "audit log").
       return member.addRole(role.id, 'Donated $10 or more.');
   }
}

const commandForName = {};
commandForName['addpayment'] = {
   botOwnerOnly: true,
   execute: (msg, args) => {
       const mention = args[0];
       const amount = parseFloat(args[1]);
       const guild = msg.channel.guild;
       const userId = mention.replace(/<@(.*?)>/, (match, group1) => group1);
       const member = guild.members.get(userId);

       // TODO: Handle invalid command arguments, such as:
       // 1. No mention or invalid mention.
       // 2. No amount or invalid amount.

       return Promise.all([
           msg.channel.createMessage(`${mention} paid $${amount.toFixed(2)}`),
           updateMemberRoleForDonation(guild, member, amount),
       ]);
   },
};
Now I can try typing pb!addpayment @Me 10.00 and the bot should assign the Premium Member role to me.
Oops, a “Missing Permissions” error appears in the console.
DiscordRESTError: DiscordRESTError [50013]: Missing Permissions
index.js:85
code:50013
The bot doesn’t have the Manage Roles permission in the test guild, so it cannot create or assign roles. We could give the bot the Administrator privilege and we’d never have this kind of problem again, but as with any system, it’s best to only give a user (or in this case, a bot) the minimum privileges that they require.
We can give the bot the Manage Roles permission by creating a role in the server settings, enabling the Manage Roles permission for that role, and assigning the role to the bot.
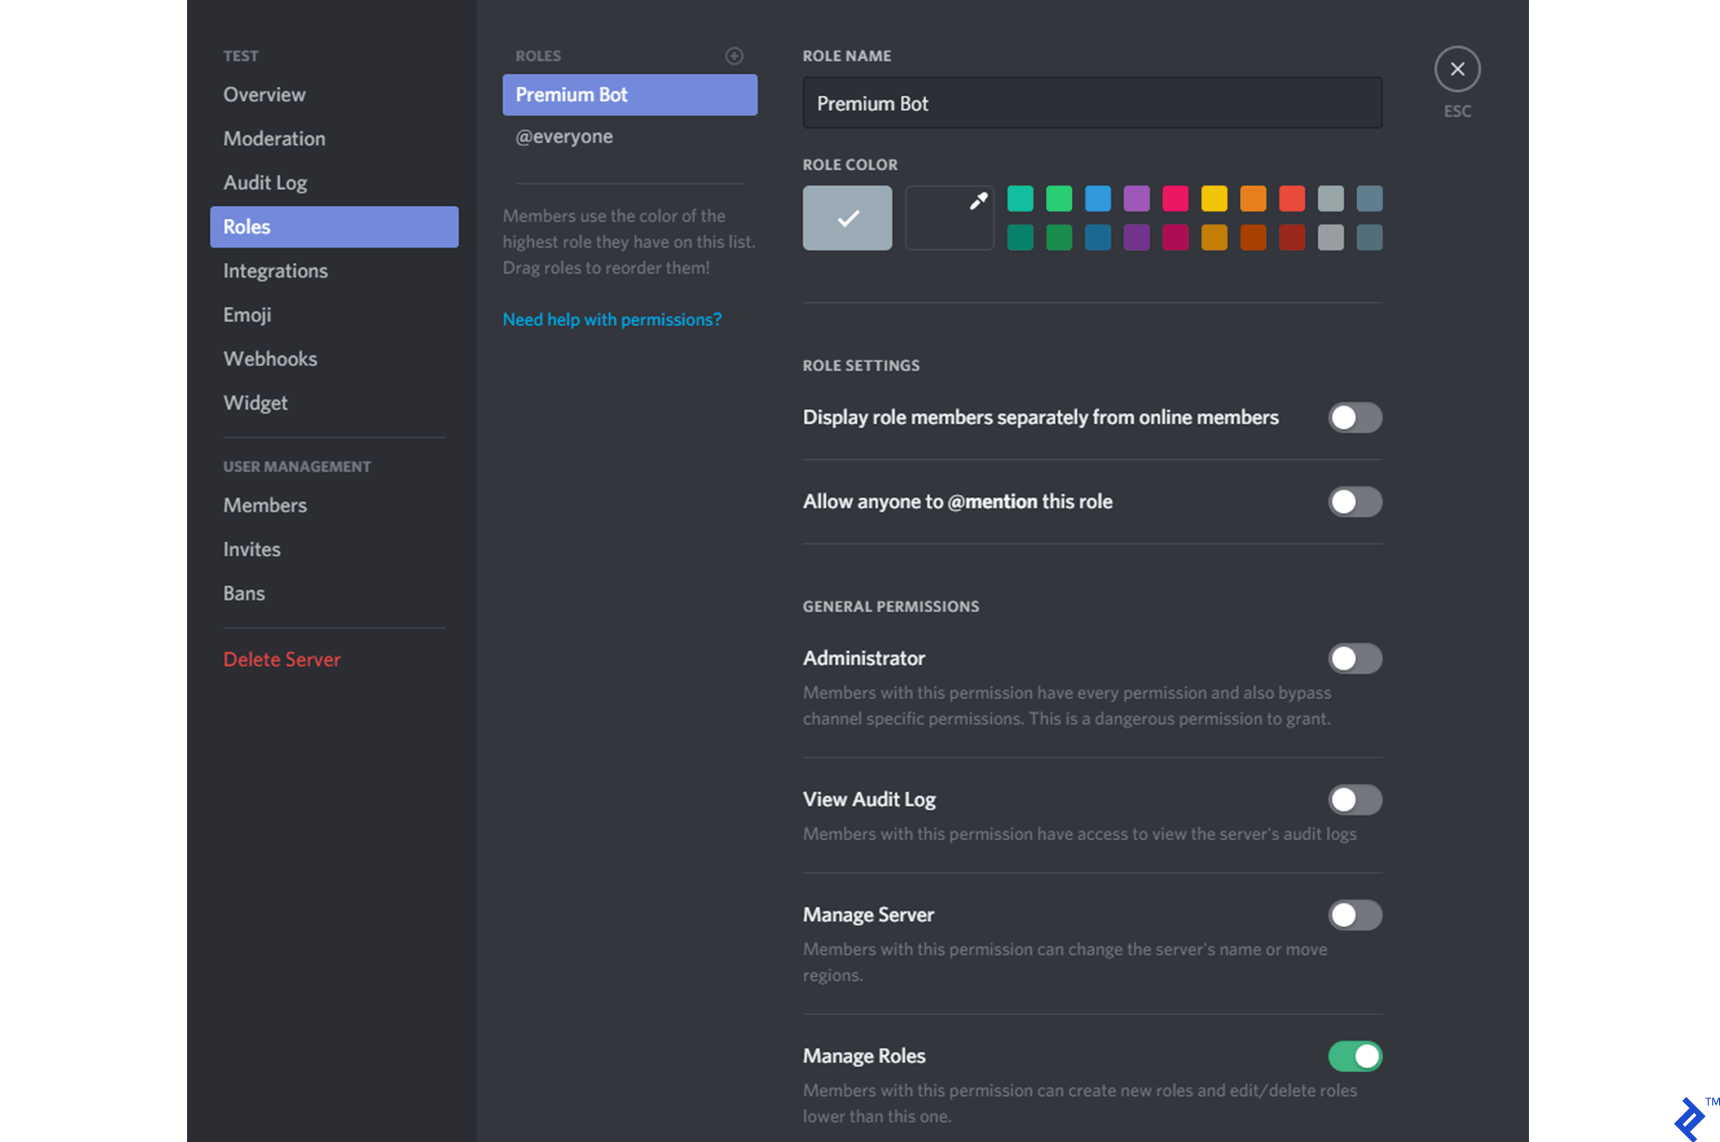
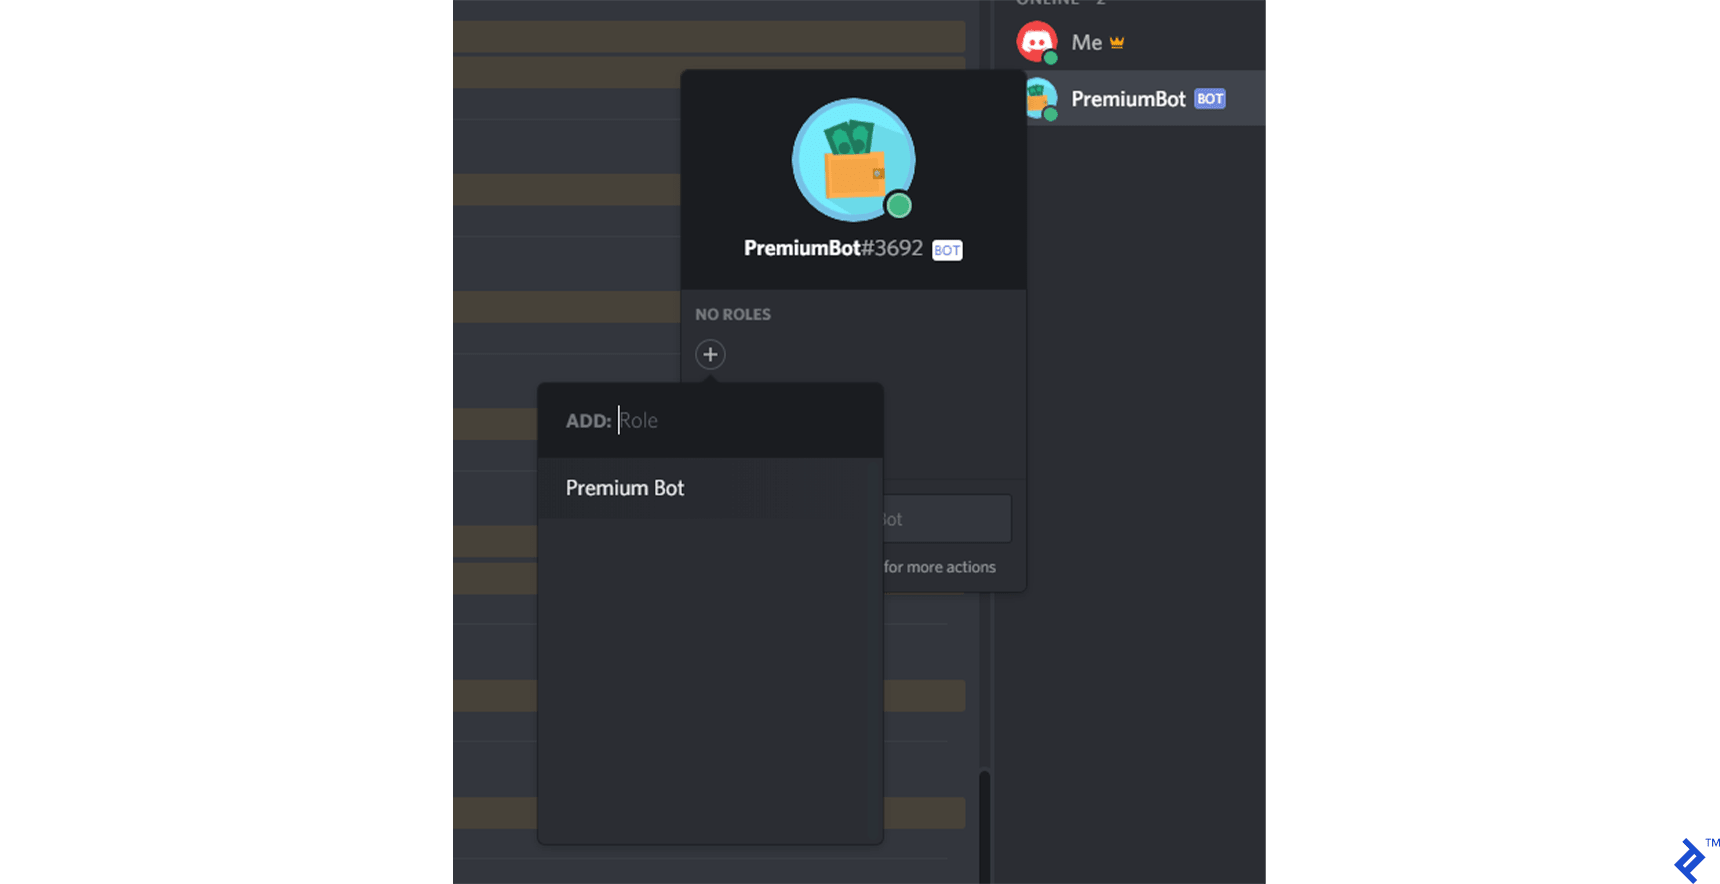
Now, when I try to execute the command again, the role is created and assigned to me, and I have a fancy name color and a special position in the member list.

In the command handler, we have a TODO comment, suggesting that we need to check for invalid arguments. Let’s take care of that now:
(GitHub code link: https://github.com/mistval/premium_bot/blob/master/src/bot_step5.js)
const commandForName = {};
commandForName['addpayment'] = {
   botOwnerOnly: true,
   execute: (msg, args) => {
       const mention = args[0];
       const amount = parseFloat(args[1]);
       const guild = msg.channel.guild;
       const userId = mention.replace(/<@(.*?)>/, (match, group1) => group1);
       const member = guild.members.get(userId);

       const userIsInGuild = !!member;
       if (!userIsInGuild) {
           return msg.channel.createMessage('User not found in this guild.');
       }

       const amountIsValid = amount && !Number.isNaN(amount);
       if (!amountIsValid) {
           return msg.channel.createMessage('Invalid donation amount');
       }

       return Promise.all([
           msg.channel.createMessage(`${mention} paid $${amount.toFixed(2)}`),
           updateMemberRoleForDonation(guild, member, amount),
       ]);
   },
};
Here’s the full code so far:
(GitHub code link: https://github.com/mistval/premium_bot/blob/master/src/bot_step5.js)
const eris = require('eris');

const PREFIX = 'pb!';
const BOT_OWNER_ID = '123456789';
const PREMIUM_CUTOFF = 10;

const bot = new eris.Client('my_token');

const premiumRole = {
   name: 'Premium Member',
   color: 0x6aa84f,
   hoist: true, // Show users with this role in their own section of the member list.
};
async function updateMemberRoleForDonation(guild, member, donationAmount) {
   // If the user donated more than $10, give them the premium role.
   if (guild && member && donationAmount >= PREMIUM_CUTOFF) {
       // Get the role, or if it doesn't exist, create it.
       let role = Array.from(guild.roles.values())
           .find(role => role.name === premiumRole.name);

       if (!role) {
           role = await guild.createRole(premiumRole);
       }

       // Add the role to the user, along with an explanation
       // for the guild log (the "audit log").
       return member.addRole(role.id, 'Donated $10 or more.');
   }
}

const commandForName = {};
commandForName['addpayment'] = {
   botOwnerOnly: true,
   execute: (msg, args) => {
       const mention = args[0];
       const amount = parseFloat(args[1]);
       const guild = msg.channel.guild;
       const userId = mention.replace(/<@(.*?)>/, (match, group1) => group1);
       const member = guild.members.get(userId);

       const userIsInGuild = !!member;
       if (!userIsInGuild) {
           return msg.channel.createMessage('User not found in this guild.');
       }

       const amountIsValid = amount && !Number.isNaN(amount);
       if (!amountIsValid) {
           return msg.channel.createMessage('Invalid donation amount');
       }

       return Promise.all([
           msg.channel.createMessage(`${mention} paid $${amount.toFixed(2)}`),
           updateMemberRoleForDonation(guild, member, amount),
       ]);
   },
};

bot.on('messageCreate', async (msg) => {
  try {
      const content = msg.content;

      // Ignore any messages sent as direct messages.
      // The bot will only accept commands issued in
      // a guild.
      if (!msg.channel.guild) {
          return;
      }

      // Ignore any message that doesn't start with the correct prefix.
      if (!content.startsWith(PREFIX)) {
          return;
      }

      // Extract the parts and name of the command
      const parts = content.split(' ').map(s => s.trim()).filter(s => s);
      const commandName = parts[0].substr(PREFIX.length);

      // Get the requested command, if there is one.
      const command = commandForName[commandName];
      if (!command) {
          return;
      }

      // If this command is only for the bot owner, refuse
      // to execute it for any other user.
      const authorIsBotOwner = msg.author.id === BOT_OWNER_ID;
      if (command.botOwnerOnly && !authorIsBotOwner) {
          return await msg.channel.createMessage('Hey, only my owner can issue that command!');
      }

      // Separate the command arguments from the command prefix and name.
      const args = parts.slice(1);

      // Execute the command.
      await command.execute(msg, args);
  } catch (err) {
      console.warn('Error handling message create event');
      console.warn(err);
  }
});

bot.on('error', err => {
 console.warn(err);
});

bot.connect();
This should give you a good basic idea of how to create a Discord bot. Now we are going to see how to integrate the bot with Ko-fi. If you’d like, you can create a webhook in your dashboard at Ko-fi, make sure your router is configured to forward port 80, and send live test webhooks to yourself. But I’m just going to use Postman to simulate requests.
Webhooks from Ko-fi deliver payloads that look like this:
data: {
  "message_id":"3a1fac0c-f960-4506-a60e-824979a74e74",
  "timestamp":"2017-08-21T13:04:30.7296166Z",
  "type":"Donation","from_name":"John Smith",
  "message":"Good luck with the integration!",
  "amount":"3.00",
  "url":"https://ko-fi.com"
}
Let’s create a new source file called webhook_listener.js and use Express to listen for webhooks. We’ll only have one Express route, and this is for demonstration purposes, so we won’t worry about using an idiomatic directory structure. We’ll just put all of the web server logic into one file:
(GitHub code link: https://github.com/mistval/premium_bot/blob/master/src/webhook_listener_step6.js)
const express = require('express');
const app = express();

const PORT = process.env.PORT || 80;

class WebhookListener {
 listen() {
   app.get('/kofi', (req, res) => {
     res.send('Hello');
   });

   app.listen(PORT);
 }
}

const listener = new WebhookListener();
listener.listen();

module.exports = listener;
Next, let’s require the new file at the top of bot.js so that the listener starts when we run bot.js:
(GitHub code link: https://github.com/mistval/premium_bot/blob/master/src/bot_step6.js)
const eris = require('eris');
const webhookListener = require('./webhook_listener.js');
After starting the bot, you should see “Hello” when you navigate to http://localhost/kofi in your browser.
Now let’s have the WebhookListener process the data from the webhook and emit an event. And now that we’ve tested that our browser can access the route, let’s change the route to a POST route, as the webhook from Ko-fi will be a POST request.
(GitHub code link: https://github.com/mistval/premium_bot/blob/master/src/bot_step7.js)
const express = require('express');
const bodyParser = require('body-parser');
const EventEmitter = require('events');

const PORT = process.env.PORT || 80;

const app = express();
app.use(bodyParser.json());

class WebhookListener extends EventEmitter {
 listen() {
   app.post('/kofi', (req, res) => {
     const data = req.body.data;
     const { message, timestamp } = data;
     const amount = parseFloat(data.amount);
     const senderName = data.from_name;
     const paymentId = data.message_id;
     const paymentSource = 'Ko-fi';

     // The OK is just for us to see in Postman. Ko-fi doesn't care
     // about the response body, it just wants a 200.
     res.send({ status: 'OK' });

     this.emit(
       'donation',
       paymentSource,
       paymentId,
       timestamp,
       amount,
       senderName,
       message,
     );
   });

   app.listen(PORT);
 }
}

const listener = new WebhookListener();
listener.listen();

module.exports = listener;
Next, we need to have the bot listen for the event, decide which user donated, and assign a role to them. To decide which user donated, we’ll try to find a user whose username is a substring of the message received from Ko-fi. Donors must be instructed to provide their username (with the discriminator) in the message that they write when they make their donation.
At the bottom of bot.js:
(GitHub code link: https://github.com/mistval/premium_bot/blob/master/src/bot_step7.js)
function findUserInString(str) {
   const lowercaseStr = str.toLowerCase();

   // Look for a matching username in the form of username#discriminator.
   const user = bot.users.find(
       user => lowercaseStr.indexOf(`${user.username.toLowerCase()}#${user.discriminator}`) !== -1,
   );

   return user;
}

async function onDonation(
   paymentSource,
   paymentId,
   timestamp,
   amount,
   senderName,
   message,
) {
   try {
       const user = findUserInString(message);
       const guild = user ? bot.guilds.find(guild => guild.members.has(user.id)) : null;
       const guildMember = guild ? guild.members.get(user.id) : null;

       return await updateMemberRoleForDonation(guild, guildMember, amount);
   } catch (err) {
       console.warn('Error handling donation event.');
       console.warn(err);
   }
}

webhookListener.on('donation', onDonation);
bot.connect();
In the onDonation function, we see two representations of a user: as a User and as a Member. These represent the same person, but the Member object contains guild-specific information about the User, such as their roles in the guild and their nickname. Since we want to add a role, we need to use the Member representation of the User. Each User in Discord has one Member representation for each guild that they are in.
Now I can use Postman to test the code:
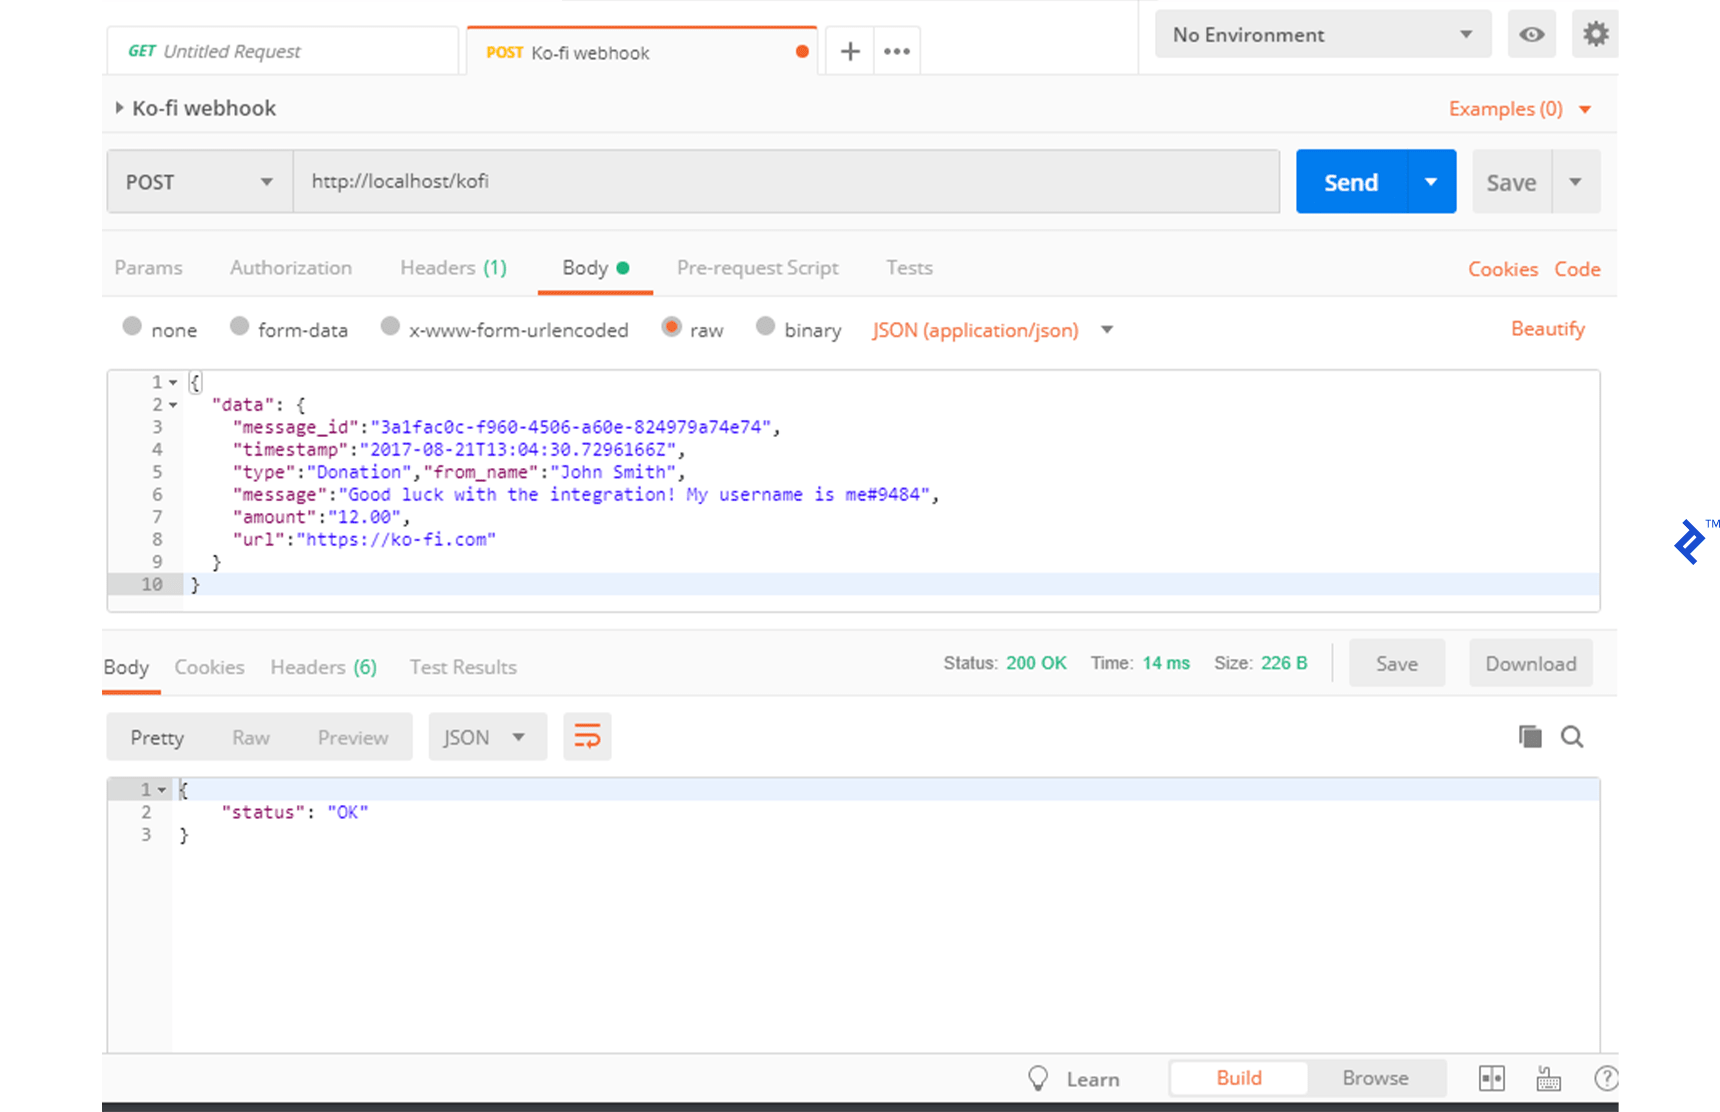
I receive a 200 status code, and the role is granted to me in the server.
If the message from Ko-fi does not contain a valid username, however, nothing happens. The donor doesn’t get a role, and we are not aware that we received an orphaned donation. Let’s add a log for logging donations, including donations that can’t be attributed to a guild member.
First, we need to create a log channel in Discord and get its channel ID. The channel ID can be found using the developer tools, which can be enabled in Discord’s settings. Then you can right-click any channel and click Copy ID.
The log channel ID should be added to the constants section of bot.js:
(GitHub code link: https://github.com/mistval/premium_bot/blob/master/src/bot_step8.js)
const LOG_CHANNEL_ID = '526653321109438474';
Then we can write a logDonation function:
(GitHub code link: https://github.com/mistval/premium_bot/blob/master/src/bot_step8.js)
function logDonation(member, donationAmount, paymentSource, paymentId, senderName, message, timestamp) {
   const isKnownMember = !!member;
   const memberName = isKnownMember ? `${member.username}#${member.discriminator}` : 'Unknown';
   const embedColor = isKnownMember ? 0x00ff00 : 0xff0000;

   const logMessage = {
       embed: {
           title: 'Donation received',
           color: embedColor,
           timestamp: timestamp,
           fields: [
               { name: 'Payment Source', value: paymentSource, inline: true },
               { name: 'Payment ID', value: paymentId, inline: true },
               { name: 'Sender', value: senderName, inline: true },
               { name: 'Donor Discord name', value: memberName, inline: true },
               { name: 'Donation amount', value: donationAmount.toString(), inline: true },
               { name: 'Message', value: message, inline: true },
           ],
       }
   }

   bot.createMessage(LOG_CHANNEL_ID, logMessage);
}
Now we can update onDonation to call the log function:
async function onDonation(
   paymentSource,
   paymentId,
   timestamp,
   amount,
   senderName,
   message,
) {
   try {
       const user = findUserInString(message);
       const guild = user ? bot.guilds.find(guild => guild.members.has(user.id)) : null;
       const guildMember = guild ? guild.members.get(user.id) : null;

       return await Promise.all([
           updateMemberRoleForDonation(guild, guildMember, amount),
           logDonation(guildMember, amount, paymentSource, paymentId, senderName, message, timestamp),
       ]);
   } catch (err) {
       console.warn('Error updating donor role and logging donation');
       console.warn(err);
   }
}
Now I can invoke the webhook again, first with a valid username and then without one, and I get two log messages in the log channel.
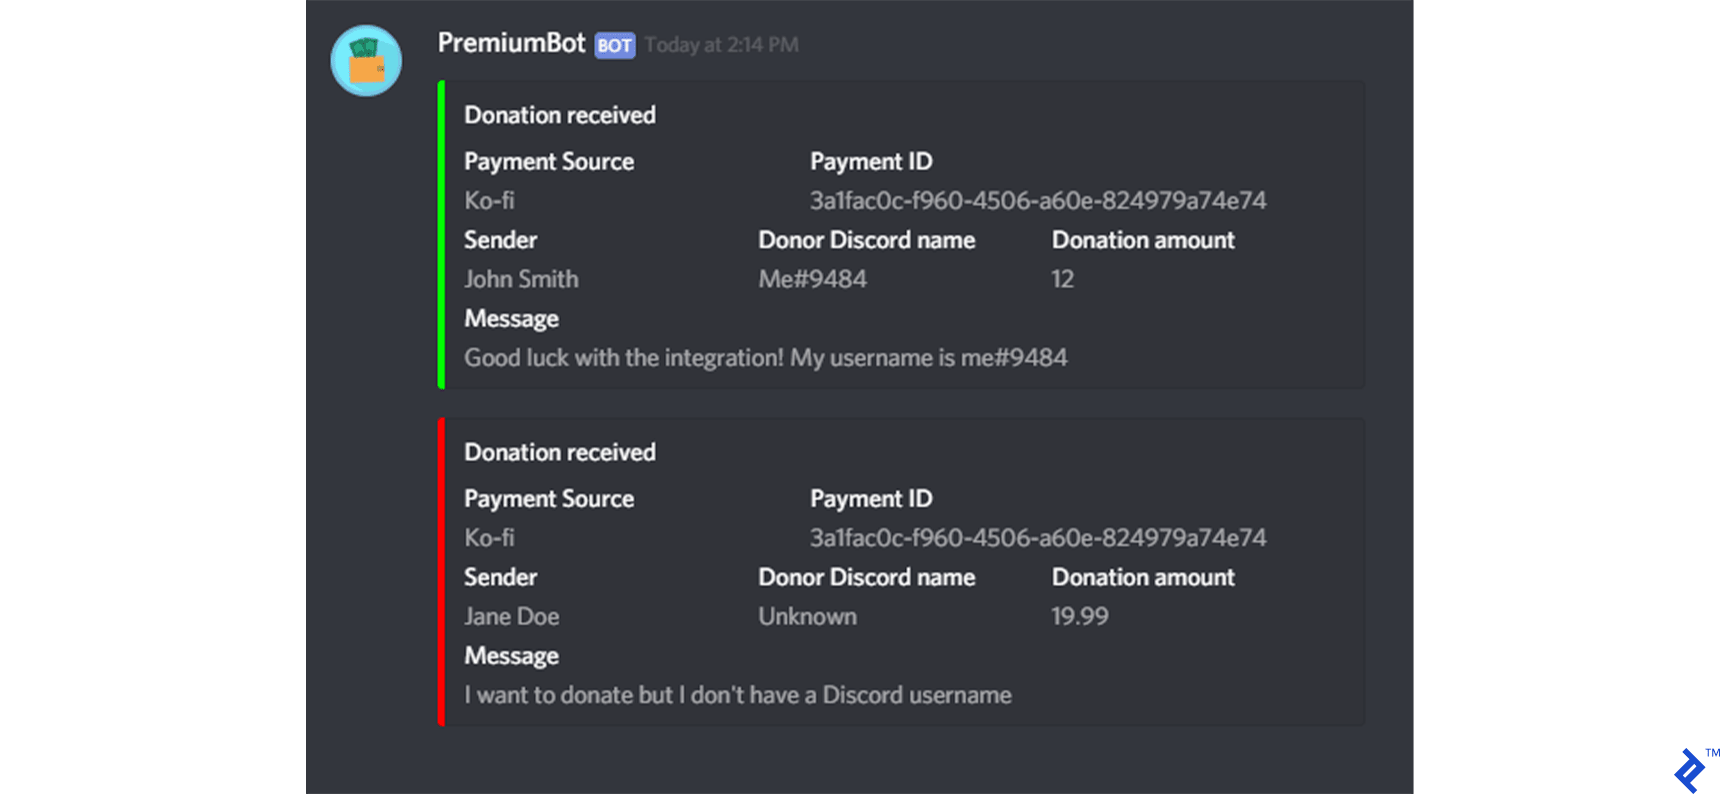
Previously, we were sending strings to Discord to display as messages. The more complex JavaScript object that we create and send to Discord in the new logDonation function is a special type of message referred to as a rich embed. An embed gives you some scaffolding for making attractive messages like those shown. Only bots can create embeds; users cannot.
Now we are receiving notifications of donations, logging them, and rewarding our supporters. We can also add donations manually with the addpayment command in case a user forgets to specify their username when they donate. Let’s call it a day.
The completed code for this tutorial is available on GitHub here.
Next Steps
We’ve successfully created a bot that can help us track donations. Is this something we can use? Perhaps. It covers the basics but not much more. Here are some shortcomings you might want to consider:
- If a user leaves our guild (or if they weren’t in our guild in the first place), they will lose their
Premium Memberrole, and if they rejoin, it won’t be restored. We should store payments by user ID in a database so if a premium member rejoins, we can restore their role and send them a “Welcome back” message if we are inclined. - Paying in installments won’t work. If a user sends $5 and then sends another $5, they won’t get a premium role. Like the above issue, storing payments in a database and issuing the
Premium Memberrole when the total payments from a user reach $10 would help here. - It’s possible to receive the same webhook more than once, and this bot will record the payment multiple times. If Ko-fi doesn’t receive or doesn’t properly acknowledge a code 200 response from the webhook listener, it will try to send the webhook again. Keeping track of payments in a database and ignoring webhooks with the same ID as those received previously would help here.
- Our webhook listener isn’t very secure. Anyone could forge a webhook and get a
Premium Memberrole for free. Ko-fi doesn’t sign webhooks, so you’ll have to rely on either no one knowing your webhook address (bad) or IP whitelisting (a bit better). - The bot is designed to be used in one guild only.
Interview: When a Discord Bot Gets Big
There are more than a dozen websites for listing Discord bots and making them available to the public at large, including DiscordBots.org and Discord.Bots.gg. Although Discord bots are mostly the foray of small-time hobbyists, some bots experience tremendous popularity and maintaining them evolves into a complex and demanding job.
By guild count, Rythm is currently the most widespread bot on Discord. Rythm is a music bot whose specialty is connecting to voice channels in Discord and playing music requested by users. Currently, Rythm is present in more than 2.85 million guilds containing a sum population of around 90 million users, and at its peak plays audio for approximately 100,000 users in 20,000 separate guilds simultaneously. Rythm’s creator and main developer, ImBursting, kindly agreed to answer a few questions about what it’s like to develop and maintain a large-scale bot like Rythm.
Interviewer: Can you tell us a bit about Rythm’s high-level architecture and how it’s hosted?
ImBursting: Rythm is scaled across nine physical servers. Each have 32 cores, 96GB of RAM, and a 10gbps connection. These servers are collocated at a data center with help from a small hosting company, GalaxyGate.
I imagine that when you started working on Rythm, you didn’t design it to scale anywhere near as much as it has. Can you tell us about how Rythm started and its technical evolution?
Rythm’s first evolution was written in Python, which isn’t a very performant language, so around the time we hit 10,000 servers (after many scaling attempts), I realized this was the biggest roadblock. so I began recoding the bot to Java, the reason being Java’s audio libraries were a lot more optimised and it was generally a better-suited language for such a huge application. After recoding, performance improved tenfold and kept the issues at bay for a while. And then we hit the 300,000 servers milestone when issues started surfacing again, at which point I realized that more scaling was required since one JVM just wasn’t able to handle all that. So we slowly started implementing improvements and major changes, like tuning the garbage collector and splitting voice connections onto separate microservices using an open-source server called Lavalink. This improved performance quite a bit but the final round of infrastructure was when we split this into nine separate clusters to run on nine physical servers and made custom gateway and stats microservices to ensure everything ran smoothly like it would on one machine.
I noticed that Rythm has a canary version, and you received help from other developers and staff. I imagine you and your team must put a lot of effort into ensuring things are done right. Can you tell us what processes are involved in updating Rythm?
Rythm canary is the alpha bot we use to test freshly made features and performance improvements before deploying them to Rythm 2 to test on a wider scale and then production Rythm. The biggest issue we encounter is really long reboot times due to Discord rate limits, and is the reason I try my best to make sure an update is ready before deciding to push it.
I get a lot of help from volunteer developers and people who genuinely want to help the community. I want to ensure everything is done correctly and that people will always get their questions answered and get the best support possible, which means I’m constantly on the lookout for new opportunities.
Discord Bot Development: Big-time Fun
Discord’s days of being a new kid on the block are in the past, and it is now one of the largest real-time communication platforms in the world. While most Discord bot authors are hobbyists, we may see commercial opportunities increase as the service population continues to increase. Some companies, like Patreon, have already waded in.
Regardless of their scope, chatbots are generally fun, except when their responses to your complex queries have the intellectual depth of a cup of water. To ensure a great UX for your users, see The Chat Crash - When a Chatbot Fails by the Toptal Design Blog for five design problems to avoid.
Further Reading on the Toptal Blog:
Understanding the basics
What is a Discord bot?
A Discord bot is an automated chatbot that operates on Discord, a popular text and voice communication platform. Bots are ubiquitous on Discord and can be programmed to provide many different services.
What are Discord bots used for?
Some common roles that bots fulfill include moderating channels, playing games with users, playing music in voice channels, internet searching, and payment processing. Bots fill countless other common and niche roles as well.
What Discord bot libraries are available for JavaScript?
Eris and discord.js are the two officially vetted JavaScript libraries. Sometimes, you may see bot code that depends on older, unmaintained libraries or on unvetted libraries, but these should generally be avoided.
What exactly does a Discord bot library do?
A bot library encapsulates the details of interacting with Discord’s WebSocket and REST APIs so that you can code at a higher level of abstraction. Many libraries also include higher-level features such as command frameworks.
What should I do if I leak my bot token?
A+ if you said “Regenerate it immediately in the Discord Developer Portal.” Token leaks are a frequent occurrence especially among novice developers, and the consequences can be severe. Web crawlers watch GitHub for leaked bot tokens, and compromised bots are used for nefarious purposes.
How do you create a Discord bot?
Anyone with a Discord account can access Discord’s Developer Portal (https://discordapp.com/developers/applications/), register an application, create a bot user, and acquire a bot token. From there, you can use a Discord library of your choice to program your bot.
Randall Schmidt
Knoxville, TN, United States
Member since May 2, 2018
About the author
Randall has more than eight years of development experience working across various domains and languages and is known for his attention to detail.
Expertise
PREVIOUSLY AT

