How to Build an Effective Initial Deployment Pipeline
Do you run deployment scripts from your development machine, or find yourself referring to deployments by the day of the week they were deployed, instead of using version numbers? It’s time for a better solution.
In this article, Freelance Ruby Engineer and automation enthusiast Amin Shah Gilani walks you through his perfect deployment pipeline to use at the beginning of your project. With this CI/CD configuration, every push is tested, the master branch is deployed to staging servers with a fresh database dump from the production server, and versioned tags are deployed to production with backups and migrations running automatically.
Amin is a developer and entrepreneur who loves writing clean, test-driven Ruby and ES6 code—crafted for CI/CD.
Expertise
I love building things—what developer doesn’t? I love thinking up solutions to interesting problems, writing implementations, and creating beautiful code. However, what I don’t like is operations. Operations is everything not involved in building great software—everything from setting up servers to getting your code shipped to production.
This is interesting, because as a freelance Ruby on Rails developer, I frequently have to create new web applications and repeat the process of figuring out the DevOps side of things. Fortunately, after creating dozens of applications, I’ve finally settled on a perfect initial deployment pipeline. Unfortunately, not everyone’s got it figured out like I have—eventually, this knowledge led me to take the plunge and document my process.
In this article, I’ll walk you through my perfect pipeline to use at the beginning of your project. With my pipeline, every push is tested, the master branch is deployed to staging with a fresh database dump from production, and versioned tags are deployed to production with back-ups and migrations happening automatically.
Note, since it’s my pipeline, it’s also opinionated and suited to my needs; however, you can feel free to swap out anything you don’t like and replace it with whatever strikes your fancy. For my pipeline, we’ll use:
-
GitLab to host code.
- Why: My clients prefer their code to remain secret, and GitLab’s free tier is wonderful. Also, integrated free CI is awesome. Thanks GitLab!
- Alternatives: GitHub, BitBucket, AWS CodeCommit, and many more.
-
GitLab CI to build, test, and deploy our code.
- Why: It integrates with GitLab and is free!
- Alternatives: TravisCI, Codeship, CircleCI, DIY with Fabric8, and many more.
-
Heroku to host our app.
- Why: It works out of the box and is the perfect platform to start off on. You can change this in the future, but not every new app needs to run on a purpose-built Kubernetes cluster. Even Coinbase started off on Heroku.
- Alternatives: AWS, DigitalOcean, Vultr, DIY with Kubernetes, and many more.
Old-school: Create a Basic App and Deploy It to Heroku
First, let’s recreate a typical application for someone who isn’t using any fancy CI/CD pipelines and just wants to deploy their application.
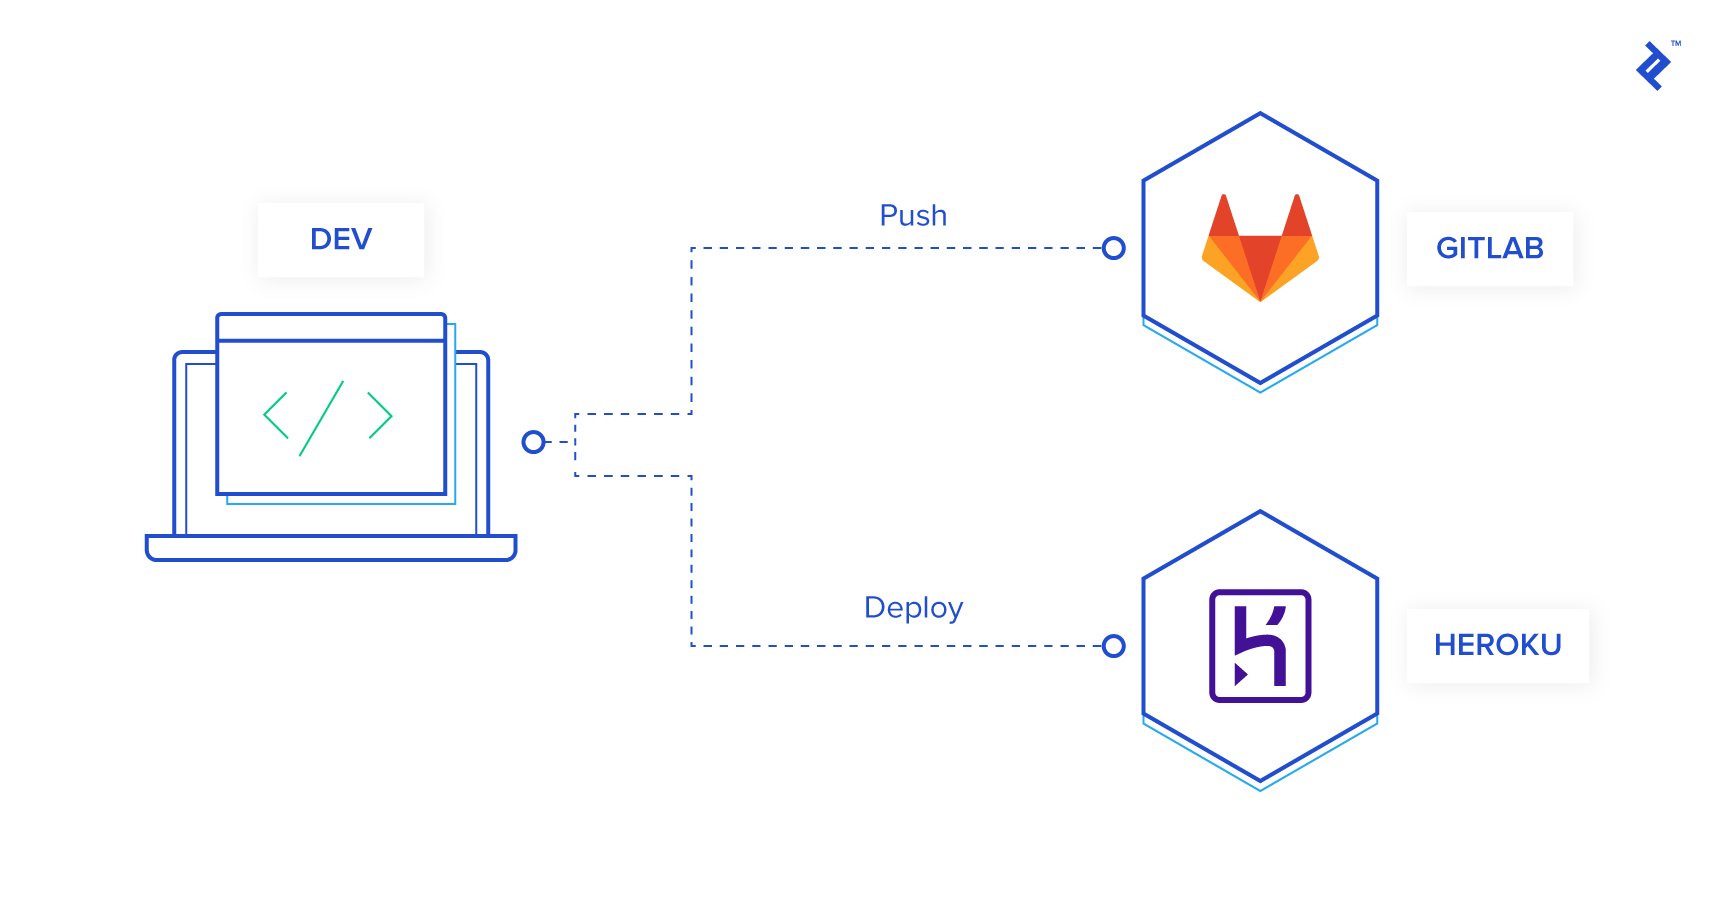
It doesn’t matter what kind of app you’re creating, but you will require Yarn or npm. For my example, I’m creating a Ruby on Rails application because it comes with migrations and a CLI, and I already have the configuration written for it. You’re welcome to use any framework or language you prefer, but you’ll need Yarn to do the versioning I do later on. I’m creating a simple CRUD app using only a few commands and no authentication.
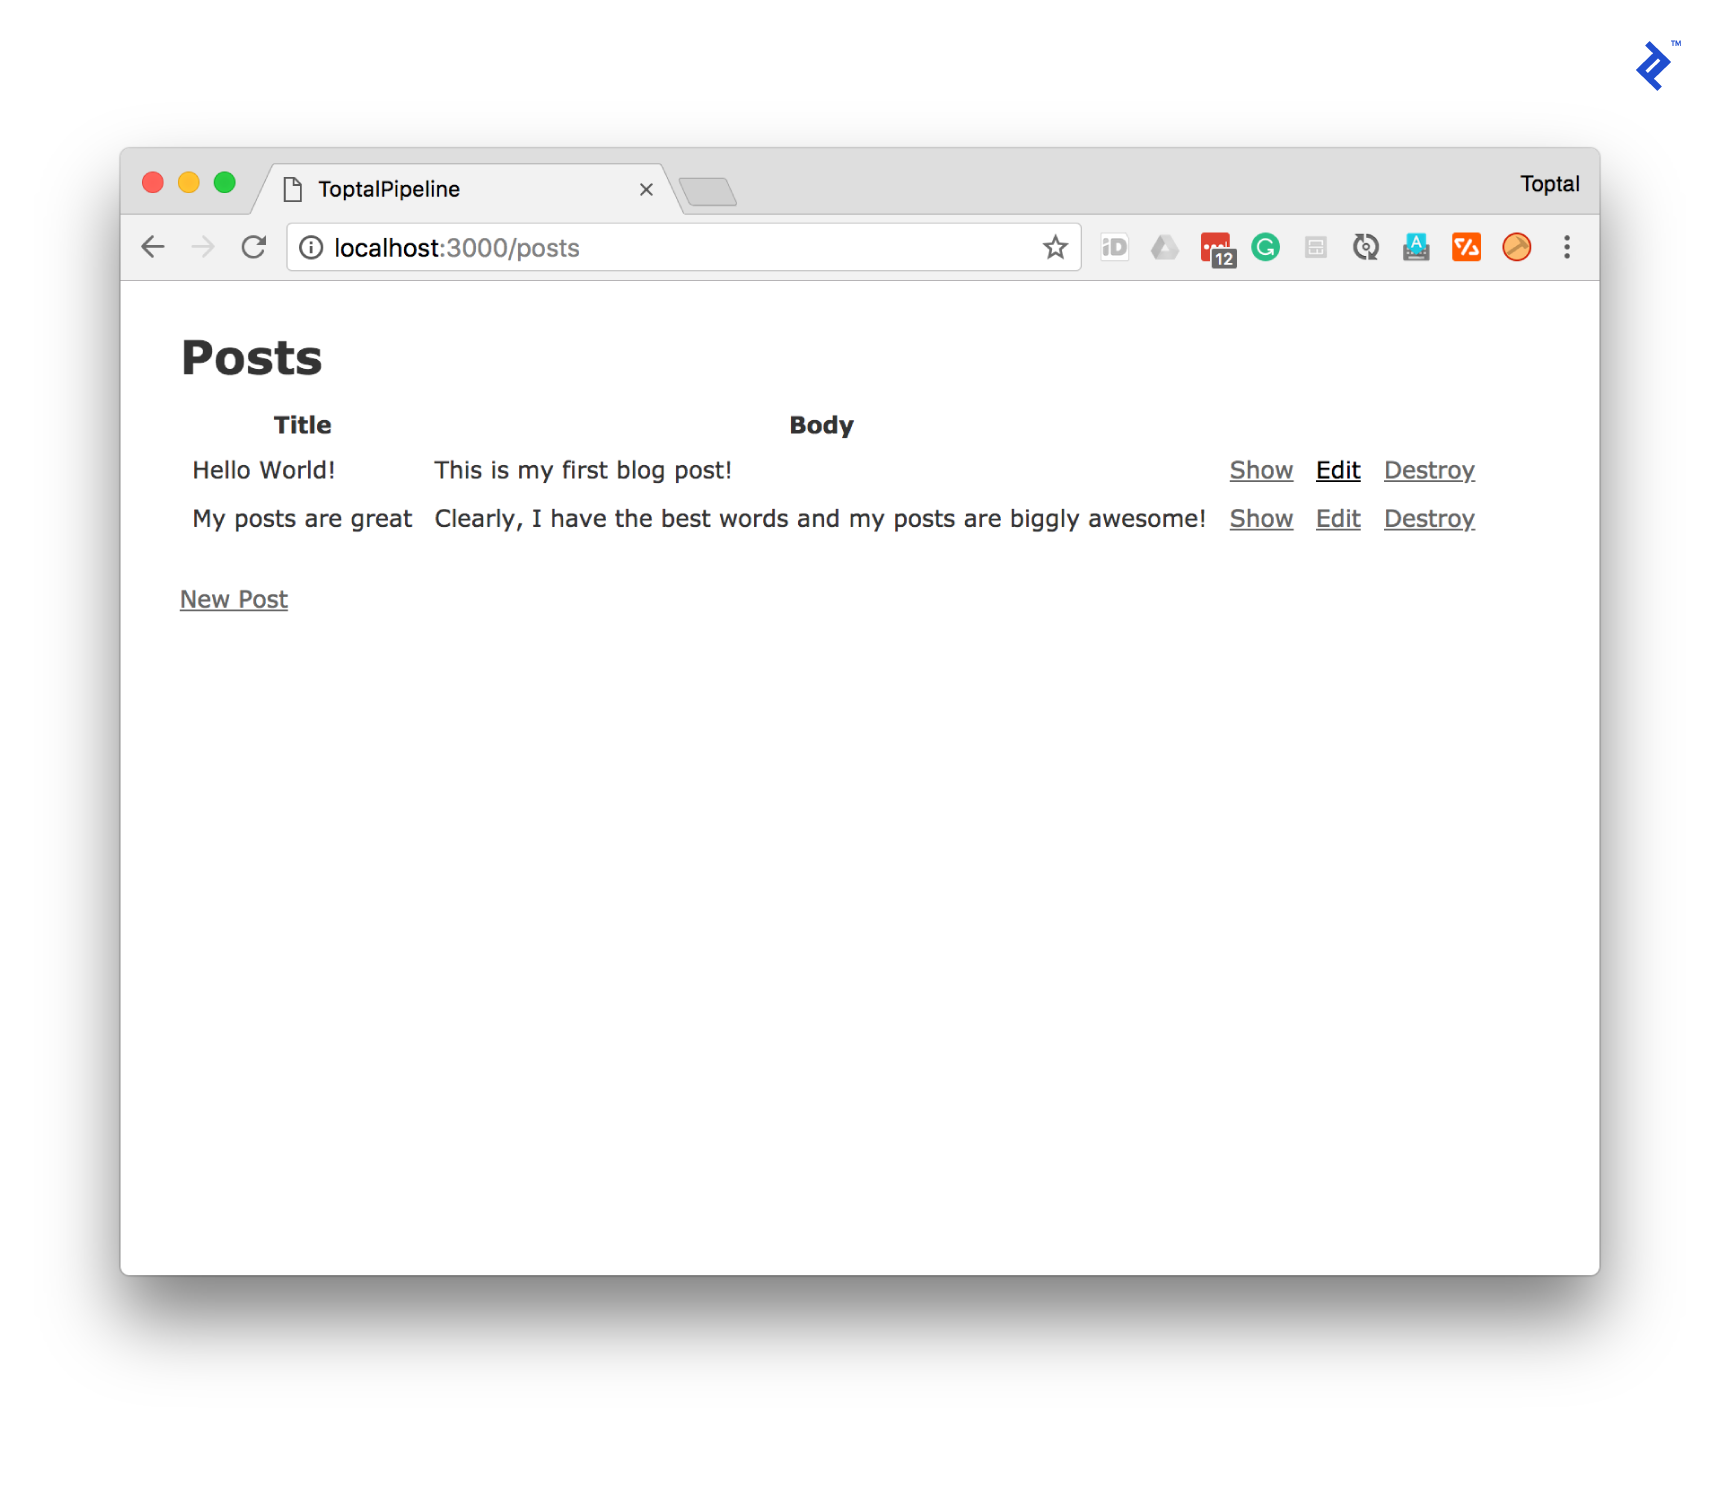
And let’s test if our app is running as expected. I went ahead and created a few posts, just to make sure.
And let’s deploy it to Heroku by pushing our code and running migrations
$ heroku create toptal-pipeline
Creating ⬢ toptal-pipeline... done
https://toptal-pipeline.herokuapp.com/ | https://git.heroku.com/toptal-pipeline.git
$ git push heroku master
Counting objects: 132, done.
...
To https://git.heroku.com/toptal-pipeline.git
 * [new branch]      master -> master
$ heroku run rails db:migrate
Running rails db:migrate on ⬢ toptal-pipeline... up, run.9653 (Free)
...
Finally let’s test it out in production
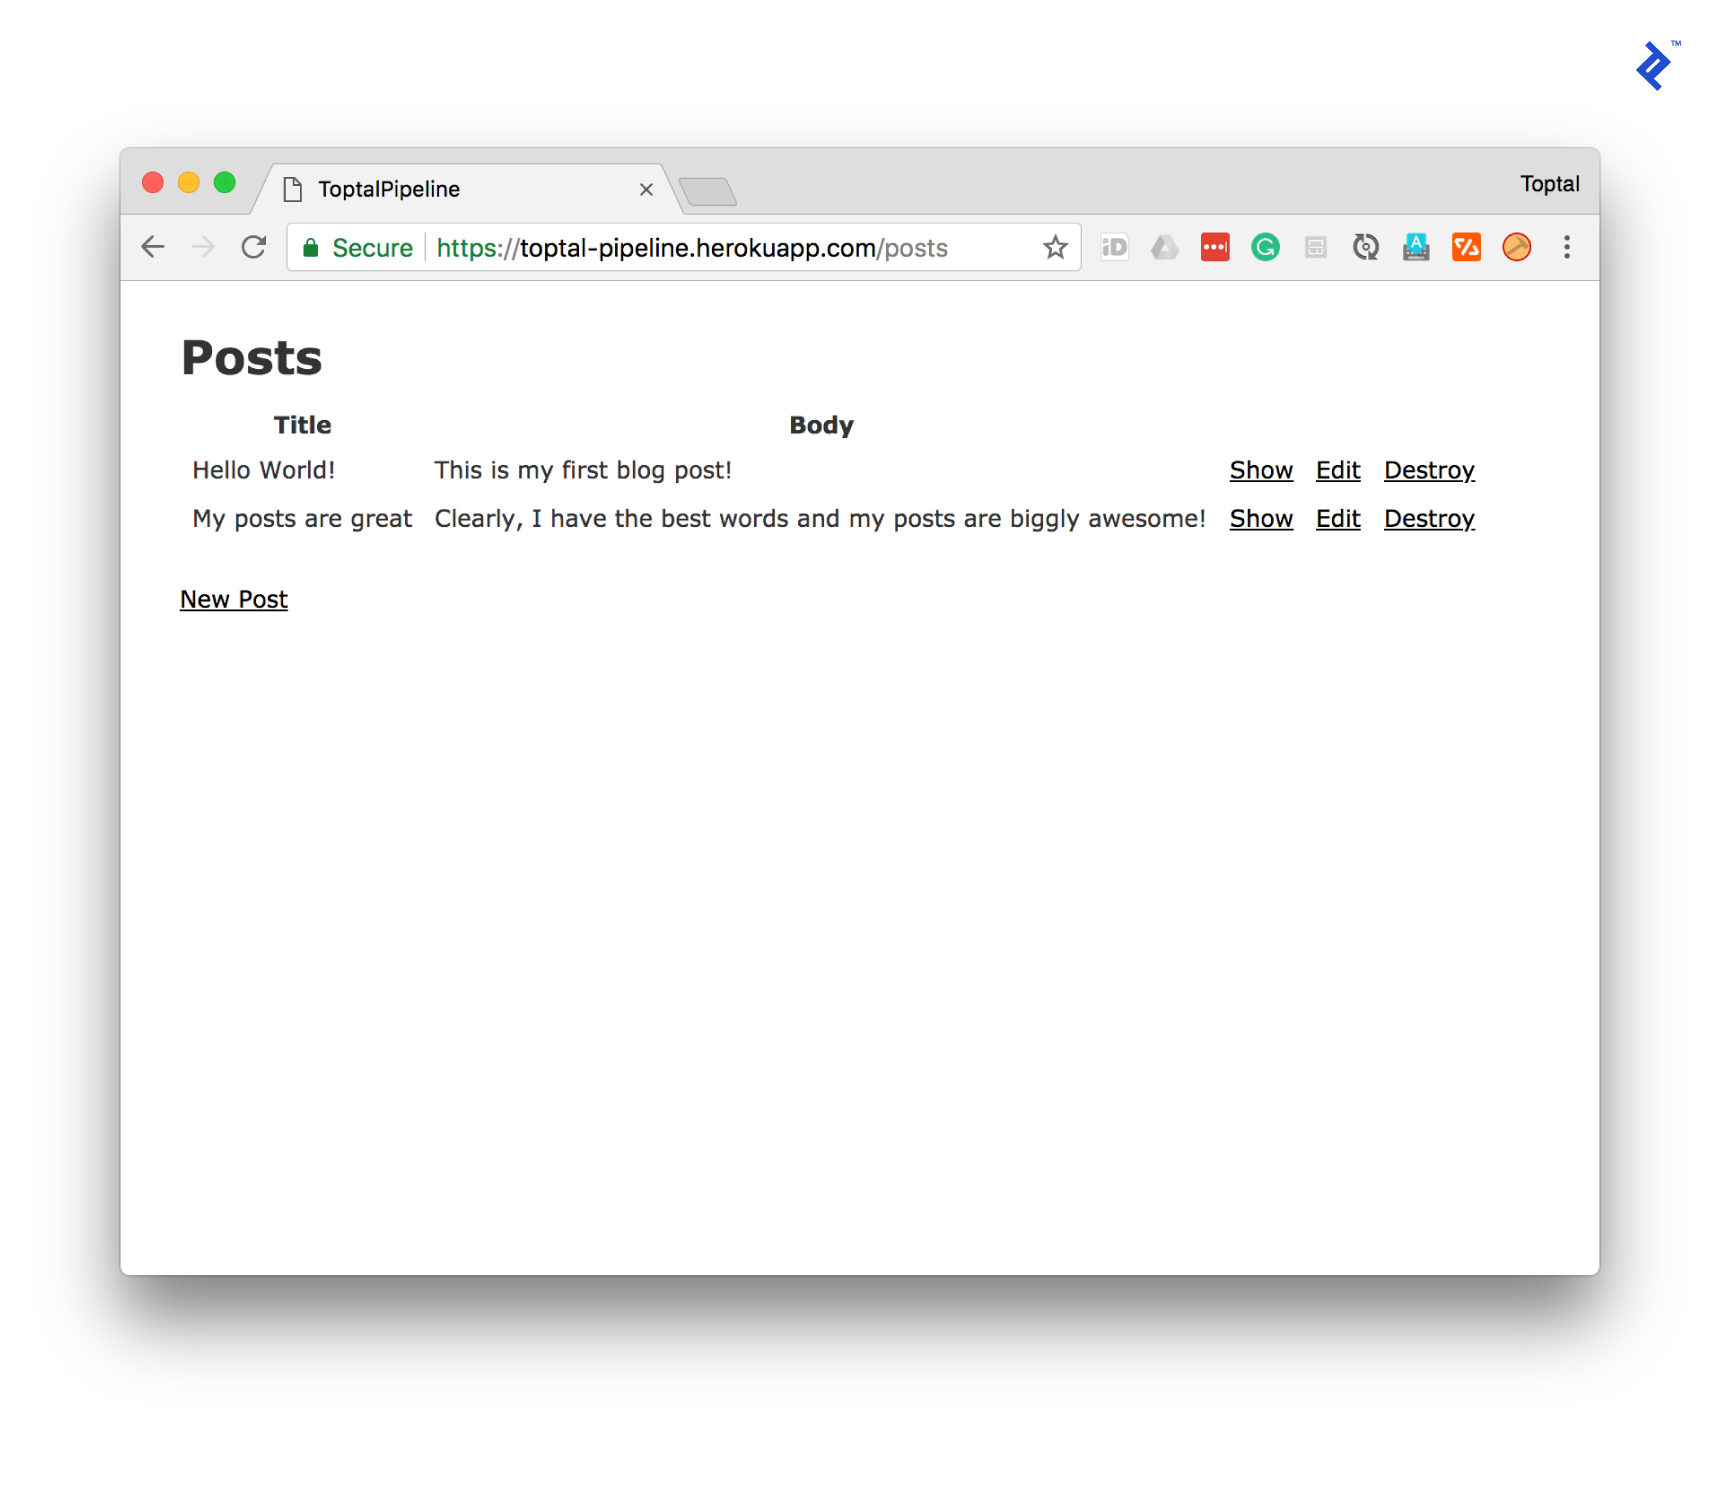
And that’s it! Typically, this is where most developers leave their operations. In the future, if you make changes, you would have to repeat the deploy and migration steps above. You may even run tests if you’re not running late for dinner. This is great as a starting point, but let’s think about this method a bit more.
Pros
- Quick to set up.
- Deployments are easy.
Cons
- Not DRY: Requires repeating the same steps on every change.
- Not versioned: “I’m rolling back yesterday’s deployment to last week’s” isn’t very specific three weeks from now.
- Not bad-code-proof: You know you’re supposed to run tests, but no one’s looking, so you might push it despite the occasional broken test.
- Not bad-actor-proof: What if a disgruntled developer decides to break your app by pushing code with a message about how you don’t order enough pizzas for your team?
- Does not scale: Allowing every developer the ability to deploy would give them production level access to the app, violating the Principle of Least Privilege.
- No staging environment: Errors specific to the production environment won’t show up until production.
The Perfect Initial Deployment Pipeline
I’m going to try something different today: Let’s have a hypothetical conversation. I’m going to give “you” a voice, and we’ll talk about how we can improve this current flow. Go ahead, say something.
Say what? Wait—I can talk?
Yes, that’s what I meant about giving you a voice. How are you?
I’m good. This feels weird
I understand, but just roll with it. Now, let’s talk about our pipeline. What’s the most annoying part about running deployments?
Oh, that’s easy. The amount of time I waste. Have you ever tried pushing to Heroku?
Yeah, watching your dependencies downloading and application being built as part of the git push is horrible!
I know, right? It’s insane. I wish I didn’t have to do that. There’s also the fact that I have to run migrations *after* deployment so I have to watch the show and check to make sure my deployment runs through
Okay, you could actually solve that latter problem by chaining the two commands with &&, like git push heroku master && heroku run rails db:migrate, or just creating a bash script and putting it in your code, but still, great answer, the time and repetition is a real pain.
Yeah, it really sucks
What if I told you you could fix that bit immediately with a CI/CD pipeline?
A what now? What is that?
CI/CD stands for continuous integration (CI) and continuous delivery/deployment (CD). It was fairly tough for me to understand exactly what it was when I was starting out because everyone used vague terms like “amalgamation of development and operations,” but put simply:
- Continuous Integration: Making sure all your code is merged together in one place. Get your team to use Git and you’ll be using CI.
- Continuous Delivery: Making sure your code is continuously ready to be shipped. Meaning producing read-to-distribute version of your product quickly.
- Continuous Deployment: Seamlessly taking the product from continuous delivery and just deploying it to your servers.
Oh, I get it now. It’s about making my app magically deploy to the world!
My favorite article explaining CI/CD is by Atlassian here. This should clear up any questions you have. Anyways, back to the problem.
Yeah, back to that. How do I avoid manual deploys?
Setting Up a CI/CD Pipeline to Deploy on Push to master
What if I told you you could fix that bit immediately with a CI/CD? You can push to your GitLab remote (origin) and a computer will be spawned to straight-up simply push that code of yours to Heroku.
No way!
Yeah way! Let’s jump back into code again.
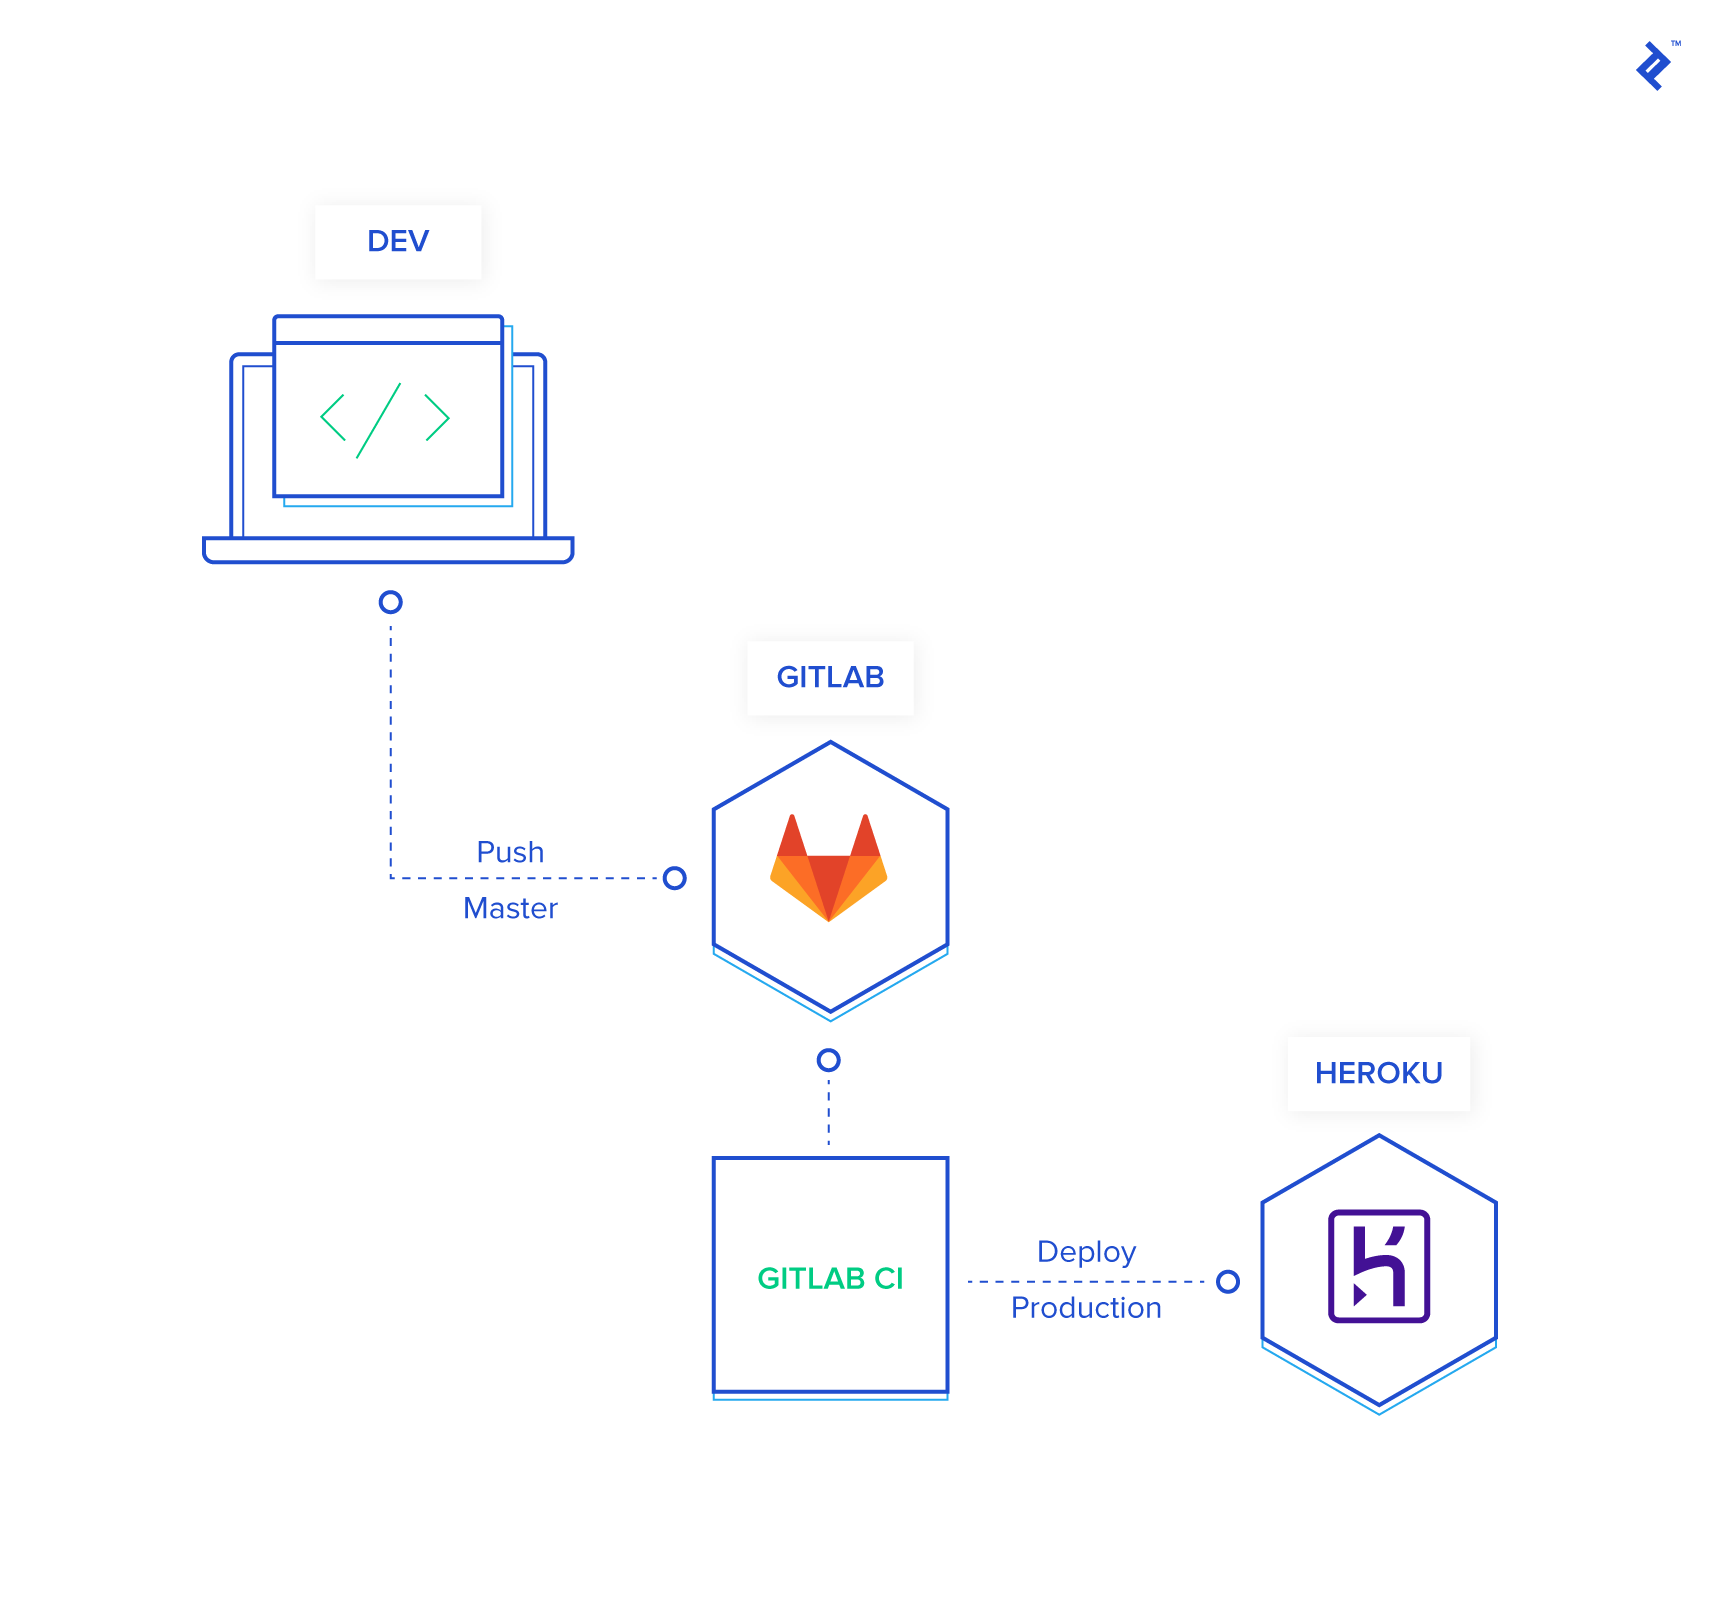
Create a .gitlab-ci.yml with the following contents, swapping out toptal-pipeline for your Heroku app’s name:
image: ruby:2.4

before_script:
  - >
   : "${HEROKU_EMAIL:?Please set HEROKU_EMAIL in your CI/CD config vars}"
  - >
   : "${HEROKU_AUTH_TOKEN:?Please set HEROKU_AUTH_TOKEN in your CI/CD config vars}"
  - curl https://cli-assets.heroku.com/install-standalone.sh | sh
  - |
    cat >~/.netrc <<EOF
    machine api.heroku.com
      login $HEROKU_EMAIL
      password $HEROKU_AUTH_TOKEN
    machine git.heroku.com
      login $HEROKU_EMAIL
      password $HEROKU_AUTH_TOKEN
    EOF
  - chmod 600 ~/.netrc
  - git config --global user.email "ci@example.com"
  - git config --global user.name "CI/CD"

variables:
  APPNAME_PRODUCTION: toptal-pipeline

deploy_to_production:
  stage: deploy
  environment:
    name: production
    url: https://$APPNAME_PRODUCTION.herokuapp.com/
  script:
    - git remote add heroku https://git.heroku.com/$APPNAME_PRODUCTION.git
    - git push heroku master
    - heroku pg:backups:capture --app $APPNAME_PRODUCTION
    - heroku run rails db:migrate --app $APPNAME_PRODUCTION
  only:
    - master
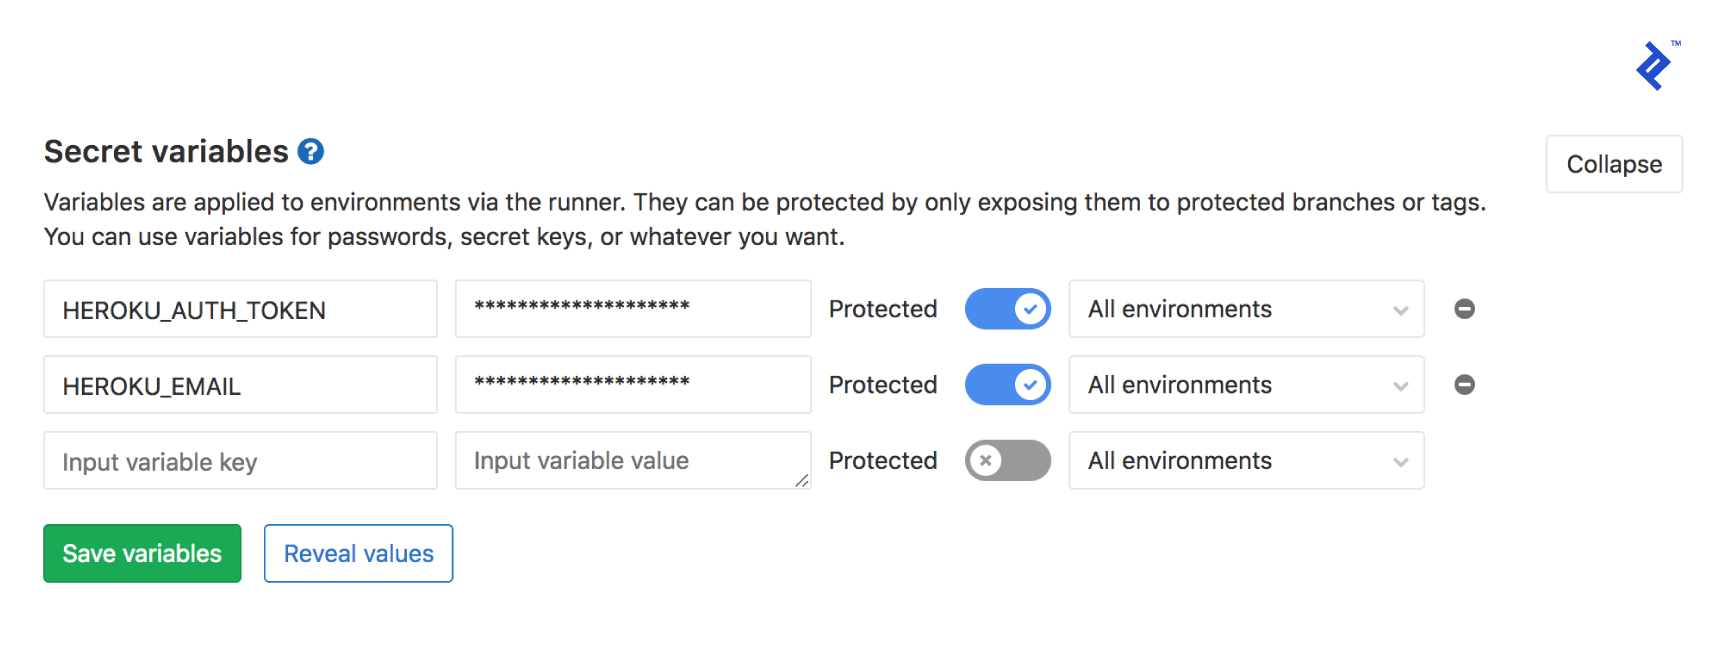
Push this up, and watch it fail in your project’s Pipelines page. That’s because it’s missing the authentication keys for your Heroku account. Fixing that is fairly straightforward, though. First you’ll need your Heroku API key. Get it from the Manage Account page, and then add the following secret variables in your GitLab repo’s CI/CD settings:
-
HEROKU_EMAIL: The email address you use to sign into Heroku -
HEROKU_AUTH_KEY: The key you got from Heroku
This should result in a working GitLab to Heroku deploying on every push. As to what’s happening:
- Upon pushing to master
- The Heroku CLI is installed and authenticated in a container.
- Your code is pushed to Heroku.
- A backup of your database is captured in Heroku.
- Migrations are run.
Already, you can see that not only are you saving time by automating everything to a git push, you’re also creating a backup of your database on every deploy! If anything ever goes wrong, you’ll have a copy of your database to revert back to.
Creating a Staging Environment
But wait, quick question, what happens to your production-specific problems? What if you run into a weird bug because your development environment is too different from production? I once ran into some odd SQLite 3 and PostgreSQL issues when I ran a migration. The specifics elude me, but it’s quite possible.
I strictly use PostgreSQL in development, I never mismatch database engines like that, and I diligently monitor my stack for potential incompatibilities.
Well, that’s tedious work and I applaud your discipline. Personally, I’m much too lazy to do that. However, can you guarantee that level of diligence for all potential future developers, collaborators, or contributors?
Errrr— Yeah, no. You got me there. Other people will mess it up. What’s your point, though?
My point is, you need a staging environment. It’s like production but isn’t. A staging environment is where you rehearse deploying to production and catch all your errors early. My staging environments usually mirror production, and I dump a copy of the production database on staging deploy to ensure no pesky corner cases mess up my migrations. With a staging environment, you can stop treating your users like guinea pigs.
This makes sense! So how do I do this?
Here’s where it gets interesting. I like to deploy master directly to staging.
Wait, isn’t that where we’re deploying production right now?
Yes it is, but now we’ll be deploying to staging instead.
But if master deploys to staging, how do we deploy to production?
By using something you should’ve been doing years ago: Versioning our code and pushing Git tags.
Git tags? Who uses Git tags?! This is beginning to sound like a lot of work.
It sure was, but thankfully, I’ve done all that work already and you can just just dump my code and it’ll work.
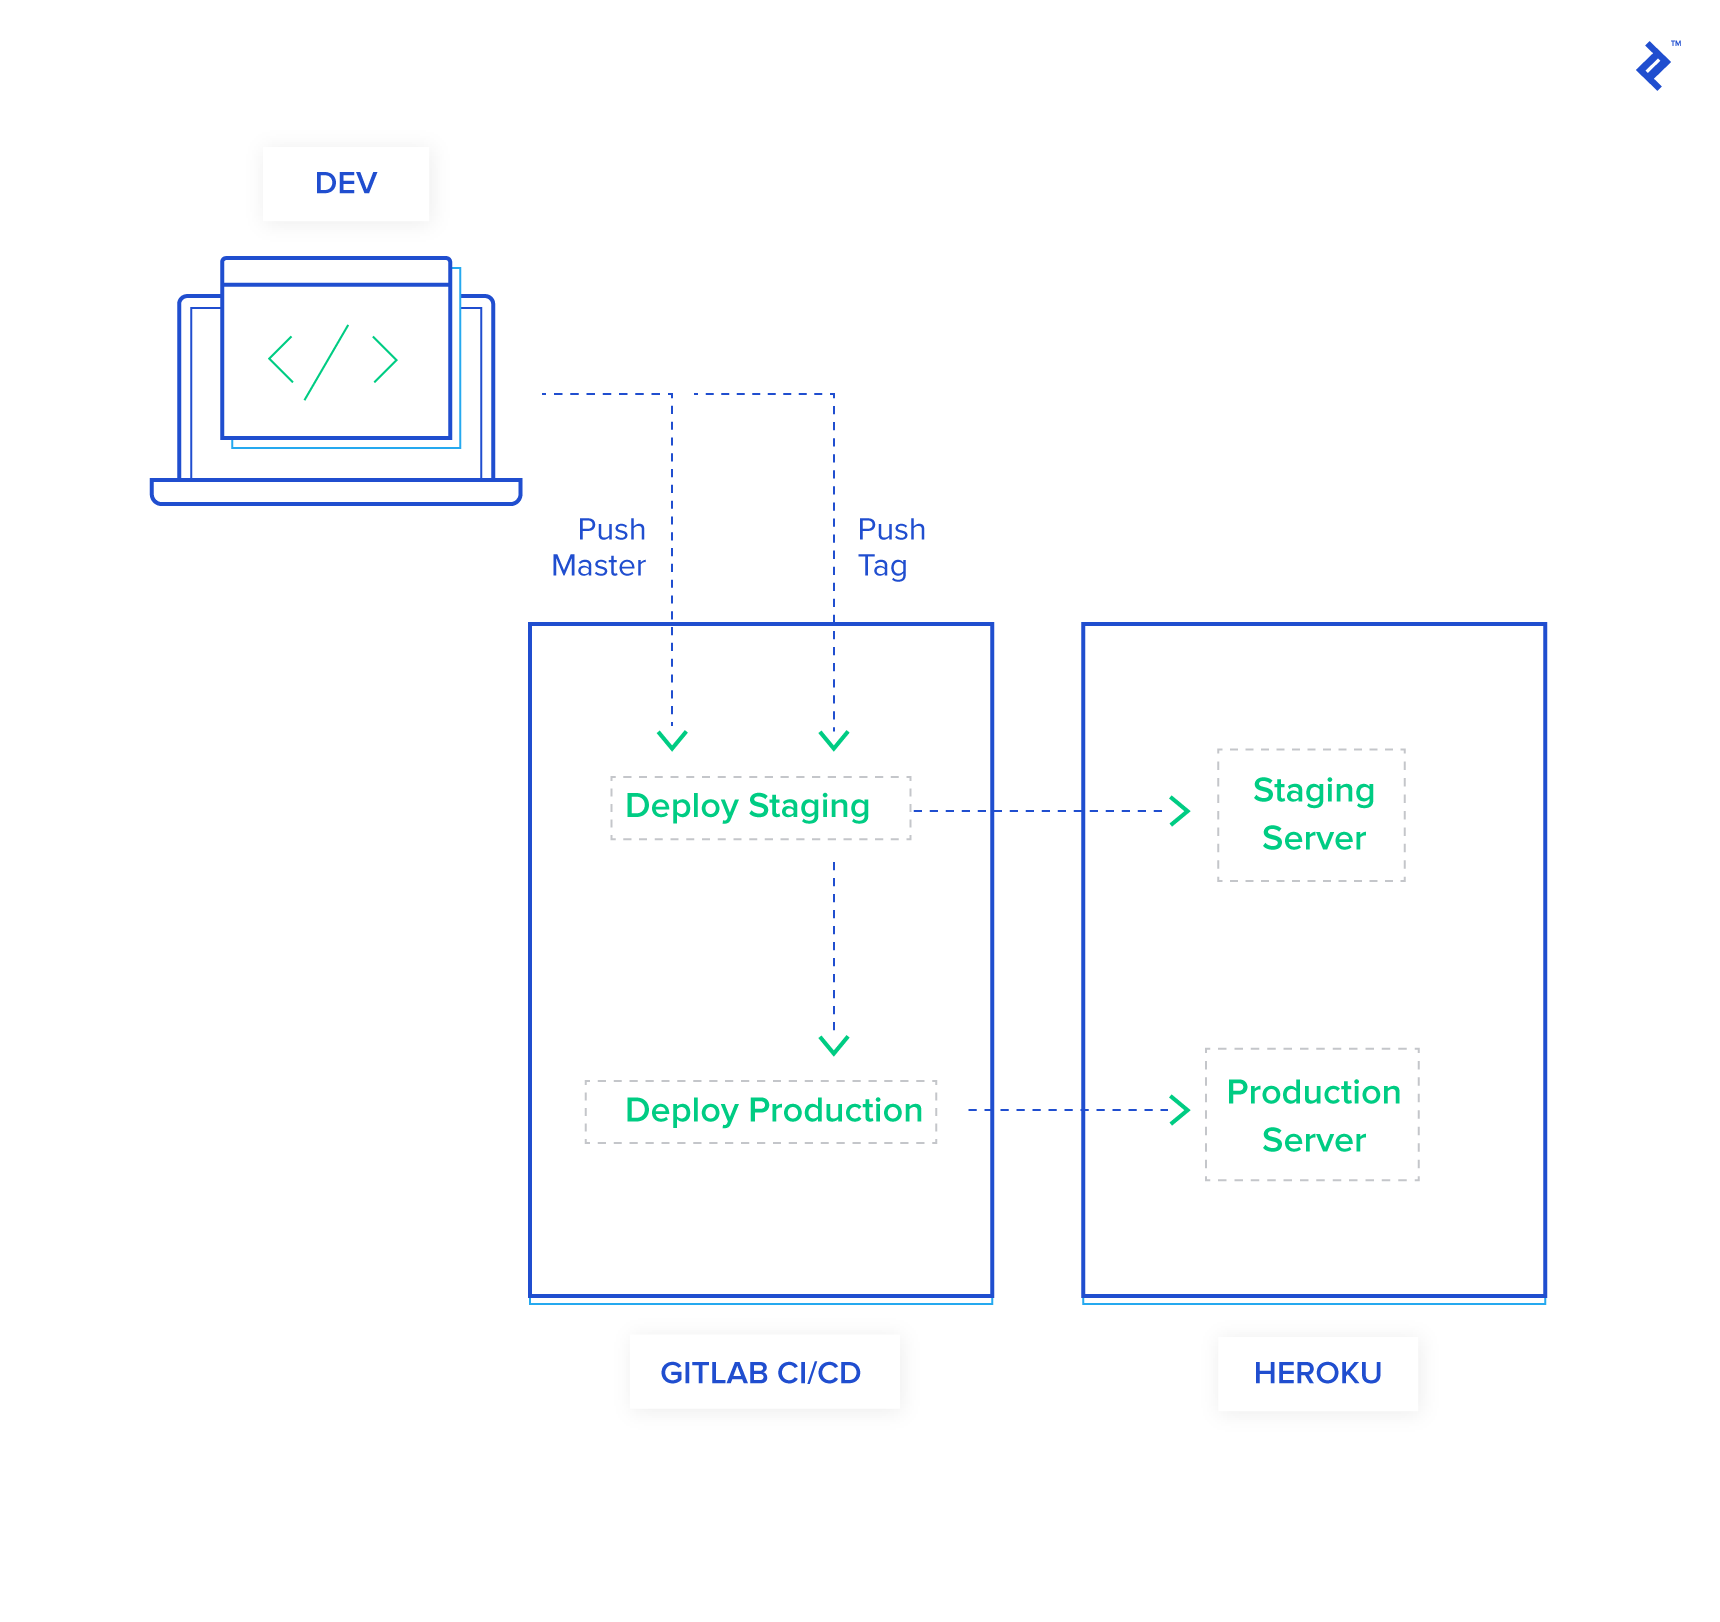
First, add a block about the staging deploy to your .gitlab-ci.yml file, I’ve created a new Heroku app called toptal-pipeline-staging:
…

variables:
  APPNAME_PRODUCTION: toptal-pipeline
  APPNAME_STAGING: toptal-pipeline-staging


deploy_to_staging:
  stage: deploy
  environment:
    name: staging
    url: https://$APPNAME_STAGING.herokuapp.com/
  script:
    - git remote add heroku https://git.heroku.com/$APPNAME_STAGING.git
    - git push heroku master
    - heroku pg:backups:capture --app $APPNAME_PRODUCTION
    - heroku pg:backups:restore `heroku pg:backups:url --app $APPNAME_PRODUCTION` --app $APPNAME_STAGING --confirm $APPNAME_STAGING
    - heroku run rails db:migrate --app $APPNAME_STAGING
  only:
    - master
    - tags

...
Then change the last line of your production block to run on semantically versioned Git tags instead of the master branch:
deploy_to_production:
...
  only:
    - /^v(?'MAJOR'(?:0|(?:[1-9]\d*)))\.(?'MINOR'(?:0|(?:[1-9]\d*)))\.(?'PATCH'(?:0|(?:[1-9]\d*)))(?:-(?'prerelease'[0-9A-Za-z-]+(\.[0-9A-Za-z-]+)*))?(?:\+(?'build'[0-9A-Za-z-]+(\.[0-9A-Za-z-]+)*))?$/
    # semver pattern above is adapted from https://github.com/semver/semver.org/issues/59#issuecomment-57884619
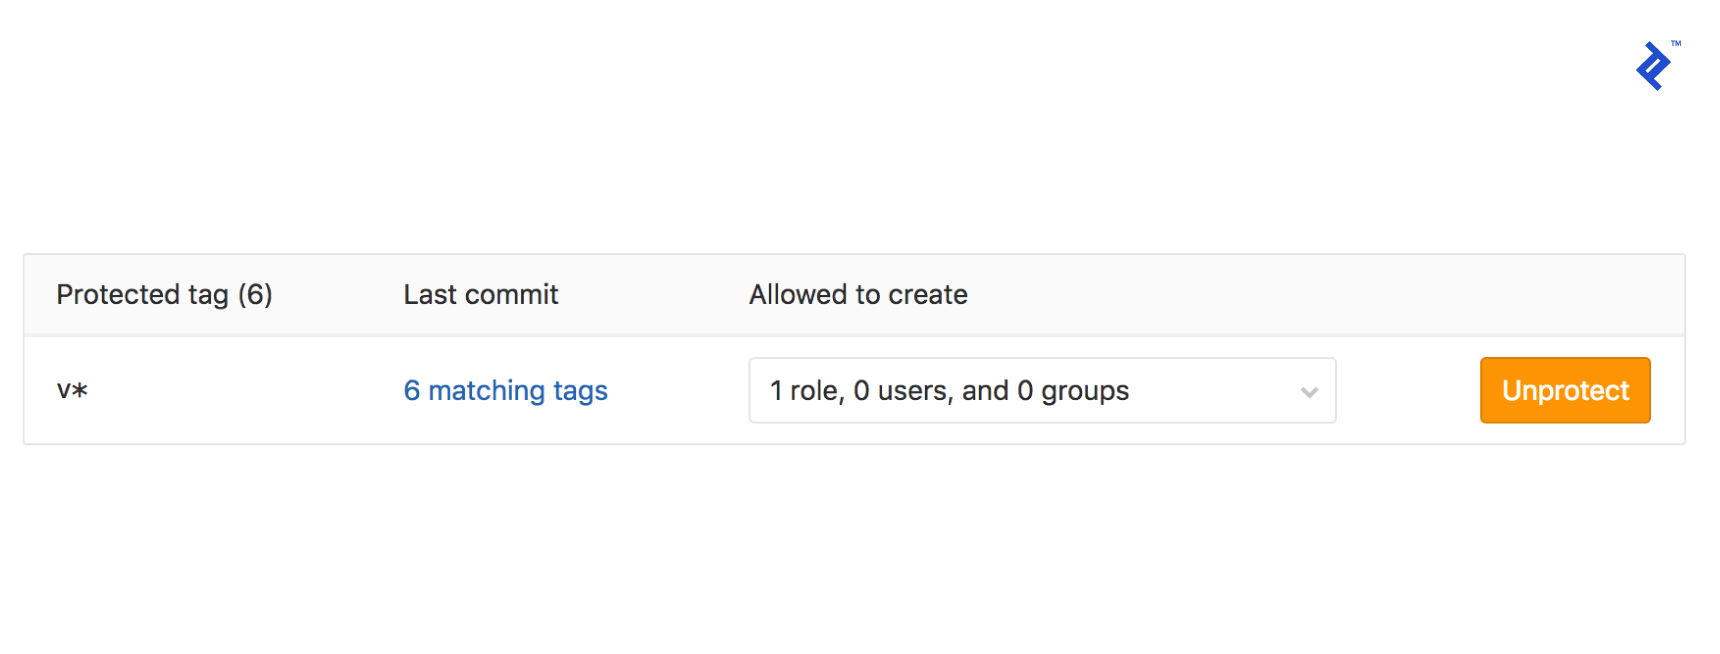
Running this right now will fail because GitLab is smart enough to only allow “protected” branches access to our secret variables. To add version tags, go to your GitLab project’s repository settings page and add v* to protected tags.
Let’s recap what’s happening now:
- Upon pushing to master, or pushing a tagged commit
- The Heroku CLI is installed and authenticated in a container.
- Your code is pushed to Heroku.
- A backup of your database production is captured in Heroku.
- The backup is dumped in your staging environment.
- Migrations are run on the staging database.
- Upon pushing a semantically version tagged commit
- The Heroku CLI is installed and authenticated in a container.
- Your code is pushed to Heroku.
- A backup of your database production is captured in Heroku.
- Migrations are run on the production database.
Do you feel powerful now? I feel powerful. I remember, the first time I came this far, I called my wife and explained this entire pipeline in excruciating detail. And she’s not even technical. I was super impressed with myself, and you should be too! Great job coming this far!
Testing Every Push
But there’s more, since a computer’s doing stuff for you anyways, it could also run all the things you’re too lazy to do: Tests, linting errors, pretty much anything you want to do, and if any of these fail, they won’t move on to deployment.
I love having this in my pipeline, it makes my code reviews fun. If a merge request gets through all my code-checks, it deserves to be reviewed.
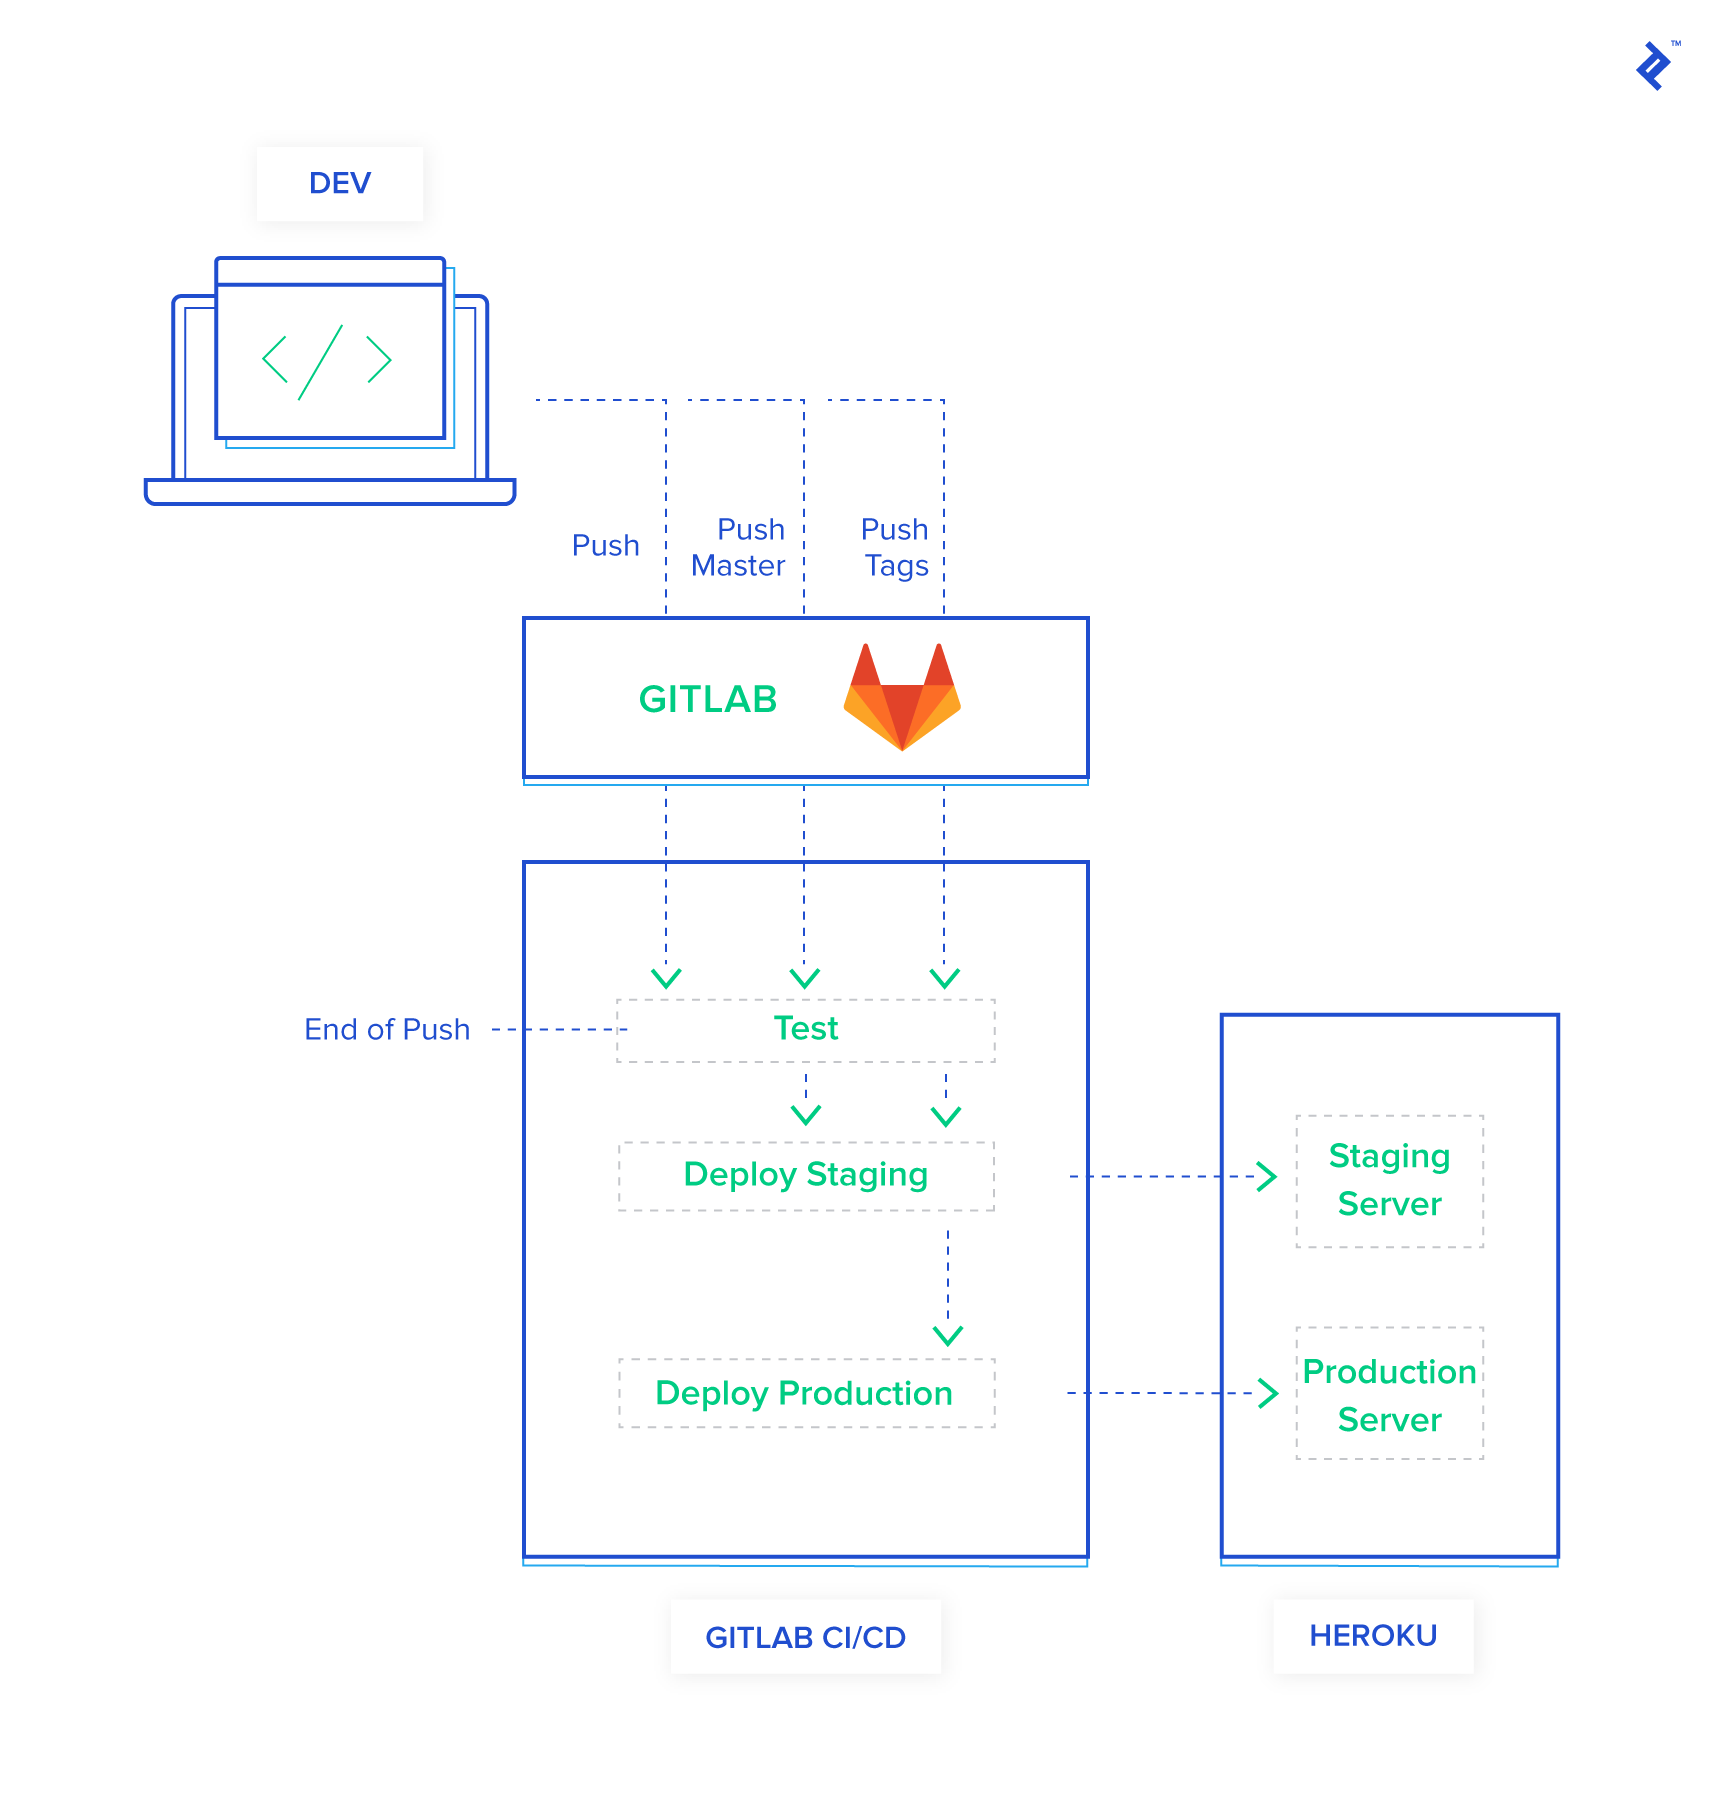
Add a test block:
test:
  stage: test
  variables:
    POSTGRES_USER: test
    POSTGRES_PASSSWORD: test-password
    POSTGRES_DB: test
    DATABASE_URL: postgres://${POSTGRES_USER}:${POSTGRES_PASSSWORD}@postgres/${POSTGRES_DB}
    RAILS_ENV: test
  services:
    - postgres:alpine
  before_script:
    - curl -sL https://deb.nodesource.com/setup_8.x | bash
    - apt-get update -qq && apt-get install -yqq nodejs libpq-dev
    - curl -o- -L https://yarnpkg.com/install.sh | bash
    - source ~/.bashrc
    - yarn
    - gem install bundler  --no-ri --no-rdoc
    - bundle install -j $(nproc) --path vendor
    - bundle exec rake db:setup RAILS_ENV=test
  script:
    - bundle exec rake spec
    - bundle exec rubocop
Let’s recap what’s happening now:
- Upon every push, or merge request
- Ruby and Node are set up in a container.
- Dependencies are installed.
- The app is tested.
- Upon pushing to master, or pushing a tagged commit, and only if all tests pass
- The Heroku CLI is installed and authenticated in a container.
- Your code is pushed to Heroku.
- A backup of your database production is captured in Heroku.
- The backup is dumped in your staging environment.
- Migrations are run on the staging database.
- Upon pushing a semantically version tagged commit, and only if all tests pass
- The Heroku CLI is installed and authenticated in a container.
- Your code is pushed to Heroku.
- A backup of your database production is captured in Heroku.
- Migrations are run on the production database.
Take a step back and marvel at the level of automation you’ve accomplished. From now on, all you have to do is write code and push. Test out your app manually in staging if you feel like it, and when you feel confident enough to push it out to the world, tag it with semantic versioning!
Automatic Semantic Versioning
Yeah, it’s perfect, but there’s something missing. I don’t like looking up the last version of the app and explicitly tagging it. That takes multiple commands and distracts me for a few seconds.
Okay, dude, stop! That’s enough. You’re just over-engineering it now. It works, it’s brilliant, don’t ruin a good thing by going over the top.
Okay, I have a good reason for doing what I’m about to do.
Pray, enlighten me.
I used to be like you. I was happy with this setup, but then I messed up. git tag lists tags in alphabetical order, v0.0.11 is above v0.0.2. I once accidentally tagged a release and continued doing it for about half a dozen releases until I saw my mistake. That’s when I decided to automate this too.
Here we go again
Okay, so, thankfully, we have the power of npm at our disposal, so I found a suitable package: Run yarn add --dev standard-version and add the following to your package.json file:
  "scripts": {
    "release": "standard-version",
    "major": "yarn release --release-as major",
    "minor": "yarn release --release-as minor",
    "patch": "yarn release --release-as patch"
  },
Now you need to do one last thing, configure Git to push tags by default. At the moment, you need to run git push --tags to push a tag up, but automatically doing that on regular git push is as simple as running git config --global push.followTags true.
To use your new pipeline, whenever you want to create a release run:
-
yarn patchfor patch releases -
yarn minorfor minor releases -
yarn majorfor major releases
If you’re unsure about what the words “major,” “minor,” and “patch” mean, read more about this at the semantic versioning site.
Now that you’ve finally completed your pipeline, let’s recap how to use it!
- Write code.
- Commit and push it to test and deploy it to staging.
- Use
yarn patchto tag a patch release. -
git pushto push it out to production.
Summary and Further Steps
I’ve only just scratched the surface of what’s possible with CI/CD pipelines. This is a fairly simplistic example. You can do so much more by swapping out Heroku with Kubernetes. If you decide to use GitLab CI read the yaml docs because there’s so much more you can do by caching files between deploys, or saving artifacts!
Another huge change you could make to this pipeline is introduce external triggers to run the semantic versioning and releasing. Currently, ChatOps is part of their paid plan, and I hope they release it to free plans. But imagine being able to trigger the next image through a single Slack command!
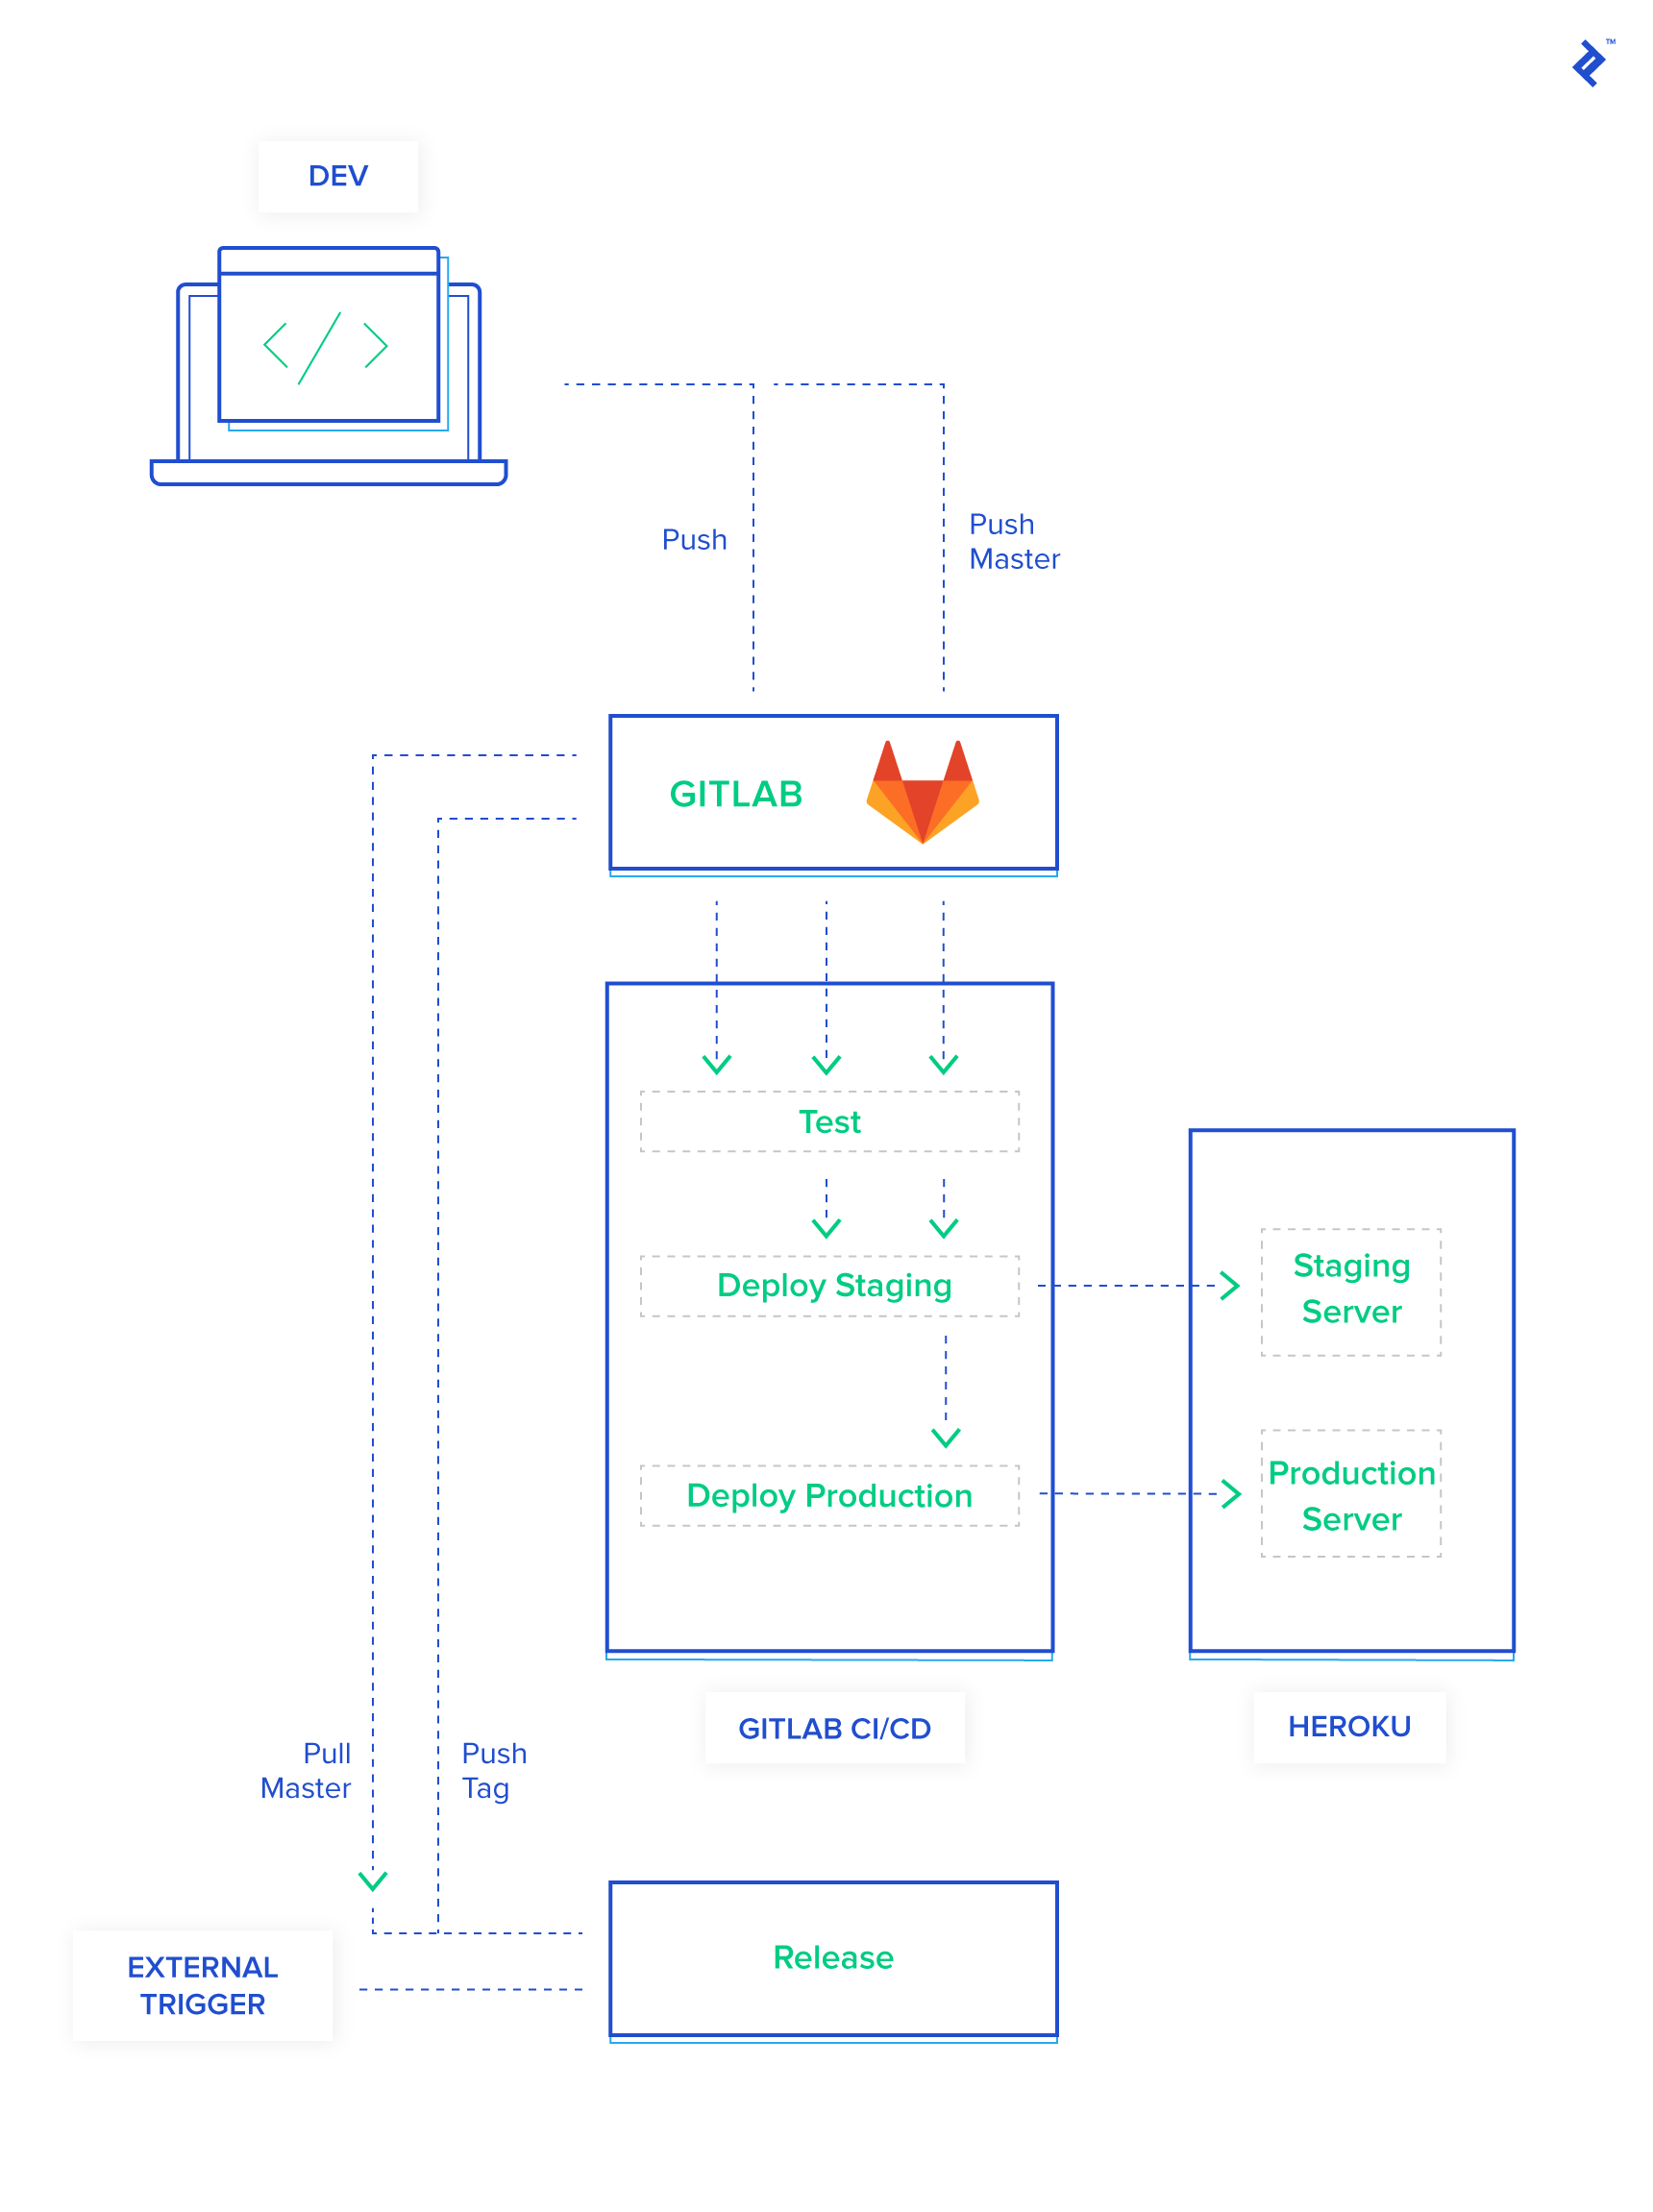
Eventually, as your application starts to grow complex and requires system level dependencies, you may need to use a container. When that happens, check out our guide: Getting Started with Docker: Simplifying Devops .
This example app really is live, and you can find the source code for it here.
Further Reading on the Toptal Blog:
Understanding the basics
What is a development pipeline?
A development pipeline is the chain of tasks and processes you go through in your development process.
What is a deployment pipeline?
A deployment pipeline is the chain of tasks and processes you go through in your deployment process.
What does CI/CD mean?
CI/CD is short for continuous integration (integrating your code into one place continuously), continuous delivery (building your product ready to ship continuously), and continuous deployment (deploying your product to production continuously).
What is GitOps?
GitOps is DevOps managed entirely through Git.
Lahore, Punjab, Pakistan
Member since January 27, 2017
About the author
Amin is a developer and entrepreneur who loves writing clean, test-driven Ruby and ES6 code—crafted for CI/CD.
