Simplified NGINX Load Balancing with Loadcat
NGINX, a sophisticated web server, offers high performance load balancing features, among many other capabilities. Like most other web server software for Unix-based systems, NGINX can be configured easily by writing simple text files. However, there is something interesting about tools that configure other tools, and it may be even easier to configure an NGINX load balancer if there was a tool for it.
In this article, Toptal engineer Mahmud Ridwan demonstrates how easy it is to build a simple tool with a web-based GUI capable of configuring NGINX as a load balancer.
Mahmud is a software developer with many years of experience and a knack for efficiency, scalability, and stable solutions.
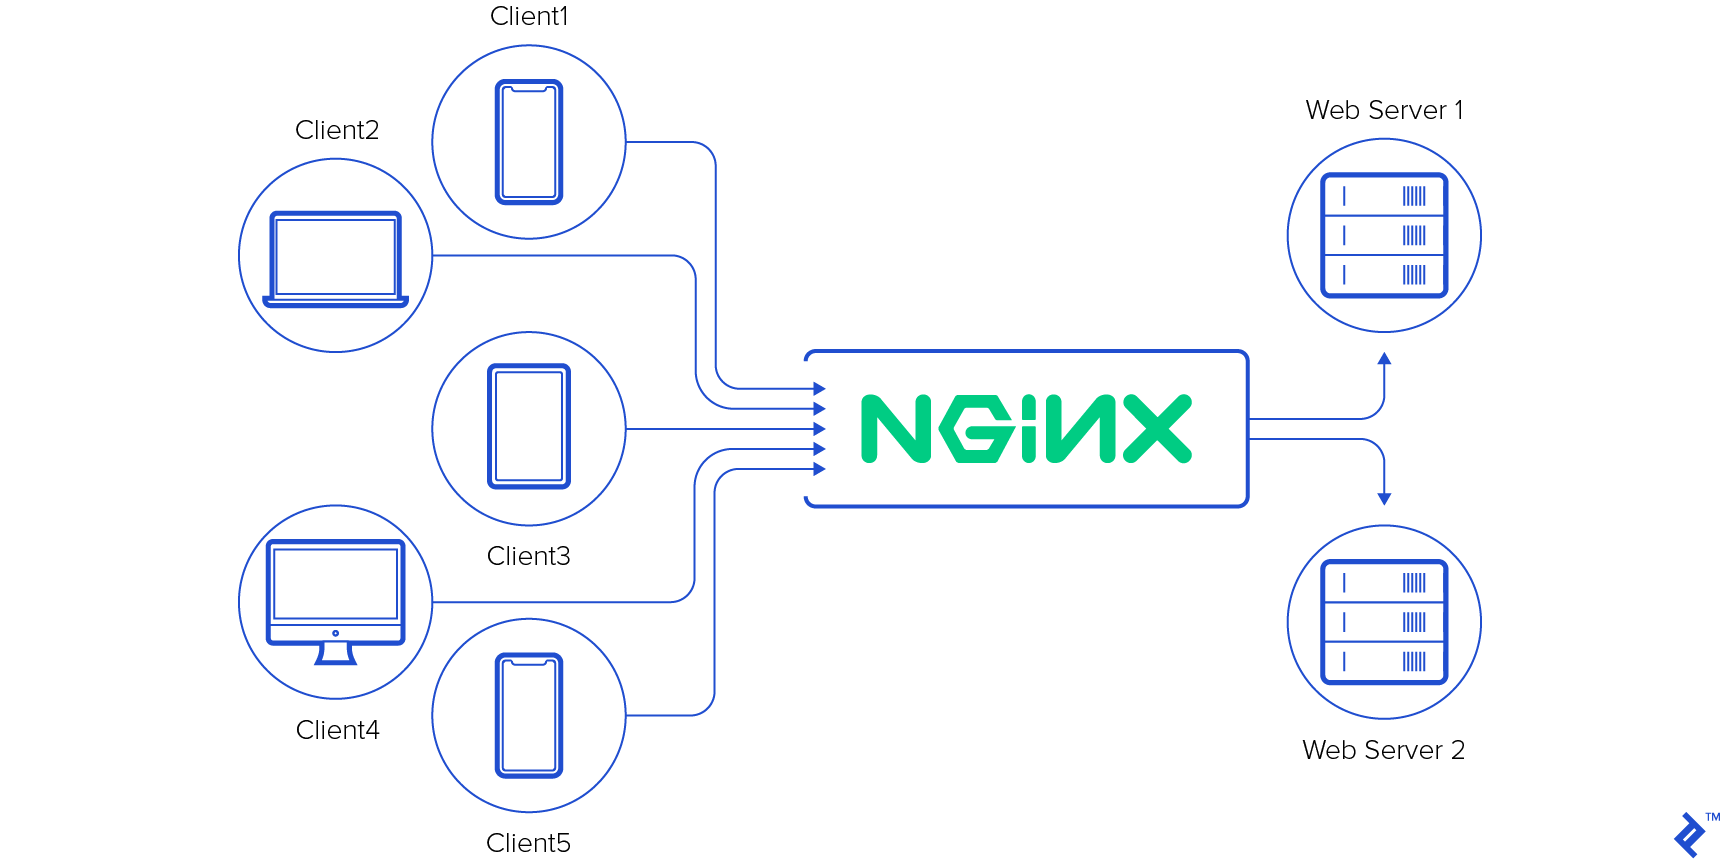
Web applications that are designed to be horizontally scalable often require one or more load balancing nodes. Their primary purpose is to distribute the incoming traffic across available web servers in a fair manner. The ability to increase the overall capacity of a web application simply by increasing the number of nodes and having the load balancers adapt to this change can prove to be tremendously useful in production.
NGINX is a web server that offers high performance load balancing features, among many of its other capabilities. Some of those features are only available as a part of their subscription model, but the free and open source version is still very feature rich and comes with the most essential load balancing features out of the box.

In this tutorial, we will explore the inner mechanics of an experimental tool that allows you to configure your NGINX instance on the fly to act as a load balancer, abstracting away all the nitty-gritty details of NGINX configuration files by providing a neat web-based user interface. The purpose of this article is to show how easy it is to start building such a tool. It is worth mentioning that project Loadcat is inspired heavily by Linode’s NodeBalancers.
NGINX, Servers and Upstreams
One of the most popular uses of NGINX is reverse-proxying requests from clients to web server applications. Although web applications developed in programming languages like Node.js and Go can be self-sufficient web servers, having a reverse-proxy in front of the actual server application provides numerous benefits. A “server” block for a simple use case like this in an NGINX configuration file can look something like this:
server {
    listen  80;
    server_name  example.com;

    location / {
        proxy_pass  http://192.168.0.51:5000;
    }
}
This would make NGINX listen on port 80 for all requests that are pointed to example.com and pass each of them to some web server application running at 192.168.0.51:5000. We could also use the loopback IP address 127.0.0.1 here if the web application server was running locally. Please note that the snippet above lacks some obvious tweaks that are often used in reverse-proxy configuration, but is being kept this way for brevity.

But what if we wanted to balance all incoming requests between two instances of the same web application server? This is where the “upstream” directive becomes useful. In NGINX, with the “upstream” directive, it is possible to define multiple back-end nodes among which NGINX will balance all incoming requests. For example:
upstream nodes {
    server  192.168.0.51:5000;
    server  192.168.0.52:5000;
}
server {
    listen  80;
    server_name  example.com;

    location / {
        proxy_pass  http://nodes;
    }
}
Notice how we defined an “upstream” block, named “nodes”, consisting of two servers. Each server is identified by an IP address and the port number they are listening on. With this, NGINX becomes a load balancer in its simplest form. By default, NGINX will distribute incoming requests in a round-robin fashion, where the first one will be proxied to the first server, the second one to the second server, the third one to the first server and so on.
However, NGINX has much more to offer when it comes to load balancing. It allows you to define weights for each server, mark them as temporarily unavailable, choose a different balancing algorithm (e.g. there is one that works based on client’s IP hash), etc. These features and configuration directives are all nicely documented at nginx.org. Furthermore, NGINX allows configuration files to be changed and reloaded on-the-fly with almost no interruption.
NGINX’s configurability and simple configuration files make it really easy to adapt it to many needs. And a plethora of tutorials already exist on the Internet that teach you exactly how to configure NGINX as a load balancer.
Loadcat: NGINX Configuration Tool
There is something fascinating about programs that instead of doing something on their own, configure other tools to do it for them. They do not really do much other than maybe take user inputs and generate a few files. Most of the benefits that you reap from those tools are in fact features of other tools. But, they certainly make life easy. While trying to setup a load balancer for one of my own projects, I wondered: why not do something similar for NGINX and its load balancing capabilities?
Loadcat was born!
Loadcat, built with Go, is still in its infancy. At this moment, the tool allows you to configure NGINX for load balancing and SSL termination only. It provides a simple web-based GUI for the user. Instead of walking through individual features of the tool, let us take a peek at what is underneath. Be aware though, if someone enjoys working with NGINX configuration files by hand, they may find little value in such a tool.
There are a few reasons behind choosing Go as the programming language for this. One of them is that Go produces compiled binaries. This allows us to build and distribute or deploy Loadcat as a compiled binary to remote servers without worrying about resolving dependencies. Something that greatly simplifies the setup process. Of course, the binary assumes that NGINX is already installed and a systemd unit file exists for it.
In case you are not a Go engineer, do not worry at all. Go is quite easy and fun to get started with. Moreover, the implementation itself is very straightforward and you should be able to follow along easily.
Structure
Go build tools impose a few restrictions on how you can structure your application and leave the rest to the developer. In our case, we have broken things into a few Go packages based on their purposes:
- cfg: loads, parses, and provides configuration values
- cmd/loadcat: main package, contains the entry point, compiles into binary
- data: contains “models”, uses an embedded key/value store for persistence
- feline: contains core functionality, e.g. generation of configuration files, reload mechanism, etc.
- ui: contains templates, URL handlers, etc.
If we take a closer look at the package structure, especially within the feline package, we will notice that all NGINX specific code has been kept within a subpackage feline/nginx. This is done so that we can keep the rest of the application logic generic and extend support for other load balancers (e.g. HAProxy) in the future.
Entry Point
Let us start from the main package for Loadcat, found within “cmd/loadcatd”. The main function, entry point of the application, does three things.
func main() {
	fconfig := flag.String("config", "loadcat.conf", "")
	flag.Parse()
	cfg.LoadFile(*fconfig)

	feline.SetBase(filepath.Join(cfg.Current.Core.Dir, "out"))

	data.OpenDB(filepath.Join(cfg.Current.Core.Dir, "loadcat.db"))
	defer data.DB.Close()
	data.InitDB()

	http.Handle("/api", api.Router)
	http.Handle("/", ui.Router)

	go http.ListenAndServe(cfg.Current.Core.Address, nil)

	// Wait for an “interrupt“ signal (Ctrl+C in most terminals)
}
To keep things simple and make the code easier to read, all error handling code has been removed from the snippet above (and also from the snippets later in this article).
As you can tell from the code, we are loading the configuration file based on the “-config” command line flag (which defaults to “loadcat.conf” in the current directory). Next, we are initializing a couple of components, namely the core feline package and the database. Finally, we are starting a web server for the web-based GUI.
Configuration
Loading and parsing the configuration file is probably the easiest part here. We are using TOML to encode configuration information. There is a neat TOML parsing package available for Go. We need very little configuration information from the user, and in most cases we can determine sane defaults for these values. The following struct represents the structure of the configuration file:
struct {
	Core struct {
		Address string
		Dir     string
		Driver  string
	}
	Nginx struct {
		Mode    string
		Systemd struct {
			Service string
		}
	}
}
And, here is what a typical “loadcat.conf” file may look like:
[core]
address=":26590"
dir="/var/lib/loadcat"
driver="nginx"

[nginx]
mode="systemd"

[nginx.systemd]
service="nginx.service"
As we can see, there is a similarity between the structure of the TOML-encoded configuration file and the struct shown above it. The configuration package begins by setting some sane defaults for certain fields of the struct and then parses the configuration file over it. In case it fails to find a configuration file at the specified path, it creates one, and dumps the default values in it first.
func LoadFile(name string) error {
	f, _ := os.Open(name)
	if os.IsNotExist(err) {
		f, _ = os.Create(name)
		toml.NewEncoder(f).Encode(Current)
		f.Close()
		return nil
	}
	toml.NewDecoder(f).Decode(&Current)
	return nil
}
Data and Persistence
Meet Bolt. An embedded key/value store written in pure Go. It comes as a package with a very simple API, supports transactions out of the box, and is disturbingly fast.
Within package data, we have structs representing each type of entity. For example, we have:
type Balancer struct {
	Id       bson.ObjectId
	Label    string
	Settings BalancerSettings
}

type Server struct {
	Id         bson.ObjectId
	BalancerId bson.ObjectId
	Label      string
	Settings   ServerSettings
}
… where an instance of Balancer represents a single load balancer. Loadcat effectively allows you to balance requests for multiple web applications through a single instance of NGINX. Every balancer can then have one or more servers behind it, where each server can be a separate back-end node.
Since Bolt is a key-value store, and doesn’t support advanced database queries, we have application-side logic that does this for us. Loadcat is not meant for configuring thousands of balancers with thousands of servers in each of them, so naturally this naive approach works just fine. Also, Bolt works with keys and values that are byte slices, and that is why we BSON-encode the structs before storing them in Bolt. The implementation of a function that retrieves a list of Balancer structs from the database is shown below:
func ListBalancers() ([]Balancer, error) {
	bals := []Balancer{}
	DB.View(func(tx *bolt.Tx) error {
		b := tx.Bucket([]byte("balancers"))
		c := b.Cursor()
		for k, v := c.First(); k != nil; k, v = c.Next() {
			bal := Balancer{}
			bson.Unmarshal(v, &bal)
			bals = append(bals, bal)
		}
		return nil
	})
	return bals, nil
}
ListBalancers function starts a read-only transaction, iterates over all the keys and values within the “balancers” bucket, decodes each value to an instance of Balancer struct and returns them in an array.
Storing a balancer in the bucket is almost equally simple:
func (l *Balancer) Put() error {
	if !l.Id.Valid() {
		l.Id = bson.NewObjectId()
	}
	if l.Label == "" {
		l.Label = "Unlabelled"
	}
	if l.Settings.Protocol == "https" {
		// Parse certificate details
	} else {
		// Clear fields relevant to HTTPS only, such as SSL options and certificate details
	}
	return DB.Update(func(tx *bolt.Tx) error {
		b := tx.Bucket([]byte("balancers"))
		p, err := bson.Marshal(l)
		if err != nil {
			return err
		}
		return b.Put([]byte(l.Id.Hex()), p)
	})
}
The Put function assigns some default values to certain fields, parses the attached SSL certificate in HTTPS setup, begins a transaction, encodes the struct instance and stores it in the bucket against the balancer’s ID.
While parsing the SSL certificate, two pieces of information are extracted using standard package encoding/pem and stored in SSLOptions under the Settings field: the DNS names and the fingerprint.
We also have a function that looks up servers by balancer:
func ListServersByBalancer(bal *Balancer) ([]Server, error) {
	srvs := []Server{}
	DB.View(func(tx *bolt.Tx) error {
		b := tx.Bucket([]byte("servers"))
		c := b.Cursor()
		for k, v := c.First(); k != nil; k, v = c.Next() {
			srv := Server{}
			bson.Unmarshal(v, &srv)
			if srv.BalancerId.Hex() != bal.Id.Hex() {
				continue
			}
			srvs = append(srvs, srv)
		}
		return nil
	})
	return srvs, nil
}
This function shows how naive our approach really is. Here, we are effectively reading the entire “servers” bucket and filtering out the irrelevant entities before returning the array. But then again, this works just fine, and there is no real reason to change it.
The Put function for servers is much simpler than that of Balancer struct as it doesn’t require as many lines of code setting defaults and computed fields.
Controlling NGINX
Before using Loadcat, we must configure NGINX to load the generated configuration files. Loadcat generates “nginx.conf” file for each balancer under a directory by the balancer’s ID (a short hex string). These directories are created under an “out” directory at cwd. Therefore, it is important that you configure NGINX to load these generated configuration files. This can be done using an “include” directive inside the “http” block:
Edit /etc/nginx/nginx.conf and add the following line at the end of the “http” block:
http {
    include  /path/to/out/*/nginx.conf;
}
This will cause NGINX to scan all the directories found under “/path/to/out/”, look for files named “nginx.conf” within each directory, and load each one that it finds.
In our core package, feline, we define an interface Driver. Any struct that provides two functions, Generate and Reload, with the correct signature qualifies as a driver.
type Driver interface {
	Generate(string, *data.Balancer) error
	Reload() error
}
For example, the struct Nginx under the feline/nginx packages:
type Nginx struct {
	sync.Mutex

	Systemd *dbus.Conn
}

func (n Nginx) Generate(dir string, bal *data.Balancer) error {
	// Acquire a lock on n.Mutex, and release before return

	f, _ := os.Create(filepath.Join(dir, "nginx.conf"))
	TplNginxConf.Execute(f, /* template parameters */)
	f.Close()

	if bal.Settings.Protocol == "https" {
		// Dump private key and certificate to the output directory (so that Nginx can find them)
	}

	return nil
}

func (n Nginx) Reload() error {
	// Acquire a lock on n.Mutex, and release before return

	switch cfg.Current.Nginx.Mode {
	case "systemd":
		if n.Systemd == nil {
			c, err := dbus.NewSystemdConnection()
			n.Systemd = c
		}

		ch := make(chan string)
		n.Systemd.ReloadUnit(cfg.Current.Nginx.Systemd.Service, "replace", ch)
		<-ch

		return nil

	default:
		return errors.New("unknown Nginx mode")
	}
}
Generate can be invoked with a string containing the path to the output directory and a pointer to a Balancer struct instance. Go provides a standard package for text templating, which the NGINX driver uses to generate the final NGINX configuration file. The template consists of an “upstream” block followed by a “server” block, generated based on how the balancer is configured:
var TplNginxConf = template.Must(template.New("").Parse(`
upstream {{.Balancer.Id.Hex}} {
	{{if eq .Balancer.Settings.Algorithm "least-connections"}}
		least_conn;
	{{else if eq .Balancer.Settings.Algorithm "source-ip"}}
		ip_hash;
	{{end}}
	{{range $srv := .Balancer.Servers}}
		server  {{$srv.Settings.Address}} weight={{$srv.Settings.Weight}} {{if eq $srv.Settings.Availability "available"}}{{else if eq $srv.Settings.Availability "backup"}}backup{{else if eq $srv.Settings.Availability "unavailable"}}down{{end}};
	{{end}}
}
server {
	{{if eq .Balancer.Settings.Protocol "http"}}
		listen  {{.Balancer.Settings.Port}};
	{{else if eq .Balancer.Settings.Protocol "https"}}
		listen  {{.Balancer.Settings.Port}} ssl;
	{{end}}
	server_name  {{.Balancer.Settings.Hostname}};
	{{if eq .Balancer.Settings.Protocol "https"}}
		ssl                  on;
		ssl_certificate      {{.Dir}}/server.crt;
		ssl_certificate_key  {{.Dir}}/server.key;
	{{end}}
	location / {
		proxy_set_header  Host $host;
		proxy_set_header  X-Real-IP $remote_addr;
		proxy_set_header  X-Forwarded-For $proxy_add_x_forwarded_for;
		proxy_set_header  X-Forwarded-Proto $scheme;
		proxy_pass  http://{{.Balancer.Id.Hex}};
		proxy_http_version  1.1;
		proxy_set_header  Upgrade $http_upgrade;
		proxy_set_header  Connection 'upgrade';
	}
}
`))
Reload is the other function on Nginx struct that makes NGINX reload the configuration files. The mechanism used is based on how Loadcat is configured. By default it assumes NGINX is a systemd service running as nginx.service, such that [sudo] systemd reload nginx.service would work. However instead of executing a shell command, it establishes a connection to systemd through D-Bus using the package github.com/coreos/go-systemd/dbus.
Web-based GUI
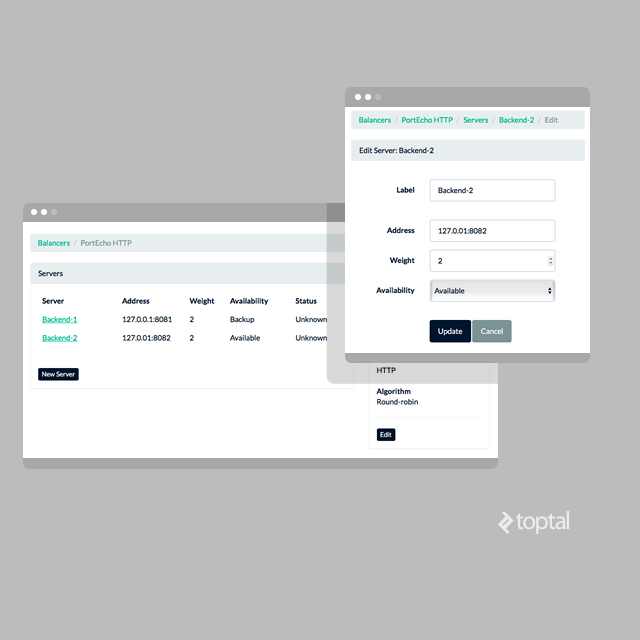
With all these components in place, we’ll wrap it all up with a plain Bootstrap user interface.

For these basic functionalities, a few simple GET and POST route handlers are sufficient:
GET /balancers
GET /balancers/new
POST /balancers/new
GET /balancers/{id}
GET /balancers/{id}/edit
POST /balancers/{id}/edit
GET /balancers/{id}/servers/new
POST /balancers/{id}/servers/new
GET /servers/{id}
GET /servers/{id}/edit
POST /servers/{id}/edit
Going over each individual route may not be the most interesting thing to do here, since these are pretty much the CRUD pages. Feel absolutely free to take a peek at the package ui code to see how handlers for each of these routes have been implemented.
Each handler function is a routine that either:
- Fetches data from the datastore and responds with rendered templates (using the fetched data)
- Parses incoming form data, makes necessary changes in the datastore and uses package feline to regenerate the NGINX configuration files
For example:
func ServeServerNewForm(w http.ResponseWriter, r *http.Request) {
	vars := mux.Vars(r)
	bal, _ := data.GetBalancer(bson.ObjectIdHex(vars["id"]))

	TplServerNewForm.Execute(w, struct {
		Balancer *data.Balancer
	}{
		Balancer: bal,
	})
}

func HandleServerCreate(w http.ResponseWriter, r *http.Request) {
	vars := mux.Vars(r)
	bal, _ := data.GetBalancer(bson.ObjectIdHex(vars["id"]))

	r.ParseForm()
	body := struct {
		Label    string `schema:"label"`
		Settings struct {
			Address string `schema:"address"`
		} `schema:"settings"`
	}{}
	schema.NewDecoder().Decode(&body, r.PostForm)

	srv := data.Server{}
	srv.BalancerId = bal.Id
	srv.Label = body.Label
	srv.Settings.Address = body.Settings.Address
	srv.Put()

	feline.Commit(bal)

	http.Redirect(w, r, "/servers/"+srv.Id.Hex()+"/edit", http.StatusSeeOther)
}
All ServeServerNewForm function does is it fetches a balancer from the datastore and renders a template, TplServerList in this case, which retrieves the list of relevant servers using the Servers function on the balancer.
HandleServerCreate function, on the other than, parses the incoming POST payload from the body into a struct and uses those data to instantiate and persist a new Server struct in the datastore before using package feline to regenerate NGINX configuration file for the balancer.
All page templates are stored in “ui/templates.go” file and corresponding template HTML files can be found under the “ui/templates” directory.
Trying It Out
Deploying Loadcat to a remote server or even in your local environment is super easy. If you are running Linux (64bit), you can grab an archive with a pre-built Loadcat binary from the repository’s Releases section. If you are feeling a bit adventurous, you can clone the repository and compile the code yourself. Although, the experience in that case may be a bit disappointing as compiling Go programs is not really a challenge. And in case you are running Arch Linux, then you are in luck! A package has been built for the distribution for convenience. Simply download it and install it using your package manager. The steps involved are outlined in more details in the project’s README.md file.
Once you have Loadcat configured and running, point your web browser to “http://localhost:26590” (assuming it is running locally and listening on port 26590). Next, create a balancer, create a couple of servers, make sure something is listening on those defined ports, and voila you should have NGINX load balance incoming requests between those running servers.
What’s Next?
This tool is far from perfect, and in fact it is quite an experimental project. The tool doesn’t even cover all basic functionalities of NGINX. For example, if you want to cache assets served by the back-end nodes at NGINX layer, you will still have to modify NGINX configuration files by hand. And that is what makes things exciting. There is a lot that can be done here and that is exactly what’s next: covering even more of NGINX’s load balancing features - the basic ones and probably even ones that NGINX Plus has to offer.
Give Loadcat a try. Check out the code, fork it, change it, play with it. Also, let us know if you have built a tool that configures other software or have used one that you really like in the comments section below.
Dhaka, Dhaka Division, Bangladesh
Member since January 16, 2014
About the author
Mahmud is a software developer with many years of experience and a knack for efficiency, scalability, and stable solutions.

