
Building a Node.js/TypeScript REST API, Part 3: MongoDB, Authentication, and Automated Tests
Our Express.js REST API series ends with a bang! Learn how to add a Dockerized MongoDB instance, Mongoose, JWT authentication, user permissions, and automated testing with Mocha, Chai, and SuperTest.

Our Express.js REST API series ends with a bang! Learn how to add a Dockerized MongoDB instance, Mongoose, JWT authentication, user permissions, and automated testing with Mocha, Chai, and SuperTest.

Marcos has 17+ years in IT and development. His passions include REST architecture, Agile development methodology, and JS.
Expertise
At this point in our series on how to create a Node.js REST API with Express.js and TypeScript, we’ve built a working back end and separated our code into route configuration, services, middleware, controllers, and models. If you’re ready to follow along from there, clone the example repo and run git checkout toptal-article-02.
A REST API With Mongoose, Authentication, and Automated Testing
In this third and final article, we’ll continue developing our REST API by adding:
- Mongoose to allow us to work with MongoDB and replace our in-memory DAO with a real database.
- Authentication and permissions capabilities so API consumers can use a JSON Web Token (JWT) to access our endpoints securely.
- Automated testing using Mocha (a testing framework), Chai (an assertion library), and SuperTest (an HTTP abstraction module) to help check for regressions as the code base grows and changes.
Along the way, we’ll add validation and security libraries, gain some experience with Docker, and suggest several further topics, libraries, and skills readers would do well to explore in building and extending their own REST APIs.
Installing MongoDB As a Container
Let’s start by replacing our in-memory database from the previous article with a real one.
To create a local database for development, we could install MongoDB locally. But differences between environments (OS distributions and versions, for instance) can present problems. To avoid this, we’ll use this opportunity to leverage an industry-standard tool: the Docker container.
The only thing readers need to do is install Docker and then install Docker Compose. Once installed, running docker -v in a terminal should yield a Docker version number.
Now, to run MongoDB, at the root of our project we’ll create a YAML file called docker-compose.yml containing the following:
version: '3'
services:
  mongo:
    image: mongo
    volumes:
      - ./data:/data/db
    ports:
      - "27017:27017"
Docker Compose allows us to run several containers at once with one configuration file. At the end of this article, we’ll look at running our REST API back end in Docker too, but for now, we’ll just use it to run MongoDB without having to install it locally:
sudo docker-compose up -d
The up command will start the defined container, listening on the standard MongoDB port of 27017. The -d switch will detach the command from the terminal. If everything runs without issue we should see a message like this:
Creating network "toptal-rest-series_default" with the default driver
Creating toptal-rest-series_mongo_1 ... done
It will also create a new data directory in the project root, so we should add a data line in .gitignore.
Now, if we need to shut down our MongoDB Docker container, we just need to run sudo docker-compose down and we should see the following output:
Stopping toptal-rest-series_mongo_1 ... done
Removing toptal-rest-series_mongo_1 ... done
Removing network toptal-rest-series_default
That’s all we need to know to start up our Node.js/MongoDB REST API back end. Let’s make sure that we’ve used sudo docker-compose up -d so MongoDB is ready for our app to use.
Using Mongoose to Access MongoDB
To communicate with MongoDB, our back end will leverage an object data modeling (ODM) library called Mongoose. While Mongoose is quite easy to use, it’s worth checking out the documentation to learn all of the advanced possibilities it offers for real-world projects.
To install Mongoose, we use the following:
npm i mongoose
Let’s configure a Mongoose service to manage the connection to our MongoDB instance. Since this service can be shared between multiple resources, we’ll add it to the common folder of our project.
The configuration is straightforward. While it’s not strictly required, we’ll have a mongooseOptions object to customize the following Mongoose connection options:
-
useNewUrlParser: Without this set totrue, Mongoose prints a deprecation warning. -
useUnifiedTopology: The Mongoose documentation recommends setting this totrueto use a newer connection management engine. -
serverSelectionTimeoutMS: For the purpose of the UX of this demo project, a shorter time than the default of 30 seconds means that any readers who forget to start MongoDB before Node.js will see helpful feedback about it sooner, instead of an apparently unresponsive back end. -
useFindAndModify: Setting this tofalsealso avoids a deprecation warning, but it’s mentioned in the deprecations section of the documentation, rather than among the Mongoose connection options. More specifically, this causes Mongoose to use a newer native MongoDB feature instead of an older Mongoose shim.
Combining those options with some initialization and retry logic, here’s the final common/services/mongoose.service.ts file:
import mongoose from 'mongoose';
import debug from 'debug';

const log: debug.IDebugger = debug('app:mongoose-service');

class MongooseService {
    private count = 0;
    private mongooseOptions = {
        useNewUrlParser: true,
        useUnifiedTopology: true,
        serverSelectionTimeoutMS: 5000,
        useFindAndModify: false,
    };

    constructor() {
        this.connectWithRetry();
    }

    getMongoose() {
        return mongoose;
    }

    connectWithRetry = () => {
        log('Attempting MongoDB connection (will retry if needed)');
        mongoose
            .connect('mongodb://localhost:27017/api-db', this.mongooseOptions)
            .then(() => {
                log('MongoDB is connected');
            })
            .catch((err) => {
                const retrySeconds = 5;
                log(
                    `MongoDB connection unsuccessful (will retry #${++this
                        .count} after ${retrySeconds} seconds):`,
                    err
                );
                setTimeout(this.connectWithRetry, retrySeconds * 1000);
            });
    };
}
export default new MongooseService();
Be sure to keep straight the difference between the connect() function from Mongoose and our own connectWithRetry() service function:
-
mongoose.connect()attempts to connect to our local MongoDB service (running withdocker-compose) and will time out afterserverSelectionTimeoutMSmilliseconds. -
MongooseService.connectWithRetry()retries the above in case our application starts but the MongoDB service is not yet running. Since it’s in a singleton constructor,connectWithRetry()will only be run once, but it will retry theconnect()call indefinitely, with a pause ofretrySecondsseconds whenever a timeout occurs.
Our next step is to replace our previous in-memory database with MongoDB!
Removing Our In-memory Database and Adding MongoDB
Previously, we used an in-memory database to allow us to focus on the other modules that we were building. To use Mongoose instead, we’ll have to completely refactor users.dao.ts. We’ll need one more import statement, to start:
import mongooseService from '../../common/services/mongoose.service';
Now let’s remove everything from the UsersDao class definition except the constructor. We can start to fill it back in by creating the user Schema for Mongoose before the constructor:
Schema = mongooseService.getMongoose().Schema;

userSchema = new this.Schema({
    _id: String,
    email: String,
    password: { type: String, select: false },
    firstName: String,
    lastName: String,
    permissionFlags: Number,
}, { id: false });

User = mongooseService.getMongoose().model('Users', this.userSchema);
This defines our MongoDB collection and adds a special feature our in-memory database didn’t have: The select: false in the password field will hide this field whenever we get a user or list all users.
Our user schema probably looks familiar because it’s similar to our DTO entities. The main difference is that we are defining which fields should exist in our MongoDB collection called Users, while the DTO entities defines which fields to accept in an HTTP request.
That part of our approach isn’t changing, hence still importing our three DTOs at the top of users.dao.ts. But before implementing our CRUD method operations, we will update our DTOs in two ways.
DTO Change No. 1: id vs. _id
Because Mongoose automatically makes an _id field available, we’ll remove the id field from the DTOs. It will come from the parameters from the route request anyway.
Beware that Mongoose models provide a virtual id getter by default, so we’ve disabled that option above with { id: false } to avoid confusion. But that broke our reference to user.id in our user middleware validateSameEmailBelongToSameUser()—we need user._id there instead.
Some databases use the convention id, and others use _id, so there’s no perfect interface. For our example project using Mongoose, we’ve simply paid attention to which one we’re using at which point in the code, but the mismatch will still be exposed to API consumers:
We leave it as an exercise to readers to implement one of the many real-world solutions available at the end of the project.
DTO Change No. 2: Preparing for Flags-based Permissions
We’ll also rename permissionLevel to permissionFlags in the DTOs to reflect the more sophisticated permissions system we’ll be implementing, as well as the above Mongoose userSchema definition.
DTOs: What About the DRY Principle?
Remember, the DTO contains just the fields that we want to pass between the API client and our database. This may seem unfortunate because there’s some overlap between the model and the DTOs but beware of pushing too much for DRY at the cost of “security by default.” If adding a field only requires its addition in one place, developers might unwittingly expose it in the API when it was meant only to be internal. That’s because the process doesn’t force them to think about data storage and data transfer as two separate contexts with two potentially different sets of requirements.
With our DTO changes done, we can implement our CRUD method operations (after the UsersDao constructor), starting with create:
async addUser(userFields: CreateUserDto) {
    const userId = shortid.generate();
    const user = new this.User({
        _id: userId,
        ...userFields,
        permissionFlags: 1,
    });
    await user.save();
    return userId;
}
Note that whatever the API consumer sends in for permissionFlags via userFields, we then override it with the value 1.
Next we have read, the basic functionality to get a user by ID, get a user by email, and list users with pagination:
async getUserByEmail(email: string) {
    return this.User.findOne({ email: email }).exec();
}

async getUserById(userId: string) {
    return this.User.findOne({ _id: userId }).populate('User').exec();
}

async getUsers(limit = 25, page = 0) {
    return this.User.find()
        .limit(limit)
        .skip(limit * page)
        .exec();
}
To update a user, a single DAO function will suffice because the underlying Mongoose findOneAndUpdate() function can update the entire document or just part of it. Note that our own function will take userFields as either a PatchUserDto or a PutUserDto, using a TypeScript union type (signified by |):
async updateUserById(
    userId: string,
    userFields: PatchUserDto | PutUserDto
) {
    const existingUser = await this.User.findOneAndUpdate(
        { _id: userId },
        { $set: userFields },
        { new: true }
    ).exec();

    return existingUser;
}
The new: true option tells Mongoose to return the object as it is after the update, rather than how it originally had been.
Delete is concise with Mongoose:
async removeUserById(userId: string) {
    return this.User.deleteOne({ _id: userId }).exec();
}
Readers may notice that each of the calls to User member functions is chained to an exec() call. This is optional, but the Mongoose developers recommend it because it provides better stack traces when debugging.
After coding our DAO, we need to slightly update our users.service.ts from our last article to match the new functions. There’s no need for major refactoring, just three touch-ups:
@@ -16,3 +16,3 @@ class UsersService implements CRUD {
     async list(limit: number, page: number) {
-        return UsersDao.getUsers();
+        return UsersDao.getUsers(limit, page);
     }
@@ -20,3 +20,3 @@ class UsersService implements CRUD {
     async patchById(id: string, resource: PatchUserDto): Promise<any> {
-        return UsersDao.patchUserById(id, resource);
+        return UsersDao.updateUserById(id, resource);
     }
@@ -24,3 +24,3 @@ class UsersService implements CRUD {
     async putById(id: string, resource: PutUserDto): Promise<any> {
-        return UsersDao.putUserById(id, resource);
+        return UsersDao.updateUserById(id, resource);
     }
Most function calls remain exactly the same, since when we refactored the UsersDao, we maintained the structure that we created in the previous article. But why the exceptions?
- We’re using
updateUserById()for bothPUTandPATCHas we hinted at above. (As mentioned in Part 2, we’re following typical REST API implementations rather than attempting to adhere to particular RFCs to the letter. Among other things, this means not havingPUTrequests create new entities if they don’t exist; this way, our back end doesn’t hand over control of ID generation to API consumers.) - We’re passing the
limitandpageparameters along togetUsers()since our new DAO implementation will make use of them.
The main structure here is a fairly robust pattern. For instance, it can be reused if developers want to swap Mongoose and MongoDB for something like TypeORM and PostgreSQL. As above, such a replacement would simply require refactoring the individual functions of the DAO while maintaining their signatures to match the rest of the code.
Testing Our Mongoose-backed REST API
Let’s launch the API back end with npm start. We’ll then try creating a user:
curl --request POST 'localhost:3000/users' \
--header 'Content-Type: application/json' \
--data-raw '{
    "password":"secr3tPass!23",
    "email":"marcos.henrique@toptal.com"
}'
The response object contains a new user ID:
{
    "id": "7WYQoVZ3E"
}
As in the previous article, the remaining manual tests will be easier using environment variables:
REST_API_EXAMPLE_ID="put_your_id_here"
Updating the user looks like this:
curl --include --request PATCH "localhost:3000/users/$REST_API_EXAMPLE_ID" \
--header 'Content-Type: application/json' \
--data-raw '{
    "firstName": "Marcos",
    "lastName": "Silva"
}'
The response should start with HTTP/1.1 204 No Content. (Without the --include switch, no response would be printed, which is in line with our implementation.)
If we now get the user to check the above updates … :
curl --request GET "localhost:3000/users/$REST_API_EXAMPLE_ID" \
--header 'Content-Type: application/json' \
--data-raw '{
    "firstName": "Marcos",
    "lastName": "Silva"
}'
… the response shows the expected fields, including the _id field discussed above:
{
    "_id": "7WYQoVZ3E",
    "email": "marcos.henrique@toptal.com",
    "permissionFlags": 1,
    "__v": 0,
    "firstName": "Marcos",
    "lastName": "Silva"
}
There’s also a special field, __v, used by Mongoose for versioning; it will be incremented each time this record is updated.
Next, let’s list the users:
curl --request GET 'localhost:3000/users' \
--header 'Content-Type: application/json'
The expected response is the same, just wrapped in [].
Now that our password is stored safely, let’s make sure we can remove the user:
curl --include --request DELETE "localhost:3000/users/$REST_API_EXAMPLE_ID" \
--header 'Content-Type: application/json'
We expect a 204 response again.
Readers may wonder if the password field worked properly, since our select: false in the Mongoose Schema definition hid it from our GET output as intended. Let’s repeat our initial POST to create a user again, then check. (Don’t forget to store the new ID for later.)
Hidden Passwords and Direct Data Debugging With MongoDB Containers
To check that passwords are stored safely (i.e., hashed, rather than in plain text), developers can inspect MongoDB data directly. One way is to access the standard mongo CLI client from within the running Docker container:
sudo docker exec -it toptal-rest-series_mongo_1 mongo
From there, executing use api-db followed by db.users.find().pretty() will list all user data, including passwords.
Those who prefer a GUI can install a separate MongoDB client like Robo 3T:

The password prefix ($argon2...) is part of the PHC string format, and it’s intentionally stored unmodified: The fact that Argon2 and its general parameters are mentioned wouldn’t help a hacker to determine original passwords if they managed to steal the database. The stored password can be strengthened further using salting, a technique we’ll use below with JWTs. We leave it as an exercise for the reader to apply salting above and examine the difference between stored values when two users input the same password.
We now know Mongoose successfully sends data to our MongoDB database. But how do we know that our API consumers will send appropriate data in their requests to our user routes?
Adding express-validator
There are several ways to accomplish field validation. In this article we’ll use express-validator, which is quite stable, easy to use, and decently documented. While we could use the validation functionality that comes with Mongoose, express-validator provides extra features. For example, it comes with an out-of-the-box validator for email addresses, which in Mongoose would require us to code a custom validator.
Let’s install it:
npm i express-validator
To set the fields we want to validate, we’ll use the body() method that we’ll import at our users.routes.config.ts. The body() method will validate fields and generate an errors list—stored in the express.Request object—in case of failure.
We then need our own middleware to check and make use of the errors list. Since this logic is likely to work the same way for different routes, let’s create common/middleware/body.validation.middleware.ts with the following:
import express from 'express';
import { validationResult } from 'express-validator';

class BodyValidationMiddleware {
    verifyBodyFieldsErrors(
        req: express.Request,
        res: express.Response,
        next: express.NextFunction
    ) {
        const errors = validationResult(req);
        if (!errors.isEmpty()) {
            return res.status(400).send({ errors: errors.array() });
        }
        next();
    }
}

export default new BodyValidationMiddleware();
With that, we’re ready to handle any errors generated from the body() function. Let’s add the following back in users.routes.config.ts:
import BodyValidationMiddleware from '../common/middleware/body.validation.middleware';
import { body } from 'express-validator';
Now we can update our routes with the following:
@@ -15,3 +17,6 @@ export class UsersRoutes extends CommonRoutesConfig {
             .post(
-                UsersMiddleware.validateRequiredUserBodyFields,
+                body('email').isEmail(),
+                body('password')
+                    .isLength({ min: 5 })
+                    .withMessage('Must include password (5+ characters)'),
+                BodyValidationMiddleware.verifyBodyFieldsErrors,
                 UsersMiddleware.validateSameEmailDoesntExist,
@@ -28,3 +33,10 @@ export class UsersRoutes extends CommonRoutesConfig {
         this.app.put(`/users/:userId`, [
-            UsersMiddleware.validateRequiredUserBodyFields,
+            body('email').isEmail(),
+            body('password')
+                .isLength({ min: 5 })
+                .withMessage('Must include password (5+ characters)'),
+            body('firstName').isString(),
+            body('lastName').isString(),
+            body('permissionFlags').isInt(),
+            BodyValidationMiddleware.verifyBodyFieldsErrors,
             UsersMiddleware.validateSameEmailBelongToSameUser,
@@ -34,2 +46,11 @@ export class UsersRoutes extends CommonRoutesConfig {
         this.app.patch(`/users/:userId`, [
+            body('email').isEmail().optional(),
+            body('password')
+                .isLength({ min: 5 })
+                .withMessage('Password must be 5+ characters')
+                .optional(),
+            body('firstName').isString().optional(),
+            body('lastName').isString().optional(),
+            body('permissionFlags').isInt().optional(),
+            BodyValidationMiddleware.verifyBodyFieldsErrors,
             UsersMiddleware.validatePatchEmail,
Be sure to add BodyValidationMiddleware.verifyBodyFieldsErrors in every route after any body() lines that are present, otherwise none of them will have an effect.
Notice how we’ve updated our POST and PUT routes to use express-validator instead of our homegrown validateRequiredUserBodyFields function. Since these routes were the only ones using this function, its implementation can be deleted from users.middleware.ts.
That’s it! Readers can restart Node.js and try out the result using their favorite REST clients to see how it handles various input. Don’t forget to explore the express-validator documentation for further possibilities; our example is just a starting point for request validation.
Valid data is one aspect to ensure; valid users and actions are another.
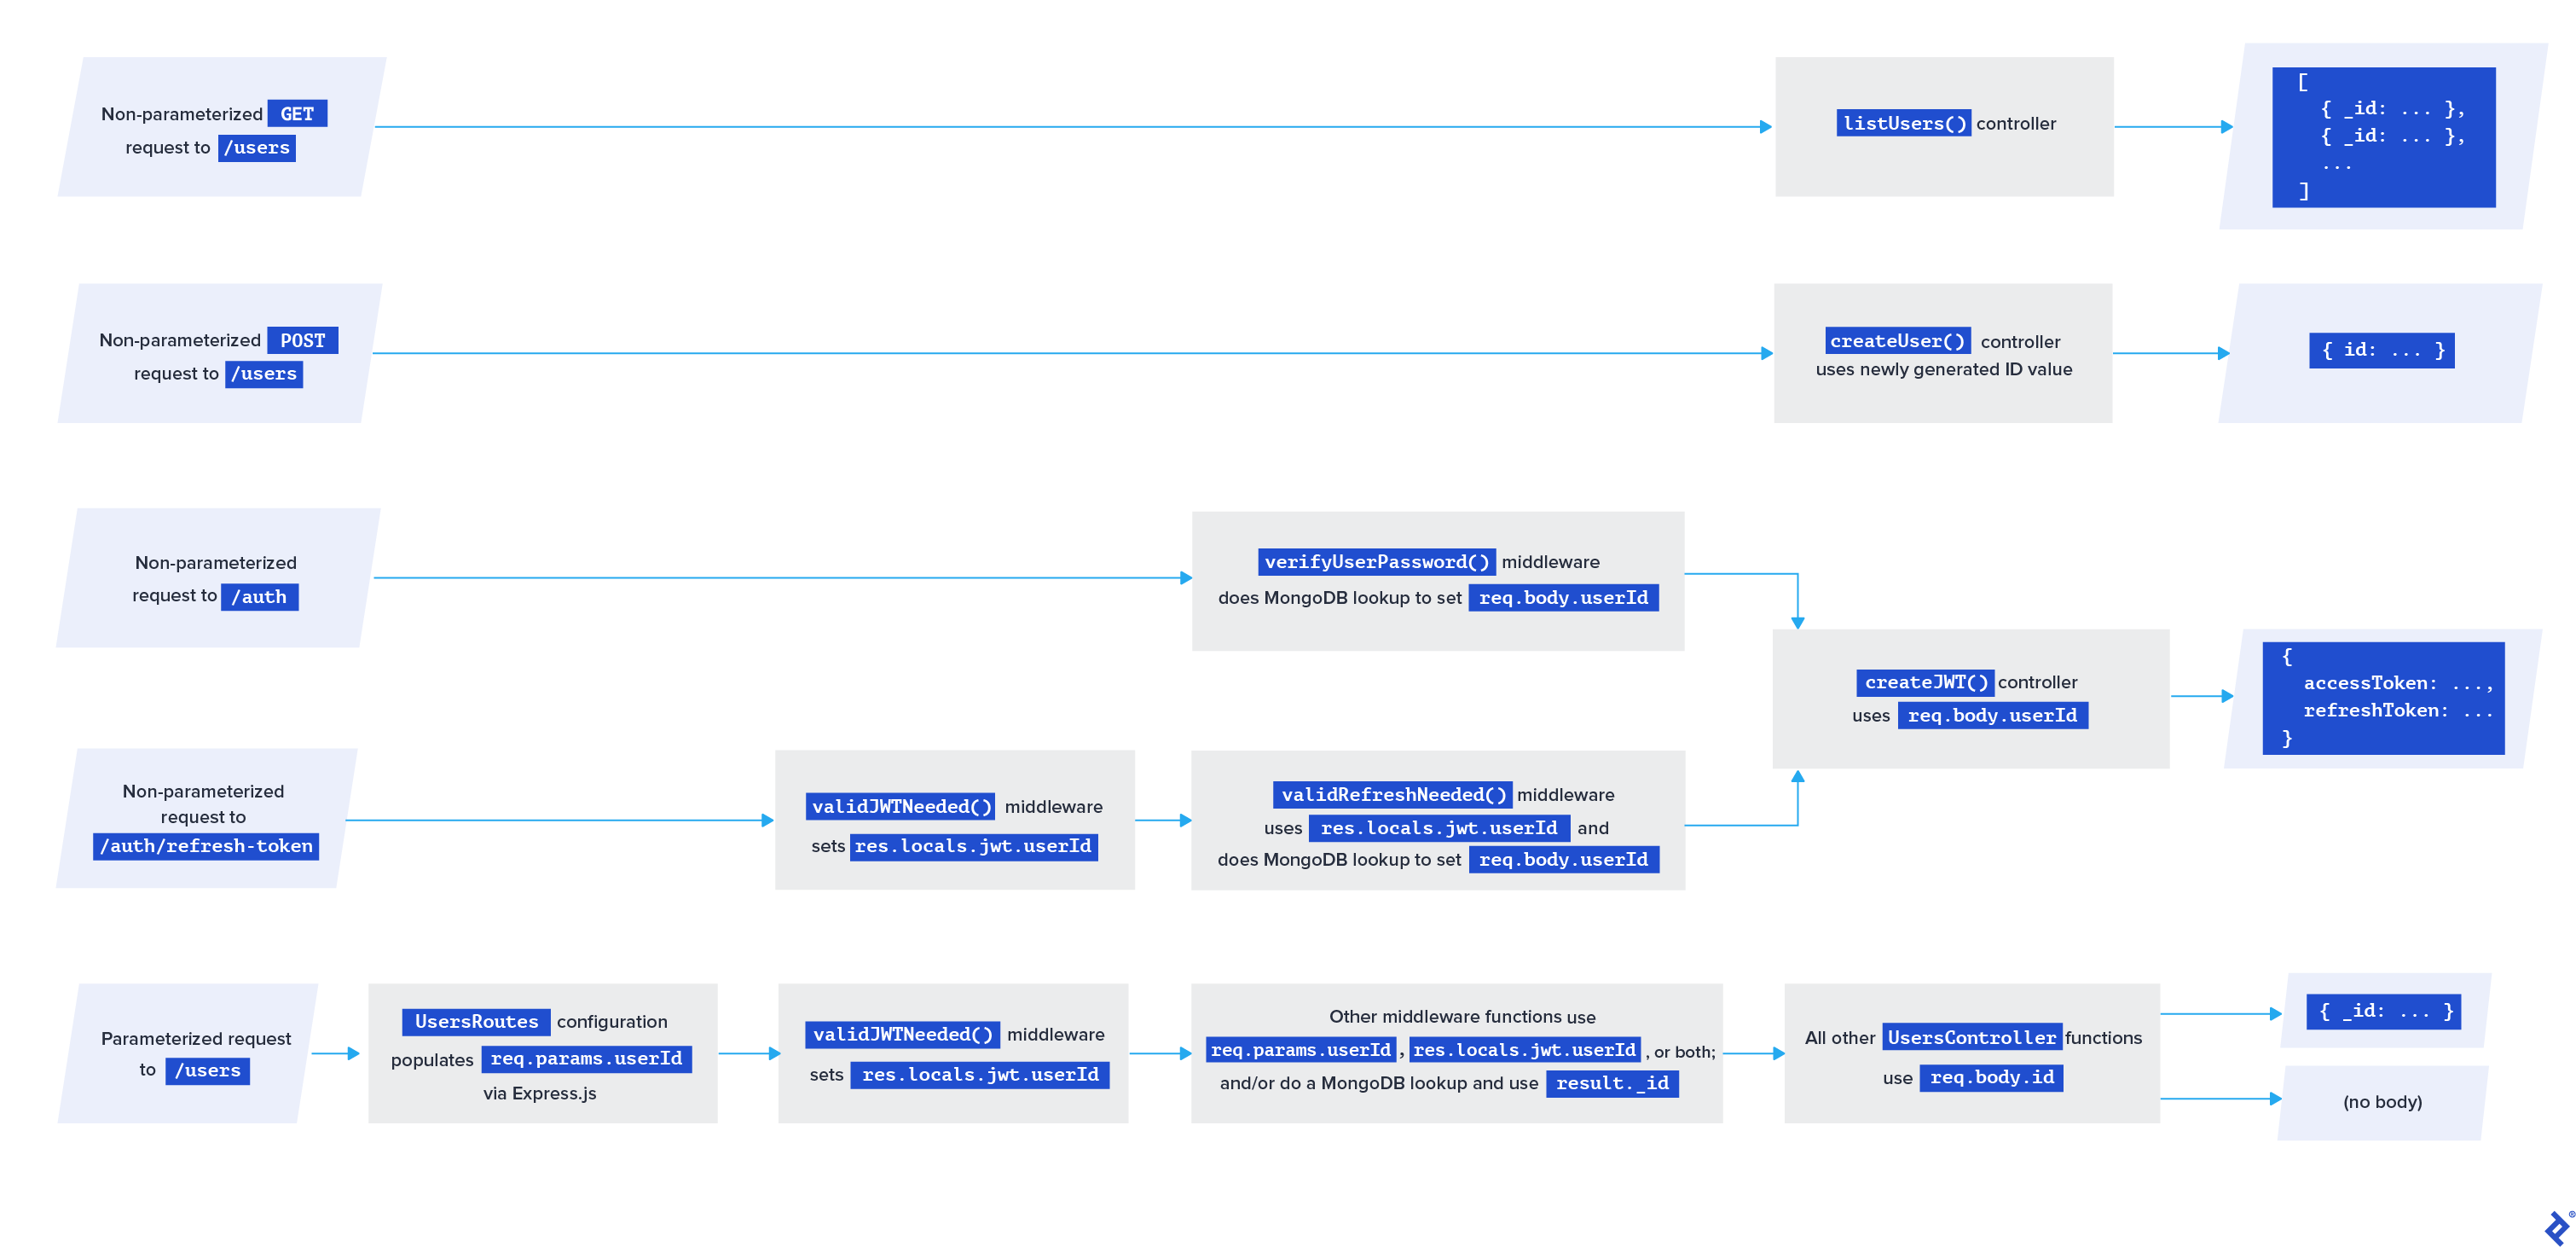
Authentication vs. Permissions (or “Authorization”) Flow
Our Node.js app exposes a complete set of users/ endpoints, allowing API consumers to create, update, and list users. But every endpoint allows unlimited public access. It’s a common pattern to prevent users from changing each other’s data and outsiders from accessing any endpoint that we don’t want to be public.
There are two primary aspects involved in these restrictions and both of them shorten to “auth.” Authentication is about who the request is from and authorization is about whether they are allowed to do what they’re requesting. It’s important to stay aware of which one is being discussed. Even without short forms, standard HTTP response codes manage to confuse the issue: 401 Unauthorized is about authentication and 403 Forbidden is about authorization. We’ll err on the side of “auth” standing for “authentication” in module names, and use “permissions” for matters of authorization.
Even without short forms, standard HTTP response codes manage to confuse the issue:
401 Unauthorizedis about authentication and403 Forbiddenis about authorization.
There are a lot of authentication approaches to explore, including drop-in third-party identity providers like Auth0. In this article, we’ve picked an implementation that’s basic but scalable. It’s based on JWTs.
A JWT consists of encrypted JSON with some non-authentication-related metadata, which in our case includes the user’s email address and permissions flags. The JSON will also contain a secret to verify the integrity of the metadata.
The idea is to require clients to send a valid JWT inside each non-public request. This lets us verify that the client recently had valid credentials for the endpoint they want to use, without having to send the credentials themselves over the wire with each request.
But where will this fit into our example API codebase? Easy: with middleware we can use in our route configuration!
Adding the Authentication Module
Let’s first configure what will be in our JWTs. Here’s where we’ll start using the permissionFlags field from our user resource but only because it’s convenient metadata to encrypt within JWTs—not because JWTs inherently have anything to do with fine-grained permissions logic.
Before creating JWT-generating middleware, we’ll need to add a special function to users.dao.ts to retrieve the password field, since we set Mongoose to normally avoid retrieving it:
async getUserByEmailWithPassword(email: string) {
    return this.User.findOne({ email: email })
        .select('_id email permissionFlags +password')
        .exec();
}
And in the users.service.ts:
async getUserByEmailWithPassword(email: string) {
    return UsersDao.getUserByEmailWithPassword(email);
}
Now, let’s create an auth folder in our project root—we’ll be adding an endpoint to allow API consumers to generate JWTs. First, let’s create a piece of middleware for it at auth/middleware/auth.middleware.ts, as a singleton called AuthMiddleware.
We’ll need some imports:
import express from 'express';
import usersService from '../../users/services/users.service';
import * as argon2 from 'argon2';
In the AuthMiddleware class, we’ll create a middleware function to check if an API user has included valid login credentials with their request:
async verifyUserPassword(
    req: express.Request,
    res: express.Response,
    next: express.NextFunction
) {
    const user: any = await usersService.getUserByEmailWithPassword(
        req.body.email
    );
    if (user) {
        const passwordHash = user.password;
        if (await argon2.verify(passwordHash, req.body.password)) {
            req.body = {
                userId: user._id,
                email: user.email,
                permissionFlags: user.permissionFlags,
            };
            return next();
        }
    }
    // Giving the same message in both cases
    // helps protect against cracking attempts:
    res.status(400).send({ errors: ['Invalid email and/or password'] });
}
As for middleware to ensure email and password exist in req.body, we’ll use express-validator when we later configure the route to use the above verifyUserPassword() function.
Storing JWT Secrets
To generate a JWT, we’ll need a JWT secret, which we’ll use to sign our generated JWTs and also to validate incoming JWTs from client requests. Rather than hard-code the value of the JWT secret within a TypeScript file, we’ll store it in a separate “environment variable” file, .env, which should never be pushed to a code repository.
As is common practice, we’ve added an .env.example file to the repo to help developers understand which variables are required when creating the real .env. In our case, we want a variable called JWT_SECRET storing our JWT secret as a string. Readers who wait until the end of this article and use the final branch of the repo will need to remember to change these values locally.
Real-world projects will especially need to follow JWT best practices by differentiating JWT secrets according to the environment (dev, staging, production, etc.).
Our .env file (in the root of the project) must use the following format but shouldn’t retain the same secret value:
JWT_SECRET=My!@!Se3cr8tH4sh3
An easy way to load these variables into our app is to use a library called dotenv:
npm i dotenv
The only configuration needed is to call the dotenv.config() function as soon as we launch our application. At the very top of app.ts, we’ll add:
import dotenv from 'dotenv';
const dotenvResult = dotenv.config();
if (dotenvResult.error) {
    throw dotenvResult.error;
}
The Authentication Controller
The last JWT generation prerequisite is to install the jsonwebtoken library and its TypeScript types:
npm i jsonwebtoken
npm i --save-dev @types/jsonwebtoken
Now, let’s create the /auth controller at auth/controllers/auth.controller.ts. We don’t need to import the dotenv library here because importing it in app.ts makes the contents of the .env file available throughout the app via the Node.js global object called process:
import express from 'express';
import debug from 'debug';
import jwt from 'jsonwebtoken';
import crypto from 'crypto';

const log: debug.IDebugger = debug('app:auth-controller');

/**
* This value is automatically populated from .env, a file which you will have
* to create for yourself at the root of the project.
*
* See .env.example in the repo for the required format.
*/
// @ts-expect-error
const jwtSecret: string = process.env.JWT_SECRET;
const tokenExpirationInSeconds = 36000;

class AuthController {
    async createJWT(req: express.Request, res: express.Response) {
        try {
            const refreshId = req.body.userId + jwtSecret;
            const salt = crypto.createSecretKey(crypto.randomBytes(16));
            const hash = crypto
                .createHmac('sha512', salt)
                .update(refreshId)
                .digest('base64');
            req.body.refreshKey = salt.export();
            const token = jwt.sign(req.body, jwtSecret, {
                expiresIn: tokenExpirationInSeconds,
            });
            return res
                .status(201)
                .send({ accessToken: token, refreshToken: hash });
        } catch (err) {
            log('createJWT error: %O', err);
            return res.status(500).send();
        }
    }
}

export default new AuthController();
The jsonwebtoken library will sign a new token with our jwtSecret. We’ll also generate a salt and a hash using the Node.js-native crypto module, then use them to create a refreshToken with which API consumers can refresh the current JWT—a setup that’s particularly good to have in place for an app to be able to scale.
What’s the difference between refreshKey, refreshToken, and accessToken? The *Tokens are sent to our API consumers with the idea being that the accessToken is used for any request beyond what’s available to the general public, and refreshToken is used to request a replacement for an expired accessToken. The refreshKey, on the other hand, is used to pass the salt variable—encrypted within the refreshToken—back to our refresh middleware, which we’ll get to below.
Note that our implementation has jsonwebtoken handle token expiration for us. If the JWT is expired, the client will need to authenticate once again.
Initial Node.js REST API Authentication Route
Let’s configure the endpoint now at auth/auth.routes.config.ts:
import { CommonRoutesConfig } from '../common/common.routes.config';
import authController from './controllers/auth.controller';
import authMiddleware from './middleware/auth.middleware';
import express from 'express';
import BodyValidationMiddleware from '../common/middleware/body.validation.middleware';
import { body } from 'express-validator';

export class AuthRoutes extends CommonRoutesConfig {
    constructor(app: express.Application) {
        super(app, 'AuthRoutes');
    }

    configureRoutes(): express.Application {
        this.app.post(`/auth`, [
            body('email').isEmail(),
            body('password').isString(),
            BodyValidationMiddleware.verifyBodyFieldsErrors,
            authMiddleware.verifyUserPassword,
            authController.createJWT,
        ]);
        return this.app;
    }
}
And, don’t forget to add it to our app.ts file:
// ...
import { AuthRoutes } from './auth/auth.routes.config';
// ...
routes.push(new AuthRoutes(app)); // independent: can go before or after UsersRoute
// ...
We are ready to restart Node.js and test now, making sure we match whatever credentials we used to create our test user earlier:
curl --request POST 'localhost:3000/auth' \
--header 'Content-Type: application/json' \
--data-raw '{
    "password":"secr3tPass!23",
    "email":"marcos.henrique@toptal.com"
}'
The response will be something like:
{
    "accessToken": "eyJhbGciOiJIUzI1NiIsInR5cCI6IkpXVCJ9.eyJ1c2VySWQiOiJVZGdzUTBYMXciLCJlbWFpbCI6Im1hcmNvcy5oZW5yaXF1ZUB0b3B0YWwuY29tIiwicHJvdmlkZXIiOiJlbWFpbCIsInBlcm1pc3Npb25MZXZlbCI6MSwicmVmcmVzaEtleSI6ImtDN3JFdDFHUmNsWTVXM0N4dE9nSFE9PSIsImlhdCI6MTYxMTM0NTYzNiwiZXhwIjoxNjExMzgxNjM2fQ.cfI_Ey4RHKbOKFdVGsowePZlMeX3fku6WHFu0EMjFP8",
    "refreshToken": "cXBHZ2tJdUhucERaTVpMWVNTckhNenQwcy9Bd0VIQ2RXRnA4bVBJbTBuQVorcS9Qb2xOUDVFS2xEM1RyNm1vTGdoWWJqb2xtQ0NHcXhlWERUcG81d0E9PQ=="
}
As before, let’s set some environment variables for convenience using the above values:
REST_API_EXAMPLE_ACCESS="put_your_access_token_here"
REST_API_EXAMPLE_REFRESH="put_your_refresh_token_here"
Great! We have our access token and a refresh token, but we need some middleware that can do something useful with them.
JWT Middleware
We’ll need a new TypeScript type to handle the JWT structure in its decoded form. Create common/types/jwt.ts with this in it:
export type Jwt = {
    refreshKey: string;
    userId: string;
    permissionFlags: string;
};
Let’s implement middleware functions to check for the presence of a refresh token, to verify a refresh token, and to verify a JWT. All three can go in a new file, auth/middleware/jwt.middleware.ts:
import express from 'express';
import jwt from 'jsonwebtoken';
import crypto from 'crypto';
import { Jwt } from '../../common/types/jwt';
import usersService from '../../users/services/users.service';

// @ts-expect-error
const jwtSecret: string = process.env.JWT_SECRET;

class JwtMiddleware {
    verifyRefreshBodyField(
        req: express.Request,
        res: express.Response,
        next: express.NextFunction
    ) {
        if (req.body && req.body.refreshToken) {
            return next();
        } else {
            return res
                .status(400)
                .send({ errors: ['Missing required field: refreshToken'] });
        }
    }

    async validRefreshNeeded(
        req: express.Request,
        res: express.Response,
        next: express.NextFunction
    ) {
        const user: any = await usersService.getUserByEmailWithPassword(
            res.locals.jwt.email
        );
        const salt = crypto.createSecretKey(
            Buffer.from(res.locals.jwt.refreshKey.data)
        );
        const hash = crypto
            .createHmac('sha512', salt)
            .update(res.locals.jwt.userId + jwtSecret)
            .digest('base64');
        if (hash === req.body.refreshToken) {
            req.body = {
                userId: user._id,
                email: user.email,
                permissionFlags: user.permissionFlags,
            };
            return next();
        } else {
            return res.status(400).send({ errors: ['Invalid refresh token'] });
        }
    }

    validJWTNeeded(
        req: express.Request,
        res: express.Response,
        next: express.NextFunction
    ) {
        if (req.headers['authorization']) {
            try {
                const authorization = req.headers['authorization'].split(' ');
                if (authorization[0] !== 'Bearer') {
                    return res.status(401).send();
                } else {
                    res.locals.jwt = jwt.verify(
                        authorization[1],
                        jwtSecret
                    ) as Jwt;
                    next();
                }
            } catch (err) {
                return res.status(403).send();
            }
        } else {
            return res.status(401).send();
        }
    }
}

export default new JwtMiddleware();
The validRefreshNeeded() function also verifies if the refresh token is correct for a specific user ID. If it is, then below we’ll reuse authController.createJWT to generate a new JWT for the user.
We also have validJWTNeeded(), which validates whether the API consumer sent a valid JWT in the HTTP headers respecting the convention Authorization: Bearer <token>. (Yes, that’s another unfortunate “auth” conflation.)
Now to configure a new route for refreshing the token and the permission flags encoded within it.
JWT Refresh Route
In auth.routes.config.ts we’ll import our new middleware:
import jwtMiddleware from './middleware/jwt.middleware';
Then we’ll add the following route:
this.app.post(`/auth/refresh-token`, [
    jwtMiddleware.validJWTNeeded,
    jwtMiddleware.verifyRefreshBodyField,
    jwtMiddleware.validRefreshNeeded,
    authController.createJWT,
]);
Now we can test if it is working properly with the accessToken and refreshToken we received earlier:
curl --request POST 'localhost:3000/auth/refresh-token' \
--header 'Content-Type: application/json' \
--header "Authorization: Bearer $REST_API_EXAMPLE_ACCESS" \
--data-raw "{
    \"refreshToken\": \"$REST_API_EXAMPLE_REFRESH\"
}"
We should expect to receive a new accessToken and a new refreshToken to be used later. We leave it as an exercise for the reader to ensure that the back end invalidates previous tokens and limits how often new ones can be requested.
Now our API consumers are able to create, validate, and refresh JWTs. Let’s look at some permissions concepts, then implement one and integrate it with our JWT middleware in our user routes.
User Permissions
Once we know who an API client is, we want to know whether they’re allowed to use the resource they’re requesting. It’s quite common to manage combinations of permissions for each user. Without adding much complexity, this allows for more flexibility than a traditional “access level” strategy. Regardless of the business logic we use for each permission, it’s quite straightforward to create a generic way to handle it.
Bitwise AND (&) and Powers of Two
To manage permissions, we’ll leverage JavaScript’s built-in bitwise AND operator, &. This approach lets us store a whole set of permissions information as a single, per-user number, with each of its binary digits representing whether the user has permission to do something. But there’s no need to worry about the math behind it too much—the point is that it’s easy to use.
All we need to do is define each kind of permission (a permission flag) as a power of 2 (1, 2, 4, 8, 16, 32, …). Then we can attach business logic to each flag, up to a maximum of 31 flags. For example, an audio-accessible, international blog might have these permissions:
- 1: Authors can edit text.
- 2: Illustrators can replace illustrations.
- 4: Narrators can replace the audio file corresponding to any paragraph.
- 8: Translators can edit translations.
This approach allows for all sorts of permission flag combinations for users:
- An author’s (or editor’s) permission flags value will be just the number 1.
- An illustrator’s permission flags will be the number 2. But some authors are also illustrators. In that case, we sum the relevant permissions values: 1 + 2 = 3.
- A narrator’s flags will be 4. In the case of an author who narrates their own work, it will be 1 + 4 = 5. If they also illustrate, it’s 1 + 2 + 4 = 7.
- A translator will have a permission value of 8. Multilingual authors would then have flags of 1 + 8 = 9. A translator who also narrates (but is not an author) would have 4 + 8 = 12.
- If we want to have a sudo admin, having all combined permissions, we can simply use 2,147,483,647, which is the maximum safe value for a 32-bit integer.
Readers can test this logic as plain JavaScript:
- User with permission 5 trying to edit text (permission flag 1):
Input: 5 & 1
Output: 1
- User with permission 1 trying to narrate (permission flag 4):
Input: 1 & 4
Output: 0
- User with permission 12 trying to narrate:
Input: 12 & 4
Output: 4
When the output is 0, we block the user; otherwise, we let them access what they are trying to access.
Permission Flag Implementation
We’ll store permissions flags inside the common folder since the business logic can be shared with future modules. Let’s start by adding an enum to hold some permission flags at common/middleware/common.permissionflag.enum.ts:
export enum PermissionFlag {
    FREE_PERMISSION = 1,
    PAID_PERMISSION = 2,
    ANOTHER_PAID_PERMISSION = 4,
    ADMIN_PERMISSION = 8,
    ALL_PERMISSIONS = 2147483647,
}
Note: Since this is an example project, we kept the flag names fairly generic.
Before we forget, now’s a good time for a quick return to the addUser() function in our user DAO to replace our temporary magic number 1 with PermissionFlag.FREE_PERMISSION. We’ll also need a corresponding import statement.
We can also import it into a new middleware file at common/middleware/common.permission.middleware.ts with a singleton class named CommonPermissionMiddleware:
import express from 'express';
import { PermissionFlag } from './common.permissionflag.enum';
import debug from 'debug';

const log: debug.IDebugger = debug('app:common-permission-middleware');
Instead of creating several similar middleware functions, we’ll use the factory pattern to create a special factory method (or factory function or simply factory). Our factory function will allow us to generate—at the time of route configuration—middleware functions to check for any permission flag needed. With that, we avoid having to manually duplicate our middleware function whenever we add a new permission flag.
Here’s the factory that will generate a middleware function that checks for whatever permission flag we pass it:
permissionFlagRequired(requiredPermissionFlag: PermissionFlag) {
    return (
        req: express.Request,
        res: express.Response,
        next: express.NextFunction
    ) => {
        try {
            const userPermissionFlags = parseInt(
                res.locals.jwt.permissionFlags
            );
            if (userPermissionFlags & requiredPermissionFlag) {
                next();
            } else {
                res.status(403).send();
            }
        } catch (e) {
            log(e);
        }
    };
}
A more customized case is that the only users who should be able to access a particular user record are the same user or an admin:
async onlySameUserOrAdminCanDoThisAction(
    req: express.Request,
    res: express.Response,
    next: express.NextFunction
) {
    const userPermissionFlags = parseInt(res.locals.jwt.permissionFlags);
    if (
        req.params &&
        req.params.userId &&
        req.params.userId === res.locals.jwt.userId
    ) {
        return next();
    } else {
        if (userPermissionFlags & PermissionFlag.ADMIN_PERMISSION) {
            return next();
        } else {
            return res.status(403).send();
        }
    }
}
We’ll add one last piece of middleware, this time in users.middleware.ts:
async userCantChangePermission(
    req: express.Request,
    res: express.Response,
    next: express.NextFunction
) {
    if (
        'permissionFlags' in req.body &&
        req.body.permissionFlags !== res.locals.user.permissionFlags
    ) {
        res.status(400).send({
            errors: ['User cannot change permission flags'],
        });
    } else {
        next();
    }
}
And because the above function depends on res.locals.user, we can populate that value in validateUserExists() before the next() call:
// ...
if (user) {
    res.locals.user = user;
    next();
} else {
// ...
In fact, doing this in validateUserExists() will make it unnecessary in validateSameEmailBelongToSameUser(). We can eliminate our database call there, replacing it with the value we can count on being cached in res.locals:
-        const user = await userService.getUserByEmail(req.body.email);
-        if (user && user.id === req.params.userId) {
+        if (res.locals.user._id === req.params.userId) {
Now we’re ready to integrate our permissions logic into users.routes.config.ts.
Requiring Permissions
First, we’ll import our new middleware and enum:
import jwtMiddleware from '../auth/middleware/jwt.middleware';
import permissionMiddleware from '../common/middleware/common.permission.middleware';
import { PermissionFlag } from '../common/middleware/common.permissionflag.enum';
We want the users list to be accessible only by requests made by someone with admin permissions, but we still want the ability to create a new user to be public, as normal UX expectations flow. Let’s restrict the users list first using our factory function before our controller:
this.app
    .route(`/users`)
    .get(
        jwtMiddleware.validJWTNeeded,
        permissionMiddleware.permissionFlagRequired(
            PermissionFlag.ADMIN_PERMISSION
        ),
        UsersController.listUsers
    )
// ...
Remember that the factory call here ((...)) returns a middleware function—hence all the normal, non-factory middleware being referenced without invocation (()).
Another common restriction is that for all routes that include a userId, we want only that same user or an admin to have access:
             .route(`/users/:userId`)
-            .all(UsersMiddleware.validateUserExists)
+            .all(
+                UsersMiddleware.validateUserExists,
+                jwtMiddleware.validJWTNeeded,
+                permissionMiddleware.onlySameUserOrAdminCanDoThisAction
+            )
             .get(UsersController.getUserById)
We’ll also prevent users from escalating their privileges by adding UsersMiddleware.userCantChangePermission, just before the UsersController function reference at the end of each of the PUT and PATCH routes.
But let’s further suppose that our REST API business logic allows only users with PAID_PERMISSION to update their information at all. This may or may not align with the business needs of other projects: It’s just to test the difference between paid and free permission.
This can be done by adding another generator call after each of the userCantChangePermission references we just added:
permissionMiddleware.permissionFlagRequired(
    PermissionFlag.PAID_PERMISSION
),
With that, we’re ready to restart Node.js and try it out.
Manual Permissions Testing
To test the routes, let’s try to GET the users list without an access token:
curl --include --request GET 'localhost:3000/users' \
--header 'Content-Type: application/json'
We receive an HTTP 401 response because we need to use a valid JWT. Let’s try with an access token from our earlier authentication:
curl --include --request GET 'localhost:3000/users' \
--header 'Content-Type: application/json' \
--header "Authorization: Bearer $REST_API_EXAMPLE_ACCESS"
This time we get an HTTP 403. Our token is valid, but we’re forbidden to use this endpoint because we don’t have ADMIN_PERMISSION.
We shouldn’t need it to GET our own user record, though:
curl --request GET "localhost:3000/users/$REST_API_EXAMPLE_ID" \
--header 'Content-Type: application/json' \
--header "Authorization: Bearer $REST_API_EXAMPLE_ACCESS"
The response:
{
    "_id": "UdgsQ0X1w",
    "email": "marcos.henrique@toptal.com",
    "permissionFlags": 1,
    "__v": 0
}
In contrast, trying to update our own user record should fail, since our permission value is 1 (FREE_PERMISSION only):
curl --include --request PATCH "localhost:3000/users/$REST_API_EXAMPLE_ID" \
--header 'Content-Type: application/json' \
--header "Authorization: Bearer $REST_API_EXAMPLE_ACCESS" \
--data-raw '{
    "firstName": "Marcos"
}'
The response is 403, as expected.
As a reader exercise, I recommend changing the user permissionFlags at the local database and doing a new post to /auth (to generate a token with the new permissionFlags), then trying to PATCH the user again. Remember that you’ll need to set the flags to the numeric value of either PAID_PERMISSION or ALL_PERMISSIONS, since our business logic specifies that ADMIN_PERMISSION by itself doesn’t let you patch other users or even yourself.
The requirement for a new post to /auth brings up a security scenario that’s worth bearing in mind. When a site owner changes a user’s permissions—for example, to attempt to lock out a misbehaving user—the user won’t see this take effect until their next JWT refresh. That’s because the permissions check uses the JWT data itself to avoid an extra database hit.
Services like Auth0 can help by offering automatic token rotation, but users will still experience unexpected app behavior during the time between rotations, however short that normally may be. To mitigate this, developers must take care to actively revoke refresh tokens in response to permissions changes.
While working on a REST API, developers can guard against potential bugs by rerunning a pile of cURL commands periodically. But that’s slow and error-prone, and quickly becomes tedious.
Automated Testing
As an API grows, it becomes difficult to maintain software quality, especially with frequently changing business logic. To reduce API bugs as much as possible and deploy new changes with confidence, it’s very common to have a test suite for the front end and/or back end of an app.
Rather than dive into writing tests and testable code, we’ll show some basic mechanics and provide a working test suite for readers to build upon.
Dealing With Test Data Leftovers
Before we automate, it’s worth thinking about what happens with test data.
We’re using Docker Compose to run our local database, expecting to use this database for development, not as a live production data source. The tests that we’ll run here will impact the local database by leaving a new set of test data behind every time we run them. This shouldn’t be an issue in most cases, but if it is, we leave readers the exercise of changing docker-compose.yml to create a new database for testing purposes.
In the real world, developers often run automated tests as part of a continuous integration pipeline. To do that, it would make sense to configure—at the pipeline level—a way to create a temporary database for each test run.
We’ll use Mocha, Chai, and SuperTest to create our tests:
npm i --save-dev chai mocha supertest @types/chai @types/express @types/mocha @types/supertest ts-node
Mocha will manage our application and run the tests, Chai will allow for more readable test expression, and SuperTest will facilitate end-to-end (E2E) testing by calling our API as a REST client would.
We’ll need to update our scripts at package.json:
"scripts": {
// ...
    "test": "mocha -r ts-node/register 'test/**/*.test.ts' --unhandled-rejections=strict",
    "test-debug": "export DEBUG=* && npm test"
},
That will allow us to run tests in a folder that we will create, called test.
A Meta-test
To try out our testing infrastructure, let’s create a file, test/app.test.ts:
import { expect } from 'chai';
describe('Index Test', function () {
    it('should always pass', function () {
        expect(true).to.equal(true);
    });
});
The syntax here may seem unusual, but it’s correct. We define tests by expect()ing behavior within it() blocks—by which we mean the body of a function we’ll pass to it()—which are called within describe() blocks.
Now, at the terminal, we’ll run:
npm run test
We should see this:
> mocha -r ts-node/register 'test/**/*.test.ts' --unhandled-rejections=strict

  Index Test
    ✓ should always pass


  1 passing (6ms)
Great! Our testing libraries are installed and ready to use.
Streamlining Testing
To keep test output clean, we’ll want to silence Winston request logging entirely during normal test runs. That’s as easy as a quick change to our non-debug else branch in app.ts to detect whether the it() function from Mocha is present:
if (!process.env.DEBUG) {
     loggerOptions.meta = false; // when not debugging, make terse
+    if (typeof global.it === 'function') {
+        loggerOptions.level = 'http'; // for non-debug test runs, squelch entirely
+    }
 }
A final touch that we need to add is to export our app.ts to be consumed by our tests. At the end of app.ts, we’ll add export default just before server.listen(), because listen() returns our Node.js http.Server object.
With a quick npm run test to check that we didn’t break the stack, we’re now ready to test our API.
Our First Real REST API Automated Test
To start configuring our users tests, let’s create test/users/users.test.ts, starting with needed imports and test variables:
import app from '../../app';
import supertest from 'supertest';
import { expect } from 'chai';
import shortid from 'shortid';
import mongoose from 'mongoose';

let firstUserIdTest = ''; // will later hold a value returned by our API
const firstUserBody = {
    email: `marcos.henrique+${shortid.generate()}@toptal.com`,
    password: 'Sup3rSecret!23',
};

let accessToken = '';
let refreshToken = '';
const newFirstName = 'Jose';
const newFirstName2 = 'Paulo';
const newLastName2 = 'Faraco';
Next we’ll create an outermost describe() block with some setup and teardown definitions:
describe('users and auth endpoints', function () {
    let request: supertest.SuperAgentTest;
    before(function () {
        request = supertest.agent(app);
    });
    after(function (done) {
        // shut down the Express.js server, close our MongoDB connection, then
        // tell Mocha we're done:
        app.close(() => {
            mongoose.connection.close(done);
        });
    });
});
The functions we’re passing to before() and after() get called before and after all the tests we’ll define by calling it() within the same describe() block. The function passed to after() takes a callback, done, which we ensure is only called once we’ve cleaned up both the app and its database connection.
Note: Without our after() tactic, Mocha will hang even after successful test completion. The advice is often to simply always call Mocha with --exit to avoid this, but there’s an (often unmentioned) caveat. If the test suite would hang for other reasons—like a misconstructed Promise in the test suite or the app itself—then with --exit, Mocha won’t wait and will report success anyway, adding a subtle complication to debugging.
Now we’re ready to add individual E2E tests within the describe() block:
it('should allow a POST to /users', async function () {
    const res = await request.post('/users').send(firstUserBody);

    expect(res.status).to.equal(201);
    expect(res.body).not.to.be.empty;
    expect(res.body).to.be.an('object');
    expect(res.body.id).to.be.a('string');
    firstUserIdTest = res.body.id;
});
This first function will create a new user for us—a unique one, since our user email was generated earlier using shortid. The request variable holds a SuperTest agent, allowing us to make HTTP requests to our API. We make them using await, which is why the function we’re passing to it() has to be async. We then use expect() from Chai to test various aspects of the result.
An npm run test at this point should show our new test working.
A Chain of Tests
We’ll add all of the following it() blocks inside our describe() block. We have to add them in the order presented so that they’ll work with variables we’re mutating, such as firstUserIdTest.
it('should allow a POST to /auth', async function () {
    const res = await request.post('/auth').send(firstUserBody);
    expect(res.status).to.equal(201);
    expect(res.body).not.to.be.empty;
    expect(res.body).to.be.an('object');
    expect(res.body.accessToken).to.be.a('string');
    accessToken = res.body.accessToken;
    refreshToken = res.body.refreshToken;
});
Here we fetch a new access and refresh token for our newly created user.
it('should allow a GET from /users/:userId with an access token', async function () {
    const res = await request
        .get(`/users/${firstUserIdTest}`)
        .set({ Authorization: `Bearer ${accessToken}` })
        .send();
    expect(res.status).to.equal(200);
    expect(res.body).not.to.be.empty;
    expect(res.body).to.be.an('object');
    expect(res.body._id).to.be.a('string');
    expect(res.body._id).to.equal(firstUserIdTest);
    expect(res.body.email).to.equal(firstUserBody.email);
});
That makes a token-bearing GET request to the :userId route to check that the user data response matches what we initially sent in.
Nesting, Skipping, Isolating, and Bailing on Tests
In Mocha, it() blocks can also contain their own describe() blocks, so we’ll nest our next test within another describe() block. That will make our cascade of dependencies clearer in the test output, as we’ll show at the end.
describe('with a valid access token', function () {
    it('should allow a GET from /users', async function () {
        const res = await request
            .get(`/users`)
            .set({ Authorization: `Bearer ${accessToken}` })
            .send();
        expect(res.status).to.equal(403);
    });
});
Effective testing covers not only what we expect to work but also what we expect to fail. Here we try to list all users and expect a 403 response since our user (having default permissions) is not allowed to use this endpoint.
Within this new describe() block, we can continue writing tests. Since we’ve already discussed the features used in the rest of the test code, it can be found starting at this line in the repo.
Mocha provides some features that can be convenient to use while developing and debugging tests:
- The
.skip()method can be used to avoid running a single test or a whole block of tests. Whenit()is replaced withit.skip()(likewise fordescribe()), the test or tests in question will not be run but will be tallied as “pending” in the final output of Mocha. - For even more temporary use, the
.only()function causes all non-.only()-marked tests to be completely ignored and doesn’t result in anything being marked “pending.” - The invocation of
mochaas defined inpackage.jsoncan use--bailas a command-line parameter. When this is set, Mocha stops running tests as soon as one test fails. This is especially useful in our REST API example project, since the tests are set up to cascade; if only the first test is broken, Mocha reports exactly that, instead of complaining about all the dependent (but not broken) tests that are now failing because of it.
If we run our complete battery of tests at this point with npm run test, we’ll see three failing tests. (If we were going to leave the functions they rely on unimplemented for the time being, these three tests would be good candidates for .skip().)
The failing tests rely on two pieces currently missing from our app. The first is in users.routes.config.ts:
this.app.put(`/users/:userId/permissionFlags/:permissionFlags`, [
    jwtMiddleware.validJWTNeeded,
    permissionMiddleware.onlySameUserOrAdminCanDoThisAction,

    // Note: The above two pieces of middleware are needed despite
    // the reference to them in the .all() call, because that only covers
    // /users/:userId, not anything beneath it in the hierarchy

    permissionMiddleware.permissionFlagRequired(
        PermissionFlag.FREE_PERMISSION
    ),
    UsersController.updatePermissionFlags,
]);
The second file we need to update is users.controller.ts, since we just referenced a function that doesn’t exist there. We’ll need to add import { PatchUserDto } from '../dto/patch.user.dto'; near the top, and the missing function to the class:
async updatePermissionFlags(req: express.Request, res: express.Response) {
    const patchUserDto: PatchUserDto = {
        permissionFlags: parseInt(req.params.permissionFlags),
    };
    log(await usersService.patchById(req.body.id, patchUserDto));
    res.status(204).send();
}
Adding such privilege escalation abilities is useful for testing but won’t fit most real-world requirements. There are two exercises for the reader here:
- Consider ways to have the code again disallow users changing their own
permissionFlagswhile still allowing permissions-restricted endpoints to be tested. - Create and implement business logic (and corresponding tests) for how
permissionFlagsshould be able to change via the API. (There’s a chicken-and-egg puzzle here: How does a particular user get permission to change permissions in the first place?)
With that, npm run test should now successfully finish with nicely formatted output like this:
  Index Test
    ✓ should always pass

  users and auth endpoints
    ✓ should allow a POST to /users (76ms)
    ✓ should allow a POST to /auth
    ✓ should allow a GET from /users/:userId with an access token
    with a valid access token
      ✓ should allow a GET from /users
      ✓ should disallow a PATCH to /users/:userId
      ✓ should disallow a PUT to /users/:userId with an nonexistent ID
      ✓ should disallow a PUT to /users/:userId trying to change the permission flags
      ✓ should allow a PUT to /users/:userId/permissionFlags/2 for testing
      with a new permission level
        ✓ should allow a POST to /auth/refresh-token
        ✓ should allow a PUT to /users/:userId to change first and last names
        ✓ should allow a GET from /users/:userId and should have a new full name
        ✓ should allow a DELETE from /users/:userId


  13 passing (231ms)
We now have a way to quickly verify our REST API is working as expected.
Debugging (With) Tests
Developers facing unexpected test failures can easily leverage both Winston and Node.js’ debug module when running the test suite.
For example, it’s easy to focus on which Mongoose queries are executed by invoking DEBUG=mquery npm run test. (Note how that command lacks the export prefix and && in the middle, which would make the environment persist to later commands.)
It’s also possible to show all debug output with npm run test-debug, thanks to our earlier addition to package.json.
With that, we have a working, scalable, MongoDB-backed REST API, with a convenient automated test suite. But it’s still missing some essentials.
Security (All Projects Should Wear a Helmet)
When working with Express.js, the documentation is a must-read, particularly its security best practices. At minimum, it’s worth pursuing:
- Configuring TLS support
- Adding rate-limiting middleware
- Ensuring npm dependencies are secure (readers may want to start with
npm auditor go deeper with snyk) - Using the Helmet library to help protect against common security vulnerabilities
This last point is straightforward to add to our example project:
npm i --save helmet
Then, in app.ts, we need only import it and add another app.use() call:
import helmet from 'helmet';
// ...
app.use(helmet());
As its docs point out, Helmet (like any security addition) is no silver bullet, but every bit of prevention does help.
Containing Our REST API Project With Docker
In this series, we didn’t go into Docker containers in depth, but we did use MongoDB in a container with Docker Compose. Readers who are unfamiliar with Docker but want to try a further step can create a file called Dockerfile (with no extension) in the project root:
FROM node:14-slim

RUN mkdir -p /usr/src/app

WORKDIR /usr/src/app

COPY . .

RUN npm install

EXPOSE 3000

CMD ["node", "./dist/app.js"]
This configuration starts with the node:14-slim official image from Docker, and builds and runs our example REST API in a container. The configuration can change from case to case, but these generic-looking defaults work for our project.
To build the image, we just run this at the project root (replacing tag_your_image_here as desired):
docker build . -t tag_your_image_here
Then, one way to run our back end—assuming the exact same text replacement—is:
docker run -p 3000:3000 tag_your_image_here
At this point, MongoDB and Node.js can both use Docker, but we have to start them two different ways. We leave it as an exercise for the reader to add the main Node.js app to docker-compose.yml so the whole app can be launched with a single docker-compose command.
Further REST API Skills to Explore
In this article, we made extensive improvements to our REST API: We added a containerized MongoDB, configured Mongoose and express-validator, added JWT-based authentication and a flexible permissions system, and wrote a battery of automated tests.
This is a solid starting point for both new and advanced back-end developers. Yet in some ways our project may not be ideal for production use, scaling, and maintenance. Aside from the reader exercises we sprinkled throughout this article, what else is there to learn?
At the API level, we recommend reading up on creating an OpenAPI-compliant specification. Readers particularly interested in pursuing enterprise development will also want to try NestJS. It’s another framework built on top of Express.js, but it’s more robust and abstract—that’s why it’s good to use our example project to get comfortable with Express.js basics first. No less important, the GraphQL approach to APIs has widespread traction as an alternative to REST.
When it comes to permissions, we covered a bitwise flags approach with a middleware generator for manually defined flags. For further convenience when scaling, it’s worth looking into the CASL library, which integrates with Mongoose. It extends the flexibility of our approach, allowing succinct definitions of abilities a particular flag should allow, like can(['update', 'delete'], '(model name here)', { creator: 'me' }); in place of a whole custom middleware function.
We’ve provided a practical automated testing springboard in this project, but some important topics were beyond our scope. We recommend that readers:
- Explore unit testing to test components separately—Mocha and Chai can be used for this, too.
- Look into code coverage tools, which help identify gaps in test suites by showing lines of code that aren’t run during testing. With such tools, readers can then supplement the example tests, as needed—but they may not reveal every missing scenario, such as whether users can modify their permissions via a
PATCHto/users/:userId. - Try other approaches to automated testing. We’ve used the behavior-driven development (BDD)-style
expectinterface from Chai, but it also supportsshould()andassert. It’s also worth learning other testing libraries, like Jest.
Aside from these topics, our Node.js/TypeScript REST API is ready to be built upon. Particularly, readers may want to implement more middleware to enforce common business logic around the standard users resource. I won’t go deeper into that here, but I would be happy to provide guidance and tips to readers who find themselves blocked—just leave a comment below.
The full code for this project is available as an open-source GitHub repo.
Further Reading on the Toptal Blog:
Understanding the basics
Not quite. Mongoose is an Object Data/Document Modeling (ODM) library. It provides a straightforward schema-based solution that uses native MongoDB drivers under the hood.
As a document database, MongoDB allows fast development and easy scalability.
The name MongoDB came from “humongous,” due its ability to scale and because of the company’s plans to make a huge impact with worldwide usage of MongoDB.
JWT comes from an RFC standard (RFC 7519) describing the use of JSON structure with self-contained encryption. JWT-based authentication can be used to manage requests in a secure way through a secret token that can be verified by a server.
A JWT contains a header, payload, and signature. The signature contains a secret encoded with a pattern. With the other side (a server) knowing this secret, it can authenticate the payload by decrypting and validating the signature.
With testing libraries/frameworks such as Mocha, Cypress, and SuperTest, developers can simulate app usage and validate the expected responses. Automated back-end testing ranges from unit testing (individual classes) to integration testing (multiple classes) to end-to-end (E2E) testing (using real HTTP calls).
The purpose of automated testing is to provide a way to detect issues before pushing code further (such as to other team members or to a live product). It also reduces testing time and effort by avoiding manual testing.
Automated testing is definitely worth it! Companies like Google, Amazon, Facebook, Apple, and Microsoft would never have been able to scale as big as they have without automated testing. But even the smallest apps benefit from the shorter development cycle and increased reliability that automated testing brings.
Lecco, Province of Lecco, Italy
Member since February 25, 2017
About the author
Marcos has 17+ years in IT and development. His passions include REST architecture, Agile development methodology, and JS.