
Visual Regression Testing With Cypress: A Pragmatic Approach
Visual regression testing is not a new concept. Toptal engineers routinely use it, but with looming deadlines, they sometimes need to innovate and improvise.
This article demonstrates how Toptal QA specialists leveraged UI testing and Cypress to run visual regression tests without resorting to specialized tools.

Rafael Anachoreta
Rafael is a senior QA engineer with nearly 10 years of experience working with testing, automation, and monitoring to make teams and products better.
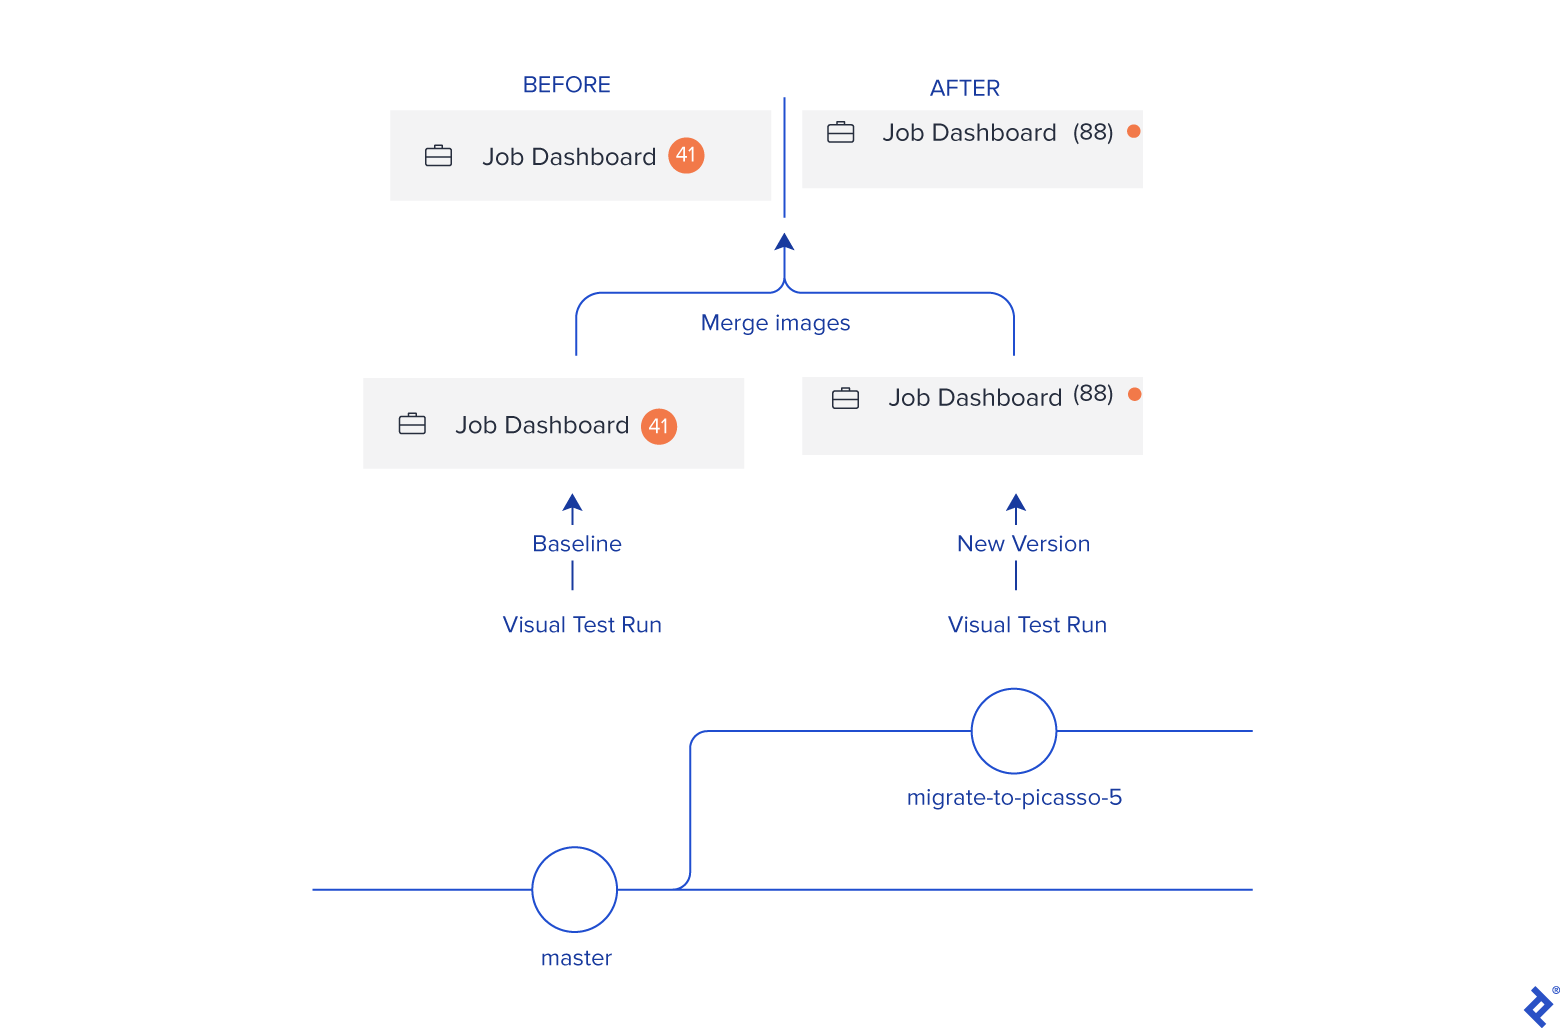
Every time a new version of our component library, Picasso, is released, we update all of our front-end applications to get the most out of the new features and align our designs across all parts of our site.
Last month, we rolled out a Picasso update to the Toptal Talent Portal, the platform our talent uses to find jobs and interact with clients. Knowing the release would come with major design changes, and in an effort to minimize unexpected issues, it made sense to use visual regression testing techniques to help us find problems before the release.
Visual regression testing is not a new concept; plenty of other projects at Toptal already use it, including Picasso itself.
Tools like Percy, Happo, and Chromatic can be used to help teams build a healthy visual regression pipeline, and we did consider adding them at first. We ultimately decided the setup process would be too time-consuming and could derail our schedule. We already had a date set for a code freeze to start the migration, and with only a few days remaining until the deadline, we had no choice but to be creative.
Visual Regression Testing Through UI Testing
While we did not have visual regression tests in the project, we did have good coverage of UI integration tests using Cypress. Even though that’s not what the tool is mostly used for, Cypress has one page in its documentation dedicated to visual testing and another that lists all the available plug-ins to help configure Cypress for visual testing.
From Cypress to Screenshots
After going through the available documentation, we decided to give cypress-snapshot-plugin a try. It only took a few minutes to set up, and once we did, we quickly realized we were not in pursuit of a traditional visual regression output.
Most visual regression tools help identify unwanted changes by comparing snapshots and detecting pixel differences between a known, accepted baseline and the modified version of a page or a component. If the pixel difference is greater than a set tolerance threshold, the page or component is flagged to be examined manually. In this release, though, we knew we were going to have several small changes to most of our UI components, so setting a threshold was not applicable. Even if a given component happened to be 100% different, it might still be correct in the context of the new version. Similarly, a deviation as small as a few pixels could mean a component is not currently fit for production.

At that point, two contrasting things became clear: noting pixel differences was not going to help identify issues, and having a side-by-side comparison of the components was precisely what we needed. We put the snapshot plug-in aside and set out to create a collection of images with our components before and after the Picasso update was applied. That way, we could quickly scan through all the changes to determine if the new versions still matched the site’s needs and the library’s standards.
The new plan was to take a screenshot of a component, store it locally, take a new screenshot of the same component in the branch with the updated Picasso version, and then merge them into a single image. Ultimately, this new approach was not too different from what we started with, but it gave us more flexibility during the implementation phase since we no longer needed to import the plug-in and use its new commands.
Harnessing APIs for Comparison Images
With a clear goal in mind, it was time to look at how Cypress could help us get the screenshots we needed. As mentioned, we had a good amount of UI tests covering the majority of the Talent Portal, so in an effort to collect as many critical components as possible, we decided to take screenshots of individual elements after each interaction.
An alternative approach would have been to take screenshots of the entire page at key moments during the test, but we decided those images would be too difficult to compare. Also, such comparisons could be more prone to human error, such as missing that a footer had changed.
A third option would have been to go through every single test case to decide what to capture, but that would have taken a lot more time, so sticking to all elements used on the pages seemed like a practical compromise.
We turned to Cypress’s API to generate the images. The cy.screenshot() command can, out of the box, create individual images of components, and the After Screenshot API allows us to rename files, change directories, and distinguish visual regression runs from standard ones. By combining the two, we created runs that did not affect our functional tests and enabled us to store images in their appropriate folders.
First, we extended the index.js file in our plug-ins directory to support the two new run types (baseline and comparison). Then, we set the path for our images according to the run type:
// plugins/index.js
const fs = require('fs')
const path = require('path')
module.exports = (on, config) => {
// Adding these values to your config object allows you to access them in your tests.
  config.env.baseline = process.env.BASELINE || false
  config.env.comparison = process.env.COMPARISON || false

  on('after:screenshot', details => {
    // We only want to modify the behavior of baseline and comparison runs.
    if (config.env.baseline || config.env.comparison) {
      // We keep track of the file name and number to make sure they are saved in the proper order and in their relevant folders.
      // An alternative would have been to look up the folder for the latest image, but this was the simpler approach.
      let lastScreenshotFile = ''
      let lastScreenshotNumber = 0

      // We append the proper suffix number to the image, create the folder, and move the file.
      const createDirAndRename = filePath => {
        if (lastScreenshotFile === filePath) {
          lastScreenshotNumber++
        } else {
          lastScreenshotNumber = 0
        }
        lastScreenshotFile = filePath
        const newPath = filePath.replace(
          '.png',
          ` #${lastScreenshotNumber}.png`
        )

        return new Promise((resolve, reject) => {
          fs.mkdir(path.dirname(newPath), { recursive: true }, mkdirErr => {
            if (mkdirErr) {
              return reject(mkdirErr)
            }
            fs.rename(details.path, newPath, renameErr => {
              if (renameErr) {
                return reject(renameErr)
              }
              resolve({ path: newPath })
            })
          })
        })
      }

      const screenshotPath = `visualComparison/${config.env.baseline ? 'baseline' : 'comparison'}`

      return createDirAndRename(details.path
        .replace('cypress/integration', screenshotPath)
        .replace('All Specs', screenshotPath)
      )
    }
  })
  return config
}
Then we invoked each of the runs by adding the corresponding environment variable to the Cypress call in the project’s package.json:
"scripts": {
  "cypress:baseline": "BASELINE=true yarn cypress:open",
  "cypress:comparison": "COMPARISON=true yarn cypress:open"
}
Once we ran our new commands, we could see that all the screenshots taken during the run were moved to the appropriate folders.

Next, we tried to overwrite cy.get(), Cypress’s main command to return DOM elements, and take a screenshot of any elements called along with its default implementation. Unfortunately, cy.get() is a tricky command to change, as calling the original command in its own definition leads to an infinite loop. The suggested approach to work around this limitation is to create a separate custom command and then have that new command take a screenshot after finding the element:
Cypress.Commands.add("getAndScreenshot", (selector, options) => {
  // Note: You might need to tweak the command when getting multiple elements.
  return cy.get(selector).screenshot()
});

it("get overwrite", () => {
  cy.visit("https://example.cypress.io/commands/actions");
  cy.getAndScreenshot(".action-email")
})
However, our calls to interact with elements on the page were already wrapped in an internal getElement() function. So all we had to do was make sure that a screenshot was taken when the wrapper was called.
Results Obtained Via Visual Regression Testing
Once we had the screenshots, the only thing left to do was merge them. For that, we created a simple node script using Canvas. In the end, the script enabled us to generate 618 comparison images! Some of the differences were easy to spot by opening the Talent Portal, but some of the issues weren’t as obvious.


Adding Value to UI Testing
First of all, the added visual regression tests proved to be useful and uncovered a few issues we could have missed without them. Even though we were expecting differences in our components, knowing what was actually changed helped narrow down problematic cases. So, if your project has an interface but you aren’t yet performing these tests, get to it!
The second lesson here, and perhaps the more important one, is that we were once again reminded that perfect is the enemy of good. If we had ruled out the possibility of running visual regression tests for this release because there was no prior setup, we may have missed out on a few bugs during the migration. Instead, we agreed on a plan that, while not ideal, was fast to execute, we worked toward it, and it paid off.
For more details on implementing a robust visual regression pipeline in your project, please refer to Cypress’s visual testing page, select the tool that best fits your needs, and watch the tutorial videos.
Further Reading on the Toptal Blog:
Understanding the basics
Visual regression testing is a type of regression testing that ensures web pages or components that were known to be correct have not changed unexpectedly.
Visual regression testing works by comparing the visual aspects of an application against a known baseline. Usually, this is done by differentiating the pixels in the images, though some solutions use artificial intelligence to distinguish real differences from false positives.
Regression testing is the testing of a previously tested application following changes to ensure defects have not been introduced as a result of said changes.
We run regression tests to prevent the introduction of unexpected or unwanted behavior in an application when changes are made.